Part 3 — FLOWERLESS-PLANT STUDY
Reading edition
FERNS
ANY interesting things about ferns may be taught to the young child, but the more careful study of these plants is better adapted to the pupils in the higher grades, and is one of the wide-open doors that leads directly from nature-study to systematic science. While the pupils are studying the different forms in which ferns bear their fruit, they can make collections of all the ferns of the locality. Since ferns are easily pressed and are beautiful objects when mounted on white paper, the making of a fern herbarium is a delightful pastime; or leaf-prints may be made which give beautiful results (see page 734); but, better perhaps, than either collections or prints, are pencil or water-color drawings with details of the fruiting organs enlarged. Such a portfolio is not only a thing of beauty but the close observation needed for drawing brings much knowledge to the artist.
References.—Our Ferns in Their Haunts, W. N. Clute, (of greatest value to teachers because it gives much of fern literature); How to Know the Ferns, Parsons; Ferns, Waters; New England Ferns, Eastman.
THE CHRISTMAS FERN
Teacher’s Story
“No shivering frond that shuns the blast sways on its slender chaffy stem; Full veined and lusty green it stands, of all the wintry woods the gem.” —W. N. Clute.
The rootstock of the fern is an humble example of “rising on stepping stones of our dead selves,” this being almost literally true of the tree-ferns. The rootstock which is a stem and not a root—has, like other stems, a growing tip from which, each year, it sends up into the world several beautiful green fronds, and numerous rootlets down into the earth. These graceful fronds rejoice the world and our eyes for the summer, and make glad the one who, in winter, loves to wander often in the woods to inquire after the welfare of his many friends during their period of sleeping and waking. These fronds, after giving their message of winter cheer, and after the following summer has made the whole woodland green and the young fronds are growing thriftily from the tip of the rootstock, die down, and in midsummer we can find the old fronds lying sere and brown, with broken stipes, just back of the new fern clump; if we examine the rootstock we can detect behind them, remains of the stems of the fronds of year before last; and still farther behind we may trace all the stems of fronds which gladdened the world three years ago. Thus we learn that this rootstock may have been creeping on an inch or so each season for many years, always busy with the present and giving no heed to its dead past. One of the chief differences between our ferns and the tree-ferns of the tropics, which we often see in greenhouses, is that in the tree-fern the rootstock rises in the air instead of creeping on, or below, the surface of the ground. This upright rootstock of the tree-fern also bears fronds at its tip, and its old fronds gradually die down, leaving it rough below its crown of green plumes.
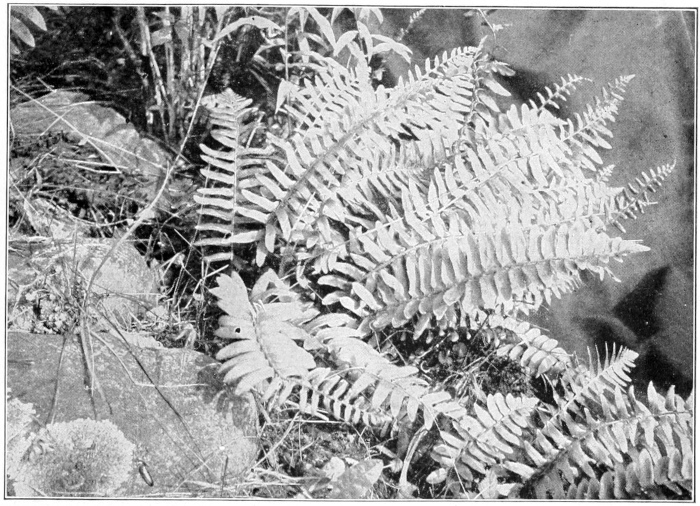
The Christmas fern. The contracted tips of some of the fronds consist of fruiting pinnæ.
Photo by Verne Morton.
The Christmas fern has its green stipe, or petiole, and its rachis, or midrib, more or less covered with ragged, brownish scales, which give it an unkempt appearance. Its pinnæ, or leaflets, are individually very pretty; in color they are dark, shining green, lance-shaped, with a pointed lobe or ear at the base projecting upward. The edges of the pinnæ are delicately toothed, each point armed with a little spine, and the veins are fine, straight and free to the margin; the lower pinnæ often have the earlike lobe completely severed.
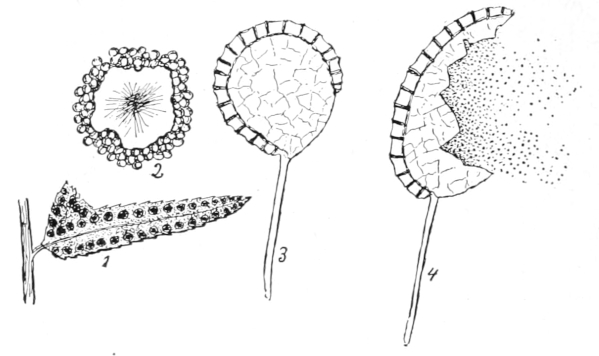
1. Fertile leaflet of Christmas fern showing indusia and spore-cases. 2. An indusium and spore-cases, enlarged. 3. A spore-case, enlarged. 4. A spore-case discharging spores, enlarged.
In studying a fertile fern from above, we notice that about a dozen pairs of the pinnæ near the tip are narrowed and roughened and are more distinctly toothed on the margins. Examining them underneath, we find on each a double row of circular raised dots which are the fruit-dots, or sori; there is a row between the midrib and margin on each side, and also a double row extending up into the point at the base. Early in the season these spots look like pale blisters, later they turn pale brown, each blister having a depression at its center; by the middle of June, masses of tiny globules, not larger than pin points, push out from beneath the margin of these dots. The blisterlike membrane is simply a cover for the growing spores, and is called the indusium; by July it shrivels into an irregular scroll, still clinging to the pinnule by its depressed center; and by this time the profusion of tiny globules covers the entire under side of the pinna like a brown fuzz. If we scrape off some of this fuzz and examine it with a lens, we can see that it consists of numberless little globules, each with a stem to attach it to the leaf; these are the spore-cases, or sporangia, each globule being packed full of spores which, even through the lens, look like yellowish powder. But each particle of this dust has its own structure and contains in its heart the living fern-substance.
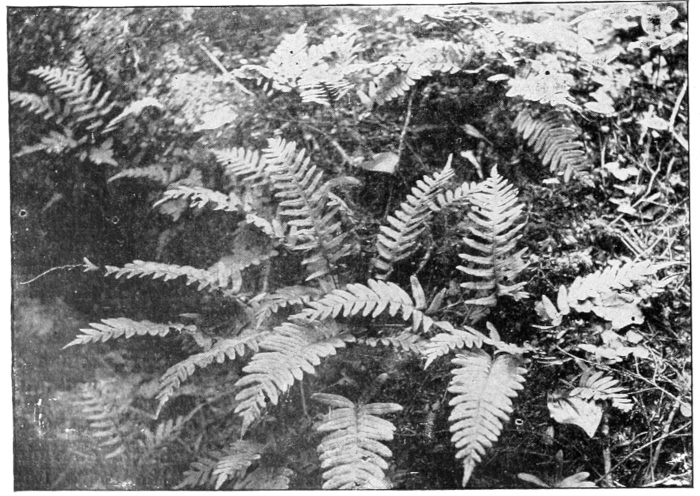
The common polypody often mistaken for the Christmas fern.
Photo by Verne Morton.
Not all the fronds of the fern clump bear these fruit-dots. The ones we select for decoration are usually the sterile fronds, for the fertile ones are not so graceful, and many ignorant people think the brown spore-cases are a fungus. The Christmas fern being evergreen and very firm in texture, is much used in holiday decoration, hence its common name, which is more easily remembered than Polystichum acrostichoides, which is its real name. It loves to grow in well-shaded woodlands, liking better the trees which shed their leaves than the evergreens; it is indeed well-adapted to thrive in damp, cold shade; it is rarely found on slopes which face the south, and sunshine kills it.
LESSON CLXXIII
The Christmas Fern
Leading thought—The fern has a creeping underground stem called the rootstock, which pushes forward and sends up fresh fronds each year. Some of the fronds of the Christmas fern bear spores on the lower surface of the terminal pinnæ.
Method—This lesson should be given during the latter part of May, when the fruit-dots are still green. Take up a fern and transplant it, in a dish of moss, in the schoolroom, and later plant it in some convenient shady place. The pupils should sketch the fertile frond from the upper side so as to fix in their minds the contracted pinnæ of the tip; one of the lower pinnæ should be drawn in detail, showing the serrate edge, the ear and the venation. The teacher should use the following terms constantly and insistently, so as to make the fern nomenclature a part of the school vocabulary, and thus fit the pupils for using fern manuals.
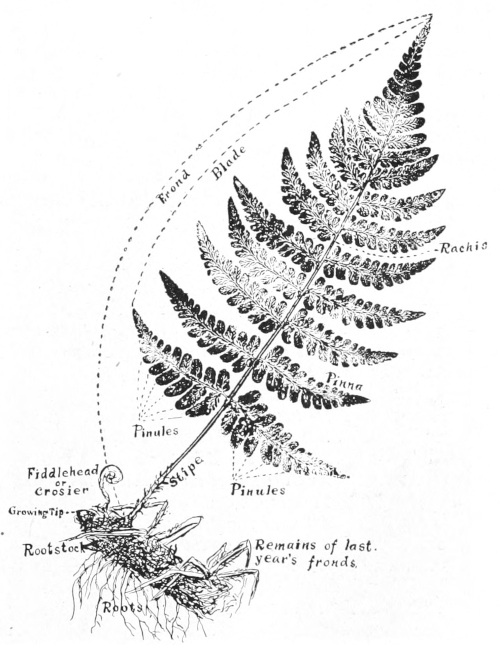
Leaf-print of a fern with the parts named. This fern is twice pinnate.
A frond is all of the fern which grows on one stem from the rootstock; the blade is that portion which bears leaflets; the stipe is the stem or petiole; the rachis is the midrib and is a continuation of the stipe; the pinnule is a leaflet of the last division; the pinna is a chief division of the midrib or rachis, when the fern is compound; the sori are the fruit-dots; the indusium is the membrane covering the fruiting organs; the sporangia are the tiny brown globules, and are the spore-cases; the spores make up the fine dust which comes from the spore-cases. It would be well to make a diagram on the blackboard of the fern with its parts named, so that the pupils may consult it while studying ferns.
Observations—1. Study a stump of the Christmas ferns. Are there any withered fronds? Where do they join the rootstock? Do the green fronds come from the same place on the rootstock as the withered ones? Do the green ferns come from near the tip of the rootstock? Can you find the growing tip of the rootstock? Can you trace back and find where the fronds of last year and year before last grew? Does that part of the rootstock seem alive now? Can you find the true root of the fern?
2. Take a frond of the Christmas fern. Is the stem, or stipe, and the midrib, or rachis, smooth or rough? What color are the scales of the stalk? Do you think that these scales once wrapped the fern bud?
3. Does each frond of a clump have the same number of pinnæ on each side? Can you find fronds where the pinnæ near the tip are narrower than those below? Take a lower pinna and draw it carefully, showing its shape, its edges and its veins. Is there a point, or ear, at the base of every pinna? Is it a separate lobe or a mere point of the pinna?
4. Take one of the narrow pinnæ near the tip of the frond, and examine it beneath. Can you see some circular, roundish blisterlike dots? Are they dented at the center? How many of these dots on a pinna? Make a little sketch showing how they are arranged on the pinna and on the little earlike point. Look at the fruiting pinnæ of a fern during July, and describe how they look then.
5. Do all the fronds of a fern clump have these narrowed spore-bearing pinnæ? Do you know what those fronds are called that bear the fruit-dots?
6. Where do you find the Christmas fern growing? Do you ever find it in a sunny place? Why is it called the Christmas fern?
FERN SONG Dance to the beat of the rain, little Fern And spread out your palms again, And say, “Tho’ the sun Hath my vesture spun, He had labored, alas, in vain, But for the shade That the Cloud hath made, And the gift of the Dew and the Rain.” Then laugh and upturn All your fronds, little Fern, And rejoice in the beat of the rain! —John B. Tabb.
THE BRACKEN
Teacher’s Story
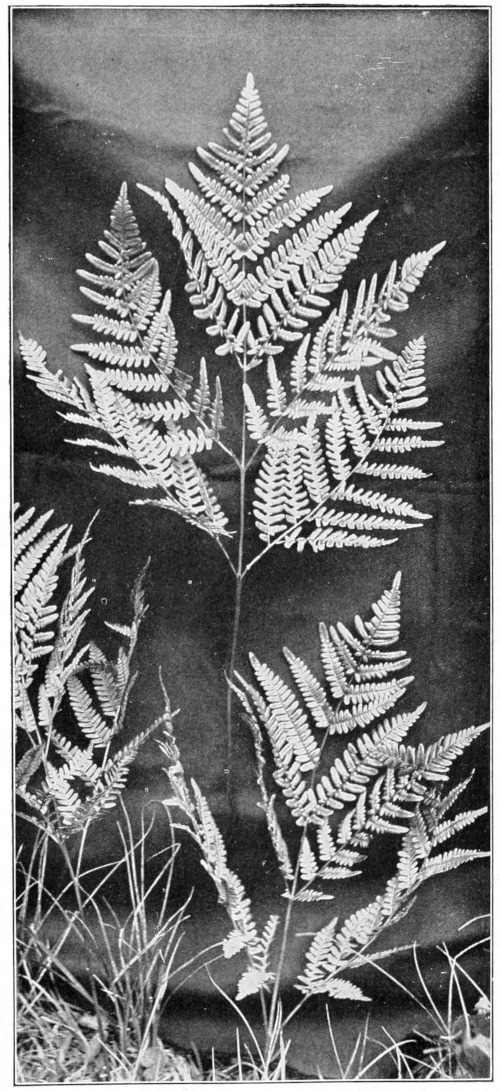
Bracken.
Photo by Verne Morton.
It is well for the children to study the animals and plants which have a world-wide distribution. There is something comforting in finding a familiar plant in strange countries; and when I have found the bracken on the coast ranges of California, on the rugged sides of the Alps, and in many other far places, I have always experienced a thrill of delightful memories of the fence corners of the homestead farm. Since the bracken is so widespread, it is natural that it should find a place in literature and popular legend. As it clothes the mountains of Scotland, it is much sung of in Scottish poetry. Many superstitions cluster around it—its seed, if caught at midnight on a white napkin, is supposed to render the possessor invisible. Professor Clute, in Our Ferns in Their Haunts, gives a delightful chapter about the relation of the bracken to people.
For nature-study purposes, the bracken is valuable as a lesson on the intricate patterns of the fern leaf; it is in fact a lesson in pinnateness. The two lower branches are large and spreading and are in themselves often three times pinnate; the branches higher up are twice pinnate; while the main branch near the tip is once pinnate, and at the tip is merely lobed. The lesson, as illustrated in the diagram of the fern, should be well learned for future study, because this nomenclature is used in all the fern manuals. The fact that a pinnule is merely the last division of a frond, whether it be twice or thrice pinnate, should also be understood.
The bracken does not love complete shade and establishes itself in waste places, living contentedly in not too shaded locations; it is especially fond of woodsides, and fence corners on high and cold land. As Professor Clute says, “It is found both in woodland and in the open field; its favorite haunt is neither, but is that half-way ground where man leaves oft and nature begins, the copse or the thicket.” With us it usually grows about three feet high, but varies much in this respect. The great triangular fronds often measure two or three feet across, and are supposed to bear a likeness to an eagle with spread wings. Its rootstock is usually too deeply embedded in earth for the study of any except the most energetic; it is about the size of a lead pencil and is black and smooth; in its way it is a great traveler, sending up fronds fifteen or twenty feet from its starting place. It also sends off branching rootstocks.
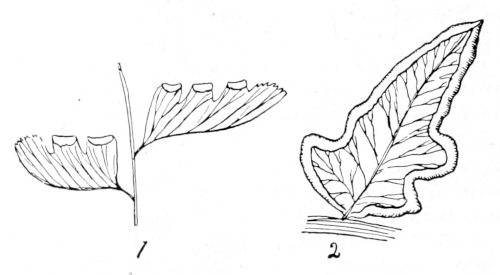
1. Fruiting pinnules of the maiden-hair fern, enlarged. 2. Fruiting pinnule of the bracken, enlarged. In both these species the spores are borne under the recurved edges of the pinnules.
The fruiting pinnules look as if they were hemmed and the edges of the hems embroidered with brown wool; but the embroidery is simply the spore-cases pushing out from under the folded margin which protected them while developing.
Much on which to base necromancy has been found in the figure shown in the cross-section of the stem or stipe. The letter C, supposed to stand for Christ, thus made is a potent protection from witches. But this figure has also been compared to the devil’s hoof, an oak tree, or the initial of one’s sweetheart, and all these imaginings have played their part in the lives of the people of past ages. It was believed in England that burning the bracken from the fields brought rain; the roots in time of scarcity have been ground and mixed with flour to make bread. The young ferns, or croziers, are sometimes cooked and eaten like asparagus. The fronds have been used extensively for tanning leather and for packing fish and fruit, and when burned their ashes are used instead of soap.
In Europe, bracken grows so rankly that it is used for roof-thatching and for the bedding of cattle. The name “brake,” which is loosely used for all ferns, comes from the word “bracken;” some people think that brakes are different from ferns, whereas this is simply a name which has strayed from the bracken to other species. Its scientific name, Pteris aquilina, signifies eagle’s wing.
LESSON CLXXIV
The Bracken
Leading thought—The bracken is a fern which has taken possession of the world. It is much branched and divided, and it covers the ground in masses where it grows. The edges of its pinnules are folded under to protect the spores.
Method—Bring to the schoolroom large and small specimens of the bracken, and after a study is made tell about the superstitions connected with this fern and as far as possible interest the pupils in its literature.
Observations—1. Do you find the bracken growing in the woods or open places? Do you find it in the cultivated fields? How high does it stand? Could you find the rootstock?
2. Take a bracken frond. What is its general shape? Does it remind you of an eagle with spread wings? Look at its very tip. Is it pinnate or merely lobed? Can you find a place farther down where the leaflets, or pinnules, are not joined at their bases? This is once pinnate. Look farther down and find a pinna that is lobed at the tip; at the base it has distinct pinnules. This is twice pinnate. Look at the lowest divisions of all. Can you find any part of this which is three times pinnate? Four times pinnate? Pinna means feather, pinnate therefore means feathered. If a thing is once pinnate, it means that it has divisions along each side similar to a feather; twice pinnate means that each feather has little feathers along each side; thrice pinnate means that the little feathers have similar feathers along each side, and so on.
3. Can you see if the edges of the pinnules are folded under? Lift up one of these edges and see if you can find what is growing beneath it. How do these folded margins look during August and September?
4. Cut the stem, or stipe, of a bracken across and see the figure in it. Does it look like the initial C? Or a hoof, or an oak tree, or another initial?
5. Discover, if you can, the different uses which people of other countries find for this fern.
HOW A FERN BUD UNFOLDS
Teacher’s Story
Of all “plant babies,” that of the fern is most cozily cuddled; one feels when looking at it, that not only are its eyes shut but its fists are tightly closed. But the first glance at one of these little woolly spirals gives us but small conception of its marvelous enfolding, all so systematic and perfect that it seems another evidence of the divine origin of mathematics. Every part of the frond is present in that bud, even to the fruiting organs; all the pinnæ and the pinnules are packed in the smallest compass—each division, even to the smallest pinnule, coiled in a spiral towards its base. These coiled fern buds are called crosiers; they are woolly, with scales instead of hairs, and are thus well blanketed. Some botanists object to the comparison of the woolly or fuzzy clothing of young plants with the blankets of human infants. It is true that the young plant is not kept at a higher temperature by this covering; but because of it, transpiration which is a cooling process is prevented, and thus the plant is kept warmer. When the fern commences to grow, it stretches up and seems to lean over backward in its effort to be bigger. First the main stem, or rachis, loosens its coil; but before this is completed, the pinnæ, which are coiled at right angles to the main stem, begin to unfold; a little later the pinnules, which are folded at right angles to the pinnæ, loosen and seem to stretch and yawn before taking a look at the world which they have just entered; it may be several days before all signs of the complex coiling disappear. The crosiers of the bracken are queer looking creatures, soon developing three claws which some people say look like the talons of an eagle; and so intricate is the action of their multitudinous spirals, that to watch them unfolding impresses one as in the presence of a miracle.
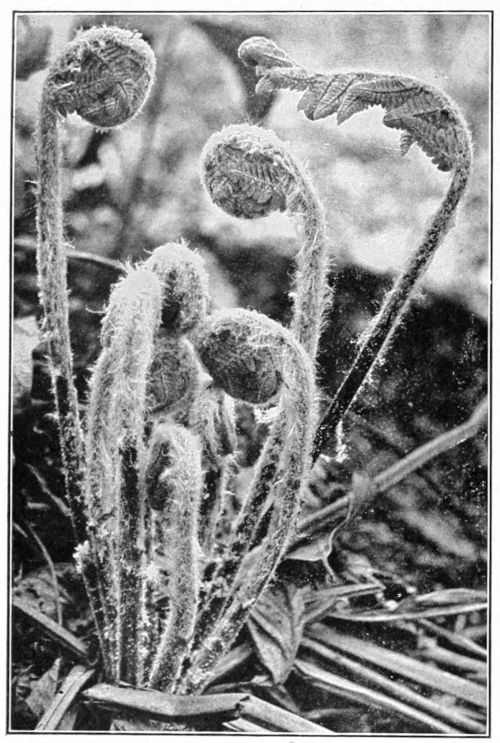
Fiddle heads, or crosiers. Young ferns unfolding.
Photo by Verne Morton.
LESSON CLXXV
How A Fern Bud Unfolds
Leading thought—All of the parts of the frond of a fern are tightly folded spirally within the bud, and every lobe of every leaflet is also folded in a spiral.
Method—The bracken crosier is a most illuminating object for this lesson, because it has so many divisions and is so large; it is also convenient, because it may be found in September. However, any fern bud will do. The lesson may be best given in May when the woodland ferns are starting. A fern root with its buds should be brought to the schoolroom, where the process of unfolding may be watched at leisure.
Observations—1. Take a very young bud. How does it look? Do you see any reason why ignorant people call these buds caterpillars? Can you see why they are popularly called “fiddle heads?” What is their true name? How many turns of the coil can you count? What is the covering of the crosier? Do you think this cover is a protection? How is the stem grooved to make the spiral compact?
2. Take a crosier a little further advanced. How are its pinnæ folded? How is each pinnule of each pinna folded? How is each lobe of a pinnule folded? Is each smaller part coiled toward each larger part?
3. Write in your note-book the story of the unfolding fern, and sketch its stages each day from the time it is cuddled down in a spiral until it is a fully expanded frond.
THE FRUITING OF THE FERN
Teacher’s Story
“If we were required to know the position of the fruit-dots or the character of the indusium, nothing could be easier than to ascertain it; but if it is required that you be affected by ferns, that they amount to anything, signify anything to you, that they be another sacred scripture and revelation to you, help to redeem your life, this end is not so easily accomplished.”—Thoreau.
The walking fern.
HE fern, like the butterfly, seems to have several this-world incarnations; and perhaps the most wonderful of these is the spore. Shake the dust out of the ripened fern and each particle, although too small for the naked eye to see, has within it the possibilities of developing a mass of graceful ferns. Each spore has an outside hard layer, and within this an atom of fern-substance; but it cannot be developed unless it falls into some warm, damp place favorable for its growth; it may have to wait many years before chance gives it this favorable condition, but it is strong and patient and retains its vital power for years. There are cases known where spores grew after twenty years of waiting. But what does this microscopic atom grow into? It develops into a tiny heart-shaped, leaflike structure which botanists call the prothallium; this has on its lower side little roots which reach down into the soil for nourishment; and on its upper surface are two kinds of pockets, one round and the other long. In the round pockets are developed bodies which may be compared to the pollen; and in the long pockets, bodies which may be compared to the ovules of flowering plants. In the case of ferns, water is necessary to float the pollen from the round pockets to the ovules in the long pockets. From a germ thus fertilized in one of the long pockets, a little green fern starts to grow, although it may be several years before it becomes a plant strong enough to send up fronds with spore-dots on them. To study the structure of the spore requires the highest powers of the microscope; and even the prothallium in most species is very small, varying from the size of a pin-head to that of a small pea, and it is therefore quite difficult to find. I found some once on a mossy log that bridged a stream, and I was never so triumphant over any other outdoor achievement. They may be found in damp places, in greenhouses, but the teacher will be very fortunate who is able to show her pupils this stage of the fern. The prothallium is a stage of the fern to be compared to the flower and seed combined in the higher plants; but this is difficult for young minds to comprehend. I like to tell the children that the fern, like a butterfly, has several stages: Beginning with the spore-bearing fern, we next have the spores, next the prothallium stage, and then the young fern. While in the other case we have first the egg, then the caterpillar, then the chrysalis, and then the butterfly. Looking at the ripe fruit-dots on the lower side of the fern leaf, we can easily see with a lens a mass of tiny globules; each one of these is a spore-case, or sporangium, (plural sporangia), and is fastened to the leaf by a stalk and has, almost encircling it, a jointed ring. (See figure on page 686).
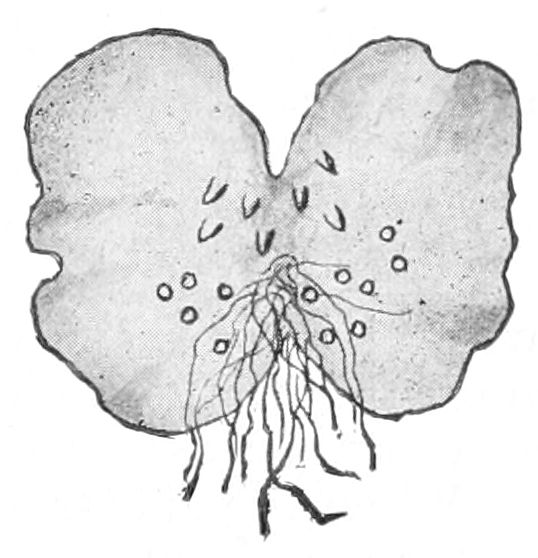
Prothallium, greatly enlarged, showing the two kinds of pockets and the rootlets.
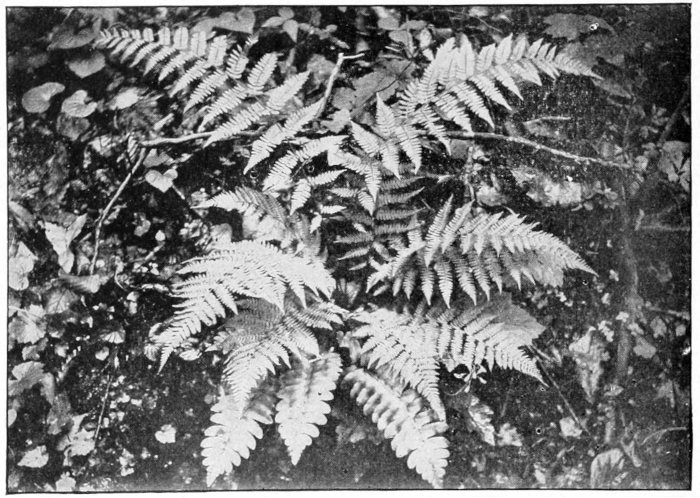
Christmas fern is below the others.
Photo by Verne Morton.
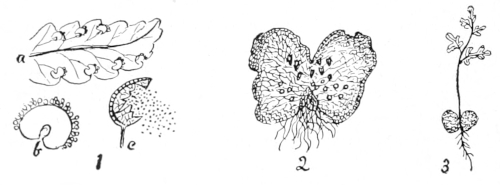
The life of a fern.
1. a, pinna bearing fruit: b, a fruit-dot, enlarged, showing spore-cases pushing out around the edges of the indusium, c, spore-case, enlarged, showing how it discharges the spores.
2. Prothallium, enlarged.
3. Young fern growing from the prothallium.
When the spores are ripe, this ring straightens out and ruptures the globule, and out fly the spores. By scraping a little of the brown fuzz from a fruiting pinna of the Christmas fern upon a glass slide and placing a cover glass upon it, we find it very easy to examine through the microscope, and we are able thus to find the spore-cases in all stages, and to see the spores distinctly. The spore-cases may also be seen with a hand lens, the spores seeming then to be mere dust.
The different ways the ferns blanket their spore-cases is a delightful study, and one which the pupils enjoy very much. All of our common ferns except the careless little polypody thus protect their spores. Whether this blanket be circular, or horseshoe-shaped, or oblong, or in the form of pocket or cup, depends upon the genus to which the fern belongs. The little protecting blanket-membrane is called the indusium, and while its shape distinguishes the genus, the position in which it grows determines the species. I shall never forget my surprise and delight when, as a young girl, I visited the Philadelphia Centennial Exposition, and there in the great conservatories saw for the first time the tree-ferns of the tropics. One of these was labelled Dicksonia, and mystified, I asked the privilege of examining the fronds for fruiting organs. When lo! the indusium proved to be a little cup, borne at the base of the tooth of the pinnule, exactly like that of our boulder fern, which is also a Dicksonia. I had a sudden feeling that I must have fern friends all over the world.
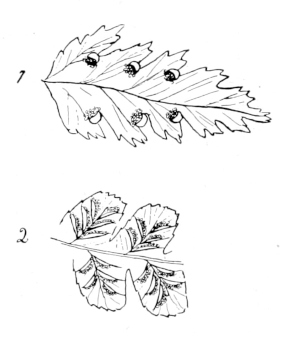
1. Fruiting pinnule of the boulder fern, enlarged. 2. Fruiting pinnules of spleenwort, enlarged.
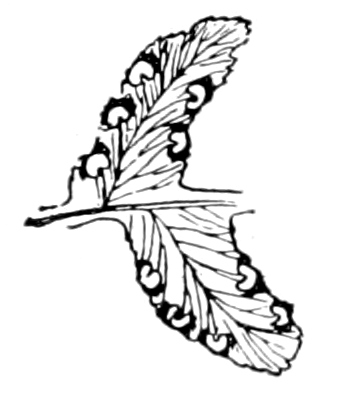
Fruiting pinnules of evergreen wood fern.
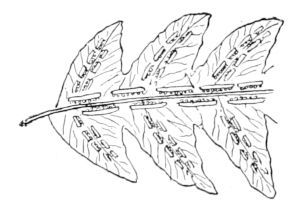
Fruiting pinnules of the chain fern.
The children are always interested in the way the maidenhair folds over the tips of her scallops to protect her spore nursery; and while many of our ferns have their fertile fronds very similar in form to the sterile ones, yet there are many common ferns with fertile fronds that look so different from the others, that one would not think they were originally of the same pattern; but although their pinnules are changed into cups, or spore-pockets, of various shapes, if they be examined carefully they will be seen to have the same general structure and the same divisions however much contracted, as have the large sterile fronds. The Osmundas, which include the interrupted, the cinnamon and the flowering ferns, are especially good for this part of the lesson. The sensitive fern, so common in damp places in open fields, is also an excellent illustration of this method of fruiting. While studying the ferns, the teacher should lay stress upon the fact that they represent the earliest and simplest forms of plants, that they reached the zenith of their growth in the Carboniferous age, and that, to a large extent, our coal is composed of them. It is interesting to think that the exquisite and intricate leaf patterns of the ferns should belong to a primitive type. Often when I have watched the forming by the frost, of the exquisite fernlike pictures on the window-pane, I have wondered if, after all, the first expression of the Creator did not find form in the most exquisite grace and beauty; and if perchance the first fishes, so fierce and terrible, did not mark the introduction of Satan.
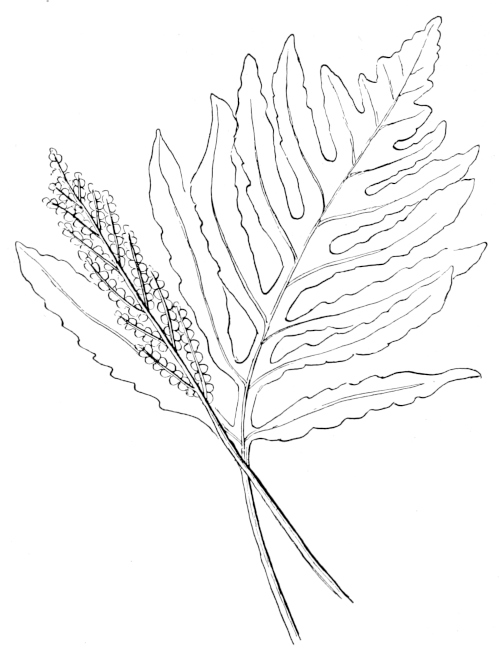
A sensitive fern, showing sterile and fertile fronds.
LESSON CLXXVI
The Fruiting of the Fern
Leading thought—Ferns do not have flowers, but they produce spores. Spores are not seeds; but they grow into something which may be compared to a true seed, and this in turn develops into young ferns. Each genus of ferns has its own peculiar way of protecting its spores; and if we learn these different ways, we can recognize ferns without effort.
Method—July is the best time for this lesson, which is well adapted for summer schools or camping trips. However, if it is desired to use it as a school lesson, it should be begun in June, when the fruiting organs are green, and it may be finished in September after the spores are discharged. Begin with the Christmas fern, which ripens in June, and make the fruiting of this species a basis for comparison. Follow this with other wood ferns which bear fruit-dots on the back of the fronds. Then study the ferns which live in more open places, and which have fronds changed in form to bear the spores—like the sensitive, the ostrich, the royal and the flowering ferns. A study of the interrupted fern is a desirable preparation for the further study of those which have special fruiting fronds; the interrupted fern has, at about the middle of its frond, three pinnæ on each side, fitted for spore-bearing, the pinnules being changed into globular cups filled with spore-cases.
While not absolutely necessary, it is highly desirable that each member of the class should look at a fruit-dot of some fern through a three-quarters objective of a compound microscope, and then examine the spore-cases and the spores through a one-sixth objective. It must be remembered that this lesson is for advanced grades, and is a preparation for systematic scientific work. If a microscope is not available, the work may be done with a hand lens aided by pictures.
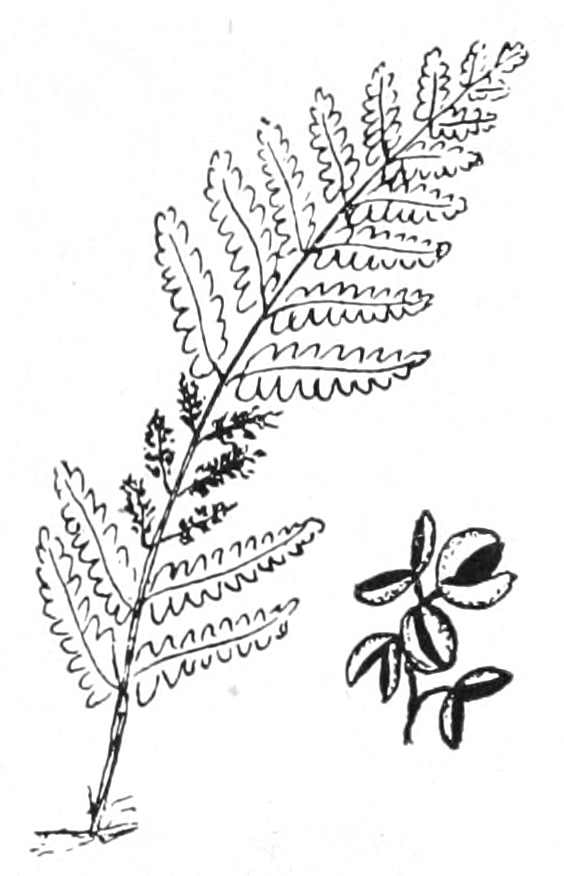
Diagram of the interrupted fern, showing the three pairs of fruiting pinnæ,and a part of one of these enlarged. This fern often has fronds four or five feet high.
Observations—1. Take a fern that is in fruit; lay it on a sheet of white paper and leave it thus for a day or two, where it will not be disturbed and where there is no draught; then take it up carefully; the form of the fern will be outlined in dust. What is this dust?
2. What conditions must the spores have in order to grow? What do they grow into? (See First Studies of Plant Life by Atkinson, p. 207).
3. Look at a ripe fruit-dot on the back of a fern leaf and see where the spores come from. Can you see with a lens many little, brown globules? Can you see that some of them are torn open? These are the spore-cases, called sporangia, each globule being packed with spores. Can you see how the sporangia are fastened to the leaf by little stems?
4. Almost all our common wood ferns have the spore-cases protected by a thin membrane, the spore-blanket, when very young; this little membrane is called the indusium, and it is of different shape in those ferns which do not have the same sirname, or generic name. Study as many kinds of wood ferns as you can find. If the blanket, or indusium, is circular with a dent at the center where it is fastened to the leaf, and the spore-cases push out around the margin, it is a Christmas fern; if horseshoe-shaped, it is one of the wood ferns; if oblong, in rows on each side of the midrib, it is a chain fern; but if oblong and at an angle to the midrib, it is a spleenwort; if it is pocket-shaped and opening at one side, it is a bladder fern; if it is cup-shaped, it is a boulder fern; if it breaks open and lays back in star shape, it is a woodsia; if the edge of the fern leaf is folded over all along its margin to protect the spore-cases, it is a bracken; if the tips of the scallops of the leaf be delicately folded over to make a spore blanket, it is the maidenhair.
5. If you know of swampy land where there are many tall brakes, look for a kind that has some of its pinnæ withered and brown. Examine these withered pinnæ, and you will see that they are not withered at all but are changed into little cups to hold spore-cases. This is the interrupted fern. The flowering fern has the pinnæ at its tip changed into cups for spore-cases. The cinnamon fern, which grows in swampy places, has whole fronds which are cinnamon-colored and look withered, but which bear the spores. The ostrich fern, which has fronds which look like magnificent ostrich feathers, has stiff, little stalks of fruiting fronds very unlike the magnificent sterile fronds. The sensitive fern, which grows in damp meadows and along roadsides, also has contracted fruiting fronds. If you find any of these, compare carefully the fruiting with the sterile fronds, and note in each case the resemblance in branching and in pinnules and also the shape of the openings through which the spores are sifted out.
6. Gather and press specimens of as many ferns in the fruiting stage as you can find, taking both sterile and fruiting fronds in those species which have this specialization.
7. Read in the geologies about the ferns which helped to make our coal beds.
Supplementary reading.—The Story of a Fern; First Studies of Plant Life, Atkinson; The Petrified Fern, M. L. B. Branch.
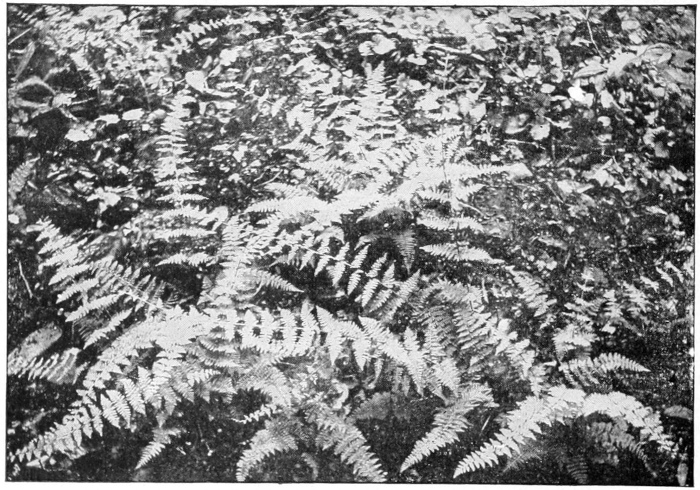
The bulb-bearing bladder fern. This beautiful fern clothes the banks of damp ravines. It has, in addition to fruiting organs, buds on the stem, which take root.
Photo by Verne Morton.
“Nature made ferns for pure leaves to see what she could do in that line.”—Thoreau
THE FIELD HORSETAIL
Teacher’s Story
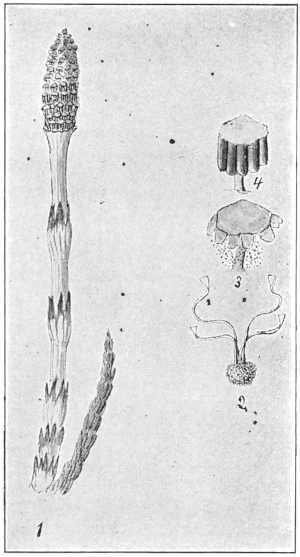
1, Fertile plant of the field horsetail; 2, spore; 3, disk discharging spores; 4, disk with spore-sacs.
These queer, pale plants grow in sandy or gravelly soil, and since they appear so early in the spring they are objects of curiosity to children. The stalk is pale and uncanny looking; the pinkish stem, all the same size from bottom to top, is ornamented at intervals with upward-pointing, slender, black, sharp-pointed scales, which unite at the bottom and encircle the stalk in a slightly bulging ring, a ring which shows a ridge for every scale, extending down the stem. These black scales are really leaves springing from a joint in the stem, but they forgot long ago how to do a leaf’s work of getting food from the air. The “blossom” which is not a real blossom in the eye of the botanist, is made up of rows of tiny discs which are set like miniature toadstools around the central stalk. Before it is ripe, there extends back from the edge of each disc a row of little sacs stuffed so full of green spores that they look united like a row of tiny green ridges. The discs at the top of the fertile spike discharge their spores first, as can be seen by shaking the plant over white paper, the falling spores looking like pale green powder. The burst and empty sacs are whitish, and hang around the discs in torn scallops, after the spores are shed. The spores, when seen under the microscope, are wonderful objects, each a little green ball with four spiral bands wound about it. These spirals uncoil and throw the spore, giving it a movement as of something alive. The motor power in these living springs is the absorbing of moisture.
The beginning of the sterile shoot can be seen like a green bit of the blossom spike of the plantain; but later, after the fertile stalks have died down, these cover the ground with their strange fringes.
The person who first called these sterile plants “horsetails” had an overworked imagination, or none at all; for the only quality the two have in common is brushiness. A horse which had the hair of its tail set in whorls with the same precision as this plant has its branches would be one of the world’s wonders. The Equicetum is one of the plants which give evidence of nature’s resourcefulness; its remote ancestors probably had a whorl of leaves at each joint or node of the main stem and branches; but the plant now having so many green branches, does not really need the leaves, and thus they have been reduced to mere points, and look like nothing but “trimming,” they are so purely ornamental. Each little cup or socket, of the joint or node, in branch or stem, has a row of points around its margin, and these points are terminals of the angles in the branch. If a branch is triangular in cross section, it will have three points at its socket, if quadrangular it will have four points, and the main stem may have six or a dozen, or even more points. The main stem and branches are made up entirely of these segments, each set at its lower end in the socket of the segment behind or below it. These green branches, rich in chlorophyl, manufacture for the plant all the food that it needs. Late in the season this food is stored in the rootstocks, so that early next spring the fertile plants, nourished by this stored material, are able to push forth before most other plants, and thus develop their spores early in the season. There is a prothallium stage as in the ferns.
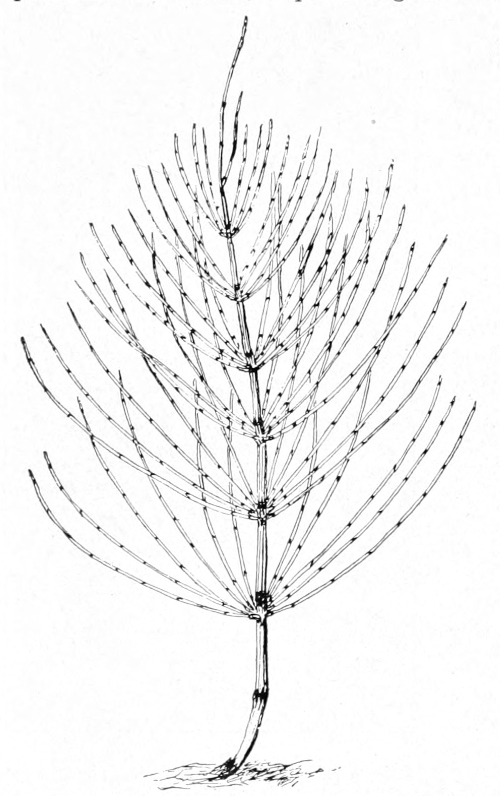
The sterile plant of the field horsetail, one-half natural size.
Above where the whorl of stems comes from the main branch, may be seen a row of upward-standing points which are the remnants of leaves; each branch as it leaves the stem is set in a little dark cup with a toothed rim. There is a nice gradation from the stout lower part of the stem to the tip, which is as delicate as one of the side branches.
The rootstock dies out behind the plant and pushes on ahead like the rootstock of ferns. The true roots may be seen attached on the under side. The food made in the summer is stored in little tubers, which may be seen in the rootstocks.
LESSON CLXXVII
The Field Horsetail
The Fertile Plant
Leading thought—The horsetail is a plant that develops spores instead of seeds, and has green stems instead of leaves.
Method—In April and May, when the children are looking for flowers, they will find some of these weird looking plants. These should be brought to the schoolroom and the observation lesson given there.
Observations—1. Where are these plants found? On what kind of soil?
2. In what respect does this plant differ from other plants in appearance? Can you find any green part to it?
3. What color is the stem? Is it the same size its whole length? Is it smooth or rough?
4. Do you see any leaves on the stems? Do you see the black-pointed scales? In which direction do these scales point? Are they united at the bottom? What sort of a ring do they make around the stem? Split a stem lengthwise and see if there are joints, or nodes, where the ring joins the stalk.
5. How does the “blossom” look? What color are the little discs that make up the blossom? How are the discs set?
6. Take one of the plants which has the discs surrounded by green ridges. Shake it over a white paper. What comes from it? Where does it come from? Which discs on the stalk shed the green spores first?
The Sterile Plants
Leading thought—The horsetail or Equicetum is nourished by very different looking stems than those which bore the spores. It lacks leaves, but its branches are green and do the work of making food for the plant.
Method—The sterile plants of the horsetail do not appear for several weeks after the fertile ones; they are much more numerous, and do not resemble the fertile plants in form or color. These sterile plants may be used for a lesson in September or October. Some of these plants with their roots may be brought into the schoolroom for study.
Observations—1. Has this plant any leaves? How does it make and digest its food without leaves? What part of it is green? Wherever there is green in a plant, there is the chlorophyl-factory for making food. In the horsetail, then, what part of the plant does the work of leaves?
2. Take off one little branch and study with the lens. How does it look? Pull it apart. Where does it break easily? How many joints, or nodes, are there in the branch?
3. Study the socket from which one of the segments was pulled off. What do you see around its edge? How many of these points? Look at the branch in cross section. How many angles has it? What relation do the points bear to the angles? Do you think these points are all there are left of true leaves?
4. How do the little green branches come off the main stem? How many in a place? How many whorls of branches on the main stem?
5. Study the bases of the branches. What do you see? Look directly above where the whorl of branches comes off the main stem. What do you see? Cut the main stem in cross-section just below this place, and see if there are as many little points as there are angles, or ridges, in the stem. Do you suppose these little points are the remnants of leaves on the main stem?
6. What kind of root has the horsetail? Do you think this long running root is the true root or an underground stem? Where are the true roots? Do you think the rootstock dies off at the oldest end each year, like the fern? Can you find the little tubers in the rootstock, which contain nourishment for next year’s spore-bearing stalks?
THE HAIR-CAP MOSS, OR PIGEON WHEAT
Teacher’s Story
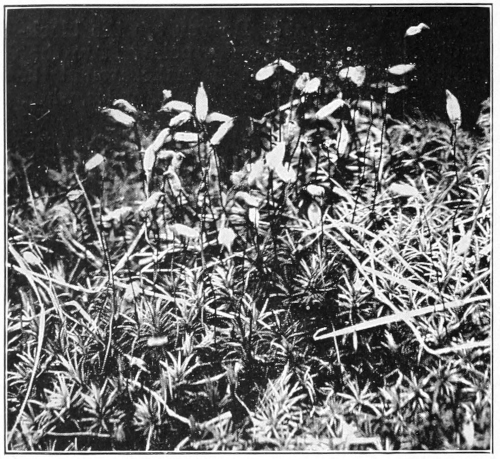
Photo by Verne Morton.
The hair-cap moss.
The mosses are a special delight to children because they are green and beautiful before other plants have gained their greenness in the spring and after they have lost it in the fall; to the discerning eye, a mossy bank or a mossy log is a thing of beauty always. When we were children we regarded moss as a forest for fairy folk, each moss stem being a tree, and we naturally concluded that fairy forests were evergreen. We also had other diversions with pigeon wheat, for we took the fruiting stem, pulled the cap off the spore-capsule, tucked the other end of the red stem into the middle of the capsule, making a beautiful coral ring with an emerald “set.” To be sure these rings were rather too delicate to last long, but there were plenty more to be had for nothing; so we made these rings into long chains which we wore as necklaces for brief and happy moments, their evanescence being one of their charms.
Pigeon wheat is a rather large moss which grows on dry knolls, usually near the margins of damp woodlands in just those places where wintergreens love to grow. In fall or winter it forms a greenish brown mass of bristling stems; in the early summer the stems are tipped with the vivid green of the new growth. The bristling appearance comes from the long sharp leaves set thickly upon the ruddy brown stems; each leaf is pretty to look at with a lens, which reveals it as thick though narrow, grooved along the middle, the edges usually armed with sharp teeth and the base clasping the stem. These leaves, although so small, are wonderfully made; during the hot, dry weather they shut up lengthwise and twist into the merest threads, in order to keep their soft, green surfaces from losing their moisture by exposure to the air; more than this, they lift themselves and huddle close to the stem, and are thus as snug and safe as may be from the effect of drought; but as soon as the rains come, they straighten back at right angles to the stem, and curve their tips downward in a joyful expanding. Bring in some of this moss and let it dry, and then drop it into a glass of water and watch this miracle of leaf movement! And yet it is no miracle but a mechanism quite automatic—and therefore—like other miracles, when once they are understood.
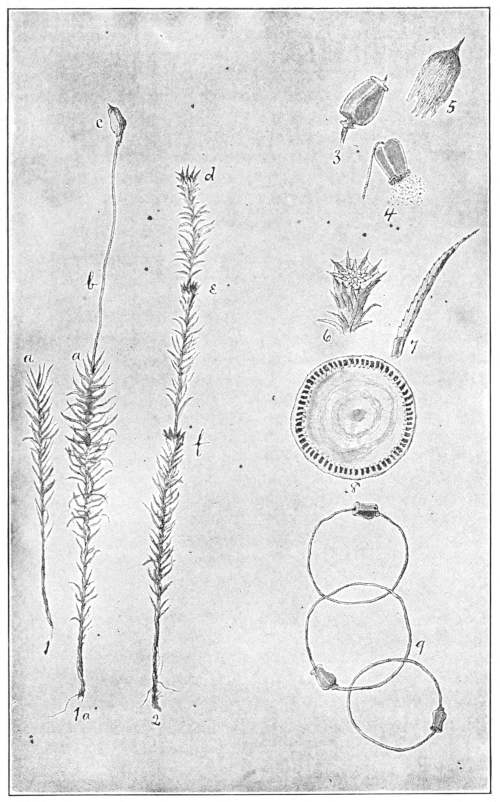
Hair-cap moss.
1. fruit-bearing moss stem before fertilization; 1a, the same stem after fruit is developed; a, where the ovule was before fertilization; b, fruit stem; c, spore-capsule with cap or veil upon it. 2, stem showing the starlike cups; d, the cup in which was developed the pollen which fertilized the ovule at a, this year; e, last year’s cup; f, the cup of year before last; only the leaves from e to d are alive. 3, spore capsule with the cap removed, showing the lid. 5, the cap or veil removed. 4, spore capsule with lid off and shaking out the spores. 6, starlike cup in which the pollen is developed. 7, leaf of moss; 8, the top of the spore capsule showing the teeth around the edge between which the spores sift out. 9, a part of a necklace chain made of the spore capsules and their stems.
In early June the mossy knoll shows us the origin of the name pigeon grass or pigeon wheat, for it is then covered with a forest of shining, ruddy, stiff, little stems, each stem bearing on its tip a woolly object about the size of a grain of wheat. But it is safe to say that the pigeons and other birds enjoy our own kind of wheat better than this, which is attributed to them.
A study of one of these wheat grains reveals it as covered with a yellowish, mohair cap, ending in a golden brown peak at its tip, as if it were the original pattern of the toboggan cap; it closes loosely and downily around the stem below. This grain is the spore-capsule of the moss; the hairy cap pulls off easily when seized by its tip. This cap is present at the very beginning, even before the stem lengthens, to protect the delicate tissues of the growing spore-case; it is only through a lens that we can see it in all its silky softness. The capsule revealed by the removal of the cap is a beautiful green object, usually four-sided, set upon an elegant little pedestal where it joins the coral stem, and with a lid on its top like a sugar-bowl cover, with a point instead of a knob at its center. When the spores are ripe, this lid falls off, and then if we have a lens we may see another instance of moss mechanism. Looking at the uncovered end of the capsule, we see a row of tiny teeth around the margin, which seem to hold down an inner cover with a little raised rim. The botanists have counted these teeth and find there are 64. The teeth themselves are not important, but the openings between them are, since only through these openings can the spores escape. In fact, the capsule is a pepper-box with a grating around its upper edge instead of holes in its cover; and when it is fully ripe, instead of standing right side up, it tips over so as to shake out its spores more easily. These teeth are like the moss leaves; they swell with moisture, and thus in rainy weather they, with the inner cover, swell so that not a single spore can be shaken out. If spores should come out during the rain, they would fall among the parent plants where there is no room for growth. But when they emerge in dry weather, the wind scatters them far and wide where there is room for development.
When seen with the naked eye, the spores seem to be simply fine dust, but each dust grain is able to produce moss plants. However, the spore does not grow up into a plant like a seed, it grows into fine, green, branching threads which push along the surface of damp soil; on these threads little buds appear, each of which grows up into a moss stem.
The spore-capsule is hardly the fruit of the moss plant. If we examine the moss, we find that some stems end in yellowish cups which look almost like blossoms; on closer examination, we find that there are several of these cups, one below the other, with the stem extending up through the middle. The upper cup matured this year, the one below it last year, and so on. These cups are star-pointed, and inside, at the bottom, is a starlike cluster of leaves. Among the leaves of this star-rosette are borne the moss anthers called antheridii, too small for us to see without a high power microscope. The pollen from these anthers is blown over to other plants, some of which produce ovules at their very tips, although the ovule has no leaf-rosette to show where it is. This ovule, after receiving the pollen, grows into the spore-capsule supported on its coral stem. These—stem, capsule and all—grow up out of the mother plant, the red stem is enlarged at its base, and fits into the moss stem like a flagstaff in the socket. After the star-shaped cup has shed its pollen, the stem grows up from its center for an inch or so in height and bears new leaves, and next year will bear another starry cup.
The brown leaves on the lower part of the moss stem are dead, and only the green leaves on the upper part are living.
And this is the story of the moss cycle:
1. A plant with an ovule at its tip; another plant with a star-cup holding the moss pollen which is sifted by wind over to the waiting egg.
2. The egg or ovule as soon as fertilized develops into a spore-capsule, and is lifted up into the world on a beautiful shining stem and is protected by a silky cap.
3. The cap comes off; the lid of the spore-case falls off, the spores are shaken out and scattered by the wind.
4. Those spores that find fitting places grow into a net of green threads.
5. These green threads send up moss stems which repeat the story.
LESSON CLXXVIII
The Hair-Cap Moss
Leading thought—The mosses, like the butterfly and the fern, have several stages in their development. The butterfly stages are the egg, the caterpillar, the chrysalis, the butterfly. The moss stages are the egg (or ovule), the spores, the branching green threads, the moss plants with their green foliage. In June we can easily find all these stages, except perhaps the branching thread stage.
Method—The children should bring to the schoolroom a basin of moss in its fruiting stage; or still better, go with them to a knoll covered with moss. Incidentally tell them that this moss, when dried, is used by the Laplanders for stuffing their pillows, and that the bears use it for their beds. Once, a long time ago, people believed that a plant, by the shape of its leaf or flower, indicated its nature as a medicine, and as this moss looked like hair, the water in which it was steeped was used as a hair tonic.
Observation—1. Take a moss stem with a grain of pigeon wheat at the end. Examine the lower part of the stalk. How are the leaves arranged on it? Examine one of the little leaves through a lens and describe its shape, its edges, and the way it joins the stem. Are the lower leaves the same color as the upper ones? Why?
2. Describe the pretty shining stem of the fruit, which is called the pedicel. Is it the same color for its entire length? Can you pull it easily from the main plant? Describe how its base is embedded in the tip of the plant.
3. Note the silken cap on a grain of the pigeon wheat. This is called the veil. Is it all the same color? Is it grown fast to the plant at its lower margin? Take it by the tip, and pull it off. Is this done easily? Describe what it covers. This elegant little green vase is called a spore-capsule. How many sides has it? Describe its base which stands upon the stem. Describe the little lid. Pull off the lid; is there another lid below it? Can you see the tiny teeth around the edge which hold this lid in place? Ask your teacher, or read in the books, the purpose of this.
4. Do all the spore vases stand straight up, or do some bend over?
5. Do you think the silken cap falls off of itself after a while? Can you find any capsules where the cap or veil and the lid have fallen off? See if you can shake any dust out of such a spore vase. What do you think this dust is? Ask your teacher, or read in the books, about moss spores and what happens if they find a damp place in which to grow.
6. Hunt among the moss for some stems that have pretty, yellowish, starlike cups at their tips. How does the inside of one of these cups look? Ask the teacher to tell you what grows in this cup. Look down the stem and see if you can find last year’s cup. The cup of two years ago? Measured by these cups how old do you think this moss stem is?
7. Select some stems of moss, both those that bear the fruit and those that bear the cups. After they are dried describe how the leaves look. Examine the plant with a lens and note how these leaves are folded and twisted. Do the leaves stand out from the stem or lie close to it? Is this action of the leaves of any use to the plant in keeping the water from evaporating? How do the star-cups look when dry?
8. Place these dried stems in a glass of water and describe what happens to the cup. Examine some of the dried moss and the wet moss with a lens, and describe the difference. Of what use to the moss is this power of changing form when damp?
Reference—First Lessons in Plant Life, Atkinson.
MUSHROOMS AND OTHER FUNGI
Teacher’s Story
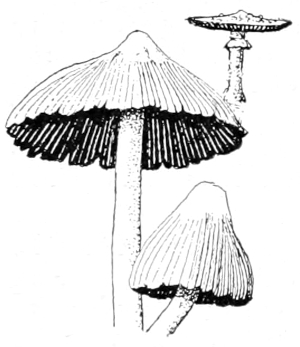
HERE is something uncanny about plants which have no green parts; they seem like people without blood. It is, therefore, no wonder that many superstitions cluster about toadstools. In times of old, not only did the toads sit on them, but fairies danced upon them and used them for umbrellas. The poisonous qualities of some species made them also a natural ingredient of the witch’s cauldron. But science, in these days, brings revelations concerning these mysterious plants which are far more wonderful than the web which superstition wove about them in days of yore.
When we find plants with no green parts which grow and thrive, though unable to manufacture their own organic food through the alchemy of chlorophyl, sunlight and air, we may safely infer that in one way or another they gain the products of this alchemy at second hand. Such plants are either parasites or saprophytes; if parasites, they steal the food from the cells of living plants; if saprophytes, they live on such of this food material as remains in dead wood, withered leaves, or soils enriched by their remains.
Thus, we find mushrooms and other fungus fruiting bodies, pallid, brown-olive, yellow or red in color, but with no signs of the living green of other plants; and this fact reveals their history. Some of them are parasites, as certain species of bracket fungi which are the deadly enemies of living trees; but most of the fungus species that we ordinarily see are saprophytes, and live on dead vegetation. Fungi, as a whole, are a great boon to the world. Without them our forests would be choked out with dead wood. Decay is simply the process by which fungi and other organisms break down dead material, so that the major part of it returns to the air in gaseous form, and the remainder, now mostly humus, mingles with the soil.
As a table delicacy, mushrooms are highly prized. A very large number of species are edible. But every year the newspapers report deaths resulting from eating the poisonous kinds—the price of an ignorance which comes from a lack of the powers of observation developed in nature-study. It would be very unwise for any teacher to give rules to guide her pupils in separating edible from poisonous mushrooms, since the most careful directions may be disregarded or misunderstood. She should emphasize the danger incurred by mistaking a poisonous for an edible species. One small button of the deadly kind, if eaten, may cause death. A few warning rules may be given, which if firmly impressed on the pupils, may result in saving human life.
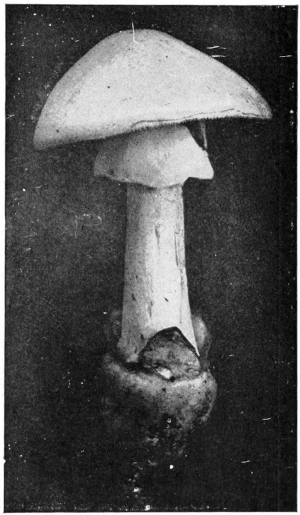
White form of the deadly Amanita (A. phalloides). Note the form of the ring and the cup at base of stem.
Photo by G. F. Atkinson.
First and most important, avoid all mushrooms that are covered with scales, or that have the base of the stem included in a sac, for two of the poisonous species, often mistaken for the common edible mushroom, have these distinguishing characters. Care should be taken that every specimen be collected in a way to show the base of the stem, since in some poisonous species this sac is hidden beneath the soil.
Second, avoid the young, or button, stages, since they are similar in appearance in species that are edible and in those that are poisonous.
Third, avoid those that have milky juices; unless the juices are reddish in color, the mushrooms should not be eaten.
Fourth, avoid those with shiny, thin, or brightly colored caps, and those with whitish or clay-colored spores.
Fifth, no mushroom or puffball should be eaten after its meat has begun to turn brown or has become infested with fly larvæ.
How Mushrooms Look and How They Live
HERE are many kinds of mushrooms varying greatly in form, color and size, but wherever they appear it means that sometime previous the mushroom spores have been planted there. There they threw out threads which have penetrated the food substance and gained a successful growth, which finally resulted in sending up into the world the fruiting organs. In general shape these consist of a stem with a cap upon it, making it usually somewhat umbrella-shaped. Attached to the cap, and usually under it, are plate-like growths called gills, or a fleshy surface which is full of pores. In the case of the gills, each side of each plate develops spores. These, as fine as dust, are capable of producing other mushrooms.

Cone-shaped. Bell-shaped. Convex. Plane. Raised at center. Depressed. Funnel form.
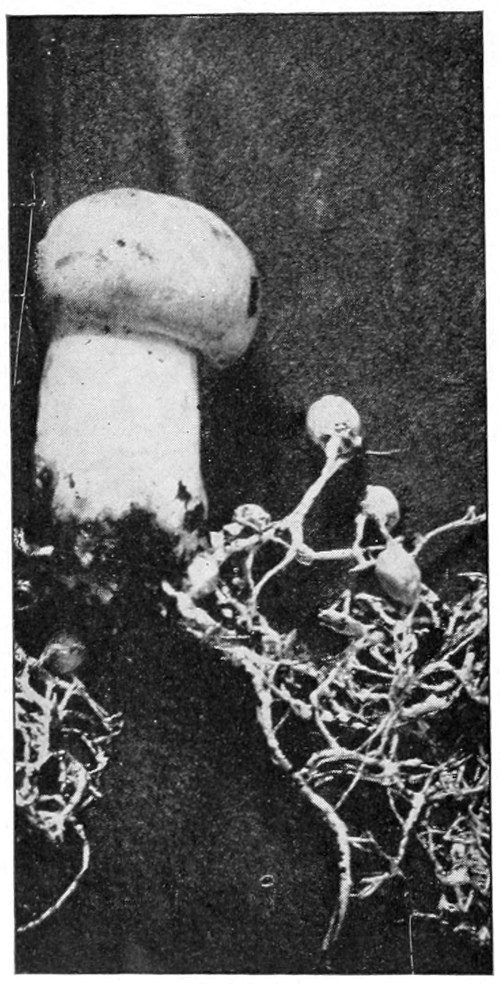
The common edible mushroom, in button stages, mycelium or spawn also shown.
Photo by G. F. Atkinson.
In the common edible species of mushroom (Agaricus campestris), the stem is white and almost cylindrical, tapering slightly toward the base; it is solid although the core is not so firm as the outside. When it first pushes above the ground, it is in what is called the “button stage” and consists of a little, rounded cap covered with a membrane which is attached to the stem. Later the cap spreads wide, for it is naturally umbrella-shaped, and it tears loose this membrane, leaving a piece of it attached to the stem; this remnant is called the ring or collar. The collar is very noticeable in many species, but in the common mushroom it soon shrivels and disappears. The cap is at first rounded and then convex; its surface is at first smooth, looking soft and silky; but as the plant becomes old, it is often broken up into triangular scales which are often dark brown; although the color of the cap is usually white or pale brown. The gills beneath the cap are at first white, but later, as the spores mature, they become brownish black because of the ripened spores.
References—Mushrooms, a most excellent and practical book with many beautiful pictures, written and illustrated by Professor George F. Atkinson; Henry Holt & Co., N. Y., $3.00; The Mushroom Book, Marshall, fully illustrated, $4.00, Doubleday, Page & Co.; One Thousand American Fungi, McIlvaine, illustrated, Bowen-Merrill Co., $5.00; Our Edible Toadstools and Mushrooms, W. H. Gibson, very fully illustrated, Harper and Bros., $3.50.
LESSON CLXXIX
Mushrooms
Leading thought—Mushrooms are the fruiting organs of the fungi which grow in the form of threads, spreading in every direction through the food material. The dust which falls from ripe mushrooms is made up of spores which are not true seeds, but which will start a new growth of the fungus.
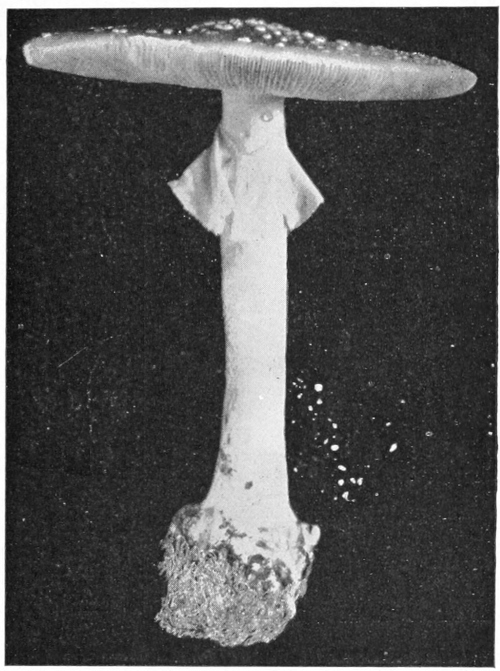
Dark form of the Amanita (A. phalloides). Compare with white form on page 707.
Photo by George F. Atkinson.
Method—The ideal method would be to study the mushrooms in the field and forest, making an excursion for the purpose of collecting as many species as possible. But the lesson may be given from specimens brought into the schoolroom by pupils, care being taken to bring with them the soil, dead wood or leaves on which they were found growing. After studying one species thus, encourage the pupils to bring in as many others as possible. There are a few terms which the pupils should learn to use, and the best method of teaching them is to place the diagrams shown on pages 708, 711, 712, on the blackboard, and leave them there for a time.
Since mushrooms are especially good subjects for water-color and pencil studies, it would add much to the interest of the work if each pupil, or the school as a whole, should make a portfolio of sketches of all the species found. With each drawing there should be made on a supplementary sheet a spore-print of the species. White paper should be covered very thinly with white of egg or mucilage, so as to hold fast the discharged spores when making these prints for portfolio or herbarium.
Observations—1. Where was the mushroom found? If on the ground, was the soil wet or dry? Was it in open fields or in woods? Or was it found on rotten wood, fallen leaves, old trees or stumps, or roots? Were there many or few specimens?
2. Is the cap cone-shaped, bell-shaped, convex, plane, concave, or funnel-form? Has it a raised point at the center? How wide is it?
3. What is the color of the upper surface of the cap when young? When old? Has it any spots of different colors on it? Has it any striate markings, dots or fine grains on its surface? Is its texture smooth or scaly? Is its surface dull, or polished, or slimy? Break the cap and note the color of the juice. Is it milky?
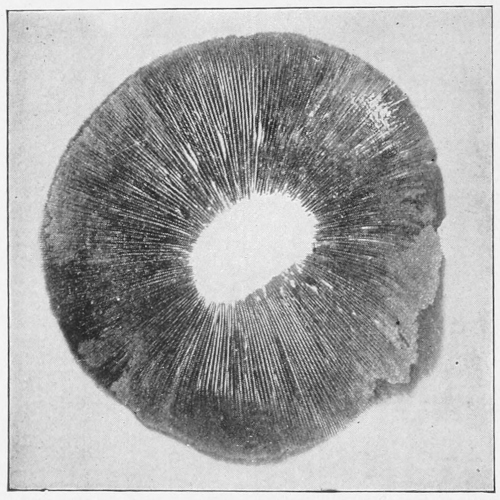
A spore print from the common edible mushroom.
Photo by George F. Atkinson.
4. Look beneath the cap. Is the under surface divided into plates like the leaves of a book, or is it porous?
5. The plates which may be compared to the leaves of a book are called gills, although they are not for the purpose of breathing, as are the gills of a fish. Are there more gills near the edge of the cap than near the stem? How does this occur? What are the colors of the gills? Are the gills the same color when young as when old? Are the lower edges of the gills sharp, blunt or saw-toothed?
6. Break off a cap and note the relation of the gills to the stem. If they do not join the stem at all they are termed “free.” If they end by being joined to the stem, they are called “adnate” or “adnexed.” If they extend down the stem they are called “decurrent.”
7. Take a freshly opened mushroom, cut off the stem, even with the cap, and set the cap, gills down, on white paper; cover with a tumbler, or other dish to exclude draught; leave it for twenty-four hours and then remove the cover, lift the cap carefully and examine the paper. What color is the imprint? What is its shape? Touch it gently with a pencil and see what makes the imprint. Can you tell by the pattern where this fine dust came from? Examine the dust with a lens. This dust is made up of mushroom spores, which are not true seeds, but which do for mushrooms what seeds do for plants. How do you think the spores are scattered? Do you know that one little grain of this spore dust would start a new growth of mushrooms?
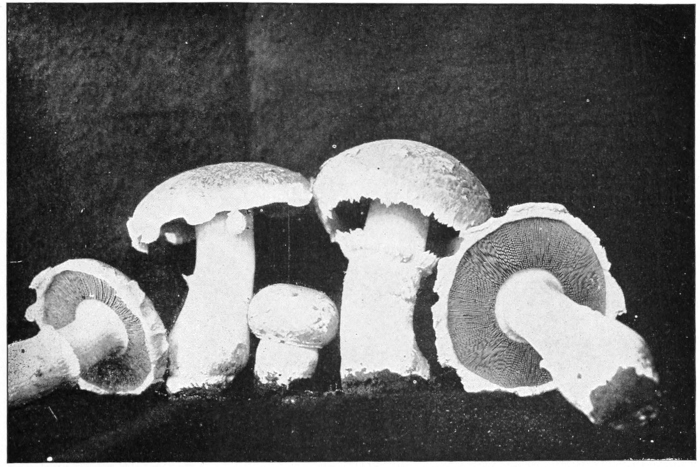
The common edible mushroom (Agaricus campestris), showing button stage, vanishing ring and gills.
Photo by George F. Atkinson.
8. Look at the stem. What is its length? Its color? Is it slender or stocky? Is its surface shiny, smooth, scaly, striate or dotted? Has it a collar or ring around it near the top? What is the appearance of this ring? Is it fastened to the stem, or will it slide up and down? Is the stem solid or hollow? Is it swollen at its base? Is its base set in a sac or cup, or is it covered with a membrane which scales off? Do you know that the most poisonous of mushrooms have the sac or the scaly covering at the base of the stem?
9. Examine with a lens the material on which the mushroom was growing; do you see any threads in it that look like mold? Find if you can what these threads do for the mushroom? If you were to go into the mushroom business what would you buy to start your beds? What is mushroom “spawn?”
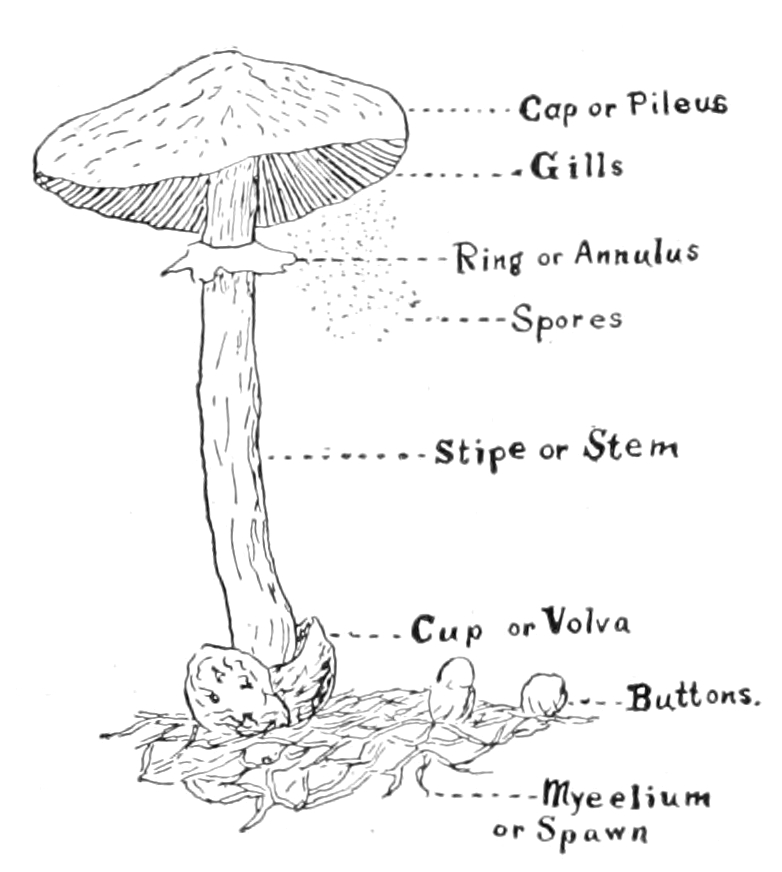
Mushroom with parts named.
10. If you can find where the common edible mushrooms grow plentifully, or if you know of any place where they are grown for the market, get some of the young mushrooms when they are not larger than a pea and others that are larger and older. These young mushrooms are called “buttons.” Find by your own investigation the relation between the buttons and the threads. Can you see the gills in the button? Why? What becomes of the veil over the gills as the mushrooms grow large?
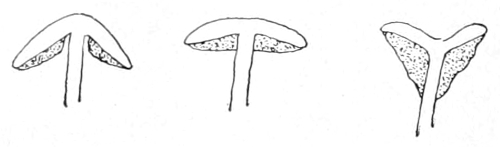
Gills free. Gills adnexed. Gills decurrent.
11. Do you know the difference between mushrooms and toadstools? Do you know the common edible mushroom when you see it? What characters separate this from the poisonous species? What is the “death cup,” as it is called, which covers the base of the stem of the most common poisonous species?
A common species of puffball, the three at the left showing early stages, the one at the right ripe and discharging spores. Photo by G. F. Atkinson.
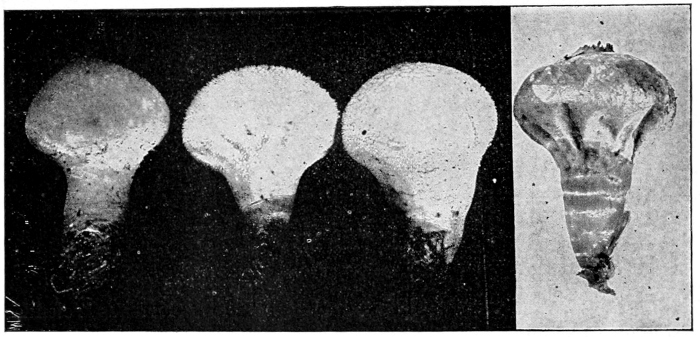
PUFFBALLS
Teacher’s Story
The puffballs are always interesting to children, because of the “smoke” which issues from them in clouds when they are pressed between thumb and finger. The common species are white or creamy when young; and some of the species are warty or roughened, so that as children we called them “little lambs.” They grow on the ground usually, some in wet, shady places, and others, as the giant species, in grassy fields in late summer. This giant puffball always excites interest, when found. It is a smoothish, white, rounded mass, apparently resting on the grass as if thrown there; when lifted it is seen that it has a connection below at its center, through its mycelium threads, which form a network in the soil. It is often a foot in diameter, and specimens four feet through have been recorded. When its meat is solid and white to the very center, it makes very good food. The skin should be pared off, the meat sliced and sprinkled with salt and pepper and fried in hot fat until browned. All the puffballs are edible, but ignorant persons might mistake the button stages of some of the poisonous mushrooms for little puffballs, and it is not well to encourage the use of small puffballs for the table.
A common species—“the beaker puffball”—is pear-shaped, with its small end made fast to the ground, which is permeated with its vegetative threads.
The interior of a puffball, “the meat,” is made up of the threads and spores. As they ripen, the threads break up so that with the spores they make the “smoke,” as can be seen if the dust is examined through a microscope. The outer wall may become dry and brittle and break open to allow the spores to escape, or one or more openings may appear in it as spore doors. The spores of puffballs were used extensively in pioneer days to stop the bleeding of wounds and especially for nosebleed.
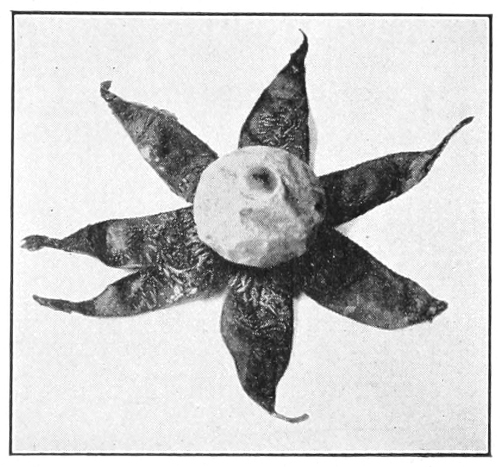
An earth-star.
Photo by Verne Morton.
In one genus of the puffball family, the outer coat splits off in points on maturing, like an orange peel cut lengthwise in six or seven sections but still remaining attached to the base. There is an inner coat that remains as a protection to the spores, so that these little balls are set each in a little star-shaped saucer. These star points straighten out flat or even curl under in dry weather, but when damp they lift up and again envelop the ball to a greater or less extent.
LESSON CLXXX
Puffballs
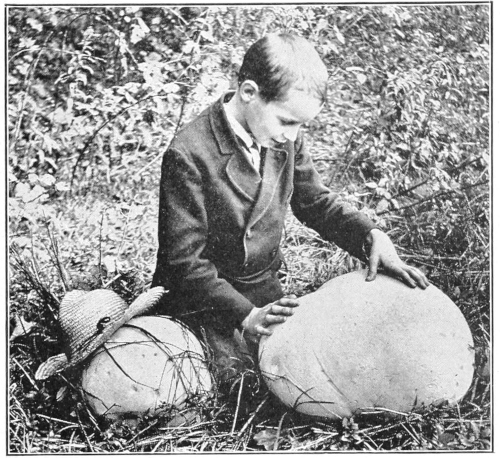
Photo by Verne Morton.
A big puffball.
Leading thought—The puffballs are fungi that grow from the threads, or mycelium, which permeate the ground or other matter, on which the puffballs grow. The puffballs are the fruiting organs, and “smoke” which issues from them is largely made up of spores, which are carried off by the wind and sown and planted.
Method—Ask the pupils to bring to school any of the globular or pear-shaped fungi in the early stages when they are white, taking pains to bring them on the soil or wood on which they are growing.
Observations—1. Where did you find the puffball? On what was it growing? Were there many growing in company? Remove the puffball, and examine the place where it stood with a lens to find the matted and crisscrossed fungus threads.
2. What is the size and shape of the puffball? Is its surface smooth or warty? What is its color inside and outside?
3. Have you ever found the giant puffball, which may become four inches to four feet through? Where was it growing? Have you ever eaten this puffball sliced and fried? Do you know by the looks of the meat when it is fit to eat?
4. If the puffball is ripe, what is its color outside and in? What is the color of its “smoke?” Does the smoke come out through the broken covering of the puffball, or are there one or more special openings to allow it to escape?
5. Puff some of the “smoke” on white paper and examine it with a lens. What do you think this dust is? Of what use is it to the puffball?
6. Have you ever found what are called earth-stars, which look like little puffballs set in star-shaped cups? If you find these note the following things:
a. Of what is the star-shaped base made? Was it always there?
b. Let this star saucer become very dry; how does it act?
c. Wet it; and how does it behave then?
d. Where and how does the spore dust escape from the earth-stars?
7. For what medicinal purpose is the “smoke” of the puffball sometimes used?
THE BRACKET FUNGI
Teacher’s Story
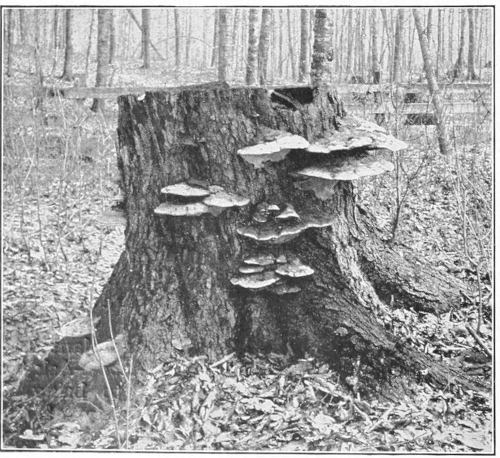
Photo by Verne Morton.
A bracket fungus.
There are some naturalists who think that one kind of life is as good as another and therefore call all things good. Perhaps this is the only true attitude for the nature lover. To such the bracketlike fungi which appear upon the sides of our forest and shade trees are simply an additional beauty, a bountiful ornamentation. But some of us have become special pleaders in our attitude toward life, and those of us who have come to feel the grandeur of tree life can but look with sorrow upon these fungus outgrowths, for they mean that the doom of the tree is sealed.
There are many species of bracket fungi. Three of these are very common. The gray bracket, gray above and with creamy surface below (Polyporous applanatus) is a favorite for amateur etchers, who with a sharp point make interesting sketches upon this naturally prepared plate; this species often grows to great size and is frequently very old. Another species (P. lucidus) is in color a beautiful mahogany, or coral-red above and has a peculiar stem from which it depends; the stem and upper surface are polished as if burnished and the lower surface is yellowish white. Another species (P. sulphurens) is sulphur yellow above and below; usually many of these yellow brackets are grouped together, their fan-shaped caps overlapping. Many of the shelf fungi live only on dead wood, and those are an aid in reducing dead branches and stumps until they crumble and become again a part of the soil. However, several of the species attack living trees and do great damage. They can gain access to the living tree only through an injured place in the bark, a break caused perhaps by the wind, by a bruise from a falling tree, or more often from the hack of the careless wood-chopper; often they gain entrance through an unhealed knot-hole. To one who understands trees and loves them, their patient striving to heal these wounds inflicted by forces they cannot withstand is truly pathetic. After the wound is made and before the healing is accomplished, the wind may sift into the wound the almost omnipresent spores of these fungi and the work of destruction begins. From the spores grows the mycelium, the fungus threads which push into the heart of the wood getting nourishment from it as they go. When we see wood thus diseased we say that it is rotting, but rotting merely means the yielding up of the body substance of the tree to these voracious fungus threads. They push in radially and then grow upward and downward, weakening the tree where it most needs strength to withstand the onslaught of the wind. Later these parasitic threads may reach the cambium layer, the living ring of the tree trunk, and kill the tree entirely; but many a tree has lived long with the fungus attacking its heartwood. A bracket fungus found by Professor Atkinson was eighty years old; however, this may have shortened the life of the tree a century or more.
After these fungus threads are thoroughly established in the tree, they again seek a wound in the protecting bark where they may push out and build the fruiting organ, which we call the bracket. This may be at the same place where the fatal entry was made, or it may be far from it. The bracket is at first very small and is composed of a layer of honeycomb cells, closed and hard above and opening below—cells so small that we can see the cell openings only with a lens. These cells are not hexagonal like the honeycomb, but are tubes packed together. Spores are developed in each tube. Next year another layer of cells grows beneath this first bracket and extends out beyond it; each year it is thus added to, making it thicker and marking its upper surface with concentric rings around the point of attachment. The creamy surface of the great bracket fungus on which etchings are made, is composed of a layer of these minute spore-bearing tubes. Not all bracket fungi show their age by these annual growths, for some species form new shelves every year, which decay after the spores are ripened and shed.
When once the mycelium of such fungus becomes established, the tree is doomed and its lumber made worthless even though, as sometimes happens, the tree heals its wounds so that the fungus is imprisoned and can never send out fruiting brackets. Thus it is most important to teach the pupils how to protect trees from the attacks of these enemies, which are devastating our forests and which sometimes attack our orchards and shade trees.
As soon as a tree is bruised, the wound should be painted or covered with a coat of tar. If the wind breaks a branch, the splinters left hanging should be sawed off, leaving a smooth stump, and this be painted. While ordinary paint if renewed each year will suffice, experiment has shown that the coat of tar is better and should be used.
Especially should teachers impress on pupils the harm done by careless hacking with axe or hatchet. We shall do an invaluable service in the protection of our forests, if we teach the rising generation the respectful treatment of trees—which is due living organisms whose span of life may cover centuries.
LESSON CLXXXI
Bracket Fungi
Leading thought—The fungi which we see growing shelflike from trees, are deadly enemies to the trees. Their spores germinate and penetrate at some open wound and the growing fungus weakens the wood.
Method—It is desirable that a tree on which shelf fungus grows should be studied by the class, for this is a lesson on the care of trees. After this lesson the fungus itself may be studied at leisure in the schoolroom.
Observations—1. On what kind of a tree is the bracket fungus growing? Is it alive or dead? If living, does it look vigorous or is it decaying?
2. Is the fungus bracket growing against the side of the tree, or does it stand out on a stem?
3. Look at the place where the bracket joined the tree. Does it seem to be a part of the wood?
4. What color is the fungus on its upper surface? How large is it? How thick near the tree? How thick at the edge? Can you detect concentric layers or rings? If it is the large species used for etching, cut down through it with a knife or hatchet and count the layers; this should show its age.
5. Look at the lower surface. How does it appear to the naked eye? If you scratch it with a pin or knife does the bruise show? Examine the surface with a lens and describe what you see. Cut or break the fungus and note that each of these holes is an opening to a little tube. In each of these tubes spores are borne.
6. Have you ever seen toadstools that, instead of having the leaflike gills, have beneath the cap a porous surface like a little honeycomb or like the under side of the shelf fungi?
7. How many kinds of shelf fungi can you find? Which of them is on living trees, and which on stumps or dead wood?
8. If the fungus is on a living tree, then the tree is ruined, for the fungus threads have worked through it and weakened it so that it will break easily and is of no use as lumber. There must have been an open wound in the tree where the fungus entered; see whether you can find this wound. There must also have been a wound where the shelf grew out; see whether you can detect it. If the tree should heal all its wounds after the fungus entered, what would become of the fungus?
9. What does the shelf fungus feed on? What part of it corresponds to the roots and leaves of other plants? What part may be compared to the flowering and fruiting parts of plants?
10. What treatment must we give trees to keep them free from this enemy?
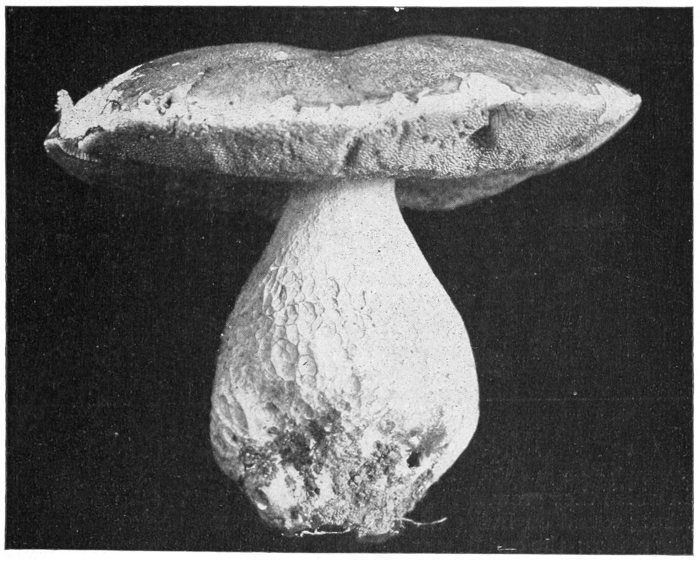
The edible Boletus (B. edulis). This has tubes below the cap instead of gills. The spores are developed within the tubes, as in the bracket fungi.
Photo by G. F. Atkinson.
LESSON CLXXXII
Hedgehog Fungi
There is something mysterious about all fungi, but perhaps none of these wonderful organisms so strangely impresses the observer as the fountainlike masses of creamy white or the branching white coral that we see growing on a dead tree trunk. The writer remembers as a child that the finding of these woodland treasures made her feel as if she were in the presence of the supernatural, as if she had discovered a fairy grotto or a kobold cave. The prosaic name of hedgehog fungi has been applied to these exquisite growths. Their life story is simple enough. The spores falling upon dead wood start threads which ramify within it and feed on its substance, until strong enough to send out a fruiting organ. This consists of a stem, dividing into ascending branches; from these branches, depending like the stalactites in a cave, are masses of drooping spines, the surface of each bearing the spores. And it is so natural for these spines to hang earthward that they are invariably so placed when the tree is in the position in which they grew. There is one species called the “satyr’s beard,” sometimes found on living trees, which is a mere bunch of downward-hanging spines; the corallike species is called Hydnum coraloides, and the one that looks like an exquisite white frozen fountain, and may be seen in late summer or early autumn growing from dead limbs or branches, is the bear’s head fungus; it is often eight inches across.
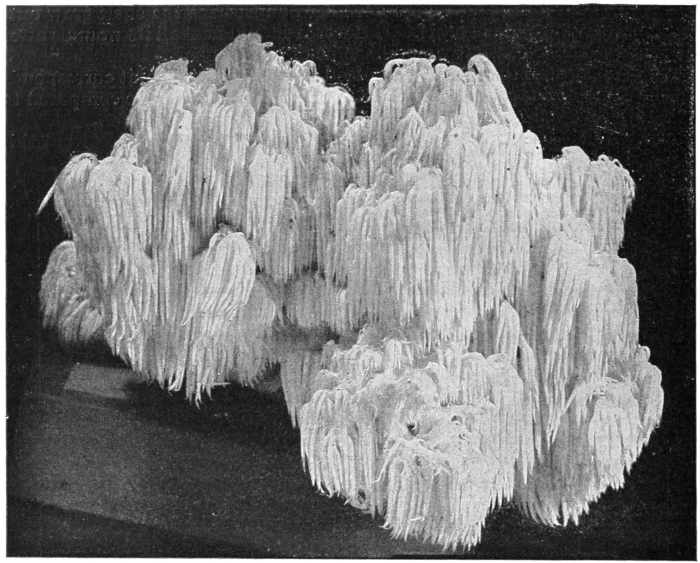
The bear’s head fungus.
Photo by George F. Atkinson.
Observations—1. These fungi come from a stem which extends into the wood.
2. This stem divides into many branchlets.
3. From these branchlets there hang long fleshy fringes like miniature icicles.
4. These fringes always hang downward when the fungus is in natural position.
5. These fringes bear the spores.
LESSON CLXXXIII
The Scarlet Saucer (Sarcocypha coccinea)
The heart of the child, searching the woods for hepaticas—woods where snow banks still hold their ground on north slopes—is filled with delight at finding these exquisite saucerlike fungi. They are more often found on fallen rotting branches which are more or less buried in leaves, and there are likely to be several of different sizes on the same stick. When they grow unhindered and while they are young, they are very perfectly saucer-shaped and range from the size of a pea to an inch or two across. But the larger they are the more likely are they to be distorted, either by environment or by the bulging of rapid growth. The under side of the saucer is beautifully fleshlike in color and feeling and is attached at the middle to the stick. The inside of the saucer is the most exquisite scarlet shading to crimson. This crimson lining bears the spores in little sacs all over its surface.
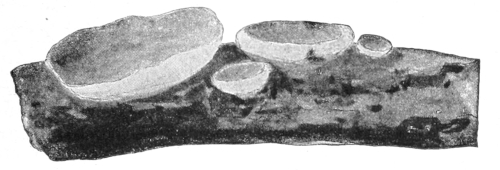
Scarlet saucer.
Observations—1. Where did you find the fungus?
2. What is the shape of the saucer? How large is it? Is it regular and beautiful or irregular and distorted?
3. What is the color inside?
4. What is the color outside?
5. Turn the one you bring in bottom side up—that is, scarlet side down—on a piece of white paper, and see whether you can get a spore harvest.
LESSON CLXXXIV
The Morels
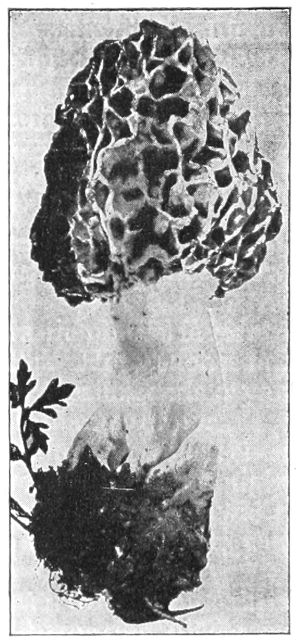
An edible morel (Morchella esculents).
Photo by George F. Atkinson.
In May or June in open, damp places, as orchards or the moist fence corners of meadows, the morels may be found. This mushroom family contains no member that is poisonous, and the members are very unlike any other family in appearance. They are very pretty with their creamy white, thick, swollen stems and a cap more or less conical, made up of the deep-celled meshes of an unequal network. The outside edges of the network are yellowish or brownish when the morel is young and edible, but later turn dark as the spores develop. In some species the stems are comparatively smooth and in others their surface is more or less wrinkled. The spores are borne in the depressions of the network. These mushrooms should not be eaten after the cells change from creamy white to brownish.
Observations—1. Where did you find the morels?
2. Describe the stem. Is it solid or hollow? Is it smooth or rough?
3. What is the shape of the cap? How does it look? What color is the outer edge of the network? What is the color within the meshes?
4. Take one of these fungi, lay it on a sheet of white paper, and note the color of the spores.
LESSON CLXXXV
The Stinkhorns
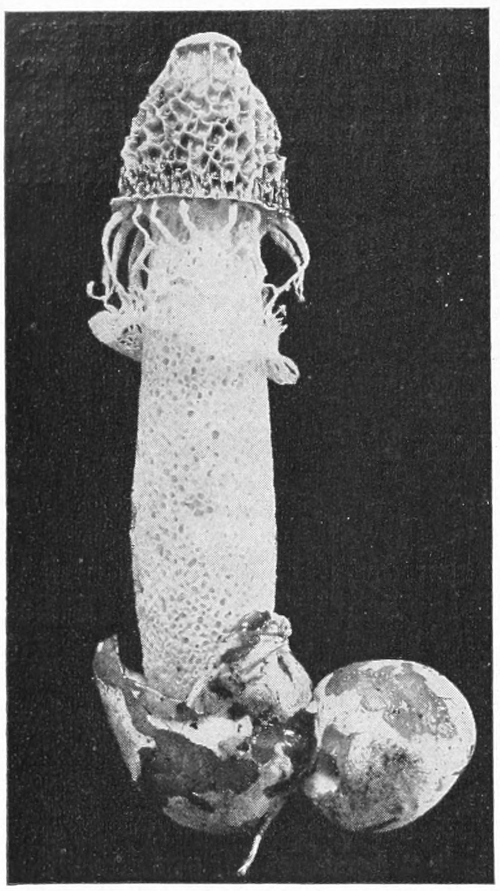
A stinkhorn.
Photo by George F. Atkinson.
To give a nature-study lesson on the stinkhorn is quite out of the question, for the odor of these strange growths is so nauseating that even to come near to one of them in the garden is a disagreeable experience. The reason for mentioning them at all is because of the impression made by them that most mushrooms are ill smelling, which is a slander.
It is a pity that these fungi are so offensive that we do not care to come near enough to them to admire them, for they are most interesting in appearance. The scientific name of our commonest genus when translated means “the net bearers,” and it is a most appropriate name. The stout, white stem is composed of network without and within. The outer covering of the stem seems to tear loose from the lower portion as the stem elongates, and is lifted so that it hangs as a veil around the bottom of the bell-shaped cap, which is always covered with a pitted network. The mycelium, or spawn, of the stinkhorn consists of strands which push their way through the ground or through the decaying vegetable matter on which they feed. On these strands are produced the stinkhorns, which at first look like eggs; but later the top of the egg is broken, and the strange horn-shaped fungus pushes up through it. The spores are borne in the chambers of the cap, and when ripe the substance of these chambers dissolves into a thick liquid in which the spores float. The flies are attracted by the fetid odor and come to feast upon these fungi and to lay their eggs within them, and incidentally they carry the spores away on their brushy feet, and thus help to spread the species.
MOLDS
Teacher’s Story
It is lucky for our peace of mind that our eyes are not provided with microscopic lenses, for then we should know that the dust, which seems to foregather upon our furniture from nowhere, is composed of all sorts of germs, many of them of the deadly kind. The spores of mold are very minute objects, the spore-cases being the little white globes, not larger than the head of a small pin which we see upon mold, yet each of these spore-cases breaks and lets out into the world thousands of spores, each one ready and anxious to start a growth of mold and perfectly able to do it under the right conditions; almost any substance which we use for food, if placed in a damp and rather dark place, will prove a favorable situation for the development of the spore which swells, bursts its wall and sends out a short thread. This gains nourishment, grows longer and branches, sending out many threads, some of which go down into the nutritive material and are called the mycelium. While these threads, in a way, act like roots, they are not true roots. Presently the tip ends of the threads, which are spread out in the air above the bread or other material, begin to enlarge, forming little globules; the substance (protoplasm) within them breaks up into little round bodies, and each develops a cell wall and thus becomes a spore. When these are unripe they are white but later, they become almost black. In the blue mold the spores are borne in clusters of chains, and resemble tiny tassels instead of growing within little globular sacs.
Molds, mildews, blights, rusts and smuts are all flowerless plants and, with the mushrooms, belong to the great group of fungi. Molds and mildews will grow upon almost any organic substance, if the right conditions of moisture are present, and the temperature is not too cold.
Molds of several kinds may appear upon the bread used in the experiments for this lesson. Those most likely to appear are the bread mold—consisting of long, white threads tipped with white, globular spore-cases, and the green cheese-mold—which looks like thick patches of blue-green powder. Two others may appear, one a smaller white mold with smaller spore-cases, and a black mold. However, the bread mold is the one most desirable for this lesson, because of its comparatively large size. When examined with a lens, it is a most exquisite plant. The long threads are fringed at the sides, and they pass over and through each other, making a web fit for fairies—a web all beset with the spore-cases, like fairy pearls. However, as the spores ripen, these spore-cases turn black, and after a time so many of them are developed and ripened that the whole mass of mold is black. The time required for the development of mold varies with the temperature. For two or three days nothing may seem to be happening upon the moist bread; then a queer, soft whiteness appears in patches. In a few hours or perhaps during the night, these white patches send up white fuzz which is soon dotted with tiny pearl-like spore-cases. At first there is no odor when the glass is lifted from the saucer, but after the spores ripen, the odor is quite disagreeable.
Bread mold, enlarged.
The special point to teach the children in this lesson is that dryness and sunlight are unfavorable to the development of mold; and it might be well to take one of the luxuriant growths of mold developed in the dark, uncover it and place it in the sunlight, and see how soon it withers. The lesson should also impress upon them that dust is composed, in part, of living germs waiting for a chance to grow.
LESSON CLXXXVI
Molds
Leading thought—The spores of mold are everywhere and help to make what we call dust. These spores will grow on any substance which gives them nourishment, if the temperature is warm, the air moist and the sunlight is excluded.
Method—Take bread in slices two inches square, and also the juice of apple sauce or other stewed fruit. Have each pupil, or the one who does the work for the class, provided with tumblers and saucers. Use four pieces of bread cut in about two-inch squares, each placed on a saucer; moisten two and leave the other two dry. With a feather or the finger take some dust from the woodwork of the room or the furniture and with it lightly touch each piece of bread. Cover each with a tumbler. Set one of the moistened pieces in a warm, dark place and the other in a dry, sunny place. Place a dry piece in similar situations. Let the pupils examine these every two or three days.
Put fruit juice in a saucer, scatter a little dust over it and set it in a warm, dark place. Take some of the same, do not scatter any dust upon it, cover it safely with a tumbler and put it in the same place as the other. A lens is necessary for this lesson, and it is much more interesting for the pupils if they can see the mold under a microscope with a three-fourths objective.
Observations—1. When does the mold begin to appear? Which piece of bread showed it first? Describe the first changes you noticed. What is the color of the mold at first? Is there any odor to it?
2. At what date did the little branching mold-threads with round dots appear? Is there an odor when these appear? What are the colors of the dots, or spore-cases, at first? When do these begin to change color? How does the bread smell then? What caused the musty odor?
3. Did the mold fail to appear on any of the pieces of bread? If so, where were these placed? Were they moist? Were they exposed to the sunlight?
4. Did more than one kind of mold appear on the bread? If so, how do you know that they are different kinds? Are there any pink or yellow patches on the bread? If so, these are made by bacteria and not by mold.
5. From the results of the experiments, describe in what temperature mold grows best. In what conditions of dryness or moisture? Does it flourish in the sunlight or in the dark?
6. Where does the mold come from? What harm does it do? What should we do to prevent the growth of mold? Name all of the things on which you have seen mold or mildew growing.
7. Examine the mold through a microscope or a lens. Describe the threads. Describe the little round spore-cases. Look at some of the threads that have grown down into the fruit juice. Are they like the ones which grow in the air?
8. If you have a microscope cut a bit of the mold off, place it in a drop of water on a glass slide, put on a cover-glass. Examine it with a three-fourths objective, and describe the spores and spore-cases.

1. Cholera bacillus. 2. Typhoid bacillus. 3. A bacillus found in sewage. These are all enlarged 2000 times. 4. Bacteria from tubercle on white sweet clover, much enlarged. 5 and 6. Bacteria of lactic acid ferments in ripening of cheese, much enlarged.
BACTERIA
Teacher’s Story
The yellow, pink or purple spots developed upon the moist and moldy bread are caused by bacteria and yeast. Bacteria are one-celled organisms now classed as plants; they are the smallest known living beings, and can only be seen through a high power microscope.
Bacteria grow almost everywhere—in the soil, on all foods and fruits, in the water of ponds, streams and wells, in the mouths and stomachs of human beings, and in fact in almost all possible places, and occur in the air. Most of them are harmless, some of them are useful, and some produce disease in both plants and animals, including man.
What bacteria do would require many large volumes to enumerate. Some of them develop colors or pigments; some produce gases, often ill-smelling; some are phosphorescent; some take nitrogen from the air and fix it in the soil; some produce putrefaction; and some produce disease. Nearly all of the “catching diseases” are produced by bacteria. Diphtheria, scarlet fever, typhoid fever, consumption, influenza, grippe, colds, cholera, lockjaw, leprosy, blood poisoning and many other diseases are the result of bacteria. On the other hand, many of the bacteria are beneficial to man. Some forms ripen the cream before churning, others give flavor to butter; while some are an absolute necessity in making cheese. The making of cider into vinegar is the work of bacteria; some clear the pollution from ponds and streams; some help to decompose the dead bodies of animals, so that they return to the dust whence they came.