Book 3 — Smoker’s Cabinet or Cellarette
Reading edition
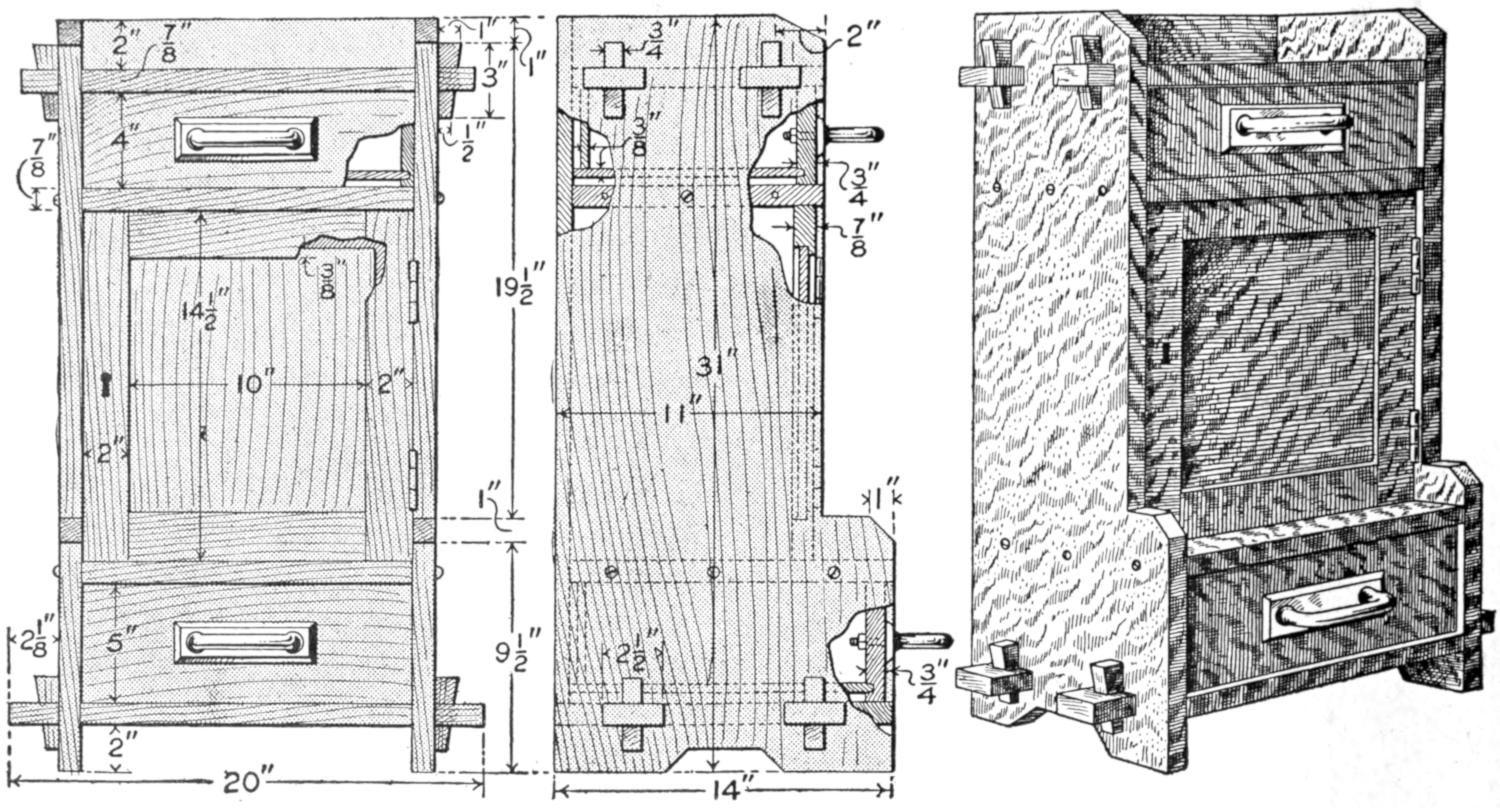
The Smoker’s Cabinet Makes an Attractive Addition to the Furniture of a Den, and should be Made Up and Finished to Match Other Pieces of the Room
This design, when completed, takes up a wall space 20 in. wide by 31 in. high, and extends out 14 in. The material necessary for it is as follows:
2 sides, ⁷⁄₈ by 14 by 31 in.
1 back, ³⁄₄ by 14 by 28¹⁄₈ in.
1 bottom, ⁷⁄₈ by 14 by 20 in.
1 top, ⁷⁄₈ by 10¹⁄₄ by 18³⁄₄ in.
1 bottom shelf, ⁷⁄₈ by 10¹⁄₄ by 14 in.
Door:
2 stiles, ³⁄₄ by 2 by 14¹⁄₂ in.
2 rails, ³⁄₄ by 2 by 10 in. (not including tenons, if such are desired).
1 panel, ³⁄₈ by 10³⁄₄ by 11¹⁄₄ in.
Upper drawer:
1 front, ³⁄₄ by 4 by 14 in.
1 back, ³⁄₈ by 3¹⁄₄ by 13¹⁄₂ in.
2 sides, ¹⁄₂ by 4 by 9⁷⁄₈ in.
1 bottom, ³⁄₈ by 9⁵⁄₈ by 13¹⁄₂ in.
Lower drawer:
1 front, ³⁄₄ by 5 by 14 in.
1 back, ³⁄₈ by 4¹⁄₄ by 13¹⁄₂ in.
2 sides, ¹⁄₂ by 5 by 12⁷⁄₈ in.
1 bottom, ³⁄₈ by 12⁵⁄₈ by 13¹⁄₂ in.
1 piece for keys, ³⁄₄ by 2¹⁄₄ by 6¹⁄₄ in.
1 pair hinges.
2 drawer pulls.
Screws and nails.
In constructing the cabinet, the outer frame should first be made. The sides can be laid out and cut to the desired design. The top and bottom crosspieces should then be squared up, and the tenons cut as shown, the bottom tenons extending farther, to balance the design. The top is set in ³⁄₄ in. from the back edge. Holes should be marked and cut for the ³⁄₄-in. keys, after which the four parts may be assembled, and suitable keys driven in place. The back for the cabinet is made from ³⁄₄-in. material, squared up to fit between the sides, and be flush with their top edges while resting on the bottom crosspiece. It can be fastened in place with nails. The top and bottom pieces of the cabinet proper can then be made, and secured in place with round-head screws, after which the door may be made and fitted. The stiles and rails of the door should be rabbeted for a ³⁄₈-in. square groove, to hold the panel in place. The frame can be made sufficiently strong, if properly glued and held together with dowel pins passing through the stiles into the rails. If it is desired to fasten the frame with tenons, an extra amount must be added to the length of the rails given in the stock list. The panel should not be glued in place, as the shrinkage of the wood will cause it to crack.
In making the drawers, the front should be rabbeted for a groove to fit the drawer bottom, and sidepieces can be fitted and nailed in place. These should be rabbeted for grooves, into which the bottom and end pieces fit.
If the cabinet is finished in mission style, or fumed oak, hammered copper or brass hinges and drawer pulls will go well with the general appearance of the design.
Skis and Ski-running Running, Jumping and Climbing By Stillman Taylor
Part II
Before the beginner makes the attempt to ski, he should see that his complete outfit is perfectly suited to his purpose. The shoes should be nicely adjusted to fit snugly between the metal toe plates of the binding, and new holes should be punched in the straps wherever needed to adjust the harness snugly and comfortably to the feet. Many of the positions required in executing the various turns and swings may be practiced at home, that the novice may get some idea of the correct position of the feet and body assumed by expert skiers. For the initial practice outside, it is a good plan to select a frosty day when the snow is old and settled by the wind. This will introduce the novice to the sport under favorable conditions, while if the first trials are made shortly after a heavy snowfall, or upon a mild day when the snow is thawing, only discouragement will be experienced. Begin with one stick—or two if timid—and pick out an easy-sloping hill with a gradual run to the level ground. A few scattered trees and rocks will do no harm, for it is a good plan to learn how to avoid them from the beginning.
How to Turn on Skis
This and the correct manner of standing on skis are easily mastered if the beginner will but remember that the weight of the body should rest largely upon the advanced foot without bending the body at the ankle too much, or raising the heel from the ski. This is the correct position to assume when standing for a rest and for sliding, and this as well as turning should be practiced on the level. To make the kick turn, simply raise the point of the ski until the heel rests on the snow, as shown in Fig. 1. Swing the ski around by turning the point out and back until the two skis are point to heel, as shown in Fig. 2. When this, the most difficult position of the three, is assumed, raise the point of the other ski as high as convenient to avoid tripping, keep the heel down and swing the ski around over the heel of the other until both are facing in the same direction, as shown in Fig. 3. A little practice will make it possible for the novice to turn quickly, and if all turns are made with the advanced foot, when practicing on the level, no trouble will be experienced later on in attempting to turn on a steep slope. The stick is really indispensable for this practice, and while two may be used, the single stick will be found assistance enough for any active person.
When skiing on level ground the correct movement is rather more of a slide than the motion used in walking or skating. The body is thrown forward on one ski and the slide is made with both feet, most of the body weight being thrown on the advanced ski, while the rear foot is slid forward without stopping the forward travel, as shown in Fig. 4. The expert skier moves forward in long gliding steps without raising the ski, but bending the knees slightly to slide the ski ahead. The feet should be kept as close together as possible to make a narrow track and the stick used to lengthen the slide. At the beginning it is a good plan to endeavor to make a long slide with each advancement of the foot, rather than strive to take long steps. The speed of level running depends, of course, upon the condition of the snow. On hard, well-packed snow, sliding is easiest and greater speed obtained, while in deep and soft snow less speed is the rule. When skiing on the hard snow of a road, four miles an hour is the average speed, and for average level running, the skier will cover about the same distance as when walking along a good path.
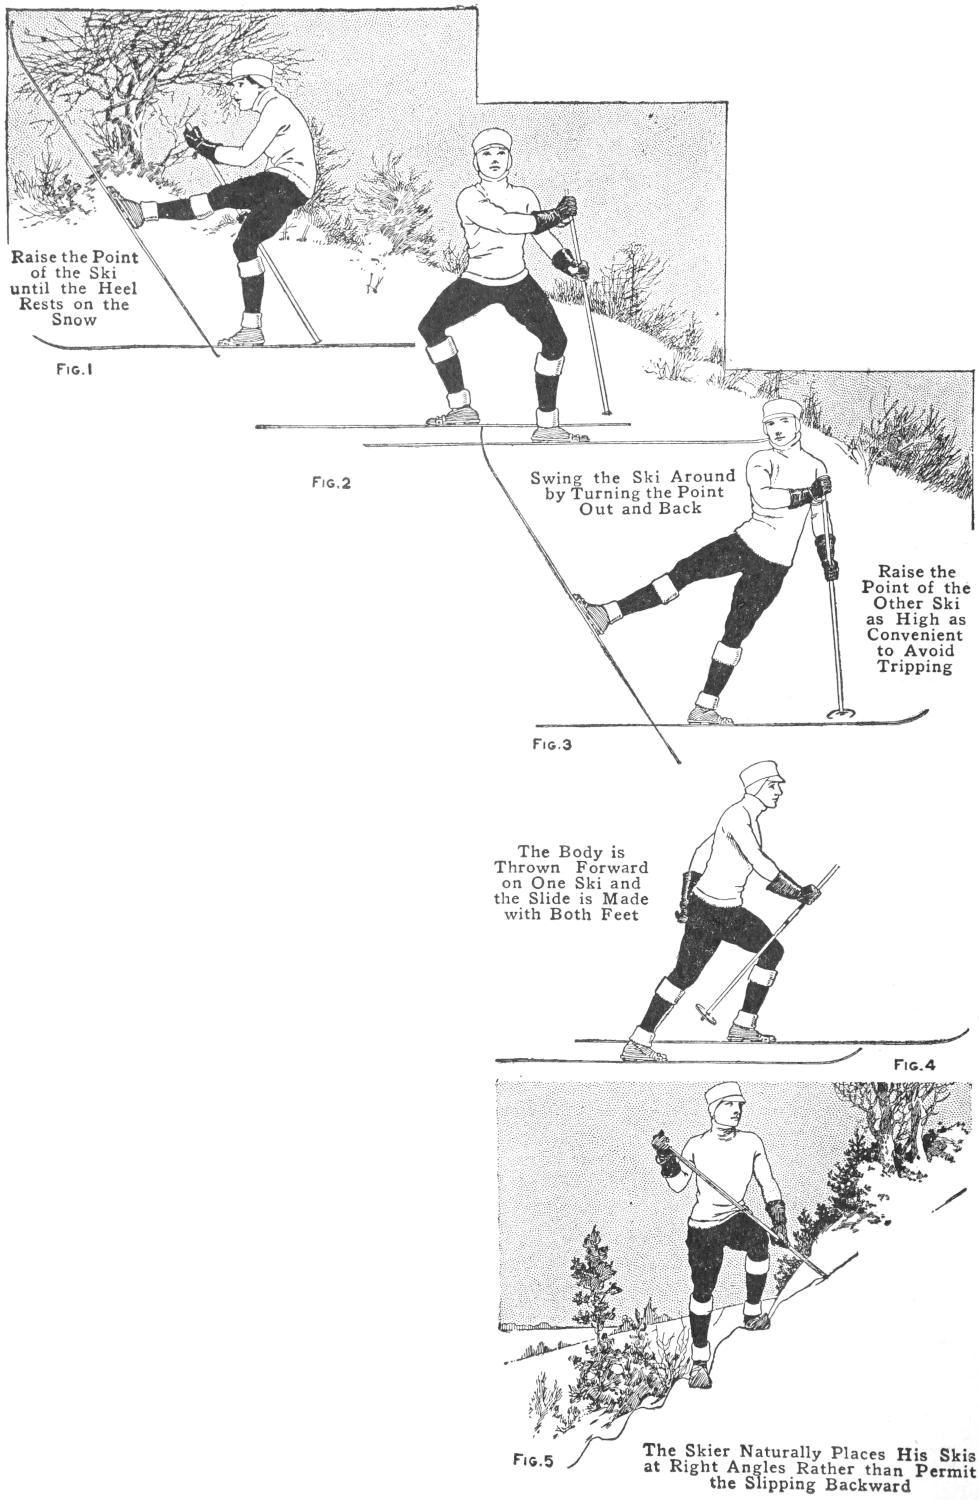
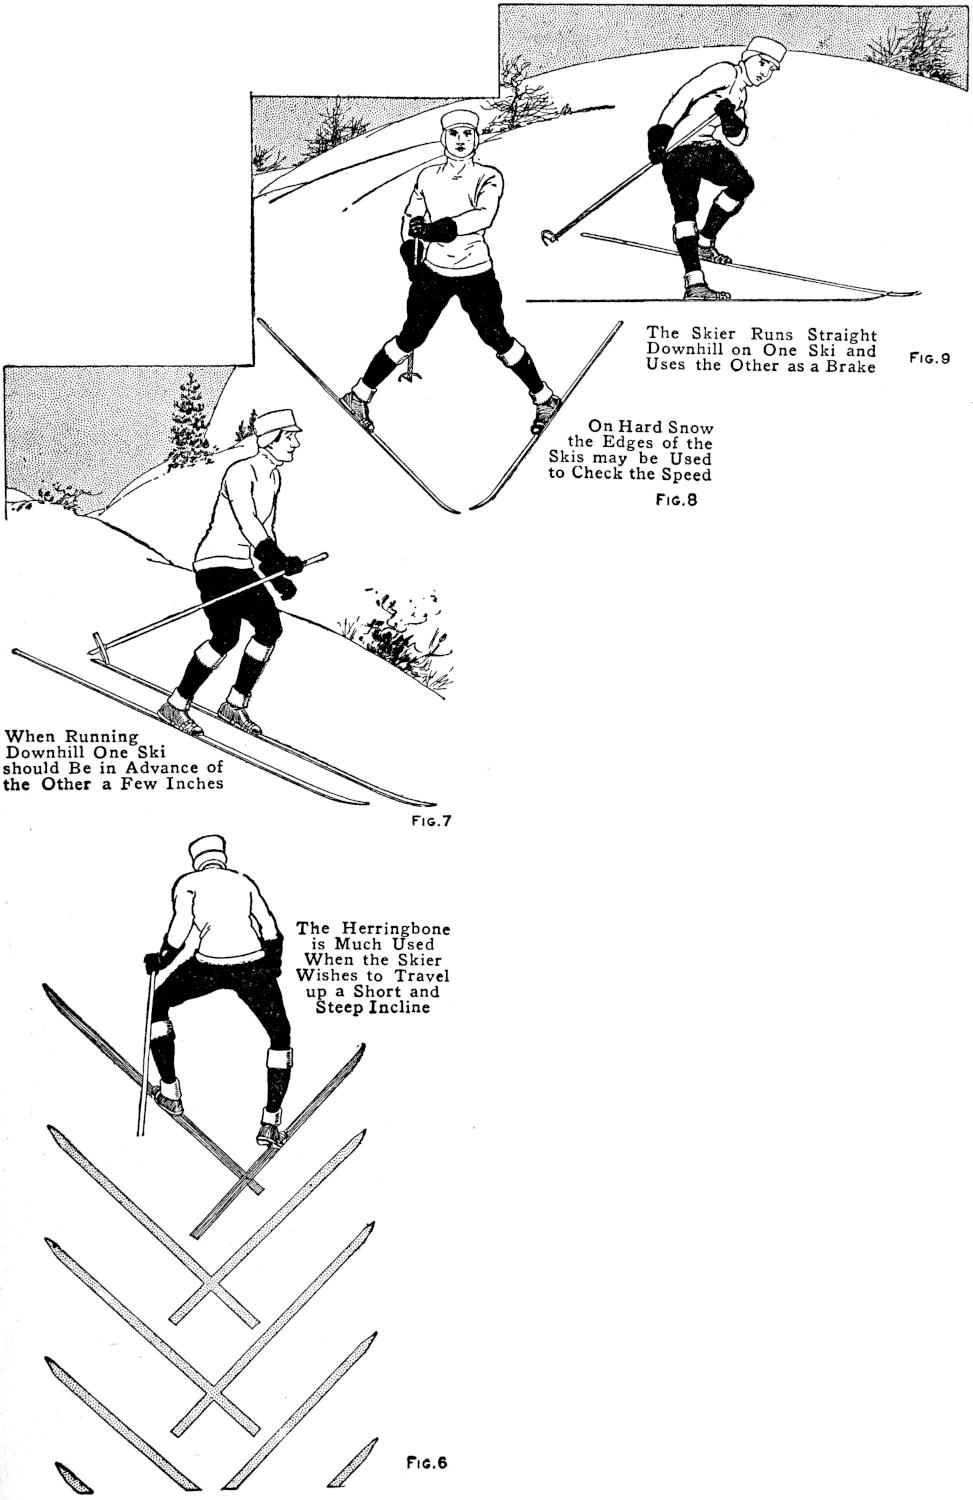
Fig. 1 Raise the Point of the Ski until the Heel Rests on the Snow Fig. 9 The Skier Runs Straight Downhill on One Ski and Uses the Other as a Brake
Fig. 2 Swing the Ski Around by Turning the Point Out and Back Fig. 8 On Hard Snow the Edges of the Skis may be Used to Check the Speed
Fig. 3 Raise the Point of the Other Ski as High as Convenient to Avoid Tripping Fig. 7 When Running Downhill One Ski should Be in Advance of the Other a Few Inches
Fig. 4 The Body is Thrown Forward on One Ski and the Slide is Made with Both Feet Fig. 6 The Herringbone is Much Used When the Skier Wishes to Travel up a Short and Steep Incline
Fig. 5 The Skier Naturally Places His Skis at Right Angles Rather than Permit the Slipping Backward
When traveling uphill, the regular sliding gait will suffice if the slope is gradual, but when a steep grade is encountered and the ski slips backward, the skier stands quite erect, raises the point of his ski about 3 in., and slaps it down smartly, without pulling it backward or making any attempt to push his body forward with the stick. This slap of the ski makes the smooth surface of the runner adhere better than when the runner is slid forward in the usual manner. If the hill is very steep, the skier will naturally place his skis at right angles rather than permit the slipping backward. This is known as “side-stepping,” and is shown in Fig. 5. In doing this, the heel of the ski must be raised clear of the snow and the upper foot lifted uphill, then the lower foot brought up to the last step of the upper foot, hence it is extremely tiring for other than a short distance.
A variation of this movement, which is known to skiers as the “half side step.” and which is made by advancing the foot with the legs somewhat wider apart, and the skis placed at not quite so acute an angle with the hill, is more useful when climbing the ordinary steep grade and is far less laborious. If the skier knows how to handle his implements, side-stepping may be done backward when necessary.
The “herringbone” is another step which is much used when the skier wishes to travel up a short and steep incline. This step is made by stretching the legs rather wide apart and pointing the toes out, as shown in Fig. 6, at a decided angle, so that the knees are bent inward and the inside edges of the skis cut into the snow. A variation of this is the “half herringbone,” the skis being turned out at a less acute angle. These special steps for special purposes are all useful now and then in mountain climbing, but when a long distance is to be covered, the skier will conserve his energy by mounting the hill in a zigzag fashion rather than attempting to climb straight up. The track of the skier will then resemble the course of a boat tacking through a narrow inlet against a head of wind, and while more ground is covered than when going straight up the steepest part of the hill, progress is faster and much hard work is avoided.
When running straight downhill, one ski should be in advance of the other a few inches, and the skis must be held quite close together so that they touch, or nearly so, as shown in Fig. 7. To make a narrow track, most expert skiers hold the knees together with the back knee slightly bent. However, the body should be perfectly and easily balanced. This is done, more or less, intuitively, by beginning the run with the body thrown on the advanced foot, and when full speed is attained the weight automatically shifts to the rear foot. The novice will find it difficult at first to keep the skis together, there being an almost uncontrollable desire to separate them to gain a better balance. A good track will come with a little practice, but if the skis are too short, or made without a groove, even an expert would be compelled to keep his feet a trifle apart and make a double track in order to keep from falling.
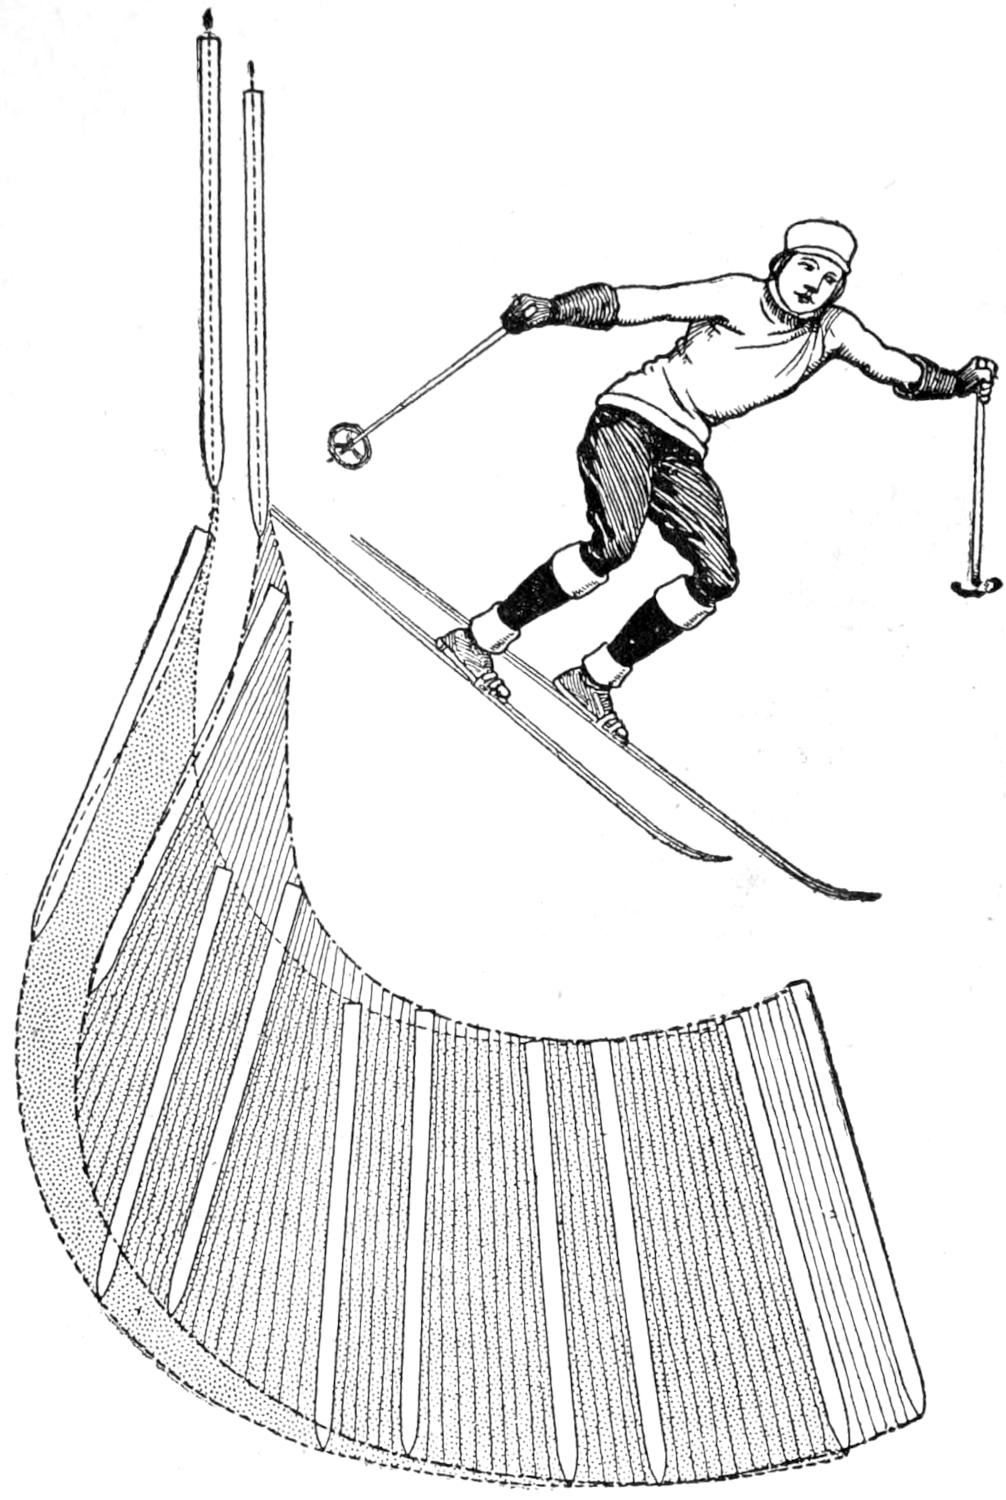
Fig. 10 The Christiania Swing is Accomplished by Pressing with Both Heels at the Same Time While the Stick Digs Well into the Snow Above
When making the start preparatory for coasting downhill, the novice may, if the slope is moderately steep, face in the desired direction and assume the proper position by supporting himself with the stick. On most very steep slopes, where the best coasting is to be had, this is quite out of the question, and the skier must step around quickly by moving the lower ski first. This will be somewhat difficult to do until the novice gains more confidence, which will quickly come after a little practice, and it is a good plan to practice starting from the slope without the aid of the stick to anchor the body. Owing to the fact that the skis do not reach much speed at the start of the coast, even the slow novice will have plenty of time to make the turn and face in the right direction before much speed is attained. A comparatively crouching position, secured by bending the knees and the body at the waist, will much lessen the liability of a fall forward. This position enables the skier to control the balance of his body with more certainty, and especially when coasting on a hill where patches of ice, or crusted snow, and soft spots of unpacked snow are encountered, a condition usually found wherever skiing is enjoyed. When coasting, the stick, or sticks, should be firmly grasped at the upper end with the looped thong, or strap, over the wrist, and the end dragging behind. Balancing is done entirely at the waist, and for straightaway running, the weight of the body will rest largely upon the rear ski. The long running surface of the ski will carry the skier over many bumps and hollows without disturbing the balance of the body or causing a fall, providing the novice does not lose his nerve. It is necessary to practice on rough and uneven ground if the skier desires ever to attain much expertness, and plenty of falls must be expected, but not dreaded by the beginner. A fall on skis is by no means fraught with danger, and one may fall with impunity providing all muscles are relaxed. Many beginners find falling the easiest manner of stopping, but this should not be necessary, providing the hints given are well understood and practiced. However, the novice should have no fear of falling if he wants to become proficient on skis, and to offset any timidity, which so very often causes the novice to lean backward and fall in this direction, it is a good plan to lean well forward to check this natural tendency. Getting up after a fall is easily enough managed if the head is pointing up the slope, but when the position is reversed much floundering is necessitated. It would seem that this would be obvious to all, yet the majority of beginners often forget it altogether.
Braking with the stick is only effective when the body is properly balanced, and the stick is kept well forward and as nearly vertical as possible. Straddling the stick, sitting upon it, or leaning backward on it held at an angle, are slovenly methods which every novice should avoid.
The “snowplow” is most largely used by all good skiers for braking, stopping, and turning. This is accomplished by stretching the legs wide apart and at the same time turning the toes in as much as possible, thus presenting the side of the ski to the snow and retarding the speed. Aside from straddling the legs wide apart, the novice will have no trouble in learning this useful knack. For the first practice, pick out a fairly steep hill road, or a hillside where the snow is old and not soft. Begin the run as for coasting, and when good speed has been attained, spread the legs wide apart, turn the toes in and endeavor to control the speed with the skis rather than depend upon the stick. On hard snow the edges of the ski may be used to check the speed, but on ordinary soft and well-packed snow, the runner may be kept quite flat. This is well shown in Fig. 8.
The knack of “stemming” is a variation of the snowplow, inasmuch as the skier runs straight downhill on one ski, and turns the heel of the other ski outward and downward and uses it as a brake, as in Fig. 9. This is a very useful movement, and is largely used when coasting down steep slopes, and when one has learned the knack of it, stemming will serve for braking and steering, and is useful for stopping by turning the skiing course uphill. To earn it, select a steep hillside, coast down at an angle, with the feet a trifle part, and endeavor to retard the speed with the stick and turn the heel of the lower ski outward. This makes the turn and the skier faces uphill and comes to a stop. By turning the heel of the lower ski outward and the heel of the upper ski inward, the skis will travel downhill with a sort of snowplow movement. When practicing these movements, the beginner should endeavor to use the stick as little as possible and learn to depend upon the skis for controlling the speed.
The “side slip” is useful on steep slopes, and is done by turning the skis so that the runners are at a decided angle to the course traveled. This affords the maximum braking by the skis alone, and is especially effective when combined with the braking done with the stick. Side-slipping may, of course, be done while the skier is traveling forward, by keeping the skis close together so that the edges almost touch. While this movement checks the speed in much the same manner as stemming, side-slipping is less tiresome, since the weight of the body gives the required braking effect, while, in stemming, the muscles are called upon to keep the heel pressing outward.
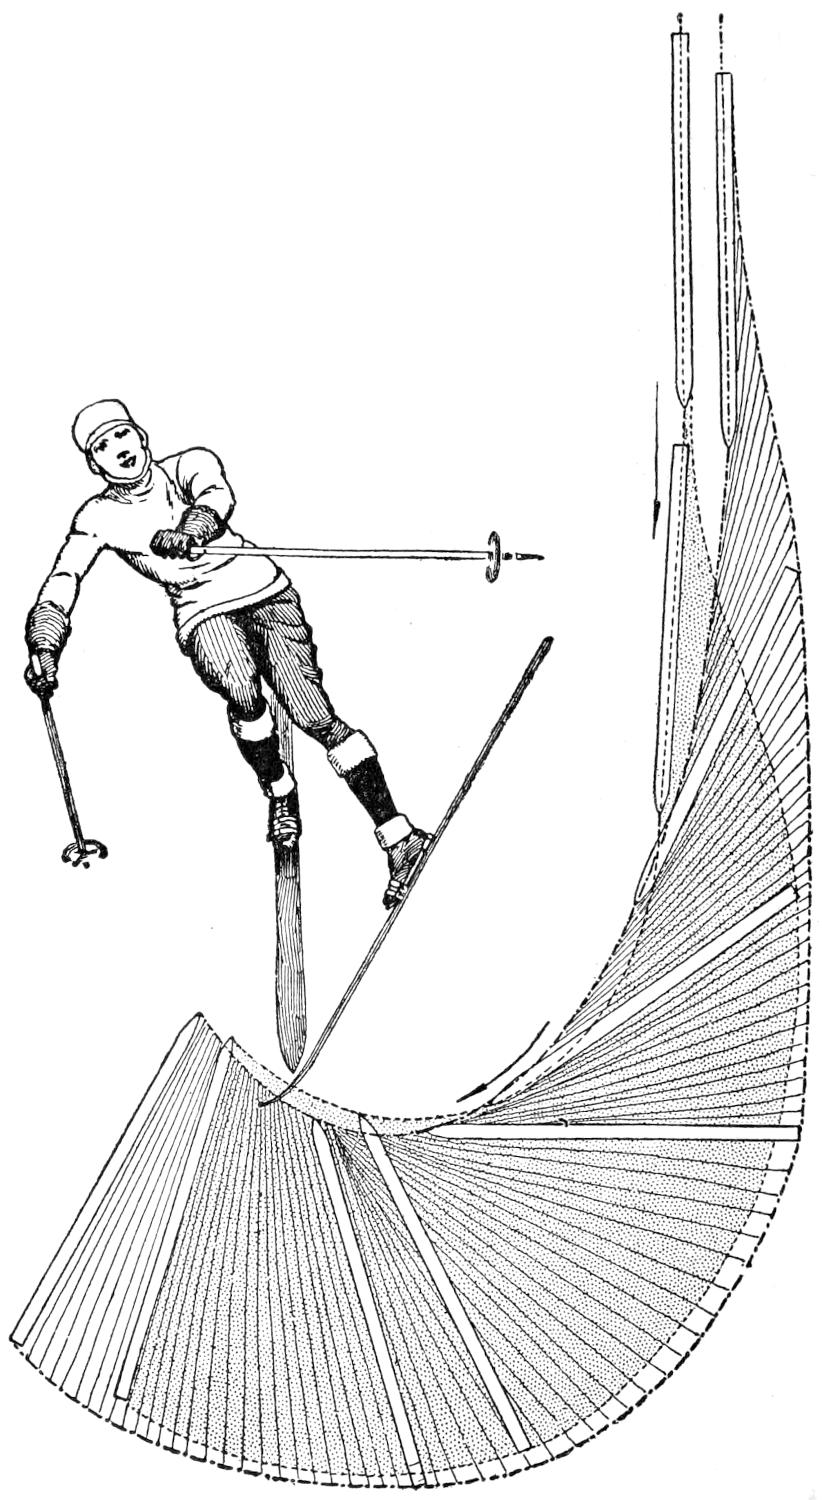
Fig. 11 The Swing is Made upon One Ski Instead of Using Both as in the Christiania Swing
Closely akin to side-slipping is the Christiania swing with the stick, which is accomplished by pressing with both heels at the same time, while the stick digs well into the snow above. This variation of the side slip is easily done, and the skier is turned sharply uphill to come to a quick stop. When a sharp hill is met with, that is considered a bit too steep to take straight, this swing with the stick may be made by taking a zigzag course down grade steering clear of any obstacles by snowplowing, stemming, or side-slipping; and turning the corners, or “tacking,” by making use of the Christiania swing and the stick, as shown in Fig. 10.
The “S”-turn may likewise be used for turning corners, without the necessity for stopping to make the ordinary kick turn. A good way to learn this useful movement is to run straight downhill in a snowplow position, reduce the speed to a comfortable walking pace with the stick, and stem with the ski. If this is done with the right ski, the “S”-turn is made by throwing practically the whole weight of the body on the right ski, at the heel, and pressing it outward while the stick is carried ahead and below the skier. If the heels are kept well apart, and the toes close together, the skier will have no trouble about swinging around in a curve and be off on the other tack. About the only difficulty in making the “S”-turn is the position of the body, which must be thrown somewhat out and away from the hill. To the novice this at first seems to invite a fall, but a few trials will soon prove that the weight of the body must be thrown on the foot which circles on the outside of the curve, hence the apparently unnatural position of the body is essential for a good turn. By bringing the stick well forward and downhill, the skier uses his staff as a pivot upon which the turn is made.
The Christiania swing, made without the stick, is a favorite with expert ski runners when running on rough and steep ground and is a good way of stopping. The swing may be made both to the right and left. To make it to the right, keep the skis close together, the right a trifle in advance, with the weight of the body equally on both feet and with knees slightly bent. Now throw the weight more forward and upon the toes, while the heels are carried forward and outward to the left. The body must lean to the right—the direction in which the swing is made—and twisted somewhat at the waist; and the sharper the turn, the more the body must lean sideways to keep the balance. The swing to the left is made in the, same fashion, only the left ski should be a trifle advanced and the body thrown to the left.
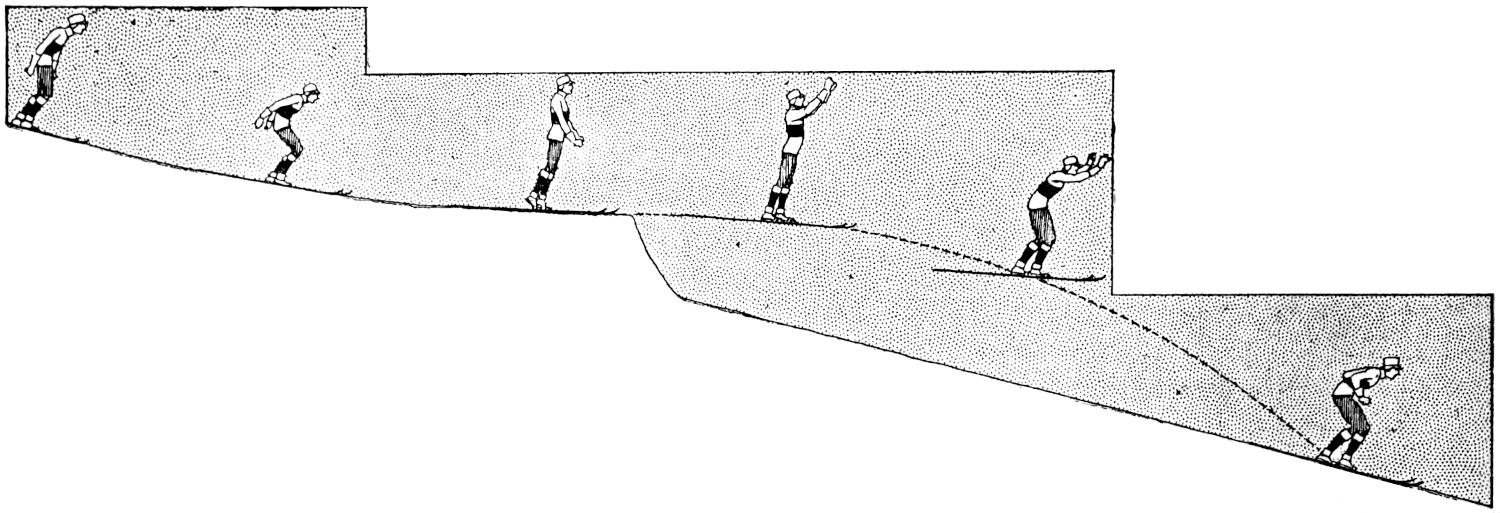
Fig. 12 To Make the Jump the Skier Assumes the Easy Position Required for Coasting Downhill
The Telemark swing is more difficult to master than the Christiania swing, because it is done on one foot, or ski, instead of using both, and as it is less powerful than the latter, it is of far less use for stopping. To make the Telemark swing to the right, assume the regular position for downhill coasting, and, advancing the left foot, turn the ski so that it rests on its edge as when making the snowplow, throw the body to the right and lean in toward the slope to keep the balance. To make the swing to the left, advance the right foot, turn the body to the left and lean as before. This is shown in Fig. 11. The Telemark turn is, in fact, made in the same manner as stemming, and the sharpness of the swing rests altogether upon the quickness with which the heel is thrown outward and the body turned in the direction the skier desires to swing. The swing is made upon one ski, and the key to the whole swing is the knack of raising the heel of the other foot off its ski until it rests upon the toes. That this is hard to do goes with the telling, and the novice should first acquire the knack of balancing by running straight downhill with the weight thrown on one foot. When this can be done, and not before then, the skier is ready to practice the turn. The Telemark swing, like all other turns, is easily acquired at slow and moderate speeds, and becomes more and more difficult to make as the speed is increased and the turn is made more sharply and quickly.
Jumping on skis is one of the most exhilarating winter sports, and it is a pity that it is not more popular wherever a medium-heavy fall of snow occurs. While touring on skis across a hilly country, there will be many natural jumps to encounter, for drifts, stumps, rocks, and other rises in the ground, when well covered and padded with snow, make good jumping-off places. While but a few skiers may have attempted such high leaps as the famous Holmenkollen, Fiskertorpet, or Foldberg, all who have done much ski running have done a little jumping, since, when running downhill, an unexpected dip is often encountered, and a rise in the ground causes the skier to leave the ground for a short distance and alight several feet below. Doubtless the skier has enjoyed the flying-like sensation of this brief moment, and very likely he has climbed the hill to repeat the jump. Moreover, this has very likely demonstrated that the distance of the jump depends upon the height of the dip, the speed of the skier passing over it, and likewise upon the spring of the body on the take-off. In making a jump of any height, the take-off may be level, pointing up or even downhill, and constructed with framework extending out from the hillside, or consist merely of a large boulder, or a pile of logs, well padded with snow. The height of the slope chosen will, of course, regulate the distance of the jump, and the place where the jumper alights should be fairly steep, since, if the skier lands upon a level place great difficulty will be experienced in keeping the balance, therefore the usual jumping hill, where jumping competitions are held, is provided with a 30°, or steeper, landing place, and this merges gradually into the outrun, or slope, connecting the hill with the level ground below.
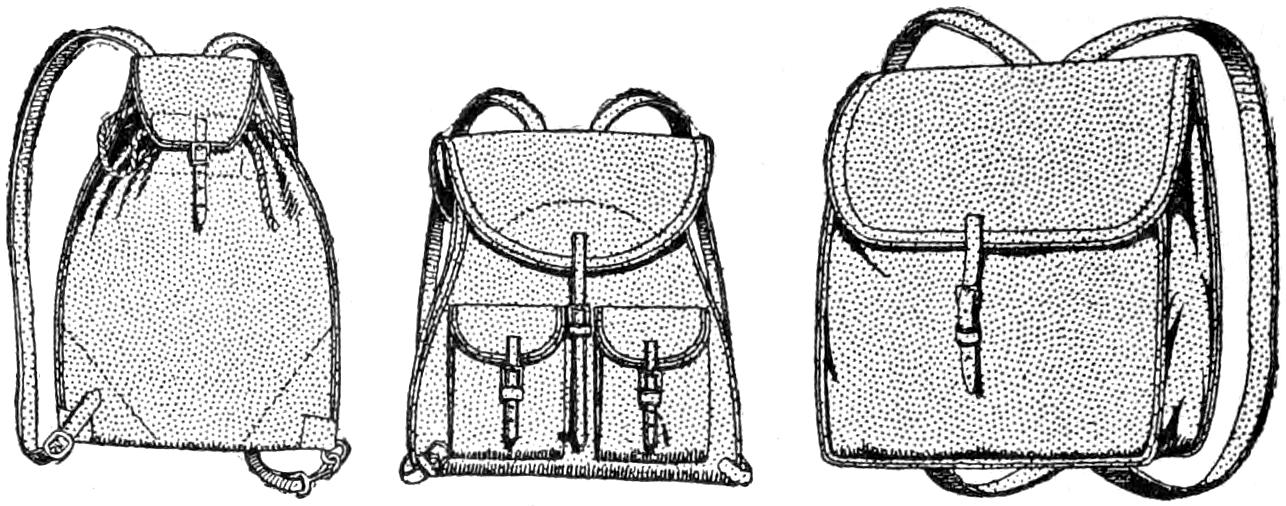
Fig. 13 Each Member of the Party should be Provided with a Ruck Sack of Good Capacity
For the safety of the skier, the snow should be firm but not icy or hard, and this is easily done by packing the snow down well by means of the skis. A good, thick padding of snow is of course essential, and a thickness of 2 ft. is really needed at the landing place and at the take-off. In our more northerly sections, plenty of snow usually falls, but wherever a few sportsmen get together, it is an easy matter to shovel sufficient snow to prepare a good and safe jumping hill.
To gain confidence and acquire some useful experience in jumping, the novice should practice leaping from a 2-ft. rise and gradually increase the height of the take-off by piling more snow upon it to increase its height. One or two packing cases firmly placed upon a smooth, steep hillside, and well padded with 2 ft. of well-trodden snow, will make a nice take-off. For the beginning the take-off may point slightly downhill or be fashioned level, and as the skier becomes more proficient, snow may be added to the edge so that the take-off will send the jumper well up into the air.
The knack of jumping is nothing more than balancing the body upon alighting, and the steeper the landing place the easier it is to keep the balance. To make the jump in good form, the skier assumes the easy position required for coasting downhill, as shown in Fig. 12. When within a dozen yards of the take-off the body is lowered until the skier is in a crouching position with the arms extending back as in the act of jumping. Arriving within a couple of yards of the dip the body and arms are thrown forward, which transfers the weight of the body upon the toes, and the body is straightened up and the arms are raised not unlike the wings of a bird, to keep the perfect balance of the body. The straightening up of the body, known to skiers as “the sats,” is the leap proper and must be timed so that the body assumes an erect position when the jumper is not less than 12 ft. from the edge of the take-off. The beginner will invariably jump too late, but after a little practice, and profiting by numerous mistakes, the take-off will be timed correctly. Alighting after a jump is best done by advancing one ski a trifle to keep the balance, and bending the knees a bit to lessen the impact. The jumper ends with the Telemark or Christiania swing.
When taking tours of any length on skis, each member of the party should be provided with a ruck sack of good capacity. That of the expanding type, made with two outside pockets, and with gores at the sides, is a good, sensible pack. It should be made of 8-oz. waterproof khaki and fitted with shoulder straps of good width, to prevent chafing the shoulders. Leather ruck sacks are sometimes used, but are heavier in weight and more expensive but no better. One member of the party should carry some kind of repairing outfit, consisting of an awl, a length of leather thong, a few spare straps and a stout cord, or string. These sacks are shown in Fig. 13.