Book 3 — A Woven-Reed Footstool By CHARLES M. MILLER
Reading edition
[The various materials referred to in this article by number or size were described in detail in an article on “A Reed Basket,” in the Boy Mechanic, Book 2, page 257.]
Reed furniture has become very popular within the last few years, and the newer designs and methods have been so attractive as to place this constructive effort among the handicraft series of modern art. It is possible so to analyze, simplify, and illustrate this work as to make it feasible for amateurs, and at the same time there are possibilities which involve problems that may try the ability of the skilled workman. In other words, there are possibilities of progress in this kind of furniture making. There are places where careful weaving is the principal aim; again particular attention will be given to corners, or, perhaps, a nicety of modeling will be found necessary to bring out the proper curves involved.
Each piece of reed furniture has a framework, usually of dowels, but it may also be made of boards in such models as small tables, dressers, bedsteads, chests, etc. The board construction is more often covered with flat reed. In footstools there are both kinds of framework. The illustrations show the same parts marked with the same letters throughout the series of sketches.
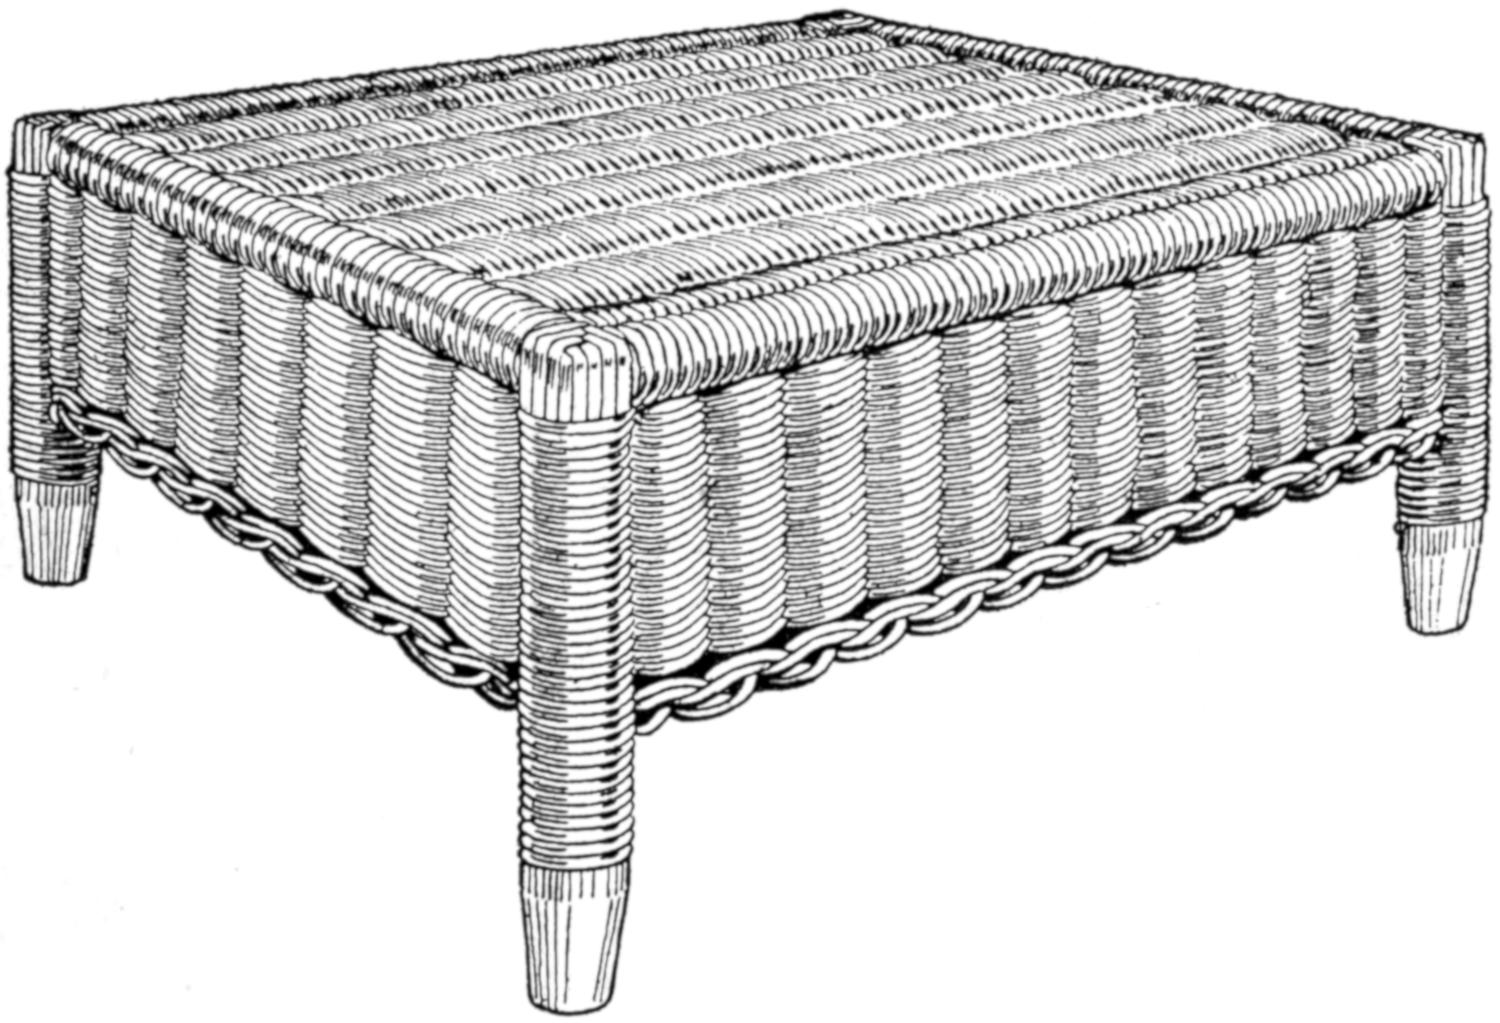
The Framework of the Stool is Made of Large Dowels, Then Covered with Windings of Reed and a Woven Reed Top and Apron
The framework of the stool is shown in Fig. 1, in which the rails and posts are made of dowels, ³⁄₄ in. in diameter, and the braces of dowels, ⁵⁄₈ in. in diameter. It will be noticed that the posts extend to the top of the frame for strength in this manner of construction. If the rails rested on top of the post S, the nails would have to be driven into the end grain of the wood, which makes the strength depend entirely on the holding power of the nail in this position, as there is no binding of the upper part to the posts in the weaving. With the post extending to the top, the nail passes through the upper part of the post and into the end grain of the rails, and the rails are bound together horizontally by the weaving.
The material for the frame consists of the following dowel stock: two pieces for rails, ³⁄₄ in. by 14 in. long; two pieces for rails, ³⁄₄ in. by 9 in. long; four posts, ³⁄₄ in. by 7 in. long, and two braces, ⁵⁄₈ in. by 17 in. long. These pieces are shown in Fig. 2. If notches are cut with a small saw, a coping saw preferred, in the ends of each rail and in the braces, as shown in Fig. 3, they will fit to the posts better and make a stronger joint. While different makers use a finishing nail; a barbed or corrugated, nail; or a cemented, or glue-coated, nail, I find the best to be an ordinary 4-penny nail, which answers the purpose well. Do not drive the nail through the posts without first drilling a hole with a ¹⁄₁₆-in. drill. A small hand or breast drill will be needed for this work.
Before nailing the frame together, the holes for the spokes in weaving should be drilled in the rails. The spokes may be No. 4 and the weavers No. 3 reed. The No. 4 reed requires a ¹⁄₈-in. hole. The hole for the top and end side spokes may be combined, as shown in Fig. 4. The dotted lines show the vertical and horizontal diameters, and E the outside and F the inside of the rail, one hole being represented as sawed in two. The spokes for the top extend down and out at the ends, and each may be of one piece, 32 in. long. As there are no spokes at the top extending to the side pieces, short spokes must be inserted at the right time for the side weaving. The location of the holes in the side rails is shown in Fig. 2. The holes in the side rails may be drilled straight in the wood.
The pieces may now be nailed together to form the frame, as shown in Fig. 1. If the top of the side rails A are set about ¹⁄₁₆ in. below the tops of the posts, the weaving will be almost level, as the winding reed is thinner than the round reed. The braces D are halved at the center, on a slant, to bring their upper surfaces on a level when they are in place. The length of 17 in., as given in the material list, is not accurate, as sufficient length is given to allow the ends to be cut, in fitting them in place after the frame is assembled. The posts should stand vertical and square. Try the braces before nailing them in place, to see that they do not draw the frame out of shape.
The first operation in weaving is to cover the tops of the four posts, which is started as shown in Fig. 5. A short piece of winding reed, G, is first tacked in place. A round reed can be split if one is careful, in case winding reed cannot be obtained. Tacks used by shoemakers are just the thing for fastening these weavings in place. After fastening the weaving G in place, another, H, is put on in an opposite direction, whereupon J is fastened on the same as G, and so on, until the post is covered, as shown in Fig. 6. Perhaps a better way to cover the posts would be to tack all eight pieces on the post part C, and then weave them down together. It may not be necessary to tack them all on the rails.
After the corners are all covered, the end rails B are wound with the winding reed, the start being shown in Fig. 7, where the frame is shown in an inverted position. The reed is tacked, at K, to the side rail, and whenever the winding comes to a hole, a pencil mark is made to locate the hole later. This mark is shown at L. When the two end rails are wound, push a bodkin, or other steel point, in between the windings where the marks are located, to make way for the insertion of the spokes. It may appear to an observer that the spokes could be put in before the winding, but the winding cannot be properly done after the spokes have been inserted, as the windings would separate too much around them. The hole must be opened up through to the opposite side of the rail. Single spokes go through the rail, and they are only put through one end rail at first, as the weaving is much easier with one end of the spokes free, but, of course, they must be inserted in the other end before the weaving gets within 2 or 3 in. of that end. An extra spoke is inserted beside each spoke, as the weaving proceeds and after a strip has been woven ³⁄₄ in. wide. These short spokes are cut just long enough to fit in between the end rails. The weaving is done with a single weaver, and it is passed over and under double spokes as if they were one. When the weaver comes to the side rail, it is wound twice around the rail, to take up the space for the two strands across. If the weaver does not go twice around the side rails each time, either the weaving will take a curve or the side winding will be loose. The starting of the weaving is shown in Fig. 8, where the extra spokes are inserted along the side of each spoke that runs through the end rails.
After the spokes have been inserted in the opposite end rail and the weaving in the top completed, the braces and posts should be wound. Where the braces D connect to the posts C, three strips of the winding reed are passed around the post and tacked on both sides of the braces, as shown at M, Fig. 9. Where the braces cross, the winding passes around both pieces for a short distance, as shown at N. It is quite appropriate to use the brass caps O on this model, but on many stools their use has been discontinued and the winding continues down to within ¹⁄₈ in. of the bottom of the post. In case the brass cap cannot be obtained, the winding may be used also on this model.
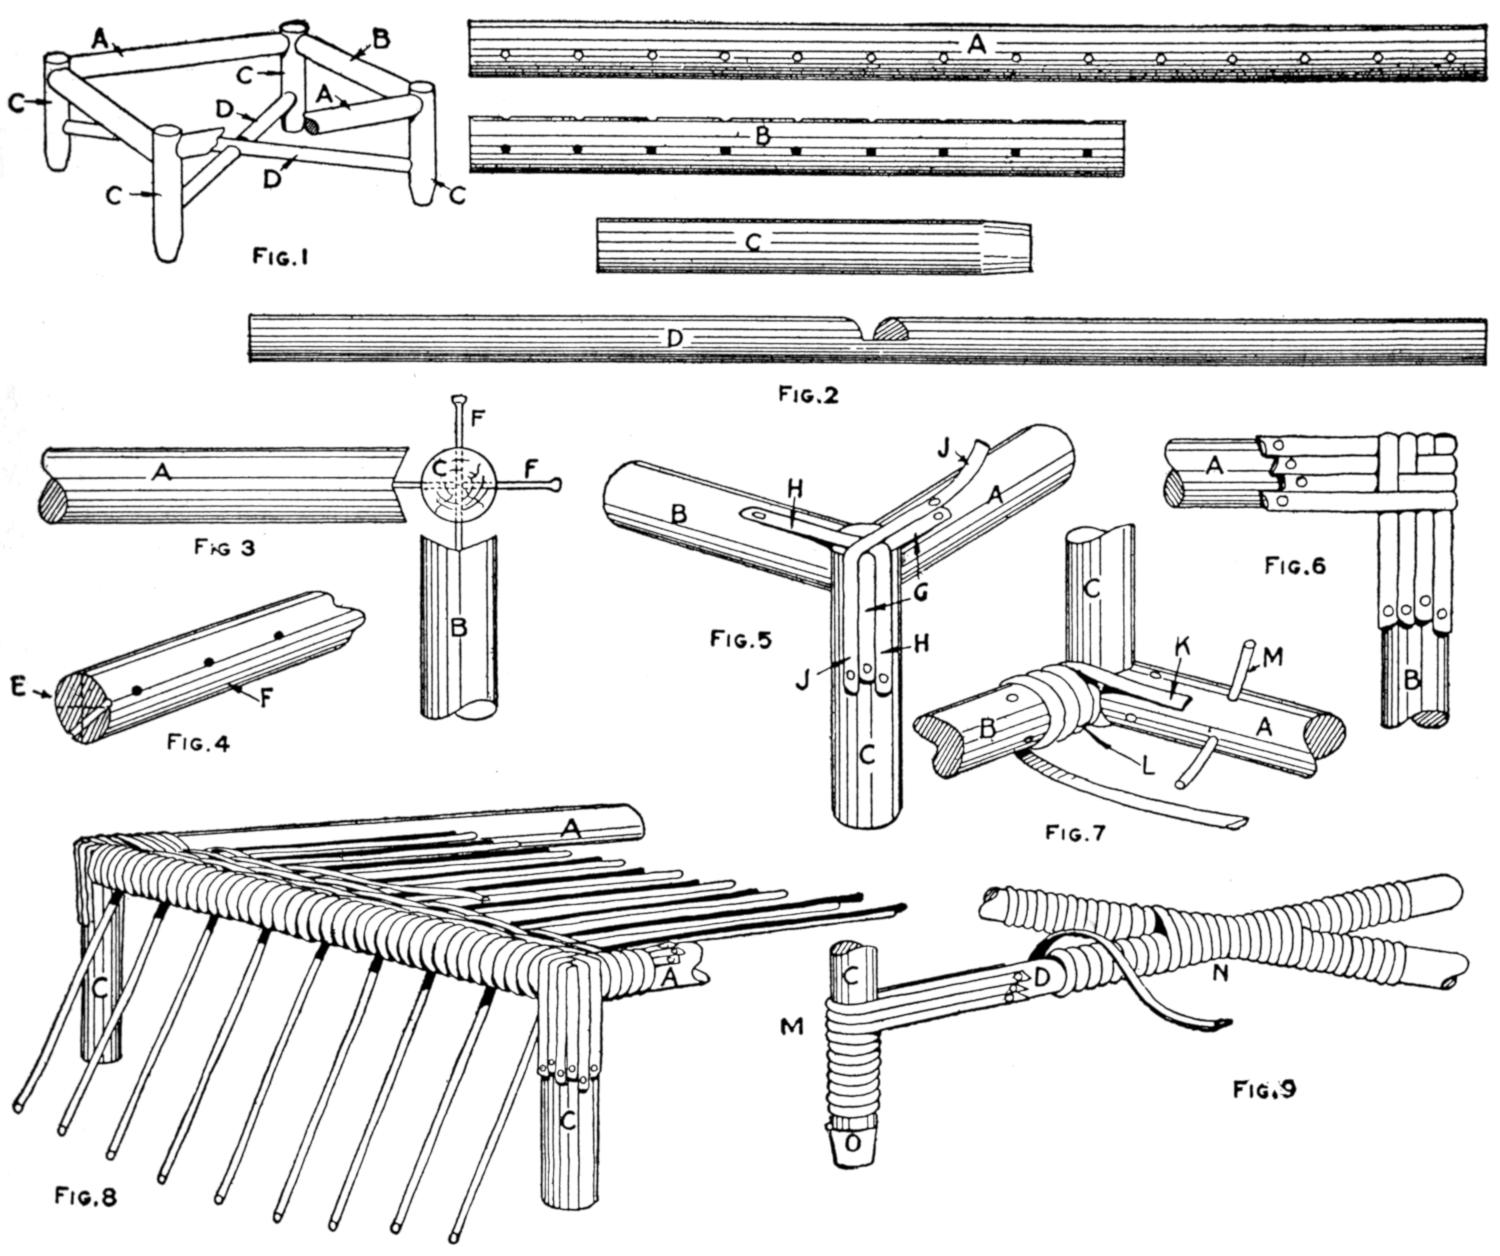
Fig. 1 Fig. 2
Fig. 3 Fig. 5 Fig. 6
Fig. 4 Fig. 7
Fig. 8 Fig. 9
Details of the Dowel Pieces, Showing Dimensions for Drilling the Holes to Admit the Spokes of Reed, Manner of Building the Framework, and How the Top is Woven
The side weaving is called the apron, and in this case the pairing weave is used. The short spokes will have to be inserted in the under side of the side rails, and the extra spokes are added after the weaving is started and a small strip woven. The pairing weave is shown in Figs. 10, 11, and 12. The two weavers are represented by the letters P and Q. The weaver P passes back of spoke T and out between T and U. The weaver Q is then used in the same manner, and so on, around the stool. When the post is approached the weaver that comes out between the last spoke and the post is passed around the post and in behind the next spoke on the other side. It will be seen in the pairing weave that the weaver behind is always thrown over the other weaver. This gives the appearance of a rope twist to the weaving, and also cinches it to the spokes and prevents slipping. Always pass the one weaver around the post twice to take up the space for the one that cuts across the corner. The weaving of the sides or apron is done with the object turned upside down, where it is in a good position for finishing off, which is sometimes called breaking down.
If the weaving has been carried far enough, the extra spokes are cut off even with the weaving, and the breaking down may be done as follows: The spoke R, Fig. 13, is shown turned down back of the spoke S, and S back of T and out. The spoke R, as shown in Fig. 14, is back of S, in front of T, back of U, and out between U and V, but as R is brought out, the spoke T is brought down back and parallel with R. Likewise the spoke S passes back of V, and U is brought down with it. The spoke T is brought back of W and V is brought down back of it. The short end of R is inserted under the roll, between the roll and the weaving, and is left extending on the inside. If it is too long, it can be cut off close to the inside of the weaving. In Fig. 15, all the short ends are shown brought through to the back as far as the weaving is illustrated. At the corners, the posts are used as spokes. To finish the roll, the spokes will have to be inserted through the roll, to correspond with the rest of it; hence, the beginning of the roll should be left loose, as in Fig. 13.
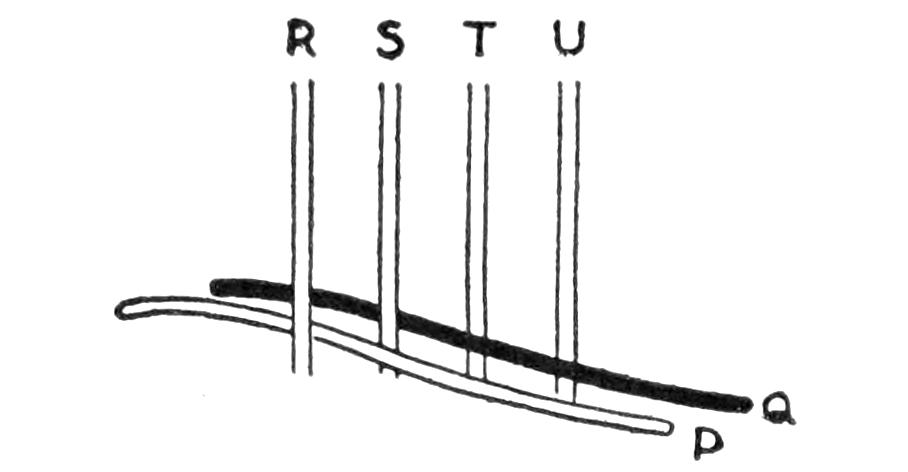
Fig. 10
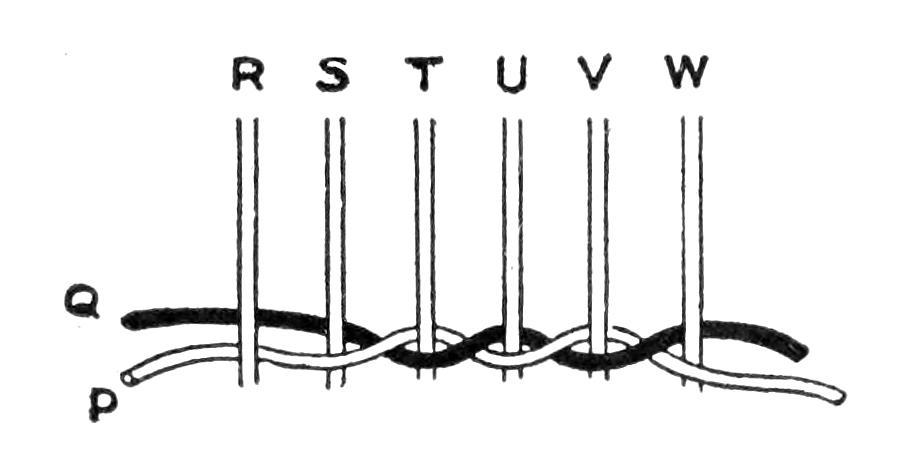
Fig. 11
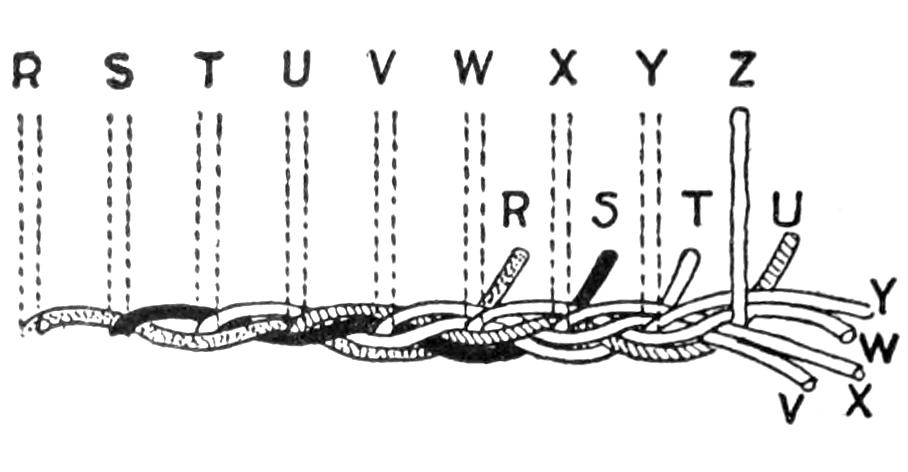
Fig. 15
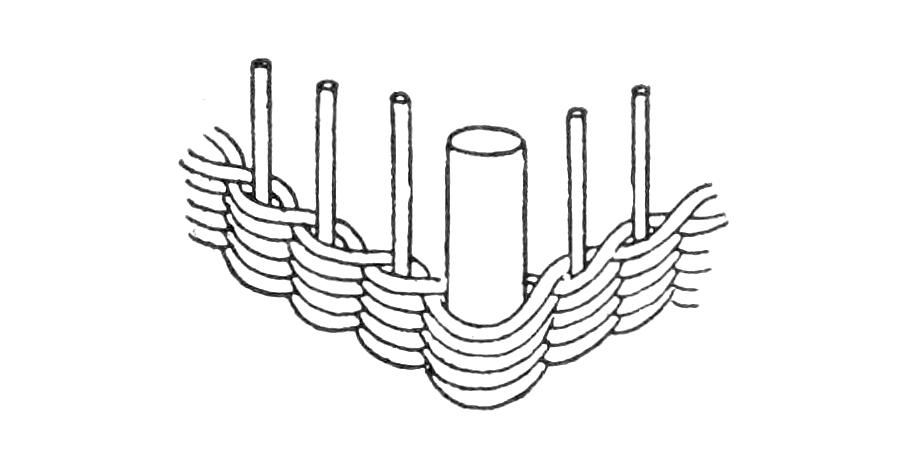
Fig. 12
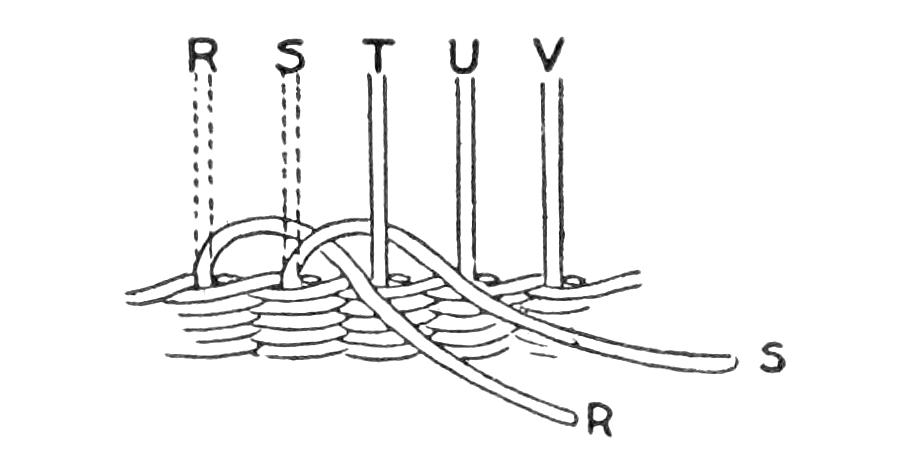
Fig. 13
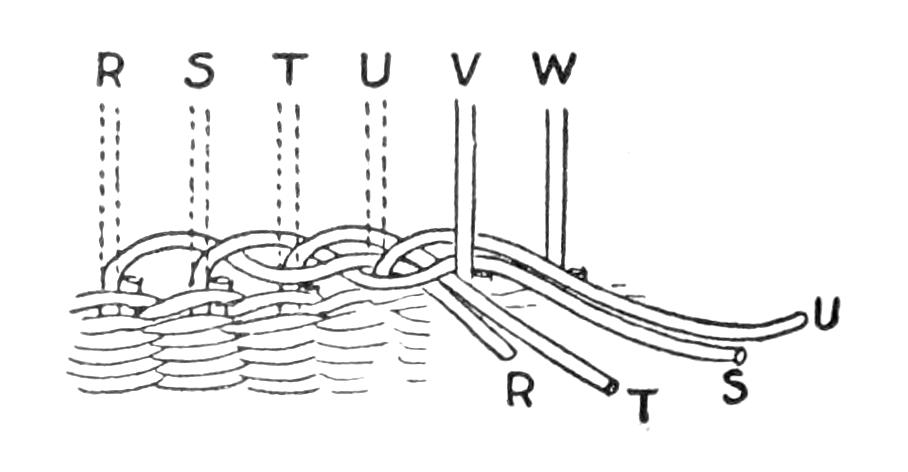
Fig. 14
The Weaving of the Apron is Done in the Same Manner as in Making a Basket, with the Break Down to Form the Edge
In weaving, the weavers should be kept wet, but not the spokes. Do not put the reed in water and leave it for any length of time, as it will become discolored. About 15 minutes will be sufficient to make the reed pliable, then it is best to have a sponge and bucket of water at hand, to dampen long weavers frequently by drawing the reed across the wet sponge. Besides being more workable, the wet reed, held in place until dry, stays curved in the form woven much better. Some workmen leave the reed in water for a long time and depend on bleaching to whiten it, but so much of the bleached work looks like a poor job of painting that it is much better to keep it white from the start. In case bleaching is found necessary, a little chloride of lime in water makes a good bleacher. Avoid making the solution too strong. It should be put on with a brush, so as to get it into the interstices of the weaving, whereupon the work is placed in the sunshine to dry.
Any kind of reed used will have some of the small hairlike fibers sticking out after the weaving is complete, and this should be singed off with a gas flame. A blowtorch is good for this purpose. Be careful not to scorch the weaving.