Book 3 — A Piano or Reading Lamp By WILLIAM E. FINKERNAGEL
Reading edition
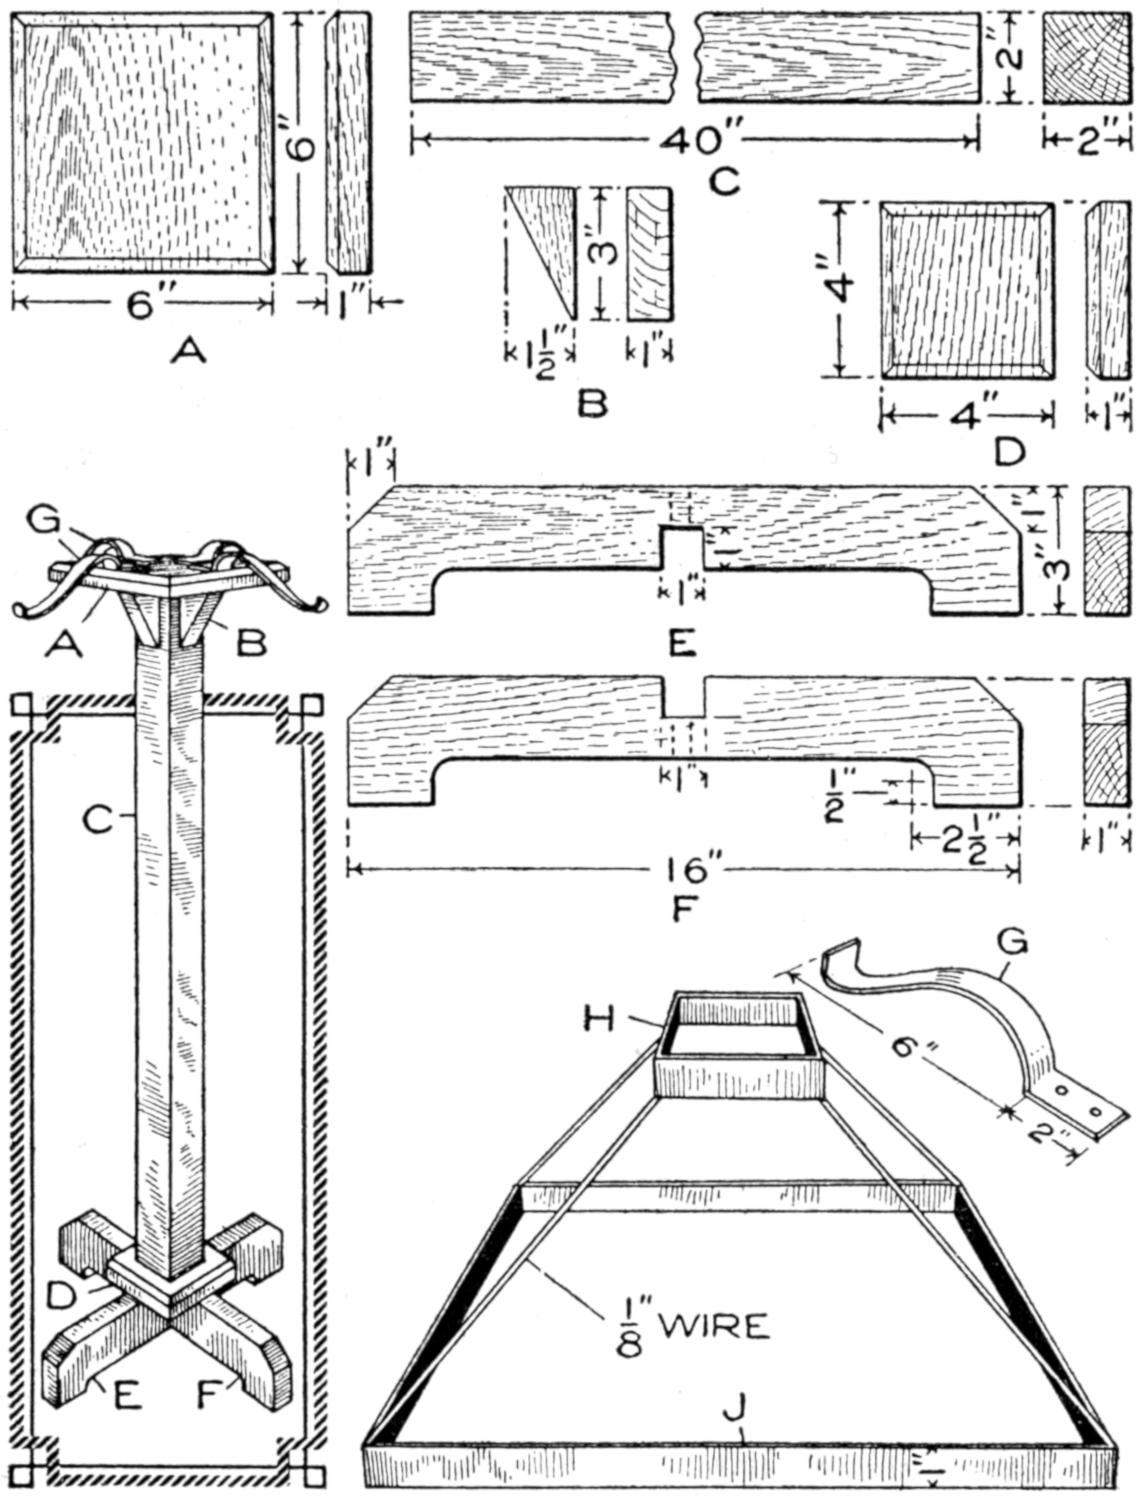
This Lamp of Substantial Construction and Pleasing Design may be Made at Small Cost. The Pedestal Assembled is Shown at the Left and Details of the Parts and of the Metal Frame for the Shade, Above
The lamp illustrated was designed for use in reading, the doing of hand work at which one is seated in a chair away from a table lamp, or for lighting a piano rack. It is light, readily moved about, easily made, and of pleasing design. It combines construction in wood and metal, is inexpensive, and within the range of a careful amateur craftsman. The pedestal is shown assembled at the left, and above are detailed sketches of the parts. The construction of the shade, which is 18 in. square, is shown at the right. The central post is 40 in. long and 2 in. square, and the base measures 16 in. on the arms.
The stock bill for the lamp is as follows:
1 piece, 2 by 2 in., oak, for post.
2 pieces, 1 by 3 by 16 in., oak, for base.
1 piece, 1 by 6 by 6 in., oak, for cap.
1 piece, 1 by 4 by 4 in., oak, for column base.
1 piece, 1 by 2 by 3 in., oak, for braces.
Copper or brass strip, 1 in. wide and ³⁄₃₂ in. thick, for shade frame. Wire braces for shade.
Make all the pieces, smoothing and finishing their surfaces with a scraper, before assembling the parts. The cap A may be made first. Square the piece to 6 in. and cut a ¹⁄₄-in. chamfer around the upper edge. Cut the 2 by 3-in. block on one of its diagonals and smooth it to form the braces B. Square the ends of the post C to a length of 40 in., and smooth up the sides. Square the column base D to 4 in. and cut a ³⁄₁₆-in. chamfer around its upper side.
Square up and smooth the cross arms E and F, for the base, to a width of 3 in. and a length of 16 in. Bevel the upper corners 1 in., at an angle of 45°. Bore holes with a ¹⁄₂-in. bit to form the rounded ends of the portions cut out from the lower sides of the cross braces. Chisel the wood away between the holes and smooth the resulting surfaces. The half-lap joint, by which the cross braces are joined, may then be made. It should not be made until the lower portions are cut out of the cross braces, and the remaining portions are made of exactly the same width, 2¹⁄₂ in., according to the drawing. The joint must be fitted tightly in what is termed a driving fit, or it will not be strong enough.
The construction may be assembled as follows, although several methods may be adopted that will prove satisfactory: Fix the cap A to the top of the post with glue and ¹⁄₂-in. dowels, bored not quite through the cap. Screws may be used for this purpose, but they mar the finish of the upper surface of the cap. Glue the braces B into the corners to support the cap. They should be warmed before applying the glue and rubbed slightly to bring them into place tightly and to distribute the glue evenly. Small brads may be used to nail them in place, but care must be taken not to mar the finish.
The column base D may be fixed to the bottom of the post in the same way that the cap was fixed at the upper end. The cross braces E and F, forming the base, should be glued in the half-lap joint and fixed to the column base with glue and dowels, or screws sunk into sockets from the lower side of the braces.
When the glue has dried, the pedestal should be scraped and cleaned preparatory to a final sandpapering before applying the stain and varnish.
The arms G for the shade holder are made of strips of brass or copper, 1 in. wide and 8³⁄₄ in. long, bent to the proper form, as shown in the sketch. The straight end, 2 in. long, is provided with two holes through which screws are fixed into the top of the cap.
The shade is constructed as follows: Make a 4-in. square, H, of brass strip, 1 in. wide, and solder or rivet it at the joint. Make the lower square J of the same material and in the same way, 18 in. on each side. Solder ¹⁄₈-in. wire, of a length that will give the desired slant to the shade, at the corners of the squares, forming a rigid frame for the covering. Cloth or silk may be used to cover the frame.
The braces for the shade may then be fastened to the top of the cap, as shown in the assembly sketch, and their ends shaped to hold the frame firmly. The pedestal should be smoothed off immediately preparatory to finishing, and the sharp edges removed slightly. Care should be taken in sandpapering, since rubbing across the grain is ruinous, as is too much sandpapering. The latter particularly smacks of the novice. A coat of stain, one of filler rubbed in thoroughly, a coat of shellac, and a finish coat of wax or varnish will give a satisfactory finish. The shellac and varnish coats should be permitted to dry thoroughly and should then be sandpapered lightly before applying other coats.
The electrical connections for the lamp may be made from a cord extension to a socket fixed in the center of the cap. In some instances it may be desirable to connect the cord from a floor socket. In that case the post should be built up of two pieces of 1-in. thickness, and a groove to admit the cord made in the center of it.