KNOTS FORMED ON ROPES BY THEIR OWN STRANDS
Reading edition
If ropes, hawsers or cables are left with their ends unguarded, they are sure to become untwisted or otherwise unmanageable. The same is true in a lesser degree of lanyards and smaller ropes. These can easily be secured with a fine whipping and the smaller yarns and threads by a single overhand or other knot. The ends of ropes at sea are variously treated. In some instances they are finely tapered to a point, to pass easily through a block or ring. While some of these knots for guarding the rope ends may seem fanciful they are by no means merely ornamental and many of them play important parts in the standing rigging of a ship.
At first glance some of these knots may appear to be very intricate and difficult to make. They are not as difficult as their pictures would seem to indicate and a little thoughtful study, carefully following the explanatory diagrams, will smooth away all troubles.
To Whip a Rope first lay the end of a length of twine along the end of the rope, and then, commencing at the part furthest from the rope’s end take a half dozen or more turns around both the rope and the twine, as shown in the first diagram. Then lay the twine in the form of a loop along the rope and over the turns already taken as seen in the second diagram. To finish off take that portion of the loop designated A, and continue taking turns tightly round the rope and part B of the twine until the loop is all used up. Pull through the remainder snugly by part C and cut off short when no end of twine will be visible as in the third diagram.
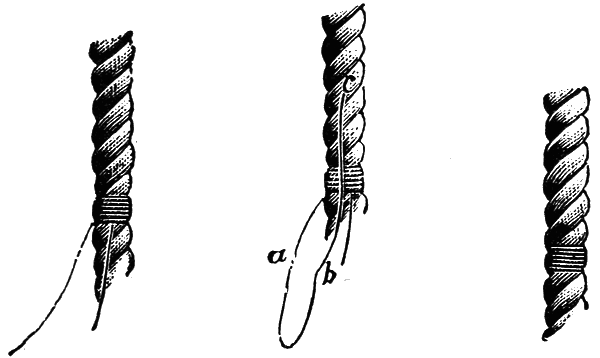
WHIPPING A ROPE
A Palm and Needle Whipping is a permanent way of securing a rope’s end from fraying and better than the whipping put on by hand. First place the needle under one of the strands and draw nearly the whole length of twine through. Take a number of turns round the rope with the twine, drawing each well taut in turn, and finish up by following round with the needle between each strand, forming a series of wrappings, and cut off the end of the twine.
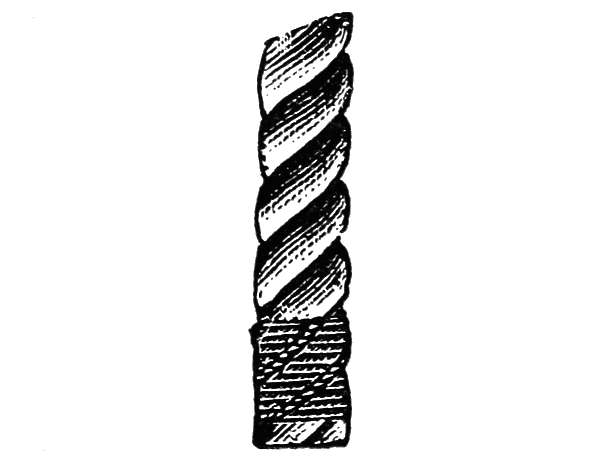
PALM AND NEEDLE WHIPPING
To point a rope first put on a stop at two and one-half times the circumference of the rope from the end, which will leave about the length for pointing. Unlay the rope to the stop, then unlay the strands, split a number of the outside yarns and make a nettle out of each yarn. A nettle is made by laying up the yarns with the finger and thumb left-handed. When the nettles are made up stop them back on the standing part of the rope. Then with the rest of the yarns, form the point by scraping them down to a proper size with a knife and marl them down together with twine. Divide the nettles, taking every other one up and every other one down. Pass three turns with a piece of twine which is called the warp very taut round the part where the nettles separate taking a hitch with the last turn. Repeat this process by placing every alternate nettle up or down, passing the warp or filling, taking a hitch each time until the point is to its required length. You may either form a bight with the last lay by passing the warp through the bights, haul them taut, and cut them off, or, work a becket in the end by taking a small piece of rope one-fourth the size of the rope, form a bight, unlay the ends, and twist the six strands up again by two taking some of the inside yarns and lay them up as the rope, then short splice that and the becket together and marl it down.
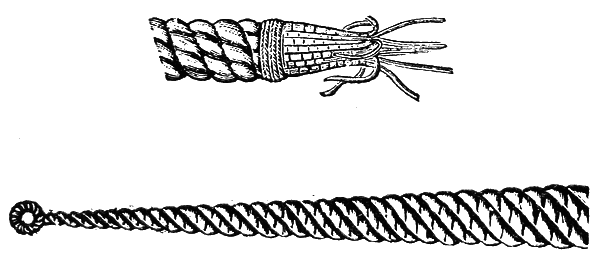
POINTING A ROPE
The Wall Knot is used for finishing off seizings forming a shroud knot. It is also used on the end of a rope to prevent it unreeving. To form a wall knot first unlay the rope so that the strands appear as in the first diagram below.
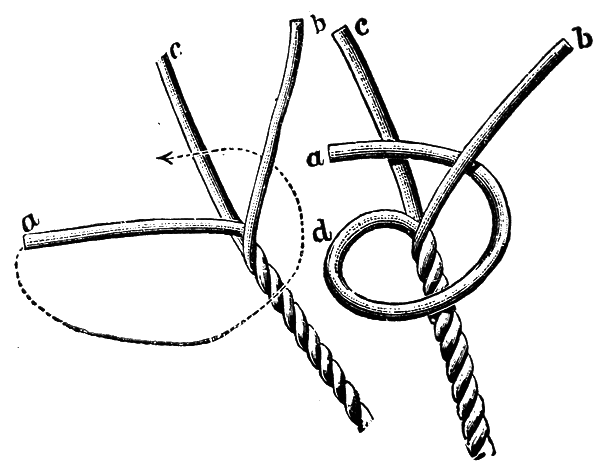
WALL KNOT
Holding the rope with the left hand, with the right lead strand A in the direction indicated, viz., under strand B and up between strands B and C as in the second diagram.
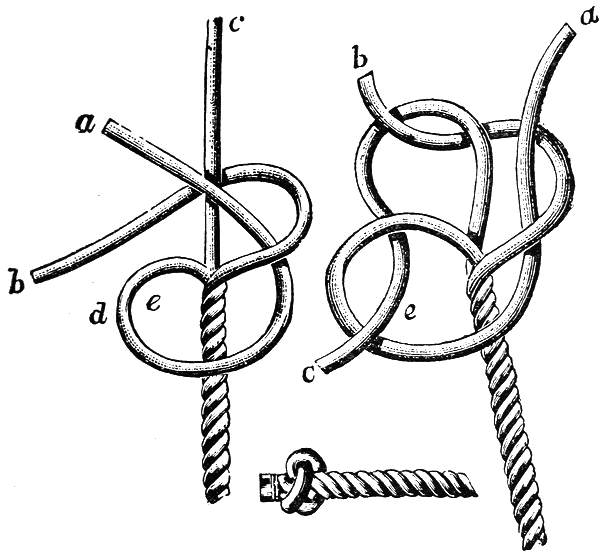
WALL KNOT IN MAKING AND FINISHED
Then with strand B form a similar loop, enclosing strands A and C and bringing the end of strand B up between A and D as in the first diagram above.
Now with strand C form a similar loop enclosing strands B and A by leading the end of strand C up through the loop E in strand A as in the second diagram. Finally work all parts well taut, whip the ends of the strands together and cut off short, at the bottom diagram.
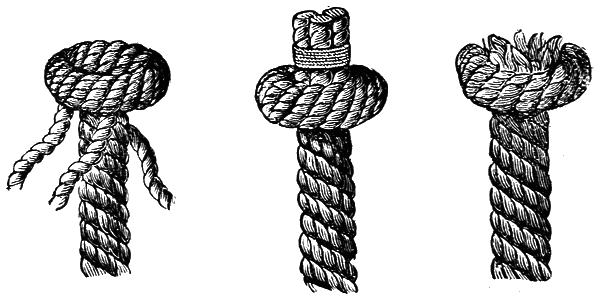
CROWNING
A Double Wall Knot is formed by making the single wall knot first and not hauling it taut. Then take one end and bring it underneath the part of the first walling next to it and push it up through the same bight. Do the same with the other strands, pushing them up and through two bights. If made this way it will have a double and a single crown. A double wall double crowned is a continuation of the double wall. The strands are laid by the side of those of the single crown and pushed through the same bight in the single crown and down through the double walling as shown in the illustration. The middle figure shows one method of finishing a single wall by cutting off the strands and tying them with twine. The double crowned wall knot may be finished by a Lark’s Nest by interlacing the loose strands one within another by a requisite number of turns over the pudding. This forms a knot at the end of the rope.
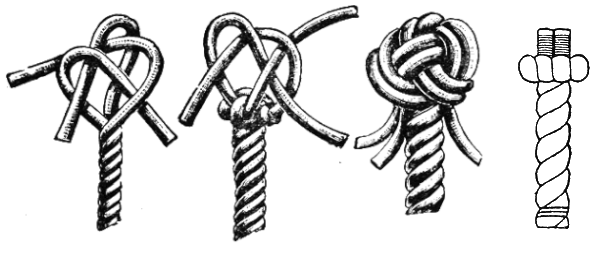
CROWN KNOT MANROPE KNOT STOPPER KNOT
The Crown Knot or crowning forms the basis of other knots. To make a crown pass the bights of the first and second strands over the second and third strands respectively, dip the end of the third down through the bight of the first and work the knot into shape. Its construction can be followed very easily in the diagram. Double crowning is done by following round each strand again alongside the first lead.
The Manrope Knot is used for securing the upper ends of the gangway manropes. It is made by first forming a wall and then crowning it as in the first diagram. Then follow round the wall again and lastly follow round the crown, when the finished knot will appear as in the second diagram.
The Stopper Knot is used in the ends of stoppers and is made by forming a wall and half a wall, putting on a good whipping about two or three inches from the knot and cut off the ends.
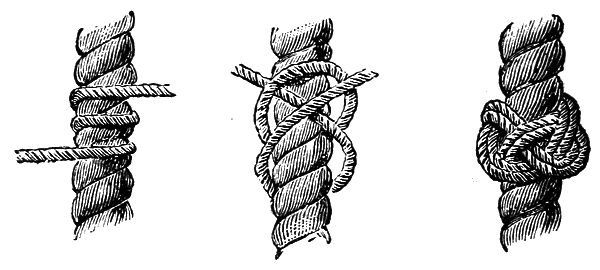
TURK’S HEAD KNOT
The Turk’s Head Knot is worked upon a rope with a piece of small line. Take a clove hitch slack with the rope with the line round the rope. Then take one of the bights formed by the clove hitch and put it over the other, pass the end under, and up, through the bight which is underneath. Then cross the bights again and put the end round again, under, and up, through the bight which is underneath. After this follow the lead and it will make a turban of three parts to each cross.
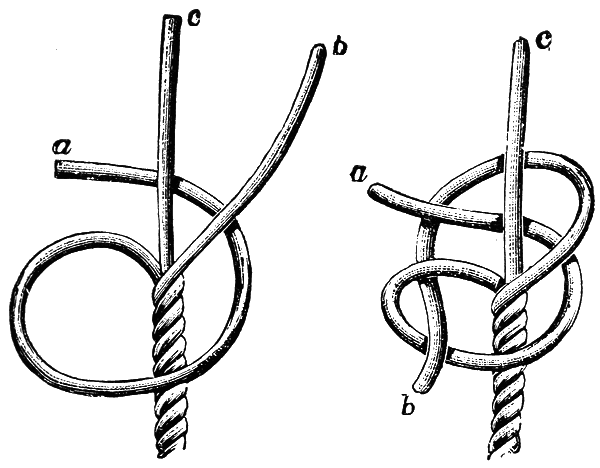
SINGLE MATTHEW WALKER KNOT
Single Matthew Walker Knot is used for securing the standing part of a rope or making beckets for buckets, etc. To make this knot begin as for the wall knot but pass the first strand A under both B and C as shown in the first diagram. Then pass B under both strands C and A, and bring up through the first loop formed by A, shown in the second diagram.
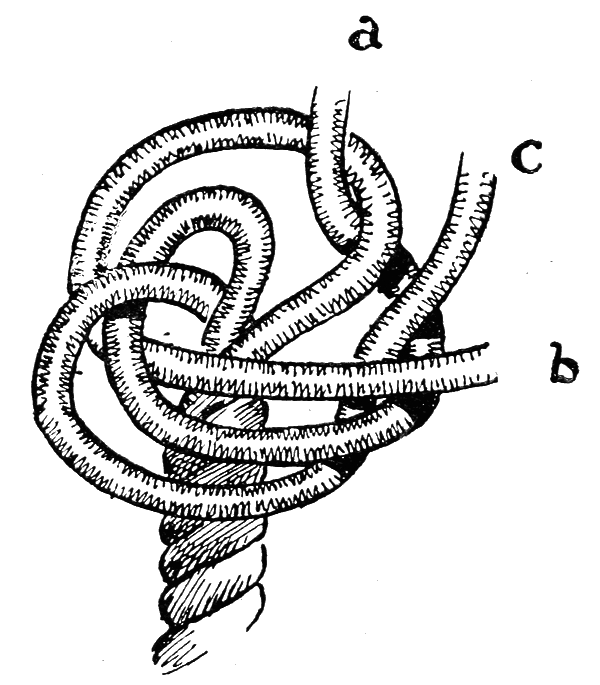
THIRD PROCESS OF MATTHEW WALKER KNOT
Similarly pass C under A and B and bring up through the loops first formed by A and B as seen in the third diagram.
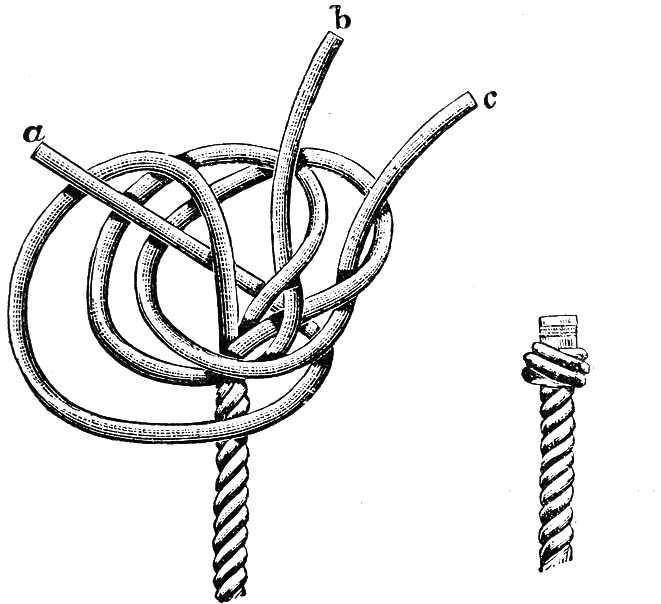
DOUBLE MATTHEW WALKER OPEN AND TAUT
The Double Matthew Walker is easily made when one notices the difference between a single Matthew Walker and a wall knot. In the wall knot each strand is simply interlaced with the strand immediately on its right coming up through the loop formed by the second strand. In the single Matthew Walker each strand interlaces the two strands to its right coming up through the loop of the third strand. Another evolution in the same order gives the double Matthew Walker. It is formed as will be seen in the diagram by making each strand contain its own loop, the other two strands and its own end, that is, each strand leads up through its own bight after interlacing the other two.
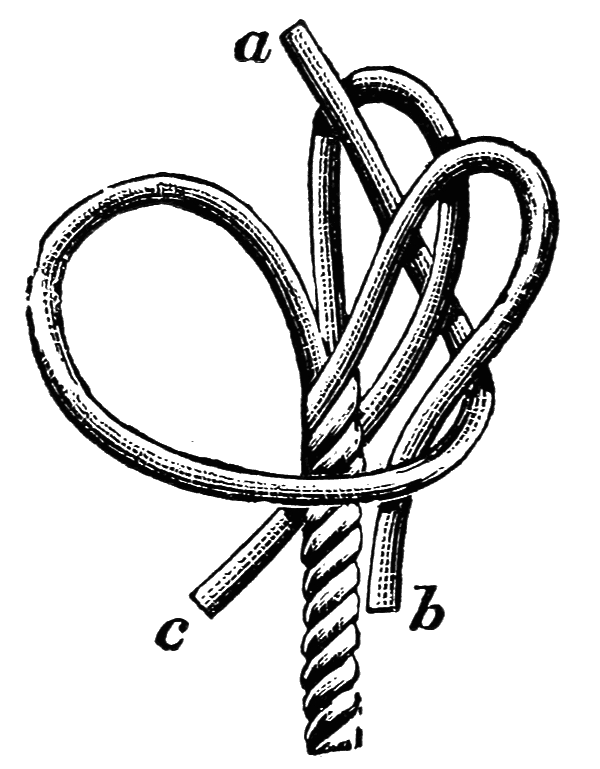
SINGLE DIAMOND KNOT MAKING
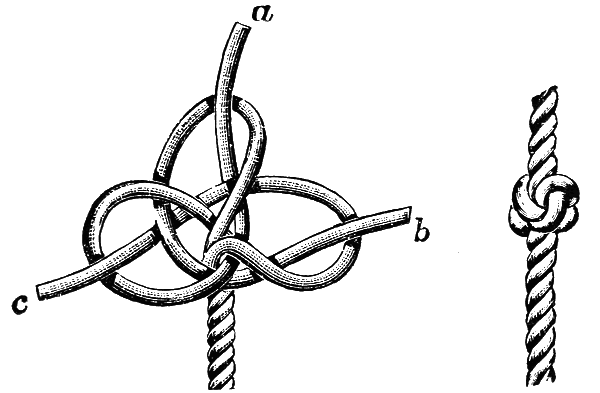
The Single Diamond Knot is made some distance from the end of a rope. It is therefore necessary to unlay the rope considerably more than is required in the preceding knots and as the strands will have to be laid up again, try to preserve the original lay in the strands as much as possible. Now bring each of the three strands down alongside the standing part of the rope, thus forming three bights, and hold them thus with the left hand. Take the first strand A as shown in the diagram and putting it over the next, B, bring it up through the bight of the third strand, C.
DIAMOND KNOT
Take the end of the second strand over the third and up through the bight of the first. The last strand is brought over the first and up through the bight of the second. Haul taut and lay the rope up again. The first diagram above shows the loops in their places with the ends through them before they are hauled taut and the second diagram shows the completed knot.
DOUBLE DIAMOND KNOT
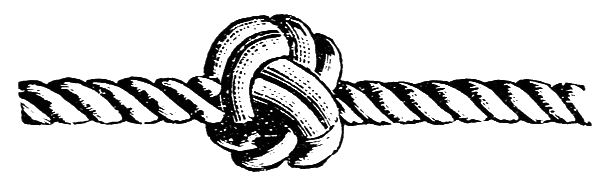
The Double Diamond Knot is made first like the single diamond and then the ends are made to follow the lead of the single knot through two single bights, the ends coming out on top of the knot. The last strand passes through two double bights. The ends are then hauled taut and laid up as for the manrope knot.
SHROUD KNOT
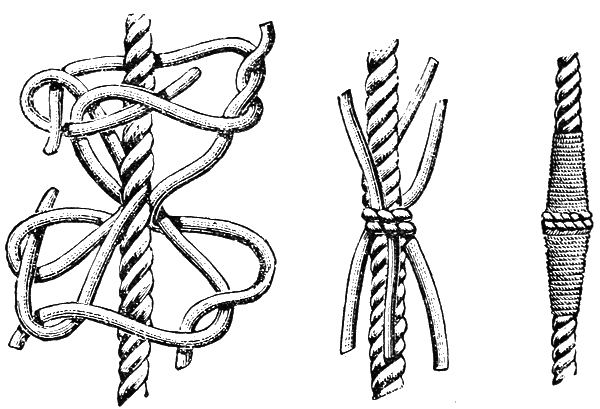
The Shroud Knot is of use in joining two ropes together, particularly in joining a stay or shroud that has been carried away. Each rope is unlaid the necessary length and they are then brought close together. A wall knot is formed on each rope with the strands of the other as seen in the first diagram. The completed knot is seen in the second diagram but to make a neat job the ends should be marled and served as in the third diagram.
SNAKING AND SEIZING
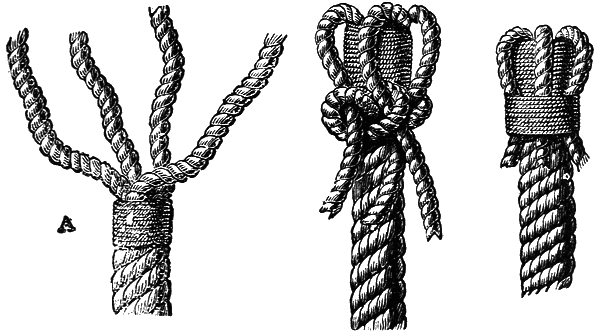
Snaking or Seizing is done by taking the end under and over the outer turns of the seizing alternately, passing over the whole. The whole may be whipped also with small twine. The ends of a four-stranded rope may be thus secured. The end is first whipped as shown at A in the diagram. The four strands are then opened out. They are then brought down over the end in loops and the strands tied together, as in the second diagram, or they may be simply brought down and bound to the cable with twine, as shown in the third diagram.
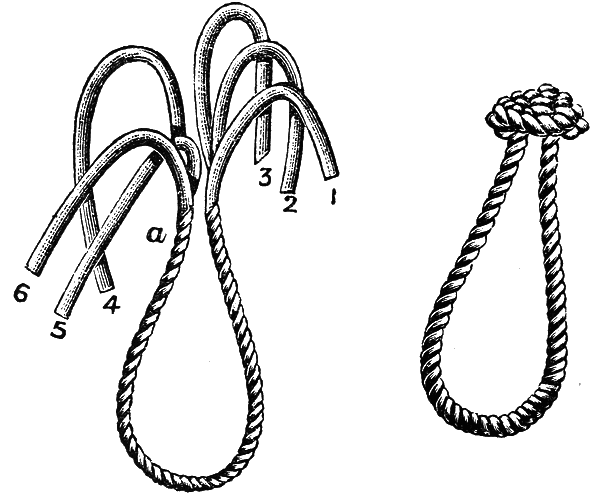
SPRITSAIL SHEET KNOT
A Spritsail Sheet Knot is made by unlaying both ends of a rope and bringing the two standing parts together as in the first diagram. Grasp both parts of the rope at A, with the six strands form a wall knot, that is, by passing 1 under 2, 2 under 3, 3 under 4, 4 under 5, 5 under 6 and 6 under the loop formed by 1. Now lay any opposite two of the strands across the top in an opposite direction and crown by passing the other four, each in turn, alternately over and under these two. Each of the six strands will then come out leading in a downward direction alongside the strands forming the first walling. Now follow round the walling again, when the strands will come through in an upward direction, each alongside a strand of the first crowning. Follow through the crowning once more and cut off the short ends, when a handsome and useful stopper knot will result as in the second diagram.