HAMMOCK MAKING
Reading edition
At the mention of a hammock one’s mind naturally reverts to the sailor and at the same time thinks of the pleasure a good hammock will afford under some shady tree or on a sheltered piazza. Hammock making is quite easy and the tools necessary are simple. First, a netting needle is required. There are two styles of these needles, which are shown in the diagram. In the top one the cord is brought round the end at A, up one side, round the pin at B and back the same side, the process being repeated on the other side of the needle. This needle is made of hardwood such as boxwood, and is 8 inches long by ¾ inch wide.
The needle shown in the middle diagram has the cord wound round it as in an ordinary shuttle.
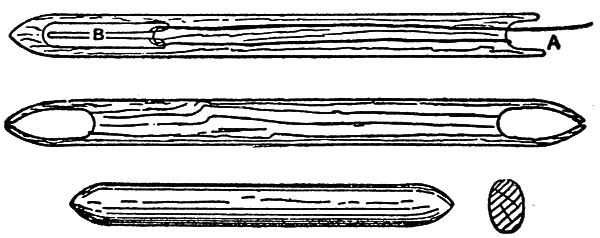
NETTING NEEDLES AND MESH STICK
The mesh stick, the lower illustration, which also shows a cross section, is made of hardwood or bone and is about 5 inches long and oval in shape.
At one end of the string to be used for the net, tie a loop and place the knot on a nail fixed in some convenient position. Place the mesh stick under the loop as shown by A in the diagram, put the cord under it, then pass the needle through the loop and pull the cord taut.
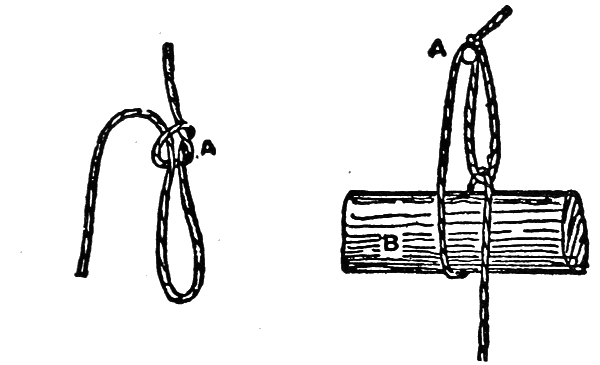
LOOP IN MESHING
FIRST STAGE OF MESHING
Now place the thumb of the left hand on the cord beyond the loop, as shown in the next diagram, and with a turn of the wrist of the right hand throw the cord to the position shown at B, then pass the needle under the loop C, through the bight B and down as at D and draw the knot tight.
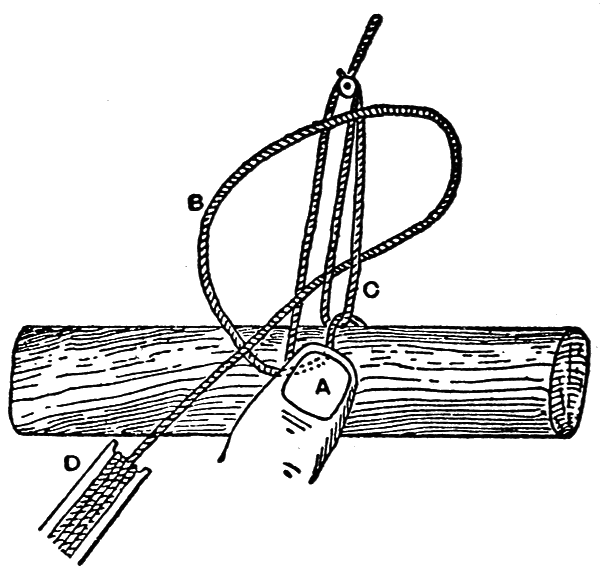
SECOND STAGE IN MESHING
When this has been done the loop will assume the shape seen in the diagram illustrating the third meshing stage. The cord must be held firmly with the thumb at A when pulling up the knots, as the uniformity of the meshes depends on this.
To continue the netting the stick is withdrawn and placed under A, in the third meshing diagram. The needle is then passed under the stick as before, brought through the loop B and as before to form another mesh. This is continued to make a chain of meshes, say forty-five or fifty, sufficient for the width of the hammock. The loop A originally tied is then unfastened and it will be found that the meshes are all of the same size.
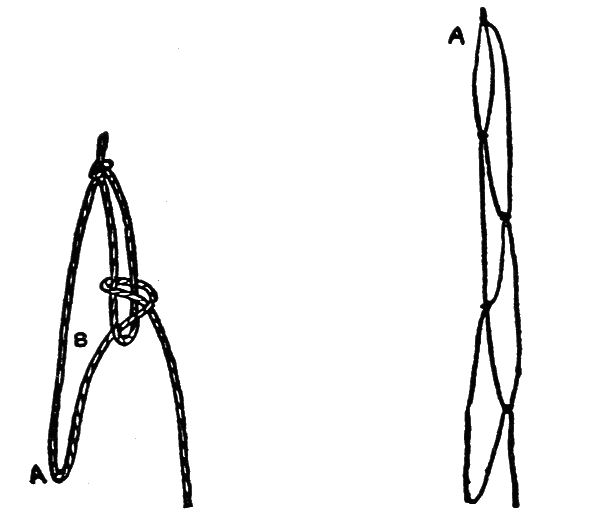
THIRD MESHING STAGE
CHAIN OF MESHES
The chain is then opened out at right angles to the line in which it was made, shown in the next diagram, and working across is begun by making a mesh at A, then at B, C, and so on, until the length of the first lot of meshes has been reached, when the net is turned over and another row of meshes worked in the same manner.
To insure uniformity it will be well to put the loops, D, E, F and G, separately on the hook or nail as the meshes under them are made. After a little practice a cord may be reeved through the top line of meshes, tied into a loop and passed over the knee and then over the foot as the work progresses.
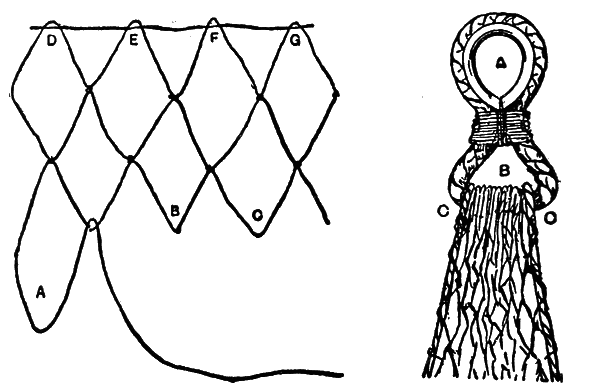
BEGINNING OF CROSS NETTING
HAMMOCK CLEW
An ash stick may be used at each end to which the end meshes are looped and tied, and a piece of codline may be passed through the side meshes on each side and attached to the ends of the sticks. At each end a stout cord is secured to the stick in the form of a triangle for hanging the hammock. Another plan is to tie a number of cords together by doubling them in the center and forming a loop, and each of the free ends is attached to one of the meshes of the net. The best plan is to reeve a cord about the size of a little finger through the end meshes and splice it into the form of a grommet. A thimble, A, is fixed in the end to which the supporting cords are attached and the cords which are reeved through the side meshes are spliced into the eye B at C. When these clews are used the net must be made longer than for sticks.