WORK AND PLAY FOR YOUNG FOLK.—XV. A ROPE YARN SPUN BY AN OLD SAILOR.
Reading edition
By C. W. Miller.
There are many things you boys can do with a rope, if you only know how. Let an old sailor spin you a “yarn” or two.
I. Splices.
If you wish to put up a swing, to make a lasso, to fasten a rope to your sled, or if you live on a farm and desire to make a halter or a hay-rope, you should know how to make an “eye-splice.”
The tools you will need are a hammer and a marline-spike. A sailor’s marline-spike is made of iron, and is about six inches long, like that in Fig. 1; but you can easily whittle from a bit of any hard wood a peg that will answer the purpose of a marline-spike.
To begin the splice, take a small rope, like a clothes-line (if possible, a new one in which the strands are unworn), and first untwist, or, as we sailors say, unlay, about four inches of it. Then wind thread tightly around the end of each strand to keep it in shape. Next bend the rope around into a loop of any size desired, letting the loose strands or cords cross on the upper side and project beyond the rope. Be sure that, as you hold the loop toward you, the rope bends toward the right.
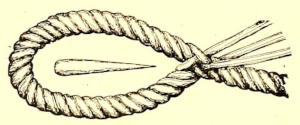
FIG. 1.—MARLINE-SPIKE AND EYE-SPLICE.
At the point of crossing, twist the solid or “standing” part of the rope the wrong way, so as to open it a little, and thrust the spike in between the strands, pushing it in until the strands are well apart. Now draw the spike out and put the end of the first loose strand into the enlarged opening. To do this easily you should insert the spike with its point toward the loose ends, so that, as you draw it out, you can follow it closely with the first end before the separated strands close. Draw the end up tight, as shown in the cut. Then take the spike and separate the next strand in the rope from the others, and insert the second loose end in the same way, and similarly place the third end under the third strand of the rope. At this stage, your splice will look like Fig. 1, and a little study of that diagram will show you, better than I can tell you, just how to insert the strands.
Continue the work, by passing the first end over one strand and under the next, and do the same with the second and third ends.
When each end has been woven in twice, take off the thread from the ends and cut about a third from the under side of each one, making it that much thinner than before. Bind the ends again with the thread, and weave each one under another strand of the rope. Again take off the thread and cut off half of what remains from the under side of each of the loose ends; replace the thread, weave under again, draw each end up tightly, and cut it off close to the rope. If you have carefully followed the directions, each end will pass over and under the strands alternately, and no two ends next each other will pass under the same strand.
You must always remember, in working with a rope, to twist every strand hard and tight, and to draw it snugly to place. And in making a splice, the rope should be pounded frequently with the hammer or a piece of wood, and rolled back and forth under your foot. This operation makes the strands sink into one another and look smooth and even.
Another splice, quite as useful as the one just described, is that by which the ends of two ropes are joined so firmly that they form one continuous rope. There are two forms of it, one called the “short splice,” and the other the “long splice.”
The short splice, is more often used, because it is quickly made, it does not waste much of the rope, and it is nearly as strong as the long splice. There is one objection to it: It makes part of the rope somewhat larger than the rest, so that it can not be run through a narrow pulley-block. The long splice, on the other hand, though using much more material, may be made without increasing the size of the rope at any point, and is, in fact, somewhat stronger.
To make the short splice, first untwist about eight inches of each of the two ends you wish to join, and bring them together in such a way that the ends of the untwisted parts are squarely and closely against each other as though they were one rope, while the six loose strands stand out all around, each one of the right-hand strands being between two of those on the left hand, or interlocked.
Now what you are to do is to weave the loosened strands of the right-hand rope into the untwisted rope of the left side, and the loosened strands of that rope into the solid part of the right-hand rope. To hold the two ends in place while you work, begin by drawing all three of the left-hand strands down over the right-hand rope, and tie them there with a piece of cord.
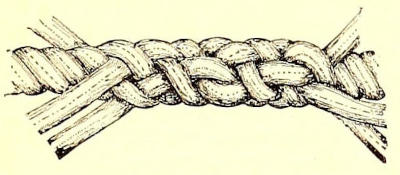
FIG. 2.—A SHORT SPLICE.
Now weave the three loose strands into the solid rope by the help of the spike, just as you did in making the eye-splice. When you have finished this side, untie the twine and weave the loose strands into the left-hand rope in the same manner. The directions given for making the eye-splice apply also to this splice. It must be well pounded and twisted back and forth until the ends work into the strands and it is smooth and firm; and this splice, too, will look better if part of the rope-yarns are cut off before weaving in the last time, but if you are not particular you may cut the ends off just as they are left in Fig. 2. To help you to see how the ends go under and over the strands of the rope, each one is marked in Fig. 2 with a different line of dots and dashes, and, by following any one line, you will learn exactly where that one strand passes in and out.
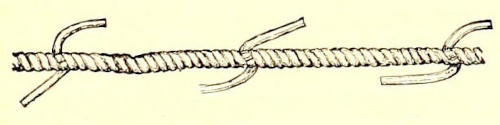
FIG. 3.—A LONG SPLICE, FIRST STAGE.
The long splice, though a little more trouble than the short splice, makes a much neater joining. For this splice, you must untwist three feet of one end of each rope and bring the two closely together as in making a short splice, with the loose ends interlocked. Next take one of the strands of the right-hand side and untwist it, or separate it from the rope an inch or two, and into the space it leaves vacant “lay” one of the loose ends from the other side. (By “laying” I mean twisting the strand tightly and pressing it into place.) Go on in this way, untwisting the strand from one side and laying in its place the strand from the other side, until the latter has only about eight inches free, while the one you have been untwisting has nearly six feet free. What you have now done is merely replacing a strand belonging to one rope by a strand from the other. Do the same thing on the other side; that is, untwist one of the strands of the left-hand rope and twist into its place a loose strand from the right-hand rope. When you have done this, your splice will look like Fig. 3, the six untwisted strands ending in pairs in three places. The pair in the middle will be three feet long each; while at the ends there will be one long and one short strand, although, as seen in Fig. 3, they all must be cut off short for the next operation.
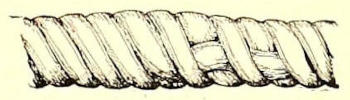
FIG. 4.—A LONG SPLICE FINISHED.
This consists in weaving the ends in, and it is done by forcing the spike under the strand next to the end you wish to weave in, passing the end through the opening, then over the next strand, and under the third, which you have opened in the same way. Now cut off a portion from the under side of the strand, pass it over and under once more, and cut off closely. Repeat this with the second strand of the pair, and your joining will look like Fig. 4, which represents a long splice finished. This figure, of course, shows only one woven-in end, the other being on the opposite side.
Having thus disposed of one pair of the loose ends, treat the other two pairs in the same way. Notice that the strands are nowhere turned back on themselves, but that they always work on in the same way they started; that is, those which turned out from the middle turn out to the end, while those that turned toward the middle (or those you untwisted to make place for the others) still turn toward the center, as they began.
II. Sennit, or Braid.
The first thing a boy learns when he goes to sea is to make braid, or, in sailors’ talk, “sennit,” and I think land boys will find it very convenient to know a few of the different kinds in use. All boys wish to make whip-lashes or to swing hammocks; and for those of you who own sail-boats, or even row-boats, there are endless uses for these braids. Fenders to protect the sides of boats from injury are best made from a short, thick piece of sennit; and many boats have a guard, made of about seven large strands, like Fig. 5, running all around just under the gunwale.
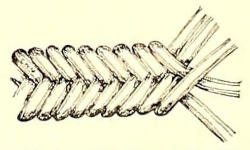
FIG 5.—THE SIMPLEST KIND OF SENNIT.
On a ship these braids are used to wrap around parts of the rigging, to keep them from chafing, so they are called “chafing-gear.” And the sailors make it by the barrelful, so that it will be on hand when needed.
In beginning a braid, tie a string around one end of the strands and fasten it to any convenient object, such as a hook in the wall or a door-knob, in order to keep the braid taut, as it is very important to draw the strands up snug and even every time. The simplest kind of sennit may be made of any uneven number of strands. It is shown in Fig. 5.
To begin, take five strands and separate them, holding three in the right hand and two in the left. First take the outside strand of the three in the right hand, pass it over the two next it, and lay it inside the two in the left hand. Now you have three in the left hand. Then take the outside strand of the three in the left hand, pass it over the two next it, and lay it inside of the two in the right hand. So you go on, always taking the outside strand from the side which has three together, passing it over its two neighbors, and laying it inside the two in the other hand. It is very easy, you see, and you will soon have a piece like that in the figure, in which the outside strand from the left side has just been laid over inside of the right. You can make this kind of braid of any uneven number of strands, and the only rule is always to bring the one from the outside of the greater number over all its neighbors to the inside of the smaller number.
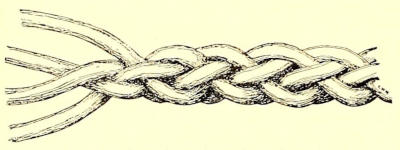
FIG. 6.—A ROUND SENNIT.
To make a whip-lash, you should try a braid like that shown in Fig. 6, which is a round sennit. The one in the drawing is made of large round strands to show the braid better; but for a lash you should take flat strips of leather, and taper them to make your lash the proper shape.
This braid is made of four strands. Take two in each hand, pass the outside strand in the right hand under its neighbor and also under the inside strand in the left hand. Bring it up between the two in the left, and lay it over the inside strand next to it, placing it at last beside the one strand in the right hand, only inside of it instead of outside, where it was first. Do the same with the outside strand of the left hand; that is, pass it under the one next to it and the inside one of the right hand, bringing it up between the two in the right, turning it over the inside one, and laying it next to the one remaining in the left hand, on the inside. Keep on doing this and you will notice that the same two strands always stay in the same hand, but each turn of one interlocks it through the two in the other hand.
In Fig. 6 the outside strand on the right side has just been passed under and up between the two on the left side, over the inside one of the left and beside the strand on the right.
This method of braiding is pretty to use in covering many things, round, square, or tapering. Even a turned vase and many articles of varying shape may be covered by it. Where the object is wide the strands cross each other at a wide angle, and where narrow, run more nearly parallel to the object, but in every case it is covered. Some very pretty things are made with this braid.
For a flat braid, which, when made of rope-yarns or cord, is very nice for a dog or goat harness, you will need the “French” sennit shown in Fig. 7. At sea, it is sometimes made eight or ten inches wide, and half an inch thick; but you will not need it so heavy. To begin, take nine strands as in the figure, though it may be made of any other number.
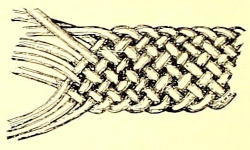
FIG. 7.—THE FRENCH SENNIT.
First spread the strands out flat, take the middle one (in this case, No. 5), bend it to the right and over No. 4, which is bent to the left. Take No. 6, bend it to the right, and under No. 4. Take No. 3, bend it to the left, over No. 5, and under No. 6. Take No. 7, bend it to the right, over No. 4, and under No. 3. Take No. 2, bend to the left, under No. 5, over No. 6, and under No. 7. Continue in this way until all the strands are in. Then take No. 5, which, you remember, was bent to the right, and now occupies the outside place on that side, bend it up and over No. 6, which is next it, and then braid it in alternately over and under just as before. Braid in the outside strand from the left side in the same manner. Go on in this way, and the braid will look like Fig. 7. So many directions make it seem hard; but when you try it with the figure before you, you will find it very easy. If the braid is made from an even number of strands, as in Fig. 8, the strands will begin on both sides by turning over; but if the number is uneven, as in Fig. 7, the strands on one side will begin by turning under.
Be careful to draw the strands even and snug. This braid has one great advantage over others. It may be split into two or more narrower braids, as you see in Fig. 8, and afterward braided together again, leaving an open loop, or a sort of button-hole. A glance at Fig. 8 will show you just how this is accomplished, and that it is an easy task.
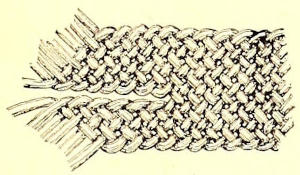
FIG. 8.
In a navy hammock, the cords which support the body are woven into a flat braid which starts with two or three strands and has the others gradually woven in, two at a time, one on each side. This finishes it off very neatly, and keeps the cords from tangling, and is a great improvement on simply putting the cords through the ring, which has a bungling appearance, as they are generally in a snarl. This braid may be more easily made by “putting the cart before the horse”; that is, by beginning at what is apparently the wrong end. Take the cords double length, and draw them all through the ring, until half the length is on each side. There will be twice as many strands as you had cords. Begin a flat braid, as in Fig. 8, until all the strands are woven in. If there are twelve, you then leave out the outside strand on each side and continue the braid with ten; leave out two again, and continue with the middle eight; and so on until you have but two left. Tie these firmly together, and the braid will not work loose.
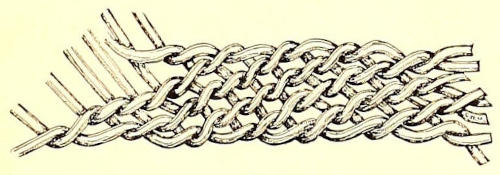
FIG. 9.
The queer-looking flat open-work braid shown in Fig. 9 is much used at sea, but it is hard to make of anything but tarred hemp rope-yarns, because it always inclines to loosen. The tarred rope does not slip like ordinary cord. In this braid, the strands do not cross the braid, but each one simply locks into its neighbor. To make it, you twist the first strand around the second, the second around the third, the third around the fourth, and so on across the braid. In the figure, the first has been twisted around the second, and the second is ready to twist around the third.
These braids can be easily learned by following the descriptions, and by referring to the cuts. Girls may use them in many ways; that shown in Fig. 5 is pretty for the hair. But I need not point out the various uses to which they may be put, for I am sure you all will discover them for yourselves.
III. The “Maderwocker.”
This object bears no relation to the famous Jabberwock; in fact, it is simply a knot in common use among sailors; and the mysterious-sounding name is merely a very bad way of pronouncing “Matthew Walker.” Matthew Walker was an inventor, and, though his name has become gibberish, his knot is as good as ever, and is a very useful one. Whenever a rope is put through a hole and held by a knot, there is the place for a maderwocker, one that is not clumsy, will hold fast, and never loosen. The boys can use it on sled-ropes, swings, rope handles to boxes, and in many other places.
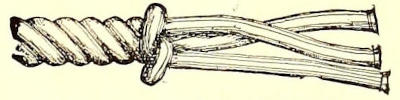
FIG 10.—A SINGLE MADERWOCKER.
To make it you must first untwist, or unlay, about six inches of one end of the rope, and tie a string firmly around it where the knot is to be. Now, hold the rope in your left hand with the untwisted ends standing up, take one strand and bend it downward and around the second. Do not draw it tight, but leave a loop. Next bend the second strand around the third, and the third around the first, bringing the third one up through the loop left in the first. Draw all the ends tight and snug, and the knot will look like Fig. 10, which is a “single maderwocker,” or “single wall.”
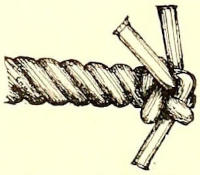
FIG. 11.—A CROWN.
If this knot is not enough you may put a “crown” on it. Bend down the first end and leave a loop; bend the second over the first, the third over the second, and put the end through the loop left in the first. Draw all the ends down snug and cut them off, and you will have a neat and strong knot like Fig. 11. Perhaps you will understand this crown better by looking at the end of the braid, Fig. 13.
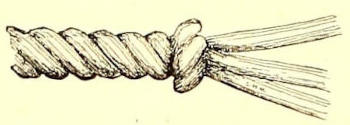
FIG. 12.—A DOUBLE MADERWOCKER.
A “double maderwocker,” or “double wall,” is a variety of this knot, made in the same way, excepting that each strand passes around two others, instead of one, as in the single maderwocker. Thus, the first strand is bent down and around the second and third, the second around the third and first, and up through the loop of the first; the third around the first and second, and up through the loop of the second, which also has been left a little loose. Draw all snug and you have a larger knot than the single one. (See Fig. 12.) You can finish it either by putting a “crown” on it, as described before, or by binding the strands close to the knot and cutting off the ends.
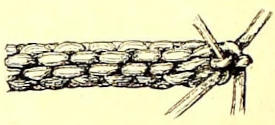
FIG. 13
A series of crowns makes a very pretty and useful round braid like Fig. 13. The one represented has but four strands, though you will notice that it looks as if it had eight. Any number of strands may be used for this, and it will always appear to have double the number it really has. To make it look even and smooth, you must always bend the strands down in the same way; that is, always bend them to the right or always to the left. Girls will find this pretty cord convenient for many things; made of fine silk braid, it is nice to hang a fan from the belt, or for other purposes. Made of heavier materials, boys, I am sure, will find use for it.