PAINTING OF DESIGNS
Reading edition
By means of the decorations on the vessels the potter expresses her personality. The type of design used by any one potter is very constant, and is distinctly individual. It is a comparatively easy matter, by an inspection of the design alone, to distinguish the vessels made by one potter from those of another.
The designs are planned in several different ways. Maria Martinez sits with the bowl in her hands for a few minutes doing nothing; apparently she is working out in her mind the combination of elements which she will use. Designs so conceived are generally simple. Maximiliana Martinez begins painting almost at once. While she is working ideas occur to her and are incorporated. Occasionally, after the painting has been completed and the vessel set aside, she will pick it up again to add some detail. This method of working is apt to cause somewhat involved figures. Antonita Roybal, in choosing her designs, refers to drawings of her own, or to photographs which have come into her hands, of old San Ildefonso vessels. This potter uses a pencil to outline very sketchily the design upon the vessel, as an aid in obtaining the proper symmetry. The figures obtained in this manner are usually very elaborate.[51]
The first lines drawn in a design are almost without exception the enclosing lines under the rim. These are followed by the enclosing lines near the shoulder (in the case of an olla), or near the bottom of the interior (in the case of a bowl). When the design consists of panels, the vertical division-lines are then added. If there are to be four panels, one division-line is drawn, and then the one on the opposite side of the bowl, dividing the surface into halves. Each of these halves is then bisected. The next step is to double all the vertical division-lines. Occasionally each quadrant is judged by the eye only, and the division lines are drawn in sequence about the vessel. When there are to be either more or less than four panels, they are outlined one after the other. No measuring instrument of any kind is used.
After the skeleton of the design has been completed, the outlines of the figure within each panel are drawn. All the lines are first placed in one panel, then the second panel is finished, and so on, until all have been filled with the outlines. All the areas on the vessel that are to be colored black are then filled, followed by the areas which are to be red. The strokes taken in outlining are not always made in the same order in the various panels. Such variation is entirely natural and should be expected in work done without the use of a visible pattern.
When a design is attached to the lower enclosing line of a panel, it usually consists of a repetition of some small figure of one or two elements. The position of such added figures has absolutely no relation in the mind of the potter to the panel-design.
When a design consists of a repetition of figures not enclosed within panels, the painter always refers, before adding another figure, to the amount of the surface as yet unfilled. The correctness of the painter’s judgment is therefore easily determined by the proportions of the last figure in the design as compared with the remaining figures. As a rule, with the product of the present-day potters of San Ildefonso, it is exceedingly difficult to determine in a finished vessel, which of the figures was the last one drawn.
In designs which consist of a single figure, or of two or more figures, with several complex elements, the development of the design upon the vessel is necessarily at variance with that described above. As a general rule, each element is completed, including the filling of areas, before the next element is outlined. Similarly, each figure is finished before the next is begun.
In considering generally the ornamentation of San Ildefonso vessels, a distinct group-similarity can be observed. The polychrome vessels are painted in black and orange-red upon a white base. The red-ware vessels are decorated only in black. The designs usually consist of several almost identical figures, each composed of a small number of rather simple elements, in which curved lines are common. And yet, in spite of this almost indefinable similarity among the vessels, the differences between the designs made by different potters of the village are clear-cut and distinct.
Maria Martinez specializes in constricted-mouthed and similarly shaped bowls of polychrome ware. Her lines are relatively narrow, and the black of the design is very uniform in color. She uses panelled designs almost exclusively. The elements within the panels are simple, and few in number. Her work is easily recognized because of its simplicity and pleasing composition (see pl. 6). Maximiliana Martinez generally confines herself to red ware in the form of small ollas and small bowls with a slightly constricted lip. Her lines are somewhat wider and more uneven than those of Maria, and the black is of varying shades. As a result of her custom of developing the design as the work progresses, the figures are rather complex and intricate, or, as the Indians themselves say, “mixed up”. The outstanding characteristic of her work is the use of one or more elements entirely detached from the figure proper. Antonita Roybal devotes most of her time to making large ollas of red ware. Her lines are relatively broad, often indeed of double width. Her blacks are also uneven. The designs upon her vessels are usually composed of two or four very large, complex figures, in which spiral curves are conspicuous. Dotting, crosshatching, and filling of many small areas characterize her work. The products of a man painter, Julian Martinez, are easily recognized by the abundant use of very narrow lines. The figures, which are usually composed of many intricate elements, impress one with the amount of detailed and careful work lavished upon them. Julian has obviously been strongly influenced by the technique of modern Hopi potters, such as the famous Nampeo, whose work he of course often sees in the curio-stores and in the State Museum at Santa Fe.
In the following pages typical designs of Maria, Maximiliana, and Antonita are discussed in detail, with the aid of figures upon which the direction and order of the strokes have been indicated. These drawings are given in order to amplify and clarify the general statements made above.
Drawing No. 1 (fig. 9); original by Maria Martinez. This design was on a constricted-mouthed polychrome bowl, and consisted of four identical panels, each four and one-half inches long by two and one-half inches wide. The work was divided into four distinct sections, or stages, each of which was completed in all four panels, one after the other, before the next stage was begun.
First stage (fig. 9, a); construction of the framing lines. Lines 1-4 are drawn completely around the bowl; then lines 5-8. The corresponding two pairs of lines are then drawn upon the other half of the bowl, thus dividing the space into four sections.
Second stage (fig. 9, b); placing of the outlines within each panel. The first three lines drawn (9-11) divide the panel into three triangles. Then the details are
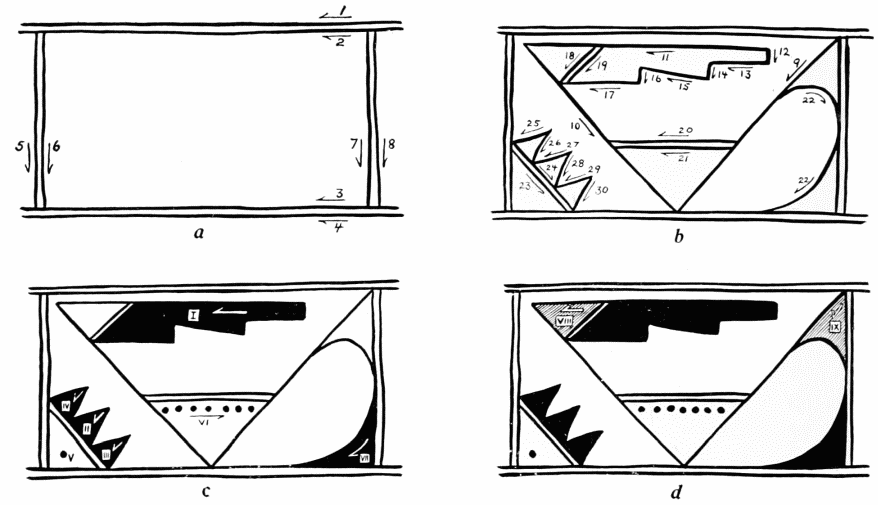
Fig. 9. The growth of a polychrome design as painted by Maria Martinez (the shading indicates red).
outlined in each triangle in turn. When the outlining of one panel has been completed, each of the other panels is treated in turn in the same manner. The work of Maria is noteworthy in that the order and direction of the lines and the filling of spaces is hardly ever changed from one panel to the next.
Third stage (fig. 9, c); filling certain areas with solid black paint. The largest area (I) is always filled first. No order is followed in filling areas II, III, and IV, and in making the dot (V). In one panel, IV is filled before II, in another V precedes the other three. After this the dots (VI) are placed below line 21. In the different panels the number of these dots varies from six to eight. The last area filled in this stage is the triangle VII. When the first panel has been completed the other three are treated in like manner before the fourth stage is begun.
Fourth stage (fig. 9, d); filling of areas with red paint (shown in the reproduction by shading). In some panels area VIII precedes area IX, in others the reverse is the
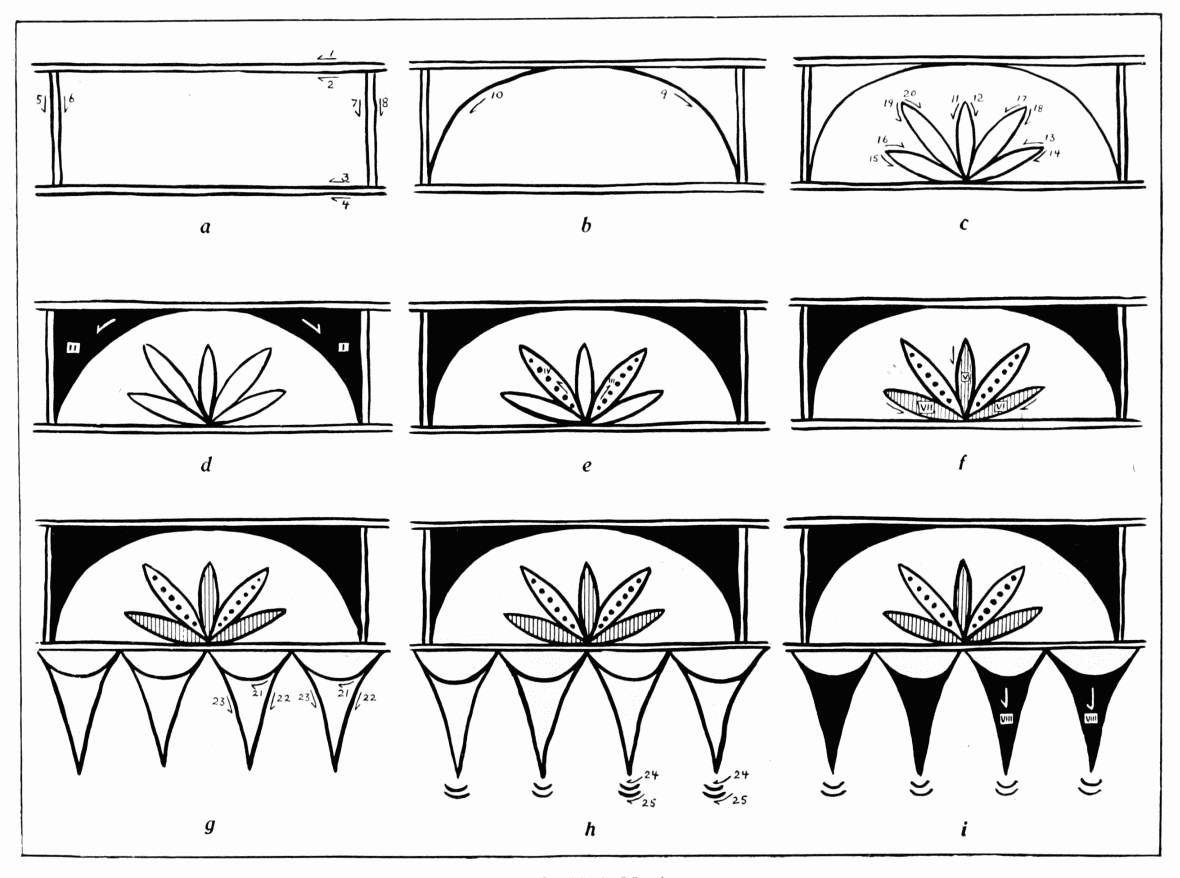
PLATE 32
Design by Maria Martinez
case. With the completion of this fourth stage in all the panels, the painting of this comparatively simple design is finished. The time consumed was twenty-five minutes.
Drawing No. 2 (pl. 32); original by Maria Martinez. This design may be placed upon either a constricted-mouthed bowl or an olla-bowl. It is made up of five identical panels. During the painting the bowl is turned counterclockwise. There are eleven distinct stages.
First stage (pl. 32, a); the enclosing lines of the panels are produced. Each panel is four inches long and one and a half inches wide. The horizontal lines (1-4) are drawn completely around the bowl before the dividing lines (5-8) are drawn.
Second stage (pl. 32, b); lines 9 and 10 are drawn, dividing each of the five panels into a semicircle and two triangles.
Third stage (pl. 32, c); the plumes are outlined in each of the panels by means of lines 11 to 20.
Fourth stage (pl. 32, d); the two triangles (areas I and II) are filled with black pigment. Sometimes area I is filled first, sometimes area II.
Fifth stage (pl. 32, e); when the triangles in all five panels have been filled, the dots are placed in two of the five plumes in each panel (areas III and IV). These dots are sometimes six in number, sometimes seven. They are painted from the base of the plume upwards.
Sixth stage (pl. 32, b); areas V to VII are filled with red pigment, thus completing the panel-design.
Seventh stage (pl. 32, g); now that the design in the panel has been finished, the second half of the figure, that below the bottom enclosing line, is begun. A series of small semicircles (lines numbered 21) are appended to the lowest enclosing line. The position of the semicircles bears no relation whatever to the series of panels. Three and a half to four semicircles fall below each panel or a total of from seventeen to twenty in the entire extent of the design as it encircles the vessel.
Eighth stage (pl. 32. g); by means of lines 22 and 23, a triangle is outlined below each of the semicircles.
Ninth stage (pl. 32, h); a very small semicircle (24) is drawn just below the point of each triangle.
Tenth stage (pl. 32, h); another similar semicircle (line 25) is drawn just below line 24.
Eleventh stage (pl. 32, i); the triangles (areas numbered VIII) are filled with black pigment.
Although this figure is based upon the panel-design, it differs from pure panel-decoration in the use of a series of simple figures appended to the bottom enclosing-line of the panel. The time required to paint this design was thirty-five minutes.
Drawing No. 3 (pl. 33); original by Maria Martinez. This design is of an entirely different type, in that there is no use of a panel. It was placed upon a constricted-mouthed bowl.
First stage (pl. 33, a); the enclosing lines (1, 2) are drawn around the rim of the vessel. These are immediately followed by the three lines (3 to 5) which form the outlines of the five spirals composing the design. The proportions of the figures were determined by constantly watching the position of the first spiral as the bowl was turned counterclockwise.
Second stage (pl. 33, b); the outlines of the details (lines 6 to 17) are drawn on each spiral in turn.
Third stage (pl. 33, c); the outlining is completed by adding to each spiral a horizontal triangle at the base of the curve. It is interesting to note that line 18, the first of the group 18 to 21, was the first one drawn, although it was entirely detached at that time from the main figure.
Fourth stage (pl. 33, d); the filling of areas is begun by painting the four small triangles on the upward curve of the spiral (areas I to IV). The order in which they are filled is apt to vary with the different spirals.
Fifth stage (pl. 33, e); the large triangle at the base of the spiral (area V) is filled with black pigment.
Sixth stage (pl. 33, f); the triangle at the bottom (area VI) is filled in each unit.
Seventh stage (pl. 33, g); this consists in placing a series of dots along the median line of the leaf-shaped area in the base of the spiral. In the various spirals these dots vary in number from eight to ten.
Eighth stage (pl. 33, h); the design is completed by filling the red areas (VIII and IX). In the first spiral so treated, area VIII was filled first, but in all the others area IX preceded area VIII.
The base of each spiral is four and one-half inches long. The width of the design is three inches.
Drawing No. 4 (pl. 34); original by Maximiliana Martinez. This rosette was placed in the interior bottom of a small constricted-mouthed bowl of red ware. A cloud-design which was painted on the rim of the same bowl is described and illustrated in fig. 6.
First stage (pl. 34, a); the outlines of one set of four leaves are drawn (lines 1-8).
Second stage (pl. 34, b); the areas within these enclosing lines are hatched (areas I-IV). These four areas are filled in clockwise rotation.
Third stage (pl. 34, c); the same areas (numbered V-VIII) are crosshatched, starting at the tip of each area and working towards the centre.
Fourth stage (pl. 34, d); four more leaves are drawn between the four already made. After lines 9 and 10 are drawn, the area between them is filled with black pigment, leaving an oblique white bar, before lines 11 and 12 are placed upon the vessel. Each of the four leaves is entirely completed before the next is begun.
Fifth stage (pl. 34, e); this consists in the placing of four lines (17-20) at the end of each of the four longer leaves. These four groups of lines are drawn upon the design in clockwise rotation.
Sixth stage (pl. 34, f); at this point Maximiliana glanced at the drawing which the writer was making in his notes. By accident the ends of the shorter leaves had there been made more pointed than the actual painting. When she saw this, she pointed the tips of these leaves with black to make them correspond in shape to the writer’s drawing.
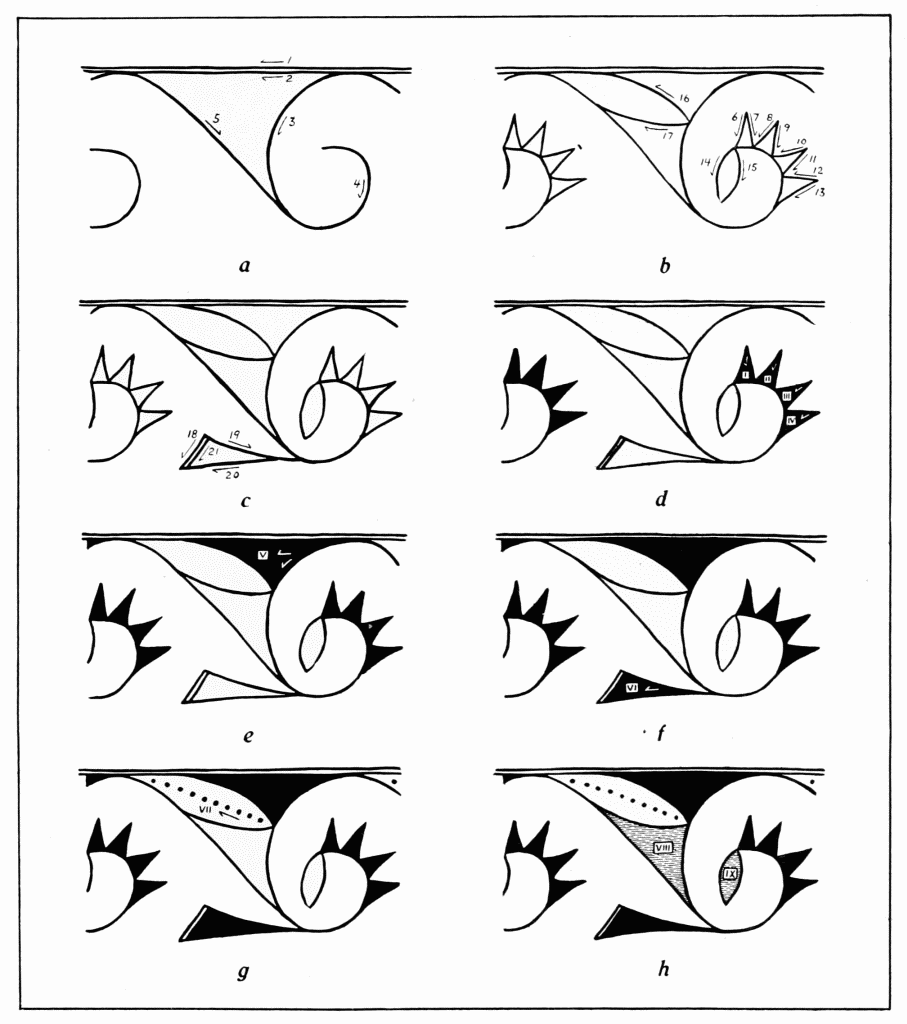
PLATE 33
Design by Maria Martinez
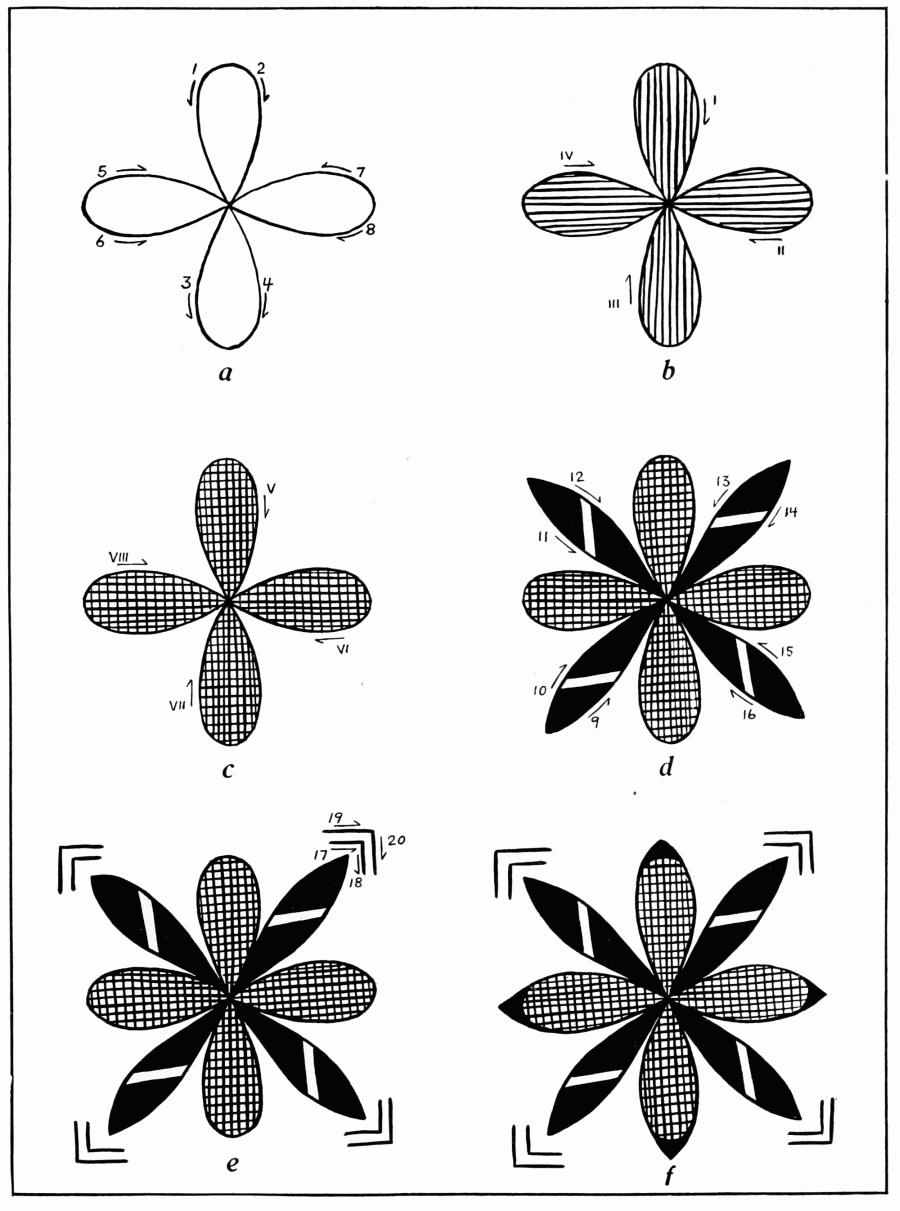
PLATE 34
Design by Maximiliana Martinez
This is an excellent example of the type of work done by a painter who develops her pattern while drawing it. The contrast between this and the simple strength of the first three designs (fig. 9 and pls. 32, 33) should be noticed.
Drawing No. 5 (fig. 10); original by Maximiliana Martinez. This is a border decoration that was applied to the edge of the constricted-mouthed bowl on which was produced Drawing No. 4.
First stage (fig. 10, a); this is the drawing of the two enclosing lines (1 and 2) about the lip of the bowl. These are followed at once by 3 to 5, which outline three small semicircles. Eight of these triple semicircles complete the circumference of the bowl.
Second stage (fig. 10, b); the three semicircles are filled with dots of pigment, two in each of the upper ones, three in the lower.
Third stage (fig. 10, c); the three small lines are added to the lowest of the three semicircles.
The painting of the rosette (pl. 34) and the eight sets of semicircles took just sixteen minutes.
Drawing No. 6 (pl. 35); original by Antonita Roybal. This elaborate decoration was placed upon a large red ware olla. Antonita, it may be noted, specializes

Fig. 10. Raincloud design by Maximiliana Martinez
Fig. 10. Raincloud design by Maximiliana Martinez
in vessels of this sort, and her designs, while not slavishly repeated, all have a strong family resemblance, due to her bold use of scrolls and step-figures. The small upper drawing illustrates the method by which the design under consideration is applied to the vessel. In the larger one it is projected flat; the centre circle represents the mouth of the olla. The time taken for painting the various parts of the pattern is incorporated in the description; the total time at the end of each stage being given immediately thereafter.
Framework lines. The heavy double-width line forming the middle of the central square is drawn first. Then two narrower lines are drawn, one inside and one outside, thus completing the square (sixteen minutes; 00:00-16:00).
The two lines encircling the mouth of the olla are next produced (four minutes; 16:00-20:00).
Neck-design within the square. Each of the four corners of the square is ornamented with a small scroll-ended element. Each element is first outlined and then filled with black before the next is begun (twelve and one-half minutes; 20:30-32:00).
Small irregularly placed spots are then dotted into the remaining surface within the square (six minutes; 33:00-39:00).
The medallions. Appended to each of the four corners of the original square is a flower-like medallion. The drawing of each is done as follows. The outer line is first traced, then the inner one. Next the inner part is filled with black, except for a narrow band across the middle. To the exterior ring are added the outlines of the nine radiating elements. As a last step these are filled with black. The olla is then turned counterclockwise and the next medallion is begun.
Each medallion is completed more quickly than the last. The time: No. 1, ten minutes (39:00-49:00); No. 2, eight minutes (49:00-57:00); No. 3, seven and one-half minutes (57:00-64:30); No. 4, six and one-half minutes (64:30-71:00).
The side patterns. Each of the four sides of the square bears a design composed of two scrolls with a double stepped element and two long appendages between them. Each design is completed before the next is begun. The drawing proceeds as follows:
1. The outlining of the scrolls and the drawing of the crossbar between them.
2. The outlining of the central stepped figures.
3. The filling of the stepped figures with black.
4. The outlining of the two long appendages between the scrolls.
5. The filling of the appendages with black, leaving two narrow crossbars in the ground color.
6. The addition of the two small appendages between the stepped figures.
7. The outlining of a central streak ending in a small circle in each of the scrolls.
8. The filling of the scrolls with black, leaving the central streak and small circle in the ground color.
As in the case of the medallions, each one of the side patterns is completed more quickly than the last. The time: No. 1, twenty-six minutes (71:00-97:00); No. 2, twenty-two and a half minutes (97:00-119:30); No. 3, twenty-one and a half minutes (119:30-141:00); No. 4, fourteen and a half minutes (141:00-155:30). The entire time required for painting the design was thus two hours, thirty-five minutes, and thirty seconds.
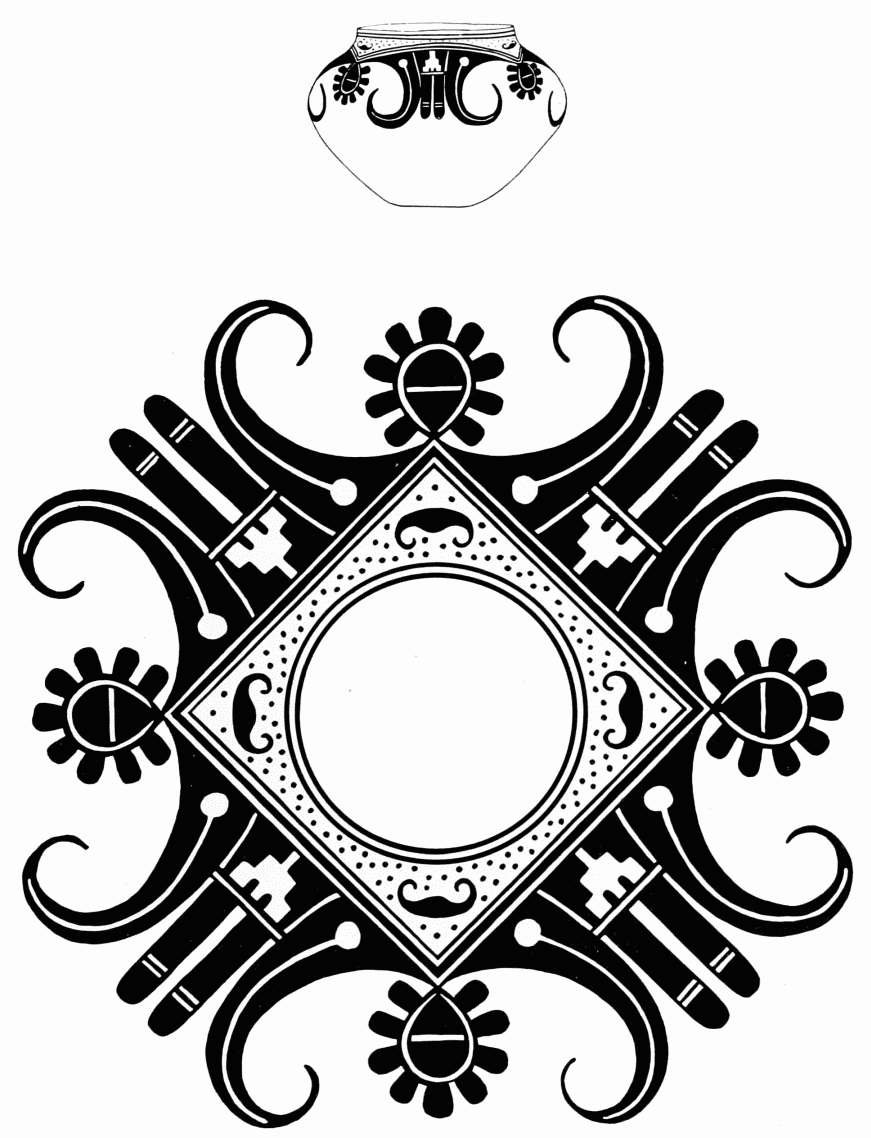
PLATE 35
Black design on red jar by Antonita Roybal (the small drawing above shows how this design is applied to the olla).