MOULDING
Reading edition
For the purpose of this report the vessels may be divided into four large groups: bowls, ollas, cooking vessels, and unusual shapes. With respect to size there are two classes of bowls: those less than four inches in diameter, and those larger than that size. In shape bowls may be either wide-mouthed (pl. 6, b, g) or constricted-mouthed (pl. 6, a, c). The ollas all have full, globular bodies and relatively small orifices with or without flaring lips (pls. 7, 15, a). As a rule, the cooking vessels are shaped like small ollas. Under unusual shapes fall all the types and forms which are not of the first three classes, such as terraced (prayer-meal) bowls, double-mouthed vessels, double bowls or “baskets”, and vessels with handles.
The moulding of each of the above forms may be said to consist of four principal steps: the making of the base, the building of the walls, the shaping, and the finishing. Very briefly, the process is as follows: The potter first forms a pancake-shaped pat of paste from six to eight inches in diameter; this she presses into the mould, or puki, to form a base. Then the walls of the vessel are built up by the addition of successive ropes, or rolls, of paste laid one upon another. The small bowls are the only exception, for they are formed in the hands of the potter from a single lump. In some cases the building is done all at one time; in others, and always with the larger vessels, a few rolls are added, then the piece is set aside to dry a little before the addition of a few more rolls. The potter usually builds two or more vessels at once in order to permit work upon one while the other is undergoing a brief period of drying. The preliminary shaping of the vessel is done either in the course of the building or after the building has been completed. The obliteration of the junctions between the rolls and of finger-marks is accomplished with the kajepe, or gourd-spoon, and further use of this implement aids in giving the vessel its shape. The final step, the finishing, consists of going over the entire vessel carefully, first with the kajepe, then with the fingers, to remove slight irregularities to even the lip and rim. The finishing is a slow, exacting process, and the difference between the artist and the mere pot-maker comes out at this stage of the work.
The moulding, although usually done in the house, may also take place in some shady spot outdoors. If a woman begins her moulding in the morning, she will commonly devote the entire day to it. By evening she will have completed from five to thirty vessels, the number depending partly upon the size of the pieces and partly upon the rapidity with which she works.
The potter sits upon her heels on some kind of mat; it may be a sheepskin with the wool side up, a piece of canvas, or a small woven rug. Her attitude is changed only when stiffness requires it. Thereupon she sits with her feet out in front of her; or with one leg bent, the foot flat on the ground, the knee beside her shoulder, and with the other leg under her or fully flexed in front with both the knee and foot upon the floor. Toward the end of the day the potter usually sits against a wall to rest her back, for any one of the postures assumed is tiring. At the end of the day the women frequently complain of stiff backs and sore abdominal muscles, caused by the almost constant stooping posture. Some potters cover their laps with shawls, others wear aprons, and still others use no protection whatever for their clothing.
When the potter is sitting upon her heels, the mould, or puki, is laid directly in front of her upon the floor. If she is sitting with her legs extended, it is either held in the lap or placed close to her right side. In the house the puki rests directly upon the hard earthen floor; outdoors, a short board is placed under it to prevent its constant turning from wearing a hole in the relatively softer ground. In the puki is sprinkled a thin layer of temper or wood-ashes to prevent the vessel from sticking to it. At the right of the potter, within arm’s reach, on a canvas or a piece of cloth, is a mass of prepared clay. Rarely this reserve paste is on the left. If the paste is in constant use, it is not covered unless exposed to the sun; when, however, the moulding is abandoned for even a few minutes, a corner of the canvas or cloth is thrown over it. A small lard-pail partly filled with water is an indispensable accessory during moulding. This is usually kept between the potter and the paste; occasionally it is on the left, sometimes near the puki beside the potter’s right knee. The gourd moulding spoons, or kajepes, are also placed within easy reach, on the floor near the puki, beside the waterpail, or in the pail itself. The potter is then ready to begin moulding.
The first step is to ascertain by a little handling whether the paste is of the proper consistency. If it was kneaded the day before, it may prove to be too dry; in such a case the hands are well moistened and perhaps a little water is sprinkled on the paste; it is then rekneaded for a few minutes. Then a handful is scooped out of the mass with the right hand. If the first handful is not sufficient, a second scoop gives the required amount. It is next worked with the hands for half a minute to five minutes; if it is of just the right consistency, it is hardly worked at all; if it is too dry, the hands are occasionally dipped in water while it is being worked; if it is too wet, kneading continues until it is sufficiently dry. There are three distinct movements in this final working of the paste. First, the handful is pinched and squeezed by opening and closing the hands; if any gritty particle is encountered, it is picked out with the thumb and forefinger of the right hand and snapped upon the floor. The second movement consists in rolling the paste between the two flattened hands. When the roll is about six inches long, it is doubled and rerolled. This may be repeated from two to half-a-dozen times. Occasionally this step is entirely omitted, especially when a pat is being made. In the third movement the paste, now a spherical lump, is slapped back and forth between the cupped hands, which are held from six to eight inches apart. Sometimes this third movement precedes the second. The handful of paste is now ready to be made into a pat.
There are two ways of forming a pat. In the first one, the spherical lump is held on the open left hand and pounded flat with the right fist; from time to time it is turned a few degrees by a slight tossing motion. It is then finished by patting
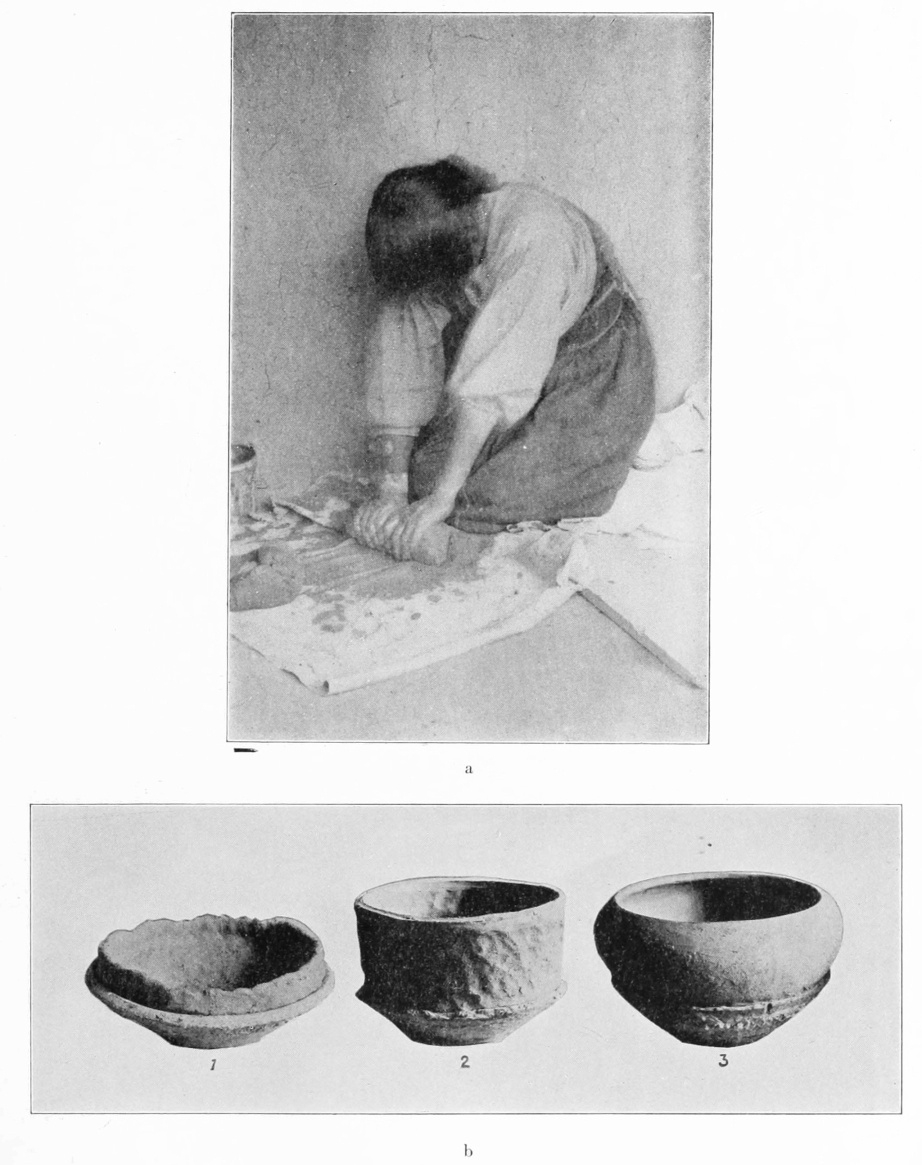
PLATE 12
a. Kneading clay preparatory to modeling a vessel.
b. Bowl-moulding, primary stages. 1, Base formed in mould, edge crimped to receive first roll (cf. pl. 13, a); 2, Walls built to full height; 3, The same piece after shaping and smoothing.
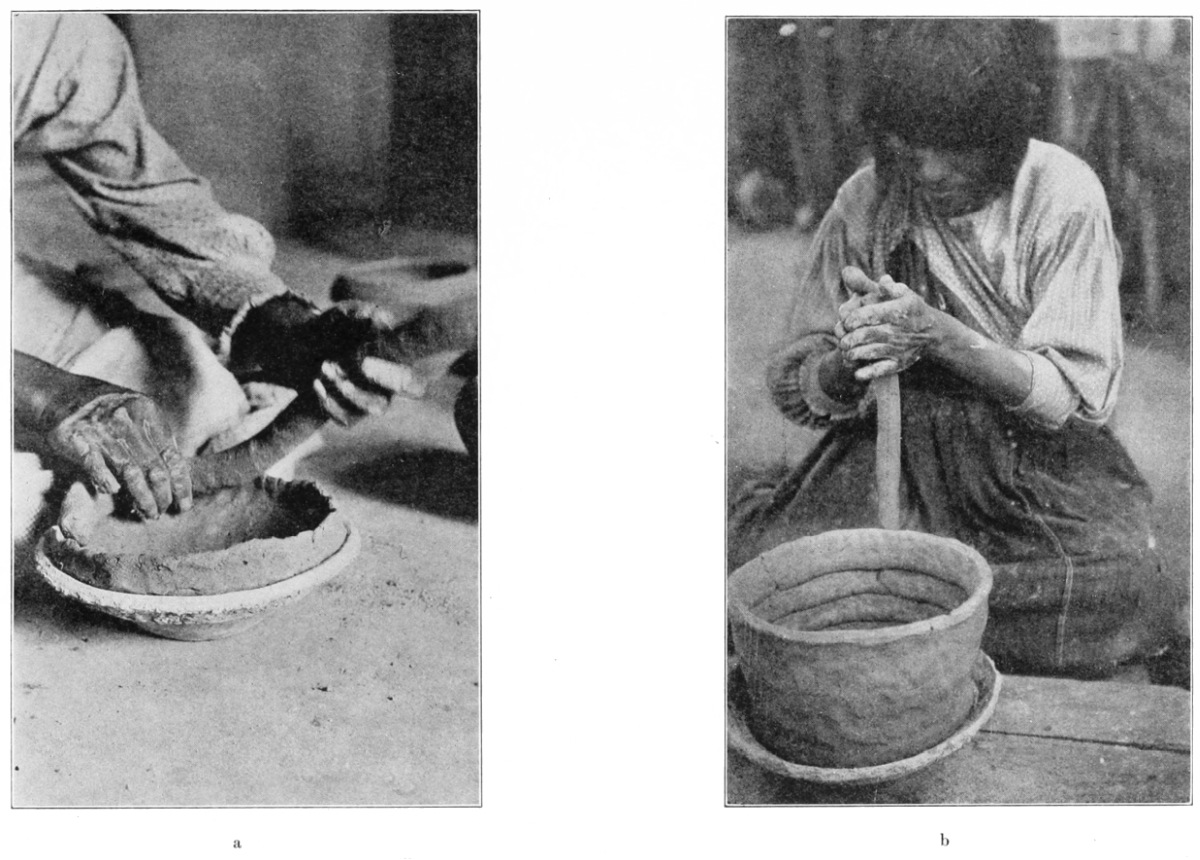
PLATE 13
a
Applying the first roll of clay to the base. The roll is held in the left hand, and is flattened and pinched into place in the inside of the rim by the fingers of the right hand.
b
A bowl-base to which four rolls of clay have been added; the potter is making a new roll. Note the junctions of the roll on the interior of the vessel.
it with the flat right hand until it is fairly smooth and of uniform thickness; in doing this the pat is turned by slapping it from the left hand to the right and back again. During this interchange, through the natural placing of the hands, the pat is turned through an angle of ninety to one hundred and twenty degrees. When the pat has been completely formed by this method, it is like a large pancake, six to eight inches in diameter and from three-eighths to half an inch thick. It is then pressed firmly into the puki, and the edge is turned up and crimped with the thumb and first two fingers of each hand to form a slight rim (pl. 12, b, 1).
In the second method, the spherical lump of paste is first pounded with the heel and then with the upper knuckles of the right hand; it is turned meanwhile by the tossing motion of the left hand. The next movement is the same as in the corresponding stage of the first method, namely, patting the paste with the flat right hand while turning it by transferring it to the right hand and back. Finally, before the pat is put into the puki, the edge is bent up and smoothed off a little, so that a shallow flat circular tray is formed instead of the slab obtained by the first method. This tray is then placed in the puki, where it is pressed down very firmly with either the heel of the hand or the balls of the fingers, in order to insure a solid uniform base and to expel any air-bubbles in the paste.
Another handful of clay is now scooped out of the mass on the canvas to the right and worked to the proper consistency as before. From the resulting spherical lump the potter very skillfully forms a roll of uniform diameter by a backward and forward motion of her two hands placed palms together (pl. 13, b).[24] There seems to be a tendency for the first part of the roll to be of slightly smaller diameter than the last part; if this occurs, the roll is reversed and partially rerolled. One end is then taken in the right hand, while the left hand holds it near the other at a point chosen to prevent too much sagging at the middle. The potter then places the end which is in her right hand against the inside of that part of the edge of the pat nearest her.[25] The roll is pressed against the edge just enough to hold it in place (see pl. 13, a). The thumb is on the exterior, the fingers on the interior of the edge. Usually only the first two fingers are used, although the third finger is occasionally brought into contact with the paste. Then, as the puki is revolved counterclockwise,[26] the rest of the roll is pressed against the edge of the pat. If the roll is not long enough completely to encircle the pat, another is made and placed on it in a similar manner. When the edge has thus been completely encircled, the unused remainder of the roll is pinched off and tossed back on the mass of paste on the canvas. The potter then pinches the roll more firmly to the edge of the pat. This is done with both hands. The thumbs, almost touching, are on the exterior, the fingers on the interior of the vessel. The puki is usually moved counterclockwise, although the same potter will sometimes revolve it clockwise. During this process of pinching, the roll is flattened until it assumes in cross-section the shape of a very much elongated ellipse (fig. 6, b). An attempt is made to keep the thickness of the side as nearly uniform as possible, and in order to accomplish this it is often necessary for the hands to be moved back over a part already flattened.
The diameter of the rolls, except for cooking-pots, varies from half an inch to slightly over an inch, according to the size of the vessel being built, and the individual doing the building. When a roll is pressed against the interior of the rim of the growing vessel,[27] from a half to three-quarters of it lies below the level of the rim (see fig. 6, a). Then, when the roll is flattened, the junction-plane between it and the preceding roll will not be horizontal, but will slope downward sharply
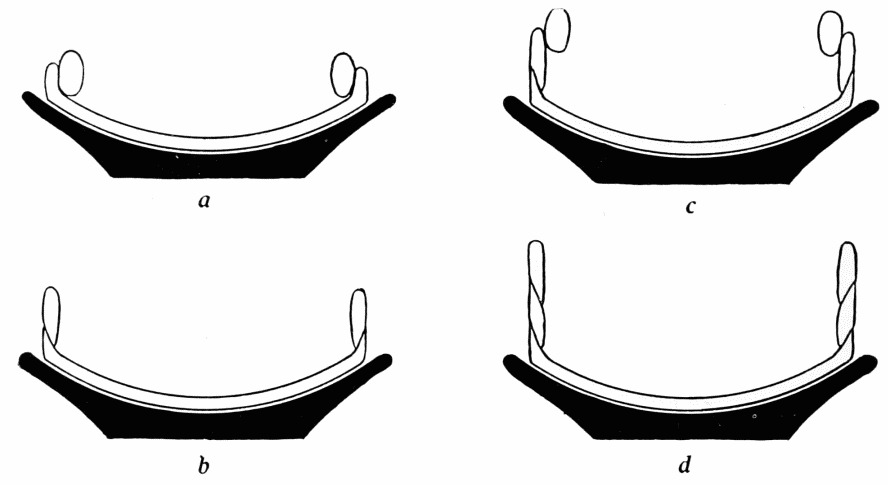
Fig. 6. Diagramatic sections of a bowl on the mould.
a. Base made and first roll applied to inner side of rim. b. First roll flattened and welded on. c. Second roll applied. d. Second roll flattened and welded on.
from the exterior (see fig. 6, b, d), thus producing a broad holding surface and minimizing the risk of the vessel’s cracking along the junction-plane. In other words, the junction-line between any two rolls on the outside wall of the vessel is considerably higher than the corresponding line on the inside. The flattened rolls, in all but cooking-pots, are from an inch and a half to two inches wide, but because of the overlapping just described the distance between the junction-lines is considerably less (see pl. 13, b, and pl. 15, a).
During the process of flattening the roll, some potters obliterate the junction-line on the exterior by rubbing it with the first and second finger of the right hand, and by the addition of small pellets of paste in the more conspicuous indentations. Others consider it unnecessary to obliterate this line during the building of the vessel, in spite of the fact that the roll may break away because of not being firmly welded. Certain women smooth the temporary rim after flattening each roll, others do not. When the flattening has been finished, the puki has made a second complete revolution, and the junction of the two ends of the roll is again directly in front of the potter; but if a few additional touches are required she may again shift the puki in one direction or another. No potter pays any attention whatever to the location of the junction points of the ends of the rolls; in successive rolls, therefore, they may lie directly above one another, or they may be distributed about the circumference of the vessel (pl. 13, b). When one roll has been completely welded on, flattened out, and incorporated into the vessel, another roll is formed, and is applied in exactly the same manner. Thus the building proceeds to the height at which the shaping is begun. The steps so far enumerated are the same for both bowls and ollas. The further treatment of the vessel varies slightly, according to the shape desired.
Stevenson, describing the moulding of vessels at Zuñi, in 1879, wrote: “When the clayey dough is ready to be used, a sufficient quantity is rolled into a ball. The dough, if worked by a careful artist, is first tested as to its fitness for molding by putting a piece of the paste to the tongue, the sensitiveness of which is such as to detect any gritty substance or particles, when the fingers fail to do so. The ball is hollowed out with the fingers into the shape of a bowl (see pl. 29, a), this form constituting the foundation for all varieties of earthenware, and assumes the desired form by the addition of strips of clay; all traces of the addition of each strip are removed before another is added,[28] by the use of a small trowel fashioned from a piece of gourd or fragment of pottery, the only tool employed in the manufacture of pottery. The bottoms of old water jars and bowls form stands for the articles while being worked by the potter” (see pl. 29).[29]
Mrs. Stevenson, writing later, also of the Zuñis, said: “In beginning the work a sufficient quantity is first made into a ball and then hollowed out with the fingers until is assumes a conventional bowl shape, which serves as the foundation to be afterward built up and elaborated into any desired shape. The vessel is then formed by the successive additions of strips of the paste long enough to encircle the bowl, each layer being pressed on the brim with the fingers and accurately fitted, the trowel being then skillfully used to finish the joining and to remove all traces of the original separation of the strips. Most of the work of remodelling the vessel into its final shape is done on the inside with a trowel, this implement being used on the outside chiefly to smooth the surface. The clay, if it has been properly worked, possesses sufficient tenacity and plasticity to admit of being pressed and scraped without cracking.”[30]
The following quotation is of interest as showing how closely modern studio-practice, undoubtedly evolved experimentally, resembles Pueblo Indian methods: “The clay for building should be rather soft as it is apt to dry quickly on handling. A plaster bat (mould) should be made. It is first necessary to roll out the clay into cords which should be a little thicker than the proposed walls are to be. These cords should be as uniform as possible and should be rolled quickly to avoid undue hardening. It is best to roll them as required. A roll of clay is taken, one end laid in the center of the bat and the rest is coiled around it in a spiral line. When the disc so formed has reached the proper size, the coils are gently rubbed over with the fingers until they have thoroughly united and the lines of the spiral have disappeared. The clay disc may now be turned over and the rubbing continued on the other side. The circle is cut true and a new coil is laid on the outer edge, thus making a shallow circular tray. In raising the walls it is best to pinch off the roll of clay when one circle has been completed, and the new roll should be begun at another point so that all the joints will not be at the same place. This plan is better than coiling a long roll in a spiral, for in this case one side of the piece will be higher than the other.
“After three rolls have been laid in position, the wall, both inside and out, should be worked like the bottom so that the rolls will disappear and the clay be welded uniformly together. This should be done without water or with as little as possible. The use of water is very tempting. It makes the clay so smooth and seems to help, but it will inevitably make the work sloppy and will tend to soften the walls.
“After three or four rolls have been worked in, the piece should be laid aside for some hours to stiffen. If this be not done the weight of the second building will cause the work to sag and fall out of shape. For this reason it is well to have two or three pieces in hand at once so that there need be no waiting. When the cylinder is of sufficient height it should be allowed to become quite stiff and then the irregularities should be corrected with a little soft clay which is worked into the joints. The whole surface may now be gone over with tools and brought to the required finish.”[31]
Before describing in detail the moulding of the various sorts of vessels, the accidents which are associated with this process should be discussed. These may result from one of two causes, the presence of foreign matter in the paste or imperfect moulding.
If the clay has been carefully sifted, as it usually is, there should be very little foreign matter in the paste. It is, however, impossible to remove entirely all gravel or stones fragment. If gravel is allowed to remain, it will cause the vessel-walls to scale during firing because of the difference in the rates of expansion under heat of stone and paste. In order to prevent this, the potter while moulding is constantly on the lookout for these small particles, which may be discovered at any stage of the work. They are at once picked out of the vessel, even if it is all but finished. The irregular hollow formed is then filled with a small pellet of fresh paste and smoothed over. The women say that a bit of hard clay does not cause flaking as does a piece of gravel or a stone splinter. Another kind of foreign matter is an air-bubble, which if left in the vessel will cause the same form of accident, because of the difference in the rates of expansion of air and clay. In order to eliminate these small air-bubbles, the pat is pressed down hard upon the puki
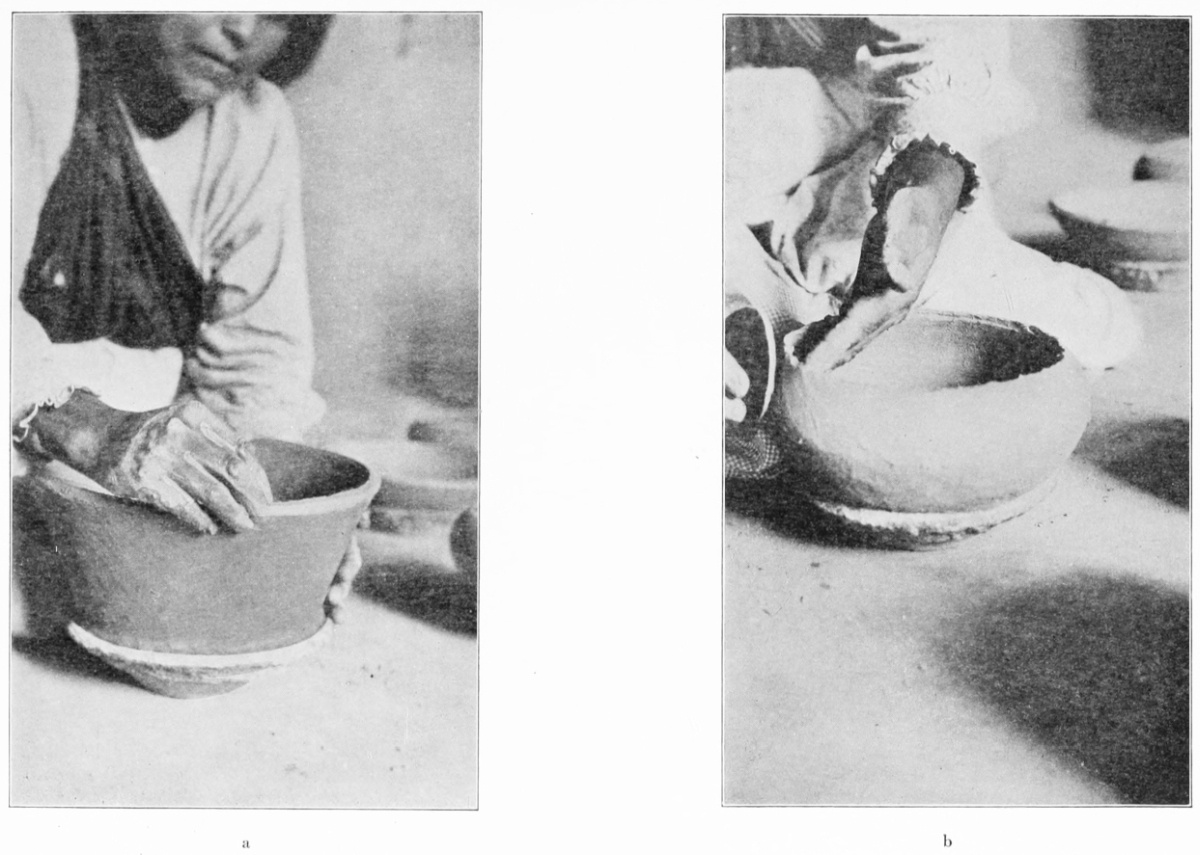
PLATE 14
a
Levelling and smoothing the rim of a bowl after it has been scraped with the kajepe, or gourd spoon. The left hand serves to keep the piece turning and to support the plastic wall.
b
Use of the kajepe in shaping a vessel; the left hand supports the wall within, while the kajepe, held in the right hand, thins the top of the wall and gently presses it inward.
and the rolls are carefully pinched at every point about the vessel. A skillful potter is able to feel an air-bubble even if it is covered with a layer of clay: such a bubble is pricked and the resulting hollow is filled as before.
If the moulding is imperfect, that is, if the rolls are not carefully welded, a weak spot occurs at the junction, which probably contains a thin layer of air. When the vessel is fired, it cracks along this line and is ruined. Such accidents seem to occur most commonly at the bases of large vessels, either because the first roll was not sufficiently welded to the base, or because the pat itself was not pressed into the puki with sufficient force. Since flaws between the rolls cannot be discovered until the firing, they cannot be corrected as in the case of foreign bodies in the clay.
Bowls
From two to eight rolls may be used to form a bowl, according to its destined size and shape. When the building has been completed, the piece is in the form of a cylinder, with sides either vertical or very slightly flaring (pl. 12, b, 2, and pl. 13, b). As a rule the fingerprints and the irregular horizontal junction-lines may be seen both on the interior and exterior. The next step is the finishing of the temporary rim. This is done with the right hand, the fingers of which assume much the same position that they would for holding a pencil (pl. 14, a). The thumb is on the interior of the rim, the forefinger on the top, and the middle finger on the outer edge. The thumb and middle finger are used as guides to help keep the rim uniform in thickness. The forefinger removes the paste from the higher parts of the rim and transfers it to the hollows. The fingers do not move with respect to each other except to exert slight pressure. The play of the right hand during this process is a gliding backward-forward motion repeated many times, while at the same time the puki is usually kept revolving counterclockwise by the left hand, which also is generally but not always, used to steady the side of the vessel. Occasionally the same potter will turn the puki clockwise. In the former case the right hand is kept in the twelve-to-two-o’clock sector; in the latter in the six-to-eight-o’clock sector. If the rim is smoothed hastily, as it sometimes is at this stage, the puki may not be turned at all. This completes the building of the bowl, which is then set aside for a few minutes, while another is begun.
The next step is the shaping. This is done with a kajepe, or gourd spoon. The kajepe should always be damp when used, and for that reason is often kept in the water-pail. It is somewhat difficult to describe in detail the use of the kajepe, for no two potters work with it in exactly the same way. Often the same potter will show variations in her method of handling the tool.
Each woman has from four to a dozen kajepes beside her while she is moulding. These implements vary much both in size and shape (pl. 11). Most of them are circular or elliptical with all edges convex, although every potter has at least one with a concave edge. Generally the smaller, circular kajepes are used on the interior of bowls, the oval ones on the exterior, and the one with a concave edge on the exterior at the shoulder, where it would be difficult to use the other types. As a rule the larger kajepes serve for the larger vessels. A potter occasionally changes kajepes in the midst of her work, usually because of the edge, which may be rougher on one than on another. The kajepes are held at an angle of from thirty to sixty degrees to the tangent of the bowl at the point of contact, according to the curvature of the part of the vessel being worked upon.
The kajepe is always used first on the inside. This is done in order to press out the sides and to give the bowl something of its final shape before the paste becomes too dry. The work begins at the bottom of the vessel and slowly advances toward the top; the bowl gradually assumes a spherical shape, the sides being forced farthest out about half way between the base and the rim. During this process the outside surface, since it is being expanded, begins to show innumerable small cracks. The strokes of the kajepe on the interior are short and always nearly horizontal, the implement being pulled towards the body. During this first use of the kajepe all traces of the junction-lines between the rolls are removed from the inside of the vessel. The tool is always held in the right hand, and the left hand, which is constantly used on the exterior as a brace and stop, is placed directly opposite the spot on the inside which is being worked. One woman scrapes in the seven-to-ten-o’clock sector, turning the bowl clockwise; that is, working from the scraped to the unscraped surface. The vessel is turned through about sixty degrees at each change of position, and about a third of the surface just scraped is gone over again by the strokes on the new sector. Another works in the nine-to-twelve-o’clock sector, turning the bowl counterclockwise, that is, working from unscraped to scraped surface; in doing this she turns the puki five or six times through an angle of between sixty and eighty degrees for each turn, before the entire interior has been gone over.
The kajepe is then applied to the exterior of the bowl (pl. 14, b). The concave surface of the kajepe is preferred for the first of the exterior scraping, although the convex surface is not infrequently used. The strokes begin again at the base. At first, when the kajepe comes in contact with the puki, the strokes are very nearly vertical. A little higher on the bowl they become diagonal. Near the rim the strokes are almost horizontal, but still have a perceptible downward slant. The kajepe is always pulled toward the body. The stroke on the exterior is from four to five inches, generally a little longer than that on the interior. During this step one woman turns the puki counterclockwise, working in the two-to-four-o’clock sector; another turns it in the same direction, but works in the four-to-six-o’clock sector. In both cases the strokes are from the scraped to the unscraped surface. Although the larger portion of the actual shaping of the bowl is done from the interior, the drawing in of the upper part to form a constricted mouth is done with the kajepe on the exterior, when the step last described is nearing completion. As when working on the interior, the left hand again acts as a brace and a stop, but this time on the inside of the bowl.[32] Usually only the ends of the fingers rest against the side. Upon the completion of the use of the kajepe on the outside for the first time, all traces of the coil-marks and of the fine cracks developed during the interior scraping are removed, but the surface is still rather rough (pl. 14, b; also 12, b, 3). After both surfaces have been gone over for the first time with the kajepe, the rim is once more trued up in the manner already described. Then, depending upon the stiffness of the paste, the piece may be set aside to harden a little or the work may continue without interruption.
The women hold the kajepe with fingers either slightly bent, or nearly fully flexed; in the latter position the tool is grasped between the thumb and bent forefinger. Just before using, the kajepe is dipped in water; and the edge is then drawn across the palm of the left hand to remove excess water before it is applied to the bowl. After perhaps a dozen strokes, the paste which has collected on the tool is removed by a dexterous motion: the inner side of the thumb of the left hand is run along the edge of the kajepe to collect the paste; then the inner side of the forefinger of the same hand is run from the base to the tip of the thumb. This brings the paste to the ends of the two fingers in the form of a pellet, which is thrown upon the mass on the canvas. Since the paste has a tendency to stick to the fingers, the potter must throw it with a jerk or snap.
When the kajepe has been used once over the entire surface, it is usually reversed so as to present its convex side to the bowl, made a little damper than for the previous scraping, and the whole process repeated in detail for both the interior and exterior. This results in better symmetry and a smoother surface. The rim is again finished in the manner already described. The walls of the bowl have by this time been thinned to about one-half or two-thirds of their original thickness, all major irregularities and rough spots have been removed, the vessel is fully shaped, and only the finishing touches are needed before it is ready to be sun-dried. The paste now has the consistency of soft thick leather.
The first step in the finishing sometimes consists in again going over both surfaces with a wet kajepe, to smooth them still more. Occasionally only the exterior is so treated. Then the bowl is turned repeatedly, while the potter touches small areas with the convex surface of the kajepe. At this point particular attention is given to the bottom of the interior; it may be retouched with the kajepe, or simply smoothed over with the ball of the thumb or forefinger. If the surface seems slightly uneven, small pellets of paste are rubbed into the bottom and then levelled down with the kajepe. The bowl on the puki is then placed upon the palm of the left hand, held at eye level, and revolved slowly, while the potter examines it for rough spots and slight irregularities of contour, which when found are smoothed over with the forefinger of the right hand. After being replaced upon the floor, the bowl may be gently pressed between the hands in order slightly to improve its symmetry. Finally the rim is smoothed for the last time, little pellets of paste being added, if necessary, to fill in shallow depressions, and great care is taken to make it as regular and smooth as possible. It is obviously impossible to describe in detail the exact procedure followed in this finishing process, for the method adopted is chosen according to the needs of the individual vessel. After all this is done, the piece is ready to be sun-dried. Its present appearance is very different from that which it had when the building was completed (compare pl. 12, b, 2, and b, 3).
The moulding of bowls less than four inches in diameter is a very simple matter compared with that of the larger ones, for there is no use of puki, rolls, or kajepe. After working the paste in the hands the resulting lump is formed into a flat spheroid. The forefinger of the right hand is inserted in the centre of this, the clay held horizontally and slowly revolved by a slight tossing rotary motion of the left hand. The forefinger of the right hand enlarges the hole and gradually shapes the mass into the desired form, thinning the sides at the same time. If the resulting bowl is too high, the rim is pinched off with the thumb and fore-finger of the right hand. When the proper shape and thickness have been attained, the little bowl is held upright in the left hand, while the fingers of the right smooth the sides and the rim. When completed it is set on a board to dry. Sometimes one of the larger of these bowls is placed in a small puki and reshaped with the kajepe. One woman used the kajepe on the interior of the vessel while it rested upon her left hand. The bowl, when treated in this way, and finished in the same manner as the larger bowls, was noticeably a better piece of moulding than the average small piece.
The time consumed in moulding bowls is variable, depending on the dexterity and speed of the potter and to a somewhat lesser degree upon the sort of vessel being moulded. Comparisons between potters are apt to be misleading, for no two make bowls of exactly the same size or exercise the same amount of care in finishing, which, from the point of view of time consumed, is the most variable phase of the moulding. One potter moulded a wide-mouthed bowl of four rolls in twenty minutes; another finished two spherical bowls of six rolls each in forty-eight minutes; a third potter, the swiftest of the three, finished a wide-mouthed bowl of two rolls after it had been under her hands just fourteen and one-half minutes. The first potter moulded six of the small bowls (less than four inches in diameter) in fifty-five minutes, averaging nine minutes to each, but to refinish one of them with a kajepe she took thirteen minutes. The third potter moulded one of the small type of bowls in four minutes.
In considering in detail the time consumed in moulding, the work of Maria Martinez was studied. She is the swiftest and most dexterous potter of San Ildefonso, and moulds in a quarter to a third less time than the slowest of the others. In three hours she turned out ten bowls, averaging about seven inches in diameter, of the constricted-mouthed and similar types; this is an average of one in eighteen minutes. She was working constantly, first on one, then on another. Subsequently she moulded six two-roll constricted-mouthed bowls in one hour and twenty-six minutes, an average of fourteen and a third minutes each. The various steps in the moulding of two bowls are recorded in Table I, which gives the actual time consumed in minutes and seconds from the beginning of the first of the pair until the two were finished and set aside. In Table II the growth and treatment of a single bowl are given in more detail, with the time in minutes and seconds that it was under the hands of the potter. This piece was one of five constricted-mouthed bowls of three rolls each which were moulded in sixty-four minutes, an average of twelve minutes, forty-eight seconds for each vessel.
TABLE I
Bowl A, constricted-mouthed bowl, diam. 8 in.; Bowl B, wide-mouthed bowl, diam. 7 in.
Min. Sec.
4.30 0.00 Bowl A— clay picked up from pile
2.00 “ “— pat in puki and pinched up
3.00 “ “— first roll on and pinched flat
4.00 “ “— second roll on and pinched flat
4.30 “ “— rim smoothed and bowl set aside
(no pause)
2.504.30Bowl B— clay picked up from pile
5.30 “ “— pat in puki and pinched up
6.20 “ “— first roll on and pinched flat
7.10 “ “— second roll on and pinched flat
7.20 “ “— rim smoothed and bowl set aside
(pause of 40 seconds)
8.00—8.00 Bowl A— picked up again
8.30 “ “— interior scraping stopped
9.15 “ “— exterior scraping stopped
9.45 “ “— first rim smoothing stopped
11.00 “ “— first interior smoothing stopped
11.30 “ “— first exterior smoothing stopped
12.45 “ “— second rim smoothing stopped
13.45 “ “— second interior smoothing stopped
14.30 “ “— second exterior smoothing stopped
15.15 “ “— third rim smoothing stopped
16.00 “ “— finishing touches stopped; bowl completed
(pause of 15 seconds)
5.05—16.15 Bowl B— picked up again
16.45 “ “— interior scraping stopped
17.00 “ “— exterior scraping stopped
18.00 “ “— first rim smoothing stopped
18.30 “ “— first interior smoothing stopped
19.00 “ “— second rim smoothing stopped
19.45 “ “— second interior smoothing stopped
20.45 “ “— touching up stopped
21.00 “ “— third rim smoothing stopped
21.15 “ “— third interior smoothing stopped
21.20 “ “— bowl completed
Total, Bowl A—12 minutes, 30 seconds
Total, Bowl B—7 minutes, 55 seconds
TABLE II
Small, constricted-mouthed bowl
Min. Sec.
00.00 — clay picked up from pile
00.15 — pat put in puki
01.00 — clay for first roll picked up
01.15 — one end of first roll pinched on pat
01.50 — first roll flattened, and clay for second roll picked up
02.10 — one end of second roll pinched on pat
02.40 — second roll flattened, and clay for third roll picked up
02.50 — one end of third roll pinched on pat
03.30 — third roll flattened, and rim smoothing begun
03.50 — bowl set aside
(14 minutes, 10 seconds, elapsed)
03.50 — interior kajepe-scraping begun
04.25 — exterior kajepe-scraping begun
04.55 — rim smoothing begun
05.20 — bowl set aside
(18 minutes, 30 seconds, elapsed)
05.20 — interior kajepe-smoothing begun
06.00 — small roll placed around edge of interior base and patted down
06.40 — interior kajepe-smoothing begun
06.55 — exterior kajepe-smoothing begun, lip turned in
07.45 — rim smoothing begun
08.50 — exterior kajepe-smoothing begun
09.25 — interior kajepe-smoothing begun
10.05 — rim smoothing begun
10.50 — bowl held at eye level, exterior kajepe-smoothing begun
11.17 — bowl placed on floor, interior kajepe-smoothing begun
11.45 — moulding completed, bowl set aside
Ollas
In the moulding of ollas the first step is the building of the lower part of the body to a height of four or five rings in the same manner as in bowl-construction. Since ollas have a larger diameter than bowls, more than one roll is needed to form a complete ring about the growing edge. The number of rolls per ring varies from one and a half to four, depending upon the size of the olla and the part worked upon. When this first building has been completed (pl. 15, a), the rim is smoothed somewhat and the scraping and shaping are at once begun.
The use of the kajepe in the shaping of ollas is identical in all details with that described above in discussing the moulding of bowls. The roll-junctions and the fingerprints are entirely removed and the sides of the vessel are flared a little. Great care is taken not to flare the sides too much, for the paste at this stage is still rather soft, and if the sides are flared unduly they collapse outward of their own weight. When the preliminary shaping has been finished the rim is smoothed a
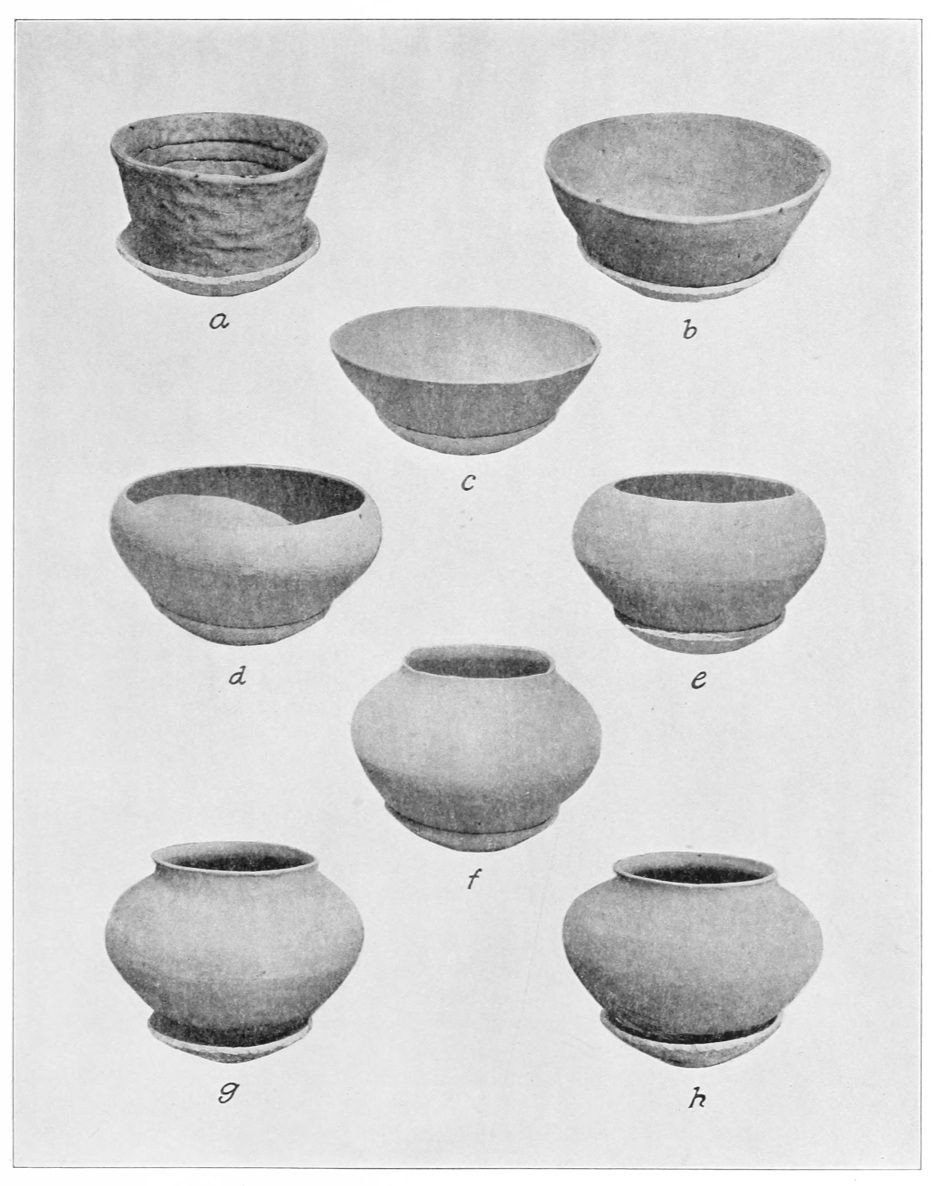
PLATE 15
SUCCESSIVE STAGES IN THE MOULDING OF AN OLLA
a. Lower wall built up of rings of clay. b. Sides smoothed and flared by use of the kajepe. c. Sides further flared and more carefully smoothed. d. Shoulder partly formed. e. Shoulder finished. f. Neck built. g, h. Neck flared and final smoothing completed; the vessels have been shifted in the moulds to allow work on lower sides.
little, and the olla is placed in the sun to stiffen. The moulding has now reached the second stage (pl. 15, b).
The vessel remains in the sun from twenty to thirty minutes. This period may be extended to as much as an hour and a half, if the vessel is in the shade or if other things occupy the potter’s time. During all the drying periods, at intervals varying from five to fifteen minutes, the potter dips her right hand in the water of the lard-pail, and moistens the rim of the partly finished olla in order to keep it soft enough to permit perfect welding when additional rolls are added. While one vessel is drying, the potter is usually occupied with another. In case the work on the latter is finished before the former is dry enough, the potter simply waits, or finds some other work with which to occupy herself until it is ready.
The test of the condition of the olla after this short drying is to pat the side gently with the balls of the fingers. The clay is now very much like soft leather. The degree of resistance offered by the side indicates the condition of the paste. Of course the value of such a test depends entirely upon the knowledge and sense of touch possessed by the potter, two qualities which can be gained only through long experience.
When the paste in the olla, which now has the shape of an open-mouthed bowl, has reached the proper degree of firmness, the vessel is brought in and the shaping continued. By using the kajepe first on the interior and then on the exterior, the sides are flared still more until the desired shape for the lower part of the olla has been obtained. Then, after a hasty smoothing of the rim, the vessel, now in the third stage (pl. 15, c), is again set aside to dry. When it has become firm enough to support the weight of the new rolls to be added, the building is continued. The temporary rim has been kept soft by the application of water from time to time. The method of preparing this rim for the application of the rings varies slightly with different potters. The rim may be pinched into scallops between the thumb and forefinger of either hand, usually the right, or it may be roughened by vertical strokes of the kajepe on the exterior. In the former case the scallops may touch one another (pl. 16, a), or they may be separated by a quarter to a half inch of unpinched rim. When the kajepe is used, it also destroys the original smoothness of the rim, producing an irregular, broken surface to which the new roll can easily be welded.
The potter must now build that part of the olla which has the greatest diameter. Each new ring of clay must therefore be of greater diameter than those which preceded and those which will follow. Three or four rather slender rolls are used to make such a ring. After two complete rings have been placed on the vessel and flattened, the shaping is begun. Gradually the new rim is drawn in until the shoulder of the olla has been formed. Again the rim is smoothed before the vessel is set aside. The moulding of the olla has now reached the fourth stage (pl. 15, d).
The olla is once more allowed to dry for about the same length of time as before. During these successive dryings the presence or absence of wind plays a considerable part in the length of time the vessel is allowed to remain in the sun; for a stiff breeze will dry the paste almost as quickly as the sun itself. The potters do not like to mould ollas when there is much wind because the paste dries so quickly that the vessel is ready to be taken up again before the second vessel, upon which the potter is working, is ready to set aside. Occasionally, but by no means always, the drying olla is turned so as to present a fresh section of the side to the sun.
After testing with the hand the newly built part of the olla, to determine its firmness, the vessel, if sufficiently dried, is taken to the work-board and the building continued. The pinching of the rim is done as before, two more rings are added, and their shaping is begun. The rolls decrease very slowly in diameter. In shaping with the kajepe only the newly added section of the vessel is treated. At this stage the work becomes more difficult, for the two rings just added form the lower part of the neck of the olla, and therefore constrict the mouth of the partly finished vessel. If the paste is a little too soft, the newly built section will sag when the shaping is begun. The vessel must then be set aside at once until it reaches the proper degree of stiffness. While using the kajepe on the exterior, during this stage of the construction, the left hand is held inside the vessel not only as a brace or stop, but also as a support for the incurving side. When the scraping and smoothing have been finished, and the side has been given the proper curve, the rim is smoothed a little before the vessel, now in the fifth stage (pl. 15, e), is again set aside.
Half an hour or so later the building of the olla is completed by the addition of one more ring. The rolls composing this ring are distinctly more slender than the first rolls used in the vessel. When this ring has been applied the rim is cursorily smoothed and the last shaping begun. The final delicate contour of the vessel depends to a large extent upon this final shaping near the rim. The kajepe is used with painstaking care, and the work progresses slowly. A slight outward flare is given to the lip by careful manipulation of the kajepe on the interior. When this is completed, the olla has reached the sixth stage (pl. 15, f).
The finishing touches consist largely in going over the rim carefully and adding pellets of paste when necessary, thus making its curve as nearly uniform as possible. This process consumes a considerable amount of time, for the work is done very painstakingly and slowly (pl. 17, a). The vessel has now attained its final shape (pl. 15, g and h), and for the last time is set out in the sun to dry.
The time taken to mould an olla is far greater than that necessary for a bowl. The type of olla shown in the illustrations is about fourteen inches in diameter at the shoulder. The potter who made these counted on moulding two such ollas each day. On some days a little time was left in the afternoon in which to make some smaller vessels, but no olla was ever begun in the afternoon. Ollas were usually started between ten and eleven o’clock in the morning and finished between half-past-three and half-past-four in the afternoon. During the early morning the household tasks had to be attended to; at noon about an hour was used in preparing and eating lunch; and at various times during the day the children, especially the baby, made it necessary for the potter to leave her work. Table III, columns A and B, gives in detail the various steps in the construction of two ollas, together with the time each vessel was actually under the hands of the potter and the length of the intervals in which the vessel was drying; columns C and D record two other ollas on which the observations were less complete. As a rule it requires one and a half
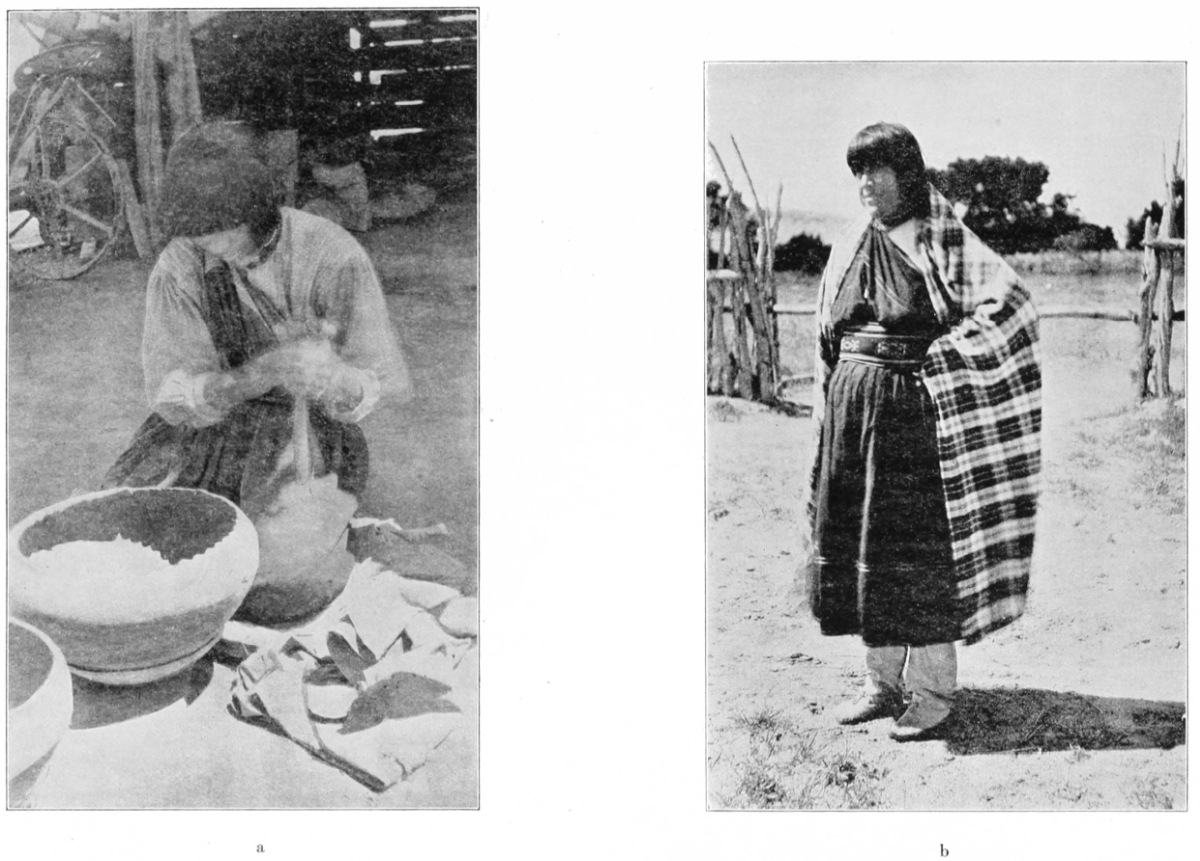
PLATE 16
a
Potter moulding an olla. The first roll at the shoulder has just been added. The temporary rim has been pinched up with the thumb and forefinger to provide a firm seat for the succeeding roll.
b
A potter of San Ildefonso. The costume is typical of the Rio Grande Pueblos. With the exception of the shawl it is entirely of native manufacture.
hours’ work to mould an olla. In the case of olla A, the potter was unfortunate in misjudging the proper consistency of the paste, which delayed the construction of this vessel an entire half-hour, omitting the periods of additional drying. The two ollas were begun at eleven o’clock in the morning; the second of the two was set aside completed at eight minutes past four in the afternoon.
It is said that it requires one whole day, and sometimes two, to mould a single very large olla. The process is identical with that just described. In the case of small ollas (such as those seen in pl. 18, a) a single period of drying elapses between the construction of the body and that of the neck. These small ollas can be moulded in a little less than twice the time taken for a bowl of about the same diameter.
TABLE III
ABCD
Min. Sec. Min. Sec.
First clay picked up00.0000.0000.0000.00
Pat placed in puki04.0004.00
Second handful of clay picked up04.3005.30
First roll added05.0006.00
First ring flattened, second begun06.4508.30
Second ring flattened, third begun09.0010.00
Third ring flattened, fourth begun11.3012.30
Fourth ring flattened, fifth begun15.0016.45
Fifth ring flattened (Stage I, pl. 15, a), inside scraping begun18.3020.00
Exterior scraping begun21.0021.30
Rim smoothed and interior scraping begun23.0024.00
Rim smoothing begun25.0027.30
Set aside (Stage II, pl. 15, b)26.0029.00
Time out34.0024.30
Interior smoothing, then exterior26.0029.00
Set aside (Stage III, pl. 15, c)33.0032.30
Time out53.0059.00
Pinching of rim begun33.0032.3033.0033.00
Pinching of rim completed34.1533.30
First roll made35.0034.15
First roll pinched on, second begun35.3034.30
Second roll pinched on, flattening begun39.4536.30
First ring flattened41.0037.3037.00
Second ring flattened, rim smoothing begun45.0041.3041.00
Interior scraping begun45.3042.0042.00
Exterior scraping begun50.0045.0045.00
Rim smoothing begun52.0047.00
Interior smoothing begun53.3048.3047.00
Exterior smoothing begun55.0049.3052.00
Rim smoothing begun57.0050.15
Set aside (Stage IV, pl. 15, d)58.0050.4554.0055.00
Time out27.0020.4528.0068.00
Pinching of rim begun58.0050.4554.0055.00
Pinching of rim completed58.4551.15
First roll completed59.3052.00
First ring flattened, second begun64.0056.45
Second ring on66.1559.45
Second ring flattened, rim smoothing begun67.1560.3061.00
Exterior scraping begun68.0060.4561.15
Interior scraping begun70.00omittedomittedomitted
Set aside (clay too soft)70.30“““
Rim smoothing begunomitted63.00““
Set asideomitted63.45““
Time out13.4517.00““
Interior scraping begun70.3063.4564.00
Exterior smoothing begun75.1569.15
Rim smoothing begun77.1571.45
Set aside (Stage V, pl. 15, e)79.1573.3069.0067.00
Time out18.0015.1568.0042.00
Interior smoothing begun79.15omittedomittedomitted
Exterior smoothing begun83.45“““
Rim smoothing begun84.15“““
Set aside84.45“““
Time out33.00“““
Interior smoothing begun84.45“““
Exterior smoothing begun88.00“““
Set aside89.45“““
Time out21.00“““
Pinching of rim begun89.4573.3069.0067.00
First roll put on92.4575.00
Ring flattened, rim smoothed, exterior scraping begun94.4577.30 73.00
Interior scraping begun97.4579.0076.00
Exterior smoothing begun100.1581.30
Interior smoothing begun (Stage VI, pl. 15, f)101.4583.00
Exterior smoothing begun102.45omittedomittedomitted
Rim smoothing begun103.3084.3084.0083.00
Set aside (clay in rim too soft)105.15omittedomittedomitted
Time out16.30“““
Interior and exterior smoothing begunomitted““87.00
Rim finishing begun105.1590.30 91.00
Vessel completed (Stage VII, pl. 15, g, h)119.4594.3093.0098.00
Total elapsed time from beginning: Ollas A and B, 5 hours, 7 minutes, 30 seconds; Ollas C and D, about 5 hours.
Cooking-Vessels
The clay forming the paste of these pieces is called Apache clay, and is very different from that employed in making ordinary ware (see p. 22); it is used without the addition of any tempering material.
Just before moulding is started, the clay is carefully gone over in a final search for small pebbles. The moulding differs only in detail from that of vessels made from other kinds of paste. A pat very much thinner than those described above is made and placed in the puki. The vessel is built by the addition of rolls which are of smaller diameter than usual—about three-eighths of an inch. When the body has been built to the desired height, the scraping and smoothing with the kajepe are begun. At first the vessel, like the others, is cylindrical; but the scraping, first on the
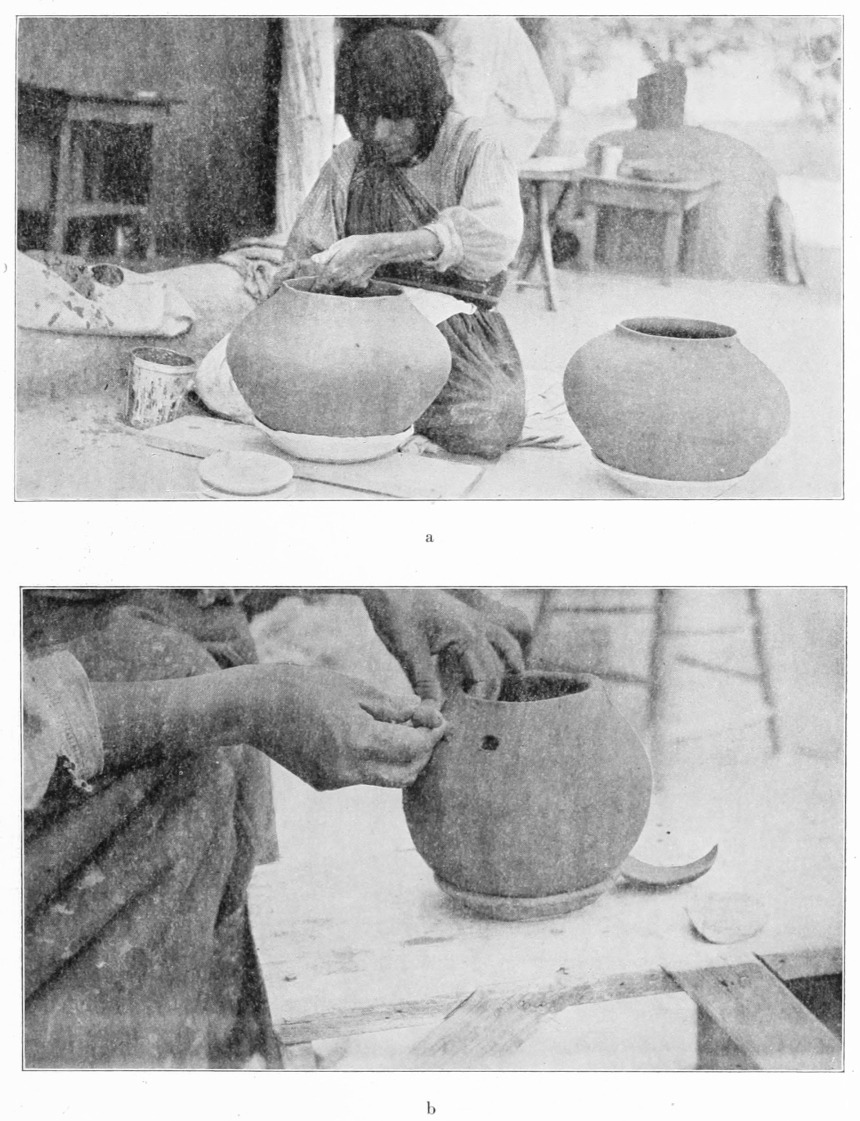
PLATE 17
a. Putting the finishing touches on an olla. The potter’s left hand is supporting the soft neck while she shapes it from the outside with the kajepe. In front is a pile of base-moulds (pukis) for small bowls; at the potter’s right is a lard-pail of water and a reserve supply of clay wrapped in a canvas.
b. Applying a horizontal handle to a small olla; two gourd spoons (kajepes) are lying on the table.
interior and then on the exterior, thins the sides and gives it a spherical shape. After the smoothing the sides are from one-eighth to three-sixteenths of an inch thick, much thinner than the walls of vessels made of other kinds of paste. When the body has assumed the desired shape, additional rolls are added to form the lip, which is scraped, smoothed, and flared with the kajepe. During the entire period of moulding small pebbles are constantly being found and removed, for Apache clay contains a great many more pebbles than the other clays. After the finishing touches have been completed, the rim is indented, and a vertical handle is added as described below (see p. 50).
The indenting of the rim is done with the thumb and forefinger of the right hand. The thumb is placed under the flaring rim, with the nail vertical; the forefinger rests upon the lip, the nail horizontal. The fingers are in about the position they would assume were the potter holding a pencil. A gentle downward pressure of the hand indents the rim slightly, the nail of the thumb leaving a small mark on the under side of the lip. This pressure is repeated at intervals of about three-quarters of an inch until the entire lip has been given an indented or undulating edge.
The construction described above is that of a small olla about six inches in diameter. Larger ollas are built in several stages in the same manner as ollas made of the other forms of paste.[33]
The time consumed in the moulding of cooking vessels was noted in only one case. Six rolls were used for the body and two for the lip. Before the kajepe was used for the first time the cylindrical body was five inches in diameter and four and a half inches high. Table IV gives the time of construction, divided according to the various steps of the work.
TABLE IV
Min. Sec.
00.00 — Kneading of small handful of clay to eliminate pebbles begun
04.00— Pat placed in puki, kneading of clay for rolls begun
12.00— Making of first roll begun
19.00— Six rolls added and flattened, interior scraping begun
20.30— Exterior scraping begun, later interior smoothing begun, followed shortly by exterior smoothing
26.00— Seventh roll added
29.00— Eighth roll flattened and interior smoothing begun
29.30— Exterior smoothing begun
32.00— Rim smoothing begun
38.00— Finishing touches begun, followed by indenting rim
46.00— Moulding completed, vessel set aside
9.00— Time out
46.00— Work upon handle begun
49.00— Handle finished, vessel completed
Prayer-meal Bowls
Prayer-meal bowls are of two sorts, bowl-shaped with a terraced elevation on one side of the rim, and rectangular, or box-like, with a terraced elevation at either end. In the construction of a rectangular prayer-meal bowl, no puki is employed. The pat, either circular or rectangular in shape, is made as usual. It is placed upon a board, care being taken to press it down hard, and the rectangular shape is accentuated by the pinching up of the edge. A thin layer of temper may, or may not, be sprinkled on the board before the pat is placed upon it. To this pat are added two or three rolls in the manner already described. When it is desired to turn the vessel, the board upon which it rests is turned. The board is either held in the lap or rests on the top of a low stool. In scraping and shaping the vessel one potter began to use the kajepe on the exterior first, then proceeded to the interior; another reversed the process. The stroke on the exterior is vertical at the corners and nearly horizontal on the sides; on the interior it is nearly horizontal. When the building of the vessel has been completed, the rim is smoothed, and the corners
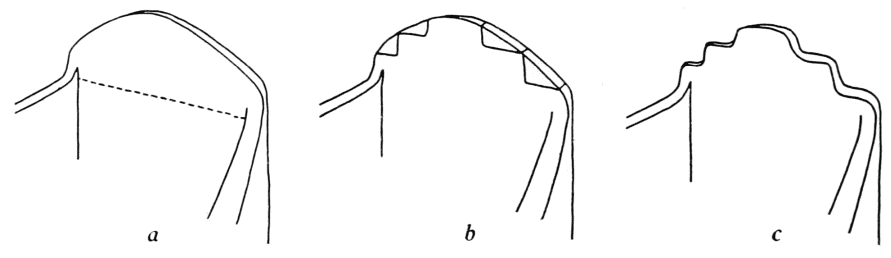
Fig. 7. The three stages in making the terraced end of a prayer-meal bowl: a. End built to full height. b. Notches cut with a taut string. c. Bits of clay removed from the notches and edges of terracing smoothed down.
made straight. The bowl may be pressed lightly between the hands to improve the symmetry and to make all the corners more nearly right angles; it is then set aside for a while.
The next step is the construction of the terraced ends. A single short roll is attached to the interior of the rim at one end. This roll is pressed flat, and smoothed with the kajepe, first on the interior and then on the exterior. The sharp edges are softened, the rim is smoothed, and the junctions of this new portion with the sides are rounded off. The result is a flattened semicircular vertical projection at the end (see fig. 7, a). The other end is then treated in the same manner. The bowl is now ready to have the terraces put in. There are two methods of doing this. One potter uses a long string in making the first marks. The string is stretched taut horizontally, parallel to the length of the bowl. It is then pressed lightly on both ends at the same time, first on one side of the centre, then on the other. The distance between the hands is next shortened, and two notches are cut on either side of the centre of the end with this string, which is still held horizontally. Similar notches are cut in the other end. Each end of the bowl is now as shown in fig. 7, b. Another potter does not make the initial marks in the two ends simultaneously. Holding the end of the bowl towards her, she lightly marks the lines to be cut with her fingernail. Then, picking up the string and following the marks made by her fingernail, the notches are cut in the way described.
As soon as the notches have been cut, the small triangular pieces of clay are removed, the edges rounded with the thumb and forefinger of the right hand, and the corners made into curves. Small pellets of clay may be added if necessary. After a few finishing touches with the forefinger the terracing of the ends of the bowl is completed (see fig. 7, c).[34]
The time consumed by the swiftest potter of the village, in moulding an unusually large prayer-meal bowl, is recorded in Table V. The piece was seven and a half inches long, four and three-quarters inches wide, and three and a half inches high. The terraces raised the ends one and three-quarters inches more.
TABLE V
Min. Sec.
00.00— Moulding of the bowl itself completed, after some time spent in pressing down the pat on the interior of the bowl. Vessel set aside
22.00— Time out
22.00— Interior and exterior smoothing begun
26.00— Paste picked up for roll to be placed on one end of bowl
29.45— Roll flattened and smoothing of edges begun
30.30— Interior scraping begun
31.10— Exterior scraping begun
31.45— Smoothing of connection with sides begun
32.30— Roll placed on other end
33.45— Roll flattened and interior scraping begun
34.15— Exterior scraping begun
34.45— Very small roll placed on first end to improve curve, followed by a little smoothing with kajepe
35.45— Finishing of end begun
37.30— Marking of one end with fingernail begun
38.15— Notches cut with thread, pieces removed, and finishing of terrace begun
40.15— Marking of other end with fingernail begun
40.35— Cutting of notches with thread begun
41.05— Pieces removed and finishing of terrace begun
43.15— Finishing completed
Double-mouthed Vases
The first step in the construction of this type of vessel is the moulding of an open-mouthed bowl. Across the mouth of this bowl a clay bridge is placed. Finishing touches are given at this stage of the work, just as if the moulding had been entirely completed. The piece is set aside for a while to stiffen.
Later, additional rolls are added to each half of the mouth of the bowl by attaching them to the rim proper and also to the bridge. In this way two necks are gradually built up. At regular intervals the work is set aside to stiffen in order that it may support the additional weight to be added. The shape and height of the two necks depend entirely upon the whim of the potter. The moulding of the upper parts of the two necks is a delicate process, and requires considerable skill. The roll-marks on the interior of the neck, if obliterated at all, are destroyed by the fingers only, since the diameter of the neck is too small to permit the use of a kajepe. After the moulding has been entirely finished, a handle connecting the two necks is usually put across the top at right angles to the bridge which forms the base of the necks. Obviously this handle has a structural as well as ornamental purpose.[35]
Handles
In all cases in which handles are to be applied the vessel is entirely finished before they are put on. The potters of San Ildefonso make three types of handles: (1) passing across the top of an open-mouthed bowl, (2) attached vertically to the side of a vessel, (3) attached horizontally to the side of a vessel. All three types consist of a short roll of paste of the proper length, usually somewhat smaller in diameter than the rolls used in the body of the vessel. This roll is slightly flattened before it is applied.
The first two types of handles are placed on the vessel in the same manner. The ends of the flattened roll are pinched still flatter. In the case of the handle over the top of a bowl, first one end of the roll, then the other, is attached by pressure to the exterior of the rim. The vertical handle on the side of a vessel is attached first to the exterior of the rim, then bent over and attached to the side just above the shoulder. The left hand is used as a stop on the inside of the vessel in order that the shape of the side may not be altered by the pressure exerted in applying the handle. The junction-lines between the handle and the vessel are then obliterated with the forefinger of the right hand. Small pellets of paste may be added to the side of the contacts, especially on the inner side of the handle where it makes an acute angle with the side of the bowl. In this way the welding is made solid, and the curves regular. Finally the curve of the handle itself is made symmetrical. A few finishing touches, such as the obliterating of fine cracks in the handle and the smoothing of its surface, complete the process. Such a handle may be constructed in three to five minutes.
Horizontal handles are attached to the sides of vessels in an entirely different manner, being keyed or riveted in, rather than merely welded on. Handles of this type are usually put on in pairs. The position of one handle is chosen and the rim of the finished pot is marked to show its location; by sighting across the top of the vessel a point exactly opposite is also marked to give the location of the other. For each handle two holes, about three-eighths of an inch in diameter and fairly close together, are cut through the side of the vessel from the exterior with a small stick. One end of the roll which is to form the handle is inserted in one of the two holes. Then the other end is similarly inserted. The left hand holds the first end in place on the interior, while the other end is being put in (pl. 17, b). Next the junctions between the ends of the roll and the interior surface of the vessel are smoothed over and obliterated with the fingers of the right hand. The handle itself is flattened a little, and small pellets of paste are added at the junctions between it and the exterior of the vessel. These are smoothed over with the fingers, so that superficially the handle looks as if it had been pressed upon the surface in the same manner as a vertical handle. A smoothing of curves, and touching up of the handles to make them symmetrical, form the last stage of the construction. It took one potter just an hour to place a pair of handles of this type on a globular bowl.[36]