Volume 5 — CANNING AND DRYING (continued 2)
Reading edition
92. RHUBARB for canning should be selected when it is most tender. The variety having red stems is the most attractive after it is canned. Only the heavy stems, which should be cut from the leaves, may be canned. Cut these stems into inch lengths, blanch them 1 to 3 minutes in boiling water, and cold-dip them quickly. Then pack these pieces into the jars. If the rhubarb is being canned for sauce, fill each jar with sirup No. 5 or 6; if it is being canned for pie, use sirup No. 1, 2, or 3. Next, adjust the rubbers and covers and proceed with the processing. In the water bath, cook for 15 minutes; in the pressure cooker, cook for 10 minutes at a 5-pound pressure or for 6 minutes at a 10-pound pressure.
GROUP 2--HARD FRUITS
93. APPLES.--The canning of apples should be done when there is a large supply of summer apples that cannot be stored for winter use or used at once. Canning is also a good means of utilizing windfall apples. This fruit may be canned in quarters for sauce, in slices for pie, or in any other desirable shape or condition.
After apples for canning are selected, wash them, scald, or blanch, them for 1 to 5 minutes in boiling water, and cold-dip them quickly. Next, peel and core them, and cut each one into pieces of any desirable size. As these pieces are cut, drop them into salt water--1 teaspoonful of salt to each quart of water--to prevent them from discoloring. Then pack the fruit into the jars and fill the jars with boiling sirup. If the apples are intended for pie, use sirup No. 1, 2, or 3; if they are for sauce, use sirup No. 3, 4, or 5. When the jars are filled, adjust the rubbers and covers and proceed with the processing. If the pieces are large, cook them in the water bath for 20 minutes; if they are medium in size, cook them for 15 minutes; and if they are in the form of slices, cook them for 10 minutes. If they are to be processed in the pressure cooker, cook them for 8 to 12 minutes at a pressure of 5 pounds or for 6 to 8 minutes at a pressure of 10 pounds.
If the apples to be canned are first baked or made into a sauce, simply pack them into jars and process them for a few minutes.
94. QUINCES.--Quinces may be canned alone, but they may be combined with apples to good advantage. If canned alone, they may require a heavier sirup than if apples are used with them. Prepare the quinces in the same way as apples. If apples are to be canned with them, cut the pieces of apples twice the size of the pieces of quinces. This should be done because more time is required for cooking the quinces soft. After packing the jars and pouring in the sirup, proceed with the processing. If quinces alone are in the jars, cook them in the water bath for 30 minutes; but if quinces and apples are combined, cook them for 20 minutes. In the pressure cooker, cook the jars of fruit for 12 to 15 minutes at a 5-pound pressure or for 10 to 12 minutes at a 10-pound pressure.
95. PEARS.--Pears for canning should be firm, but not hard. After sorting and washing them, blanch them for 1 to 3 minutes and cold-dip them quickly. Then pare, halve, and core them. Pack them immediately into the jars and pour sirup No. 3 or 4 over them. Next, adjust the rubbers and covers and proceed with the processing. In the water bath, cook them for 20 minutes; in the pressure cooker, cook them for 8 minutes at a 5-pound pressure or 6 minutes at a 10-pound pressure.
GROUP 3--SPECIAL FRUITS
96. FIGS.--Although figs are not a common fruit, there are parts of this country, particularly on the western coast, in which they are abundant. For canning, ripe figs should be selected. To prepare them, blanch them for 2 minutes in boiling water and cold-dip them. Then pack them into the jars and fill the jars by pouring sirup No. 4, 5, or 6 over the figs. Proceed with the remainder of the process as in canning peaches.
97. KUMQUATS AND LOQUATS.--Kumquats and loquats are small acid fruits resembling oranges in color and plums in size and shape. Such fruits are not very common, but they may be obtained in some markets. To can either of these fruits, wash them, blanch for 5 minutes, cold-dip, pack into jars, and fill the jars with sirup No. 5 or 6. In the water bath, cook them for 15 minutes. In the pressure cooker, cook them for 10 minutes at a 5-pound pressure or for 5 minutes at a 10-pound pressure.
98. NECTARINES.--Nectarines are a smooth-skinned variety of peach. Ripe nectarines may be canned in the same way as peaches, but they do not require so much sugar, sirup No. 2 or 3 usually being about right.
99. PERSIMMONS.--Persimmons are a seedy, plum-like fruit common to the southern and southwestern parts of the United States. This fruit is very astringent when unripe, but is sweet and delicious when ripe or touched by frost. Well-frosted persimmons should be selected for canning. Blanch them so that the skin may be removed easily and cold-dip them quickly. Then peel them and pack them into hot jars. Fill the jars with sirup No. 6 and process them in the same way as peaches.
100. PINEAPPLES.--Pineapples are better known than any of the other special fruits. For canning, those ripe enough to permit the center leaves to pull out easily should be selected; also, they should be free from soft or rotten spots, which are most likely to appear first near the bottom. Pineapples are graded in size by the number that may be packed in a case. These sizes are 24, 30, 36, and 42, size 24 being the largest and size 42 the smallest. Sizes 30 and 36 are best for canning.
In canning pineapples, first place each in boiling water for 10 minutes and dip it quickly into cold water. Then prepare it for the cans. This may be done by removing the peeling with a sharp knife, digging out the eyes, and then slicing or dicing; by slicing first and then peeling and taking out the eyes; or by peeling, taking out the eyes, and then shredding it with the aid of a fork. When it is prepared, pack the fruit into the jars, fill each jar with sirup No. 4 or 5, adjust the rubbers and covers, and proceed to process it. In the water bath, cook for 30 minutes; in the pressure cooker, cook for 12 minutes at a pressure of 5 pounds or for 10 minutes at a pressure of 10 pounds.
CANNING MEAT AND FISH
101. Both fish and meat, including that from fowl and game, may be canned at times that seem convenient and then used when an emergency arises or at a time when the same food will cost more to prepare. Fowl, game, and fish may be canned to special advantage during the season when each is plentiful. The best process for canning such foods is the one-period cold-pack method.
102. MEAT.--In canning meat, whether from domestic animals, fowl, or game, first cut it into pieces of a size that would be suitable for serving at the table. The meat may be left raw or it may be prepared by any desirable cooking process, such as frying, fricasseeing, braizing, etc. Careful attention must be given to the drawing of fowl that is to be canned, because the entire alimentary tract should be removed without being broken. The giblets should not be canned with the rest of the meat, as they will not keep so well. Whether the meat is to be canned raw or cooked, pack the jars as tightly as possible. If the meat is raw, add 1 teaspoonful of salt to each quart of food and fill the jars three-fourths full with boiling water. In case the jar is filled to the top, fat will rise and injure the rubber. If the meat is cooked, add any liquid that may have resulted from the cooking, as well as boiling water, provided more liquid is needed. Then, as in canning vegetables and fruit, adjust the rubbers and covers and proceed with the processing. In the case of raw meat, sterilize for 3 hours in the water bath, or for 1-1/2 hours at a 10-pound pressure in the pressure cooker. In the case of cooked meat, sterilize for 1-1/2 hours in the water bath, or for 30 minutes at a 10-pound pressure in the pressure cooker.
103. FISH.--To prepare fish for canning, first clean it by scaling it and removing the entrails. Wrap the cleaned fish in cheesecloth and steam for 15 minutes. After steaming, remove the bones, which will come out easily, and cut the fish into pieces. Pack the pieces into the jars, and to each quart of the food add 1 teaspoonful of salt. Next, fill each jar three-fourths full with boiling water and continue with the canning in the manner directed for meat.
STORING AND SERVING CANNED FOODS
104. After jars of canned food have been cooled and tested for leaks, carefully wiped with a damp cloth, and then wrapped and labeled, they are ready to be placed in storage. Such food should be stored in an orderly manner on shelves that may be covered to keep off dust, or in a large cupboard provided with doors that may be closed. The temperature of the room in which the canned foods are kept is of no great importance, but, in homes provided with cellars, the cellar is the logical place in which to store them.
Canned foods, no matter how well the canning may have been done, undergo gradual deterioration. Therefore, those kept for more than a year, will not be so good as those used during the first year after canning. If canned foods from a previous year are at hand when new cans are ready to be stored, the old ones should be placed to the front of the shelves and the new ones to the back, so that the old ones will be used up first.
105. Canned foods take the place of raw foods, and whether they should be cooked or not depends on the kind. In the case of vegetables, most of them may be made ready to serve simply by heating them, although they may be used in the preparation of many dishes, as is evident from the recipes throughout the lessons. In the case of fruits, some may be served just as they come from the can; however, there are many ways of using canned fruits in the making of desserts, as is pointed out in Fruit and Fruit Desserts. In the case of meats and fish, the food, if cooked before canning, may be prepared for serving simply by heating it; whereas, if it is canned raw, some cookery method for meat will have to be applied.
When foods are boiled, one reason for a change in taste is that oxygen is driven off by the boiling. Therefore, to improve the taste of canned foods that are to be served without any further preparation, it is advisable, when a jar is opened, to pour the contents into an open dish and thus expose it to the air.
In opening jars of canned fruit, care must be taken not to crack or nick either the top of the jar or its cover. The cover of any kind of jar will come off easily if a little air is admitted. Insert a knife blade between the cover and jar rubber of a glass-covered jar, but do not use a knife to loosen a metal top, as it may bend the edge in places. Hot water poured over the jar will assist in opening it.
SCORING CANNED FOODS
106. In order that the housewife may judge the quality of her own canned products according to standards that have been set by canning authorities, a score card, together with an explanation of the terms and the procedure, is here given. The beginner in canning will do well to score her own foods, so that any fault that may be found can be corrected when similar foods are canned at another time. In fact, the chief purpose of scoring any product is to learn of faults that may be corrected. The scoring should be done as impartially as if a disinterested person were doing it, and if the cause of any trouble is not readily apparent, pains should be taken to find it out.
SCORE CARDPER CENT.
General appearance10
Method of sealing10
Proportion of food to liquid10
Flavor35
Texture of food20
Color15
Total100
107. As a rule, scoring, or judging, is done at the time the canned food is to be opened and used.
The general appearance is judged before the jar is opened. If a jar of food is well and symmetrically packed and has clear liquid and a good color, it should receive a perfect score of 10.
The method of sealing must also be judged before the can is opened. A properly filled jar with the rubber and cover in good condition and tightly sealed should receive a perfect score of 10.
The proportion of food to liquid should score 10. The jars should be as full of uncrushed food as possible, and the liquid that has been added should fill all crevices to the very edge of the jar.
The flavor is judged after the can is opened, and if it is perfect, it is entitled to a score of 35. The flavor of canned fruit is injured by any kind of spoiling, such as molding, fermentation, etc. Fruits canned in good condition should retain the characteristic flavor of the fresh fruits; also, they should contain sufficient sugar to be agreeably sweet, but no more. Canned vegetables should retain their characteristic flavors, with no sour, musty, nor disagreeable taste, and be slightly salty. Canned meats and fish should also possess their characteristic flavors.
The texture of food is entitled to a score of 20 if it is perfect. The canned food should be whole; that is, in the original pieces as they were put into the can. Underripe fruit or insufficiently cooked fruit or vegetables do not have the proper texture; neither do overripe or uncooked foods.
The color of canned food merits a score of 15 if it is right. Fruits and vegetables should have retained their natural color. Fading after canning may be prevented by wrapping the cans, as has been explained.
DRYING
PRINCIPLES OF DRYING
108. DRYING consists in removing the moisture contained in foods by evaporation and thus rendering them less susceptible to the attacks of undesirable bacteria. Dried foods, as foods so treated are called, will not replace fresh or canned foods. However, they are valuable in many cases and possess some advantages over such foods. For example, the weight of dried foods is very greatly reduced, the storage space required by them is much less, and they are easy to keep without spoiling and easy to transport. Likewise, the containers for such foods are less costly than those required for canned foods and they are easily procured, since paper boxes or paper bags are satisfactory. In fact, the housewife, by taking care of the bags and boxes that come into the home, can easily provide all the containers she will possibly need at practically no cost.
109. The water in food that is to be dried may be evaporated by applying heat, by bringing the food in contact with moving air, or by subjecting it to a combination of both of these methods. The heat for drying may be obtained from the sun, as in the sun-drying method, or from the stove, as in the stove-drying method, while moving air for evaporating moisture may be obtained from an electric fan, as in the electric-fan drying method.
In the application of any of these drying methods, however, it is important to note that the more surface of food there is exposed, the more quickly will evaporation take place. Drying should therefore be done on devices constructed in such a way that air may pass up through food, as well as across its surface. In drying foods, the racks should be turned frequently, so that all parts will be exposed equally to the heat or the currents of air. Also, the food must be turned over often, in order that all parts will dry evenly.
110. Any fruit or vegetable may be dried if the method is properly applied, but there is usually more or less change in both the flavor and the color of the dried food. The more rapidly the drying can be done, the more natural will the color and flavor remain; whereas, the longer the process is continued, the greater will be this change.
Foods should be dried when they are in such quantity that they cannot be used to advantage in the raw state, when there is no market for them, when the owner cannot afford to give them away, and when home canning ceases to be practical and profitable. In other words, if it is not practical to save foods in another way, they should be dried.
DRYING METHODS
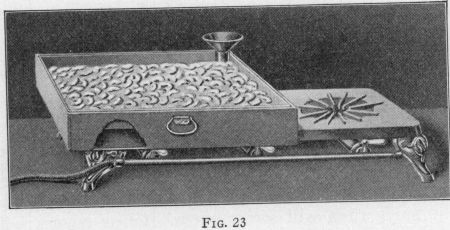
111. DEVICES FOR DRYING.--Many manufactured devices may be had for the drying of foods. Some are made so that they may be placed on top of a stove, like that shown in Fig. 23. This device is in the form of a metal box. It has a tray for holding the food to be dried, and underneath this is a space for holding water. Water is poured into this space through a funnel in one corner, and heat for drying is supplied by heating the water. Other devices are made so that they may be suspended over a stove, put into a stove oven, or used out of doors. Still others have a heating device placed inside of them. It is possible, however, to make drying devices in the home that will answer the purpose just as well as the devices that may be bought.
As has been stated, drying devices should be so made that the air may pass up through the food and across its surface. A pan, a platter, or a solid board, as will be readily seen, is not so good for drying as a wooden frame of convenient size that has small slats or fine, rustless-wire netting, or screening, attached to the bottom. Such a device may be covered with cheesecloth to keep out dirt. If it is to be used in the oven or set in the sun, a nail driven part way into each corner will provide feet and thus keep it from resting on the oven floor or any other flat surface.
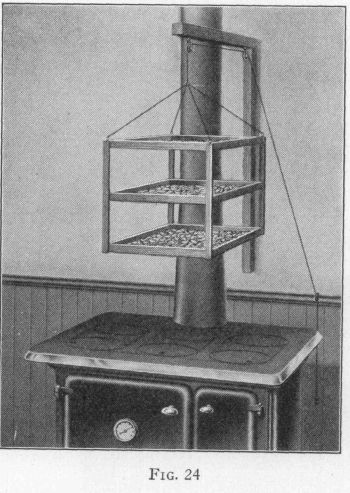
For suspending food that is to be dried over a stove, a rack like that shown in Fig. 24 may be easily made in the home. As will be observed, it consists of three trays fastened together. These trays are suspended by four strings tied to another string that runs over small pulleys. The pulleys are attached to a wooden brace that is secured to the kitchen wall. The pulleys and string permit the rack to be raised or lowered, so that the food may be easily put into and taken out of the trays.
112. SUN-DRYING METHOD.--If food is to be dried in the sun, spread it in a single layer on each tray, cover the trays so that no dirt will fall into them, and set them out of doors so that the sun's rays will strike them. Glass covers will help to increase the heat from the sun. As the sun changes, change the position of the trays or turn them. Food that is being dried outdoors should be brought into the house when the sun goes down and put out again the following morning. This procedure should be kept up until the food is so dry as to be leathery; that is, in a condition that will permit of bending without cracking.
113. STOVE-DRYING METHOD.--If food is to be dried by the stove-drying method, it may be placed in the oven, on top of the stove, or suspended above the stove.
114. If the oven is to be used, a device that fits the oven should be employed. Spread the food on the trays in single layers, and put the device into the oven. The temperature of the oven demands attention in this method. Only a very moderate heat may be applied at first, 110 degrees Fahrenheit being considered the ideal temperature for beginning. As it is difficult to hold an oven at such a low temperature if a fire is burning, the oven door should be left open to admit air. The temperature of the oven of a coal stove in which the fire is banked or is being allowed to go out is usually ideal for drying foods. If desired, the heat of an oven may be gradually increased to about 180 degrees as the food dries; but the application of greater heat is liable to scorch the food and injure its flavor. The food must be turned often to permit it to dry evenly.
115. If food is to be dried on top of the stove, the device shown in Fig. 23 will prove satisfactory. The same arrangement may be improvised by placing a metal tray over a large flat vessel of water. Place the food to be dried in a single layer on the tray over the water. Let the water boil and keep it boiling, and turn the food frequently so that the heat will be applied to all sides. Continue this process until the food is leathery, when it may be stored.
116. If food is to be dried in a rack suspended above the stove, a rack like that shown in Fig. 24 should be used. Cover the trays in the rack with a single layer of food, and dry it to the leathery stage, when it may be removed and stored. In using this device, only a coal or a wood stove is practical. When the heat coming from the stove is not great, the rack may be allowed to come close to it, and when the heat is intense the rack may be drawn up. Regulating the distance of the rack from the stove will tend to keep the food at a uniform temperature and allow it to dry evenly, especially when the food is turned from time to time.
117. ELECTRIC-FAN DRYING METHOD.--If a house is wired for electricity, drying foods by means of the air-currents generated by a moving electric fan is a simple matter. Use devices like those required for the sun and oven-drying methods. Spread the foods to be dried on the trays in a single thin layer, and arrange them so that the air from the electric fan will blow over them. Turn the trays as the food dries, so that one part does not dry sooner than another; also, turn the food frequently so as to expose all parts alike. If the fan can be placed so as to blow across a stove and thus blow heated air on the food, it will dry more quickly. A very warm kitchen is an excellent place in which to do the work with an electric fan, as the combination of air and heat does the work more rapidly than either one used alone.
118. COMBINATION DRYING METHODS.--A combination of any of the drying methods mentioned may be used effectively. Drying may be started in the sun and completed in the oven, or it may be started with an electric fan and completed in the sun or the oven. Any means whereby the time required for drying may be shortened is advantageous.
DIRECTIONS FOR DRYING VEGETABLES AND FRUITS
119. PREPARATION OF FOODS FOR DRYING.--The correct preparation of the foods before drying is very important. The thinner and smaller the pieces to be dried are cut, the more quickly may the process be completed. Any skins or hulls that would prevent the rapid evaporation of moisture from the food must be removed or broken, and every raw food that is to be dried must first be immersed in salt water made in the proportion of 1 teaspoonful of salt to each quart of water, as this prevents discoloring to a great extent.
120. STRING BEANS.--Beans for drying should be selected while they are young and tender. Wash them and remove the strings if this is necessary. Cut them in half, lengthwise, with a sharp knife. Drop them into salt water, remove, and spread on the drying trays. Dry by any method selected.
121. CORN.--Corn that is to be dried should be at the dough stage; younger corn contains too much water for good results. Prepare the corn by husking it and removing the silk. Then blanch it in boiling water for 5 minutes, after which cut off the grains close to the cob with a sharp knife. Spread these on the drying trays and proceed according to the method desired.
122. GREENS.--Wash the greens thoroughly. Cut across the leaves several times. Drop them into salt water, remove, and spread on the drying trays. Dry by any method selected.
123. TUBER AND ROOT VEGETABLES.--Irish potatoes, sweet potatoes, carrots, parsnips, and even onions may be successfully dried. First peel or scrape them. Then slice or cut them into small pieces. Drop them into salt water, remove from the water, and spread them on the drying trays. Dry them by the method selected.
124. SMALL FRUITS.--Berries, cherries, and other small fruits may be dried, but since they contain considerable water, the drying is not accomplished very rapidly. Ripe, firm fruit should be selected and cleaned. Cherries should have the seeds, or pits, removed. Such fruits must be dried as quickly as possible, or they will spoil in the process.
125. APPLES, QUINCES, AND PEARS.--In order to dry apples, quinces, and pears, wash, peel, core, and cut the fruit into eighths. Put the peeled fruit into the salt water and keep it there until all are peeled and cut and ready to dry. Then spread the cut pieces in a thin layer on the drying trays and proceed according to the method desired.
126. PEACHES AND APRICOTS.--Peaches and apricots are most easily dried with the skin on. Wash them thoroughly and, in the case of peaches, rub the fuzz off the skins. Cut the fruit into halves, remove the seeds, or stones, and drop the halves into salt water and keep them there until they are ready to be placed on the drying trays. Dry by any process desired.
STORING AND COOKING DRIED FOODS
127. When foods are taken from the various drying devices to be stored, they still contain a very small quantity of moisture. This moisture, however, is not distributed evenly, because some of the pieces of food are larger than others, or some have been exposed more than others to heat or air in drying. To offset this unequal drying, the containers in which the foods are to be stored should not be closed permanently as soon as the food is put into them. Rather, once a day, for about 3 days, the food should be poured from one container into another and back again several times. This will mix all the food and distribute the moisture equally.
128. The object in storing dried foods is to keep them as dry as possible; that is, not to allow them to absorb moisture from the air. The best containers in which they may be placed are those coated with paraffin. Paper bags or boxes may be prepared in the home by dipping them into paraffin, although heavy paper containers already covered with paraffin may be bought in supply stores. Heavy paper or cloth bags may be used, provided they are stored in a dry place where there is no danger from rats and mice. Containers of any kind should be securely tied before storing them permanently. Bags and boxes of dried food are preferably suspended from rafters in an attic, but if this is not possible a rack or a bin located in a place that is not damp will answer.
It is well, in storing dried foods, to use containers that will hold only a small quantity of food, so that when some is taken out to be cooked a large amount will not be exposed. It is best to store just enough for a meal or two in each container.
129. Before dried foods are cooked, as much as possible of the water evaporated in drying should be restored. In order to do this, soaking is necessary. The dried food should be put into cold salt water made in the proportion of 1 teaspoonful of salt to 1 quart of water and soaked for at least 1/2 hour. The salt water seems to help restore the original color of the food. When dried vegetables are to be cooked, they should be cooked in the salt water in which they are soaked; when dried fruits are to be cooked, the salt water should be poured off and fresh water used. Long, slow cooking at a low temperature is better for all kinds of dried foods than rapid cooking. The fireless cooker will be found valuable for cooking dried foods.
CANNING AND DRYING
EXAMINATION QUESTIONS
(1) Give three reasons for canning food.
(2) What foods may be canned?
(3) (a) How may satisfactory canning equipment be provided at little or no cost? (b) What metals are not good for canning or preserving kettles?
(4) (a) What are the requirements for satisfactory types of jars? (b) What are the qualities of good jar rubbers?
(5) What kind of tin cans should be used for canning fruits or vegetables that contain acid?
(6) (a) Why should care be exercised in the selection of foods to be canned? (b) What points must be considered in the selection of foods for canning?
(7) Why do canned foods spoil?
(8) How may canned foods be prevented from spoiling?
(9) (a) What are spores? (b) What connection have spores with the spoiling of canned food?
(10) Mention three things that assist in the keeping of canned foods.
(11) (a) How should jar covers and rubbers be treated in the open-kettle canning method? (b) Describe the filling and closing of jars in this method.
(12) (a) Describe the utensil used for processing in the one-period cold-pack canning method. (b) How should jars, covers, and rubbers be treated in this method?
(13) (a) How are foods blanched and scalded, and why are blanching and scalding done? (b) How are foods cold-dipped, and why is cold-dipping done?
(14) (a) How should foods be packed in jars in the cold-pack canning method? (b) How should the rubber and cover be adjusted before processing? (c) When should you begin to count the boiling time for food that is being processed in the water bath?
(15) (a) How and when should jars be closed in the cold-pack method? (b) How should jars of food be cooled?
(16) (a) How should jars of food be treated for storage? (b) How should they be stored?
(17) Mention some advantages of dried foods over fresh or canned ones.
(18) What important points should be considered in the process of drying food?
(19) What are the proportions of salt and water into which foods that discolor are placed before they are canned or dried?
(20) What precautions should be observed in the storing of dried foods?