BUILDING THE LOG CABIN
Reading edition
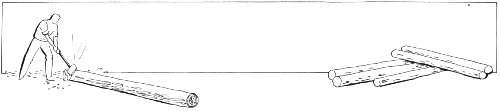
Mention of a “cabin in the woods” brings a vision to the average man of one thing—a log cabin. And, although few people will ever build a real log cabin, most of us have inherited from our pioneer ancestors a romantic attachment to the sturdily constructed homes of our early settlers. The pioneers built of logs primarily because they had no other materials and also because they needed a shelter that would be a protection against Indians, wild animals and rough weather.
But just because a cabin is built of rough logs instead of finished lumber doesn’t mean that it will be less expensive in this day and age. According to such experts as C. D. Aldrich, who designs some of the finest cabins in the country, a log cabin costs about twice as much as a frame cottage of comparable size and design. A one-room-and-porch cabin that can be built of lumber for about $500 would cost roughly $1,000 if well built of logs.
There are two styles of log cabin construction—the traditional kind with the logs laid horizontally and the stockade type in which the logs or half logs are placed upright. The latter is easier to build since skilled axe work is not required to notch the log ends and the principal task is to hew down the sides to make them fit closely. On the other hand, a cabin built with horizontal logs is the favorite with most people—probably because it is the most familiar.
Logs for a stockade style cabin need not be particularly heavy since they are to be spiked to the horizontal members of a timber frame, but care should be taken to obtain pieces as straight as possible to avoid waste. Second growth timber is most frequently used. Chinks between the timbers are caulked with oakum, or, if the fit is very loose, combine oakum with willow wands or narrow battens. However, most people building a recreational home of logs will want the horizontal type of construction, so this chapter will be devoted to that subject.
One of the first things to decide after the rough plans are drawn and the list of materials estimated is whether the cabin is to be of peeled logs or logs with the bark left on. Logs that are to keep their bark must be cut in late October or November and stacked on skids until spring. Be sure they are piled so that plenty of air circulates. Logs to be peeled should also be cut in fall or winter and seasoned—preferably for six months or more. To prevent cracks when they begin to weather, have the logs scored down one side—a two or three inch strip of bark removed the entire length. Then if the logs crack a bit, they will do so along the scored lines and they can be laid so the cracks won’t show in the finished building.
The size of your cabin, or rather the dimensions of the various walls, is not necessarily limited by the length of the logs, because they can be spliced. (See Fig. 7 for the best method of splicing.) If you are counting on leaving a projection at each end beyond the wall, then you can figure that logs 20 feet long will give you a room with inside walls about 16 feet long. Logs between 20 and 30 feet long are most satisfactory unless you have a large crew to help. They should average about 10 inches at the top end with as little taper as possible. If you get smaller logs, it will require too many to gain the needed height, and logs much larger than that are unwieldy to handle.
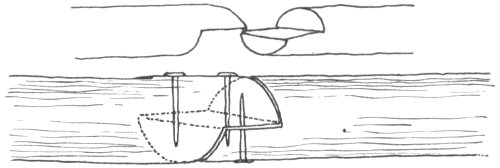
Fig. 7. How to splice logs.
The best timber for a log cabin on the Pacific Coast is redwood or western cedar. Balsam, hemlock, pine, and, if you are lucky, tamarack also make good logs. The latter are especially fine. You may buy your logs from a lumber company, from a public utility company’s supply of power-line poles, or you can hire a good woodsman to cut them for you—if you can find the timber. Certain sections of the National 14 Forests are available for cutting logs and stumpage charge is very nominal.
There are several possible methods of fitting logs together. The choice depends entirely on how much time and labor you care to devote to it, but once a style has been adopted carry it throughout the whole house. Use similar logs or poles instead of dressed lumber wherever possible. They’re more “woodsy.” Speaking of style, all log ends that project should be finished off with an axe, not sawed.
After the sill logs are laid on the leveled boulder foundation, or in the case of a concrete or stone wall underpinning bolted to the foundation, the next step is to lay the floor joists. They should be not less than 2×6 material, spaced not over two feet on center. Notch them into the sill log and the first log above as shown in Fig. 8 and spike them in.
Use Spirit Level Frequently
You are now ready to start erection of the walls. Make frequent and careful use of the plumb line and spirit level in this work. Without constant checking the walls have a way of going off at odd tangents.
The simplest and least difficult style of fitting logs is the “saddle and notch,” in which the logs are given a rough notch and laid together without special fitting or trimming. The spaces are later caulked with oakum. While this is the simplest method, it is the poorest from the standpoint of weather tightness.
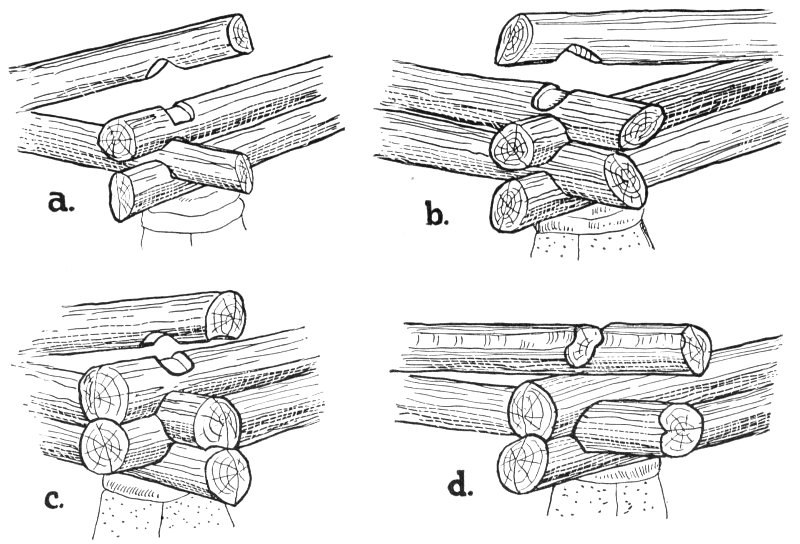
Four methods of notching logs.
Another and better method is the same as above except that the notches are so carefully cut that the logs fit closely and must be hewn down along two sides to provide neatly joined surfaces. This also will require some caulking but not as much. It is customary to lay a strip of oakum between all logs, regardless of the style of fitting.
Cupped Logs Fit Snugly
A third method is to use “cupped” logs. The same saddle and notch is used at the corners, but the upper log has a concaved channel cut its entire length, which makes it fit down snugly over the lower log. The cup may be cut with curved-blade adz or with a heavy gouge. This is more work but well worth it. Cut each cup to fit its individual lower log, marking the cup with a pair of dividers to insure a close fit. When you have a perfect cup (which means rolling the log into position several times to try its fit) lay a layer of heavy oakum along the lower log, roll the upper into its final position and spike it down.
The finest method of all is a further refinement of the cupped log style. The upper log is cupped as above but, instead of a simple notch at the end, the upper log is cut out exactly to fit down over the lower tightly, while the lower is not notched at all. Oakum is strung the same as for other methods and laid in at the corners. In the best work of this type no oakum should show. Although the pioneers put their cabins together without nails, they did so because they had no nails to use. To be safe, spike all logs together with 12-inch spikes—the largest size made.
Before you get the walls too high, give a thought to windows and doors. There are two ways of taking care of them. The extravagant way, much used by our forefathers, was to build with logs to the top line of the proposed opening and then cut out a hole the required size. An easier—and 15 less wasteful—way, if you are doing your own work, is to use short logs, leaving a more or less rectangular opening. Then nail a couple of straight boards where your frames should come and saw off the rough projecting log ends as illustrated above.
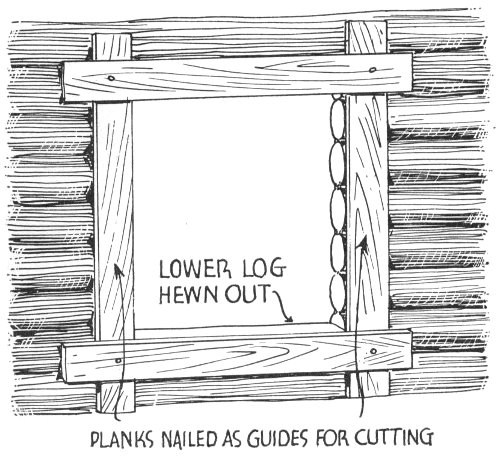
PLANKS NAILED AS GUIDE FOR CUTTING
LOWER LOG HEWN OUT
Incidentally, in planning your house remember to take into consideration that a log cabin’s interior absorbs a great deal of the light unless—God forbid—you intend to whitewash the walls. Therefore, plan for as many windows as your walls will allow without unduly weakening them or disrupting your interior plans.
Use timber at least two inches thick for window and door frames and wide enough to protrude slightly on the outside of the log wall. The bottom piece—or sill—of the window frames should have a pitch of about one inch to the outside and project two inches to allow for drainage of rainwater. Don’t try to build your own windows. Order them to size from a mill and set them in.
Roof Should be Sturdy
The pitch of the roof and the width of the eaves are largely matters of personal taste and the kind of cabin you are building. A low pitched or flat roof, however, must be thoroughly braced if it is to bear a heavy load of snow, and the additional materials may cost more than a steeply pitched roof. The most effective roof for many cabins is low pitched with wide eaves—not too wide, of course, but wider than you’d have on a city house. Build the gable ends to the height you finally decide on; then trim down the rough ends along a line marked to the pitch of the roof.
If you have been wise, you have a long, straight log of unquestioned strength saved for your ridge pole. This should rest in notches at the very peak of the gables, and since it forms the keystone of your house, be sure it is solid and well bedded in oakum. The auxiliary roof supports, called purlins, run parallel to the ridge log and should be set by notching out the gable log where the purlin end rests. Cope the log above it so that the two gable logs grip the purlin firmly. These purlins ought to project eight or ten inches beyond the roof itself to allow for axe-trimmed ends. (Fig. 9.)
Smaller Logs for Rafters
Rafters are the next problem. Choose smaller timbers, yet ones that are well proportioned to the purlins. For the average cabin, logs with four-inch butts are about right. They should be spaced not more than two feet on the centers. Saw a square cut into the plate log—the top logs of your walls—then square a place on your rafter to fit into this cut. Drive it well home. (Fig. 9.)
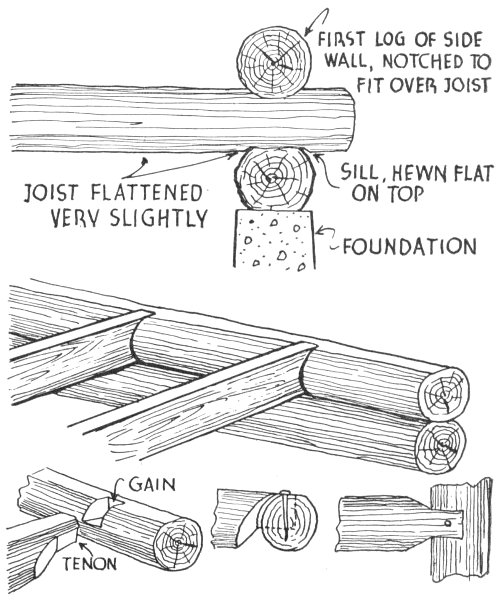
Fig. 8
FIRST LOG OF SIDE WALL, NOTCHED TO FIT OVER JOIST
JOIST FLATTENED VERY SLIGHTLY
SILL, HEWN FLAT ON TOP
FOUNDATION
GAIN
TENON
Each rafter should be cut in slightly to the purlins and spiked tightly to each purlin and to the ridge log. When setting in any of these pieces don’t forget to bed them well with oakum to make sure that they are weather tight. 16 Dressed siding is good material for the roof. On this nail the roofing you have selected.
The type of roofing used depends on how much you want to spend. Composition roofing is fire resistant and will last quite well, but it is not particularly attractive on a log cabin. Shingles laid in the customary way with the butt ends exposed for about one-third of the length make a good roof. Shakes probably make the most interesting as well as durable roofs for a cabin, although they are more expensive. Shakes come in various sizes and add a final distinctive touch to a house.
If you expect to use your cabin in very cold weather, a double roof would be the wise provision. After laying your sheathing, cover it with a layer of building paper or other insulating material. Then nail on a series of 2×2 timber strips parallel to the rafters beneath. Across these strips lay another layer of sheathing and then the shingles or shakes. This forms a dead air space that is effective in insulating the house against cold.
Use Planks for Cabin Doors
If you are going to keep the pioneer atmosphere in your log cabin, don’t spoil it by buying millwork doors. Good, honest plank doors—made of any dressed timber, with cross pieces firmly nailed and clinched—are more in the spirit of things. A little ingenuity will go a long way toward making a beautiful door out of humble materials. Have some country blacksmith make a set of strap hinges and an old fashioned latch. You’ll be well pleased with the effect. A good, strong snap lock is a necessity to keep out intruders in your absence, of course.
If you want a good floor with a cabin “look” to it, get a supply of planks in widths varying from 6 to 12 inches—and have them tongue-and-grooved at the mill. Instead of nailing them, bore ¾-inch holes half way through and fasten them down with screws. Into each hole drive a hardwood plug, gluing it for tightness; then cut it off and smooth it down flush with the floor with sandpaper. This gives the effect of a “pinned” floor, which was very popular with the pioneer cabin builders.
Tongue-and-grooved flooring in narrow widths should be “blind-nailed”—the nails driven in at a slant from the sides and set with a punch, but for wide planks it is perfectly all right, if you wish, to nail through the boards and let the heads show.
How to Prevent Pests
Log cabins, particularly those where the bark is left on, fall heir to many evils in the form of borers and beetles that make their homes in the bark. Winter-cut logs are less likely to have borers than others, and if they are to be peeled, peeling should be done in the spring before the first flight of the beetles. Cedar and redwood are almost entirely free from borers. Peeled logs are not likely to attract boring pests, but they may be the home of larvae previously laid there.
If you do not care if your logs are stained, they may be painted with a solution of liquid oil coal-tar creosote. This stains the bark a dark brown, if used straight, but diluted with three parts kerosene it stains only slightly. The odor is rather unpleasant, but if the treating is done several months before the logs are used, it will wear off.
Pyridine, a colorless liquid, is one of the best pest killers. It also has a strong, unpleasant odor. It should be applied on a windy day and in the open air. It burns the skin slightly, so be careful. Also, it is highly inflammable.
Paradichlorobenzene is a very effective control but is not permanent in effect. It will, however, rid your logs of existing pests by slowly liberating a gas which kills the insects. Dissolve three parts, by weight, in a gallon of kerosene and apply either with a spray gun or a brush. Small logs may be dipped in a trough filled with the solution. Two gallons will saturate about 100 square feet of wood surface.
For logs that are to retain their bark, it is also well to paint all cut places and knots with crude creosote soon after cutting and again before use.
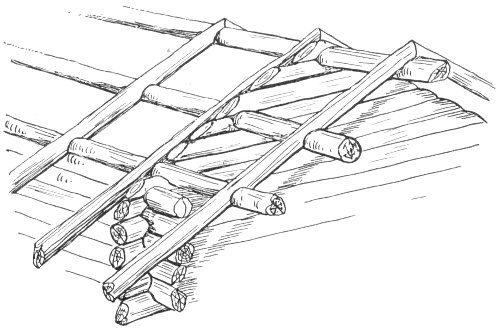
Fig. 9. Gable end showing ridge pole and purlins with rafters notched over them.
17