BUILDING A CABIN OF STONE
Reading edition
Next to a log cabin one of the most effective in appearance is one built of stone—rough field stones and boulders that can be picked up on the shore of any lake or stream. Naturally, such a house is a pretty big task for an amateur builder—not that it requires much more technical knowledge but because stones have a way of getting pretty heavy when they have to be lifted 8 or 10 feet off the ground. However, the result is well worth the effort.
If you are ambitious enough to want to build a stone cabin, here are some simple directions about how to do it. They are the result of actual experience but, of course, cannot be taken as a practical course in masonry.
The first step is like the old recipe for rabbit stew—you get some rocks and a load or two of aggregate, clean sand and numerous sacks of cement. (Tell the cement dealer what you plan to do and he’ll advise how much of each you’ll need.) You’ll also need a quantity of rough lumber, 2×4’s, 1×6’s, and such, for the framework and a more or less water-tight mortar boat in which to mix your mortar.
A cabin of stone requires a full concrete or rock foundation. The walls will be extra heavy, so the footings as well as the foundation walls should be proportionately wider and thicker than those described for log and frame cabins.
MORTAR FILL
SMOOTH FORM OF PLANKS OR PLYWOOD
MORTAR
FOUNDATION
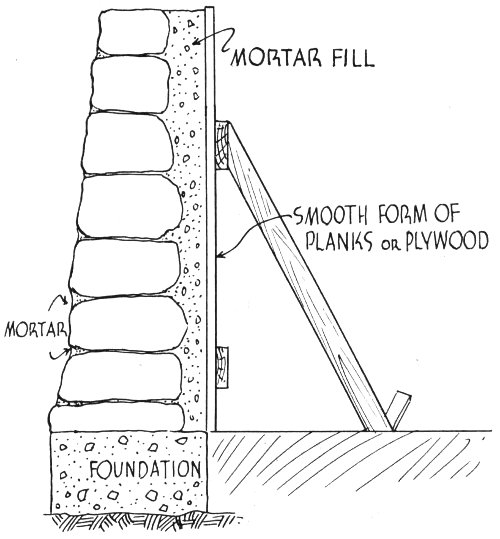
After the foundation is poured, erect a frame for your house to the height of your roof plate on the inner side of the foundation walls, putting rough boarding on the outside of 2×4 studs. This will give you something to work against to insure plumb walls.
Stone walls should be at least one and one-half feet thick at the bottom (remember this in building the foundation) and taper to eight inches or so at the top. The larger rocks, of course, should be used lower down, although, if the work is carefully done, an occasional large one may be set in higher up to lend effect.
Mix Mortar Thoroughly
Start the first course of stones about three inches from the board form and fill in the space between with mortar. The correct mixture for this mortar is six parts of clean sand to one part of cement. After a little experimentation you will find the correct consistency, but be sure that it is well mixed. As one expert says, “Mix the stuff with your hoe until your back is broken and then mix it some more.” Wet the stones thoroughly before setting in the mortar.
The end of each stone should be firmly bedded in the mortar, and as soon as several courses of rock have been laid, tamp the mortar well down. Small pieces of rock may be pushed into the mortar if you wish to make it go farther.
When you build your wooden form, of course you put up the door and window frames. They can’t be cut out of the walls afterward as with a log cabin. Drive numerous long spikes into the outer surfaces of these frames. This gives you something to “tie” to when you reach that height with your masonry.
Building a stone house is slow work, and since you’ll have to leave your work at times, remember that all mortar that has been laid the day before must be thoroughly wet before fresh mortal is applied on top of it. And the entire walls ought to be wet down at least twice daily for a week or more after completion.
18
When you have reached the top course of stones, set in a row of threaded iron bolts two feet apart and long enough to allow three inches of the threaded end to stick up. On these you must bolt 2×4’s, so that you have something to nail the rafters to.
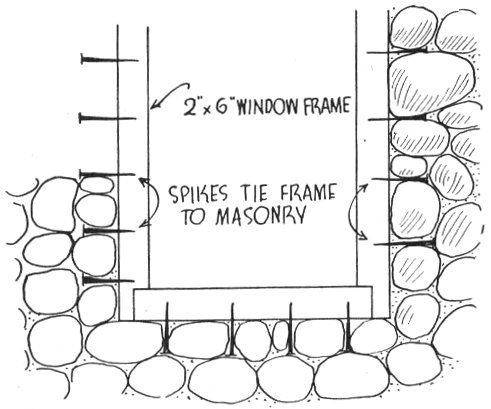
Window and door frames are set into the masonry as it proceeds, with long spikes protruding to “tie” them firmly.
2″×6″ WINDOW FRAME
SPIKES TIE FRAME TO MASONRY
When the walls have set, remove the interior wooden forms and go over the inside walls to fill up any air holes. These are not important unless they are too large. The rest of the job is done just as in finishing any other house. You’ll probably want to cover the interior with some material, because concrete is pretty cold and might remind someone of the time he was arrested for speeding.
The cost of a stone house depends on the amount of material you can find lying around the neighborhood and the cost of labor. Some stone cabins, with most of the labor hired, have been built for approximately $2.50 per square foot of floor space. This includes labor, materials, built-ins, electrical wiring and fixtures, and plastered walls. If you find it necessary to hire skilled stone masons or to transport your material considerable distance, the cost will be higher. You can, of course, lower it by doing a larger amount of the work yourself.
Remember that stone work is slow work, so allow yourself plenty of time. The first course or so of stone will drop into place pretty fast, but don’t forget that Rome was not built in a day—and Rome was built of stone.
For making colored concrete, for floors, hearths, etc., a topping containing the color is put on over the previously-poured base. This topping consists of five gallons of water per sack of cement, one cubic foot of sand and 1½ cubic feet of coarse aggregate. You may use factory-colored cement, or mix it on the job by passing the dry cement and coloring matter through a screen with a ⅛-inch mesh until well mixed.
An excellent treatment for colored concrete is to rub the surface thoroughly with equal parts of paraffin oil and benzine. This closes the pores and brings out the color uniformly.
In considering such permanent types of construction as stone, the great advantage of concrete should not be overlooked. Walls of this material are poured between wood, plywood or metal forms in the manner previously described for foundation walls.
Perhaps you object because the finished structure would not be “in keeping” with a woods atmosphere. But one method is possible whereby a facing of natural stone backed by poured concrete combines the advantages of concrete with a stone house “look.” This is called a Flagg Masonry Wall after its originator, Ernest Flagg, New York architect. The illustration shows the method of pouring such a wall.
For a beach house the smooth, modern lines of the concrete walls are quite appropriate for the clean, clear atmosphere of a beach site.
Concrete is fireproof, termite proof, requires little or no maintenance, and is not subject to decay. In a house that is often not in use, like a beach or mountain retreat, the value of a material of these characteristics is obvious.
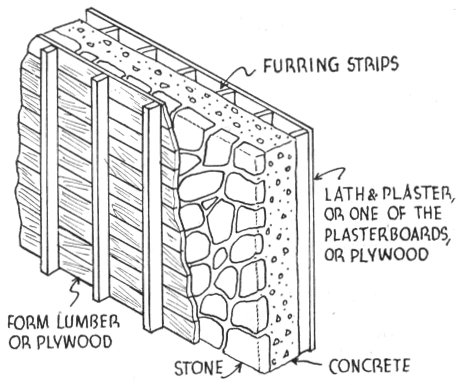
This is a detailed plan of the Flagg masonry wall, showing forms, concrete fill and outer covering of stonework.
FURRING STRIPS
LATH & PLASTER, OR ONE OF THE PLASTERBOARDS, OR PLYWOOD
FORM LUMBER OR PLYWOOD
CONCRETE
STONE
19