BUILDING THE CABIN FIREPLACE
Reading edition
If the chapters in this book were arranged in the order of their importance from the standpoint of cabin features, this one, dealing with fireplaces and chimneys, would probably come first. No matter what other ideas you may have about a vacation cabin you will undoubtedly insist on a fireplace as a dominant feature. To most people a cabin without one just isn’t a cabin at all.
When it comes to building it you can have the work done a lot easier than you can do it yourself. On the other hand, you’ll probably do a lot of arguing with the mason because, strange as it seems, there appear to be comparatively few masons who can build a fireplace and a chimney that will work to perfection. The instructions here have been collected from people who do know how, and if you follow them, you should have a successful fireplace.
In the preceding chapter you have read about the fireplace foundation. By the time the rest of the house is pretty well along this should be in good condition for the next step.
A fireplace consists of four essential parts: the fire box itself, the throat, the smoke chamber, and the flue. The shape and relationship of these are very important. One simple relation to remember is that the area of the fireplace opening should not be more than 10 times the area of the flue. Some people say 12 times, but 10 is a better average.
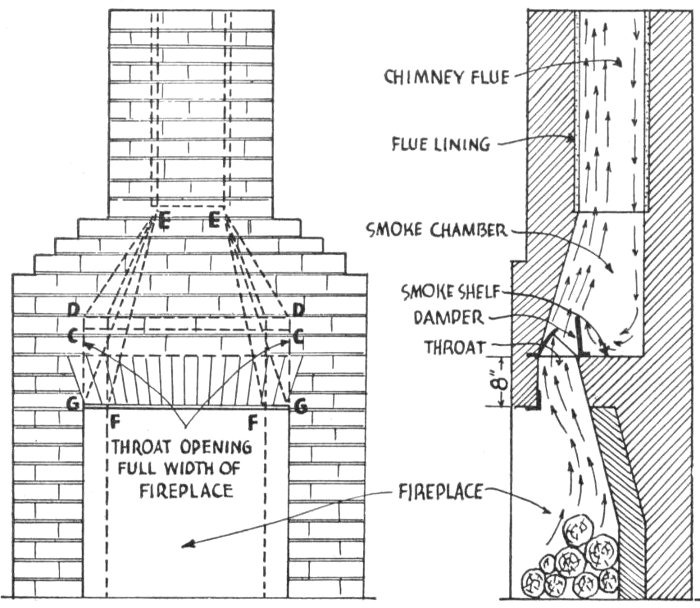
Fig. 6. Construction of fireplace.
THROAT OPENING FULL WIDTH OF FIREPLACE
CHIMNEY FLUE
FLUE LINING
SMOKE CHAMBER
SMOKE SHELF
DAMPER
THROAT
8″
FIREPLACE
The over-all dimensions of the fireplace, including mantel, are matters of proportion and taste, governed by the size and shape of the room. In almost every case the width of the opening should exceed the height. The top of the opening should be at least 30 inches from the floor but not much more than 40 inches unless it is at least six feet wide—and not many cabins can stand a fireplace as big as that. For a six-foot opening plan for a depth of about 24 inches. No fireplace should have a depth of less than 18 inches. Remember, however, that the deeper your fire box the less efficient it will be for heating purposes. The hearth should extend at least a foot on either side of the opening and have a minimum depth of 20 inches.
You may have the opening flush with the hearth, or, as some builders prefer, lay a course of stone several inches high across the lower edge and curve the bottom of the fire chamber up to it. Or you may elevate the entire bottom of the fireplace. It is smart to plan the hearth flush with the floor so that trash may be swept into the fireplace without using a dustpan.
Rough native stone, of course, is the most interesting material for a cabin fireplace and chimney. Brick seems too refined for the woods. If you want the finished job to look as massive in appearance as possible, don’t use stones that are too small.
The walls of a stone fireplace and chimney should be at least one foot thick. But as a concession to safety, the entire fire box—back, sides and floor—should be lined with good quality firebrick. The space between the stone shell and firebrick lining is filled with concrete. Since the back and sides of the interior must reflect the heat into the room, the back must be slanted forward as it rises, running up straight about one-third of the height of the opening from the hearth floor and then slanting toward the front at an angle of from 23 to 30 degrees. The sides should slope inward, 11 as they approach the back at, roughly, an angle of 60 degrees.
Regardless of whether the top of the fireplace opening is flat or arched, you will need a strong support at this point. The best is an iron bar about one-half inch thick and two inches wide. Extend it across the width of the opening and set it firmly in the stonework at each side. Any blacksmith can make this bar for you, and the curve he puts in it will determine the arch of the opening. A “T” bar, set with the tail of the “T” upward, is even better, since it is stronger and requires less iron.
Behind the bar build a wooden form extending back several inches and sloped slightly upward. Then lay a course of stone on top of the iron and fill in between the stone and the form with a rich mixture of concrete reinforced with iron rods. This concrete should rise at such an angle as to come flush with the edge of the damper. The reinforcing rods should extend the full width of the arch and tie into the stone at the sides.
Buy a Good Damper
Since the fireplace is probably the most important feature of your cabin, don’t skimp on materials. Buy the best dome-type damper that you can afford. Some fireplace “experts” will say this is nonsense, but don’t let them fool you. The damper is to a fireplace what a mainspring is to a watch.
The dome damper is set on top of the fire brick lining where the throat enters the smoke chamber. The handle to control it may be set in the front or side as you wish (make sure of this when you buy it) and may project or be set in a recess in the masonry.
The throat, as can be seen in Fig. 6, is considerably narrower from front to rear than the fire box—5½ inches is maximum—and should come as near the front as possible. It should begin 6 to 8 inches above the top of the fireplace opening, extend the entire width of the fire box and slant downward toward the back. At the same time the back surface of the fire box has been slanting forward until it reaches the same height at the beginning of the throat. At this point construct the smoke shelf, which is literally a shelf set back to the vertical line of your masonry.
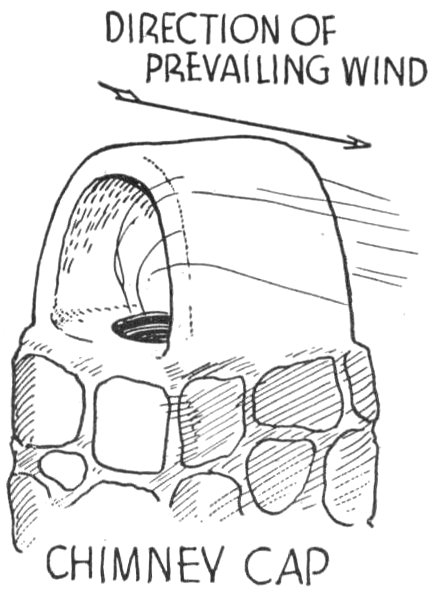
An arch like this helps prevent downdraft.
DIRECTION OF PREVAILING WIND
CHIMNEY CAP
Proper construction of the smoke chamber is often the factor that determines the success of your fireplace. The amount of taper may vary, but it is a good general rule to slope the walls inward one foot for every 18 inches of height. The smoke chamber walls must be as smooth as possible, the best finish being about ½ inch of mortar—or a commercial steel unit. This cuts down the amount of friction and makes it draw better. After the smoke chamber walls are tapered up to the desired dimensions, the flue is straight from here on up.
Use Special Mortar
Government specifications for fireplace mortar, which must be used in laying all work except the fire brick, are as follows: hydrated lime, nine pounds to each 94-lb. bag of Portland cement; mix this with three times its volume of clean sand and enough water to make a smooth workable mortar. Wet all stones before applying the mortar. Don’t use ordinary lime mortar for fireplaces and chimneys.
Construction of the flue is the next important matter. The flue is installed as the chimney is built and must be planned with a fairly close relationship to the fireplace itself. Fireplace experts estimate that the correct ratio is 14 to 16 square inches of flue area to each square foot of fireplace opening.
A round flue is the most satisfactory type. It offers less friction and is easier to clean. Square or oblong flues should be slightly larger than if a round one is used. The easiest method—and one that assures a tight flue—is to use fire clay flue lining, filling in between it and the stone shell with cement. Be sure that the flue is as straight as possible and uniform in size right up to the top. Don’t taper it. If turns must be made in it, make them gradual—never greater than an angle of 45 degrees.
Don’t try to use one flue for fireplace and kitchen stove or another fireplace. Make separate flues for each. They may go up the same chimney but the two or more flues should be separated by at least four inches of solid brick or concrete unless tile flue linings are used. When you have reached the top, test the flue for leaks by lighting a fire and covering the top of the chimney. Escaping smoke will reveal any leaks, which must be repaired at once.
12
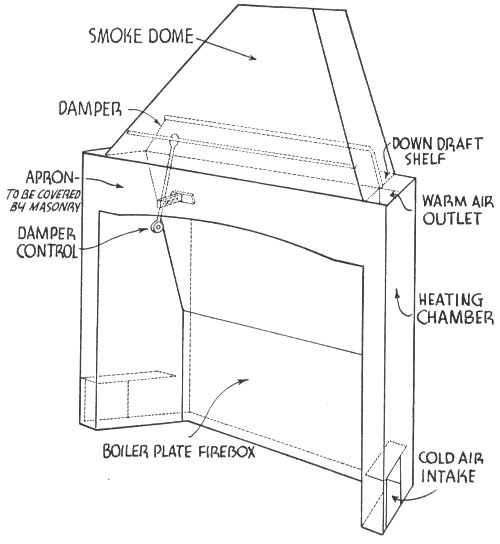
Diagram of a patented fireplace form showing how it heats and circulates the air. The masonry is laid around the form.
SMOKE DOME
DAMPER
DOWN DRAFT SHELF
APRON—TO BE COVERED BY MASONRY
WARM AIR OUTLET
DAMPER CONTROL
HEATING CHAMBER
BOILER PLATE FIREBOX
COLD AIR INTAKE
Location of your house will affect the action of the chimney, since large objects such as trees or a hill nearby will cause a down draught. If this trouble is encountered, it may be corrected by building an arch over the chimney cap. The arch should be placed at right angles to the cause of the down draught.
The chimney cap itself, which is an important feature affecting the air currents that pull the smoke out, should be about 12 inches high. It can be made of cement and stone chips, modeled by hand. Reinforcing rods or wire mesh may be added if desired. The sides of the cap should curve from the outside edge of the masonry proper to the top of the cap.
A good type of flashing, which must be installed to prevent leaks between the chimney and the roof, is made of sheet lead, which is everlasting. Galvanized iron or copper is also satisfactory. The flashing should be cut to fit the chimney like a collar and is imbedded in the masonry. The roofing should overlap the upper edge several inches, and the flashing must overlap the roofing at the lower edge if set on a slanting roof. In case the chimney comes at the ridge, flashings are fastened over the roofing all around.
While you’re up on the roof finishing the chimney, it would be a good idea to take the measurements of the entire top. In your leisure time, make a fairly tight cover, shaped like a shallow box, that will fit on top of the chimney when you close the cabin for the season. It can be lashed down with wire or rope. The object of this will be well known to anyone who has left a cabin chimney open for several months, because it seems to have a great attraction for birds and squirrels—not to mention the fact that snow and rain get in and rust the flue lining if it’s made of metal.
In planning your cabin fireplace don’t fail at least to investigate the several so-called “patented” fireplace forms which circulate heated air. (See illustrations.) These are especially worth considering if you expect to rely upon your fireplace for heating the cabin during the colder months, and also greatly simplify the intricate job of fashioning a fireplace.
When using these forms the fireplace is constructed with an air chamber behind the fire box. Cold air is drawn off the floor and circulated back in the room as warm air. This gives you both direct radiated heat and warm air from absorbed heat. Various installations are possible, with the added heat being used in an adjoining room—or even upstairs.
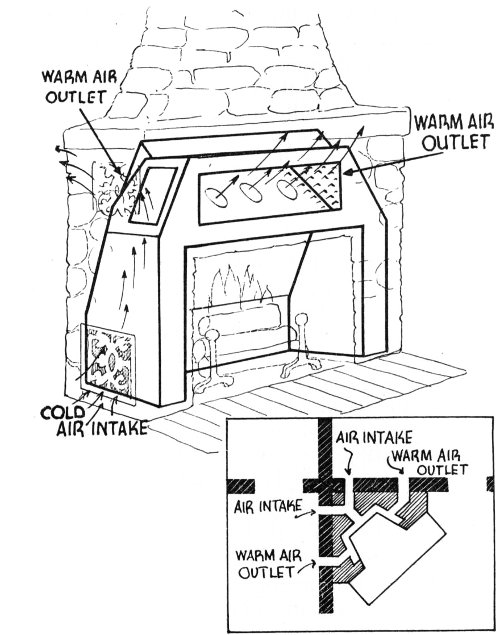
Another patented fireplace design showing how warm air may be piped to adjoining rooms
WARM AIR OUTLET
COLD AIR INTAKE
13