PART III. Scientific Pursuits: (continued 3)
Reading edition
The mode of using these simple instruments is as follows:—Place the forefinger or thumb firmly on the large end, and push the point under water. When the opening is close to the sought-for object, lift the finger suddenly, and admit the air into the tube. The water will immediately rush in at the lower end, and if the orifice has been properly directed, will carry the object into the tube. The finger is again applied to the mouth of the tube, and the object can be then carried off.
As with the pocket-lens almost every object is to be viewed by means of direct light, the young observer will find himself much aided by a suitable background. Any small object, such as a minute insect, a seed, or a hair, becomes very indistinct if held up against the light, or even when viewed against a broken background of trees, houses, or herbage. The simplest plan of securing a proper background is to take a disc of ivory, bone, or even of white cardboard, and to blacken one side of it. The black paint which is used for this purpose must be without gloss, and have what is called a “dead” surface. Ink answers very well for the purpose, and so does ivory-black; but Indian ink is too glossy to be serviceable.
To procure specimens from the water is a matter of some difficulty if managed badly, but easy enough when the collector knows his business. It is of course needful to attach the collecting vessel to the end of a rod, and to plunge it into the spots which look most favourable. Now even so simple a matter as this requires some little care, if the young microscopist really wishes to obtain the best specimens. A common walking-stick will answer most purposes; but the most efficient rod for the purpose is one of the common walking-stick fishing-rods without the top joint, as it can be carried without attracting attention, and can be lengthened at will by adding the different joints.
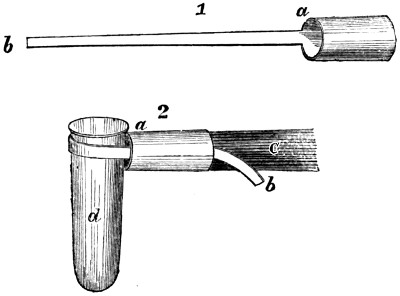
Many methods have been proposed by which the vessel is to be attached to the rod; but that which I am about to describe is certainly the simplest and most effective that I have tried. Get a piece of gutta-percha tubing, just large enough to be slipped on the end of the rod or stick; mark off an inch or so, and cut the tube nearly through, as at a in Fig. 1. Now cut it away longitudinally, so that a long tongue of gutta-percha is left, as at b, and the instrument is completed.
Its application is as simple as its structure. Bend the tongue over, so as to form a loop, and push the end through the short tube. Slip the neck of the bottle into the loop, and draw the tongue until it is tolerably tight. Push the end of the stick into the tube, taking care to hold the tongue firmly in its place, and the vessel will then be fastened at right angles to the stick.
The whole arrangement can be seen in Fig. 2, where a represents the gutta-percha tube, b the tongue, c the stick, and d the vessel.
The method of collecting by means of this instrument is as follows:—Immerse the vessel in the water, with the mouth downwards, so that no water may enter. Push it gently towards the spot which is to be investigated, move it about a little, so as to cause a disturbance, and then turn the vessel with its mouth upwards. Water will instantly rush in, carrying with it the objects which are to be examined. The contents of the vessel may then be transferred to the large bottle, and another dip made. Confervoid growths, especially those which accumulate in a kind of scum on the surface, should be obtained very quietly, without previous disturbance of the water.
After the pond or stream or ditch has been well searched, the bottle should be roughly examined, by means of a pocket-lens, and the contents sorted into the smaller tubes, as has already been mentioned. This precaution is especially needful when any of the minute crustacea called Entomostraca are captured, as they are most voracious beings, and will make sad havoc among other specimens, unless they are placed in separate bottles. They are mostly large enough to be detected with the naked eye, and look something like little fleas, as they move along.
As the Entomostraca cast their shells repeatedly during their lives, some species performing this operation every two days, a beautiful series of objects can be obtained by gathering the cast shells, and preparing them for the microscope, according to the directions that will be found in the following pages. These shells are peculiarly valuable, as they retain the chief external characteristics of the creature to which they belonged, the limbs, plumes, and even the delicate bristles being preserved entire. It is in the power of the microscopist to retard or hasten the change of shell, heat and light aiding development, and cold and darkness retarding it. The remarkable “ephippium,” or saddle, which is found on the backs of the Daphnia, the Moina, and other Entomostraca, and which is used as a receptacle for eggs, should be searched for and preserved.
A very thin and very flat bottle is a most useful assistance in detecting the character of any unknown object, especially if it be living. Such a bottle may easily be made by heating one of the small test-tubes in the spirit-lamp until it is of a glowing red heat, and then pressing the sides together. Some little neatness is required in this process, as an unskilful operator is apt to press the sides unequally, and to leave a bulging projection at the end.
Should a higher power be required than is furnished by the pocket-lens, a “Coddington” lens is the very best that can be obtained. In general shape it resembles the well-known “Stanhope” lens; but the latter is so very inferior an article, that it ought never to be purchased. The two glasses can easily be distinguished by the shape of the ends; those of the Coddington being alike, while in the Stanhope one is much more convex than the other.
At first the young observer generally finds some difficulty in arranging this lens, so as to hit off the focus exactly; but if he adopts the following plan, he will soon handle a Coddington as easily as an ordinary pocket-lens. The object should be held in the left hand and the glass in the right. Let the wrists be placed firmly against each other, and the lens brought as close as possible to the object, without quite touching it. Now bring the eye to the lens, taking care not to disturb the arrangement, and then gradually draw the object away from the lens. The moment that the proper focus is obtained the object will be seen with beautiful clearness, and by drawing the object from the lens, instead of approaching the lens to the object, there is no danger of injuring the one or the other by contact.
The great advantages of the Coddington are the exceeding clearness with which it shows the object, the perfect definition of every line, its achromatic character, and its freedom from colours, and the flatness of the “field;” so that the circumference is defined as perfectly as the centre. It can now be obtained very cheaply at any of our microscopical opticians, and should always be mounted on a tolerably long handle.
THE COMPOUND MICROSCOPE.
We have already described the simpler forms of magnifying instruments, together with the best method of using them. We now purpose to describe the more complicated instrument called the compound microscope, and hints will be given as to the best method of making preparations for it.
The great distinction between the simple and compound microscope is, that whereas the former instrument magnifies the object, the latter magnifies the magnified image of the object. In the least elaborate form of this instrument there are two glasses, one at each end of a tube, the small glass magnifying the object, and being therefore called the “object glass,” while the other, which magnifies the image of the object, is placed next to the eye, and is therefore termed the “eye-glass.” In practice, however, this arrangement is found to be so extremely defective, that the instrument was quite useless, except as an experimental toy; for the two enemies of the optician, chromatic and spherical aberration, prevailed so exceedingly, that every object appeared as if surrounded with prismatic colours, and every line was blurred and indistinct.
In this uncertain state the compound microscope remained for many years, its superb capabilities being scarcely recognised. The chief fault was thought to be in the material of which the object-glass was made, and for a long series of years all experiments were conducted with a view to an improvement in this respect. When, however, the diamond had been employed as an object-glass, and had failed equally with those of less costly material, attention was directed to the right point—namely, the arrangement of the different glasses,—and at length opticians succeeded in obtaining a pitch of excellence which can be almost termed perfection. It would be impossible to describe the method which is employed for this purpose, and it must suffice to say that the principle is that of playing off one defect against another, and so making them mutually correct their errors.
The magnifying powers of the compound microscope can be very great, and it is therefore necessary that extreme care should be taken in its manipulation. It will be possible for a clumsy person to do more damage to a good instrument in three minutes than can be repaired in as many weeks.
Before proceeding to the management of the microscope and the construction of the “slides,” we will briefly describe one or two chief forms of the compound microscope.
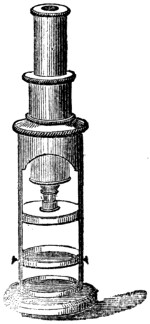
The accompanying illustration represents the simplest form of the compound microscope as at present made. It consists of a stand and a sliding tube, in which are set the glasses which magnify the object and its image. At the top is the tube, which is capable of being slid up and down in the shoulder of the stand, so as to obtain the proper focus. Above is seen the eye-glass; and the object-glass is shown at the bottom of the tube. Below the object-glass is the “stage” on which the object to be magnified is laid; and lowest of all is a mirror, which serves to reflect the light upwards through the object, and which can be turned by means of the knobs at the sides. The object-glass is composed of two pieces, which can readily be separated. If both are used, sufficient magnifying power is gained to show the scales on a butterfly’s wing and similar minute objects; while, if one is removed, the object is not magnified to so great an extent, but a larger portion can be seen, and the definition is clearer. The cost of this instrument, together with a few accessories, is half-a-guinea.
There is another microscope constructed on the same principle, which is a very superior instrument, though it does not at first sight present any remarkable difference. It possesses, however, four times the magnifying power of that which has just been mentioned. Instead of two magnifiers, there are four, and several subsidiary articles are sent with it,—such as a condenser, a live box, an aquatic box, and half a dozen slides ready prepared. This instrument costs one sovereign.
But if the reader can by any possibility afford it, let us advise him in the strongest terms to devote three guineas to the purpose, and get a really good instrument. For this small sum a microscope may now be obtained which could not have been purchased for twenty times three guineas only a few years ago. One of these beautiful instruments is seen in the accompanying illustration; in which may be seen the tube, with its eye-piece and object-glass, and the stand, containing the stage and the mirror. The arrangement, however, is very different; for the focus is not obtained by sliding the tube up and down, but by turning the large milled heads which we see on a level with the stage, and which raise or depress the tube by means of a rack and pinion. As an extremely high power can be used with this instrument, a still finer adjustment is required, so as to obtain a very accurate focus. This is seen on the front of the tube. The reader will notice that the microscope can be inclined backwards, for it is so made that it can be set to any angle which may best suit the observer. The value of this arrangement is very great, as it permits the observer to sit at his ease in a chair, without being forced to crane his neck over the microscope, and look perpendicularly down. Another advantage attending this arrangement is that the secretions which lubricate the eye do not interrupt the vision, as is apt to be the case when looking directly downwards.
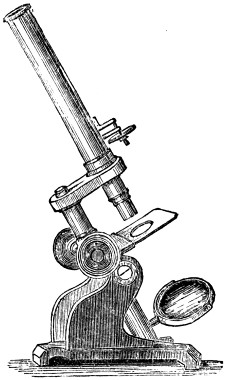
The mirror, too, can be turned in any direction, and its distance from the stage lessened or increased by means of a draw-tube. Three different powers are supplied with this microscope, together with a live-box, dissecting and stage forceps, &c.; and the whole is made so as to admit of additional apparatus. The microscope fits into a neat square box, in which is plenty of room for various articles which will presently be described. These three microscopes can be obtained from Messrs. Baker, 244, High Holborn; and we mention them, not because we wish to make any invidious distinctions between the many excellent opticians who now make microscopes, but because we happen to have used Messrs. Baker’s instruments for some years, and can bear practical testimony to their performance.
Another three-guinea microscope ought, however, to be mentioned. It is the Society of Arts microscope, which is made by Messrs. Field, opticians, of Birmingham. In form it closely resembles the instrument which has just been mentioned, but differs in some of the details, as it possesses a “diaphragm-plate” under the stage for regulating the admission of light, and, instead of three object-glasses and one eye-piece, has two object-glasses and two eye-pieces. Dr. Carpenter mentions that, up to 1861, no less than eighteen hundred of these microscopes had been sold. To this instrument the medal of the Society of Arts was awarded.
Either of these microscopes affords all that an ordinary observer is likely to need; and if he adds a few articles of supplementary apparatus, he will find himself possessed of a microscope that will serve all purposes except scientific controversy.
Presuming that the reader has supplied himself with one or other of the compound microscopes, we will proceed to show the method of using them.
The manipulation of a compound microscope is not so easy as it looks. The possessor of a really good instrument may fail hopelessly in his attempts to see a single object. Now, there are three essential points which a microscopist must attend to,—namely, the correct focus, the proper light, and the preparation of the object. Of these the focus is of course the most important, and can be best obtained as follows:—
Lay the object on the stage of the microscope, so as to get its centre exactly under the centre of the object-glass, and illuminate it as you best can. Put on the lowest power, and, without looking through the tube, lower the object-glass until it nearly touches the object. Now look through the tube, and raise the object-glass gradually from the object, until the right focus is obtained. The reason for taking these precautions is, that if you look through the tube and lower it upon the object, you will in all probability push the glass against the object, and damage either the one or the other. When you have thus learned the focus of the lowest power, add another, and repeat the process; and so on until you have made out the focus of each object-glass. If you have more than one eye-piece, try them both with each object-glass.
The proper light is our next point, and upon it rests the chief beauty of the effect. The light which will suit one object will not suit another, and even the same object should be examined under every variety of light. Some objects are best shown when the light is thrown upon them from above, and others when it is thrown through them from below. Again, the direction of the light is of vast importance; for it will easily be seen that an oblique light will exhibit minute projections by throwing a shadow on one side and brilliancy on the other, while a vertical illumination would fail to show them. On the same principle, one object will be shown better with the light in front, and another when it is on one side.
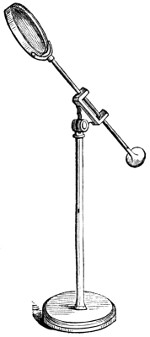
One of the most effective means of attaining this object is by using the “bull’s-eye condenser,” which is sometimes fixed to the stage, but is usually detached, as represented in the illustration. As the upright stem is telescopic, the glass can be raised to a considerable height, while the joint and sliding-rod permit the lens to be applied at any angle which promises the most brilliant light.
As for the kind of light that is employed, there is nothing which equals that of a white cloud; but as such clouds are rare, and are at the best extremely transient, and can only be seen by day, various artificial methods of illumination have been invented. Novices generally think that when the sky is bright and blue they will be very successful in their illumination, and feel grievously disappointed at finding that they obtained much more light from the clouds, whose disappearance they had anxiously been watching. Finding that the blue sky gives scarcely any light at all, they rush to the other extreme, turn the mirror towards the sun, and pour such a blaze of light upon the object, that the eye is blinded by the scintillating refulgence, and the object is often injured, because the mirror is capable of reflecting heat as well as light.
In the daytime there is nothing better than the “white-cloud illuminator,” which is made easily enough by means of plaster of Paris. A sheet of thin white paper fastened against a window-pane is also useful; and the simple plan of dabbing the glass with putty will have a beneficial effect in softening the light, when the window has a southern aspect. In default of these conveniences, it will be often sufficient to fix a piece of white letter-paper over the mirror, or even to dull its surface with wax. At all events, he who aspires to be a true microscopist must be ready with expedients, and if he finds himself in a difficulty, he must summarily invent a method of obviating it.
At night a lamp is necessary; candles are useless, because they have two faults—they flicker, and they become lower as they burn. The latter defect can be cured by using a candle-lamp, but no arrangement will cure the flame of flickering; it is peculiarly trying to the eyes, and destructive of accurate definition. An ordinary moderator lamp answers pretty well, and a small one is even better for the microscopist than one of large dimensions. The chief drawback to the moderator lamp is, that the flame cannot be elevated or lowered, so that the only way to procure a light at a higher elevation, is to stand the lamp on a block of wood or a book. Small lamps are, however, made expressly for the microscope, and, if possible, should be procured, and used for no other purpose, and intrusted to no other hands.
If you want a really brilliant, clear, white light, you must trim the lamp yourself. A small piece of pale blue or neutral-tint glass, interposed between the lamp and the microscope, has a wonderful effect in diminishing the yellow hue which belongs more or less to all artificial lights which are produced by the combustion of oil or fat. We have no doubt but that in a few years we shall be rid of the clumsy and dirty machines that we call lamps, and have substituted for them the pure brilliancy of the electric light.
Whatever lamp you use, a shade is absolutely necessary, in order to defend the eyes. Let me here warn my young readers, that they cannot be too careful of their eyes. In the exuberance of youthful strength and health we are too apt to treat our eyes as unceremoniously as our digestion, and in later years we awake to unavailing repentance.
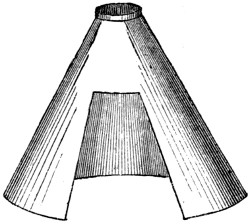
Many shades can be purchased; but it is far better to make your own after the shape here exhibited. They are not pretty to look at, but they save the eyes better than any other form, and whether for reading, writing, or microscopic work, you should use no other. The peculiar merit of them consists in the fact that the light is thrown on the spot where it is wanted, and is cut off from everything except that spot.
Another point which calls for extreme attention is the perfect cleanliness of the glasses. It is astonishing how a tiny dust-mote, or the least condensation of damp, will diminish the powers of the microscope, and how often the instrument is blamed for indistinctness, when the real fault lies in the carelessness of the operator. Even when the greatest care is taken, dust is sure to settle on the glasses, especially on the eye-piece, and before using the microscope the glasses ought to be carefully examined. Never wipe them with an ordinary handkerchief, but get a piece of new wash-leather; beat it well until no dust issues from it, and then put it into a box, with a tightly-fitting cover. Use this, and nothing else, for cleaning the glasses, and you will avoid those horrid scratches with which the eye-glass and object-glass of careless operators are always disfigured.
Moisture is very apt to condense on the glasses and to ruin their clearness. If the microscope be brought from a cold into a warm room, the glasses will be instantly covered with moisture, just as the outside of a tumbler of cold water is always covered with fine dew when brought into a warm room. The microscope should therefore be kept at least an hour in the room wherein it is to be used, so that the instrument and the atmosphere may be of the same temperature. You should make the microscope a trifle warmer than the surrounding atmosphere, and so avoid all danger of condensation. When changing the object-glass or eye-piece, always keep the hand as far away from the glass as possible, and manipulate with the tip of the forefinger and thumb. The human skin always gives out so much exhalation, that even when the hand is cold the glasses will be dimmed; and it is a peculiarity of such moisture, that it adheres to the glasses with great pertinacity, and does not evaporate like the dew which is condensed from the atmosphere.
In order to insure perfect success in this important particular, the young microscopist will do well to get the optician from whom he purchased his instrument to explain its construction, and to give him a lesson or two in the art of taking it to pieces and putting it together again; for unless each glass can be separately cleaned, no one can be quite sure that the instrument will perform as it ought to do. The best method of ascertaining whether it is quite clean is to throw the light upwards by means of the mirror, and then to turn the eye-piece slowly round. If any dust or moisture has collected either upon the eye-glass or the “field-glass,” which forms the second lens of the eye-piece, it will be immediately detected. Turning the object-glass will in a similar manner detect impurities upon its surface.
We will now proceed to the manner in which objects are examined. Suppose, for example, that we take a buttercup-leaf, because it can be found at almost any time of the year. Place a piece of glass on the stage, lay the leaf on it, put on the lowest power, set the focus, and then look at the leaf. You will probably be disappointed, and see nothing but a confused mass of undulating dark green, like a green carpet thrown carelessly on the ground, and seen in the dim twilight.
Two points are now needed; the first being to get the leaf flat, so as to avoid the undulation, and the second being to throw a proper light upon it.
Take out the leaf, and, instead of laying it entire under the microscope, select the flattest part, and cut it out with scissors. A piece the size of a silver penny will be amply large enough. Lay this piece on the glass, get the focus afresh, and then look through the microscope. The leaf will now appear much more regular, and will be seen as a rough surface, mottled with white and traversed by pink and green ridges, which are the large and small nervures. By means of a mirror or the condenser throw a brighter light upon it, and it will be seen to be covered with a slight roughness, the nature of which cannot be clearly ascertained; then add the next highest power, and try if the structure of that roughness can be made out. Curiously enough, although the magnifying power has been more than doubled, the roughness has much the same appearance as before; so that we must try another plan, and look at the leaf edgeways.
Take the piece of leaf in the stage-forceps, but do not touch it with your hand; fix the forceps on the stage and turn the leaf so that it presents its edge to the object glass. Get your focus, and you will now see the cut edge of the leaf, and will at once distinguish its structure. On either side may be seen the upper and lower cuticle, and in the centre the soft green substance, or “parenchyma,” as it is called. From the cuticle project a number of short hairs, and when the focus is accurately obtained, the cause of the roughness will be seen in a vast number of minute projections, which are, in fact, identical in structure with the hairs, though not so well developed. The under-cuticle of the leaf is much more interesting than the upper.
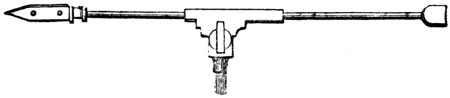
Now change the illumination, and, instead of throwing the light upon the object from above, turn the mirror so as to direct it through the object from below. No apparent result will follow, because the leaf is so thick and opaque that the light cannot pass through it. Hold the leaf horizontally, and, by means of the stage-forceps, rip it smartly across, and if you do this rightly, you will find that the two cuticles are partly separated, so as to allow either to be examined separately. At first the leaf will most probably be torn along one of the large nervures, so that the cuticles are not perfectly separated. Never mind failure, but try again; and you are sure, after a few efforts, to hit upon the right method of tearing the leaf.
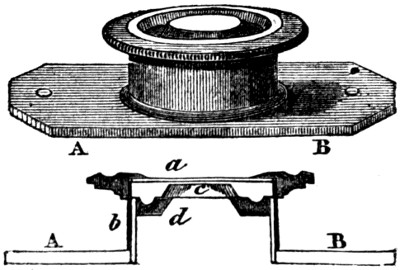
One of the most useful capabilities of the “live-box” is now shown. As may be seen by the figure and section, it consists of an inner tube with a thick glass, and an outer tube with a thin glass. The outer tube can be taken off, water or any other substance laid on the thick glass, and then the outer tube or cover is slid down upon it until the object is pressed flatly between the two glasses. When you have succeeded in getting a convenient slip of the leaf, lay it on the thick glass of the inner tube, and put a drop of water on it. Put on the cover, and push it down until the piece of leaf is pressed flat, without being squeezed. Now look through the microscope, and you will see a beautiful sight, showing how much there is in a despised leaf, which we daily tread under foot.
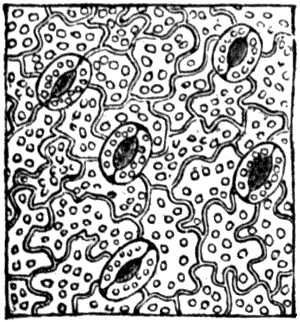
The cells of which the cuticle is chiefly composed are seen in many a waving outline, while at their points of junction are placed the remarkable contrivances called “stomata,” or mouths, which are the apertures through which the atmosphere is enabled to penetrate into the interior of the leaf. The two semilunar cells at the sides of the opening may be considered as lips, which open and close according as the plant needs the air or not. The numerous dots which are seen upon the leaf are of a vivid green colour, and it is to their presence that the leaf owes its hue.
We have given these details because they are applicable to the examination of all leaves and petals, and show the young observer the method which is to be adopted when looking for the first time at a strange object.
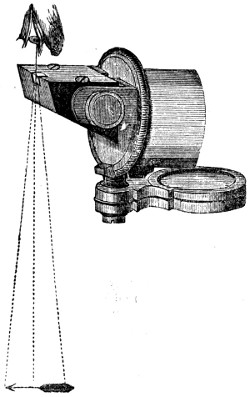
If the microscopist should follow up his work properly, and make sketches of every object which he places under the microscope, he cannot do better than use the camera-lucida, a neat little instrument, which is fitted into the eye-piece of the microscope. Dr. Beale’s neutral glass is as efficacious in careful hands, and only costs a fourth of the sum. This instrument cannot be applied to the ten and twenty shilling microscopes, as it requires that the tube should be perfectly horizontal. The method of using it is simple enough.
After fixing the object and getting the right focus, set the instrument horizontally, and arrange the light so that the object is well illuminated, and its lines quite clear and well defined. Now remove the cap of the eye-piece, and fix the camera-lucida in its stead. Lay a drawing-pad on the table under the camera-lucida, look through the square opening (or, if you use Mr. Beale’s glass, look through the neutral glass), and you will see the object apparently projected on the paper. We say apparently, because in reality the image is not thrown on the paper at all, but on the camera, and the eye refers it to the paper, as being the nearest object. In fact, the principle on which this camera-lucida is arranged is exactly that of the Polytechnic ghost, which appears to be in one place, whereas it is in another.
Now take a pencil, cut it to a very fine point, and trace the outline of the object on the paper. At first you will think this to be an impracticable task, for the point of the pencil will totally vanish. Soon, however, the eye will so adjust itself as to see the pencil and the object perfectly well, and by a little practice the observer will be able to sketch every object as rapidly and firmly as if he were copying a drawing, by means of tracing-paper. The neutral glass is perhaps to be preferred to the camera-lucida, as it is learned more easily, and gives less trouble than that instrument. Its cost is five shillings.
After you have practised yourself well in the handling of the microscope, your ambition will take another step, and lead you to the preparation of permanent objects. In order to set yourself up with the needful apparatus, you will have to disburse about five shillings. A small spirit-lamp will cost eighteenpence, and a small bottle of Canada balsam, another of asphalte varnish, and another of Dean’s gelatine, will make about eighteenpence or two shillings more. A few pence will purchase a sheet or two of ornamental paper, and a few more a flat plate of brass or copper, about five inches by three. The rest of the five shillings may be expended in “slides” and thin glass, cut square.
Slides are merely slips of glass, three inches in length by one in width, and the thin glass is used for laying upon the objects and defending them from dust. We advise the square glass, because it scarcely costs one quarter as much as the round glass, and is equally effective when properly managed. There are several methods of “putting up” preparations—namely, dry, in Canada balsam, in gelatine, and in cells. We will take them in their order.
The simplest plan is, of course, the “dry” mode. Suppose that you want to preserve a tiny piece of down, or the scales from a butterfly’s wing. First wash all the slides and glasses well, by dipping them into a strong solution of soda, and then into hot water, in order to get rid of grease, taking care never to touch them with the hand, but to take them out of the water with the forceps. This can be done at any time, and the glasses carefully wrapped up and placed in a box ready for use.
You now select one of the slides, and lay the object exactly in its centre. If very minute objects are used, they must be examined in order to see whether they are properly disposed. The next process is, to take one of the thin glasses with the microscope, and lay it very carefully over the object. Then cut a piece of ornamental paper, about two inches long and seven-eighths of an inch in width; cut or punch a circular piece out of its centre, damp it well, and cover the wrong side slightly, but completely, with paste. Lay it on the slide, so that the centre of the hole shall coincide with that of the object, work it down neatly with the fingers, and it will hold the square piece of thin glass, which is technically called the “cover,” in its place. Watch it occasionally as it dries, and be ready to press down any part of the paper that may start up. Write, with ink, the name of the object on the end of the slide.
When you have made a dozen or two of these preparations, it will be time to letter and index them. On each slide paste a slip of white paper, and on the paper write a brief notice of the object, thus—
SCALES. D. HEAD MOTH.
Then scratch with a bit of flint, or with a writing-diamond, if you have one, a number on the end of the slide, and have a note-book with a corresponding number opposite to which you enter the description at a fuller length, thus:—
18—Scales of Death’s Head Moth (Acherontia Atropos), from centre of under-surface of right fore wing. Dry. June 4, 1864. +
The cross signifies that you prepared the object yourself, and the reason for adding the date is, that in after years you will have a valuable guide as to the durability of your preparations. If the specimen has been purchased or presented, always add the name of the seller or donor, as well as the date. These precautions may seem to be needlessly minute, but we have so often seen whole sets of valuable preparations rendered useless for want of ticketing, that we cannot too strongly impress on our readers the necessity for the note-book as well as the label, the one acting as a check upon the other. When the label has been affixed, and the details transferred to the note-book, the ink may be washed off the end of the slide.
There is another convenient method of putting up the elytra of beetles, parts of various insects, mosses, minute shells, and similar objects. Take a common pill-box of the smallest size, and cut a little cylinder of cork, that will nearly, but not quite, equal the height of the box, and fasten one end to the bottom of the box with glue. Now blacken the interior of the box and the cork cylinder. Put a little drop of Canada balsam, Arabian cement, or gum Arabic on the top of the cylinder; put the object on it, press it into its place, and, when the cement is hard, the preparation is complete. The cover of the box serves to keep the object from dust.
Now we come to the Canada balsam, a substance which produces beautiful effects when rightly handled, but is most aggravating to the learner, causing alternate irascibility and depression of spirits. Many objects, such as the antennæ and feet of insects, will not show their full beauty unless they are mounted in Canada balsam. The method of doing so is as follows:—A week or two beforehand put the objects into ether or spirits of turpentine, and allow them to remain there until wanted. Pile up some old books, or take a couple of convenient wooden blocks; lay your brass plate upon them; light the spirit-lamp, and put it under the plate so as to heat it. Lay two or three slides on the plate, and all then can be heated at the same time.
Warm the bottle of Canada balsam, and with a glass rod take out a very little drop, and put it exactly in the middle of the slide. In order to insure this point, I always put a dot of ink on the wrong side of the slide. Stir it about with one of the needles mentioned on page 428, and if any bubbles rise, break them. When the balsam is quite soft and liquid, take one of the objects out of the bottle and put it into the balsam, exactly over the black dot. Now add a little more balsam, so as to cover it, and let it lie for a few moments. Take one of the glass covers, put a very little balsam on its centre, and lay it neatly over the object, pressing it down gradually and equally. Unless this be done, the object will not remain in the centre, but will shoot out on one side, and the whole operation must be begun de novo. Remove it from the hot plate and lay it on a cool surface, still continuing the pressure until the balsam has begun to harden. Lay a little leaden weight—a pistol-bullet partly flattened is excellent for the purpose—and on the cover write the name of the object, as already mentioned, and then proceed to prepare another slide.
Twenty such slides may be prepared in the course of a morning, and when they are finished they should be laid carefully in a cold place, where they will be free from dust. In a week or so the balsam will be quite hard, and then the slide may be completed. Take an old knife, which should be kept for this special purpose; heat the blade in the spirit-lamp, and then run it along the edges of the slide, so as to take off the superfluous balsam which has escaped from beneath the cover. This must be done very quickly, or the balsam inside the cover will be heated by the knife, and the preparation spoiled. When this is done, cut the ornamental paper, as already described, number and label the slide, wash off the ink, and then the preparation is complete. Some objects are very troublesome to prepare, and require to be soaked in turpentine and boiled repeatedly in the balsam before they are completely penetrated with it.
Objects which are put up in Deane’s gelatine are managed after a similar fashion, save that the gelatine is to be heated by placing the bottle in hot water, and that the turpentine is not needed. Vegetable structures show beautifully when thus prepared. To remove the superfluous gelatine use a wet and not a hot knife.
Cells are very difficult to manage, and the novice had better not attempt to make them, but is hereby advised to purchase them ready made. Suppose that the young microscopist has dissected the digestive organs of a bee, and wishes to preserve it in spirit; his best plan will be to use a cell for the purpose. Let him buy a cell of sufficient depth, float the preparation into it, fill it up with spirit, put the cover loosely on, and leave it for a week, occasionally raising the cover and stirring the preparation with a needle, in order to get rid of any air-bubbles that may have been entangled in the tissues.
Then let him wipe the edges of the cell very dry, put on a slight layer of gold-size or asphalte varnish—the former is preferable—fill up the cell a “bumper,” and lay the cover very gently upon it, beginning at one end and gently lowering it. With blotting-paper the liquid that escapes must be removed, the edges dried afresh, a flattened bullet placed on the cover, and with a very small camel’s-hair brush the slightest possible coating of size painted round the edge of the cell. When it has hardened another may be given, and so on, until a thick hard wall of size has been built up round the edges and made the cover completely air-tight.
We presume that the reader does not intend to use his microscope merely as a toy, but that he desires to gain some insight into the works of Nature, and is therefore willing to set to work in a systematic manner.
It is now known that both animal and vegetable structures are built up by means of certain minute particles, technically called CELLS, and that in every part of a plant or of an animal can be recognised the constituents of which it is formed. We will, therefore, begin with the vegetables.
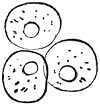
CELL, STRAWBERRY.
Some of the lowest plants, such as the minute algæ that inhabit the water, afford excellent examples of the simple vegetable cell; but as these plants are not readily procured by a beginner, we will select some familiar object wherein the cells may be found. If any soft and pulpy fruit be taken when it is quite ripe, and submitted to the microscope, the vegetable cell will be seen in a tolerably perfect form. The three rounded objects shown in the accompanying illustration are cells from the strawberry, specimens of which can easily be seen, if a very thin slice be cut with a razor or lancet, the latter being the preferable instrument. Be careful to dip the blade in water before cutting the fruit, and to float the slice from the blade to the glass slide by placing them both under water. Unless this precaution be taken, the section will not be flat, but will be crumpled up, and the cells will not be properly seen.
Within each of these cells may be seen a small rounded object, which is technically called the “nucleus;” and in some cases a smaller nucleus, called the “nucleolus,” may be observed within the nucleus itself. The increase of cells mostly takes place by a process of division. A line passes across the nucleus, which presently separates into two distinct parts, each of which recedes from the other, causing the cell to enlarge and alter its shape. Presently a line is seen across the cell itself, and in due time the cell is also divided into two parts, each having its own nucleus.
In the present instance the cell is totally spherical, because the fruit from which it was taken was soft, and allowed the constituent cells to expand. When, however, the vegetable substance becomes hard, the cells are pressed closely together, and their shapes are very much altered. Sometimes, when the cells are of nearly the same size, and the pressure is equal on every side, the cells form regular twelve-sided figures, called “dodecahedra,” which, when that occurs, show a six-sided outline. A very thin slice of raw potato will show the twelve-sided cells beautifully, and has the further advantage of exhibiting the starch globules with which the cells are filled. Here is a figure of a potato cell, which presents a six-sided outline, just like that of a bee’s waxen dwelling, and which is crowded with the beautiful globules of starch. If the reader likes to make a few dozen balls of clay, and to squeeze them together in a mass, he will find that the central balls will have lost their globular shape, and assumed a more or less regular twelve-sided form, very much like that of the potato cells.
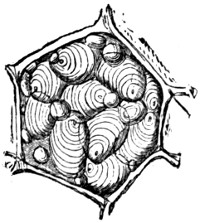
CELL, POTATO.
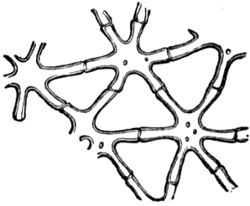
STELLATE TISSUE.
CELL, POTATO.
STELLATE TISSUE.
Sometimes the cells run out longitudinally into cylinders, and attain the really enormous length of three inches; sometimes they become flattened, as the skin or epidermis of many plants; and oftentimes they push out their sides into arms or rays, like stars, and form the tissue which is technically called “stellate.” Here is a specimen of stellate tissue taken from the pith of the common rush, wherein the rays are seen to be very regular: generally, however, the rays are extremely irregular, and require some little practice to detect them. Stellate tissue may be seen in the white portion of orange-peel, in the thick fleshy substance of many aquatic plants, in certain leaf-stalks, and in many similar objects.
We will now see how the soft cells which form the pulpy fruit of the strawberry can be changed into the hard timber of the oak or iron-wood tree.
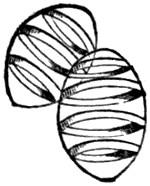
RINGED STRUCTURE.
Wherever a cell is destined to form part of a permanent tissue, it is strengthened by receiving certain additions to its walls. These additions are technically known as “secondary deposit,” and are made in various ways. Sometimes they extend in a thin layer over the whole cell-wall, leaving a number of little holes, which are called “pits,” and earning the name of “pitted structures.” Very frequently the secondary deposit is arranged in a series of rings, an example of which is given in the accompanying illustration. This object is taken from the mistletoe. Good examples of the ringed structures may be seen in the anthers of many plants, and in the leaf-stem of the common rhubarb, an example of which is shown in the next illustration. Another very common form of secondary deposit is the spiral, which is generally used where strength and elasticity are united. Two examples of the spiral form are given in the illustration; the first taken from the lily, and the second from the “rhizome,” or subterranean stem of the water-lily.
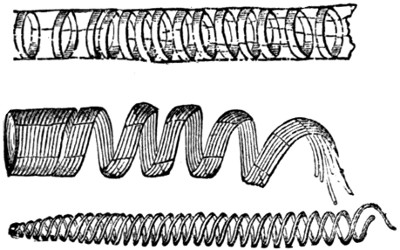
RINGED AND SPIRAL STRUCTURES.
Another beautiful form of secondary deposit is seen in the fern root. If the root be cut longitudinally, and the dark hard fibre dissolved carefully out with nitric acid, the deposit will seem to have assumed the shape of a winding staircase, and is then called “scalariform,” or ladder-shaped. Similar structures may be found in asparagus.
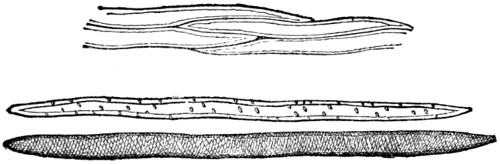
WOOD-CELLS.
The reader will see that the hardness of the structure depends entirely on the amount of secondary deposit, and we accordingly find that when the wood is hard and fit to be worked with tools the cells are almost wholly filled with the secondary deposit. In this state they are called “wood-cells.” Examples of these cells may be seen in the accompanying illustration. In the first example, which is taken from the elder-tree, four cells are shown in order to display the manner in which their pointed ends are arranged. (The reader must remember that in all wood-cells the ends are pointed.) In the next example, which is taken from the chrysanthemum, the pitted structure is still retained; but in the last figure, which is drawn from the lime-tree, the entire cell is filled with secondary structure. The reader must understand that we can only give the veriest outline of the subject, and profess to do nothing more than indicate the method of observation, leaving the pupil to work out the details by himself.
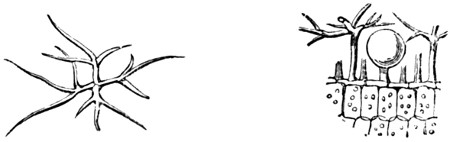
HAIR OF LAVENDER.
Another curious development of the plant-cells is the formation of HAIRS. These objects alone afford an inexhaustible field for the microscopist, and any one who chooses to work out the subject will find himself repaid if he makes a good series of preparations. In their primary forms the hairs are seen merely as little projections on the epidermis, whether of the stem, leaf, or petal, and by degrees assume their varied and beautiful forms. In order to show the singular forms which hairs sometimes assume, an illustration is here given of the hairs of the lavender leaf. This is one of the hairs that give the leaf its silvery gloss. It consists of an upright stem, from the top of which a number of forked branches shoot out horizontally, much like an open umbrella held upright. The object of this remarkable form is, that the delicate vessels in which the perfume is held should escape injury. If the reader will refer to the second figure, which represents a much magnified view of the edge of the leaf, he will see the globular perfume-gland standing under the shelter of the branching hairs.
The following plants afford valuable examples of hair:—Arabis, marvel of Peru, sowthistle, tobacco, southernwood, hollyhock, snapdragon, pansy (in throat of flower), deutzia (under-side of leaf), verbena, alyssum, tradescantia, borage, cowhage, and many others. The beautiful effect produced by the petals of flowers is caused by the imperfect hairs with which their surfaces are studded.
The POLLEN of plants is always worth observing, and some specimens are of remarkably beautiful shapes. Take that of althæa, crocus, cactus, heath, violet, daisy, lily, snowdrop, wallflower, willow-herb (a very beautiful form), hollyhock, periwinkle, primrose, &c. Put some up in Deane’s gelatine, and dry some, besides examining them all when fresh.
The microscopist ought to examine the structures of WOOD by making sections in the directions transverse and longitudinal. A razor will answer very well for the purpose, and the wood should always be soaked inside, and the razor wetted before the section is made. It is often useful to make diagonal sections of several woods, especially those of the pine and juniper. All the forest trees should be examined, and their roots and bark should not be omitted. Cut sections of coconut-shell, vegetable ivory, sugar-cane (a most beautiful object when mounted opaque), bamboo, butcher’s broom, &c.
Mosses are beautiful objects, and can always be found. Examine particularly the fruit or seed-vessel, and note the structure of its different parts. Put these on a slide, and breathe on them, noting at the same time any change which may take place.
The SPORE CASES of ferns are extremely beautiful, and should be carefully examined. The little brown dots or streaks that are seen on the under surface of the fronds are called “sori,” and contain a large but variable number of the sporanges. These consist of stalked sacs or cases, and differ much in shape, according to the species of fern. If the fern be fresh from which the sorus is taken, the sporanges may be seen writhing and twisting like so many serpents, and sometimes it happens that one of the sporanges bursts, and suddenly covers the field of the microscope with minute black dots. These dots are the spores or seeds of the fern, and when magnified with a very high power, they are seen to be variously shaped. One of the most remarkable spores is that of the equisetum, or mare’s tail of the water. This spore looks like a ball with something coiled round it. As soon as the spore is discharged from its case, four threads are seen to uncoil themselves from around it, and by their elasticity to cause the spore to jump about as if alive. These fibres are technically named elasters, and are prolongations of the outer coat of the spore.
Fungi of all kinds should be examined. There is never any difficulty in finding fungi, though the autumn is the best time of year for this purpose. “Mould,” as it is popularly called, is a form assumed by many species of fungus, which, though objectionable to the careful housewife, are full of interest to the microscopist. The well-known mushroom and toadstools are the highest of the fungi. The black spots on leaves are fungi, mostly belonging to the genus puccinia, and the best specimens are generally found on the wild rose or bramble. The black “smut” of wheat is another fungus, very pretty under the microscope, but very obnoxious to the farmer; and the “bunt” also belongs to the same vast tribe of plants, four thousand species of which are now known to exist.
The young observer should also look for the beautiful crystals which exist in many vegetable cells. The RAPHIDES, as these crystals are called, are of various forms, mostly shaped like curved needles, but often assuming very pretty and regular outlines. Raphides are plentifully found in the bulb of the onion, in the rhubarb, the lily, the iris, &c. They are best mounted as opaque objects and, if the reader can procure a binocular microscope, he will see the form of the raphides better than with the single-tube instrument.
Seeds of different plants should be carefully examined, especially those of small dimensions, which often exhibit some wonderful beauties of structure. The winged seed of various plants, such as the thistle, the dandelion, the valerian, and the willow-herb, are extremely interesting objects; while those of the yellow snapdragon, the mullein, the Robin Hood, and the bur-seed, are remarkably beautiful in form, though they have no parachute, as the feathery appendage is called.
Leaving dry land, we will devote a short time to the water. Let the reader take with him the simple collecting apparatus mentioned on page 430, and secure specimens of the water from different ponds, ditches, and streams. For collecting the larger objects a little net, which can be purchased cheap, is of very great use. It is easily made by any tinman, and if the young microscopist knows the use of solder, as all experimental philosophers ought to do, he can put it together in a few minutes. It is formed of a strip of zinc bent into the requisite form, and with a socket, to which a handle can be attached. A piece of coarse muslin, or, rather, fine “net,” is then stretched over the bottom, and the apparatus is complete.
In the water is sure to be found one of the lowest forms of vegetable life—namely, the “confervoid algæ.” Look for these in bright, clear pools, placing the collecting bottle near any greenish film collected around the stems of plants, or spread over the stones on the bed of the pool. If this film be very carefully taken up, it will produce many interesting forms of vegetable life. One of the most remarkable of these vegetables is that which is called “volvox globator,” a figure of which is here given.
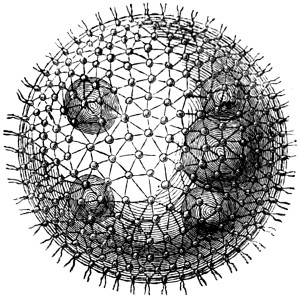
VOLVOX.
This wonderful object is about as large as the head of a very small pin, so that it is visible to the naked eye, and looks like a tiny globule passing through the water. When it is placed under a lens of moderate power, say of an inch focus, it exhibits some very strange peculiarities. It continually revolves, and by its revolution is able to enjoy a moderate degree of locomotion, though without any apparent object. Small dark spots are also seen upon it.
If a half-inch lens be now used, the structure of the volvox begins to be exhibited. The whole surface is covered with a network of very fine fibres, having a spot at the intersection of each mesh. On applying a still higher power, say the four-tenths of an inch, the structure is further elucidated, and the dots on the surface are seen to consist of greenish bodies, each furnished with a pair of delicate fibres, technically named cilia, which are constantly vibrating, and cause the revolution of the general mass. The dark spots are now seen to be the young plants in different stages of progress. From six to ten of these are inclosed within the parent, and when the latter has reached its full age, the membrane bursts asunder, and the little volvoces are liberated.
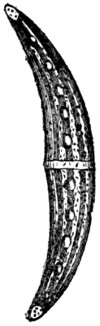
CLOSTERIUM.
Another interesting form is the closterium, a genus which is sure to produce several good examples. We may mention that the ponds in Blackheath are very rich in these curious vegetables, and a very considerable series of confervoids may be obtained from them. The closteria are easily recognised by their resemblance to the Australian “boomerang.”
As our space is rapidly waning, we must leave the vegetable, and proceed to the animal kingdom.
As is the case with vegetables, the animal structure is composed of cells, though they cannot be so easily traced as in the examples which we have already noticed. The young observer may readily perceive the animal cell, in its largest and simplest form, by placing a little of the yolk of egg under the microscope. CARTILAGE, or gristle, is easily seen to be composed of cells. The nails of the fingers afford good objects for the microscopist in search of animal cells. If a thin section be placed under the microscope, none but an experienced observer will be able to make out the presence of cells at all; but if the section be soaked in “liquor potassæ,” the cells immediately swell up, and their shape is at once made plain. Take the BONE of a young chicken or rabbit, and make a thin section that embraces both the bone and cartilage, and there will then be a beautiful object for the microscopist, showing how the cartilage is changed by degrees into bone.
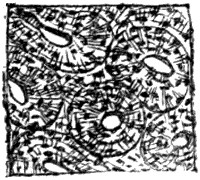
BONE, TRANSVERSE.
Sections of bone should also be made, both transverse and longitudinal.
The BLOOD is another object which must be carefully examined. The “corpuscles” which give the colouring matter to the blood are cells of different size, according to the creature from which they are taken. The dimensions of the animal exercise no apparent influence on the corpuscles, for those of “proteus anguinus,” a little creature not larger than a lamprey, are many times larger than those of the ox. In the accompanying illustration is shown a series of specimens, in order to show the great difference in their shape and size, all being drawn to scale and magnified by the same lens. The circular corpuscles in the left-hand upper corner are those of man; immediately below is a single corpuscle from the pigeon. The great central corpuscle is taken from the proteus; the two in the lower right-hand corner are from the frog, one of these being viewed edgeways; and of the remaining two, that on the left hand belongs to the tortoise, and that on the right to a fish.
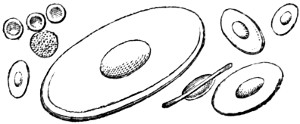
BLOOD CORPUSCLES.
The insect tribes are an inexhaustible source of objects for the microscopist, who may find that even a single fly will give him employment for many months. The scales from the butterfly’s wing, the wonderful compound eyes with which insects are gifted, the structure of their feet, and their entire anatomy, are always at the service of any microscopist who really cares for his work. It would, of course, be impossible to give even a list of the interesting portions of the different insects; so one or two examples must suffice us.
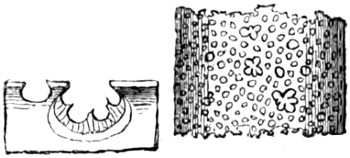
ANTENNÆ OF FLY.
Take the ANTENNÆ of the insect tribes, and see how beautifully they are formed, how graceful is the shape, and how elaborate the structure. A low power will be useful for exhibiting their general shape and outline, but it is not until we know how to use the higher powers that the real beauty of these curious organs is seen. In the accompanying illustration is given part of an antenna of the common blue-bottle fly, in order to show the remarkable cavities which exist within the antennæ, and which are thought by some anatomists to be organs of hearing, and by others to be organs of smell.
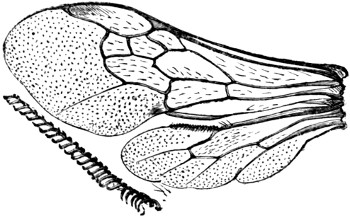
WINGS OF BEE.
The WINGS of insects are also most remarkable, and possess many peculiarities of structure which cannot be detected without the aid of a microscope. Take, for example, the wings of any hymenopterous insect, say those of a humble-bee, and see how beautiful is the structure which causes the four wings to be united into two when the insect is about to fly. In the illustration may be seen a pair of these wings, together with the row of hooks which bind them together. A still more magnified representation of the hooks is placed near the wings.
It is now ascertained that the wings of insects are connected with the breathing apparatus, and that the respiration of the insect extends even to the very tips of these singular organs, which are not modifications of existing limbs, as in the birds, but additional structures. The circulation of insects may often be seen by placing a portion of a transparent wing under a moderately high power. We have often seen it in the wing of the great water-beetle. A series of very beautiful preparations may be made in order to show the distinction between the wings of different insects; and as the orders of insects are founded upon their wings, there ought to be at least one example of each order. The proboscis of insects is always worthy of careful examination.
As to the breathing apparatus itself, the best mode of examining it is to open a caterpillar, remove a part of the large breathing tube which runs along each side, and place it under the microscope. It should always be taken so as to include one of the spiracles, or breathing-holes. An example of a breathing-tube, taken from a silk-worm, is given in the illustration.
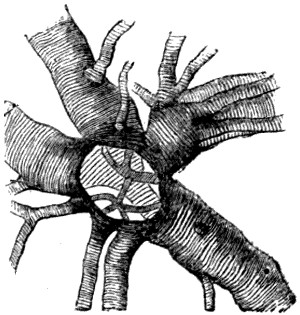
BREATHING-TUBE, SILKWORM.
Hairs of animals are very curious and interesting objects. They should be mounted in three modes—namely, dry transparent, dry opaque, and in Canada balsam, transparent. Be sure to procure some hair of the bat, the sheep, the mouse, the deer, the mole, and any of the weasel tribe. Many insects have very beautiful hair, but the most lovely hair in the animal kingdom is that which is obtained from the sea-mouse. Fish scales should also be procured, and specimens should be taken from the lateral line.
Molluscs of all kinds afford many beautiful objects, and the observer should be very careful to examine the wonderful tongue-ribbon of the snail, the slug, the periwinkle, the whelk, and other similar molluscs. If meant to be examined by polarized light, the tongue-ribbon should be mounted in Canada balsam.
Crystals should always form part of a collection. Take those of common salt, nitre, sugar, chlorate of potash, salicine, &c.; indeed, anything that will crystallize should be prepared and mounted, as such objects will often be most useful when examining unknown substances.
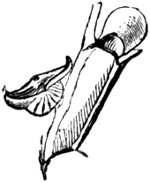
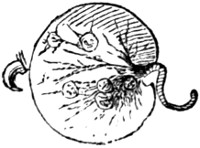
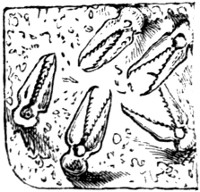
BIRD’S-HEAD PROCESS. NOCTILUCA. PEDICILLARIÆ.
BIRD’S-HEAD PROCESS.
NOCTILUCA.
PEDICILLARIÆ.
Zoophytes must of course find a place in the cabinet, and the young microscopist ought to put up a few specimens of the “bird’s-head” processes which are found in the bugularia and other inhabitants of the sea. The pretty noctiluca, to which is mostly owing the phosphorescence of the sea, should be preserved, and the extraordinary appendages to the skin of certain star-fish and sea urchins should be examined. These are called pedicillariæ, and a sketch of them is given in the illustration.
OPTICS AND OPTICAL AMUSEMENTS.
“‘Seeing is believing,’ so the sages say, To prove this false, hear me, my friends, I pray, And very soon you all will be agreeing, That nought is so deceptive as our seeing.”—Martin.
Optics is the science of light and vision. Concerning the nature of light, two theories are at present very ably maintained by their respective advocates. One is termed the Newtonian theory, and the other the Huygenean. The Newtonian theory considers light to consist of inconceivably small bodies emanating from the sun, or any other luminous body. The Huygenean conceives it to consist in the undulations of a highly elastic and subtle fluid, propagated round luminous centres in spherical waves, like those arising in a placid lake when a stone is dropped into the water.
LIGHT AS AN EFFECT.
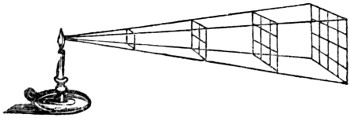
Light follows the same laws as gravity, and its intensity or degree decreases as the square of the distance from the luminous body increases. Thus, at the distance of two yards from a candle we shall have four times less light than we should have, were it only one yard from it, and so on in the same proportion.
REFRACTION.
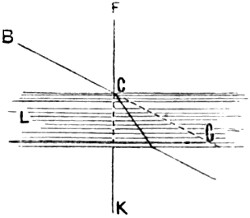
Bodies which suffer the rays of light to pass through them, such as air, water, or glass, are called refracting media. When rays of light enter these, they do not proceed in straight lines, but are said to be refracted, or bent out of their course, as seen in the drawing. The ray of light proceeding from B through the glass L G is bent from the point C, instead of passing in the direction of the dotted line. But if the ray F C falls perpendicularly on the glass, there is no refraction, and it proceeds in a direct line to K; hence refraction only takes place when rays fall obliquely or aslant on the media.
THE INVISIBLE COIN MADE VISIBLE.
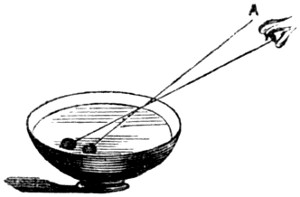
If a coin be placed in a basin, so that on standing at a certain distance it be just hid from the eye of an observer by the rim or edge of the basin, and then water be poured in by a second person, the first keeping his position; as the water rises the coin will become visible, and will appear to have moved from the side to the middle of the basin.
THE MULTIPLYING GLASS.
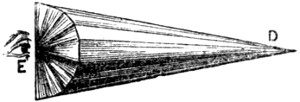
The multiplying glass is a semicircular piece of glass cut into facets or distinct surfaces; and in looking through it we have an illustration of the laws of refraction, for if a small object, such as a fly, be placed at D, an eye at E will see as many flies as there are surfaces or facets on the glass.
TRANSPARENT BODIES.
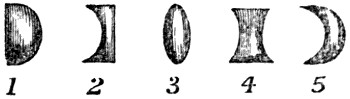
Transparent bodies, such as glass, may be made of such form as to cause all the rays which pass through them from any given point to meet in any other given point beyond them, or which will disperse them from the given point. These are called lenses, and have different names according to their form. 1. Is called the plano-convex lens. 2. Plano-concave. 3. Double convex. 4. Double concave. 5. A meniscus, so called from its resembling the crescent moon.
THE PRISM.
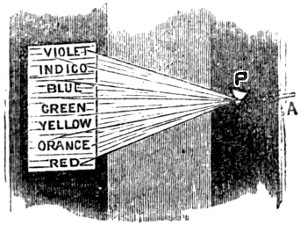
The prism is a triangular solid of glass, and by it the young optician may decompose a ray of light into its primitive and supplementary colours, for a ray of light is of a compound nature. By the prism the ray A is divided into its three primitive colours, blue, red, and yellow; and their four supplementary ones, violet, indigo, green, and orange. The best way to perform this experiment is to cut a small slit in a window-shutter, on which the sun shines at some period of the day, and directly opposite the hole place a prism P; a beam of light in passing through it will then be decomposed, and if let fall upon a sheet of white paper, or against a white wall, the seven colours of the rainbow will be observed.
COMPOSITION OF LIGHT.
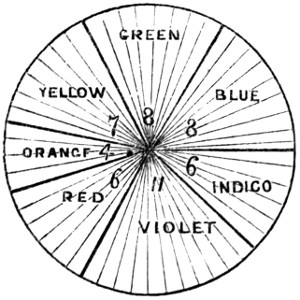
The beam of light passing through the prism is decomposed, and the spaces occupied by the colours are in the following proportions:—red, 6; orange, 4; yellow, 7; green, 8; blue, 8; indigo, 6; violet, 11. Now, if you paste a sheet of white paper on a circular piece of board about six inches in diameter, and divide it with a pencil into fifty parts, and paint colours in them in the proportions given above, painting them dark in the centre parts, and gradually fainter at the edges, till they blend with the one adjoining. If the board be then fixed to an axle, and made to revolve quickly, the colours will no longer appear separate and distinct, but becoming gradually less visible they will ultimately appear white, giving this appearance to the whole surface of the paper.
A NATURAL CAMERA OBSCURA.
The human eye is a camera obscura, for on the back of it on the retina every object in a landscape is beautifully depicted in miniature. This may be proved by the
BULLOCK’S EYE EXPERIMENT.
Procure a fresh bullock’s eye from the butcher, and carefully thin the outer coat of it behind: take care not to cut it, for if this should be done the vitreous humour will escape, and the experiment cannot be performed. Having so prepared the eye, if the pupil of it be directed to any bright objects, they will appear distinctly delineated on the back part precisely as objects appear in the instrument we are about to describe. The effect will be heightened if the eye is viewed in a dark room with a small hole in the shutter, but in every case the appearance will be very striking.
THE CAMERA OBSCURA.
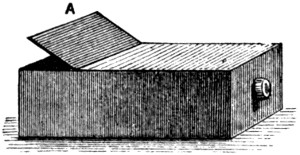
This is a very pleasing and instructive optical apparatus, and may be purchased for four or five shillings. But it may be easily made by the young optician. Procure an oblong box, about two feet long, twelve inches wide, and eight high. In one end of this a tube must be fitted containing a lens, and be made to slide backwards and forwards so as to suit the focus. Within the box should be a plain mirror reclining backwards from the tube at an angle of forty-five degrees. At the top of the box is a square of unpolished glass, upon which from beneath the picture will be thrown, and may be seen by raising the lid A. To use the camera place the tube with the lens on it opposite to the object, and having adjusted the focus, the image will be thrown upon the ground-glass as above stated, where it may be easily copied by a pencil or in colours.
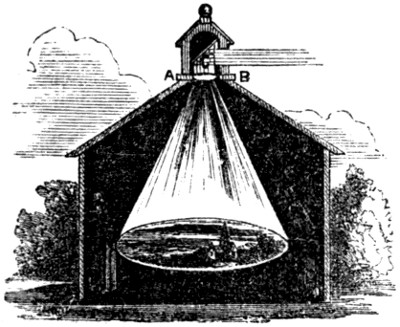
The form of a camera obscura used in a public exhibition is as follows:—D D is a large wooden box stained black in the inside, and capable of containing from one to eight persons. A B is a sliding piece, having a sloping mirror C, and a double convex lens F, which may with the mirror C be slid up or down so as to accommodate the lens to near and distant objects. When the rays proceeding from an object without fall upon the mirror, they are reflected upon the lens F, and brought to fall on the bottom of the box, or upon a table placed horizontally to receive them, which may be seen by the spectator whose eye is at E.
THE CAMERA LUCIDA.
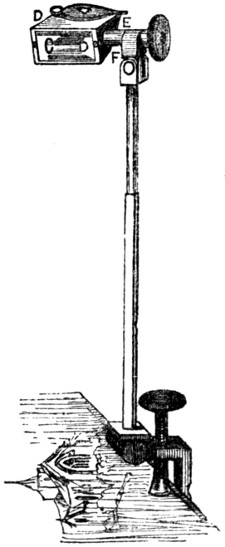
This instrument consists of a glass prism, C, D, D, E, having four sides covered. The sides C, D, being exposed to the object to be delineated, rays pass through the glass and fall on the sloping side D, E; from this they are reflected to the top, and finally pass out of the prism to the eye;[11] now from the direction at which the rays enter the eye, it receives them as if coming from an image at A, B, and if a sheet of paper be placed below the instrument, a perfect delineation of the object may be traced with a pencil. This is a very useful instrument to young draughtsmen.
THE MAGIC LANTERN.
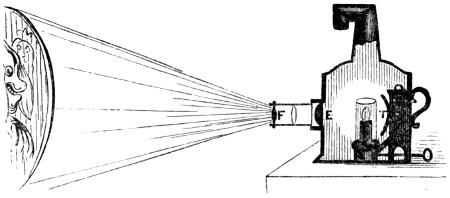
This is one of the most pleasing of all optical instruments, and it is used to produce enlarged pictures of objects, which being painted on a glass in various colours are thrown upon a screen or white sheet placed against the wall of a large room. It consists of a sort of tin-box, within which is a lamp, the light of which (strongly reflected by the reflector T,) passes through a great plano-convex lens E fixed in the front. This strongly illuminates the objects which are painted on the slides or slips of glass, and placed before the lens in an inverted position, and the rays passing through them and the lens F, fall on a sheet, or other white surface, placed to receive the image. The glasses on which the figures are drawn are inverted, in order that the images of them may be erect.
PAINTING THE SLIDES.
The slides containing the objects usually shown in a magic lantern, are to be bought at opticians with the lantern, and can be procured cheaper and better in this way than by any attempt at manufacturing them. Should, however, the young optician wish to make a few slides of objects of particular interest to himself, he may proceed as follows:—
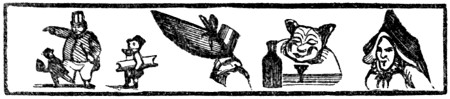
Draw first on paper the figures you wish to paint, lay it on the table, and cover it over with a piece of glass of the above shape; now draw the outlines with a fine camel’s hair pencil in black paint mixed with varnish, and when this is dry, fill up the other parts with the proper colours, shading with bistre also mixed with varnish. The transparent colours are alone to be used in this kind of painting.
TO EXHIBIT THE MAGIC LANTERN.
The room for the exhibition ought to be large, and of an oblong shape. At one end of it suspend a large sheet so as to cover the whole of the wall. The company being all seated, darken the room, and placing the lantern with its tube in the direction of the sheet, introduce one of the slides into the slit, taking care to invert the figures; then adjust the focus of the glasses in the tube by drawing it in or out as required, and a perfect representation of the object will appear.
EFFECTS OF THE MAGIC LANTERN.
Most extraordinary effects may be produced by means of the magic lantern; one of the most effective of which is a
TEMPEST AT SEA.
This is effected by having two slides painted, one with the tempest as approaching on one side, and continuing in intensity till it reaches the other. Another slide has ships painted on it, and while the lantern is in use, that containing the ships is dexterously drawn before the other, and represents ships in the storm.
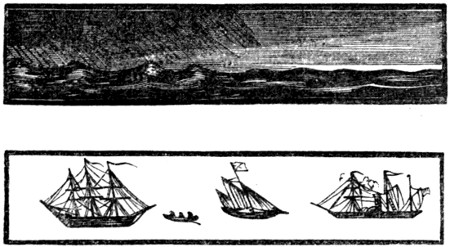
The effects of sunrise, moonlight, starlight, &c., may be imitated, also by means of double slides, and figures may be introduced sometimes of fearful proportions.
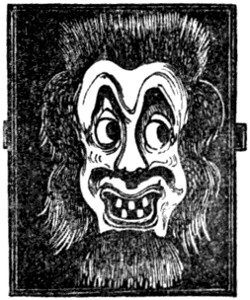
Heads may be made to nod, faces to laugh; eyes may be made to roll, teeth to gnash; crocodiles may be made to swallow tigers; combats may be represented; but one of the most instructive uses of the slides is to make them illustrative of astronomy, and to show the rotation of the seasons, the cause of eclipses, the mountains in the moon, spots on the sun, and the various motions of the planetary bodies, and their satellites.
THE PHANTASMAGORIA.
Between the phantasmagoria and the magic lantern there is this difference: in common magic lanterns the figures are painted on transparent glass, consequently the image on the screen is a circle of light having figures upon it; but in the phantasmagoria all the glass is made opaque, except the figures, which, being painted in transparent colours, the light shines through them, and no light can come upon the screen except that which passes through the figure, as is here represented.
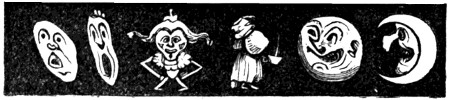
There is no sheet to receive the picture, but the representation is thrown on a thin screen of silk or muslin placed between the spectators and the lantern. The images are made to appear approaching and receding by removing it further from the screen, or bringing it nearer to it. This is a great advantage over the ordinary arrangements of the magic lantern, and by it the most astonishing effects are often produced.
DISSOLVING VIEWS.
The dissolving views, by which one landscape or scene appears to pass into the other while the scene is changing, are produced by using two magic lanterns placed side by side, and that can be a little inclined towards each other when necessary, so as to mix together the rays of light proceeding from the lenses of each, which produces that confusion of images, in which one view melts as it were into the other, which gradually becomes clear and distinct; the principle being the gradual extinction of one picture, and the production of another.
HOW TO RAISE A GHOST.
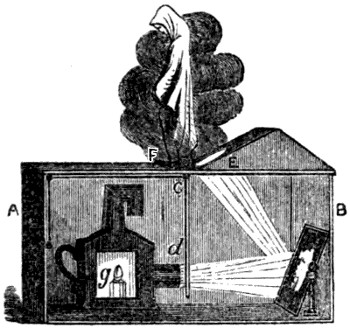
The magic lantern, or phantasmagoria, may be used in a number of marvellous ways, but in none more striking than in raising an apparent spectre. Let an open box, A B, about three feet long, a foot and a half broad, and two feet high, be prepared. At one end of this place a small swing dressing-glass, and at the other let a magic lantern be fixed with its lenses in a direction towards the glass. A glass should now be made to slide up and down in the groove C D, to which a cord and pulley should be attached, the end of the cord coming to the part of the box marked A. On this glass the most hideous spectre that can be imagined may be painted, but in a squat or contracted position, and when all is done, the lid of the box must be prepared by raising a kind of gable at the end of the box B, and in its lower part at E an oval hole should be cut sufficiently large to suffer the rays of light reflected from the glass to pass through them. On the top of the box at F place a chafing-dish, upon which put some burning charcoal. Now light the lamp G in the lantern, sprinkle some powdered camphor or white incense on the charcoal, adjust the slide on which the spectre is painted, and the image will be thrown upon the smoke. In performing this feat the room must be darkened, and the box should be placed on a high table, that the hole through which the light comes may not be noticed.
THE THAUMATROPE.
This word is derived from two Greek words, one of which signifies wonder, and the other to turn. It is a very pretty philosophical toy, and is founded upon the principle in optics, that an impression made upon the retina of the eye lasts for a short interval after the object which produced it has been withdrawn. The impression which the mind receives lasts for about the eighth part of a second, as may be easily shown by whirling round a lighted stick, which if made to complete the circle within that period, will exhibit not a fiery point, but a fiery circle in the air.
THE BIRD IN THE CAGE.
Cut a piece of cardboard of the size of a penny piece, and paint on one side a bird, and on the other a cage; fasten two pieces of thread one on each side at opposite points of the card, so that the card can be made to revolve by twirling the threads with the finger and thumb: while the toy is in its revolution, the bird will be seen within the cage. A bat may in the same manner be painted on one side of the card, and a cricketer upon the other, which will exhibit the same phenomenon, arising from the same principle.
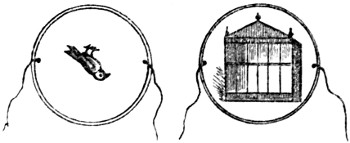
CONSTRUCTION OF THE PHANTASMASCOPE.
The above-named figure is a Thaumatrope, as much as the one we are about to describe, although the term Phantasmascope is generally applied to the latter instrument; which consists of a disc of darkened tin-plate, with a slit or narrow opening in it, about two inches in length. It is fixed upon a stand, and the slit placed upwards, so that it may easily be looked through. Another disc of pasteboard, about a foot in diameter, is now prepared and fixed on a similar stand, but with this difference, that it is made to revolve round an axis in the centre. On this pasteboard disc, paint in colours a number of frogs in relative and progressive positions of leaping; make between each figure a slit of about a quarter of an inch deep: and when this second disc is made to revolve at a foot distance behind the first, and the eye is placed near the slit, the whole of the figures, instead of appearing to revolve with the disc, will all appear in the attitudes of leaping up and down, increasing in agility as the velocity of the motion is increased. It is necessary, when trying the effect of this instrument, to stand before a looking-glass, and to present the painted face of the machine towards the glass.
A very great number of figures may be prepared to produce similar effects—horses with riders in various attitudes of leaping, toads crawling, snakes twisting and writhing, faces laughing and crying, men dancing, jugglers throwing up balls, &c.; all of which, by the peculiar arrangement above detailed, will seem to be in motion. A little ingenuity displayed in the construction and painting of the figures upon the pasteboard disc will afford a great fund of amusement.
CURIOUS OPTICAL ILLUSIONS.
One of the most curious facts relating to the science of vision is the absolute insensibility of a certain portion of the retina to the impression of light, so that the image of any object falling on that point would be invisible. When we look with the right eye, this point will be about fifteen degrees to the right of the object observed, or to the right of the axis of the eye, or the point of most distinct vision. When looking with the left eye, the point will be as far to the left. The point in question is the basis of the optic nerve, and its insensibility to light was first observed by the French philosopher, Mariotte. This remarkable phenomenon may be experimentally proved in the following manner:—
Place on a sheet of writing-paper, at the distance of about three inches apart, two coloured wafers; then, on looking at the left-hand wafer with the right eye, at the distance of about a foot, keeping the eye straight above the wafer, and both eyes parallel with the line which forms the wafers, the left eye being closed, the right-hand wafer will become invisible; and a similar effect will take place if we close the right eye, and look with the left.
ANOTHER.
Cut a circular piece of white paper, about two inches in diameter, and affix it to a dark wall. At the distance of two feet on each side, but a little lower, make two marks; then place yourself directly opposite the paper, and hold the end of your finger before your face, so that when the right eye is open it shall conceal the mark on your left, and when the left eye is open the mark on your right. If you then look with both eyes at the end of your finger, the paper disc will be invisible.
ANOTHER.
Fix a similar disc of paper, two inches in diameter, at the height of your eye on a dark wall; a little lower than this, at the distance of two feet on the right hand, fix another of about three inches in diameter; now place yourself opposite the first sheet of paper, and, shutting the left eye, keep the right eye still fixed on the first object, and when at the distance of about ten feet, the second piece of paper will be invisible.
THE PICTURE IN THE AIR.
One of the numerous optical illusions which have from time to time been evolved by scientific minds, is that of making an image or picture appear in the air. This is produced by means of a mirror, and an object in relief, upon which a strong light is thrown,—the mirror being set at such an angle as to throw up the reflection of the image to a certain point in the view of the spectator. This illusion is produced as follows: Let a screen be constructed in which is an arched aperture, the centre of which may be five feet from the floor: behind the screen is placed a large mirror of an elliptical form. An object is now placed behind the screen, upon which the light of a strong lamp is thrown from a point above the mirror, and is received by the mirror and reflected to the centre of the arched cavity in the screen, where it will appear to the spectator. Care should be taken to place the image in an inverted position, and the light, which must be very powerful, should be so placed that none of it may reach the opening.
BREATHING LIGHT AND DARKNESS.
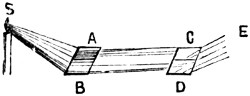
The following experiment, if performed with care, is exceedingly striking. Let S be a candle, whose light falls at an angle of 56° 45′ upon two plate glasses, A B, placed close to each other; and let the reflected rays, A C, B D, fall at the same angle upon two similar plates, C D, but so placed that the plane of reflection from the latter is at right angles to the plane of reflection from the former. An eye placed at E, and looking at the same time on the two plates, C and D, will see very faint images of the candle, S; which by a slight adjustment of the plates, may be made to disappear almost wholly, allowing the plate C to remain where it is. Change the position of D, till its inclination to the ray, B D, is diminished about 3°, or made nearly 53° 11′. The distance may be easily found by a little practice. When this is done, the image that had disappeared on looking into D will be restored, so that the spectator at E, upon looking into the two mirrors, C D, will see no light in C, because the candle has nearly disappeared, while the candle is distinctly seen in D. If, while, the spectator is looking into these two mirrors, either he or another person breathes upon them gently and quickly, the breath will revive the extinguished image in C, and will extinguish the visible image in D.[12]
TO SHOW THAT RAYS OF LIGHT DO NOT OBSTRUCT EACH OTHER.
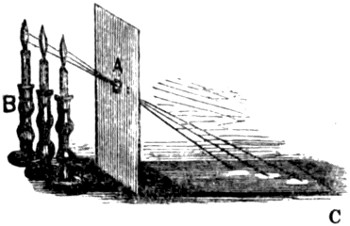
Make a small hole in a sheet of pasteboard, A, and placing it upright before three candles, B, placed closely together, it will be found that the images of all the candle flames will be formed separately on a piece of paper, C, laid on the table to receive them. This proves that the rays of light do not obstruct each other in their progress, although all cross in passing through the hole.
OPTICS OF A SOAP-BUBBLE.
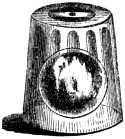
If a soap-bubble be blown up, and set under a glass, so that the motion of air may not affect it, as the water glides down the sides and the top grows thinner, several colours will successively appear at the top, and spread themselves from thence down the sides of the bubble, till they vanish in the same order in which they appeared. At length, a black spot appears at the top, and spreads till the bubble bursts.[13]
THE KALEIDOSCOPE.
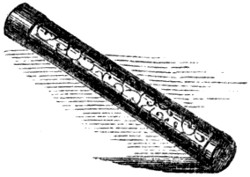
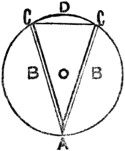
If any object be placed between two plane mirrors, inclined towards each other at an angle of thirty degrees, three several images will be perceived in the circumference of a circle. On this principle is formed the kaleidoscope, invented by Sir David Brewster, and by means of which the reflected images viewed from a particular point exhibit symmetrical figures, under an infinite arrangement of beautiful forms and colours. The kaleidoscope may be bought at any toy-shop, but it is requisite that every young person should be able to construct one for himself. He must, therefore, procure a tube of tin or paper, of about ten inches in length, and two and a half or three inches in diameter. One end of this should be stopped up with tin or paper, securely fastened, in which is to be made a hole, about the size of a small pea, for the eye to look through. Two pieces of well-silvered looking-glass, B B, are now to be procured; they must be not quite so long as the tube, and they should be placed in it lengthways, at an angle of 60 degrees, meeting together in a point at A, and separating to the points C C, the polished surfaces looking inwards. A circular piece of the glass is now to be laid on the top of the edges of the reflectors, B B; which, by their not being quite so long as the tube, will allow room for its falling in, and it will be supported by the edges of the tube, which may be slightly bent over, to prevent the glass from falling out. This having been done, now proceed to make the “cap” of the instrument. A rim of tin or pasteboard must be cut, so as to fit over the glass end of the tube; and in this, on the outer side, a piece of ground glass must be fastened, so that the whole may fit on the tube like the lid of a pill-box. Then, before putting it on, obtain some small pieces of broken glass of various colours, beads, little strips of wire, or any other object, and place them in the cap; and by passing it over the end, so that the broken glass, &c. has free motion, the instrument is complete. To use it, apply the eye to the small hole, and, on turning it, the most beautiful forms will appear, in the most wonderful combinations.
The following curious calculation has been made of the number of changes this instrument will admit of. Supposing it to contain 20 small pieces of glass, and that you make 10 changes in a minute, it will take an inconceivable space of time, i. e. 462,880,899,576 years, and 360 days, to go through the immense number of changes of which it is capable.
SIMPLE SOLAR MICROSCOPE.
Having made a circular hole in a window-shutter, about three inches in diameter, place in it a glass lens of about twelve inches focal distance. To the inside of the hole adapt a tube, having at a small distance from the lens a slit, capable of receiving one or two very thin plates of glass, to which the object to be viewed must be affixed by means of a little gum-water exceedingly transparent. Into this tube fit another, furnished at its extremity with a lens half-an-inch focal distance. Place a mirror before the hole of the window-shutter on the outside, in such a manner as to throw the light of the sun into the tube, and you will have a solar magic lanthorn.
The method of employing this arrangement of lenses for microscopic purposes is as follows:—Having darkened the room, and by means of the mirror reflected the sun’s rays on the glasses in a direction parallel to the axis, place some small object between the two moveable plates of glass, or affix it to one of them with very transparent gum-water, and bring it exactly into the axis of the tube; if the moveable tube be then pushed out or drawn in, till the object be a little beyond the focus, it will be seen painted very distinctly on a card, or piece of white paper, held at a proper distance, and will appear to be greatly magnified. A small insect will appear as a large animal, a hair as big as a walking-stick, and the almost invisible eels in paste or vinegar as large as common eels.
ANAMORPHOSES.
This is a very curious optical effect, producing a distorted and grotesque figure from a regular one. The term is derived from two Greek words, signifying a distortion of figure, and by its means many optical puzzles may be produced geometrically.
Take any subject, such as the portrait of a head; divide it vertically and horizontally with parallel lines, of which the outer sides shall form the boundary, A, B, C, D, and the whole shall be equidistant. Then, on a separate piece of paper, or cardboard, prepare a drawing similar to Fig. 2 by the following means:—
1. Draw a horizontal line, a b, equal to A B, and divide it into as many equal parts as the latter is divided.
2. Let fall a perpendicular line, e v, from the middle of a b, and then draw s v parallel to a b.
3. Both e v and s v may be any length at pleasure, but the longer the first is, and the shorter the other, so will the anamorphoses be more and more deformed. The proportions in our figures are sufficiently different.
4. After having drawn from the point v right lines, v 1, v 2, v 3, v 4, to the divisions of a b, draw the line s b, and through each point where s b intersects the divergent lines draw other horizontal lines parallel to a b. We now have a trapezium, a b c d divided into as many cells as the square in Fig. 1.
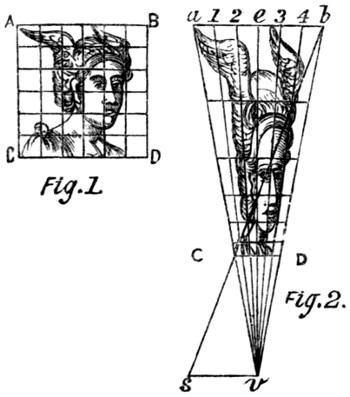
The next step is to fill up all the cells of Fig. 2 with portions of the device, proportionate to their position in Fig. 1. For instance, in Fig. 1 the nose is in the second vertical division from the left, and in the third and fourth horizontal divisions from the top, and that portion of the face must accordingly be placed in a corresponding part of Fig. 2.
By these means we procure the anamorphosis seen in Fig. 2, which when viewed from a particular position, will lose all its distortion, and assume an appearance resembling that in Fig. 1. This position lies immediately over the point v, and at a height above it equal to the length of the line s v; and the means of determining it are as follows.
Place the drawing horizontally before a window; take a slip of card, and rest its lower edge on the line s v, the card being accurately vertical; pierce a small hole in the card vertically over the point v, and at a height from it equal to the length of the line s v, then with the eye placed immediately behind the card, look through the orifice at the anamorphosis, and it will be found that as soon as it has become accustomed to the novelty of the experiment, the anamorphosis will lose its distortion, and appear almost exactly like the symmetrical figure.