Sand Toys
Reading edition
By Adelia Belle Beard
One of the Authors of Little Folks’ Handy Book
“What can we do with this beautiful sand, Donald?” asked Polly as she let the dry white sand of the beach sift through her fingers.
“Make a sand wheel,” answered Donald with sudden inspiration. “And we can do it now.”
Polly was more than willing, so they were soon hard at work in their out-of-door Kraft Shop on the back porch of their summer home.
“First we must make the wheel and next a high reservoir to hold the sand,” Donald announced.
“I will make the wheel if it doesn’t have to be wood,” said Polly.
“Bristolboard will do, and the wheel must be a good deal like a water wheel, you know, Polly.”
“Yes, of course,” and Polly placed a smooth piece of bristolboard on the table and took her school compass from the drawer, while Donald disappeared into the house in search of a flat-sided cocoa can which he had decided would answer for his reservoir.
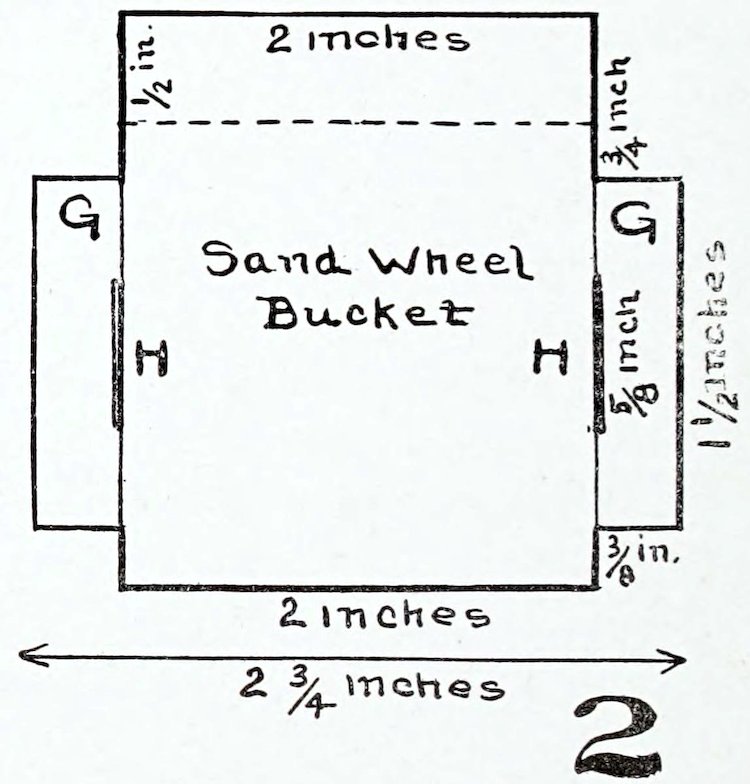
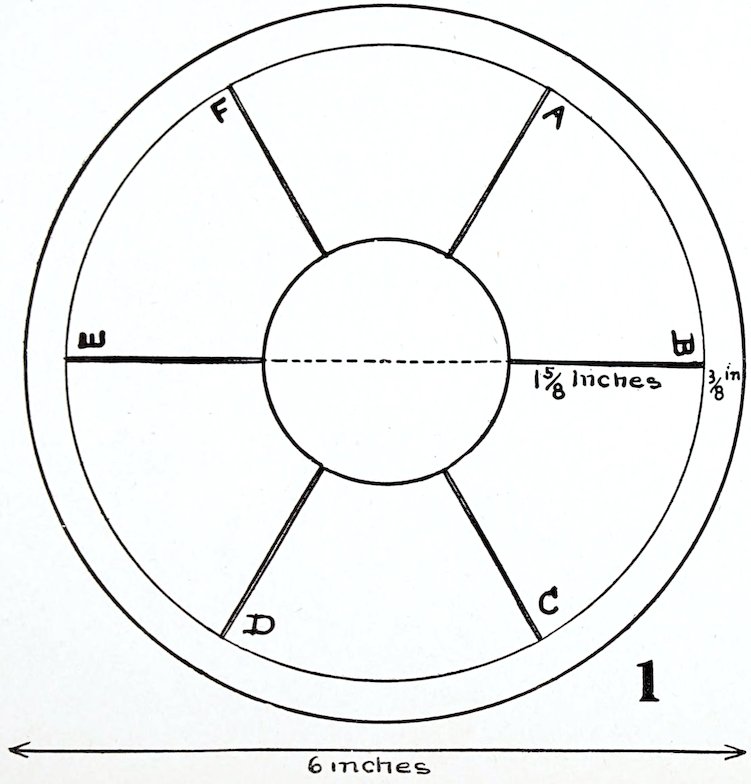
Polly made her wheel in this way: First she drew a straight, horizontal line six inches long on the bristolboard (E B, Figure 1), then she put the point of her compass directly on the middle of the line and drew a circle that just touched each end of the line. This gave her a circle six inches in diameter. (Figure 1.) Keeping the point of her compass on the middle of the line, she drew another circle inside the first, making the second circle five and one-quarter inches in diameter and three-eighths of an inch from the outer circle. Inside the second circle, with the point of the compass still on the middle of the line, she drew a third circle two inches in diameter. This left just one and five-eighths inches between the two 30inner circles. Dividing the second circle into six equal parts, she proceeded to draw the lines F C, A D, and a little to the right of these, also by the side of the horizontal line, she drew parallel lines. “These,” Polly explained, “are the slots to hold the steps of my wheel.”
“Buckets, Polly, not steps,” protested Donald.
“Well, buckets; I am going to have six buckets between the two wheels.”
“There is only one wheel; the sides are called disks,” again corrected Donald.
“Disks, then, and I will fasten the buckets on with bolts. You see, the outer edge of each bucket is to be turned up to hold the sand. I suppose that is why it is called a bucket,” said Polly.
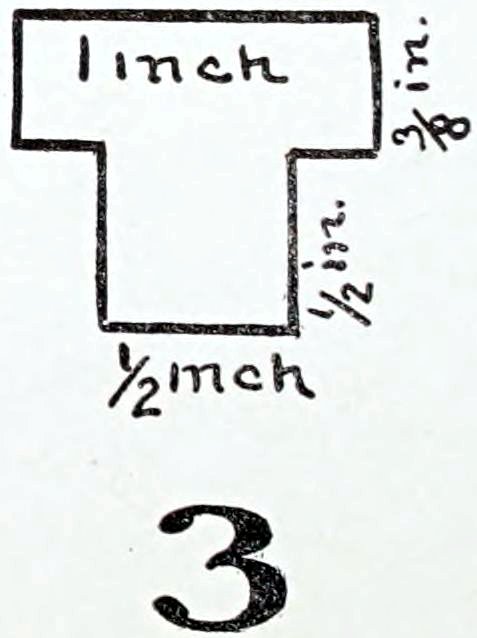
“You know what you are doing, go ahead,” said Donald; and Polly went ahead. She made another disk exactly like Figure 1 and cut both out carefully. She used a sharp pocketknife for cutting the slots and a ruler to guide the knife along the lines. Then she made her buckets, six of them, like Figure 2. First she drew a square that measured exactly two inches on each edge. This was for the bottom of the bucket. On each side of the square she added extensions three-eighths of an inch wide and one and one-half inches long, placing them at equal distances from the top and bottom edges of the square. (G G, Figure 2.) At the top of the square she added an oblong one-half inch wide and extending all the way across. The dotted line in Figure 2 shows where this oblong is to be bent up to form the front of the bucket. Along each side line of the square, at equal distances from the ends of the extension, she made slots five-eighths of an inch long. (H H, Figure 2.) The bolts, two for each bucket, she made like Figure 3. The upper 31part of each bolt was one inch long and three-eighths of an inch wide and the lower part was half an inch square.
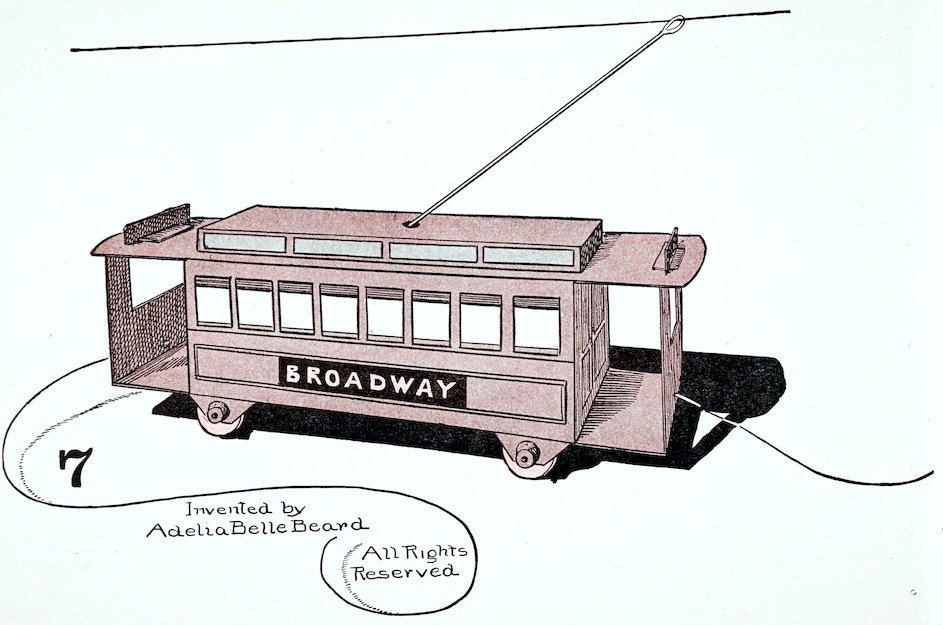
“It is all ready now. See how easy it is to put together, Donald,” said Polly, as she bent up the front of a bucket and slipped one of its extensions through a slot in one of the disks and the other extension through a slot in the other disk, and then secured them in place by sliding a bolt through the slot in each extension. (Fig. 7.)
“Better glue those bolts down,” said Donald. “When the wheel turns fast they may drop out.”
By this time Donald had gathered together all the materials for his sand tower. For the base of the tower he used an empty cigar box, eight inches long and two and one-quarter inches deep, and for the reservoir a cocoa can four inches high and two inches wide at the narrow sides. On each of the wide sides of the can, about one and one-half inches from the top and at equal distances from the side edges, he made a hole by driving a large wire nail through the tin. (I, Figure 4.) In the bottom he cut with a can opener a large hole, as shown in Figure 4. This hole is not in the middle, but at the back, left-hand corner as the can stands upside down. (Figure 4.)
“The funnel goes through this hole,” Donald said. “I have made a funnel for 32the sand because it holds more than the can and because only a part of the sand will run out of the can without it.”
Donald made the funnel of a piece of strong paper twelve inches square. He twisted this into a cornucopia and then trimmed it off evenly at the top and cut the point off at the bottom. He enlarged the bottom opening several times in order to allow a sufficient flow of sand to turn the wheel easily. The lapped edges he pasted securely together. To hold the reservoir up he whittled out of an old shingle two uprights like Figure 5. Each upright was thirteen and one-half inches long and three-quarters of an inch wide, except at the top, where it widened out to one inch. Three-quarters of an inch from the top edge he bored a hole large enough to admit a very large, spikelike wire nail a little over four inches long and quite thick.

“I am going to spike these on,” Donald said, thrusting the large nail through the hole in one upright, then through both holes in the can and through the hole in the other upright. “It is a little loose, though,” he continued, shaking the can.
“Put a cork on the end of the spike,” said Polly; “that will hold it.” Donald took her advice and pushed a large, flat cork up on the nail until it fitted snugly against the tin and held it firmly in place. Then he took up the cigar box. “Will you make a hole in this for the shaft of the wheel, Polly? Put it just here,” he said, indicating a spot two and one-half inches from the top and half an inch from the left-hand edge as the box stands on end. (J, Figure 6.) “Bore it with a hot wire nail; it will make a smoother surface than the gimlet.”
Then Polly, holding her hot nail with a pair of pincers, burned a small round hole in the cigar box and also the hole K in the front upright, Figure 8. This front upright, which was to hold the outer end of the wheel shaft, Donald had whittled from a shingle. He made it six and one-quarter inches high, with a base three and one-half inches wide. Polly was careful to have the hole in the upright the same distance from the bottom of the box, so that the shaft of the wheel would be perfectly horizontal when put through the two holes. Donald used small wire nails for fastening the side uprights to the cigar box. He removed the lid of the box, so that he could easily get at the inside, then drove the nails through the uprights into the side, top and bottom edges of the box. (Figure 6.)
33
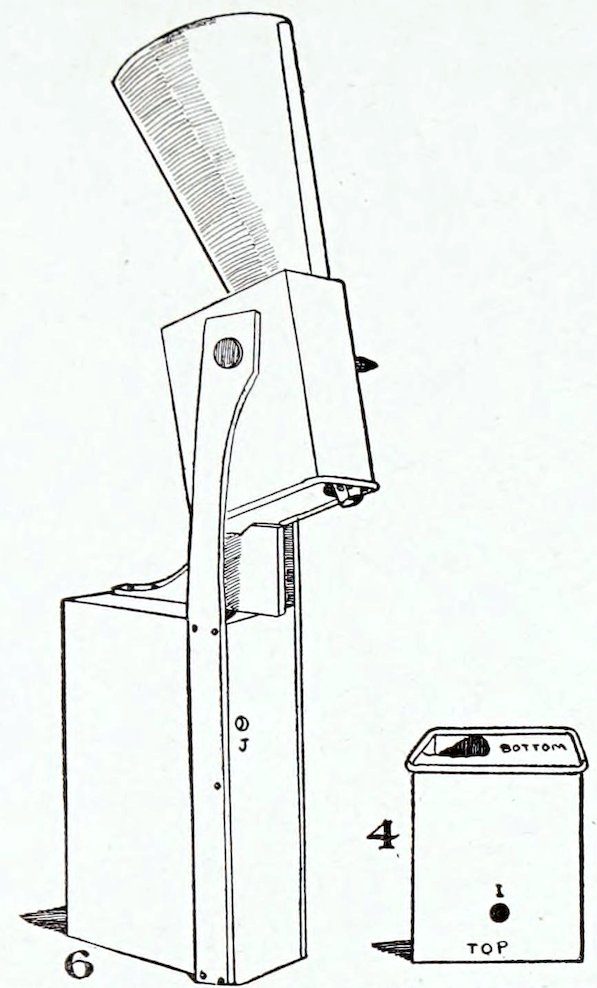
The sand tower was not difficult to make
“I think we will have to nail the tower and other things to a board,” he said. “They will never stand firm on the sand.” A suitable piece of board could not be found, but Polly begged an old pastry board from the cook and that made a fine flooring for their machinery. Donald stood the sand tower on the board at the left-hand front corner, with the cigar box base just six and one-half inches from the front edge and four inches from the side edge of the board. “I can tack this down from the inside of the box,” he said, and using two good sized carpet tacks he drove them through the end of the box into the board. “Now get a shaft for your wheel, Polly, and we will put the wheel up before I nail the front upright in place.”
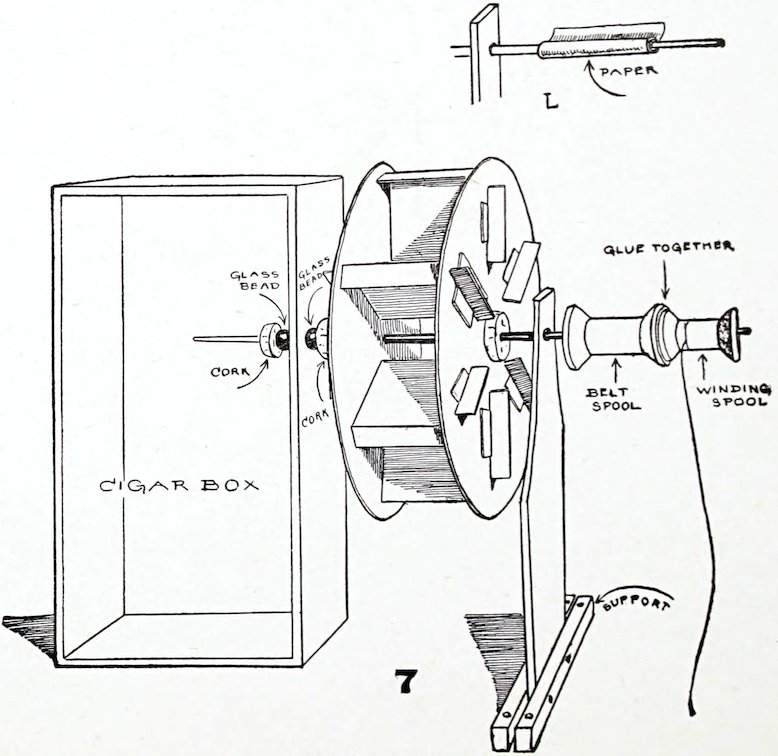
The wheel and shaft turn together
Polly had secured for the shaft of her wheel a long, slender paint brush handle. The brush was a No. 2 bristle oil paint brush, and had cost five cents when new. Exactly at the center of each disk of the wheel she made a puncture and then gradually and with great care pushed her shaft through until the wheel was in the middle and on the largest part of the shaft. Then she cut a medium-sized cork into three slices. The two largest slices she pushed up on the shaft, one from either end, and before settling them in place she put a little glue on the shaft close to the wheel as well as on the inner side of the corks, then pushed the corks up over the glue on the shaft and close against the wheel. In this way the shaft, the corks and the wheel were glued together. “They must all turn together,” Polly remarked, “and not like a wheel on an axle.” On the end of the shaft which was to rest in the hole in the box, she slid the remaining slice of cork, leaving it within three-quarters of an inch of the cork fastened to the wheel. This was to keep the shaft from running too far into the box.
“Be sure you get the right end of the shaft into the box,” Donald cautioned. “Remember, the edges of the buckets bend down when the left side of the wheel is toward you.” (Figure 7.)
“I know,” said Polly. “Now I am going to put this large glass bead on to keep the cork from touching the box. The bead is so smooth and round it will turn easily against the wood.” So Polly put her bead on the shaft and slipped the end of the shaft through 34the box. “I will put a bead on the inside, too,” she added, “and then a cork to keep it from slipping off, and it will have to be a very small cork or it will rub against the side of the box and the shaft won’t turn.” (Figure 7.)
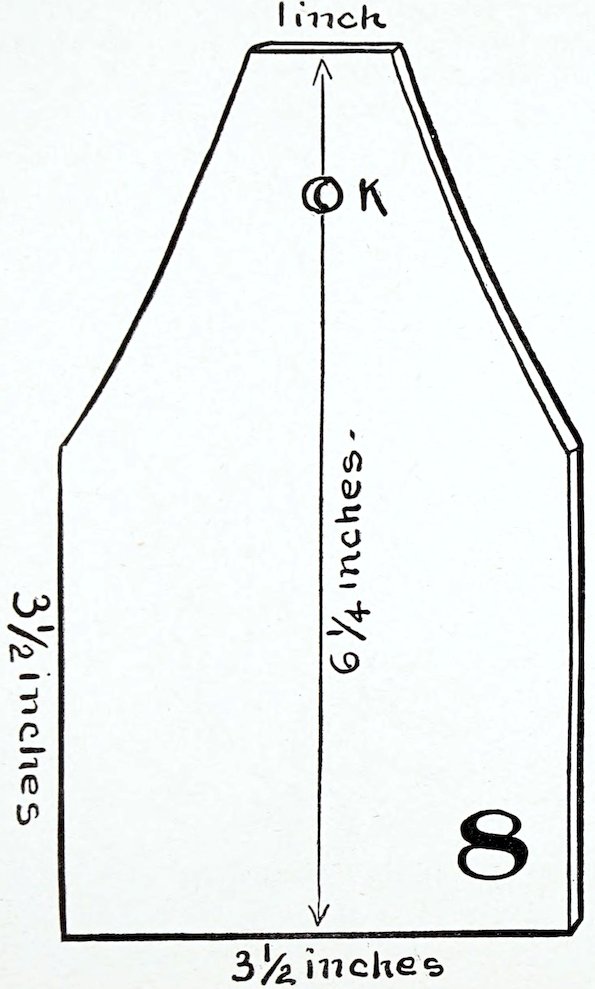
The front upright
Meanwhile Donald had been devising a way to hold the front upright erect. “I have it now,” he exclaimed, and cutting a piece of wood half an inch wide and half an inch thick into two pieces four and one-half inches long, he nailed them to the front and back of the lower edge of the upright; then sliding the free end of the shaft through the hole in the upright, he settled the upright in place in front of the box, a little to the left, so that the hole in the box and the hole in the upright were directly opposite each other and the shaft went through true and straight. Then he nailed the supports to the board. (Figure 7.)
When the children adjusted the funnel and filled it with sand they found that to make it work perfectly it was necessary to tilt the can forward in order to send the stream of sand near the outer edge of the wheel, and that something must be invented to hold the can in that position, so Donald quickly whittled out the little brace. (Figure 9.) The brace is five inches long at the bottom, two and one-quarter inches long at the top and one and five-eighths inches high. The V-shaped notch is one inch from the front end.
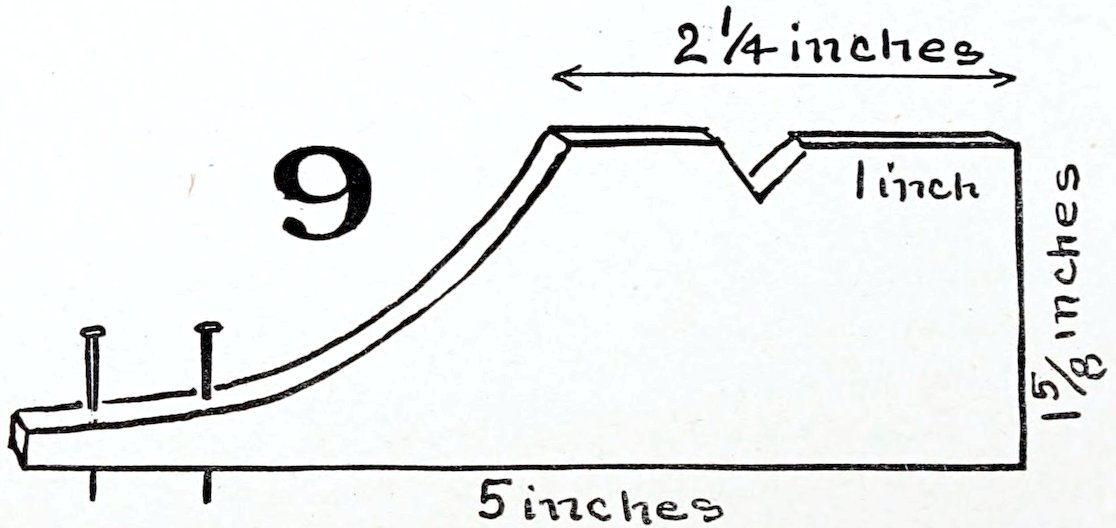
A brace
Fitting the back edge of the can into the notch of the brace, Donald adjusted the brace on top of the box so that the can was held at the required 35angle and the falling sand struck the wheel in the right place; then with two small nails he fastened it on securely. (Figure 6.) Donald also slipped a thin strip of wood between the back of the funnel and the large nail. The wood rested on the bottom of the can and extended up to the top of the funnel.
“That will strengthen it,” he said. “The wheel works all right; now we will make it move things.”
“Let us have a merry-go-round,” Polly suggested.
“Yes, and a mine. The wheel will draw the miners up in a bucket, and then I think when the merry-go-round turns it will pull a wagon uphill, too,” Donald answered.
The merry-go-round is built like this
“And everything will move at once,” Polly cried delightedly.
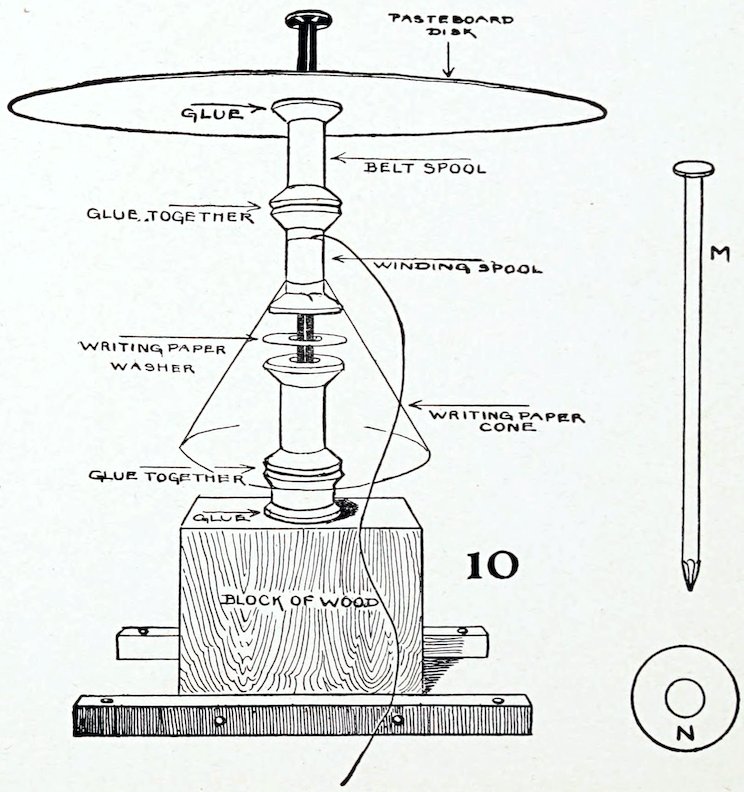
“We will have to have a belt spool and a winding spool on the end of this shaft,” Donald said. “The belt spool will connect it with the merry-go-round and the winding spool will draw up the miner’s bucket. The spools must be fastened to the shaft, too, so that they will turn with it.”
As the shaft was too slender to fit the holes in the spools, Polly wrapped it with a strip of newspaper. (L, Figure 7.) She used newspaper because it was soft and would cling. She cut a strip about twelve inches long and two inches wide. This she covered on one side with glue; then sticking one end to the shaft about half an inch from the upright, she wrapped the paper tightly around the shaft, making a number of layers, which, glued together, became a solid mass. Donald had selected two spools and glued the ends together—a medium-sized spool for the belt spool and a small spool for the winding spool. When the glue had hardened on the spools and on the paper roll he covered the outside of the roll and the inside of the spools with glue and pushed the spools up on the shaft until they covered the paper roll and stuck fast. (Figure 7.)
“Now cut a round bristolboard disk for the merry-go-round, Polly,” Donald said, “while I rig up a stand for it.”
36
The cone
The disk Polly made was seven and one-half inches in diameter with a round hole in the center a little larger than the hole in a spool, and while she was drawing the circle and cutting it out Donald found a level-sided block of wood, two and one-quarter inches high, for the base of his stand. To this block he nailed small strips of wood, one on either side like the supports on the front upright. (Figure 10.) Then, selecting a medium-sized spool, two smaller spools and a buttonhole twist spool to make the shaft of the merry-go-round the proper height, he glued the two smallest spools together and the larger and buttonhole twist spools together. On top of the smallest spools he glued the disk. Taking a second spikelike wire nail, longer than the one used on the sand tower (M, Figure 10), he slipped it through the disk and the two smallest spools, then stopped and thought a moment. “A washer will have to go on now,” he said, “to make these upper spools turn easily on the lower ones.” So he cut a washer like N, Figure 10, from a piece of very glossy writing paper, making it a little larger than the end of the spools. “I’ll glue these two lower spools to the block before I put the nail through,” he continued as he covered the bottom of the buttonhole twist spool with glue and fitted it on top of the block exactly in the middle. He waited a while for the glue to dry; then, placing his paper washer on top of the large spool, he dropped the point of the nail down through the washer and the spools and drove the nail into the block far enough to hold it quite steady, but leaving enough space between the top of the disk and the head of the nail to let the disk turn freely. “We will put the merry-go-round here,” Donald went on, as he placed the block directly at the front edge of the board about seven and one-half inches to the right of the sand tower. “It won’t do to have it too far from the wheel.” Then, driving nails through the strips of wood on either side of the block, he fastened the 37merry-go-round in place. “Now get a piece of tape for the belt, Polly, and we will make her spin,” he said. “Get cotton tape; linen is too slippery.”
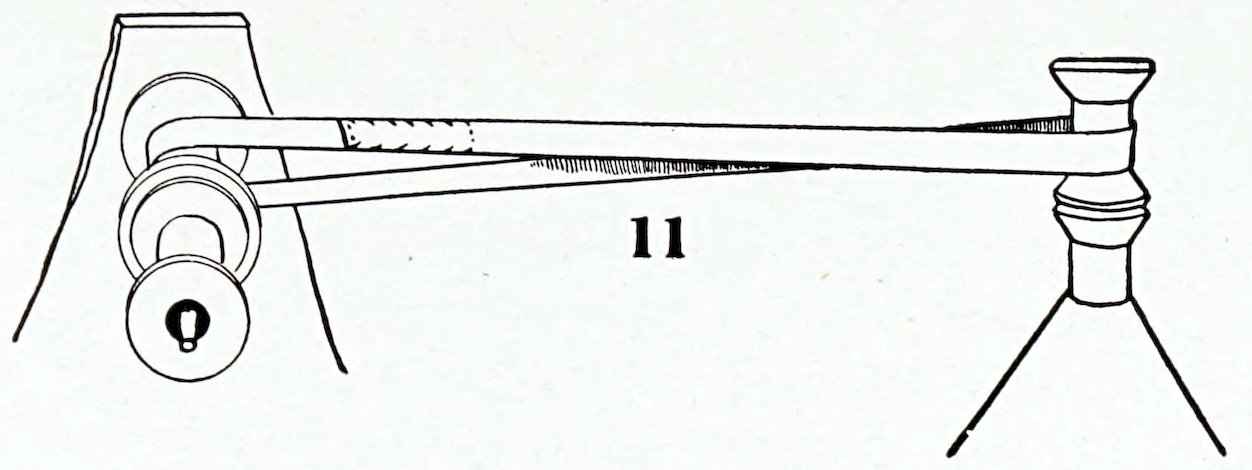
Polly returned with a piece of cotton tape a little over a quarter of an inch wide and about twenty-five inches long. Donald passed it over the belt spool on the wheel shaft and around the belt spool on the merry-go-round shaft (Figure 11) and pinned the lapped ends together. Then Polly poured sand in the funnel of the sand tower and Donald watched the working of the belt, tightening or loosening it as it seemed to require. When it was in perfect working order Polly sewed the ends of the tape together, making a lapped seam, as in Figure 11. Then she proceeded to fasten a piece of thread about a yard and one-quarter long to each of the winding spools. First she placed one end of the thread lengthwise on the spool and then glued a strip of paper around the spool and over the thread. Looking up from her work, she found Donald drawing a circle on a piece of writing paper.
“I am making a cone,” he explained, “to fit over the lower spools and prevent the thread from catching on the block.”
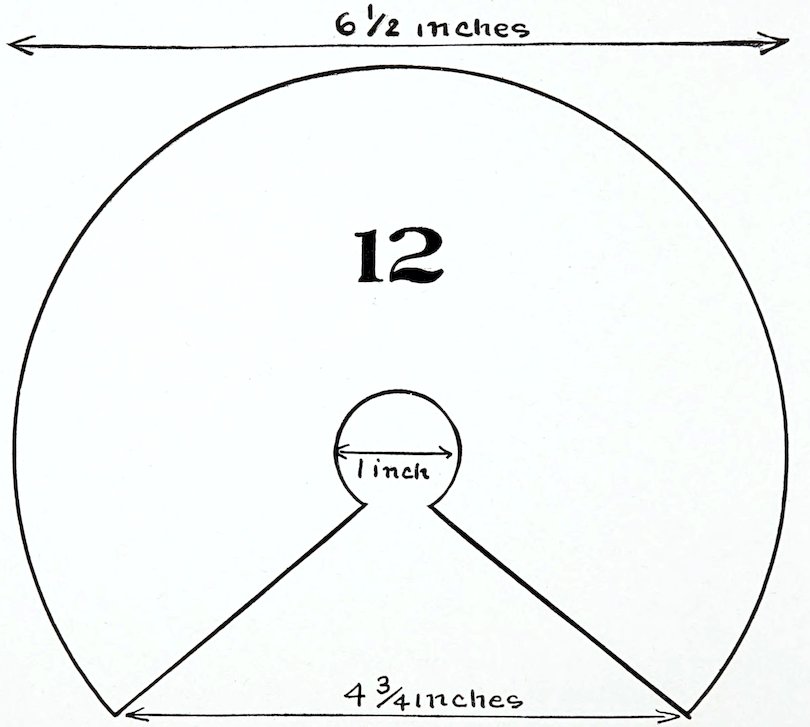
Donald made the circle for his cone six and one-half inches in diameter, and at the center he cut a round hole large enough to fit around the spool. Out of this circle he cut a pie-shaped slice four and three-quarters inches wide at the outer edge. (Figure 12.) Adjusting the cone on the lower part of the winding spool, he lapped the edges and pasted them together. The cone stood out beyond the side edges, but did not touch the block.
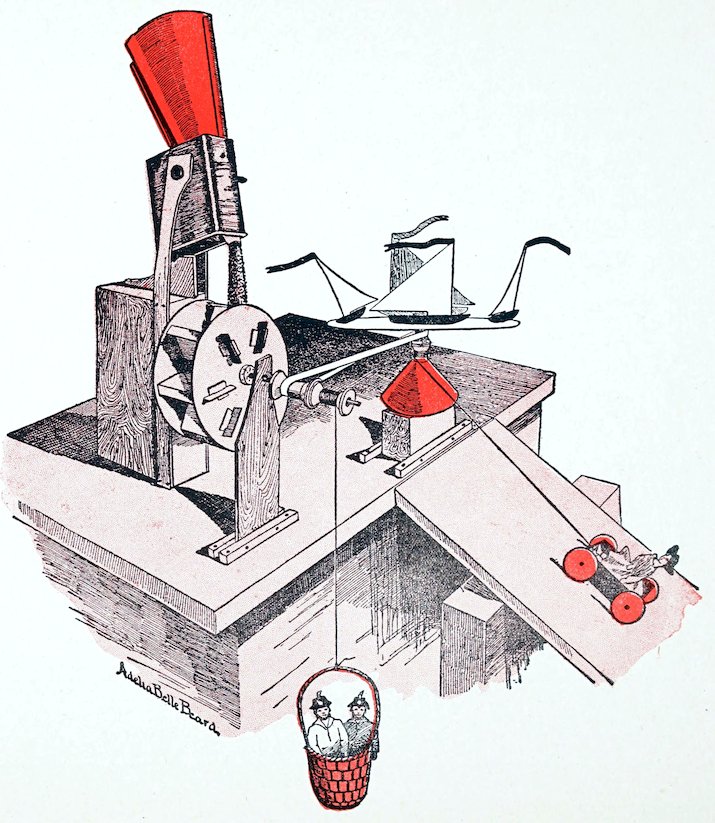
“I am going to put these on the merry-go-round, they will look so pretty ‘as they sail, as they sail,’” chanted Polly, showing four little boats she had cut from writing paper and painted in gay colors with watercolor paints. Polly had made the boats with extensions at the bottom, which she slit up through the middle. Bending one half out on one side and the other half out on the other side, she pasted the extensions to the top of the disk near the edge, placing the boats at equal distances apart. By this time Donald had begun a little wagon, making it of a match box by cutting writing paper wheels and pinning them on to the box with ordinary pins, one pin for each wheel. “The wagon must not be heavy,” he said, “because our machinery is light.” The children chose a small, light toy basket to use as a miner’s bucket, and then made two paper doll miners to put in the bucket and a paper doll lady to ride in the wagon. The end of the thread hanging from the winding spool on the wheel shaft they tied to the handle of the basket and the thread fastened to the winding spool on the shaft of the merry-go-round they tied to the front of the wagon. Then they carried the whole thing out on the beach and set it up on an empty box which they had put on top of a little hill of sand to raise it high above the ground. Donald found a smooth board, one end of which he propped up directly under the merry-go-round and on this he set the little wagon, drawing it down the full length of the thread. Polly scooped a hole in the sand for a mine and dropped the little basket in it. Then, all being ready, Polly held her hand under the funnel for a stopper, Donald filled the funnel with dry sand, Polly took away her hand, the sand began to run out in a steady stream, the wheel whirled round, the merry-go-round spun merrily, fluttering the tissue-paper pennants on the little boats and tipping them most naturally. The miner’s basket emerged from the mine and slowly ascended, and the little wagon climbed up the incline, bearing its lady passenger.
38
39