How to Make a Trolley Car
Reading edition
By Adelia Belle Beard
One of the Authors of Things Worth Doing
[All rights reserved]
“Polly!” called Donald, leaning over the banisters, “I’ve a jolly good idea this morning and I want you to help me.” Polly had been romping with her two fuzzy little kittens in the lower hall, but she promptly deserted them and mounted the stairs on a run.
“What is it?” she cried, appearing at the Kraft Shop door before Donald had reached his seat at the table.
“What do you think of making a little trolley car?” he replied.
“One that will go on a real trolley wire? I think that will be just loads of fun. How long can we have the line?”
“As long as we like, but I will use linen thread instead of wire; it is easier to manage.”
“And we will use spools for wheels, of course, and bristolboard for the car,” said Polly.
The trolley car runs on its own trolley
40“Yes, and I’m going to make as much of the car in one piece as I can.”
“Then I don’t see what I can do,” Polly objected.
“Oh, there will have to be some separate parts,” Donald hastened to say. “You can make the little top roof and the trolley pole, and you can get the spools and thread and two little sticks for axles. That will be a big help. Now look at my pattern; you see, I’ve worked it down until it fits into an oblong, fourteen inches long and seven and one-half inches wide. This takes in the main part of the car, but not the platforms. (Figure 1.) Now I will carry these two lines (J H and J L) down to make a platform and the upright front of the platform. I don’t suppose it is called a dashboard.”
“Where will you put the other platform?” inquired Polly.
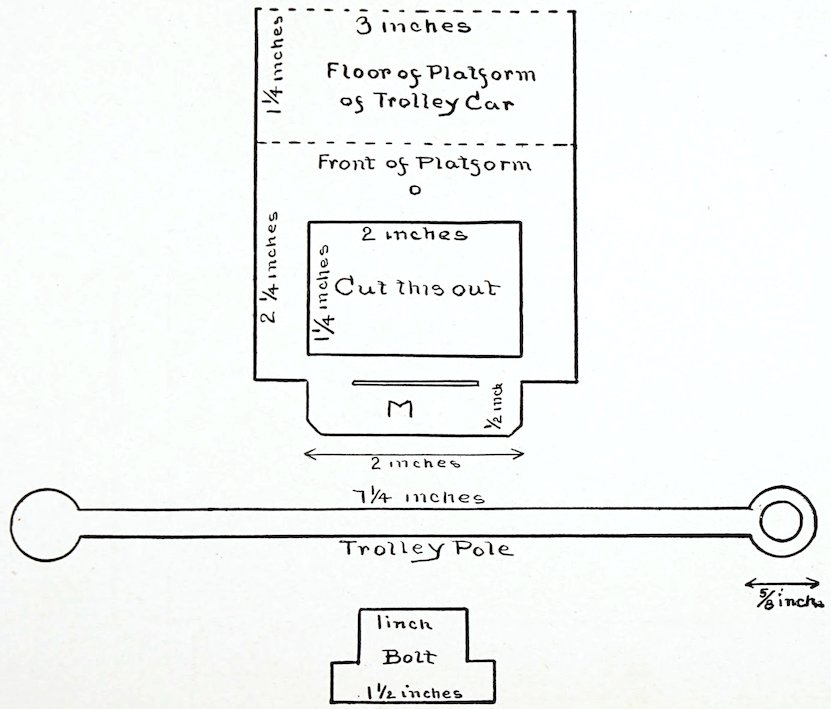
“At the upper right hand corner,” said Donald. Then Donald drew below the lines H H and above the lines G G the platform which, for lack of space, is given separately here, but which must be traced and made a part of the pattern by being fitted out at each end of the car.
“This projection,” (M) Donald continued, “is to fasten the front of the platform to the roof.”
“You haven’t made a place for the wheels,” said Polly.
“You’re right, I haven’t. We will put them here,” and Donald drew the axle guards, marked F. “This is the place for the doors,” he went on, indicating the spaces at either end of the two sides of the car. “The top part of the door is glass, you know,” he said. On the door at the upper left-hand corner (Figure 2) he made the catch B and on the middle line of the lower door he cut the slot B. The inner edge of the slot is on the line, the outer edge is left of the line. The order was reversed on the right-hand side. (Figure 2.) Here he put the catch (A) on the lower door and the slot (A) on the upper door.
“If you will tell me how large you want the little top roof I’ll make it now,” said Polly.
“All right. I’ll draw a place for it, then I’ll know,” and on the top of the car Donald drew the oblong two and one-quarter inches wide. The top line of the oblong was three-eighths of an inch below the line I I, and the bottom line of the oblong was three-eighths of an inch above the line J J, Figure 2.
Wheel, axle and hub of the car
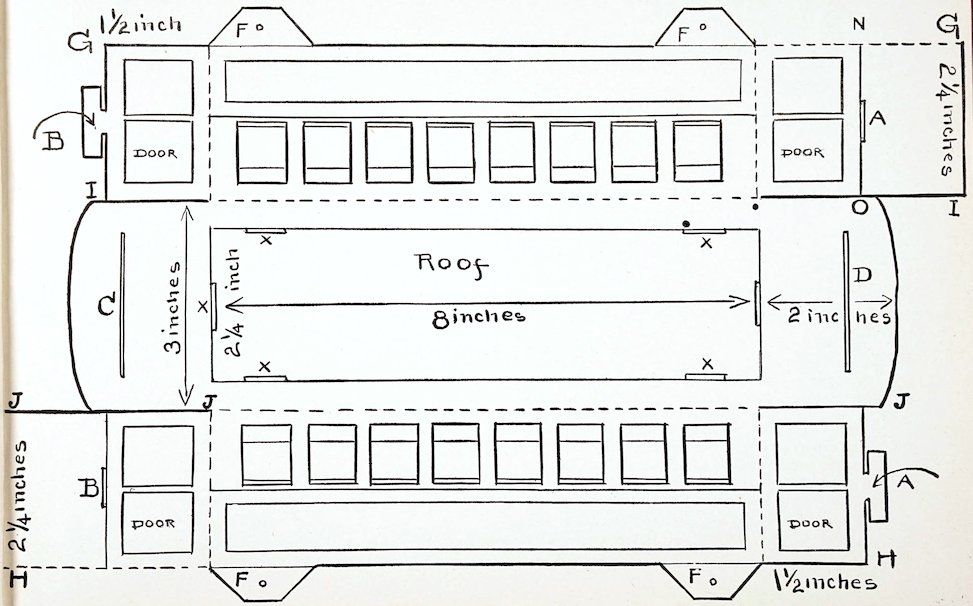
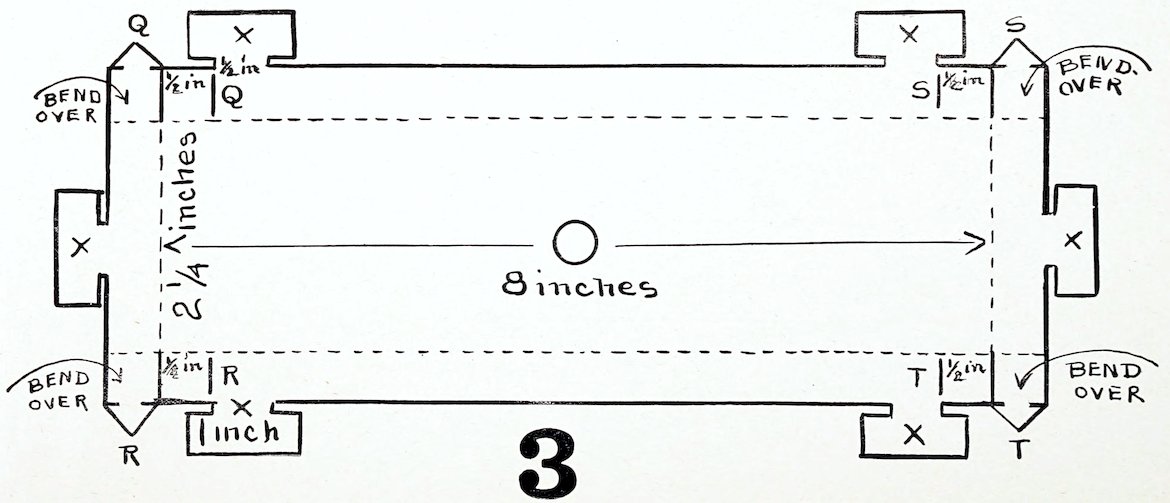
“Now I have it,” he said. “You must make the little top roof just eight inches long and two and one-quarter inches wide. Draw an oblong exactly that size, you know, for the top. I want it to stand up half an inch above the car, so you must add half an inch at each side and each end, with bend-overs and catches at each corner to hold the sides and ends together, and slits in the sides for the catches. Then make large catches to hold the top roof to the other roof, one catch at each end of each side and one in the middle of each end. (Figure 3.) Be sure and make the side catches half an inch from the end of the oblong.”
“You mean,” said Polly, “that the neck of the catch must be half an inch from the corner when the sides and ends are bent down.”
41
42
“That’s it, and make the neck half an inch wide and the catch about one inch long from end to end. Don’t forget the hole in the middle of the roof for the trolley pole,” Donald added. “Make it not quite half an inch in diameter. (Figure 3.) Then Donald drew slots for the catches in the oblong on top of his car, placing them to correspond with the catches on the top roof and making them a little more than half an inch long. He placed each side slot just half an inch from the ends of the oblong, and all inside the boundary line.
“Now I will draw in the windows, eight on each side,” he announced, spacing them off carefully with a rule. He made each window three-quarters of an inch wide and seven-eighths of an inch high, allowing one-quarter of an inch space between. Then on the front of each platform he drew an opening two inches wide and one and one-quarter inches high. On a line with the lower edge of the front of the bottom, in the middle of the projection, he drew a slot a little over one inch long (Figure 2), and on the roof extension at each end of the car he made a slot a little over two inches long, C and D, page 41. These slots are one and one-quarter inches from the end lines of the middle oblong on the roof.
“My car is ready to cut out now,” said Donald.
“So is my top roof,” said Polly. “Is the trolley pole all right?”
43Polly had made the pole seven and one-half inches long and one-quarter of an inch wide, with a ring at one end five-eighths of an inch in diameter, and a ball as the other end one-half an inch in diameter. (Figure 4.)
Donald pronounced the pole “first rate.” “Put the ball through the hole, Polly,” he said. So when Polly had cut out the roof according to the heavy lines and bent down the sides and ends according to the dotted lines (Figure 3), she turned in one edge of the ball and pushed it through the round hole in the roof. When she flattened the ball out again it could not slip through the hole, but the pole could be moved in any direction.
Donald cut out his car according to the heavy lines and bent it according to the dotted lines. Both he and Polly remembered to score the dotted lines lightly with the edge of a pocket knife before bending them. The sides of the car Donald bent down; the doors he bent inward to meet under the projecting roof; the platform he turned out and the front of the platform up. Before fastening the catches and projections in their slots he fitted the top roof on the car, putting the catches marked X through the slots marked X. First he bent both ends of each catch inward, which made them narrow enough to slide through the slots, then he pushed the catches through the slots, settled the top roof firmly on the main 44roof and opened the catches on the inside of the car. When this was done he fastened the doors by putting the catch B through the slot B in the opposite half of one door, and the catch A through the slot A on the opposite half of the other door. The projections at the top of the fronts of the two platforms he pushed through their corresponding slots in the roof.
“Hello! we’ve forgotten the bolts for these projections,” Donald suddenly exclaimed.
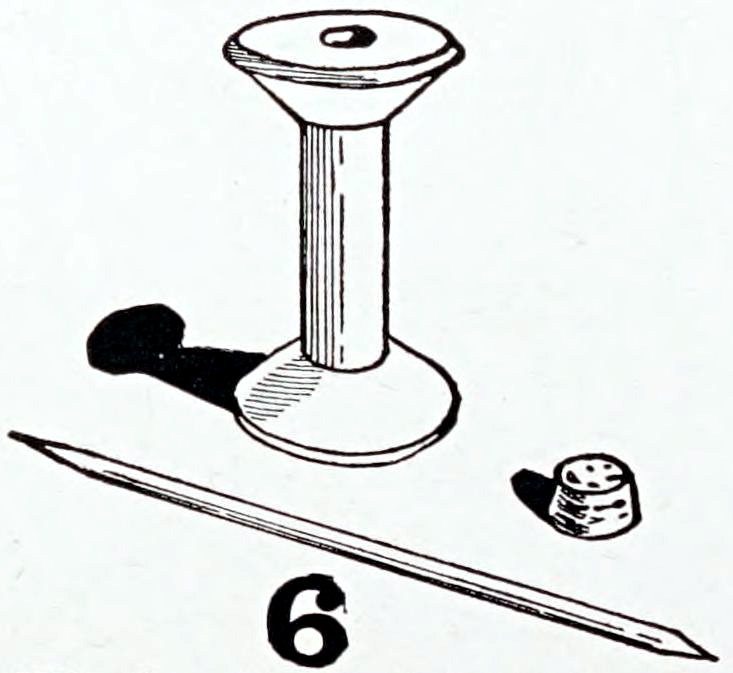
“I’ll make them while you put on the wheels,” said Polly. Then she cut two bolts like Figure 5, making them one and one-half inches wide at the bottom and one inch wide at the top. When the bolts were slipped through the slots in the projections C and D they held the fronts of the platforms securely in place. The two spools that Polly had selected for wheels were like Figure 6, each about two inches high, and the slender, round sticks, pointed at each end, were four inches long. Donald slipped a spool on one of the sticks, then pushed one end of the stick through the middle of one of the axle guards from the inside, and the other end of the stick through the middle of the opposite axle guard.
“Here are the hubs,” said Polly, producing four small corks. Then Donald pushed a cork on each end of the stick. The corks kept the axle from slipping out of place. He adjusted the other spool in the same way, then threaded a large needle with a piece of linen thread several yards long and pushed the needle through the front of the platform below the opening at the place marked with a dot in Figure 2. A large knot on the inside of the front of the platform held the string in place and the needle was again threaded with a long thread to fasten on the other end of the car. (Figure 7.)
“Now for the trolley wire,” exclaimed Polly. “How shall we put that up?”
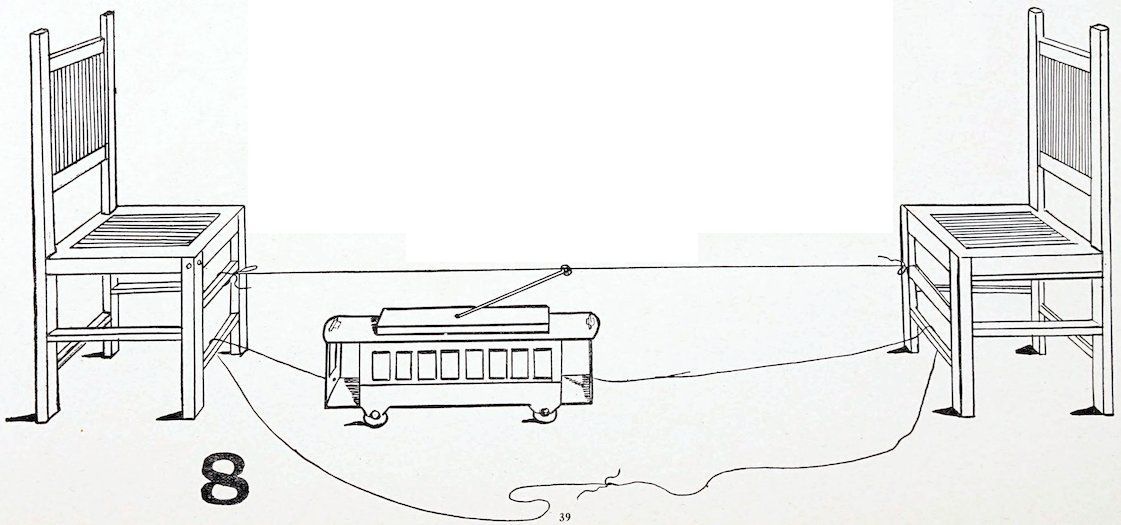
“This way,” said Donald, and he placed two chairs at opposite ends of the room, then he cut a piece of thread a little longer than the space between the chairs and tied one end to the top rung of one chair. The other end of the thread he passed through the ring in the top of the trolley pole and then tied it to the top rung of the other chair.
“There we are. Now, Polly, you sit down by the chair and take hold of one thread, and I will sit by this chair and hold the other thread. When you pull your thread the car will run all the way to your chair; when I pull my thread back it will come to me.”
The children kept the little car running back and forth for some time and were vastly entertained. When they wished, they had it make several stops to allow imaginary passengers to get off and on, and again it was an express car and went from one end of the line to the other without stopping. Finally Donald was called away to go an errand and Polly discovered that she could work the car entirely alone by running the loose ends of the threads over the lower rungs of the chairs, tying the two ends together and pulling the thread first one way, then the other. Figure 8 shows the trolley in working order with the threads tied together in the way Polly devised.
45