Making Toy Furniture Without Glue
Reading edition
By Adelia Belle Beard
“I am going to have a Kraft Shop, a Kraft Shop!” sang Polly, noisily pulling out the old and much-battered table in the children’s play room and then skipping excitedly around to hunt up scissors, knife, ruler and pencils, the tools she thought would be necessary. Donald watched proceedings over the top of his book. Things were beginning to look interesting. “What do you know about Kraft Shops?”
“Everything. Mother told me and, besides, I went through a real Kraft Shop last summer and saw all the people at work.”
“What were they making?”
“Why—er—I am not sure that I quite remember just what they were making, but I know they do make beau-ti-ful things, and all with their hands, too. They don’t use machinery at all. That’s what I’m going to do, and you, too, Donald. I don’t want to be a Krafter all by myself. Mother said it would be nice if you and I started a home Kraft Shop and made toys and all sorts of things.”
Donald’s book closed with a snap. “All right, I’m ready. What shall we try first?”
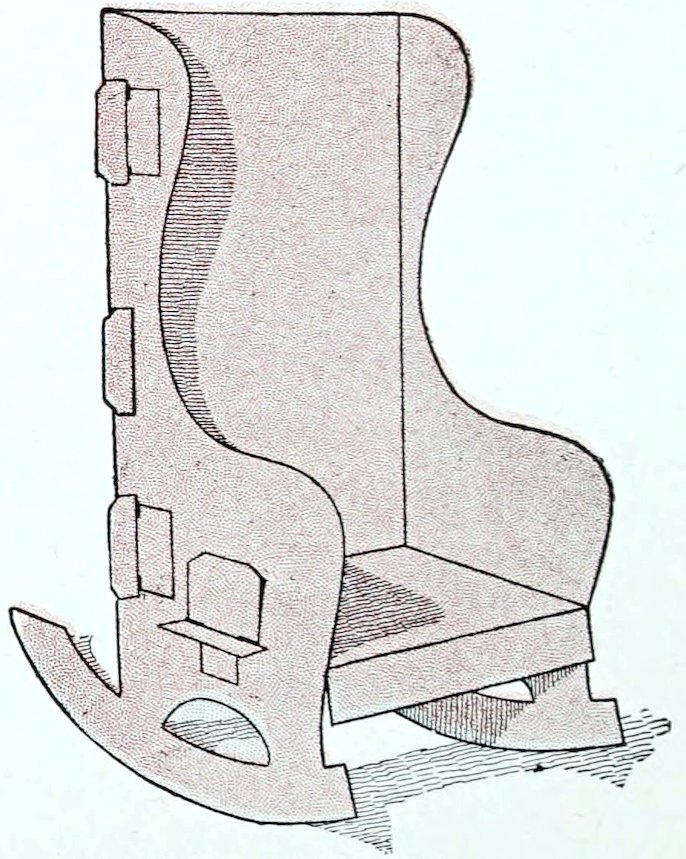
Polly’s chair. Figure 1
“Suppose we make toy furniture and call it—oh, I know, we will call it KraftShop furniture, and pretend that it’s real.”
“First rate; but I’ll have to get some wood.”
“No you won’t; we can make it of this cardboard; it will be easier to cut, anyway.”
“That is bristolboard, but it is better than cardboard, stronger and tougher, you know, and we can put the furniture together with pegs, just as if it were of wood.”
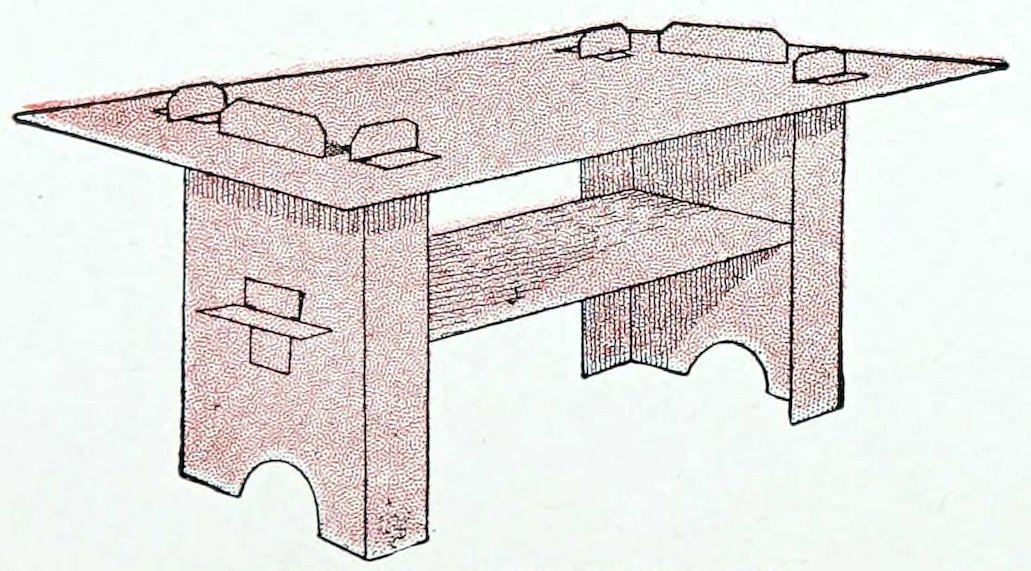
Donald’s table. Figure 2
“Yes, yes!” said Polly, jumping up and down in her enthusiasm. “That’s it. I was sure you would know how. What will you make?”
“A table, I think—a library table.”
“Then I’ll make an armchair, and, Donald, it is going to have rockers, too.”
“How about bookshelves, Polly? They would make the library set complete.”
46“Dear me! Of course we must have the shelves. Now let’s begin this very minute.”
“Well, get the furniture advertisements you saved—the pictures, you know. They will give us ideas, but we won’t have to copy them exactly.”
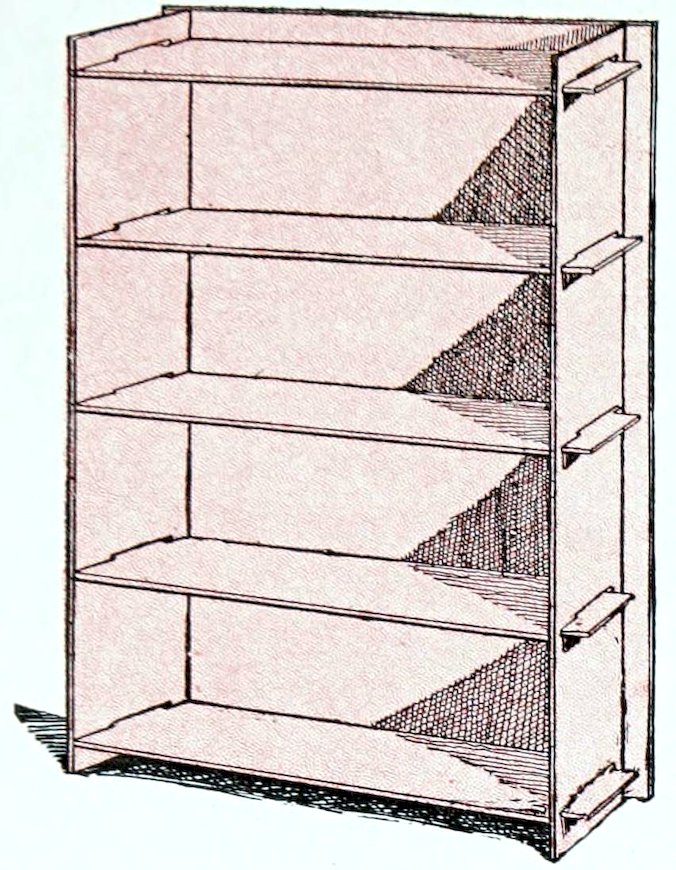
After many experiments and alterations, and with much fitting together of the various parts, Donald finished his table, Polly her chair, and together they worked out the bookshelves, using bolts for the shelves, instead of pegs, to hold them together. Here they are, Figures 1, 2, and 16.
The Kraft Shop table
“They are good and strong,” Donald said.
“And so pretty,” Polly added.
“And we didn’t use a bit of glue,” continued Donald, proudly.
“And I can put cushions in my chair if I like—real huffy, puffy cushions.”
“And little books on the shelves,” suggested Donald.
“Oh!” breathed Polly, estatically; “and, Donald, we can take them all apart and pack them in a flat box. Isn’t that fine?”
“It just is.”
47
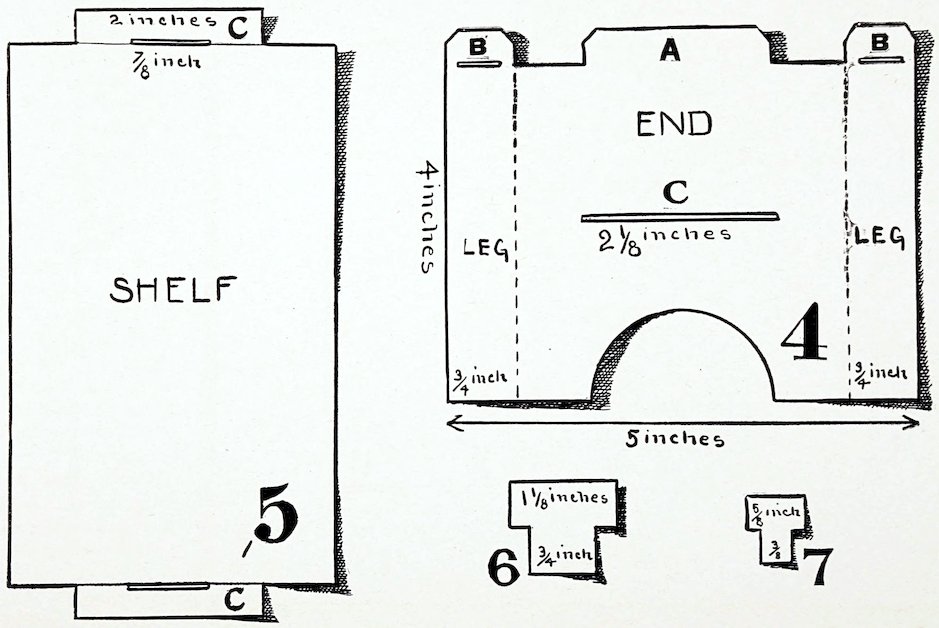
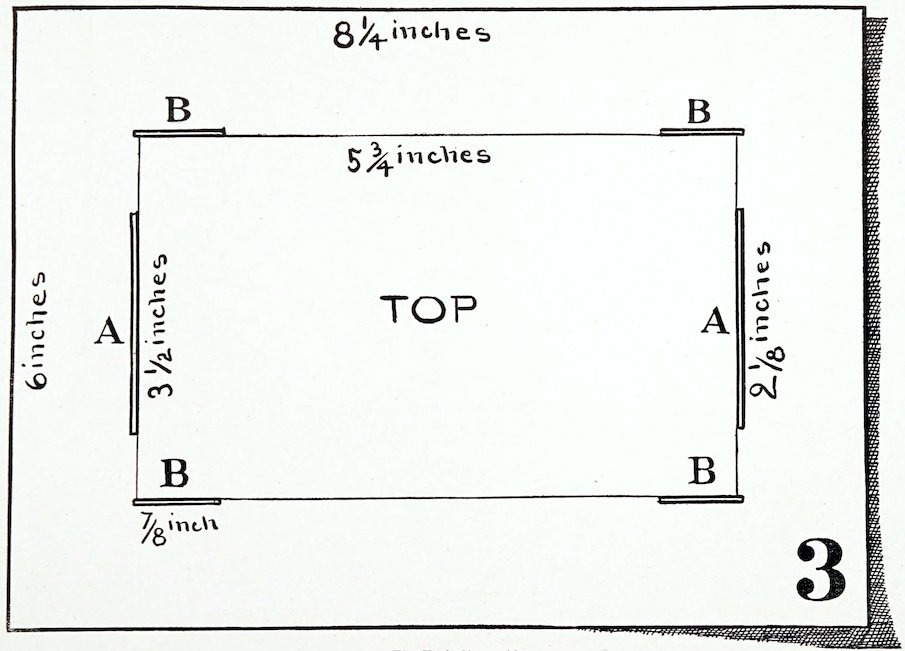
Donald made the top of his table first. With careful measurements he drew on the smooth bristolboard an oblong eight and one-quarter inches long and six inches wide (Fig. 3), which he cut out with the large shears. Within that oblong he drew another five and three-quarter inches long and three and one-half inches wide. This left a border one and one-quarter inches wide all around the center oblong. At the sides and ends of the inner oblong he drew lines for slits, as shown in Figure 3. The inside edge of each slit is on the outline of the oblong, and the outside edge outside of the oblong. The end slits (AA) are two and one-eighth inches long and the side slits (BB BB) are seven-eighths of an inch long, and extend a little beyond the end lines of the inner oblong. He cut 48these slits with a sharp knife and made them about one-sixteenth of an inch wide, which is a little more than the thickness of the bristolboard. The two end supports of the table Donald made like Figure 4, which is cut from an oblong five inches wide and four inches high. The real end of the table, from dotted line to dotted line, is three and one-half inches wide, just the width of the inner oblong on the top of the table, under which it must fit. The parts to the right and left of these dotted lines are the table legs. The projection in the middle, at the top, is two inches long and three-eighths of an inch high. The projections at the ends just over the table legs are the same height. Slits are cut in these projections one-half an inch long, with the lower edge of each slit on a line with the top edge of the end pieces, as shown in Figure 4.
49In the middle of each end piece, two inches from the bottom, there is another slit, two and one-eighth inches long, for holding the shelf, and the bottom is cut in a half-circle arch. When the end pieces were completed Donald scored the dotted lines by lightly drawing the blade of his knife down their entire length. Then he bent the bristolboard along these lines so that the table legs faced the sides.
Without the projections CC the shelf (Figure 5) is formed of an oblong exactly the size of the inner oblong on the table top. The projections are two inches long and a quarter of an inch wide. In these are cut slits seven-eighths of an inch long, and the slits are outside of the lines of the oblong, just as the slits are outside of the lines of the oblong on the table top.
Donald put all these parts together, slipping the projections A through the slits A, the projections B through the slits B, and the projections C through the slits C, and was delighted to find they fit perfectly. Then he made pegs like Figures 6 and 7; two like Figure 6, which is three-quarters of an inch wide at the bottom, one and one-eighth inches wide at the top and one inch high; and four like Figure 7, which is three-eighths of an inch wide at the bottom, five-eighths of an inch wide at the top and three-quarters of an inch high. He slid the two pegs (Figure 6) through the slits in the shelf, and the four pegs (Figure 7) through the slits in the projections above the table legs, and the stanch little table (Figure 1) was complete. He dropped it on the floor; it did not break. He tossed it into the air; its joints held firmly. Then Donald was satisfied with his work.
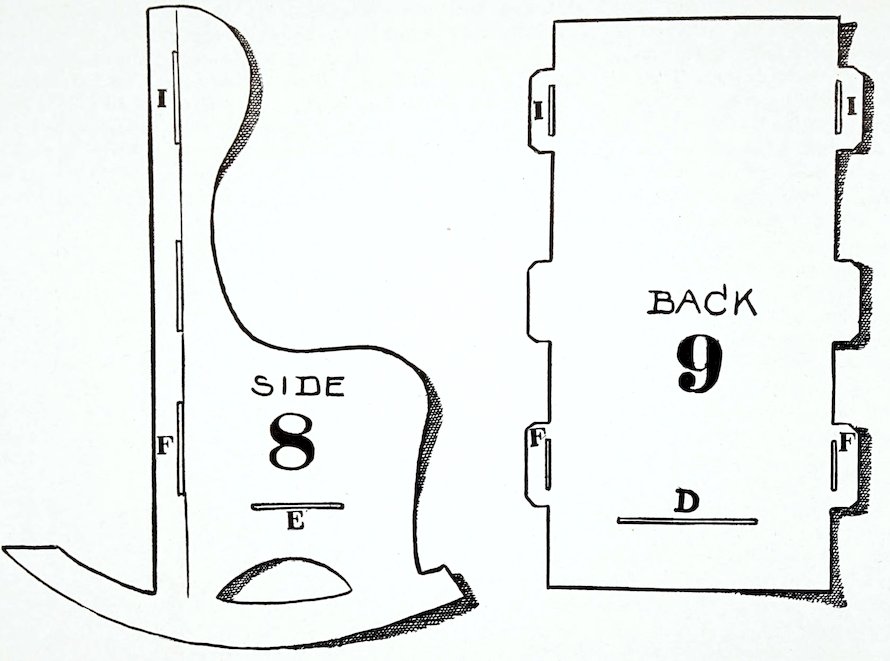
Polly made her chair in three parts, not counting the pegs. First she drew the two sides (Figure 8), which are six and three-quarter inches high, and three inches wide from front of arm to back edge. 50The rockers are five inches long from end to end and one-half an inch wide. One-quarter of an inch from the back edge Polly drew a straight line, extending it from the top edge of the chair to the top of the rocker (Figure 8), and along this line she cut three slits, each slit just one inch long. The top of the first slit is half an inch from the top edge of the chair; the top of the second slit one inch below the first slit; and the top of the third slit is three-quarters of an inch below the second slit. Just above the rocker she cut an arch half an inch high, and half an inch above the arch she made a horizontal slit one inch long. This finished the two sides of the chair.
For the back Polly drew an oblong six inches long and three inches wide. To this she added three projections on either side one-quarter of an inch wide. She spaced the projections exactly as she did the slits in the sides of the chair, making them each one inch long. Then, to allow them to pass easily through the slits, she cut a fraction off each end of each projection, which left the projections seven-eighths of an inch long. In the two top and two bottom projections there are slits for the pegs half an inch long, and three-quarters of an inch above the bottom edge there is a horizontal slit one and one-half inches long (Figure 9.)
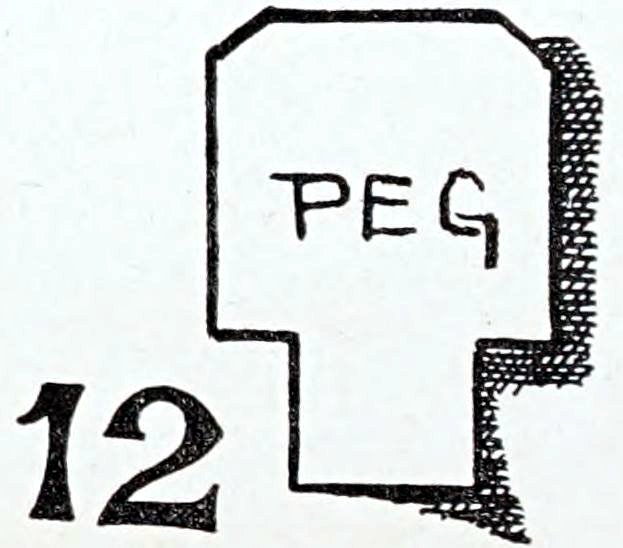
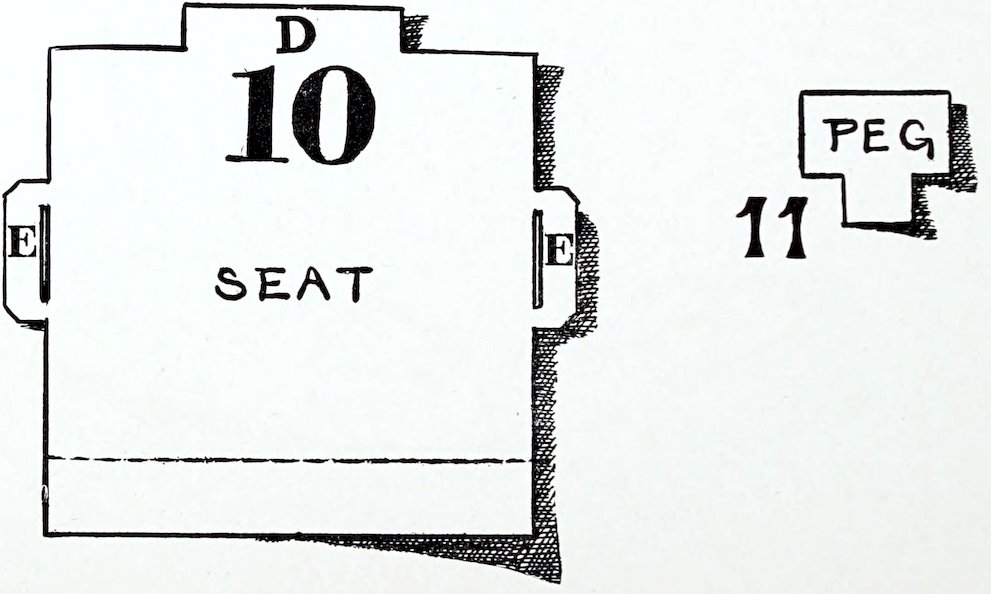
Figure 10 shows the seat which Polly made, three inches square, then added three projections one-quarter of an inch wide. The side projections are seven-eighths of an inch long and the back projection one and three-eighths inches long. Slits five-eighths of an inch long are cut in the side projections. The dotted line one-half inch above the bottom edge (Fig. 10) shows where the seat is scored to be bent down in front (Figure 2.) Of the six pegs needed for the chair, four are three-eighths of an inch wide at the bottom, not quite an inch wide at the top and three-quarters of an inch high (Figure 11.) The other two pegs are half an inch wide at the 51bottom, one inch wide at the top and one and one-quarter inches high (Figure 12.) Polly fitted the two sides of the chair to the back, sliding the projections on the back (II FF) through their corresponding slits (I F) in the sides, and fitted the seat to the back and sides, slipping the projection D through the slit D and the projections EE through the slits EE. Then she pegged them all together, using the pegs (Figure 11) for the slits II FF, and the pegs (Figure 12) for the slits EE. When it was finished she set the chair to rocking and clapped her hands with delight to see how perfect it was.
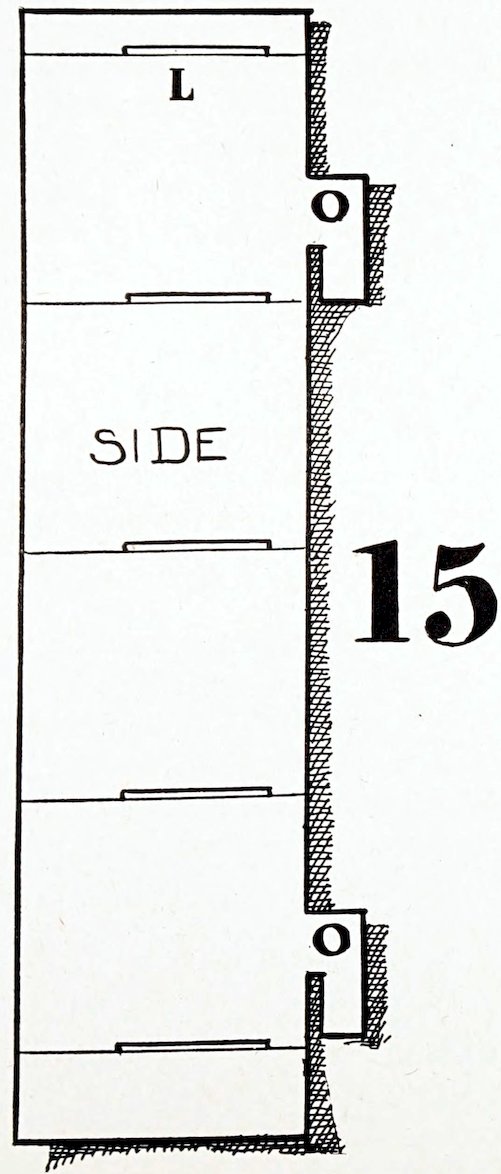
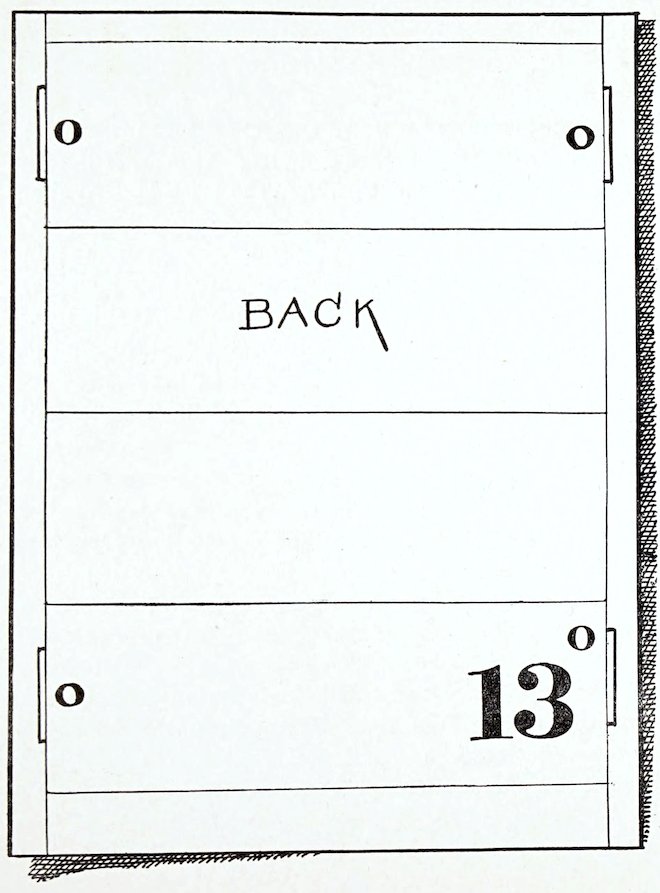
When the children made the bookshelves (Figure 16) they cut an oblong for the back piece six and one-quarter inches high and five inches wide (Figure 13.) On either side of this oblong, one-quarter of an inch from the edge, they drew straight lines from top to bottom; then, between these lines, they marked the position of the shelves with five horizontal lines one and one-half inches apart, making the first line one-quarter of an inch from the top edge. On either side of the back piece they made slits to hold the bolts on the side pieces (OO OO) (Figure 13.) The inner edge of these slits is on the side lines and the outer edge outside the side lines, and the slits are each three-quarters of an inch long. The top slits are five-eighths of an inch from the top edge and the bottom slits are one inch from the bottom edge of the back piece.
Of course the side pieces had to be made exactly as high as the back piece, six and three-quarters inches, and the children decided that one and three-quarters inches was a good width, but this width does not include the bolts (OO) (Figure 15.) The bolts are three-eighths of an inch wide at their widest part and a trifle less than three-quarters of an inch long, so that they will slip easily through the slits. The necks of the bolts measure three-eighths of an inch from top to bottom.
“Look out, Polly!” exclaimed Donald, suddenly. “You are not getting those in the right places. The lower edge of the neck of the top bolt has to be the same distance from the top edge of the side piece as the lower end of the top slit is from the top edge of the back piece, because it rests upon it. Don’t you see?”
52
“Yes, I see,” said Polly. “That will make it one and three-eighths inches from the top edge. And by the same token the bottom edge of the neck of the lower bolt must be just one inch above the bottom edge of the side piece, for the lower slit is one inch from the bottom edge of the back piece. Is that right?”
“You’ve got it,” answered Donald.
“That is the way it works; now draw the shelf lines across your side pieces to correspond to those on the back piece, and make them exactly the same distance apart. The top line must be one-quarter of an inch from the top edge, remember.”
Along the shelf lines Polly made slits for holding the shelves (L, Figure 15); the lower edge of each slit is on the line, the upper edge of the slit above the line. Each slit is three-quarters of an inch long. The left-hand ends of the slits are five-eighths of an inch from the left edge of the side piece.
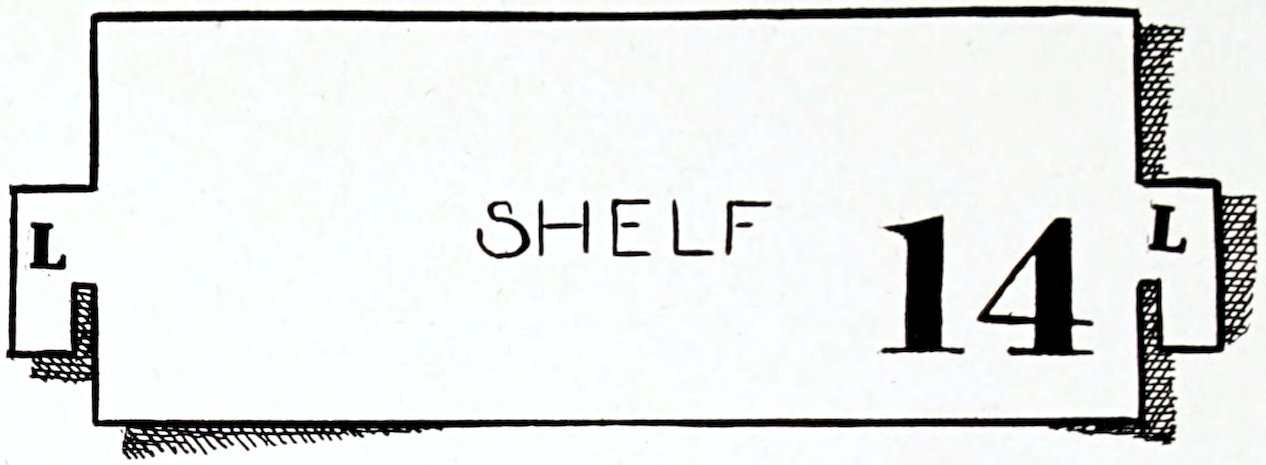
Figure 14 is the shelf. Donald made five of these shelves. They are four and one-half inches long; not including the bolts, and one and three-quarter inches wide, just the width of the side pieces. The bolts LL are the same size as the bolts OO on the side pieces. The lower edge of the neck of each bolt is five-eighths of an inch from the bottom edge of the shelf. The bottom edge of Figure 14 is the front edge of the shelf when it is put up.
When all the parts were finished the children first fitted the shelves to the side-pieces, sliding the bolts L through the slits L and pushing them forward until the bolts held fast and each shelf fitted the sides exactly. Then they slid the slits O in the back over the bolts O on the sides, pushed the sides down, the bolts slid into place and the little bookshelves were securely fastened together.
53
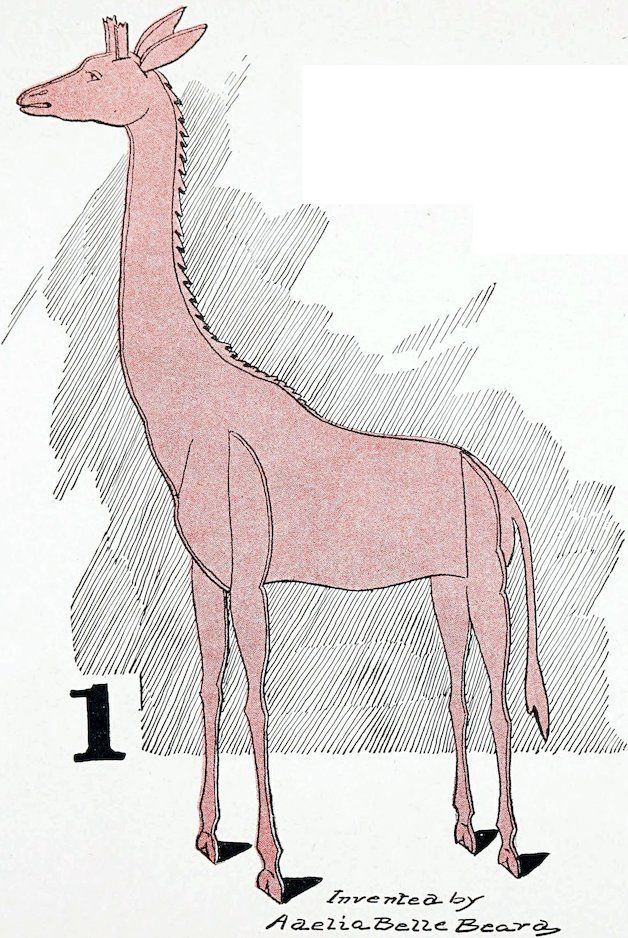
The giraffe is long-necked and awkward