Making the Bird Airship
Reading edition
By Adelia Belle Beard
One of the Authors of Things Worth Doing
“How are we going to make an airship when we can’t fill the bag with gas?” said Donald. “Why, make it of stiff paper and it will stand out without gas,” Polly answered. “Yes, but I don’t see what is to hold it up?” Donald objected. “We will make the airship first and then find something to hold it up,” Polly replied, cheerfully.
“That’s a girl’s way of doing things,” laughed Donald.
“Well, it’s a good way,” retorted Polly.
Donald did not entirely agree with her, but Polly’s way seemed the only way in this case. “Of course we will make the balloon cigar shaped, like a dirigible, and have a propeller,” he said.
“Yes, and let us make wings, too; they will help keep it in the air,” Polly added.
“And a tail for a rudder,” said Donald.
“Why, it will look just like a bird!” Polly exclaimed. “And we can call it the ‘bird airship.’ That sounds nice, doesn’t it, Donald?”
“All right,” said Donald; “now I’ll make the balloon.”
“Oh, Donald, please let me do that. You always take the hardest parts and I know I can do some of them,” protested Polly. “Besides, I have thought of a way to make it.”
“Well, I don’t care if you make the balloon,” said Donald. “This is your scheme, anyway. I’ll do the other things, but use this stiff manila paper, Polly; it is good and strong.”
Polly was soon at work bending and clipping and shaping a pattern that later she would correct and reduce to exact measurements. Donald watched her while he waited to learn what size to make the wings, tail and little passenger car.
“I am making the balloon in panels,” Polly informed him. “It is easier than trying to keep it round, and I shall cut each end into points with a bend-over on each point to fasten them together.”
“Going to glue it?”
“Why, no. I thought I would button it together with catches and slits. It is hard to glue a thing of this kind, and one has to hold each part so long for the glue to harden,” Polly answered.
24
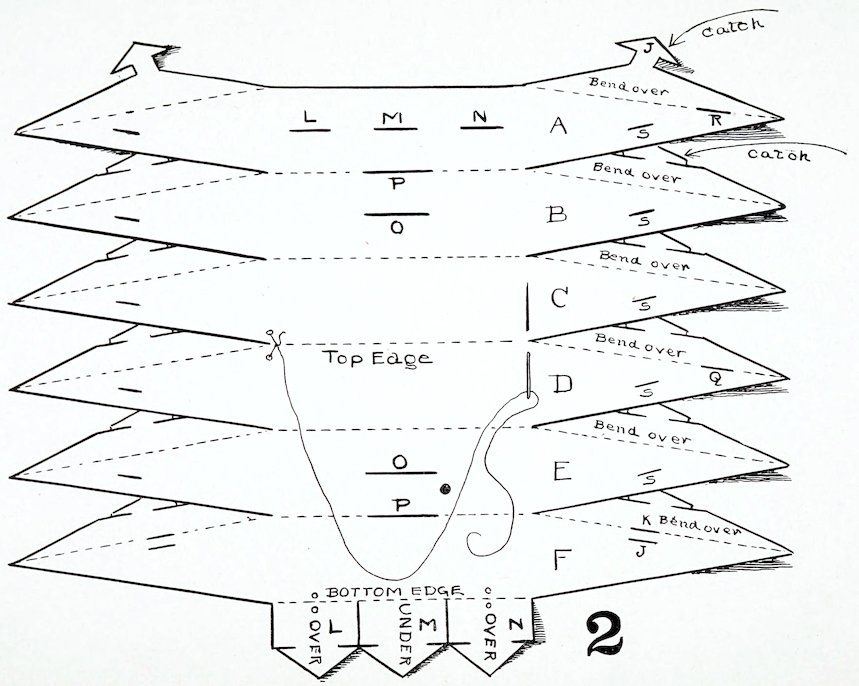
Figure 1 shows how Polly drew the pattern for her balloon after making it out. She was very careful in her measurements, 25using a rule and making the lines for the panels exactly one inch apart. “The sides won’t fit if they are not even,” she said to herself.
When the balloon was put together it looked like this
“That looks simple enough,” commented Donald.
When Polly cut the balloon out along the heavy lines it was like Figure 2.
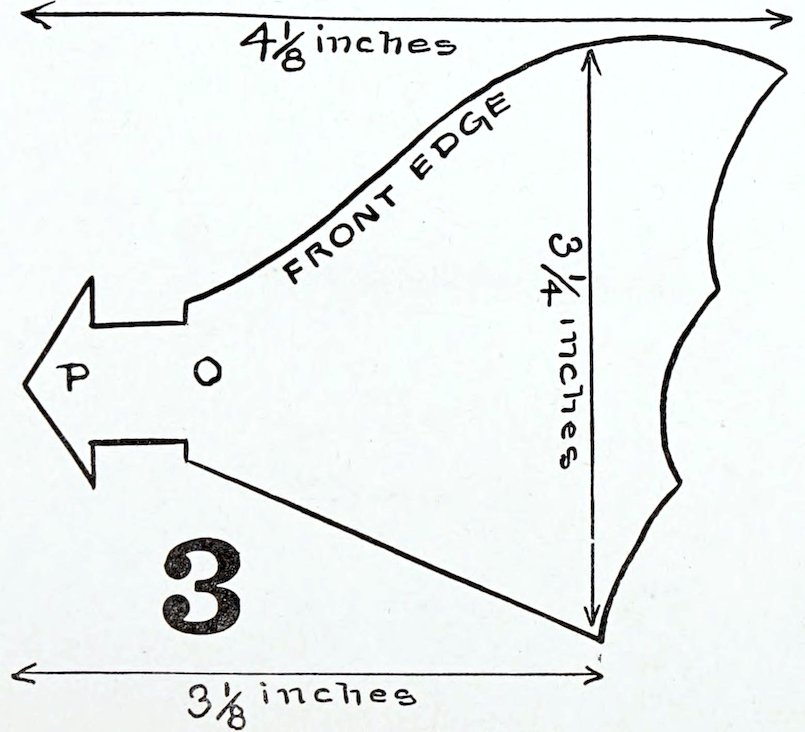
By this time Donald, who had been experimenting with Polly’s first pattern, had designed the wings (Figure 3), and the tail (Figure 5). He directed Polly to cut slits for the wings in the position shown in PO, OP, Figure 2. The slits P are exactly in the middle of the edge between the first and second panels at the top and the first and second panels at the bottom, and the slits O are in the middle of each second panel, top and bottom. Each slit is three-quarters of an inch long.
“Now make slits for the tail in the top edges of the top point and the fourth from the top point,” said Donald. “Make each slit five-eighths of an inch from the tip.”
“How long a slit?” said Polly.
“Three-eighths of an inch,” returned Donald.
Donald cut the wings like this
So Polly made the slits R and Q, Figure 2, and then bent the balloon along the dotted lines. Donald made the wings (Figure 3) four and one-eighth inches long from tip of catch to tip of wing. The neck of the catch is one-half of an inch long and five-eighths of an inch wide, and the catch from tip of point to neck is three-eighths of an inch deep. Just above the neck of the catch the wing is seven-eighths of an inch wide and at its broadest part it is three and one-quarter inches wide.
Donald bent in the points of the catch of one wing and pushed the catch in through the slit O in the balloon and out through the slit P, then he opened out the points of the catch.
“That will hold it steady,” he said, and fastened the other wing on in the same way.
“Do you want to fasten the tail on now?” asked Polly.
“No. Put the balloon together first,” said Donald.
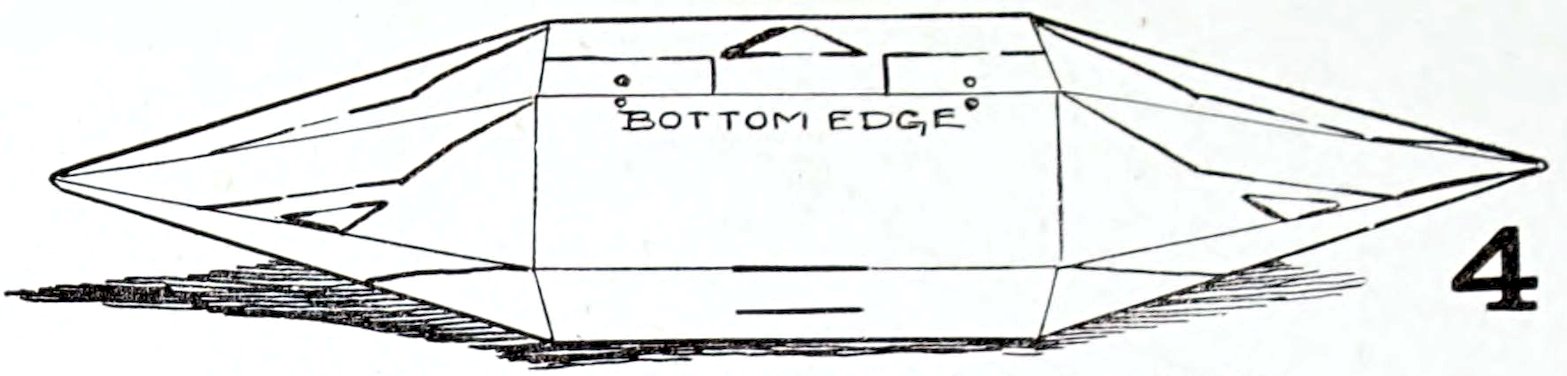
Then Polly began to shape her balloon by slipping the catches of the bend-overs at the bottom L, M, N through the slits L, M, N. She lapped L and N over the panel and M under the panel. This brought the catches of L and N on the inside, and the catch of M on the outside. 26Then she lapped the bend-over of the point B over the edge of the point A and inserted the catch of the bend-over in the slit in the point A. The catch of the bend-over of the point C she put through the slit in the point B, and in the same way fastened D to C, E to D and F to E. This brought all the points at one end of the balloon together, except F and A, and these she secured by putting the catch J of the point A in through the slit J and out through the slit K in the point F, which brought the catch on the outside. The other end of the balloon she put together in the same way, and it looked like Figure 4.
“This is the tail,” Donald said, holding up a piece of paper cut like Figure 5. The tail is four and one-half inches long, two and one-quarter inches wide at the end and five-eighths of an inch wide where it joins the body. Donald cut a slit half an inch long in the middle of the narrow end and then cut out a small, wedge-shaped piece at the end of the slit. The wedge is five-eighths of an inch long and a trifle over one-quarter of an inch at the base.
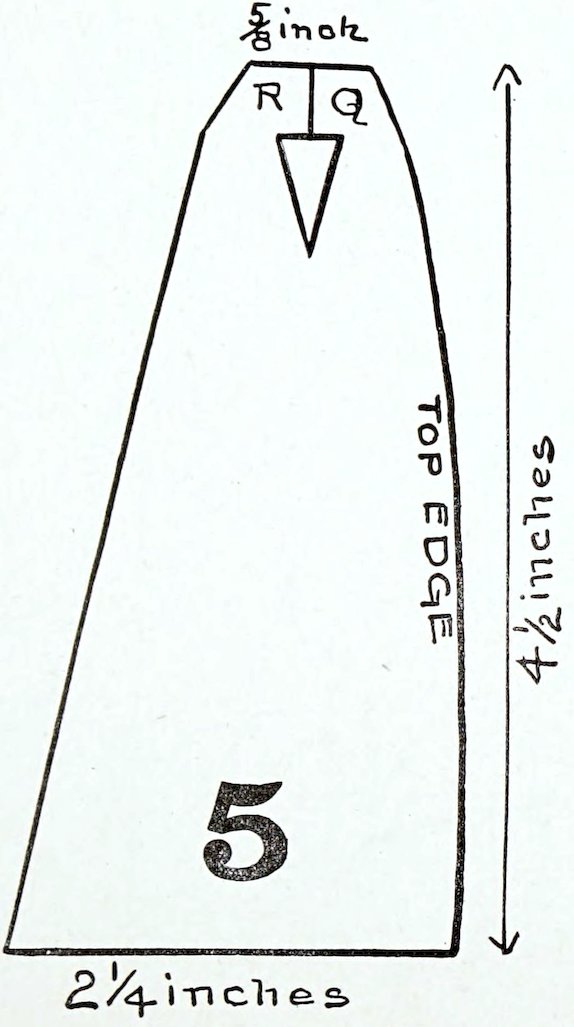
The tail acts as a rudder
“What is that pointed hole for,” said Polly.
“The end of the balloon fits in that when these two square catches (Q, R, Figure 5) are put through the slits you made for the tail,” Donald answered. (Q, R, Figure 2.) Polly looked for the slits and found that one was on the top edge and one on the bottom edge of the back end of the balloon.
“Now we will hitch it on,” said Donald, taking the balloon from Polly and adjusting the tail. He opened the slit between the catches, pushed the catch Q down through the top slit Q, and the catch R up through the bottom slit R, and the tail could not slide out of place. “The wings must stand out at the sides,” he added, bending each wing down where it joined the balloon.
“Is this the car?” Polly inquired, taking up the little box. (Figure 6.)
“Yes,” said Donald, “but I haven’t put the propeller on yet.”
The car Donald made is pointed at each end. It is three inches long from point to point, one inch wide and one inch high. Each side of the car is two inches long and the ends are double. Figure 7 is the pattern of the car. The entire length of one side of Figure 7 is five inches, while the entire length of the other side is but four and three-quarters inches. The difference is at the ends. The end divisions on the left of Figure 7 are three-quarters of an inch from top to bottom, while the end divisions on the right are only five-eighths of an inch from top to bottom. The other divisions of the two ends are exactly alike, each three-quarters of an inch from top to bottom. The slits V, W, T, U, are one-eighth of an inch from the inner edge and are three-eighths of an inch long. V and U are one-eighth of an inch from the end edges and the slits W and T are one-quarter of an inch from V and U.
27Donald made a catch at either end of the left side of Figure 7 (Y, X). The necks of these catches are one-quarter of an inch long. Then he bent up the points V, W, U, T, along the dotted lines, which made the floor of the car pointed at each end. He bent the sides up and the ends in, according to the dotted lines. The points V, W, U, T, he pushed through the corresponding slits from the inside of the car, V through V, W through W, U through U and T through T. Then he fitted the other end pieces on the outside, covering the points, and fastened the catches Y and X in the slits Y and X. This held the point securely between the double ends and made all snug and tight.
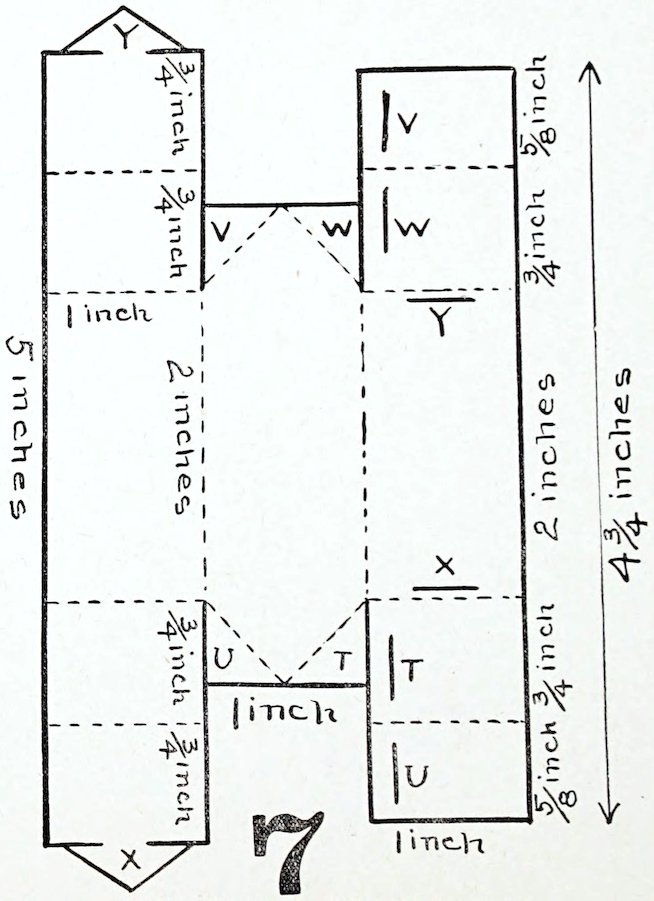
This is the pattern of Donald’s little car
“I can put the ropes on now,” said Polly, and threading a needle with soft cotton twine she pushed the needle through the double end of the car just beyond the side bend and near the top edge, as shown in Figure 6. She drew the string through and tied it at the end. Threading the needle again, she fastened another string to the other end of the car; then, with the needle still threaded, she took a stitch in the bottom edge of the balloon at the middle of one of the bend-overs. The place is indicated by the two dots on Figure 4. Bringing the needle down again, she ran it through the opposite side of the car, unthreaded it and tied the end of the string to the car.
This made a loop which passed from one side of the car through the bottom edge of the balloon to the other side of the car. The string used for the loop was three and one-half inches long. The other end of the car Polly attached to the balloon in the same way and the little passenger car hung suspended from the balloon by four ropes. (Figure 8.)
“I have the propeller ready now,” said Donald.
“What a good idea to use a pinwheel for a propeller!” exclaimed Polly. “How will you fasten it on?”
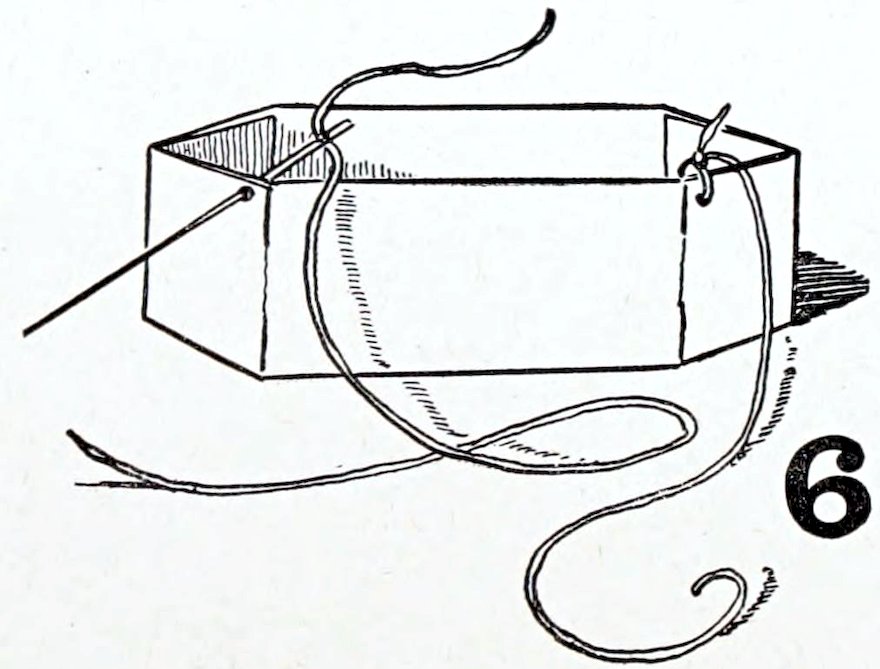
Polly put the ropes on the little car
“This way,” said Donald, and he ran a hatpin through the pinwheel, pushed a small cork up on the pin, leaving one inch between the cork and the head of the pin so that the wheel would turn easily. (Figure 9.) Then he forced the pin in through the middle of the forward end of the car and out the middle of the back, allowing a space of one-quarter of an inch between the cork and the car. (Figure 8.)
28“Why, Donald, you have put the propeller in front of the car!” cried Polly.
“That is all right,” Donald assured her. “It won’t spin around if we have it at the back; and, besides, Santos Dumont, who has made some of the finest airships in the world, put the propeller at the front of some of them. He says it draws the ship along instead of pushing it.”
Donald made the pinwheel for his propeller of a two-inch square of paper. He folded the square diagonally first one way, then the other, and cut slits along the folds almost to the center, as I am sure you all know how to do. Then he took up the alternate points and, turning them over to the center, ran the pin through them and the center of the wheel in the way you have done scores of times.
“Now, Polly,” said Donald, “how are you going to make the thing fly?”
“I will show you,” said Polly, and she threaded a needle with a piece of strong black linen thread ten inches long. Then she took a stitch through the top edge of the balloon at the forward end, drew the thread through and tied the end fast. She took a stitch through the top edge of the balloon at the other end, where she tied the last end of the thread. This made a loop extending upward from the top of the balloon. (Figure 8.)
In Figure 2 you will see just where the needle was put through the edge of the balloon. At the middle of the loop Polly tied another piece of thread about two feet long, and at the end of the long thread she tied a short loop.
“Watch it now, Donald!” she cried, as, grasping the short loop tightly in one hand and holding it at arm’s length, she began to swing the airship around in a circle. Slowly it went at first; then, gathering speed, it began to fly in earnest. The little propeller spun around busily and the ship seemed sailing by its own power. As the supporting thread was black, it was hardly visible, and the wings that were lifted and lowered by the movements of the ship appeared, like a bird’s wings, to buoy it up.
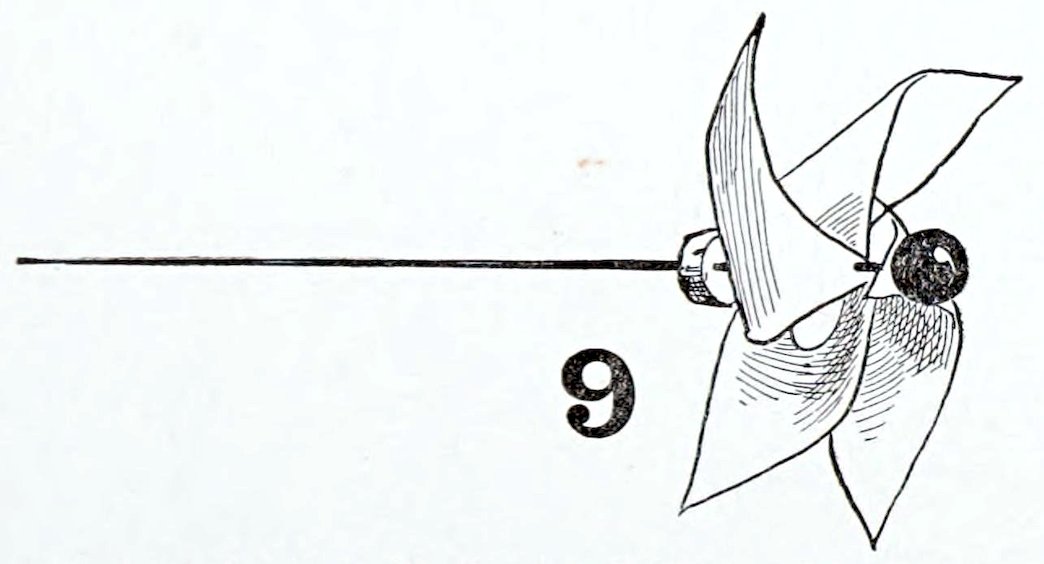
The propeller is made of a pinwheel on a short hatpin
“Isn’t it perfectly lovely?” Polly exclaimed. “See how I can make it dip and rise again, just like a real airship.”
“Yes, it is certainly good,” he said; “and one of the best things about it is the way the tail acts as a rudder. Don’t you see how it keeps the ship going always forward? Here—let me see if I can make it back.” And, taking the thread from Polly’s hand, he swung the ship in a straight line, first one way then the other, but at each end of the course the balloon turned and started over the route again, bow forward.
“It is all right, Polly,” he declared. “Put some of your little dolls in the car for passengers and we will give them a ride.”
29