Making an Automobile
Reading edition
By Adelia Belle Beard
One of the Authors of Things Worth Doing
“Donald,” said Polly, “don’t you think we could make a cunning little automobile if we tried ever so hard?”
“Y-e-s, we might if we could manage the wheels. They must be heavy and turn easily. It won’t be a real auto unless it can go whizzing.”
12
“Spools, spools!” she cried joyfully. “They will go as fast as lightning. See?” and jumping up she seized her workbasket, turned it upside down, found an empty spool, then dropped on her knees and sent the spool rolling across the hardwood floor.
“Spools are all right,” said Donald. “Now, can we make our motor car?”
“Well, here is the bristleboard, but I should think it would be best to make a paper pattern first, then we can alter it as much as we like. Donald, do you remember just how an automobile looks?” Polly inquired, with a giggle, for 13Donald’s hobby was to know all about automobiles, and he was sure he could drive one as well as an experienced chauffeur if he had the opportunity.
Donald disdained a reply. “Where is the brown wrapping paper for the patterns? Oh, here it is,” he said. “Now we will begin. Get the very largest spools you can find, Polly; two will be enough, but they must be the same size. Yes, these will do.”
The spools Polly selected were two inches high, an inch and a quarter across the ends and had quite slender shafts.
“But, after all,” objected Polly, “the spools don’t look like auto wheels.”
“That doesn’t matter; we will put the spools under the car and make show wheels for the outside. No one will notice, when we speed the car, that her outside wheels are not turning, They’ll appear to be.”
“Then what shall we use for show wheels?”
“Pill boxes will do. Look them up, Polly, while I make the auto frame to hold the spools. And, Polly,” he called, as she was leaving the room, “bring up some of those round, slender, little sticks I saw in the kitchen, will you?
“I guess you mean skewers. Jane uses them to pin meat together with. She got them from the butcher boy.”
“Whatever they are, I want them for axles.”
While Polly was gone Donald planned his auto frame, making it first of the wrapping paper, and without very accurate measurements. When she came back with the pill boxes and skewers, Donald slipped each of his two spools onto a skewer, fitted the skewer under the frame, rolled the frame on the table, and found his scheme would work. Then he took his pattern apart and spread it out in front of him.
“Queer looking thing, isn’t it?” remarked Polly. “Shall I draw it on the bristolboard and make it more exact?”
“Do,” said Donald, “and be sure you get both sides precisely alike and both ends precisely alike, else it won’t balance.”
Polly nodded. “I’ll begin with the oblong in the middle; that’s the floor, I suppose, then draw the sides and ends to fit.” So she fell to work while Donald perfected his pattern for the body of the car.
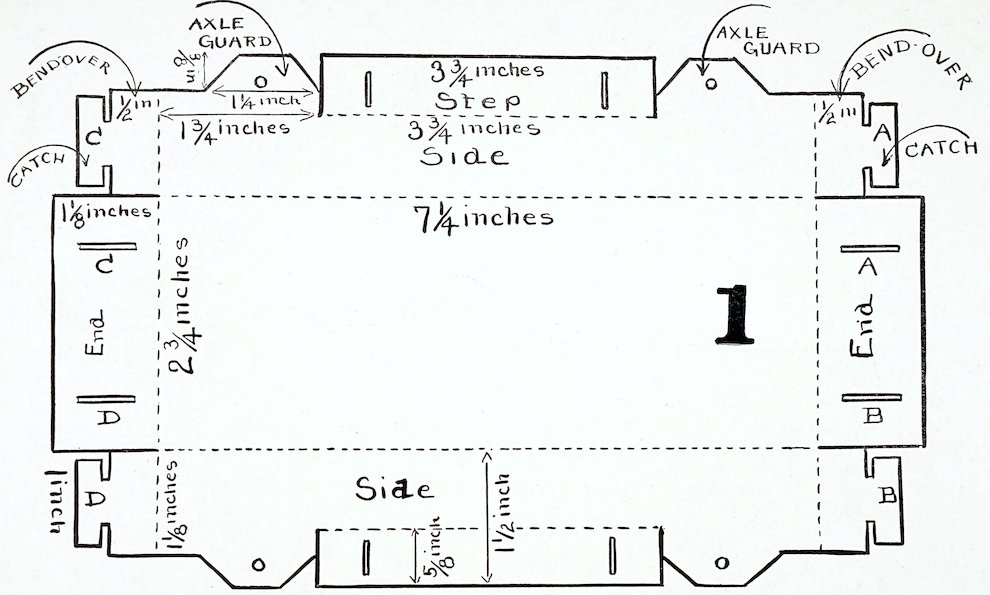
The center oblong Polly made seven and one-quarter inches long and two and three-quarters inches wide. (Fig. 1.)
“Be sure you make the sides and ends at right angles to one another,” cautioned Donald.
“Yes, dear,” said Polly, and she proceeded to draw the sides, making long oblongs one and one-half inches wide on either side of the large oblong, and for the ends she drew oblongs one and one-eighth inches wide across the entire width of the three long oblongs. “That simplifies things,” she explained, as she extended the side lines of the large oblong 14across the end oblongs. “Now I can cut it down where it needs cutting without losing the large proportions.”
15
Five-eighths of an inch from the outer edge of each of the sides she drew a horizontal line for the steps. (Figure 1.) This line is three and three-quarters inches long. It begins just one and three-quarters inches from one end of the side and ends one and three-quarters inches from the other end. Then Polly drew the short vertical lines from the edge to meet the ends of the horizontal line, which gave her the end of the steps. On either side of each step she drew an axle guard three-eighths of an inch high, with a base half an inch wide and top an inch and a quarter wide. “Now I will make the bend-over and the catch,” she said.
“That is a good name for it,” said Donald. “Half an inch will be wide enough for the ‘bend-over,’ and make the catch one-quarter of an inch wide after you have allowed a little space between it and the bend-over.”
“How much space?” inquired Polly.
“One-sixteenth of an inch will be wide enough, and don’t make the catch quite as long as the bend-over. Cut a little off at each end. (Figure 1.) Be careful about the slits in the ends of the frame, Polly. They must be just half an inch from each edge, because the bend-over is half an inch wide, and since you have made the necks of the catches half an inch wide the slits must be a little longer.”
“What are the slits on the steps for?”
“They are to hold the mud guards. Make them about three-eighths of an inch long and put a slit half an inch from end of each step.”
“That’s explicit,” commented Polly. “Shall I cut the frame out now?”
“Better first go over the lines you are to cut and make them quite heavy; then dot the lines to be bent, so that you won’t spoil it by cutting along the wrong lines.”
“Good advice; I’ll do that.”
When cut out the auto frame looked like Figure 1.
16
“I shall use my small scissors to cut the slits, Donald,” Polly said. “The knife is so apt to slip.”
Before bending the frame into shape Polly scored the dotted lines by drawing the blade of her knife lightly along their entire length, using a rule to keep the knife on the line. When the sides, ends and bend-overs were bent down Polly folded the ends of each catch inward, then lapped the bend-overs outside the ends, inserted each catch in its own particular slit, opened out the catches, and the ends and sides were held firmly and evenly in place. The catch A was put through the slit A, catch B through slit B, C through C and D through D. (Figure 1.) Then Polly bent the steps up to stand out at right angles from the sides. “I am ready for the spools,” she announced.
“You will have to sharpen the blunt ends of these skewers, then,” said Donald, “and cut them off if they are too long. Three and one-half inches will be just about the right length.”
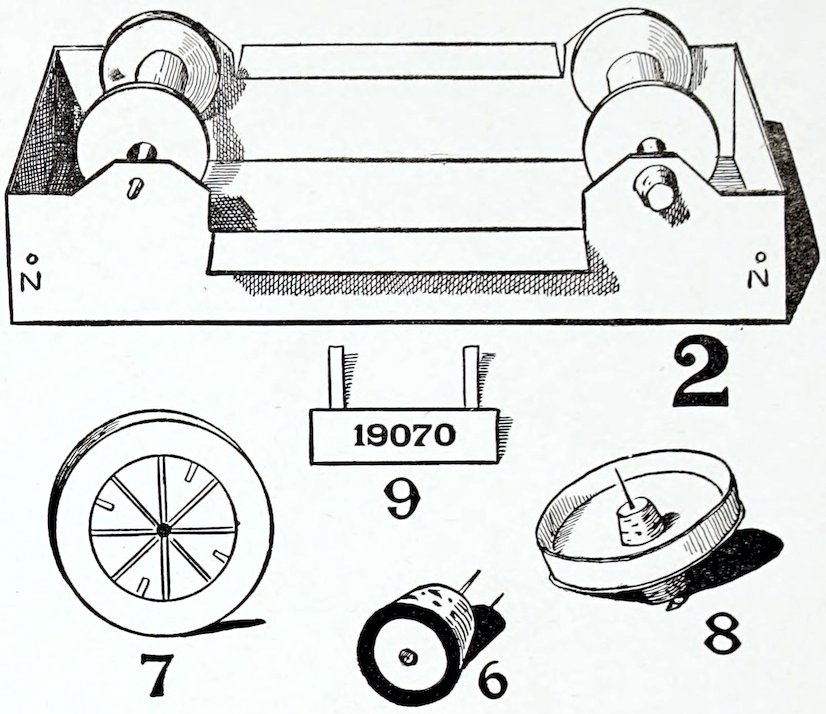
When she had cut her axles the proper length and sharpened the ends, Polly punctured a very small hole in each axle guard, as shown in Figure 1. Then, from the inside, she pushed one end of an axle through the hole in one axle guard, slipped a spool on the axle and forced the other end of the axle through the hole in the opposite axle guard. The auto frame upside down (Figure 2) shows how this is done.
“Now for the hub to keep the axle in place,” she reflected. “I know,” and with a spring she was up and off to rummage in her treasure box, coming back triumphantly with several small corks.
“See, Donald,” she said, screwing the point of the axle into the large end of a cork. “It holds splendidly, and the spools cannot possibly drop off.”
“First-rate idea, Polly; I hadn’t thought of the hubs. This is the body of the car,” he continued, showing his paper pattern. “I’ll draw it on the bristleboard if you will make wheels of the pill boxes.”
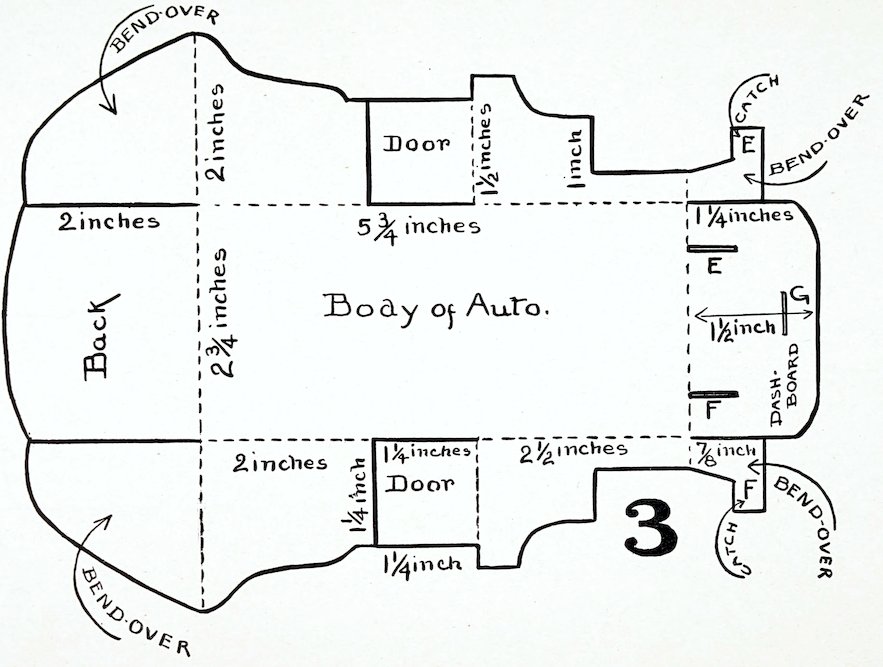
Figure 3 shows how Donald made the body of the automobile. The oblong in the center is the floor. It is two and three-quarters inches wide, just the width of the auto frame, and five and three-quarters inches long. The back is two inches high at the side edges and curves up one-quarter of an inch higher in the middle. The bend-overs at the back measure two inches at each edge, and curve, as in Figure 3. The length of the side from the dotted line of the bend-over to the door is two inches. The door is square, measuring one and one-quarter inches each way. The length of the side 17between the dashboard and the door is two and one-half inches. Next to the door it is one and one-half inches high, and at the lower corner, where the curve ends, it is one inch high. The strip that meets the dashboard is three-eighths of an inch high. The bend-over, including the catch, is seven-eighths of an inch high and seven-eighths of an inch long, and the catches E and F are each three-eighths of an inch square.
The dashboard fits in between the two front bend-overs. It is one and one-half inches high in the middle and slopes to the sides, which are one and one-quarter inches high. The slits in the dashboard, E and F, are each one-half inch long and just one-half inch from the side edges. The slit G at the top is one-half inch long and three-eighths inch below the top edge. When Donald had cut out the auto body and scored the dotted lines, he bent up the back, front and sides, then lapped the back bend-overs across the outside of the back and fastened them in place by running a pin through from the outside, as shown in Figure 17. He found that the pin alone would not make it sufficiently secure; so, adopting Polly’s idea, he pushed a cork on the pin, brought up snugly against the inside of the back, and it held like a bolt. The front bend-overs he lapped over the outside of the dashboard and pushed the catch E through the slit E and the catch F through the slit F.
“Oh, Donald, the little doors will open, won’t they!” Polly exclaimed.
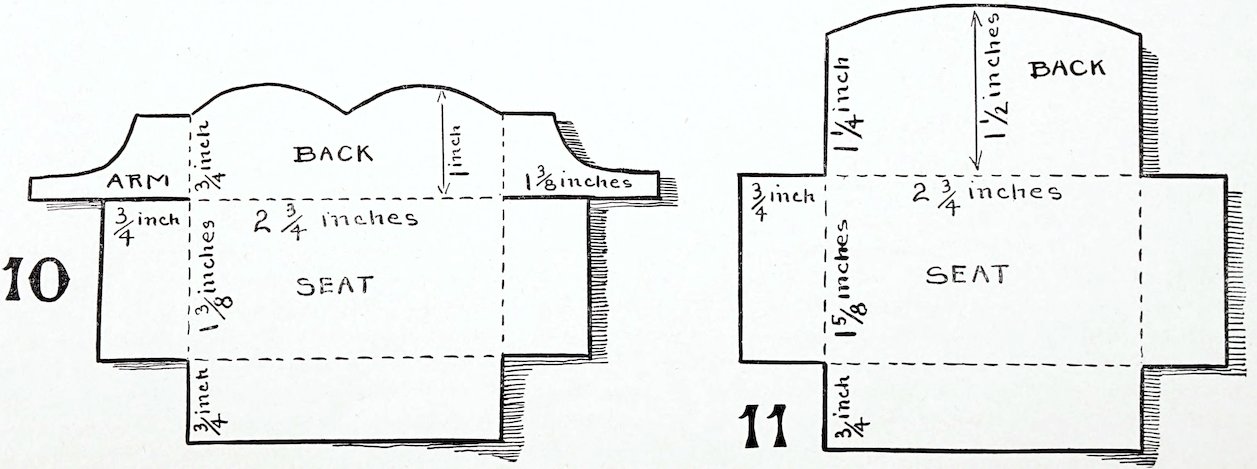
The seats are easily made. No. 10 is the front seat, No. 11 the back seat, and No. 12 an arm of the former. No. 13 is the mud guard
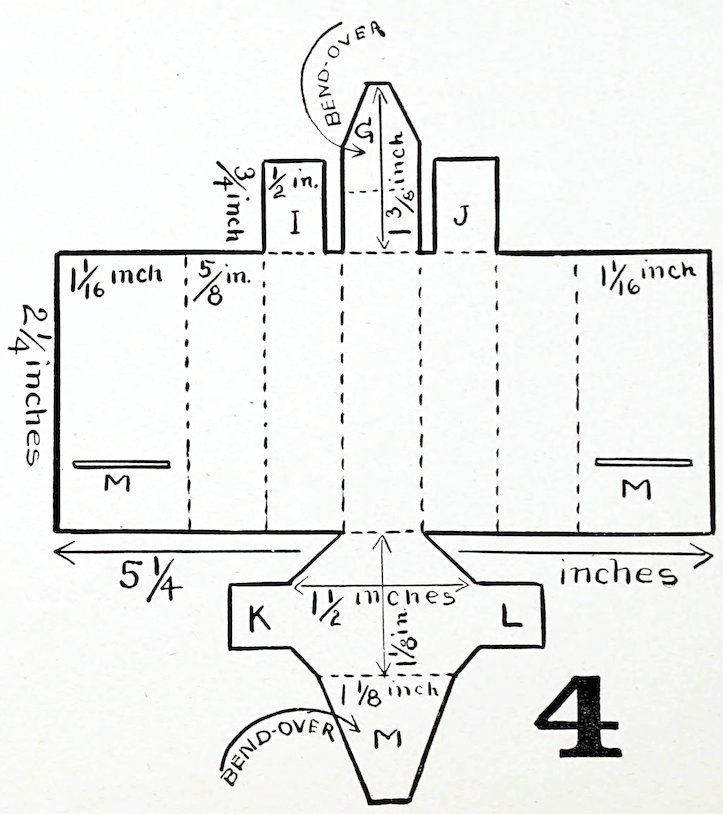
18“Of course,” said Donald, bending them outward along the dotted lines. “This is the hood,” he went on. “The power box, you know,” showing his pattern like Figure 4. “I will draw it on the bristleboard now.”
First, Donald drew an oblong, five and one-quarter inches long and two and one-quarter inches wide. This he divided into seven parts, or panels, by drawing straight, vertical lines across the oblong. (Figure 4.) Each of the two end panels he made one and one-sixteenth inches wide and each of the other panels five-eighths of an inch wide. He extended the middle panel up one and three-eighths inches above the oblong, and across the extension, half an inch above the top line of the oblong he drew a dotted line to denote that beyond that was a bend-over. Then he cut off the corners of the bend-over. (H, Figure 4.) He made extensions three-quarters of an inch high above the two panels next to the middle panel, then he cut off the inner part of these extensions, making each half an inch wide. (I and J, Figure 4.)
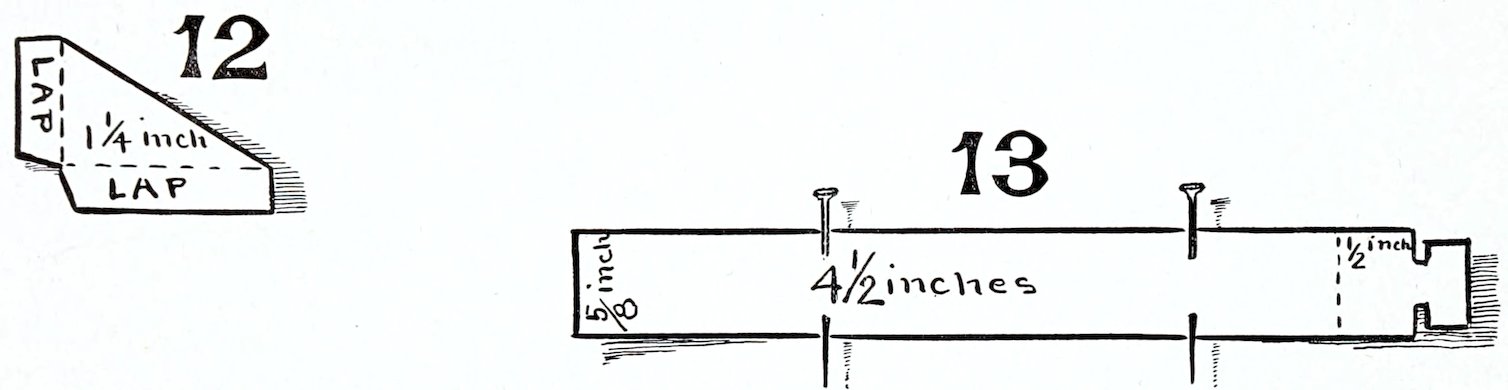
The seats are easily made. No. 10 is the front seat, No. 11 the back seat, and No. 12 an arm of the former. No. 13 is the mud guard.
Directly through the center of the middle panel Donald drew a straight, vertical line, bringing it down several inches below the bottom of the oblong. He did this in order that he might measure on either side and so get the end of the hood exactly in the middle and evenly balanced. He called this center line his plumb line.
Three-eighths of an inch below the bottom line of the oblong, and three-quarters of an inch to the left of the plumb line, Donald drew a horizontal line just half an inch long; then he drew a corresponding line at exactly the same distance to the right of the plumb line. These lines he connected with the bottom corners of the middle panel with slanting lines. (Figure 4.) Half an inch below the two short horizontal lines he drew parallel lines of the same length and connected their outer ends with the outer ends of the upper lines by vertical lines. This made two square extensions. (K and L, Figure 4.) One-quarter of an inch below the lower lines of the extensions K and L he drew another horizontal line one and one-eighth inches long, half on one side of the plumb line, half on the other side, and then he connected this horizontal line with the inner ends of the bottom lines of the extensions K and L by slanting lines. This formed the octagon-shaped front face of the hood. Below the octagon he drew a bend-over one inch high and running almost to a point at 19the bottom and half an inch above the bottom edge of each end panel he made a slit three-quarters of an inch long. (MM, Figure 4.)
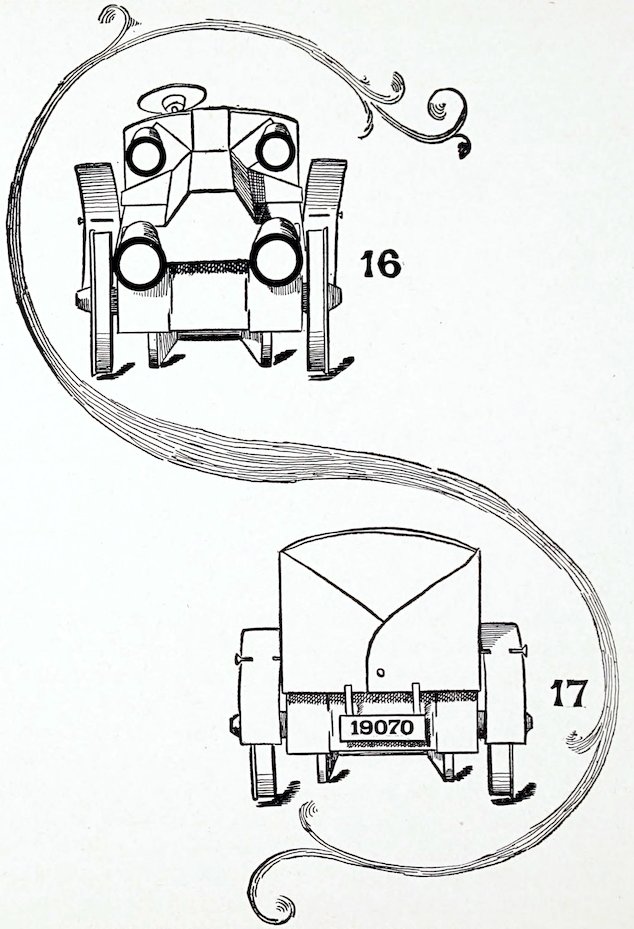
A front view and a rear view of the children’s automobile
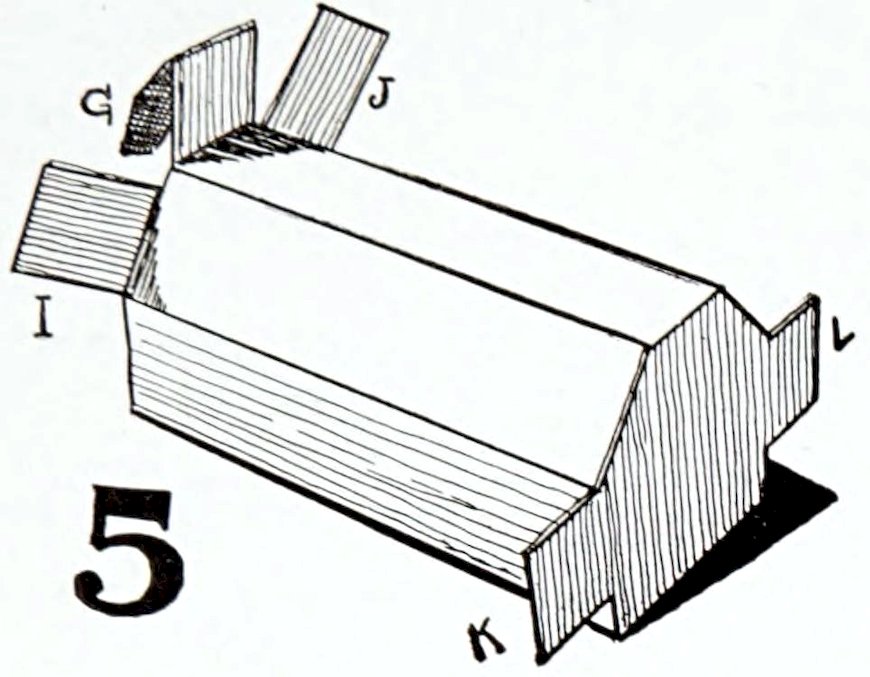
When Donald bent the hood into shape it looked like Figure 5. The end panels from the bottom of the hood, and lapping completely over one another, make it double, and the point of the bend-over (M, Figure 4) slipped through the two slits M and M holds the hood in shape.
“But I don’t see how you are going to fasten it on,” said Polly.
“Wait until I make the lamps,” Donald answered, “and I will show you. Are there any more corks, Polly?”
“Yes; how many do you want?”
“Four for the lamps, but bring all you have.”
Donald selected two pretty good sized corks for the lower lamps and two smaller ones for the upper lamps. Both sizes were rather longer than he wanted, so he cut a slice off the small end of each cork. This left the largest corks three-quarters of an inch long and the smallest half an inch long.
“Now, Polly,” he said, “we will cut some rounds of silver paper to fit the tops of these corks and paste them on to represent glass, then paint black circles around them for the rims to hold the glass. That will make them shine.” (Figure 6.)
In a trice the lamps were finished and Donald fastened the largest ones on the extensions K and L at the front of the hood by running a large pin through the middle of each lamp, then through the extension, securing it at the back with a thick slice of cork. This done he proceeded to fasten the hood to the dashboard; first by 20running the bend-over H through the slit H from the inside of the dashboard, then by pinning the small lamps on the extensions I and J, running the pin through the dashboard also, and making fast with slices of cork. The exact position of the lamps is shown in the front view of the automobile. (Figure 16.)
“Now fasten the whole thing together,” urged Polly, and Donald adjusted the body of the car to its frame. He allowed the back of the body to project over the back of the frame half an inch, which gave one inch and three-quarters space in front of the hood to rest on. The hood extended about half an inch beyond the front of the frame.
“The pins and corks hold so well I’ll use them for this,” Donald announced, as he pinned the floor of the auto body to the top of the frame. He put one pin just back of the dashboard and another close to the back of the auto body. This time he used two slices of cork for each pin, one on top of the floor, the other underneath the frame.
The two back mud guards Donald made like Figure 13, which is a strip of bristleboard five and one-quarter inches long and five-eighths of an inch wide. The dotted line at the end, showing where it is to be bent, is three-quarters of an inch from the end and just half an inch from the slots that separate the catch from the guard. From the dotted line to the other end the guard is four and one-half inches long.
The two front mud guards he made exactly like the back ones, except that between the dotted line and the dotted line and the opposite end the distance was but two and three-quarters inches. He curved all four of the guards by drawing them lightly over the blade of his knife; then he bent them at the dotted lines, turned in the ends of each catch and inserted each catch in its slit in the auto step. The two back guards he put at the back ends of the steps, the two front guards at the front ends of the steps. Taking two pins, he inserted them in one of the back mud guards, as shown in Figure 13; then he pushed the pins into the side of the car, the lower one into the frame just below the door and the other into the auto body about one-quarter of an inch from the back. The other back guard he secured in the same way, but one pin only was needed for each of the front guards. This was run in three-quarters of an inch from the bend of the guard and forced into the frame just in front of the dashboard.
“Are the wheels ready?” asked Donald.
“Here they are,” and Polly pushed across the table four little wheels like Figure 7. “I didn’t use the box covers because there was writing on them, but I tore away the upper part of the box and the lower part was exactly like the lid. I drew a circle on the bottom of each box to mark off the tire and then drew the spokes and little air valves. See them?”
“We will give the tires a light wash of black paint to make them rubber color and paint the spokes black,” said Donald.
When they were finished Donald used three small corks for fastening each wheel in place. One for the hub, one inside the wheel, to steady it against the auto frame (Figure 8), and one on the inside of the auto frame. The front wheels he pinned at the extreme front of the auto frame, half way up from the bottom edge of the frame, and the back wheels at the extreme back of the frame, the same distance above the bottom edge. (NN, Figure 2.)
21“You see,” said Donald, “these wheels must not touch the ground, else they will interfere with the speed of the car.”
“Here are the seats,” said Polly. “I worked them out while you were busy with the other parts.”
Figures 10, 11 and 12 are the patterns of the seats. Figure 10 is the front seat and Figure 12 the arm that divides it into two. The seat proper is an oblong two inches and three-quarters long by one inch and three-eighths wide. The ends and front that bend down and form the supports are each three-quarters of an inch high. The back is one inch high at the middle of each curve and three-quarters of an inch high when it bends to form the arms. The arms, which are cut to fit the sides of the auto, are one inch and three-eighths long. The middle arm (Figure 12) is one and one-quarter inches long at the bottom, three-quarters of an inch high at the back and the laps are each one-quarter of an inch wide.
Polly used paste to fasten the arm to the middle of the seat, putting the paste on the laps, then she fitted the seat in the car, pasting the sides of the seat to the sides of the car.
The back seat has no arms. It is the same length as the front seat, but one-quarter of an inch wider. The supports are the same height. The back at the middle is one and one-half inches high, while at the side edges it is one and one-quarter inches high. When the back seat was pasted to the back and sides of the car, Polly decided that she would make little cushions and cover them with tan-colored tissue paper, to look like leather.
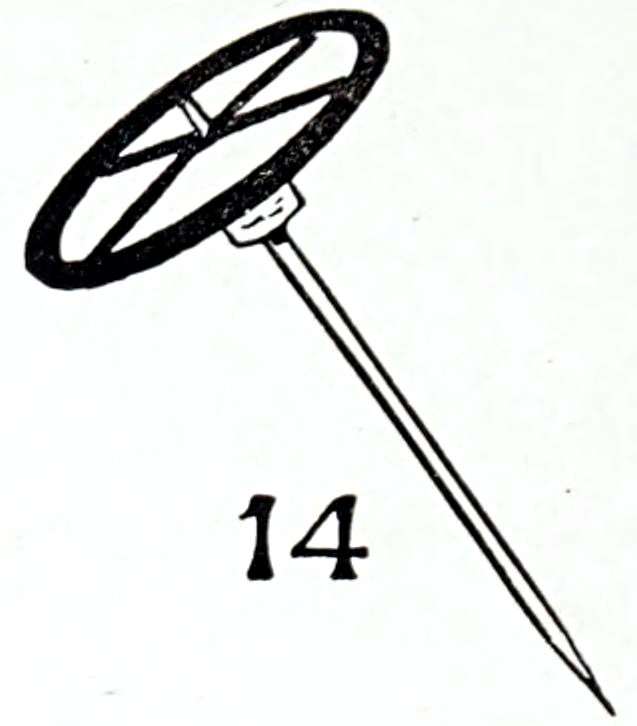
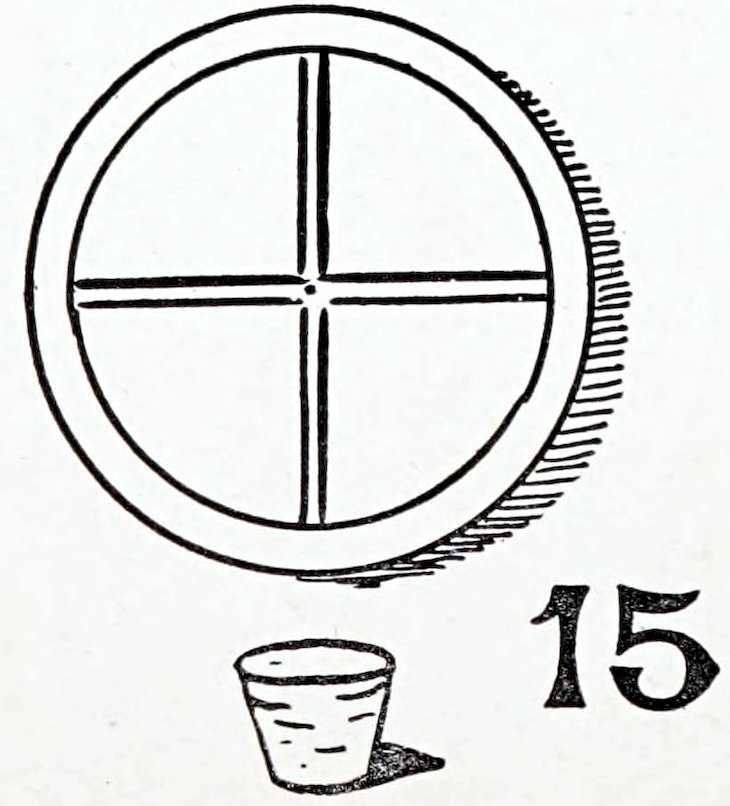
“I have made the steering wheel,” said Donald, and he held it up. (Figure 14.) Figure 15 shows how it is cut from bristleboard and then marked off into a rim and four spokes. He used a wooden toothpick for the column and a small cork to keep the wheel in place. First he forced the small cork onto the toothpick, pushing it down not quite half an inch, then he inserted the point of the stick into the small hole he had previously punctured in the center of the wheel and pushed the wheel down to rest on the cork. (Figure 14.)
With a large hatpin he pierced a hole slantingly at the base of the dashboard, half an inch from the right side, all the way through the frame of the auto; then he forced the lower end of the steering column into the hole and it retained the proper slanting position.
“I didn’t forget the number,” said Polly, holding up a little oblong card, to which she had attached narrow strips of yellow paper for straps. On the card was printed the number of the Kraft Shop automobile. (Figure 9.) With a drop of paste on the end of each strap Polly hung the number to the back of the car. (Figure 17.)
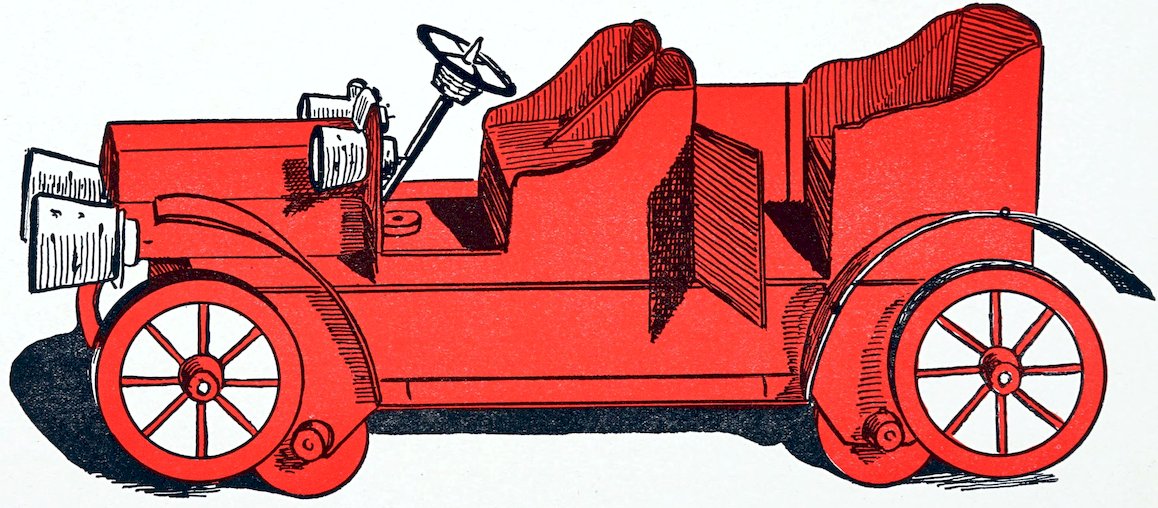
The finished motor car is shown in Figure 18.
“Now we will test her speed,” said Donald, as he knelt on the floor and with a sure, strong push sent the auto spinning the whole length of the room.
“My, but it does go!” said Polly.
22
23