Making Wind Toys
Reading edition
By Adelia Belle Beard
One of the Authors of Things Worth Doing
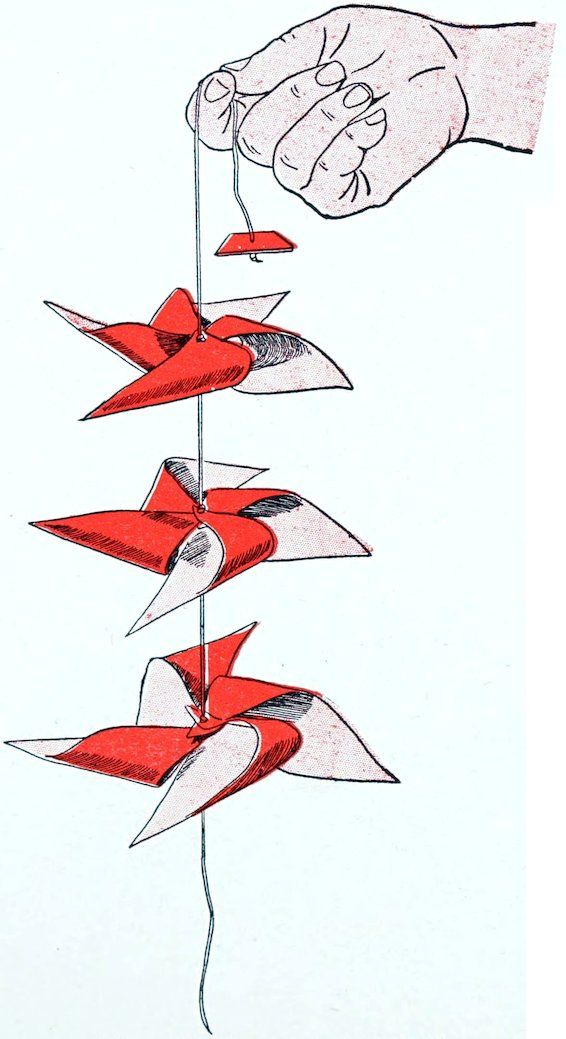
(Figure 4.) The string of pinwheels
It was the windy weather that suggested the new toys to the children. “Suppose we try pinwheels,” said Polly. “Not the old kind on sticks that we used to make, but we can have them different somehow, and this wind will make them spin like mad. Donald, I just must have pinwheels.”
Polly’s enthusiasm inspired Donald. “We can make a windmill with a pinwheel for the big wheel,” he said.
“Oh, yes,” chimed in Polly, “you do that, and I will make a string of pinwheels that will not need sticks, or pins either. What shall we make them of?”
“Stiff writing paper is the best,” replied Donald. “Here is our best pad,” he added, taking from the table drawer a large pad of good quality writing paper. “Do you think we ought to use it?”
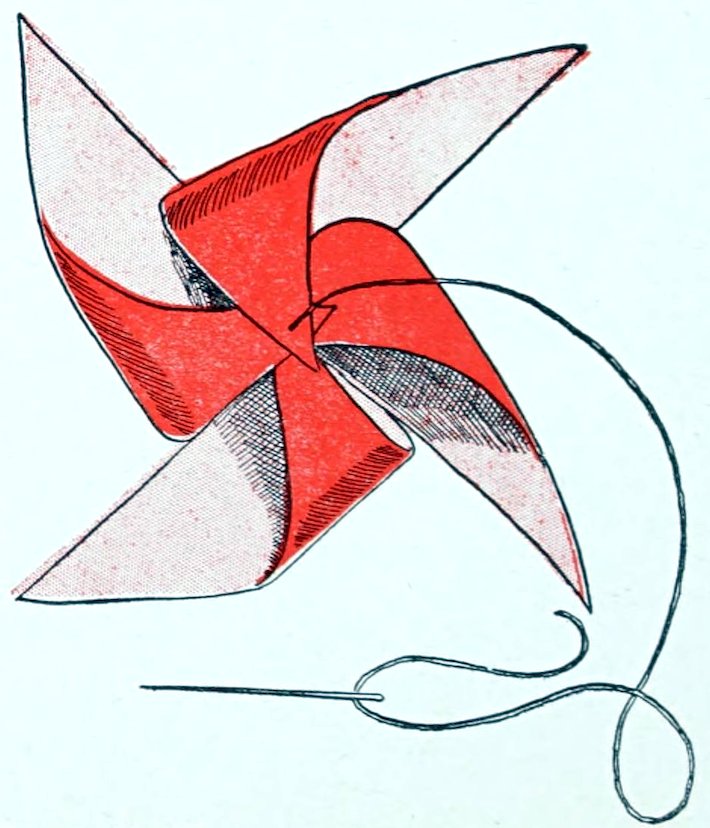
(Figure 3.) The way the thread goes through
“Why not?” said Polly. “Mother says we are learning lots of things in our Kraft Shop.”
Donald had no further scruples about using the paper, though he was careful not to waste it. “I am going to make the tower for my windmill of this heavy manila wrapping paper,” he announced. “It is nice and smooth and plenty strong and stiff enough.”
“I would,” Polly answered absently, as she folded and slashed the squares for her pinwheels. “I’ll have them graduated,” she continued, thinking of her own work; “first a large wheel, then a smaller, then a smaller one still, and the last shall be smallest of all.”
6
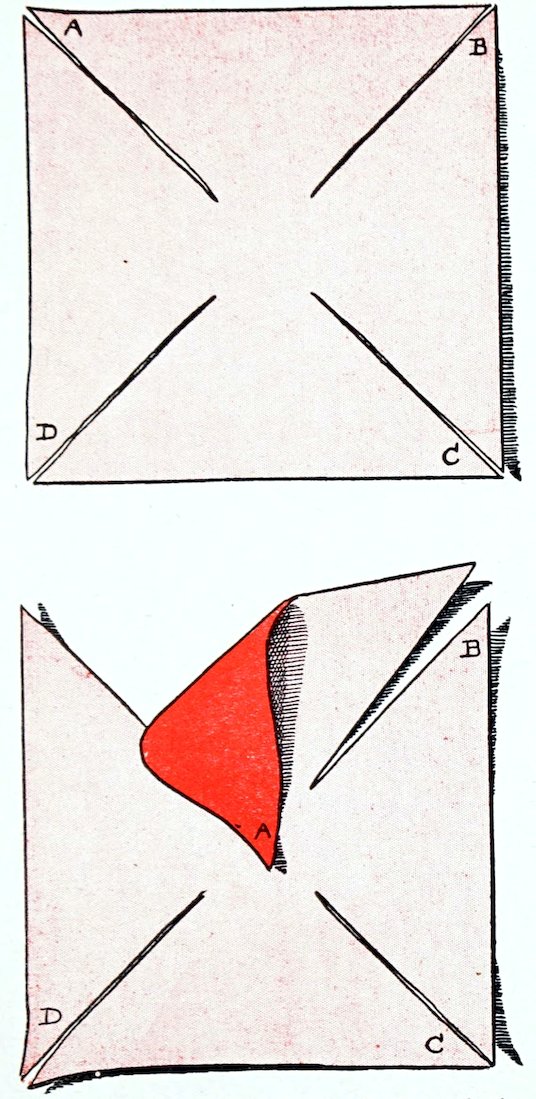
(Figures 1 and 2.) First steps in making pinwheels
For her largest wheel Polly cut a square of writing paper, which measured exactly six inches along each edge. The next she cut five and a half inches square, the next four and a half inches square and the smallest three and a half inches square. Then she placed her ruler across the largest square diagonally from the upper right-hand corner to the lower left-hand corner and ran her pencil along its edge. This gave her a diagonal pencil line from corner to corner on her square. Again she placed her ruler across the square, this time from the upper left-hand corner to the lower right-hand corner, and drew a line along its edge, dividing her square into four equal triangles. After this she drew the same kind of lines on the three other squares. With her scissors she cut slashes along each line on each of the squares to within three-quarters of an inch of the center. (Figure 1.)
Lifting the upper left-hand point of the large square (A, Figure 1), she brought it to, and overlapped, the center of the square (A, Figure 2), curving, not sharply bending the paper. The point B she brought also to the center, overlapping the point A. She did the same with C and D, C overlapping B and D overlapping C. When all the four points met at the center Polly ran a large needle, threaded with a long, soft, white cotton string, through the center of the wheel at the back and out through the overlapping points in front, taking care that the needle passed through every point. Then she drew the needle up until the back of the pinwheel rested against a knot which was tied about six inches from the end of the string and, allowing almost one inch of string for the wheel to turn on, she tied another knot in front of the wheel, to hold it. Between the two knots the wheel could whirl, but could not move out of place.
Six inches above the last knot she made another knot and then strung the next largest pinwheel on the string and fastened with a second knot in the same manner as the first wheel. In this way all four were put on the string, each six inches from its neighbor, and then there remained half a yard or more of free string above the last wheel. On the free end of the string Polly fastened a small square of pasteboard by pushing the needle through the center of the square and tying a large knot at the extreme end of the string to keep the pasteboard from slipping off. (Figure 4.)
“The wind can’t pull the string through my fingers when I hold it by this pasteboard square,” she said, and almost before the last knot was tied Polly was at the window. “Come quick, Donald, I am going to try my pinwheels,” she cried, throwing up the sash and putting out the hand that held the end of her string.
7
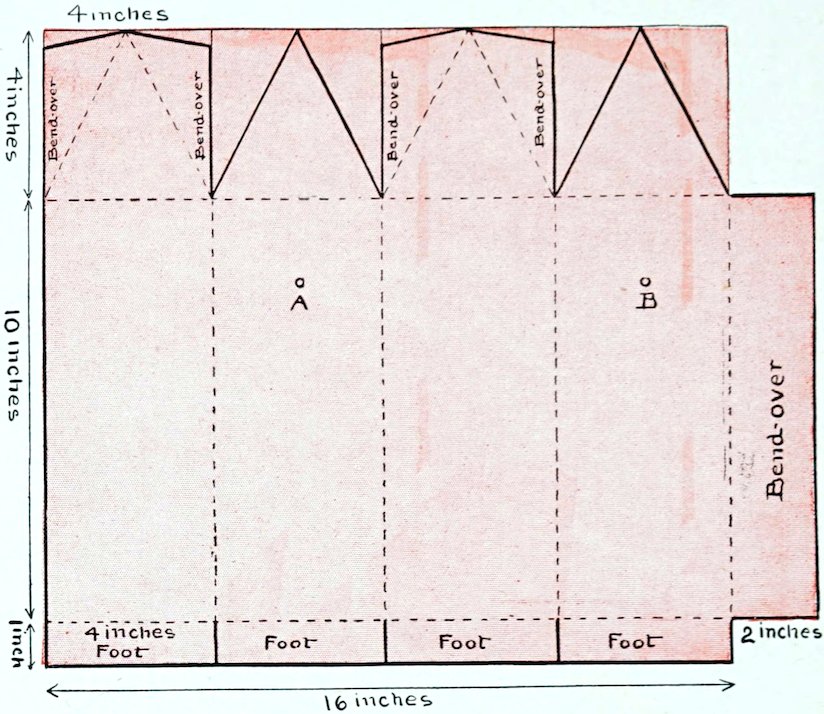
(Figure 5.) Donald made the tower all in one piece
Donald dropped his windmill and gained the window at a bound, as anxious as Polly to see the result of her experiment. Immediately the wind caught the string of pinwheels, lifted it out straight and sent each wheel whirling at a great rate.
“How they do go!” Donald exclaimed. “Now come and help finish the windmill. You make the wheel while I get the tower in shape.”
“All right,” said Polly cheerfully. “How big shall I make the wheel?”
“About six and one-half inches square.”
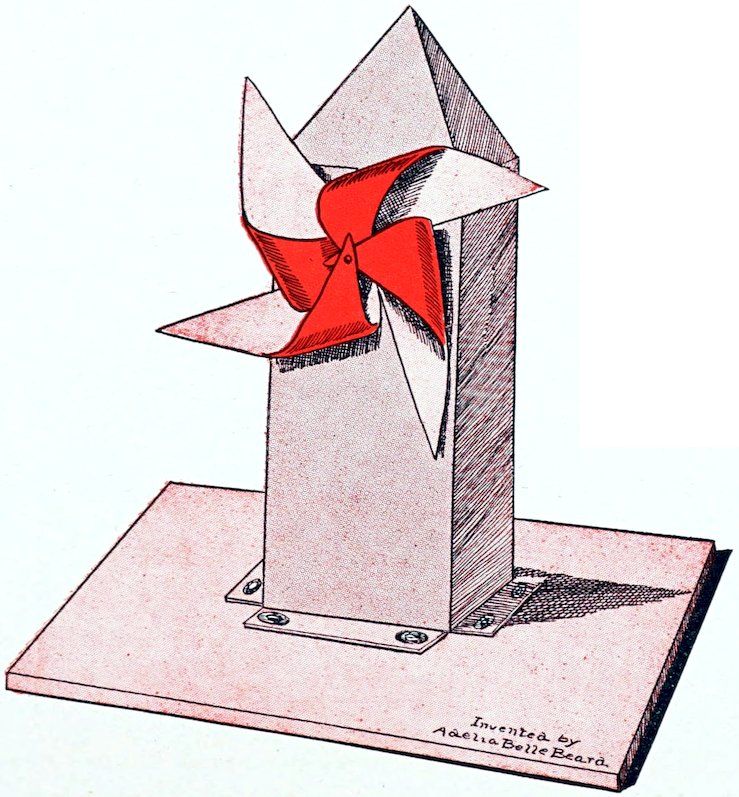
(Figure 6.) It looks like a real windmill
Donald made the tower for his windmill all in one piece. (Figure 5.) He first decided upon the height and width, then drew four connecting oblong panels for the four sides. Each of these panels he made ten inches high and four inches wide. For the peaked roof he drew four more panels, one above each of the side panels. These he made four inches high and four inches wide, just the width of the side panels. Exactly at the middle of each top line of each roof panel he made a dot with his pencil, then drew slanting lines from the ends of the base of each roof panel to the dot at the top. This gave four points for the roof. (Figure 5.)
The laps, or feet, for the tower to stand on, Donald made by drawing a horizontal line just one inch below the lower edges of the side panels and bringing the side lines down to meet it. The bend-over, attached to the fourth panel, which holds the tower together, he made two inches wide and exactly the length of the side panels.
This finished the drawing and Donald proceeded to cut it out. He cut along the slanting lines of the second and fourth points of 8the roof, but on the first and third points he left bend-overs, as shown in Figure 5, simply cutting off some of the top of the two squares to make the bend-overs fit under the other two points. Just two inches below the top line and two inches from each side line of the second and fourth side panel Donald punctured two small holes. (A and B, Figure 5.) These were for the wheel rod. He then slashed the lines which separated the feet at the bottom of the side panels and bent the tower in shape according to the dotted lines in Figure 5. The feet he bent out, the roof he bent in, the sides he bent in, and each bend he creased sharply to give a smooth, even edge. With good glue he fastened the bend-overs of the roof to the under side of the cut-out points; then he glued the side bend-over to the outside of the first panel and his tower was finished.
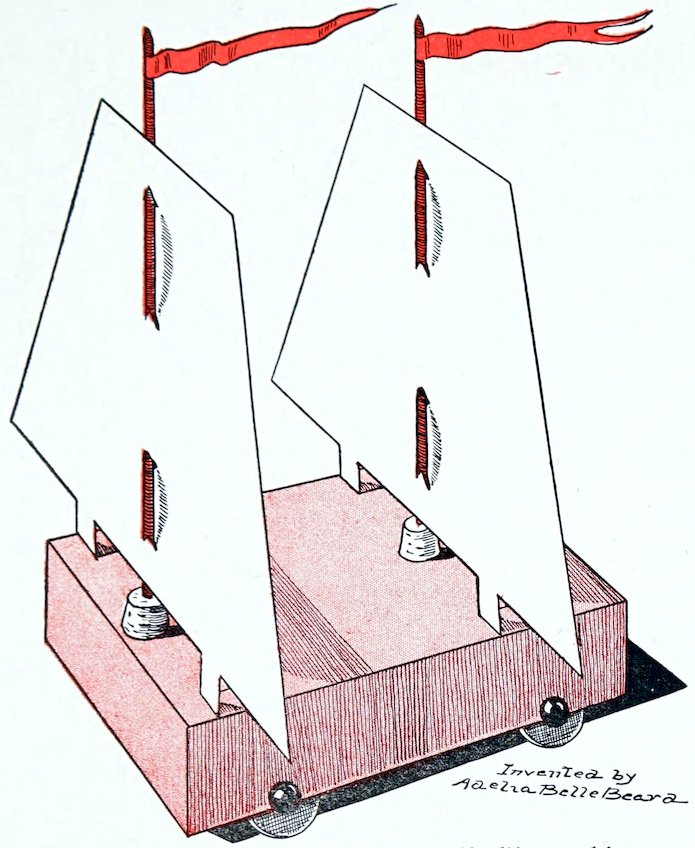
(Figure 7.) The wind wagon sails like a ship
Polly had completed the wheel for the mill, making it as she did her pinwheels, with this difference: instead of a string to hold the wheel together she used a strong pin and put it through from the front, piercing the laps before running it through the center of the wheel.
“Are the little holes to hold the stick for the wheel, Donald?” she inquired.
“Yes; I wish you would find me a good stick, Polly, while I tack the feet of the tower to a piece of board.”
Donald used two large-headed carpet tacks for each foot, and, to prevent the sharp edges of the heads from tearing the paper, he cut little rounds from an old kid glove and pushed one round up on each tack before tacking the tower to the board.
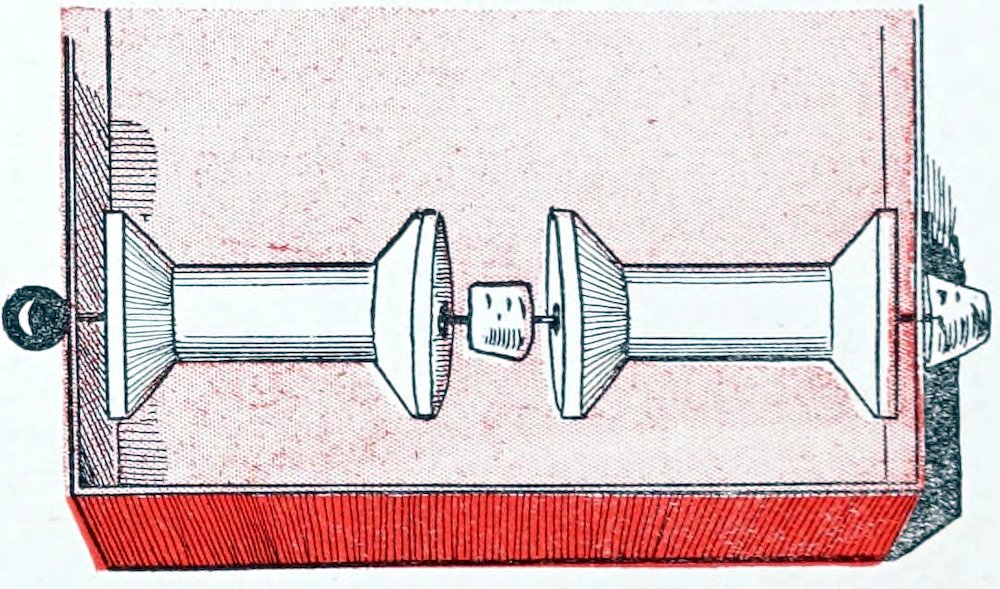
(Figure 8.) This is the way Polly fastened the wheels on the wind wagon
“Will this do?” asked Polly, holding up the slender handle of an old paint brush.
“Just the thing,” said Donald, pushing the pointed end of the stick into the hole A in the front of the tower and out through the hole B at the back.
Donald forced the point of the pin that held the wheel into the blunt end of the wheel rod which extended out one inch beyond the hole A at the front of the tower. Then, to hold the rod at the back he pushed a cork onto its pointed end.
“Now for a wind wagon!” cried Donald.
“Won’t a box do for the wagon part?” Polly asked, “and—”
“Spools for wheels,” broke in Donald.
9
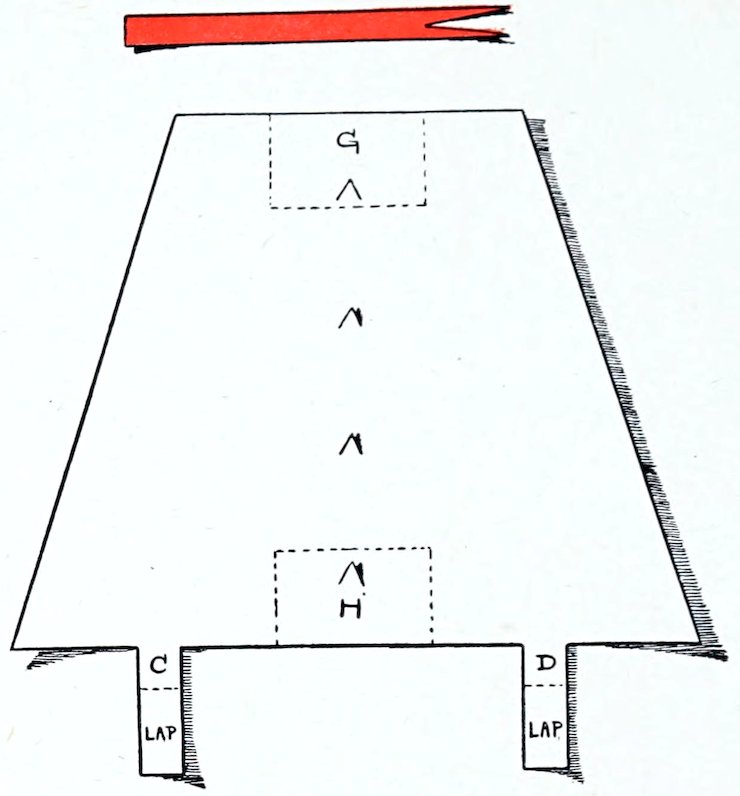
(Figure 9.) Donald made the two sails like this
(Figure 10.) A twig for a mast
“Hatpins for axles,” added Polly.
“Four wheels and corks between to keep them apart,” said Donald.
“I am going to use this pasteboard letter-paper box,” said Polly.
“Well, tell me how wide and how long it is, so that I can make the sails to fit.”
Polly measured the box. “It is a little over six and one-half inches long, five inches wide and one inch and a half deep,” she announced.
“Be sure your spools are all the same size,” Donald said.
Polly begged two hatpins of her mother. One was long, the other short. The shortest was just the right length for her axle, so, using a pair of nippers, she broke the longer pin off at the point to match the short one. Then she pushed one pin in on one side of the box a quarter of an inch from the edge and one inch and a quarter from the end. On this pin, inside of the box, she strung a large spool, then a small cork, then another large spool and finally pushed the point of the pin through the other side of the box exactly opposite to where it entered the first side. On the point of the pin she stuck a small cork for a hub. The round head of the pin answered for the other hub. (Figure 8.) The other two spool wheels were adjusted in the same manner and the last pin was inserted in the box the same distance from the back end and edge as the first pin was from the front end and edge.
Donald cut both of his sails like Figure 9, making them eight inches wide at the bottom, four inches wide at the top and six and one-quarter inches high. He drew a line directly through the middle of each sail from top to bottom, and on this line he cut four small points at equal distances apart for openings to admit the masts. He made two braces at the bottom of each sail, four inches apart, to hold them steady. (C and D, Figure 9.) Each brace is half an inch wide, half an inch high, and has a lap at the bottom one inch long.
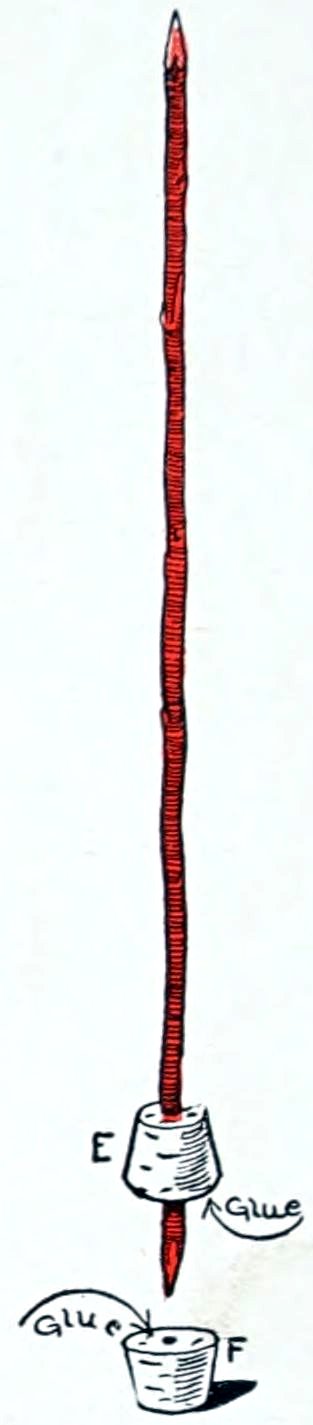
When the sails were ready he erected his masts. These were slender, straight twigs, nine inches long, sharpened to a point at each end. The front mast he placed half an inch from the front edge of the wagon, the back mast one inch and a half from the back edge of the wagon, and both directly on a line drawn lengthwise through the center of the box. Donald first punctured small holes in the box at these points, then forcing a half-inch cork up one inch on the lower end of the front mast (E, Figure 10), he covered the bottom of the cork with glue, and inserted the end of the mast in the hole at the front of the box where it was a tight fit.
10When he had pushed the mast down until the glue on the cork held it fast, he covered the top of another cork with glue (F, Figure 10), and forced the last cork up on the mast from the under side of the wagon until it stuck to the top. When the glue dried the mast was firm and steady.
The sail Donald slipped onto the mast from the top, running the mast in and out of the holes, as shown in Figure 7. He bent the laps back at the dotted lines and glued them to the top of the box. Then to make the sail still more secure he pasted oblongs of paper over the masts where they ran through the sails at the back. The dotted inclosures, G and H, show the positions of the oblongs on the sail.
When the second mast and sail were erected and adjusted in the same way as the first, Donald cut two narrow strips of blue tissue paper, four and a half inches long, for pennants. (Figure 7.)
“She is done now,” said Donald.
11