Part 5 — CHAPTER XVI (continued 4)
Reading edition
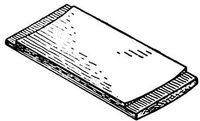
Fig. 686.
You can sometimes facilitate the process of planing off the superfluous wood by making cuts with the saw and removing part of it with the chisel, or by planing across the grain (the jack-plane is good for this purpose), or paring across the grain with the chisel, or any such method, always being careful not to cut quite as deep as the intended surface, so that all the marks and cuts can be removed by the final planing. See Plane, and also page 179.
Try-Square.—See Square.
Turning-Saw.—See Saw.
Turpentine.—See Finishing and Painting.
Twist-Drill.—The twist-drill is much better than the gimlet-bit. It makes a good hole, bores easily, is not easily dulled, can be used upon metal, and one kind in common use can be easily kept in order by simply sharpening the ends. There are various patterns. A little care is necessary, however, particularly in hard wood, as they are liable to be snapped by bending. See Bits.
Varnish.—See Finishing.
Veining-Tool.—See Carving-Tools.
Vise.—See page 65. For vise for metal-work, see page 70.
Warping, To Remove.—Of course the simplest way to straighten a warped board is to put a weight on it, but the difficulty here is that it usually will stay straight only while the weight is on it, unless you leave it longer than the patience of the average amateur lasts. To do this (or to warp a straight board either) with some chance of success, (1) heat one side, or (2) wet one side, or (3) wet one side and heat the other, or (4) wet both sides and expose one to the fire (Fig. 687). But do not be too sure that the result will be lasting. Sometimes it will and sometimes not. Another way is to thoroughly soak the board, press it into shape between clamps or under a weight, and leave it until dry; a week or more is none too long, and boiling water is better than cold. Simply laying a board down on a flat surface will often cause it to warp, because the two sides of the board will be unequally exposed to the action of the atmosphere. Planing off one side only, or planing one side more than the other, often produces the same effect. See pages 50-53 and Appendix.
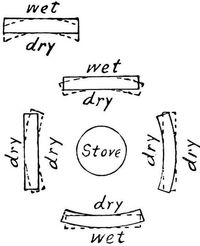
Fig. 687.
Wedges.—Wedges are in constant use for lifting or separating heavy bodies, as doubtless you know, and the principle of the wedge comes in in using the axe, hatchet, chisel, knife, and the other edge-tools (see page 25). Besides this use of the wedge you will often find it valuable to tighten or clamp objects of various kinds, or to hold them firmly in place.
If you wish to split objects or tear them apart, use a single wedge, for the increasing thickness of the wedge applied at one point tears or splits the wood apart. But if you merely wish to squeeze, or press, or hold firmly, or move, without damaging the shape of the wood, use double wedges,—that is, two wedges having the same inclination or taper and pointing opposite ways. You will see that the sides of the double wedge (that is, the outsides of the wedges) will be parallel no matter how hard you drive the separate wedges, so that the pressure will be exerted without injuring or jamming the surfaces against which the wedge bears (see Fig. 333). Short, flaring wedges do the work more quickly, but require harder blows to drive, and are more liable to slip. Long, tapering wedges work more slowly, more easily, and are not liable to slip. You will also use wedging to secure tenons and dowels (see Mortising, etc.).
Whittling.—See Knife.
Winding-Sticks.—Two straight-edges, each of equal width throughout, can be laid on edge, one across each end of the surface to be tested. Stand back a little and look across the top edge of one to the top edge of the other, and if these edges agree you may know at once that there is no winding where you have placed the straight-edges (Fig. 688). By putting them in different positions you can finally determine whether the whole surface is true or not.
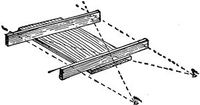
Fig. 688.
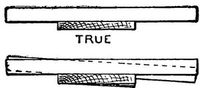
Fig. 689.
It is more accurate to use winding-sticks considerably longer than the width of the piece to be tested, as then any warping or winding will be exaggerated and more easily seen (Fig. 689). If the upper edges of the sticks are thin, or "feather-edged," it is easier to tell exactly when they are in line, but this does not ordinarily matter, except in work requiring extreme accuracy.
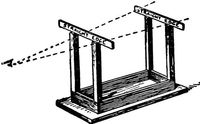
Fig. 690.
To find, for example, when the legs of a table, chair, or the like are cut so that the article will stand evenly, turn it over with the legs sticking up, put straight-edges on the ends of the legs, sight across these (Fig. 690), and trim one or two legs until the edges are in line. See Scribing for other methods.
Warping or winding of short pieces can be detected by simply laying one straight-edge diagonally from corner to corner (Fig. 691). This will show at once which parts require to be planed to make the surface true.
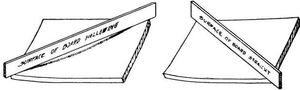
Fig. 691.
Withdrawing Nails.—When withdrawing nails place a block under the hammer-head as shown (Fig. 692), using more blocks, if necessary, as the nail is withdrawn.
To draw the nails from boxes, pry up a board, together with the nails, a short distance—perhaps ¼"—and then with a sharp, quick blow of the hammer pound the board back into place, not striking the nails but the board between them. This will usually leave the nail-heads projecting a little above the surface, so that you can draw them as shown in Fig. 692, and thus save splitting or defacing the boards and bending the nails, as usually results from smashing or wrenching boxes apart. The quick blow drives the board back before the motion has time to communicate itself to the nails, on somewhat the same principle that a bullet makes a round hole in a window pane without smashing the glass.
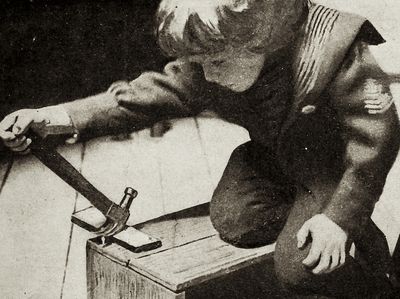
Fig. 692.
Wood-Filler.—See Finishing.
Wrench.—A strong wrench is often very serviceable in wood-working operations.