Part 5 — CHAPTER XVI (continued 2)
Reading edition
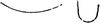
Fig. 534.
Gouge.—This tool is similar to the chisel, except for the curvature across the blade. The common gouge has the bevel on the convex or outer side and is known as an "outside" gouge. This is the more useful for ordinary work. The "inside" gouge has the bevel on the inner or concave side. Although very useful for many purposes, it is less important for general work and is harder to sharpen. Gouges are of various degrees of curvature, Fig. 534 showing a "flat" and a "quick" curve. Those of moderate depth and curvature will be more useful for your work than very deep or very flat ones.
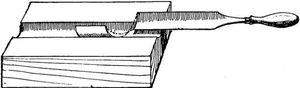
Fig. 535.
In using the common or "outside" gouge, light, short strokes should usually be made, for only the bevel of the tool bears on the wood, which makes this gouge quite hard to control.
You can often apply the principle of the sliding or sideways cut in using the gouge, as with the chisel, to good advantage. You can roll the gouge around with your hand from side to side so as to make it cut slantingly. This is particularly useful to give a clean cut when gouging across the grain (Fig. 535). In some cases, in working out a moulding, for instance, you can hold the tool at an angle with the work and get a better result than to push it straight forward lengthways (Fig. 536).
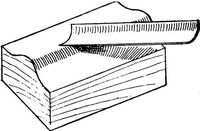
Fig. 536.
Be careful not to scoop out little hollows below the required depth of the cut, and keep the direction of the grain in mind the same as with the chisel. The little inequalities left by the gouge can be reduced easily by the file, curved scraper, or glass and sandpaper. See Sharpening.
Gouge-Bit.—See Bits.
Grindstone.—When you get to the point of having a grindstone, get one which is somewhat soft and fine, for if too coarse it will produce a rougher edge than is desirable for your tools.
Do not allow your grindstone to become softened in spots by being left partially immersed in a trough of water, as it will wear away irregularly. With the best of care a stone will, however, become untrue after continued use, not merely in its circular outline, but the face will become hollowed and uneven. It must then be trued, either by some one of the contrivances now made for the purpose, or by simply turning the stone into the correct shape by holding the end of a piece of soft iron, as a piece of pipe, against the surface, without water, moving the iron as occasion requires, until the stone becomes true.
Grooving.—Grooves of different dimensions are often required for various purposes in wood-working. By far the best way, as a practical matter, is to take the work to a mill and have the grooving done by machine, which is not expensive. It can be done by hand with the planes devised for the purpose (as the plough), but though these are valuable tools, they are largely superseded, or becoming so, by machine-work, and it is usually fully as well for the amateur to take such work to the mill as to buy the tools.
In some cases the sides of the groove can be sawed by the hand-saws and the material removed by the chisel, but this is not easy if the groove is long. Pieces are sometimes clamped beside the line to guide the saw and sometimes even attached to the saw itself, or to a piece of saw-blade. The lines for the groove can be scored with the knife or chisel and the wood between removed by the chisel, much as in cutting a mortise.
In nice work, as fitting a shelf in a bookcase, it makes a better joint not to fit the entire end of the shelf into a groove, but to cut a tongue or wide tenon on the end of the shelf, with a shoulder at each side and the front edge, to fit into a corresponding groove, as shown in Fig. 284.
Half-Round File.—See File.
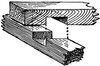
Fig. 537.
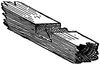
Fig. 538.
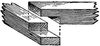
Fig. 539.
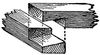
Fig. 540.
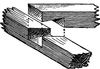
Fig. 541.
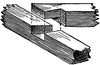
Fig. 542.
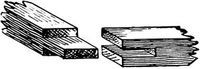
Fig. 543.
Halving.—This joint shown in Fig. 537 is a common, simple, and good way of joining two sticks when they cross at right angles or obliquely. Place the sticks in position and mark the width of each upon the surface of the other, using a knife or chisel for scribing. With small sticks the wood can be removed with the knife, first cutting a notch at each side and then paring off the wood between (Fig. 538). With large pieces the lines should be marked by the square, the depth (one-half the thickness of either piece) by the gauge. The lines at the outside of the space can then be sawed down to the gauge line, taking care to keep just on the inside edge of the line. The wood between can be pared out with the chisel down to the gauge lines. When the halving is at the ends of the pieces or at the end of one piece (Fig. 539), the process is the same, except that the wood can be entirely removed by the saw. Other forms involving bevelling and dovetailing are shown in Figs. 540, 541, and 542. This principle of the lap joint is often carried a little further and we have the open mortise and tenon (Fig. 543), which can successfully be applied to a mitred joint and can also be dovetailed, and boxes are now made by machine with the corners entirely made up of a continuous series of these joints (Fig. 544). See Joints.
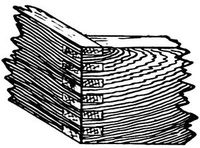
Fig. 544.
Hammer.—The hammer is made in many forms, but the common kind used by carpenters will usually answer your purpose, and is too familiar to require description. For general use select one of medium size and weight. Remember that the face of the hammer-head, although harder than the nails it is meant to drive, is not intended to pound every piece of hardened steel you may run across, nor to break up boulders when you are after minerals. For the use of the hammer see Nailing.
Hand-Screws.—Hand-screws are of great use in clamping work that has been glued and for holding pieces in any required position. Wooden hand-screws are probably the most generally useful, but a couple (or more) of the simple iron clamps will be of great service at times, as they can be used more advantageously than the wooden ones in some kinds of work. Get medium-sized hand-screws rather than small ones if you can, as they will be generally more serviceable.
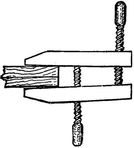
Fig. 545.
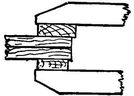
Fig. 546.
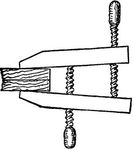
Fig. 547.
To open or close a hand-screw, hold it at arm's-length in front of you with a handle in each hand, and with a twirling motion revolve it toward or from you, as may be required, to increase or decrease the opening between the jaws. The screws should be greased or rubbed over with black-lead, soap, or bayberry tallow.
To hold two pieces together with uniform pressure is of course necessary for gluing and various other operations, but a little practice will show you how to adjust the hand-screws so that the jaws will bear on the wood evenly. The main point to remember is to keep the jaws parallel. The final tightening is given entirely by the outer screw, so, in adjusting the screws, leave the jaws open a little at the tip as in Fig. 545, that when the final pressure is put upon the outer screw the jaws will bear on the wood with an even pressure (Fig. 546). If the jaws were adjusted to bear evenly before tightening the outer screw, the final result would be as shown in Fig. 547.
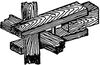
Fig. 548.
In clamping together finished work or pieces which could be injured by the pressure, always put pieces of waste wood between the work and the hand-screws. In case of delicate work, like carving or mouldings, a piece of soft pine placed between the surface and the hand-screws or clamps will enable considerable pressure to be applied without injury to the work.
A simple home-made clamp, suitable for such work as temporarily holding in place parts of the frame of a boat, for instance, is shown in Fig. 548. See Clamps and also Figs. 66 and 647.
Hatchet.—The hatchet is too familiar to need description. A common, medium-sized hatchet, that can easily be swung with one hand, is all that the beginner will ordinarily require, although there is quite a variety of hatchets and axes for various purposes.
The main thing in the use of the hatchet, besides keeping your fingers out of the way, is to look sharply after the direction of the grain of the wood, as it is not easy to stop a blow in the wrong place, for the hatchet is not so easily controlled as some other tools. Experience is the best teacher in the use of a hatchet. For removing superfluous wood with the hatchet, see Paring.
Hinges.—There are many varieties of hinges for various purposes. The common kind, like that shown in Fig. 135, had best, for neatness' sake, on moderately heavy work, be narrower than the thickness of the stock, so as not to extend across the edge. The hinge should be sunk in the wood of one or both of the parts to be hinged—in the case of many boxes, for instance, one half of the hinge when shut is usually sunk in each part, but in some kinds of work the whole thickness may be sunk in one part. The hinge can be held in position on the edge (in the case of the box) so that the centre of the pin on which it turns is in line with the back of the box, or sometimes a little outside. Marks can be made with the knife or chisel at the ends of the hinge, and the recess in which it is to fit marked with the square and gauge. This wood should be removed with the chisel, first making cross cuts to break up the grain, as in Fig. 614. Fit the other hinge or hinges in the same way. Next lay the lid exactly in position on top of the hinges and mark by them and cut the recesses in the top in the same way. Hold the hinges in place with two or three screws each and see whether the cover opens and shuts as it should. Make any needed alterations, and finally screw the hinges firmly in place. Another way is to place the lid exactly in position (shut) and mark directly from the hinges, on both box and cover at the same time, the points from which to lay out the recesses. It will be well to look at a properly fitted hinge for a similar purpose before beginning your work, since one rule cannot be laid down for all cases.
For strap-hinges, T-hinges, and the like, see page 247.
Holes and Cracks, To Fill.—The simplest way to stop holes, cracks, checks, and the like, in painted work, is with putty, always applying it after the first coat of paint and never before (see Painting), but this method should not be used for other than painted work, and the nicer the work, the less desirable the use of putty becomes.
For nice work, as furniture, which has not been finished, small holes or cracks are often stopped by putting a daub of hot glue on the smooth end of a piece of wood of the same kind as the article, and with a sharp chisel, held nearly at right angles with the surface, scraping off fine wood-dust, which, mixing with the glue, forms a paste with which the crack can be more than filled. When hard, the surplus can be pared and scraped off.
Plaster of Paris (calcined plaster), mixed with very thin hot glue, is excellent for stopping cracks and holes of considerable size. It can be mixed with water only, but this is not as good.
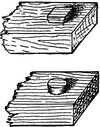
Fig. 549.
Fitting in a plug of wood is a good way when the hole is of such shape that you can do so, making the grain of the plug run the same way as that of the piece to be plugged. Taper the plug slightly, so that when driven in it will fit tightly and not be flush with the surface, but project above it (Fig. 549). Dip in hot glue, and drive well in. When dry smooth off. If the hole is irregular, trim to some shape to which you can fit a plug. In nice work take pains to have the plug a good match for the rest of the wood.
Slight cracks at the end of a piece can often be plugged and at the same time secured against further splitting by sawing directly down the crack, so as to remove it and substitute a straight saw-kerf. In this kerf a slip of wood can be fitted and glued.
Wax, and also melted shellac, can be used to stop holes and cracks in finished work. For this, see under Finishing.
Jack-Plane.—See Plane.
Jointer.—See Plane.
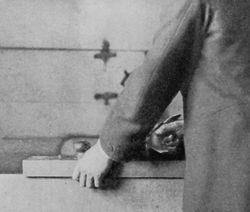
Fig. 550.
Jointing.—This term is applied to the act of straightening and making true the edges of two boards or planks which are to be joined to make a tight joint, with glue or otherwise. It is, also, popularly applied to straightening the edge of one piece only, as to "joint" the edge of a board. This you will often have to do, and for jointing two edges which are to be glued particular care will be required. Assuming that the edges have been got out nearly straight, the only plane you will require is the fore-plane,—or better, the jointer, or even the "long" jointer if the piece is long and you are fortunate enough to have these tools,—and it should be set fine, although if the edge is very crooked and you have to work off much superfluous stock, the iron can be set to make a coarse shaving at first.
In shooting or jointing edges it is customary to hold the finger under the sole of the plane as a guide (Fig. 550). This helps in regard to the common fault of tipping the plane sideways so as to plane off more on one side than on the other (Fig. 551). This trouble may be aggravated by a wrong position of the left hand on the fore part of the plane in case you use a wooden plane (see Fig. 624 for correct position). Keep testing across the edge with the square (Fig. 640). The shooting-board can be used to advantage for short pieces (see Shooting-board), and attachable guides can also be obtained.
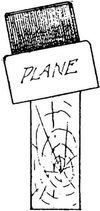
Fig. 551.
The jointing should be done with long, deliberate, steady strokes. Any hasty, hit-or-miss slashing away with the plane will be sure to result in a bad joint, and you can easily get the edge into such shape by three or four careless strokes that it will take you a good while to get it straight. Try also to avoid planing the edge rounding, from end to end (see Plane, Figs. 635-637). Sight along the edge. Also test with straight-edge, looking toward the light. If any shines through, the edge is not yet accurate and the process must be resumed.
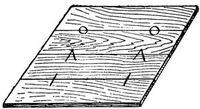
Fig. 552.
If you are jointing two edges, as for a "glue-joint," first examine the pieces to see which edges will best go together, according to the purpose for which they are intended. Look at the end grain so as to arrange it in different ways if you are building up a piece of selected parts (Fig. 559). If merely joining two or more boards to make a wider one, notice the way the grain runs lengthways, and the way it crops up to the surface, for you will have, for everything but the roughest work, to plane the surface over after the joint is glued, and if the grain runs in two or three different ways it will be harder to make the surface smooth. There are cases, however, in handsomely figured wood, as quartered oak or mahogany, where you will arrange the grain in the way that will look the best, but in such cases you expect to go through extra labour for the sake of having the article as handsome as possible. With soft, straight-grained white pine or whitewood, these matters are of less importance. When you have the pieces laid together in the best way, mark on the surface right across the joints (Fig. 552) so that you will know how to put the pieces together, for you will forget how they were arranged after you have moved them around a few times.
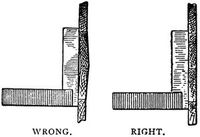
Fig. 553.
Joint each edge separately. For nice work it is well to joint the edges of the successive pieces alternately from opposite sides,—that is, if in planing the edge of the first piece the marked (or face) side of the board is towards you, plane the edge of the next piece with the face side of the board against the bench, or away from you. This helps to counteract the result of any tendency to tip the plane to one side or any inaccuracy in setting the plane-iron. See Shooting-board.
Then, putting one piece in the vice with the jointed edge upwards, lay the other edge upon it in the proper position and see if the two edges touch throughout. If not, one or both must be planed with thin, careful strokes until they do fit, for the joint will not be good unless the edges coincide. Remember, however, that it takes more than merely touching to make a good joint. The surfaces of the boards must be in line (in the same plane). Of course this really depends upon the edges being square. Test by holding a straight-edge, the square, the edge of the plane, or anything straight, against the surface of the boards (Fig. 553).[47]
Do not be misled by the directions you may see in "amateur" books and magazine articles which tell you, for cases like this,—when you wish to glue up the lid of a desk, for instance,—to plane and sandpaper your boards carefully on the sides and then fit the edges together, after which you "have only to glue the edges and the job is done." That is not the right way to make a glued joint, as you will find out for yourself after you have planed a few dozen boards the second time. The skilled workman seldom attempts to do this except in repairing or some case where the surface of the pieces must be preserved. The practical work-man's way (which is the way for you), is to glue first and plane afterwards. The best way, practically, is to glue up the rough boards before they have been planed at all, and then have the whole planed down as one piece by machine to the required thickness. Of course you should get the surfaces as nearly in line as you can, to avoid needless planing afterwards, but give your special attention to making the joint hold (see note under Clamps).
Sometimes the edges of boards to be glued are purposely planed, hollowing lengthways, so that the two pieces touch at the ends, but do not quite come together in the middle, the idea being that a clamp at the middle will force the joint together for its whole length and will give a stronger result than to attempt to make both edges exactly straight. If there is to be any open place in the joint before gluing, it is better to have it at the middle than at the ends, but there is a difference of opinion as to whether there is any advantage in springing boards to fit in this way.
Before gluing hardwood edges, it is well to tooth them over with the toothed-plane, if you have one. (See Plane.)
See Plane, Gluing, Joints, Cleating, Dowelling, etc.
Joints and Splices.—There are many kinds of splices and joints used in the different branches of wood-work, a few of which are here given.
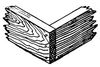
Fig. 554.
The common square butt-joint (Fig. 554) is the simplest way to join two pieces at right angles, as in making a box or frame, and is used for all common work. Glue is of but little use with this joint. Rely wholly on nails or screws.
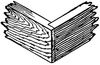
Fig. 555.
To make a better joint, cut a rabbet at the end of one piece and you have a joint (Fig. 555) which shows less end wood, and can be helped a good deal by gluing, on account of the shoulder.
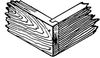
Fig. 556.
Another way is shown in Fig. 556. Some strength and stiffness is gained by the tongue and groove, but a groove near the end introduces an element of weakness.
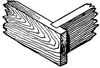
Fig. 557.
A much stronger way and a tighter joint (Fig. 557) is often used for cisterns, water-tanks, and horse troughs, but the projecting ends are objectionable for most purposes. See Halving, Mitring, Dovetailing, and also Box-making, page 219.
In nailing any such joints as those just shown, remember to always bore holes for the nails wherever there is danger of splitting. See Awl, Bits, Boring, Nailing.
There are many ways, besides those just mentioned, for joining sticks and timbers at right angles, which is something you will often have to do, whether for a kite or some small framework or for the timbers of a building.
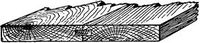
Fig. 558.
To join two or more boards or planks to make a wider surface, several methods can be used. Cleating, though strong and suitable for all such work as drawing-boards, rough doors, and the like, is often undesirable, both on account of the looks and because the cleats may be in the way (see Cleating). The simplest way, without cleats, is to glue the jointed edges (see Jointing and Gluing). Dowels can be used with this joint (see Dowelling), or grooves can be cut and a strip or spline or tongue inserted (Fig. 558). This last way can be done at the mill quicker and better than by hand. The edges can also be halved, or a rabbet cut in each edge from opposite sides. The boards can also be "matched" (see page 46), in which case it is not usual to glue them. All of these joints can best be made by machine.

Fig. 559.
To avoid the warping and change of shape to which wide pieces are subject, particularly when they are not middle boards (see Chapter III), they are often built up of selected narrower pieces (Fig. 559). This is done for many things,—the frames of machines, the tops of sewing-tables, drawing-boards, chopping-blocks, etc. Masts, bows, fishing-rods, and the like are sometimes built up of selected pieces, the idea being that a better result can be obtained by combining selected smaller pieces, that flaws and defects (which are apt to occur in larger pieces) can be avoided, and that sometimes the grain can be arranged to better advantage. This is doubtless true, but there is always the objection that glued joints may give way. If you can get a piece which is practically perfect, it is probably in most cases better than a glued-up combination, for it is not easy to improve on Nature when you can get her best specimens; but unless you can get first-class stock of the dimensions required, it is better to "build up" with smaller pieces of selected stock.
Where the ends of two pieces come together and you wish to make a close joint, you will, of course, saw the pieces off as squarely as possible, using the square or perhaps the mitre-box. If you mark and saw them with exactness, and if everything about their arrangement is straight and square and true, the ends will come together exactly and make a close joint, but as a practical matter this frequently will not happen, however careful you may be. For nice work, the workmanlike way in such cases is to plane or pare the ends until they fit, but for rougher work the expedient of sawing the ends to fit can be resorted to. To do this, put the ends together as they are to go (Fig. 560), keep them from moving, and saw straight down through the joint. As the saw will leave a kerf of uniform thickness, the pieces can now be pushed together and the ends will fit, unless the joint was very much open, in which case you have only to saw again, and if necessary repeat the operation until the ends fit. This is a very useful expedient in case of need, but should not be relied on as a regular way to make joints, lest it engender a careless and inaccurate method of work. This applies also to joints which meet at any angle.
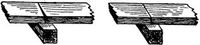
Fig. 560.
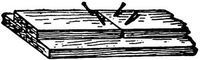
Fig. 561.
In some cases, where only one side of each piece shows, as in laying floor-boards, it is usual to undercut the ends slightly—that is, to make the joint a little open at the bottom, which gives a tight and neat joint on the side which shows (Fig. 561, which is exaggerated).
Another way to make an end joint is by bevelled scarfing or splaying (Fig. 562). You will see the ends of the clapboards on old houses joined in this way, and it doubtless makes a better joint in many cases than the common square or butt-joint, but it is more work. Strips of moulding are often cut in this way.
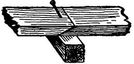
Fig. 562.
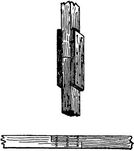
Fig. 563.
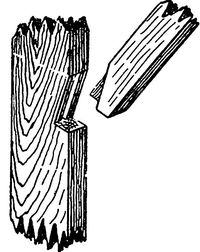
Fig. 564.
There are many ways of splicing two or more pieces so as to get greater length, many of them, such as are used in bridge-building and roof-framing, being quite complicated. You will rarely, however, in such work as you will do at first, have occasion to do more than nail strips (fish-plates) on the sides of the pieces or make a halved splice or scarfed joint (Fig. 563). The latter is often made longer than that shown and fastened in various ways. A joint for a brace is shown in Fig. 564.
See Cleats, Doors, Dovetailing, Dowelling, Gluing, Halving, Mitring, Mortising, Nailing, etc.
Keyhole Saw.—See Saw.
Knife.—An excellent knife for shop work is a sloyd knife. A good shoe-knife will do very well. This is better for shop work than a jack-knife. It will not close on your fingers for one thing. For general purposes, however, a pocket-knife is the best thing, as you cannot carry a sloyd knife around with you. In buying it get a good plain knife with not more than two or three blades and of the best steel you can afford. Do not waste money in trying to get your whole kit of tools into the compass of one jack-knife handle. In selecting a knife, open the blades and sight along the back to see that each blade is accurately in line with the handle, as they are sometimes fastened at a slight angle, which weakens the knife.
An immense variety of work can be done with a common pocket- or jack-knife, which is the best emergency tool for either the beginner or the skilled workman. One great thing about whittling is that you cannot rely on squares, rules, or compasses to get your work right, but must be independent, think quickly, look sharply, and rely on your own faculties. A knife is so easy to sharpen that there is not much excuse for using a dull one. See Sharpening.
In cutting, always keep your left hand behind the blade, and as a general rule cut from you, for the tool may slip and cut you instead of the wood. There are cases where you have to cut towards you, but there is never any need of getting your left hand in front of the cutting-edge.
Level.—A spirit-level is important for some work, but not often necessary for the beginner, as a substitute can easily be made. A horizontal or level line being at right angles with a vertical line, a home-made level can be made by using the principle of the plumb-line, as shown on page 96. When the plumb-line hangs freely on the line ab, which is at right angles to cd, the latter line (cd) must of course be level. The frame should be several feet long for levelling large work, as it can be adjusted more accurately than if small.
Linseed Oil.—See Finishing and Painting.
Locks.—Use locks of good quality or none at all. Never put very cheap locks on good work. There are many varieties of locks, some to be screwed on the outside of the wood, others to be sunk in recesses cut in the side of the wood, others still to be let into mortises—chest-locks, door-locks, cupboard-locks, drawer-locks, etc.
To fit a chest- or box-lock (not a mortise-lock), place the lock in the right position, mark around the part required to be sunk in the wood, which can be cut away with gouge and chisel, the keyhole having been bored quite through the wood and trimmed to a neat outline which will conform to the shape of the key. When the lock has been screwed in its recess, put the "hasp," or part which is to be on the lid, into its place in the lock, just where it will be when the chest is locked. Then close the lid, and by slightly pressing you can make a mark on it to show where to put the hasp. Sometimes you can mark the place with a pencil, or by putting transfer-paper between the hasp and the wood, or by rubbing blackened grease on the plate of the hasp. The plate of the hasp should be sunk in the lid to be flush with the surface, and may then be screwed on, bearing in mind the thickness of the lid when selecting the screws. A mortise-lock is fitted in a similar way, but let into a mortise (see Mortising).
To fit a common drawer-lock, determine the place for the keyhole and place the lock in position on the inside as before. With a pencil mark the outline of the box-part of the lock, which bears against the wood. Cut away the wood within this line, making a recess slightly deeper than the thickness of the box-part of the lock. The hole must be bored for the key, as before. Put the lock into place and mark the outline of the outer plate, not merely on the inside of the drawer front but also on the top edge. Cut away the wood with the chisel to let the plate sink flush with the wood. When the keyhole is shaped, try the lock and if it works, screw it on. Close the drawer and turn the key hard to raise the bolts (the tops of which have been previously rubbed with blackened grease, such as can be scraped from an oil-stone, or using transfer paper), which, pressing against the wood, will mark the places for the mortises into which they are to slide. Cut these mortises and the drawer can be locked.
The variety of locks and their arrangement in regard to fitting is so great that it will be best for you to examine a well-fitted lock for the same purpose that the lock you have to fit is intended, for one rule cannot be given for all cases.
Mallet.—The mallet, which is merely a hammer with a wooden head, is made in various forms and sizes, from the big beetle of the wood-chopper to the ladies' carving mallet. It is used to strike the wooden tool-handles.
For heavy work a mallet with the handle put through the head from the outside, like the handle of a pickaxe, is good because the head cannot come off. A rounded head with the handle on the end (like a potato-masher) saves having to notice how you hold it, as it is equally effective in any position. A mallet of this type can be turned all in one piece. Hickory or lignum-vitæ or any dense, hard wood is good for a mallet.
You do not gain force by using the mallet instead of the hammer, but the softer and more yielding blow of the mallet saves the tool-handle.
Marking.—For all rough work the ordinary carpenter's pencil, sharpened flatways, like a screw-driver, is the most convenient and durable instrument. For nicer work, where you need more accurate lines, the common round pencil (medium hard or rather soft) is all you need, but for nice, close work (such as marking accurate joints), a knife, the corner of a chisel, a marking-awl, or a scriber of some sort is necessary. There is no need to buy any tool for this, although they are to be had—nothing is better than a common pocket-knife or a chisel. Keep your pencils sharp by rubbing them on a piece of fine sandpaper, or an old file.
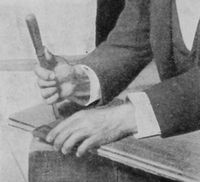
Fig. 565.
In scribing with the chisel, the edge is drawn along with one corner slightly raised and the flat side next the straight-edge, holding the tool either like a pencil or for deeper scoring as in Fig. 565.
In all marking and scribing, whether with pencil, awl, knife, chisel, or other tool, be sure that the marking edge is kept close up to the rule, straight-edge, or square, as it will often tend to follow the grain of the wood and run off the line, and will sometimes force the straight-edge or square out of position if the latter is not held firmly.
Do not try to stop lines which meet at a given point, but let them cross one another when they will not show in the finished work, as it is quicker to do so and the crossing of two lines marks a point more accurately than a dot. For work to be finished, however, scoring the surface with lines should be avoided wherever they will show, as they will become conspicuous after the work is finished.

THIN RULE—FINE WORK. Fig. 566.
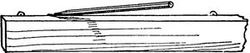
THICK RULE—ROUGH WORK. Fig. 567.
In marking lines with a straight-edge or ruler you must be careful that it does not slip. If it is long you can put weights on it. To mark a line accurately through given points, the ruler should not quite touch the points, but be pushed almost up to them and equally distant from each (Fig. 566). This will give you a clear view of both points so that you can be sure that the pencil or whatever you mark with will go as nearly as possible through the centre of each. Bearing the pencil against the edge of the ruler, you can slant it a trifle till the pencil-point will just coincide with the given point on the wood, and, keeping the same inclination, move the pencil along the ruler, and it should also go through the second given point. This applies to a regular ruler with a comparatively thin edge, and to fine work only. In marking by a thick edge, or where extreme nicety is not required, you will of course put the straight-edge right up to the points and run the pencil-point along in the angle (Fig. 567).
Besides marking lines, the straight-edge (in some form), is used to determine whether a surface is true. See Straight-edge.
For rough, off-hand marking, particularly on undressed stock, chalk is often best. Sticks, shaped like school-crayons, of graphite or some black composition, are good for rough marking.
The chalk-line is used for distances too great to be covered conveniently by a straight-edge and in places where the latter could not so well be used. The chalk-line is a chalked cord drawn taut between the two points to be connected. It is better to use a small cord than a large one, and blue chalk is often preferred to white. Fasten one end of the cord with a loop around an awl or nail at one end of the desired line, and from this point chalk the cord, holding it between the thumb and the chalk so that the cord will bear on the flat side of the chalk in such a way as to wear it away evenly without cutting it in two. Then draw the chalked cord tight to the other end of the desired line and, holding the end down with one hand, lift the cord from as near the middle as practicable with the thumb and forefinger of the other hand and let it snap back on to the surface. The cord should be raised squarely from the work and not pulled slantingly to one side or the line will not be straight.
Marking-Awl.—See Awl.
Marking-Gauge.—See Gauge.
Matching-Plane.—See Plane.
Measurements and Measuring.—For various suggestions, see Rule, and also pages 47, 48, 50, 167 (footnote), 244, and 261.
Mirror-Plates.—A good way to fasten such articles as mirrors, cabinets, etc., to the wall is by mirror-plates, which you can buy or make yourself of brass. These should be sunk in the wood so as to be flush with the back side of the shelves. After being fitted, they should be taken off during the process of finishing the work.
Mitre.—See Mitring.
Mitre-Board.—See Mitring and also page 92.
Mitre-Box.—If you can afford it, an iron mitre-box which will cut at various angles will be very useful. You can make one yourself of wood. You can get a carpenter to make you one for a small sum, but the iron ones are better. See page 90.
Mitre Shooting-Board.—See page 94.
Mitring.—A common joint is the mitre (Fig. 568). Its only advantage is that it shows nothing but a line at the angle and the "end wood" is entirely concealed. It is a weak joint at best, even when made by a skilled workman, and is particularly hard for an amateur to make well. The slightest variation in one of the corners of a frame or box throws the whole structure out of shape and in attempting to correct the error the other joints are apt to be opened, and if the whole is finally got together in a fashion it is often after bother enough to have accomplished much good work in some other way.
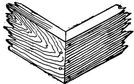
Fig. 568.
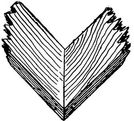
Fig. 569.
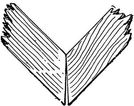
Fig. 570.
The mitre is particularly unscientific for wide pieces used flatways (Fig. 569), as the inevitable expansion and contraction of the pieces is very apt to cause an open joint. If the wood is not quite dry, so that it shrinks, the joint may open permanently toward the inside corner, for when the wood shrinks in width the pieces will become narrower and so separate at the joint, leaving a crack, tapering from the inner to the outer corner. Even if the wood is thoroughly seasoned it will expand and contract more or less. When it expands, the joint will tend to open at the outer corner (Fig. 570). When it contracts it will tend to open, as just shown (Fig. 571), at the inner corner.
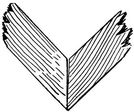
Fig. 571.
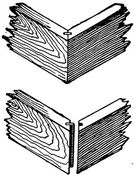
Fig. 572.
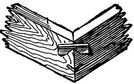
Fig. 573.
Of course there are some cases, as in making a picture frame of prepared "mouldings," when mitring is the only way in which the frame can be put together, and there are some other cases in which it is the most proper and suitable joint, but as a general rule, for amateur work, particularly in framing where strength is a consideration, avoid the mitre. Other and better forms for anything like a box are shown in Figs. 554, 555, 556, 557.
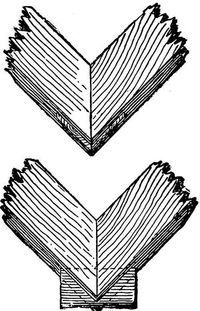
Fig. 574.
The mitre is sometimes strengthened for box work and the like by fitting a spline or tongue with the grain running across and not lengthways of the joint (Fig. 572.) This, properly glued under pressure, makes a good joint and one much superior to the plain mitre. But, though easy to do with machinery, it is a slow and careful job to make such a joint by hand, and if a case arises where you wish it done you had best take the work to a factory, where a circular saw is all that is needed.
The principle of halving shown in Figs. 539 and 543, can also be applied to a mitred joint.
Saw-kerfs are often made (Figs. 573 and 574) into which small strips are tightly fitted and glued. This is a good way and easily done, once having got the mitre properly put together. A combination of the mitre with the joint shown in Fig. 555 is shown in Fig. 575. See also Dovetailing and Joints.
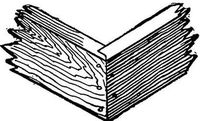
Fig. 575.
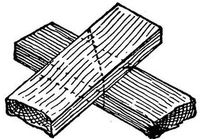
Fig. 576.
To lay off a mitre, or the lines by which to cut the intersection of any two pieces at any angle, a simple way is that shown in Fig. 576. The pieces are laid one above the other at the desired angle. Then the points of intersection are marked on each edge. Lines connecting these points will give the desired angles for sawing. The square can be used to help in determining the points accurately and to project them to the upper side of the top piece.
Mortise and Tenon.—See Mortising.
Mortise-Chisel.—See Chisel.
Mortise-Gauge.—See Gauge.
Mortising (Mortise and Tenon).—If you can get out two pieces and fit them together accurately with a mortise-and-tenon joint, and do the work well, you will be competent to handle a great many of the difficulties of ordinary wood-work.
You will often have occasion to use this joint. The mortise is the hole in one of the two pieces to be joined. The tenon is the pin or projection in the other piece, shaped to fit the mortise.
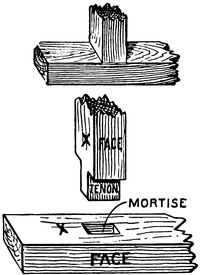
Fig. 577.
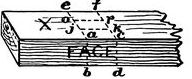
Fig. 578.
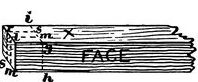
Fig. 579.
To lay out a mortise and tenon (Fig. 577), select and mark the working faces for each piece. First take the piece in which the mortise is to be cut (Fig. 578). Square two lines, ab and cd, across the face and the same distance apart as the width of the piece on which the tenon is to be cut. Carry these lines across the side X (ae and cf) and also across the side opposite to X (that is, the side where the tenon will come through).
Next take the tenon-piece (Fig. 579) and measure from the end a distance a little greater than the width of the face of the mortise-piece, and at this point square a line, gh, across the face of the tenon-piece. Continue this line, gi, around the piece, with the square.
Now take the gauge and, setting it at the distance from the face settled upon for the mortise, scribe the line jk on the side X and also on the side opposite X. Also from the face of the tenon-piece, without changing the gauge, mark the line lm on the side X, on the opposite side, and on the end. Set the gauge to measure from the face to the other side of the mortise,—that is, add the width of the mortise to the figure at which the gauge was set,—and scribe another set of lines, op and rs, in the same manner as before, remembering to gauge all the time from the same face.
In the coarser kinds of work, where marks on the surface do no harm, the gauge marks can be run across the other lines, as being easier and more distinct, but in fine work, especially that which is to be finished, care should be taken not to make scratches that will be seen when the work is finished. The parts to be cut away are indicated by cross marks (Fig. 580) and it will be seen at once that the tenon and mortise are laid out correctly.
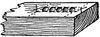
Fig. 580.
To cut, take first the mortise-piece and fasten it securely by vise or clamp in a convenient position. The simplest way to remove the wood is to bore a series of holes with a bit of a diameter as nearly the width of the mortise as you have (Fig. 580), but a trifle smaller. This removes a large part of the wood with but slight danger of splitting. The rest can easily be trimmed away to the lines with the chisel, taking care not to jam the chisel down lengthways of the mortise when the latter is blocked with chips or firm wood, or the wood may split off at the side of the mortise.
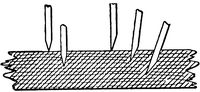
Fig. 581.
To cut out the wood with the chisel only (or to trim the ends of the mortise after using the bit), bear in mind the way the chisel acts when you drive it into the wood. If both sides of the chisel were bevelled (as is the case with carving chisels), it would tend to go straight down into the wood, and if held vertically would make a vertical cut (Fig. 581), but the chisels you use for mortising are flat on one side and bevelled on the other. Being one-sided in this way, the edge of the tool is forced by the inclined bevel to slide off, so to speak, more or less, in the direction of the side which is flat. You can prove this easily by holding a chisel across the grain of a board and driving it in. If you hold the tool lightly, you will see that as you drive it in it will incline to cut under, always on the side which is flat (Fig. 581).
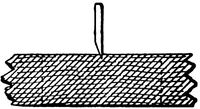
Fig. 582.
This shows how to go to work to cut a mortise so as to keep the sides square and true. If you put the chisel at the end, flat side outward, the cut will tend to run under and make the hole too large below the surface. If you turn the tool the other way, it tends to slip in towards the middle of the mortise. So, to cut out the wood, take a chisel just a trifle less in width than the mortise, and, beginning near the middle of the mortise, hold the chisel as in Fig. 582 and make successive cuts, working toward the end, first in one direction and then in the other, giving the chisel handle a slight pull toward the centre of the mortise each time you move it, to loosen the chips (Fig. 583). You can thus work safely toward the ends, which will be left slanting (Fig. 584).
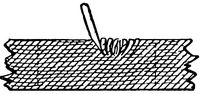
Fig. 583.
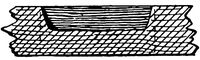
Fig. 584.
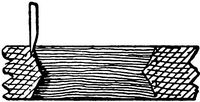
Fig. 585.
After cutting about half through the piece in this way, turn it over and repeat the process from the other side, the result being a hole like that shown in Fig. 585. Now turn the chisel around with the flat side toward either end of the hole, and you can pare down the ends to the line without danger of undercutting (Fig. 585).
Care must be taken not to jam the chisel down lengthways of the grain until the hole is practically cleared of wood, or the side of the mortise may be split off. Use the chisel lengthways of the grain only at the end of the process, to pare the sides of the mortise evenly, with light strokes, down to the line.
In all the use of the chisel, take pains to hold it vertically as regards the sides of the mortise—that is, do not tip it over sideways, or the mortise will be slanting or too wide at the bottom.
The common firmer-or paring-chisel can be used for all light mortising, but for heavy work the regular mortising-chisel should be used (see Chisel).
To cut the tenon, simply saw carefully on the line gh and its opposite (Fig. 579) and then on the lines lm and rs. Be careful not to cut beyond the line, so as to make the tenon too small. It is easy to trim it a little with the chisel if it is too large. Cut a little bevel around the end of the tenon, so that it will drive through smoothly without catching and tearing the sides or ends of the mortise. When it goes through properly and the tenon and shoulder fit snugly, the projecting end of the tenon can be sawed off after the whole job is done.
The tenon should be just large enough to drive through with a slight pressure and fit snugly without any wobbling around. It should not be so tight as to require much force to drive it home, or there will be danger of splitting out the sides of the mortise.
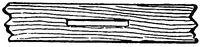
Fig. 586.
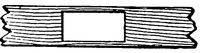
Fig. 587.
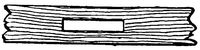
Fig. 588.
There is no absolute rule as to how wide to make the mortise and tenon in proportion to the width of the pieces. It depends on the kind of work, the kinds of wood, the kind of strain to be put on the joint, and various circumstances too complex to be gone into here. If the tenon is very thin it will be weaker than the sides of the mortise (Fig. 586). If very thick, the sides of the mortise will be too thin and will be weaker than the tenon (Fig. 587). One third of the width is as thin as a tenon is often made. It will then sometimes be weaker than the sides of the mortise, as you can see from Fig. 588. But it all depends on what the joint is for. If it is to stand violent wrenching, the tenon in this case might break before the mortise-cheeks, and had best be made a little thicker, with the sides of the mortise a little thinner; but, on the other hand, if the joint is merely to hold the tenon-piece in position, as in case of a post resting on a sill, one third is plenty wide enough for the tenon, as it will be best not to weaken the sill by cutting any larger mortise than is necessary. Sometimes the tenon-piece is simply let in to the other piece for its full width. This is called housing (Fig. 589). Two thirds of the width of the piece is thicker than you will be likely to have occasion to make a tenon, as this leaves the cheeks of the mortise very thin. It is wholly a matter of judgment (between, say, one third and two thirds of the width), according to the conditions of each job.
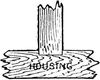
Fig. 589.
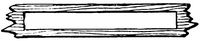
Fig. 590.
The length to which a mortise can safely be cut is also a matter of judgment according to circumstances. If the tenon is thin, the mortise can be longer than if the tenon is thick, as the cheeks will be thicker and stronger, but, as a rule, avoid trying to make very long mortises, unless the tenon is very thin and the wood very strong, as there will not be strength enough left in the cheeks of the mortise (Fig. 590). Six times as long as it is wide is about as long as it is well to make a mortise under ordinary circumstances, though, as just said, it all depends on the conditions of the particular piece of work.
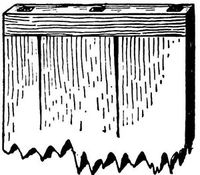
Fig. 591.
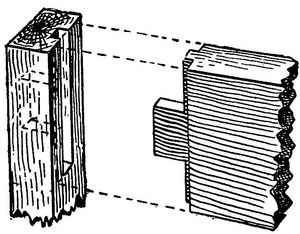
Fig. 592.
When a wide piece is to be mortised into another piece, two or more tenons are sometimes cut, thus avoiding too long a mortise, but this will not do for very wide pieces, unless some of the tenons are fitted loosely, for the expansion and contraction of the wide piece may cause it to buckle or split if all the mortises fit snugly (Fig. 591).
In such cases as a door-frame or when the end of a board is to be fitted into the side of a post, a tongue and groove is often used in addition to the tenon, and this (known as "relishing") is a good way to do (Fig. 592).
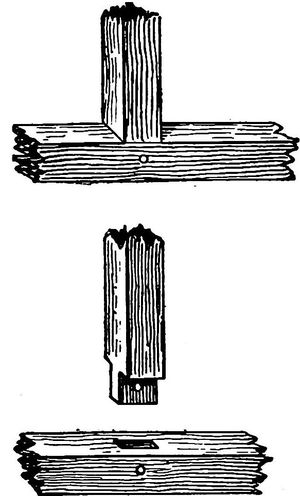
Fig. 593.
The mortise and tenon given above is a very simple form. Sometimes the tenon is short and does not go through (Fig. 593). This is a common form, and is used a great deal in the best work. It is sometimes called blind mortising, the tenon being known as a "stub" tenon.
Mortise and tenon joints are sometimes merely fitted together, but can also be glued (see Gluing), pinned, wedged, or dovetailed and fastened with a key.
To pin a mortise and tenon, simply mark a point with square and gauge upon each side of the piece containing the mortise (Fig. 593), fit the tenon in place, and bore in from each side (or in rough work bore right through from one side until the spur appears on the opposite surface) (see Boring). Then drive through a snugly fitting pin and trim off the projecting ends. The pin should be slightly pointed before driving, on the same principle that the end of the tenon is bevelled. It is not necessary to round the pin. An eight-sided one is just as good.
Do not use too large pins. In ship-building, bridge-building, and old-fashioned house-framing pins and treenails from 1" to 1¾" or more in diameter, are used. Dowels of various sizes will usually answer for such framing as you may have to do (though a rift-pin is stronger). For such work as pinning a joint in a chair, you will not need anything larger than a ¼" hardwood pin.
You must use judgment as to how near the edge to place the pin. If you put it too far from the edge, its hold on the tenon will be weak and the end of the tenon may break out (shear). If you put it too near the edge, the sides of the mortise may tear or split out.
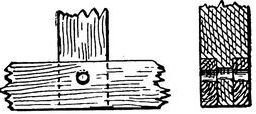
Fig. 594.
Sometimes, particularly in timber work, to insure a snug fit at the joint, "draw-boring" is resorted to (Fig. 594). The hole for the pin is not bored through the tenon as just shown, but is bored a trifle nearer the shoulder of the tenon than the other holes (in the mortise-piece). The result is that when the pin is driven through it draws the tenon-piece down to a snug fit at the shoulder. But this has to be done with judgment. If the hole in the tenon is too much out of line, driving the pin through tends to split (strictly speaking to shear) the end of the tenon, and too much strain is put on the pin.
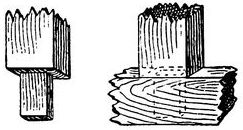
Fig. 595.
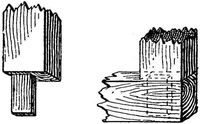
Fig. 596.
In the mortising just shown, there are only two shoulders where the tenon begins—that is, the tenon is made by only four cuts. This is good for all common or rough work. In nice work a shoulder is also cut at each edge of the tenon (Fig. 595). This makes a neater-looking joint, as these shoulders cover the ends of the mortise completely. When the joint comes at the end of the mortise-piece, the tenon can extend to the edge on the outside and the mortise be cut clear out to the end, forming an open mortise-and-tenon joint (Fig. 543), or a wide shoulder can be left on the outside of the tenon—the tenon itself being made narrower (Fig. 596). This course is adopted in doors and frames of various kinds (see Fig. 334).
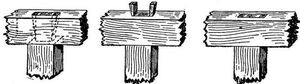
Fig. 597.
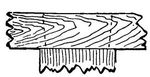
Fig. 598.
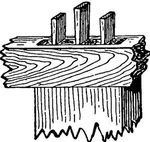
Fig. 599.
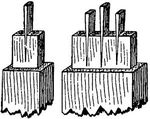
Fig. 600.
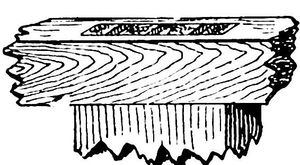
Fig. 601.
A good way to fasten tenons is to wedge them. This can be done whether the tenon goes through the mortise-piece or only part way, as in a blind joint. The wedges can be driven between the tenon and the ends of the mortise (Fig. 597), or, as is often better, driven into cuts made in the tenon itself, thus spreading the tenon toward the end, dovetail fashion, making it extremely difficult, or impossible, to pull it out of the mortise. Before wedging, the mortise should be cut under or enlarged toward the side on which the tenon comes through (Fig. 598). The wedges can then be dipped in glue and driven as in Fig. 599. To spread the tenons themselves, one or two or even three saw-cuts should be made in the tenon, lengthways and farther than the wedges will extend (Fig. 600). The tenon and mortise having been properly glued, the tenon is fitted in place, and the wedges, previously prepared of some strong wood and tapering quite gradually, are dipped in the glue and driven down into the saw-cuts, thus spreading the end of the tenon into a dovetail until it fills the mortise (Fig. 601). It is often best to drive the outer wedges nearer the edge of the tenon than is shown in Fig. 600, lest the tenon-piece be split.
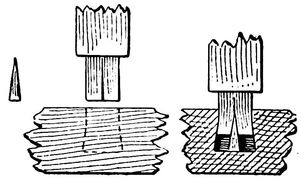
Fig. 602.
The process is much the same when the tenon does not go through the mortise-piece (Fig. 602). The mortise is undercut as before, and saw-cuts are made in the end of the tenon. The wedges are carefully planned and cut so that, when the tenon is finally in place, they will be of the right size to spread it so as to fit the mortise. The wedges must not be too long, so as to interfere with the tenon being driven home or to break off. When you are sure the whole will go into place and fit snugly, glue everything, start the wedges in the cracks, and drive the tenon quickly to place. This will of course drive in the wedges, which will spread the tenon at the end and fix it firmly. In fact, if well done, you cannot get it out again.
There are other forms of mortise and tenon, but they will be seldom required by the amateur. See Joints.
Nailing.—To drive nails, hold the hammer near the end of the handle. Do not, as is often done by boys and amateurs, grasp it close to the head. The nearer the end of the handle you take hold, the harder blow you can strike, just as the longer the handle, the harder the blow. Use light strokes—mere taps—in starting the nail. After you are sure it is going straight you can then use more force to drive it home. Do not try to sink the nail-head quite flush with the wood. Leave that for the nail-set. You may think that any slight depression you may make if the hammer strikes the wood will be too slight to be seen, but that is not so, as the slightest dent or depression will probably show in finished work.
The head of the hammer should be swung back and forth through an arc of a circle of which the wrist is the centre. Do this carefully and steadily and you will send the nail in quicker and straighter than when you flourish the hammer wildly around in the air and bring it down with a ferocious bang somewhere in the vicinity of the nail, as boys of all ages have been known to do.
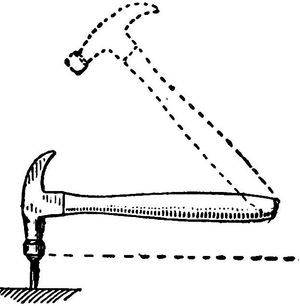
Fig. 603.
Now, remembering that the hammer-head will (and should) swing around in an arc of which your wrist is the centre, you must see that your wrist is in such a position that the hammer-head can strike the nail squarely—that is, the hammer-handle, when the head rests squarely on the nail-head, must be in a line parallel with the flat surface of the top of the nail (Fig. 603). If the wrist is much above or below this line, the nail will be struck slantingly, and either be driven crooked or bent (Fig. 604).
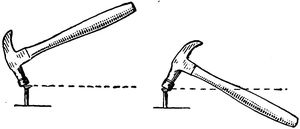
Fig. 604.
First place the hammer in the correct driving position, and then swing it back and forth as nearly in the same curve as you can. Practise this motion a little on a soft piece of board to see how squarely you can dent the board and how nearly you can hit the same dent with successive strokes.
Frequently a nail does not drive straight, but becomes bent and goes in the wrong direction. If you withdraw it do not, as a rule, try to drive another in the same hole, but start it in another place. Sometimes a nail will be bent because the face of the hammer-head has glue or grease on it. In such a case rub it on a piece of fine sandpaper or in the ashes or the ground.
Holes should always be bored when there is any chance of splitting, or when slender nails are driven into hard wood (lest they bend), but remember that the hole, particularly in the inner piece, should not be quite as large as the nail. With nails having large heads it does not matter in hard wood if the holes in the outer piece are about as large as the nails, provided the latter drive tightly into the inner piece.
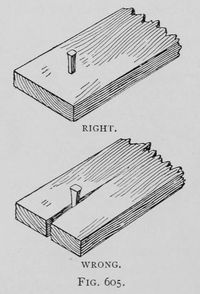
Fig. 605.
The hole made by a brad-awl is better, when it does not split the wood, than one made by a bit or drill, because it does not remove the wood but merely presses it aside, so that when the nail is driven the fibres tend to spring back to their original position and close in around the nail, helping to hold it in place.
In driving the old-fashioned nails, which have two sides parallel, while the other two incline toward the point or taper, they should be used on the same principle on which you use the brad-awl. If placed the other way, the wedge shape of the nail will tend to separate the fibres and split the wood (Fig. 605). With nails having two sides smooth and two rough, as you pick them up you can tell by the fingers which way to hold them, the rough sides going across the grain and the smooth sides with it.
Nails will drive into hard wood easier if you touch the points to grease, tallow, lard, or soap.
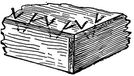
Fig. 606.
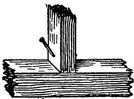
Fig. 607.
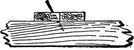
Fig. 608.
"Toe" Nailing.—If you wish nails to hold as much as possible, toe them—that is, slant them (Fig. 606). You can see at a glance that the board will be held much tighter than if the nails were driven straight up and down. Of course you cannot always drive nails this way, and there are many cases in which you would gain nothing, but it takes only a moment longer to toe nails, and it is often very useful where you wish to be sure that the work will hold together. There are many cases where you cannot nail any other way, as when you fasten a stud to the top of a sill (Fig. 607), and you can see at once that it is advantageous. Of course this is not a good method for work which you may wish to take apart again.
Slanting the nails helps to draw one piece tightly up to another, as is often desirable for a tight box or a floor (Fig. 608). You can increase this effect, after you have driven the nail part way in, by drawing the hammer towards you as you strike, or in the direction towards which the nail points, thus bending the upper part of it toward the other piece, which tends to make a tight joint.
Clinching Nails.—The way to clinch nails is simply to drive them through against a heavy hammer, or any solid metal object, held on the other side. As the point comes through it is gradually turned over or hooked around into the wood and when the head is driven home the point will be firmly embedded in the wood. Another way is to simply strike the projecting ends with light, slanting blows. This will gradually bend or curl the point over to one side, and as it bends over you can pound more directly downward until the hooked end of the nail is buried in the wood. Clinching is very useful for many purposes, as in nailing cleats on a shed door. It is usually best to bend the nails over in the direction of the grain, rather than across it.
Whether to clinch or toe the nails must depend on the work. Clinching is better for anything that is to be slammed or subjected to violent treatment, while in many cases toeing is better, and frequently you cannot reach the points of the nails to clinch them.
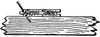
Fig. 609.
Blind nailing is resorted to in order to have a clear, smooth surface, as in floors laid with matched-boards. Each board is nailed just above the tongue, with the nails slanting through the solid part of the board (Fig. 609). This holds the board down and tends to force it closer to the adjoining board. The grooved edge of the next board entirely conceals the nailing and leaves an unbroken surface.
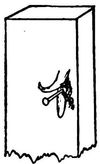
Fig. 610.
Another form of concealed nailing, known as "sliver" nailing, is sometimes practised in inside work (sometimes in putting up "inside finish"). A little shaving is raised with the gouge (an inside gouge is best) or a narrow chisel, where the nail is to go, and curled away sufficiently to drive and set the nail (Fig. 610). Hot glue is then dabbed into the groove, the shaving (which is only raised at one end and not detached from the wood) is pressed back into place, and the spot rubbed with sandpaper drawn around a flat block until the shaving is firmly glued where it belongs. This takes but a moment or two, and when the work is finally smoothed and finished the place cannot be detected, if the operation has been properly done. This is convenient to know in case you have to drive a nail where there is objection to its being seen.
See Withdrawing Nails.
Nails.—There are many kinds of nails, many more than is worth while to specify here, as you will probably use those of wire for most of your work. When another kind would be preferable (as is the case for some purposes) it will be specified. The nails in common use before the introduction of those of wire were known as "cut," being stamped from a sheet of metal, and "wrought," the latter kind being much older and originally forged by hand into shape, one by one (hence the name), but now commonly made by machine. The expressions three-penny, eight-penny, ten-penny, etc., indicate the length, and come from an old custom of so designating the lengths, but you need only to call for them by the length, as 2 inch or 2¾ inch, in order to get what you want, and you can easily select whatever degree of stoutness you need. Copper or galvanised nails and tacks will be needed for your boat-building, copper being preferable, particularly for salt water.
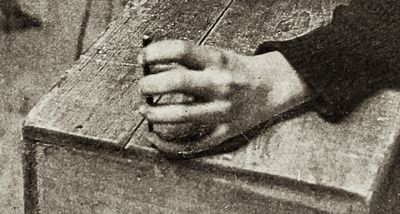
Fig. 611.
Nail-Set, or Punch.—The nail-set, for sinking nail-heads below the surface, is quite important, and it is well to have a large one and a fine one. The end of the set or punch must not be allowed to become rounding or it will be all the time slipping off the nail-head and punching holes in the surrounding wood. A slight conical depression in the end of the set is good. Do not use a file for a nail-set, for the end is too hard and will dent the face of the hammer-head.
When setting nails, hold the nail-set firmly against the little finger, placing the latter on the wood close to the head of the nail, as shown in Fig. 611. This will keep the set from slipping off the nail-head and damaging the work.
Nippers.—A pair of these will often be of use in wood-working operations.
Odd-Jobs.—A very simple combined tool known as "Odd-jobs" can be used as a marking-gauge, mortise-gauge, scratch-awl, try-square, T-square, depth-gauge, mitre-square, spirit-level and plumb, inside-square, and beam-compass. It is well suited to much amateur work, and is cheap.
Oil.—Sperm oil is good to use with your oil-stones. Kerosene is good. Lard oil can be used. All thick and gummy oils should be avoided. Never use linseed oil or any similar vegetable oil, as it is not a good lubricator, and gums the stone. Glycerine thinned with turpentine or alcohol is sometimes used, and even turpentine alone. For oil for finishing and painting, see Finishing and Painting.
Oil-stone.—It is very essential to have a good oil-stone. They can be found of many degrees of fineness. Those of very fine and hard grain, which give a keen edge but cut very slowly, will not be found so well adapted to your use as those of moderate coarseness and softness, which cut faster. The stone known as Red Washita is good to use for wood-working tools, as it cuts rapidly. It should be free from hard spots. The Arkansas stone produces a very fine edge, but is of so fine texture that it is not so well adapted for your tools as a coarser stone, unless you happen to find a quick-cutting one. The Turkey stone will produce a keen edge, but is not so good for your use.
Some stones (and excellent ones) cut best with water. When first trying a new stone use water, and if the surface does not become at all glazed or polished it will not be necessary for you to use oil.
The stone should always be kept covered when not in use, to protect it from the dust and dirt. Set it in a block with a cover or make a box for it. Always wipe it clean after using, to remove the paste of ground stone, steel, and oil left on the surface.
When an oil-stone becomes unevenly worn, it can be trued by rubbing it around on a sheet of sandpaper fastened on a flat surface, like the side of a board. Water can be used in this operation.
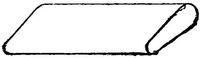
Fig. 612.
In addition to the ordinary flat oil-stone, slips of stone of various shapes are useful, a common and useful form being that shown in Fig. 612, wedge-shaped on one edge and convex on the other. If you have V-tools, carving gouges, or other tools sharpened on the inside, you must have slips of stone of various shapes with which to sharpen them. See Oil and Sharpening.
Painting.—You can paint your work very satisfactorily—perhaps not quite as well or quickly as a skilled painter by trade, but well enough for all practical purposes if you observe carefully a few simple principles. If you disregard them and think, like many amateurs, that anyone can paint right off the first time without any knowledge or thought, your painting will be botch-work.
Keep your work well painted. It is cheaper in the end to paint frequently and keep the work protected from the decay and damage due to exposure—not to speak of the better appearance.
Do not use cheap paint, unless, of course, for some cheap or temporary purpose, and it is most important that the first or "priming" coat should be of good quality. If you are obliged to use inferior paint at all, use the best for the first coat and the poorer quality outside rather than the reverse, but it is economy of money and time to use good paint throughout.
Prepared liquid paints are the simplest, handiest, and cleanest for amateur work, and (if you do not try to economise on the quality) the best for you to use for many purposes, but for outside work (work exposed to the weather) you can probably do no better than to use the best quality of white lead and oil,[48] coloured if desired, which costs less, is more durable, and which you can easily mix yourself, or buy already mixed of a painter. If you need but a little, you can get a pot of paint with suitable brush at a paint shop, returning what you do not use and paying by weight. But if you have much painting to do, it is better and cheaper to have your own brushes and paint. The prepared paints of any colour you can also buy in the form of paste, to be thinned when used, which is usually cheaper than the prepared paint in liquid form.
The white lead you can buy by the pound, ground and already thinned with oil, or, what is perhaps more reliable, ground in the form of paste ready to be thinned with oil or, if for inside work, with turpentine. White lead, which is also the basis or an ingredient of the prepared paints, is a poisonous and unhealthful substance. There is, however, but slight danger (practically none) from such painting as you will do. But it is well to wear old clothes when you paint, and carefully wash the hands and face as soon as the work is done, and in case of continued indoor painting to see that the room is well ventilated. The mere odour from a can of paint is enough to make some people feel ill, as you may know, while it can be used for a long time by others apparently without harm.
In regard to coloured paints, the simplest way is to buy your colours ready mixed in oil, to be thinned for use, or in liquid form of any desired colour, prepared to use upon opening the can. You can, however, colour or tint your paint yourself with various dry colours, which you can buy in the form of powder at the paint shops for a few cents. It takes but very little of most colours. Do not stir these dry colours directly into your paint, but first mix them with oil or turpentine.
It requires considerable knowledge of colours and their combinations to know how to mix different colours or shades to produce some particular shade, or to match some tint, but when the exact shade makes no difference you will have no great difficulty in producing the colour you wish. Test the shade of your paint on a piece of wood. The way it looks in the paint-pot is often very deceptive. In making a shade darker, especially when tinting white paint, be careful to add but a very little of the darker pigment at first and be sure that it is thoroughly mixed, or you will be likely to find after you have begun to paint that you have a much darker shade than you intended. It is surprising how small a quantity is sometimes needed to tint a whole canful of white paint—the merest dab of chrome yellow will tint a quart of white paint to a good cream shade. Remember that it is much easier to add a little more colour if the result is not dark enough than to lighten the shade if too dark.
Linseed oil (either raw or boiled) is required with which to mix the lead and thin it to the proper consistency. Raw oil is best for outside work that is exposed to the weather, as it is more penetrating and more adhesive, although slower in drying than boiled oil. Boiled oil does very well for inside work where it is not exposed to the weather. There is some difference of opinion, however, in regard to the use of the two kinds.
Turpentine is also used for thinning paint. It makes the paint flow easily and is freely used for that reason, but it probably detracts from the durability of all paint if used lavishly and should never be used for outside work. It is commonly used for inside work and causes the paint to work more freely and smoothly from the brush and to dry more quickly. It gives the paint that dull, soft, or "dead" appearance often desired in inside work, instead of the shiny surface which is produced when mixed with linseed oil alone.
It is usual to add to the paint something else, known as a "dryer," to cause it to dry more quickly. Japan is one of the best of these preparations, but be careful to use very little of any form of dryer, as it is undoubtedly injurious to the durability of the paint and liable to cause cracking and checking. Avoid all kinds of "chain-lightning" dryers. Do not add a dryer to the colour until just before you use the paint and only to the amount you are to use at one time.
Another ingredient, which is not injurious to use, is zinc, but zinc paints are considered inferior. Red lead is commonly used to paint iron and is considered very durable for that purpose. Black japan varnish is often used. Iron must always be dry and it will be better to have it warm also.
Be sure that your work is thoroughly dry before beginning to paint, else the wood will be liable to decay, or the paint to peel, or both. Do not paint wood before it is thoroughly seasoned. Look the work over carefully and see that it is ready in all respects, before applying the paint. See that the surface is free from dust.
Look over the work for any knots or streaks of resinous or pitchy matter and wash them with a coat or two of shellac, to "kill" the turpentine and prevent its oozing through and spoiling the paint.
Try to mix enough, and only enough, paint for the coat you are about to put on, but do not mix a great quantity in advance with the idea of keeping it on hand.
The first coat should be thin rather than thick—with plenty of oil to saturate the wood. The oil will be quickly drawn into the wood, and you can readily see that the first coat should be thin to properly soak into the surface. If thick, the paint will not be sufficiently absorbed, but the oil will soak in quickly, leaving too much residue of the pigment on the outside. Work this first coat well into the wood. Take up but little paint, and draw the brush carefully over the edge of the pail,[49] or over a wire stretched across the top, to remove any superfluity of paint, and begin the painting at the highest part of the work, or the part farthest from you, to prevent spattering or dripping paint over the freshly covered surface. Begin, also, at one end or side of the surface, working toward the other end or side, drawing the brush back and forth both ways to distribute the paint as evenly and smoothly as possible, and try not to leave any part of a surface untouched until another time, or it will be likely to show a "lap" where you end and begin—that is, if you cannot cover the work entirely at one time, leave off where there is some natural line or break in the work. Finish the side or the end and do not leave off right in the middle of a flat surface. This does not matter quite so much in the priming, but will show plainly in the later coats.
After this coat has had time to dry thoroughly, carefully putty the holes and cracks. Remember never to use the putty until after at least one coat of paint has been applied and dried. The reason for this is that the fresh wood will quickly absorb the oil from the putty, leaving it dry and crumbly, while if a coat of paint has been put on first and dried, the wood will be already charged, so to speak; the pores will be more or less choked up and the bulk of the oil will remain in the putty.
Paint with the grain of the wood, or the long way of the work, using a large brush for large surfaces and finishing all corners, mouldings, and edges with a small brush. In doors or panel-work first paint the panels, then the rails, then the styles (see Fig. 505). You will thus follow the construction of the work and the grain of the wood, and where you daub the paint beyond the part you are painting (as you will have to do), the daub will be wiped out neatly when you paint the next part.
Paint joints in outside work, tenons and mortises, shoulders, etc., before putting together, with good white lead. It is not always customary to paint the hidden parts of joints before putting together, particularly in cheap work, but it is well to do so in all work which you wish to have endure, in all framework exposed to water and the weather, and in boat-building. Exposed work quickly decays at the joints and seams because the water and dampness collect in such places and do not run off or evaporate as readily as from a smooth surface, so the more you can protect these hidden parts with paint, the better, and the labour is but slight.
When you have paint left in the paint-pot which you wish to keep for use another time, pour just enough raw linseed oil over the top to cover it completely. This thin layer of oil will exclude the air and keep the paint from hardening. When you wish to use it again, pour off the oil or stir it into the paint, according to whether the latter requires more oil or not. When you get through painting, if you are going to do more in a short time, it will do to leave the brush in the paint, but do not leave it standing or resting on the bottom of the can, as that tends to bend the ends of the bristles and get the brush out of shape. Rig a wire hook on the handle and hang the brush so that the bristles will be covered by the paint, but without touching the bottom. If you are not going to use the brush again for some time, it should be cleaned and put away. Turpentine is often used, but kerosene answers every purpose. Be careful to wash out all the paint, however, as a very little left between the bristles will stick them together so as sometimes to ruin the brush. Another way to keep brushes which are in use is to hang them from the handles in a can partially filled with oil, the whole being kept covered. Water can be used instead of oil. Arrange it so that the hairs will be just covered.
The first coat especially should be given plenty of time to dry, for it is the foundation and basis of the whole operation and the firmness and durability of the painting depends much upon it.
Each succeeding coat should have plenty of time to dry before applying another, bearing in mind that applying a second coat, before the first is fully hard, excludes the air from the under layer of paint and causes it to dry much more slowly than if left exposed as it should be. In such cases, the outside surface may often seem to be dry and hard while the paint underneath remains comparatively soft. When the first layer finally does dry, the tendency is to crack the surface of the outside, which has dried first. You can find an extreme illustration of this point in some old paint and varnish shop where some convenient place on the wall has been taken against which to slap and work brushes. You can find daubs of old paint and varnish, sometimes an inch thick, made up in this way of hundreds of layers slapped on before the previous ones were dry, the inside remaining soft in some cases after twenty years.
Paint dries, as a rule, more quickly in a warm temperature than where it is cold, and more quickly where it is dry than where it is damp. So, if you are obliged to paint where it is cold or damp, you will be justified in using more dryer than where it is warm and dry.
Sandpaper nice inside work after the first coat and between each two successive coats. Pumice can be used for old inside work to be repainted. Steel wool can also be used.
Keep a rag with you, when painting, to wipe off the spattering which you will be sure to make. It is not easy to get daubs of paint off after they are hard.
Turpentine will take the paint from your hands, but common kerosene will clean them satisfactorily when the paint is fresh, and is probably better for the hands.
Panels.—See Doors and Panels.
Panel-Saw.—See Saw.
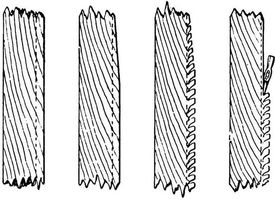
Fig. 613.
Paring.—In paring or trimming a piece of wood to a line, if there is much surplus wood to be removed, you can sometimes chop pretty boldly with the hatchet until you get near the line, provided you watch the direction of the grain carefully to see that the split cannot run up to the line; sometimes you can chop safely in one direction but not in the opposite (Fig. 613), but as a rule keep well away from the line for the first cut. Even wood that appears to be quite straight-grained will often split differently from the way you expect.

Fig. 614.
To trim a piece of wood, like the edge of a board, down to a line, with a hatchet, for instance, you can first score the piece with a series of short cuts, stopping short of the line, to break up the grain of the wood, and then trim these loosened chips off down to the line with the plane, chisel, draw-knife, or whatever tool may be suitable. The main point is to cut in such a direction that the grain will not cause the cuts to extend farther than the line or to run into the main piece of wood (Fig. 614). The same principle can be applied often in trimming and removing superfluous wood with a chisel, a draw-knife, or a knife. The cuts can often be made with the saw to better advantage (Fig. 614). It takes a little more time to make these cross-cuts with hatchet, knife, chisel, or saw than to whack away furiously lengthways, as if you were chopping kindling, but after you have spoiled a few pieces by splitting beyond the line you will conclude that the former is the more workmanlike and reliable way.
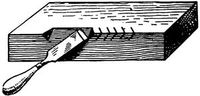
Fig. 615.
This same principle is applicable to making chamfers or bevels with a chisel or knife (Fig. 615). You will find frequent occasion to apply this principle of breaking the grain into small pieces before making the final cuts in many kinds of work. It is in constant use in "roughing out" carving.
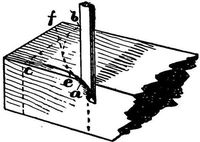
Fig. 616.
To trim to a curve as shown in Fig. 616, begin at the edge just outside of the end of the curve and work with the grain from a to b. It is often a help in such cases to first remove part of the wood with the saw, as on the lines bc and then ef. Finally trim the curve smoothly close to the line. Frequently this can be done to better advantage with the work held in the vise instead of lying horizontally on the bench.
Paring off superfluous wood down to a given line or trimming off an irregular edge with the chisel is very easily done provided the grain of the wood is straight, or runs in the same direction, even if slanting, as in Fig. 617, because you can then cut with the grain. It is often better, however, to cut across the grain, or diagonally, with the chisel, as the wood is less likely to be split by the tool.
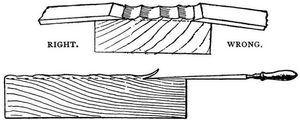
Fig. 617.
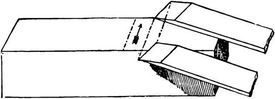
Fig. 619.
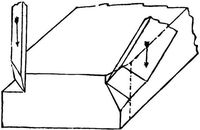
Fig. 620.
When the grain runs in several directions, and keeps cropping up to the surface and dipping down again as shown in Fig. 701, it becomes more difficult to pare the surface smoothly with the chisel. In such a case remember the sliding or drawing stroke and traverse the surface with a diagonal crossways motion (Fig. 619) that will trim off the fibres with a slanting stroke without causing them to be torn up. Slant the cut so that if the wood should tend to split, it will be in the direction of the part cut away and not towards the piece to be kept—i.e., so that the chips will split and not the body of the wood. Reverse the chisel and cut in the opposite direction when a change in the direction of the grain requires it. Some pieces are, however, so extremely irregular that you cannot do this, but must slice away the best that you can and leave the rest to other tools. In cutting off a corner or rounding or bevelling an edge you can use the slanting cut (Fig. 620).
In using the chisel for paring, let the left hand, which is nearer the cutting-edge than the right, act as a brake or countercheck or drag to check the progress of the tool. It is largely by the varying balance of these two forces—the pushing forward of the tool with the right hand and the checking and controlling with the left—that correct and effective control of the tool is gained. The left hand should in many cases rest upon or grasp the wood as well as the blade. See Chisel.
Paring-Chisel.—See Chisel.
Parting-Tool.—See Carving Tools.
Pencil.—See Marking.
Pincers.—There are various kinds of pincers, pliers, and nippers. A pair of common pliers and also cutting nippers will be very useful.
Plane.—A plane is in principle (roughly speaking), as you will readily see, nothing but a chisel stuck through a block of wood or iron. Small or narrow surfaces may be smoothed to a certain degree by the chisel, the knife, or even the hatchet, but for large surfaces something is needed which can be more exactly controlled than the knife, ax, or chisel, held in the hands. So, to hold the chisel firmly in one position and to apply force to it more advantageously, it is firmly fixed in a block of convenient size and shape and becomes a plane.
A very short block will prevent the chisel cutting deeper at one point than another, but the tool will follow the irregularities of the surface and, though it may make the surface smooth, it will not make it level, or flat; so the block is made longer, that it may not go down into all the little hollows, but plane off only the higher parts.
The two essential parts of a plane are the iron and the stock. The bottom surface of the stock is called the sole or face (ab in Fig. 621), the wedge-shaped hole where the iron goes is called the throat (c), and the slot at the bottom through which the edge of the iron projects is called the mouth (d).
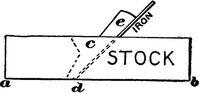
Fig. 621.
Bear in mind that the shape of the cut made by the plane will be a reversed copy of the shape of the cutting-edge. If the edge is rounding, the cut will be hollowing. If the edge is hollowing, the cut will be rounding. If the edge is straight, the cut will be straight. If the edge is nicked, ridges will be left on the wood.
If buying new, you will do best, as a rule, to get iron planes, though very good ones can be had with wooden stocks, but with the convenient appliances of the iron planes. Some workmen still prefer the old wooden planes, but it is better to buy iron ones.

Fig. 622.
The jack-plane is used for coarse work and to rough off the surface with large shavings, ready for the other planes. Fourteen or fifteen inches is a good length. The edge of the iron is not ground squarely across, like the chisel, but is rounded slightly so as to cut deeper in the middle (Fig. 622). Heavy shavings can be cut and the rough outside of a piece of wood taken off quicker and easier than with a more squarely ground iron, but it does not leave the surface smooth, as the strokes of the jack-plane form a series of hollows and ridges (Fig. 623, exaggerated). After taking off the rough surface with the iron projecting considerably, you can of course set the iron finer, and by going over the work several times you can take off the worst of the ridges, but without a great deal of labour you can never get a really smooth surface with a plane that cuts hollows. A common use of the jack-plane is for "traversing," or planing across the grain, which is often the quickest and easiest way to reduce a surface to the desired shape, and for cleaning off where pieces have been glued together. If you should use a jack-plane to do the work of a fore-plane, have it ground more squarely across like the fore-plane.
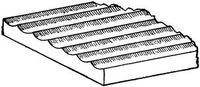
Fig. 623.
If you use an old-fashioned wooden plane, take the handle in your right hand, laying your left over the top and side, just a little in front of the iron, with the thumb towards you and the fingers on the farther side, as shown in Fig. 624. This position allows you to bear weight on the fore part of the plane when necessary and to control the tool to the best advantage. This applies to the old-fashioned wooden planes. If your plane is iron, there is a handle or knob for the left hand which you simply grasp in a natural way.
Push the jack-plane forward steadily an arm's-length. Then stop and start afresh for another arm's-length stroke. When drawing the plane back tip it on the farther edge. The cap or break-iron can be set quite far back from the edge for rough work, about one eighth inch, but much nearer for finer work.
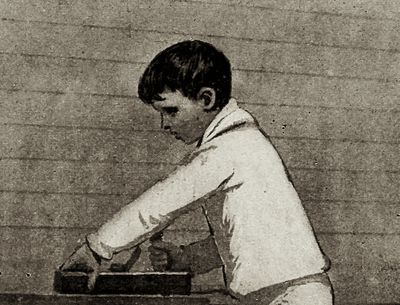
Fig. 624.
In these days when almost everything is planed by machinery with greater or less smoothness, you will probably not have much use for a jack-plane unless you find you have a good deal of rough planing to do yourself.

Fig. 625.
The fore-plane or trying-plane is longer and larger than the jack-plane. Eighteen to twenty-two inches is a good length. It is used to straighten and level the surface after the worst roughness has been taken off. The surface having been roughed off by the jack-plane, the fore-plane is not required to take off such heavy shavings and the iron is therefore ground squarely across like a chisel, but very slightly rounded at the corners (Fig. 625). It is held in the same way as the jack-plane, but the stroke should be long and steady, for the fore-plane, which is long, will straighten the surface, and smooth it also. The iron can project more for soft and loose-grained woods than for hard, and the cap or break-iron should be nearer the edge for hard woods.
The jointer (22" to 30" in length) or long jointer (from 24" to 30"), is still longer than the fore-plane and correspondingly more accurate for making a surface level and true, or for shooting the edges of boards. Twenty-four inches is a good length. It is very useful for making joints to be glued, and is used in the same way as the fore-plane, the stroke being continued steadily the whole length of the piece if possible.
The smoothing-plane is used, as its name indicates, for the final smoothing of the surface, so far as it can be done with a plane. It is from five to ten inches long.
It is an invaluable plane to the amateur, and the beginner can get along very well for a great deal of work with no other, for stock can be bought ready planed and can easily be trued and jointed, when necessary, at any wood-working mill or shop at slight expense.