Part 5 — CHAPTER XVI (continued 3)
Reading edition
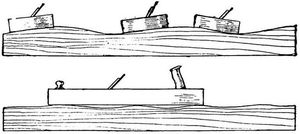
Fig. 626.
A plane with a short stock, as the smoothing-plane, will make your work smooth, but it is hard to make it straight and level or true with such a tool, because, being short, it will follow the larger irregularities of the surface and will only plane off the smaller inequalities. It will go up and down over the hills and valleys of the wood, so to speak, while a longer plane cannot do this, but will cut off the tops of the hills until the surface is made level, as shown in Fig. 626. The smoothing-plane is therefore merely to smooth the surface after it has been straightened by a longer plane, or in cases where smoothness only is essential and it is not required that the surface should be true. Small pieces can, of course, be straightened and trued by the smoothing-plane alone.
A wooden smoothing-plane can be held as shown in Fig. 627. An iron plane can be used by laying the hand naturally over the knob for the purpose.
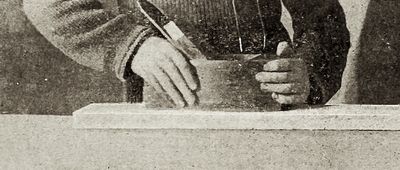
Fig. 627.
The block-plane is small and is meant chiefly for planing across the ends of pieces (for planing "end-grain"), but it is also frequently useful in other directions. The iron is usually set at a more acute angle with the face of the stock than in the other planes and with the bevel upwards, and the width of the mouth is often adjustable, which is a convenience. A block-plane is made which can, by means of a detachable side, be used as a rabbet-plane. The block-plane makes a quite good substitute for a smoothing-plane for amateur work and is a very useful little tool.
The toothed-plane is about the size of the smoothing-plane, but the iron is corrugated or scored with grooves lengthwise, so that one side of the cutting-edge of the iron, instead of being smooth, is notched into little teeth somewhat like a fine saw or the edge of a file, and the iron is inserted in the body of the plane almost vertically. This plane makes scratches all along its course instead of taking off shavings. It is used in veneering and in gluing other surfaces. It can frequently be used to good advantage to break up the grain where two edges or surfaces are to be glued together, so that the glue may hold the two rough surfaces together more strongly, upon somewhat the same principle that the plastering on a lathed wall holds its place tightly through the hold it gets on the cracks between the laths, intentionally left for the purpose. The toothed-plane is used for this purpose in veneering. The idea upon which this tool is based originated with the Orientals, who have for ages scratched or toothed the joints of their wood-work.
It can also be used to subdue a refractory piece of crooked grain which you wish to get smooth, but which may crop to the surface in such a way that you cannot plane it without chipping the grain. By scratching the surface thoroughly in all directions with the toothed-plane set very fine, the obstinate fibres can be broken so that the surface can be smoothed with the scraper, not using the smoothing-plane. As a matter of fact, however, if you cannot smooth a piece of wood, the trouble is usually with the edge of the plane-iron or its adjustment, or with your manner of planing, for a very keen edge is supposed to be able to cut the most obstinate grain, unless, of course, the wood is extraordinarily hard.
The bull-nosed-plane has the iron close to the fore end of the stock, to work into corners and awkward places which cannot be reached by the smoothing-or block-planes. The iron is reversed. A very small plane (perhaps four inches long) of this kind is useful.
The circular-plane is used for planing curved surfaces, the sole being now made of a thin, flexible metal plate and adjustable so that either concave or convex surfaces can be smoothed. It is very useful at times, but is not essential for an amateur.
The rabbet-plane, which is used to cut rabbets, as the name indicates, is a useful tool, but in most cases you can dispense with it by having rabbets cut at a mill.
A router, for cleaning out and smoothing the bottoms of grooves and depressions, is very useful at times.
There is a variety of other planes for special purposes, as the plough, matching-planes, hollow and round planes, beading-planes, etc., as well as various combination and "universal" planes. Many of these are excellent, but, as a rule, are not important for the amateur in these days, as the work they do can be so easily and cheaply done at a mill. You will seldom feel the need of buying any of them, unless you live where you cannot reach a factory.
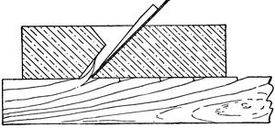
Fig. 628.
You will find it important to bear in mind the purpose of the cap or dull iron screwed upon one side of the cutting-iron, in what are called "double-ironed" planes. A plane with a single iron, like a chisel, will cut satisfactorily and easily for straight-grained, soft wood, and for hard wood when planing with the grain, but many pieces of stock are difficult to plane, because the grain does not run in the same way, but turns and twists, cropping up to the surface and dipping down again in all sorts of curious and perplexing ways. In planing them the wood is likely to be continually chipping or tearing and breaking off below the surface, instead of planing smoothly like a piece of straight-grained pine, leaving dents and rough hollows over the surface. The natural tendency of the plane-iron is to split the wood in front of the iron in such cases (Fig. 628). To remedy this the plane has a double iron. An iron or cap with a dull edge is screwed on to the face of the cutting-iron (Fig. 629) so as to help bend and break off the shavings before the split gets fairly started (Fig. 630), when the iron can cut it smoothly off. The thickness of the shavings is greatly exaggerated in the cuts for the sake of illustration.
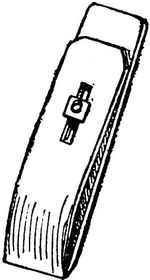
Fig. 629.
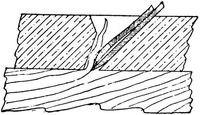
Fig. 630.
The cutting edge is said to have "lead" in proportion to the distance it is in advance of the cap-iron. The cap can be set some little distance from the edge for the jack-plane, as far as an eighth of an inch, but with the fore-plane and smoothing-plane it must be set quite close to the edge, the distance varying according to the character of the wood. The more crooked or cross-grained the wood, the nearer the dull iron is brought down towards the edge of the sharp one. The nearer the edge, the smoother the result, but the harder to work the plane.
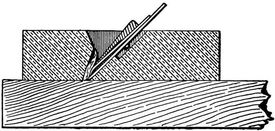
Fig. 631.
Something more than the break-iron is required, however, to insure breaking the shavings. There must be an angle, against which they can be broken, close in front of the cutting edge and above the shaving. This angle is the forward edge of the mouth or slot in the sole through which the iron projects (Fig. 631). Thus the width of the mouth makes a difference in the smoothness of the surface, for a narrow mouth is necessary to ensure the shaving being readily broken by the cap. With a wide mouth, the shaving will not be broken by the cap in time, because there is no corner against which to break it.
With straight-grained wood this does not make so much difference, but with crooked and broken grain narrowness of mouth is quite essential to a smooth surface, provided that the opening is wide enough to allow the shaving to pass through freely. Rough and knotty wood requires the mouth very narrow and the iron set very fine (i.e., projecting but very little from the sole) and the cap quite near the edge.
The modern iron planes have simple appliances for setting or adjusting the projection of the iron from the sole and thus regulating the thickness of the shaving. If, however, you are obliged to use the old-fashioned wooden planes, you raise the iron in the same way that you loosen it for removal, by lightly tapping on the top of the fore end of the stock, keeping hold of the plane with the left hand so as to prevent the iron falling through if loosened too much. When the iron is raised enough, fix it in place by tapping on top of the "chip" (Fig. 621, e) or wedge which holds it in place. To lower the cutting edge, loosen as before and, checking the edge with the finger, let it project the required distance, which you can tell about by looking along the sole (Fig. 632), and fix in place by tapping the "chip" as before. This is the process used in removing the iron for sharpening and replacing it, the chip being removed as well as the iron. Any carpenter will show you the operation. Always hold the plane in the left hand in all these adjusting operations. Do not strike or tap any part of it while it rests on the bench or on anything solid.

Fig. 632.
To smooth a rough piece of wood, use first the jack-plane, to remove the rough surface and superfluous wood, and then the fore-plane, to straighten and smooth the surface. If there is no need to have the surface true, but only smooth, you can omit using the fore-plane and follow the jack-plane at once by the smoothing-plane. With ordinary machine-planed stock you do not usually need the jack-plane, though it is sometimes useful in reducing a piece of wood to a given shape.
Before beginning to plane, see that all dirt or grit which might dull the tool is brushed from the surface.
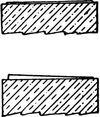
Fig. 633.
Turn the plane over and sight along the sole (Fig. 632), not merely to see that the iron projects to the required degree, but also to see that it projects equally, lest one side or corner of the iron should cut more deeply than the other, and thus make a groove or scratch on the wood (Fig. 633). The latest iron planes have appliances to adjust any inequality of this sort, but if your plane is not so arranged a little tapping on one side of the upper end of the iron will correct the trouble. Try the plane on a waste piece before beginning on nice work.
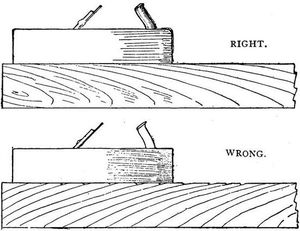
Fig. 634.
Plane with the grain, as a rule, and the fibres will be cut off cleanly where they crop up to the surface and your work will be left smooth. If you plane against the grain, some of the fibres will tend to splinter or chip off just below the surface before they are cut off (Fig. 634).
Stand behind the work with the plane before you. Plane with the arms (and from the shoulder), not with the whole body. Try to shove the plane straight ahead, also to plane as equally and evenly as possible over the surface; for while it is comparatively easy to get a surface smooth it is quite another thing to keep it true or to make it true if warped or winding.
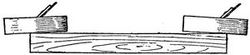
Fig. 635.

Fig. 636.
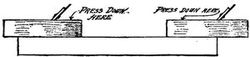
Fig. 637.
The natural tendency, and a common fault, is to begin and end the stroke as shown in Fig. 635. Rolling the body back and forth, instead of pushing steadily with the arms from the shoulder, aggravates this trouble. The result of this way (which is unconscious at first) is that the surface after planing is apt to be as shown in Fig. 636. To prevent this, press down with the left hand on the forward part of the plane during the first part of the stroke, and with the right hand on the rear part of the plane during the last part of the stroke (Fig. 637).
In planing wood which is dirty or rough, it is best to lift the plane from the work when drawing it back for a fresh stroke, or to draw it back so that only the point touches the board, or to draw it back on edge, but in planing small surfaces of clean wood it is not usually worth while to take this precaution.
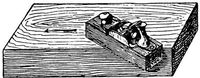
Fig. 638.
In planing pieces with crooked grain, turn the piece when practicable, so as to plane as much of it with the grain as you can. But many pieces are so crooked in grain that you cannot do this. So at times it is well to turn your plane sideways to get a slicing cut and cross the grain at an angle (Fig. 638); but as a rule the plane should be pushed straight forward.
A few drops of oil rubbed over the face of the plane will make it run more smoothly, particularly on hard wood.
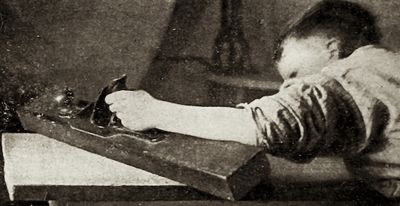
Fig. 639.
Test the accuracy of your planing of broad surfaces with a straight-edge, the blade of a square, or the edge of the plane itself (if straight). By applying such a straight-edge across the surface or lengthways or diagonally you can tell whether your work is straight and true (Fig. 639). Also "sight" with your eye. If the surface is large or long, winding-sticks can be used (see Winding-sticks). In planing edges test lengthways with the eye and straight-edge of some sort, and crossways by applying the try-square (Fig. 640). (See Jointing.)

Fig. 640.
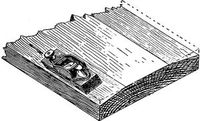
Fig. 641.
It is, of course, harder to plane a broad surface, as the side of a board, than a narrow one, as the edge. When planing a flat surface, as a board, be careful not to plane off more at the edges than elsewhere (Fig. 641), as you will be quite likely to do if you allow the plane to tip sideways over the edge instead of keeping the sole parallel with the flat surface.
When planing across end-grain with the block-plane or smoothing-plane, either secure a waste piece of wood at the side where the planing ends, to prevent the edge chipping off, as shown in Fig. 642, or plane from both edges toward the middle (Fig. 643).
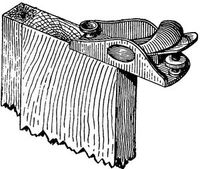
Fig. 642.
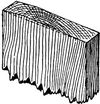
Fig. 643.
The use of the straight-edge will give the necessary clue to the process of making warped surfaces true. (See Truing Surfaces.)
Whenever you make nice articles from wood planed by an ordinary cylinder planer, the wood will seem quite smooth just as it is, but do not neglect to smooth it carefully so as to take out all the "planer-marks" or those little corrugations across the grain left by the machine will often show clear across the room as soon as the work is finished. See pages 44, 45, and 46, and also Sharpening.
Planing.—See Plane, Jointing, Truing Surfaces.
Plank, Laying.—See Boards, Laying.
Plough.—See Plane.
Plumb.—You can make a plumb-line by merely hanging any weight at the end of a cord, when the cord will of course be vertical as soon as it stops swinging (Fig. 644). For convenience in using hang the cord on a board as shown in Fig. 130. When the cord hangs exactly on the line or at the apex of the notch the edge of the board will be vertical.
A long board will give a more accurate test than a short one in most cases, just as a long plane will make a straighter edge than a short plane, for the long board will bridge over the irregularities of the surface to be plumbed. For example, to take an exaggerated case, the post plumbed as at a (Fig. 645) is vertical, taken as a whole; while the same post plumbed as at b leans over, because the short board happens to be placed where the surface of the post is not straight.
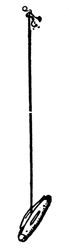
Fig. 644.
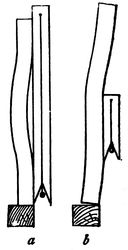
Fig. 645.
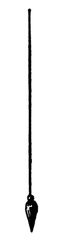
Fig. 646.
When the plumb-line is used to determine a point exactly over or under another point, as in surveying, the bob is shaped with a point like a top (Fig. 646). For making the plumb, see page 96. (See also Level.)
Pod-Bit.—See Bits.
Punch (for Nails).—See Nail-set.
Putty.—Common putty is (or should be) a mixture of linseed oil and whiting of about the consistency of dough. A mixture of white lead worked in with the whiting is, however, superior for some purposes, and is better when but one coat of paint is to be put on after the puttying. To colour putty, stir the colouring matter in a little oil and then work and knead it into the putty until the whole is coloured. Keep putty under water. Do not leave it wrapped in the paper in which you may take it from the painter's, for the oil will be absorbed by the paper and the putty will quickly become dry and hard. Use a square-bladed putty-knife for flat surfaces, and do not use your fingers. See also Holes, To Stop.
Putty-Knife.—An old case-knife can be used (better if reshaped squarely across or to an obtuse angle), or, in fact, any knife, but a regular putty-knife is best.
Quill-Bit.—See Bits.
Rabbet.—A rabbet is a recess or rectangular groove cut lengthways in the edge of a piece of board, plank, or other timber (Fig. 284). It is usually better for the amateur to get such work done at a mill, when practicable, rather than to do it by hand. The rabbet-plane is, however, a very useful tool to have. In some cases, as at the end of a piece, the saw can be used, the lines for the rabbet having been carefully marked with a knife or chisel. The chisel can also be used to make a rabbet, much as in cutting a mortise, taking pains when driving the chisel down next the line not to cut under or jam the wood beyond the line. In the final trimming to the line, the chisel should be held with the flat side toward the line. In removing the wood with the chisel, it is often best to pare across the grain rather than with it (see Paring).
A strip of wood can be clamped across the piece exactly on the line as a guide for the saw and the sawing be done with the heel or rear corner of the saw, keeping the latter close up to the gauge stick, and pieces are sometimes even clamped to the saw itself to guide it, but such arrangements, though useful expedients under some circumstances, are hardly the most workmanlike methods.
Rabbet-Plane.—See Plane.
Rasp.—The rasp—only used for wood—is a sort of coarse file, but instead of ridge-like teeth it is studded with projecting points, which tear off the wood more quickly, but also more roughly, than the file. It is extremely useful to remove surplus wood and to get curved objects roughly into shape. One good-sized half-round (or "slab-sided") rasp will be a great help. See File.
Rasping.—See Filing.
Reamers.—See Bits.
Repairing Furniture.—To repair thoroughly—to make things as strong as when new and to leave no sign of the mending—often requires more skill and ingenuity and more general knowledge of wood-working than to make new articles. Skill in repairing comes not merely from general knowledge of wood-working, but from experience and ingenuity in applying your knowledge to new problems. You will rarely have two jobs of repairing just alike, even if of the same kind, and the variety is almost endless. It is, therefore, impossible to give rules to cover all the different cases. In fact, to attempt to give complete directions for repairing would be to describe the majority of operations used in wood-working, and the reader is referred to other parts of the book for whatever information it may contain. Suggestions on one or two points may, however, be of use.
Suppose the arm of a chair comes off, after having been stuck on with glue perhaps a dozen times. How is it usually mended each time it comes off? The family glue-pot, containing the dregs of all the glue used since it was bought, is put on the stove, a little water poured in, and as soon as the glue gets warmed into a thick paste a lot of it is daubed on to the joints, on top of the thick coating they already have, and the arm pushed as nearly into place as it will go. It is then usually left for a few hours and sometimes even tied on with a string while the glue dries. Of course it sticks for a while and then the usual result follows.
Now how should you go to work to do this properly? First clean off all the old glue. This is important. You want to put the fresh glue on the wood, not on top of the old glue; but do not scrape away the wood in getting off the glue so that the parts will no longer fit. Next, see whether the pieces will fit together as they should. If they will, then contrive some way to clamp them in place while the glue is drying. Sometimes hand-screws will do this, sometimes clamps, sometimes a rope twisted, and often it will take all your ingenuity to contrive any arrangement, but clamped they must be if you wish to be sure of a good job.
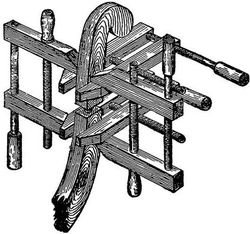
Fig. 647.
The pieces often make an angle with one another, or are curved, so that the clamps or hand-screws will not hold, but slip as fast as you tighten them. In such a case the method shown in Fig. 647 can often be used. Screw a hand-screw firmly on each side of the joint, rubbing chalk on the insides of the jaws to help prevent slipping, and putting on the hand-screws so that the jaws will be parallel. Then, by using two other hand-screws, those first put on can be drawn towards one another and the joint firmly closed. Then proceed to glue the parts as with new work. For the way to do this see Gluing.
In patching old work with new wood, pains should be taken to have the wood match as well as possible, and, as a rule, pare or trim the new pieces after they are glued in place rather than before. Staining to match the older parts is often required (see Staining). See also Holes, To Stop.
The repaired joint may never be quite as strong as a new one, therefore it is well to reinforce it with a block glued and screwed on the under or inner side, in cases where this can be done without injuring the appearance, as inside of the frame under a chair, sofa, or table.
It is not uncommon, particularly in work which has come apart several times, for the tenons to be too small. If you can glue on thin pieces to make the tenon larger, trimming them afterwards to fit, it will be the best way; but if the conditions do not admit of this, a little muslin, laid in glue, can sometimes be wrapped around the tenon as the latter is fitted to place. The same can sometimes be done with round pins or dowels. The expedient of splitting and wedging tenons and dowels can often be applied in repairing (see Mortising and Dowels).
Sometimes you may find it necessary to use screws in places where the heads will show. In such cases first make, when possible, a neat round or square hole with bit or chisel of sufficient diameter to admit the head of the screw and deep enough to allow a shallow plug to be inserted after the screw has been set (see Holes, To Stop). The hardest part in finished work is to make the patch match the rest of the work.
See also Gluing, Clamps, and whatever other operations may be required.
Ripping-Saw.—See Saw.
Rivets.—In heading rivets hold another hammer or piece of metal, or have someone else do so, against the head of the rivet while upsetting the other end.
Rounding Sticks.—It is often required to round sticks for poles, masts, spars, arrows, and a great many other purposes. First plane the piece until it is as nearly square, in section, as you can make it. Then use the form shown on page 95, which will hold the squared stick firmly while you plane off the corners, making it eight-sided. Be careful not to plane the corners off too much, for the eight sides of the stick should be as nearly alike as possible. Next, if the stick is large enough, plane off each of the eight corners so that it will be sixteen-sided. This is about as far as you can go in this way, unless the stick is very large. Set the plane quite fine for taking off these corners or you may plane off too much before you know it. The rest of the rounding you must do with light, fine strokes, testing by eye and by passing your hand over the work (for you can judge a great deal by the sense of touch). The rasp and file can often be used to good advantage. The spoke-shave is good for the final smoothing, followed by the scraper or glass (both of which can be curved) and sandpaper. The latter can be used crosswise as well as lengthwise. Cut it in strips and pull it back and forth around the stick, much as bootblacks put the final polish on shoes with a strip of cloth (Fig. 648).
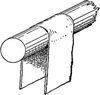
Fig. 648.
To hold large sticks for this final shaping and smoothing you can put them in the vise, but if there are several, and large, it is better to contrive some way to hold them after the fashion of the centres of a lathe. For one centre, drive a nail or screw through a block or stick of wood and screw the block in the vise (Fig. 649). Make the other centre in the same way and fasten it at such a distance from the first centre that the stick will just fit in between the two. Just how to fasten this second centre will depend on the length of the stick to be rounded and the arrangements of your shop, but you can easily contrive some way to hold it. The stick held between these centres will be clear of everything and can be turned around without trouble. The middle can be supported, if necessary, by a piece of board or a strip lightly nailed to the bench-top.
Masts and spars should be "natural sticks," if possible, and the final shaping and smoothing will be all they will require, for which some such apparatus as that just described will save time and trouble.
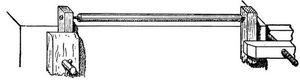
Fig. 649.
To round small sticks, as spars for model boats, arrows, etc., the same process should be followed so far as the small size of the sticks will allow, as you can of course shave more accurately with the plane, on account of the long guiding sole, for the same degree of effort, than with any "free-hand" tool like the knife. But when the stick is quite small it is hard to hold it firmly, and it is also too much covered by the plane. In such cases turn Japanese. Fasten the plane bottom-up in the vise (or even hold it in your lap if you have no vise) and pull the stick along the sole of the plane instead of pushing the plane over the stick. But look out for your fingers when you do this, for a plane-iron in this position has a great appetite for finger-tips.
In filing a short, round stick, one end can often be rested on the bench and the stick turned around towards you as you file.
A good way to finish the shaping of such small sticks is to hold your knife with the edge downward close against the side of your leg just above the knee. Then pull the stick up steadily between your leg and the knife. The leg acts as a sort of gauge to steady both the stick and the knife and with care you can cut a very even shaving in this way.
One very important thing to bear in mind in all these rounding operations is that you will rarely find wood with absolutely straight grain, except in "rift" stock or natural sticks (and in these there are often seemingly unaccountable twists and crooked streaks); so you need to keep constant watch of the direction of the grain, for even a slight turn of the stick will often bring the grain wrong with relation to your tool, and one false cut running in too deep, or even across the stick, will spoil the work.
Router.—See Plane.
Rule.—A rule with which to lay out your work and measure your stock is one of the first tools of which you can make use. A two-foot rule, folding once, is the most convenient for shop-work, but the more common kind, folding to six inches in length, is more convenient to carry around away from the shop. One brass-bound (with brass edges) is more durable, but hardly as convenient to use as the common cheap kind, which will answer every purpose until it breaks.
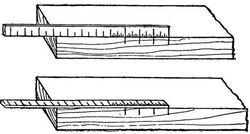
Fig. 650.
To mark distances with the rule for accurate work, lay the rule on edge so that the divisions marked on it will touch the wood and not be an eighth of an inch above it, as they are when the rule lies flat (Fig. 650). You can thus mark the points more accurately.
Sandpaper.—The fineness of sandpaper is indicated by numbers—00 (the finest), 0, ½, 1, 1½, 2, 2½ and 3 (the coarsest). You will use the fine and medium numbers more than the very coarse ones, and will seldom require coarser than 1½. Test sandpaper, when buying, by rubbing the sand a little with your hand to see if it is securely stuck on, and tear the paper a little to see if it is strong.
Never use sandpaper until all the cutting with the tools is done. Sandpaper with the grain, except for work which is to be painted.
The proper use of sandpaper, as a rule, for such work as you will do, is merely to give a little extra smoothness, to take out little scratches, to round edges, and the like, but not to cut away the wood and scrub it into the shape you wish. To use it much, except to skim over your work, is apt to get you into a slovenly style of working, and the result will lack the sharp accuracy of good work. Do not rely on the sandpaper to remove the defects in your work. Do the work right and you will need but little sandpaper, except in a few operations which will be specified when there is occasion.
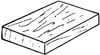
Fig. 651.
For flat surfaces it is well to fold the sandpaper over a flat block of cork or wood (Fig. 651), the edges of which have been slightly rounded. If the surface is curved, the block should be curved correspondingly. A piece of thick rubber or leather which can be bent to fit the surface is excellent. Care should be taken not to round the corners and edges of the work when sandpapering.
In sandpapering any very delicate piece of work, when the edge might get rounded or the surface scratched by the stiffness of even the finest sandpaper, as in rubbing down finished work, split the paper, which you can easily do by removing the outer layer of paper from the back, when the remaining part to which the sand adheres will be much softer and more flexible.
Saw.—Saws are used for cutting across the grain and with the grain and there are various kinds for special purposes.
The cross-cutting saw is used, as the name indicates, for cutting across the grain of wood and for ordinary work. The blade is usually thicker at the teeth than at the back, to stiffen it and to enable it to pass through the wood more freely. From 18" to 24" is a good length for a cross-cutting saw (or more commonly called panel-saw) for your work, with about eight to ten teeth to the inch.
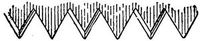
Fig. 652.
Examine the teeth (Fig. 652) and you will see that they are pointed and sharp, somewhat like the point of your knife, and that they cut across the fibres much the same as your knife does when you hold it upright and draw it across a board.
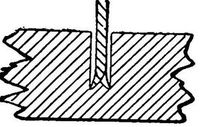
Fig. 653.
You will notice, also, that the teeth are alternately bent outwards,—one tooth being bent out to one side, the next to the other side,—this spreading of the teeth (which is called the "set") making the saw wider at the points of the teeth than elsewhere. You will also notice that the sharp cutting edge of each tooth is on the outside. This set, and the way the teeth are sharpened, makes the cut wider than the thickness of the blade, thus giving the saw "clearance" and enabling it to slip back and forth easily and without "binding" (Fig. 653). As a practical matter of fact, however, it is nothing uncommon for a saw to bind in the cut, either from not sawing straight or from the wood closing on the saw (see Fig. 695). The teeth not only cut or break off the fibres in parallel lines at the points of the teeth, but also tear off and remove the bits of wood (i.e., the sawdust) between these parallel cuts.
The degree to which the teeth are set and the number of teeth to the inch depend upon the use to which the saw is to be put and the kind of wood to be used. Of course the finer the teeth the smoother the cut. Cross-cut saws are usually sharpened differently for soft and for hard wood, but little set being required for the latter, while the former needs a wider set to give the blade clearance, because the fibres of the looser-textured soft wood are bent aside by the tearing action of the saw teeth and are not so cleanly cut off as in the hard wood.
We have examined the teeth of the cross-cut saw and have seen that they cut across the grain of the wood very much as the point and edge of a knife, and that the fibres, being cut or broken or torn off in fine pieces, are removed from the kerf by the teeth. Now to saw in the direction of the grain, instead of across it, we use a saw based on a different principle. As we used little knives to cut across the grain, so we use little chisels to cut with the grain. Look at the teeth of the ripping-saw and you will see that they are little chisels sharp only at the end (Fig. 654), though not as acute as chisels for obvious reasons. These sharp ends, which are square (Fig. 655, showing set) or may be oblique, cut or tear off the fibres, and the front edges of the teeth push the pieces out of the cut. The teeth of the cross-cut saw are filed so that the front cutting-edge is drawn across the wood in the most effective way, much as you would draw the knife-point across, while the teeth of the ripping-saw are pointed forward at a more acute angle so that the cutting-edge is pushed through the wood, somewhat as you push a chisel.
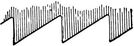
Fig. 654.
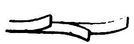
Fig. 655.
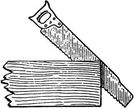
Fig. 656.
The ripping-saw cuts only on the down stroke. It is not suitable for use directly across the grain, as it tears the fibres when pushed across them much more than the cross-cut saw. The ripping-saw usually has larger teeth than the cross-cut saw. From 5½ to 8 points to the inch will do for your work. The ripping-saw usually cuts best when held slanting rather than at right angles with the board (Fig. 656), as you can easily understand when you think how a chisel works best in paring at the end of a board.
If the cut closes up after the saw so as to "bind" it, drive a wedge (or even a screw-driver or chisel) into the crack so as to open it enough for the saw to work freely. Binding of the saw from this cause is very common in making long cuts. When you come to a hard knot in splitting you can sometimes gain by taking the cross-cut saw to cut through it.
You will probably get most of your splitting done at a mill and will not have to depend on hand ripping-saws so much as your grandfathers did.
The back-saw should have, for your use, from 10 to 16 teeth to the inch and be perhaps 12 inches long. The blade is very thin to insure a finer and more accurate cut than can be made with the common saw, and therefore requires care in using. It has a back (whence the name) made of a thin piece of brass or iron put on so as to give the blade the necessary firmness.
This is an exceedingly useful tool, with which and a common panel saw you can do a great deal of work without any other. The back-saw must be used with care, for the blade is so thin that a little wrenching will spring it out of shape in spite of the strengthening back.
In the compass-saw the blade is very narrow, being about one inch at the broadest part and diminishing gradually to about a quarter of an inch at the other end. It is about fifteen inches long and is employed in cutting curved forms. As the blade is narrow and tapers towards the back and the teeth have a wide set it will cut a small circle. Notice that the teeth of the compass-saw are a sort of a compromise between those of the ripping and cross-cut saws, which enables them to cut freely either way of the grain, as is of course necessary in sawing curves.
The turning- or bow-saw is much better for any work with which the bow will not interfere, and is a very useful tool at times. Get one with handles which turn so that the blade can be turned to saw at an angle with the frame. You will need a few extra blades of different widths. The main thing to be borne in mind is to make the cut square with the surface. It is easier to follow the line than to secure a cut at right angles to the surface.
The keyhole-saw, which is even smaller than the compass-saw, is used for cutting quicker curves, as for a keyhole. It has a handle like that of a chisel, with a slot cut through from end to end. There is a screw on one side, so that the blade may be fixed at any length, according to the size of the hole to be cut. A good kind, which can be used for both compass-and keyhole-saws, has a handle into which various blades can be fitted.
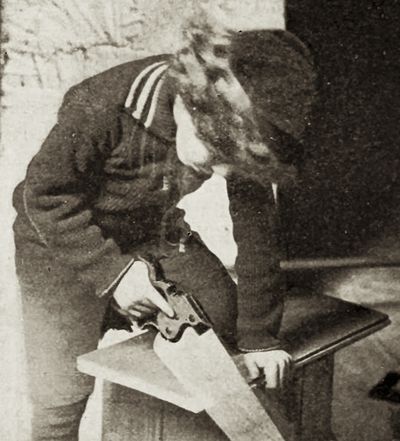
Fig. 657.
Compass-and keyhole-saws are difficult for beginners to use without bending, twisting, or breaking their thin and narrow blades. Most of your curved sawing can be done better with a turning-saw or at a mill by a band- or jig-saw. If done at the mill, have a piece of waste wood put on the under side to prevent the burr, or ragged edge, left by the sawing.
A common way to test saws, when buying, is to take the handle in one hand and bend the point of the saw around in a curve sideways and then let the blade spring back, which it should do without being permanently bent or sprung.
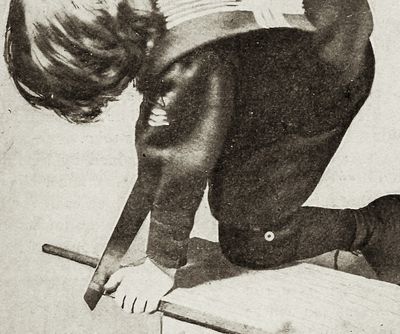
Fig. 658.
Do not saw from one side of the line. Have your eyes above the line so that you can look on both sides of the saw (Fig. 657). This will help you to keep the saw-blade at right angles with the surface of the wood.
Hold the saw firmly with the forefinger pressed against the side of the handle to help guide and steady it (Fig. 657).
Having placed the saw just at the outside edge of the line and on the farther side of the piece, seize the wood with the left hand and hold the thumb against the blade (above the teeth) to help start the cut in the right place (Fig. 658). Aside from the danger of the saw jumping and damaging the wood unless guided by the thumb, it is liable to cut your left hand.
You can make a little notch with the knife or chisel on the outside of the line, to help start the saw, in the case of nice work, if you wish. Cut straight in just on the line and then make a sloping cut to meet this from outside the line (Fig. 659). First draw the saw gently backwards, guiding it by the thumb, with as little pressure on the wood as possible until you see that the cut is started right, then push it gently forward, and after a few easy strokes in this way to get the cut started right, keep on with long, steady strokes, but not long enough so that the end of the saw enters the kerf, lest it catch and the saw buckle. The saw should cut most on the downward motion, not on the up stroke.
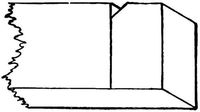
Fig. 659.
With a sharp saw, there is nothing gained by bearing down heavily on the teeth, which may spring the saw and make crooked work. Rather let the saw run of itself with an easy, light stroke, guiding it carefully, and not letting it press on the wood on the up stroke. The more hastily and furiously you saw the poorer the result will probably be.
When you begin to run off the line, as you will be pretty sure to do, twist the saw a little with the wrist as you go on, which will bring it back to the line, because of the kerf being wider than the thickness of the saw-blade.
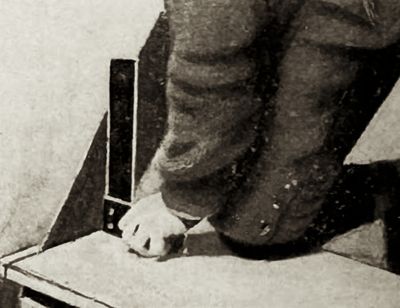
Fig. 660.
Beginners are apt to bend the saw over to one side. You can tell whether it is cutting at right angles with the face of the board by testing with the try-square as shown in Fig. 660. Such a test as this is, however, too inconvenient for ordinary practical work and you should learn as quickly as you can to hold the saw-blade correctly.
At the end of the cut, as at the beginning, saw gently with quick, light strokes, and hold the piece which is being cut off with the left hand, lest it break off and splinter one of the two pieces.
If the saw "binds" or does not work easily, you can for your rougher work put a little tallow, butter, lard, or lubricating oil on the blade, but beware of doing this for your nice work, or it will deface it when done. If the binding is caused by the springing together of the wood (Fig. 695) the crack should be wedged open.
Do not get into the habit of sawing a little way outside of the line and then trimming off the superfluous wood with your knife or a chisel. That is not a good way to learn to saw by a line. Try your best to make the cut where it should be (even if you do make mistakes for a good while) and thus get into the habit of doing it right without having to rely on any other tool than the saw.
Many pieces of wood can better be screwed in the vise for sawing instead of being laid on the horses, and this position is often preferable. In this case you grasp the wood with the left hand and use the saw as already described. (See Sharpening).
Saw-Filing.—See Sharpening.
Sawing.—See Saw.
Saw-Set.—Various contrivances can be bought for setting saw teeth. When you get to the point of needing one you can easily find a variety from which to select.
Scraper.—The scraper is made of saw-blade steel (frequently from an old saw) and may be of any shape or size to suit the work required of it. A common form for scraping flat surfaces is rectangular like a postal-card, and a good size is from 2" × 4" to 3" × 5".
A piece of glass makes a good scraper for almost every purpose except where a flat, true surface is required. It is good to smooth the handle of a paddle, for instance, but not good for scraping the top of a nice table. For many rounded surfaces glass is fully as good as a steel scraper, but for general use the latter is much better. The following directions may be of use when you wish to break glass to use for a scraper: "Take the back of a knife, or the smooth, straight edge of any piece of iron fixed with tolerable firmness for a moment, then, taking the piece of glass in both hands, rest its edge midway between them on the edge of the iron; let the upper edge of the glass lean from you, and push it gently along the iron, so as slightly to indent the edge of the glass; then, reversing its position so as to make it lean towards you, draw it smartly along the iron, and you will find it separated by a clean fracture directly across, forming a line more or less curved, and leaving one edge of the glass much sharper than the other. By a little practice, and by pressing a little more with one hand than the other, almost any curvature that the work to be done may require may be achieved" (Lord and Baines, Shifts and Expedients of Camp Life).
The edge of the scraper is turned over so as to form a sort of hooked edge or angle (Fig. 661), which when pushed over the surface scrapes off thin shavings. To smooth a flat surface the scraper can be held with both hands, between the fingers and thumb (Fig. 662), and pushed along in the direction towards which it is inclined. Sometimes one end of the scraper is held between the thumb and fingers of the left hand and the palm of the right hand applied below to push the tool along. As a rule scrape with the grain, and it is often advantageous to hold the scraper obliquely to the grain when pushing it forward. In case of some crooked and twisted grain you will find it best to scrape in any and in all directions.
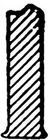
Fig. 661.
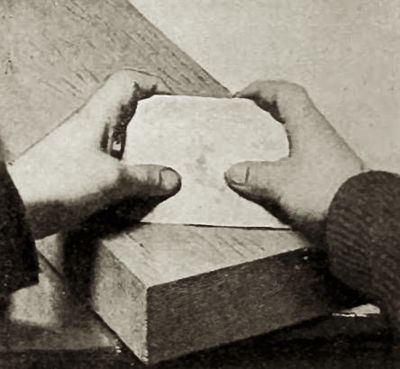
Fig. 662.
You can make scrapers yourself by filing and grinding pieces of old saw-blades. It is very convenient to have a number of them with edges of various degrees of curvature (both convex and concave), but these you can make as you need them. A scraper is sometimes set in a stock and guided by handles like those of a spoke-shave, and sometimes set in a stock like a plane and used in the same manner. A scraper of the latter sort is often useful to assist in keeping the surface true when scraping, as its flat sole prevents its following all the undulations of the surface as readily as the hand-scraper, with which one is apt to make depressions by scraping too much in some particular spot. But so far as smoothing the surface goes there is nothing better than the common hand-scraper or so easily taken care of. For sharpening the scraper, see Sharpening.
In many large places you can get your wood for nice work scraped to a satin-like finish by a machine made for the purpose, but this is hardly worth while for ordinary work. You can also have it smoothed very nicely by sandpapering machines, but this is not advisable if there is to be any cutting of the wood afterwards, as the grit left in the pores of the wood will quickly take the keen edge from your tools.
The best test for smoothness alone is to run the fingers over the surface with a light touch. Great acuteness of touch can be acquired in this way. Any experienced wood-worker can at once detect inequalities with his fingers that he could not possibly see. Irregularities in curves can be detected in the same way.
Bead cutters or scrapers and reed scrapers and fluters can be bought of various patterns. You will hardly need to buy anything of the sort for some time, as you can make one when required. See Beading.
Scratch-Awl.—See Awl.
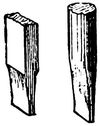
Fig. 663.
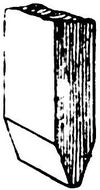
Fig. 664.
Screw-Driver.—The screw-driver is too familiar to need description, but in buying one see that the end is shaped like either of those shown in Fig. 663 and not as shown in Fig. 664. Cheap screw-drivers are often made in the latter way. If ground with a short bevel (Fig. 664) it will bear only on the top of the slot in the screw and will be all the time slipping out, on the principle of the inclined plane, while if the sides are parallel or concaved slightly the end will remain at the bottom of the nick of the screw. This is also a help in extracting screws, as it saves the need of pressing against the screw so hard to keep the screw-driver from slipping out of the slot. It is well to have screw-drivers of different sizes, as it is difficult and often impossible to use a screw-driver with an edge much too large or too small.
Remember that a long screw-driver is always preferable to a short one, except where lack of space makes a short one necessary. The reason for this is in the fact that in using the screw-driver you do not, as a practical matter, keep it exactly in the line of the screw, but keep wobbling it round more or less, which gives a leverage in the form of a crank-like action as you turn the handle. The longer the screw-driver the larger the circle or wobbling curve you describe with your hand and the greater the leverage (Fig. 665).
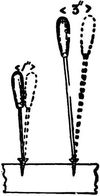
Fig. 665.
A screw-driver to be turned by the bit-brace is very useful for driving screws rapidly and with force, on account of the greater leverage gained by using the brace instead of the common handle. This is particularly useful where they need to be driven in very hard or when tight screws have to be loosened. It also saves much time when many screws are to be used. It is not advisable to buy automatic screw-drivers. They work satisfactorily for light work, but are not suitable for such wrenching and straining as your screw-drivers are liable to be subjected to. You want screw-drivers to which you can apply all your strength. See Screws.
Screws.—There are many kinds of screws. You will use the common wood-screws for most of your work. These are either flat-headed or round-headed, and of steel (either bright or blue or bronzed or nickled) or of brass. When others are required they will be mentioned. It is doubtful economy to buy second-hand or waste screws, but a pound or two of "mixed" screws, which you can get at any hardware store, will be very useful when you want some odd screw for some special purpose. Many of the screws in the "mixed" lots, which are sold very cheap, are defective, but you can often find among them just the peculiar screw you need, and so save time and money.
Nails are often used where it would be better to use screws, which will, as a rule, hold the pieces more securely. When work becomes loose, screws can be tightened, while nails usually have to be redriven.
To make a screw drive easily, rub the point on a piece of common soap. Oil is objectionable for nice work on account of the spot made by it. If screws are to be used in places where they may rust, it is a good plan to warm them slightly and then dip them in melted tallow or lard. They can also be inserted and removed more easily for this treatment. Try to keep the screw-driver from slipping from the slot of the screw (see Screw-driver).

Fig. 666.
In boring holes for screws, considerable discretion must be used. The hole in the outer piece (the one nearer the head of the screw) should be large enough to allow the screw to slip through freely—that is, you should not screw it into both pieces, but only the inner one, the screw acting somewhat in the nature of a clamp to bind the outer piece to the inner by pinching it tight between the screw-head and the inner piece (Fig. 666). How much of a hole to bore in the piece into which the point of the screw enters depends on circumstances. The stouter the screw the less hole required. The softer and larger the piece and the farther from the edge the less hole required. If the piece is small or liable to split, the hole must be carefully made—the more carefully in proportion to the slenderness of the screw, as a slim screw is liable to twist off in hard wood unless a sufficient hole is provided. Brass screws are very apt to do this, and much care must be used, particularly with slender ones in hard wood. If the hole is a bit too large, they will not hold. If a trifle too small, they will twist off, which is very annoying, especially in such cases as hinge-screws, for instance, where the place for the screws cannot well be changed. The hole should be somewhat smaller than the diameter of the screw. In good-sized pieces of soft wood there is frequently no need of any hole.
In rough work, especially in soft wood, the screws may be pounded part way with the hammer, driving them home with the screw-driver. Some theoretical workman will be quite sure to tell you never to do such a thing as that, so be sure to understand what is meant. Theoretically there may be some loss of holding power by that process, but practically the screws will hold just as well for the cases in which you are advised to do that way. Judgment must be used about all such things and theories are only of value when used by the light of common-sense. For example, if you are screwing the top on a mahogany table or framing a nice boat never think of using a hammer to start your screws, but if you are putting cleats on an old shed door or screwing up a packing-case do not spend an hour and a lot of strength driving screws all the way with a screw-driver when you can do the work in half an hour by driving the screws three quarters of the way in with the hammer. Good practical workmen are just as certain to use the hammer in such cases as they are careful not to use it for nice work or where the full holding power of the screw is needed.
Flat-headed screws almost always should be countersunk (see Countersink), for neatness if for no other reason, and in hard wood you should cut the depression for the head of the screw with the regular countersink made for the purpose. This should be done for nice work in soft wood where a good surface is required, but for common work in soft wood there is no need, as a rule, for the head of the screw will sink itself easily until flush with the surface.
If a screw hole requires to be moved a little, but not far enough so that a new hole can be bored without the bit slipping into the old hole, plug the old hole with a wooden pin dipped in glue, and when dry bore the new hole where required.
See Screw-driver.
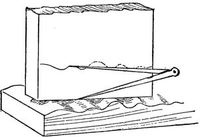
Fig. 667.
Scribing.—Compasses are often used for scribing a line parallel to another line or surface, whether regular or irregular, in places where the gauge cannot be used. Suppose, for instance, you wish to cut the edge of a board to fit the undulating surface shown in Fig. 667. Run the compasses along with one point on the surface and the other making a mark on the board, and the line on the board will be parallel with the surface.
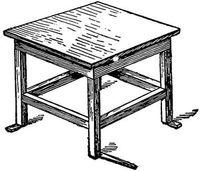
Fig. 668.
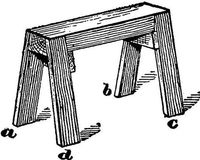
Fig. 669.
Another example is that of making a table, bench, chair, horse, or any four-legged object stand evenly. If it stands on three legs, which is a common fault and likely to occur in your first attempts, do not hastily saw one leg shorter by guess, and, making it too short, saw another and so on until it stands firmly, when the top will probably be all out of level. If there is any true surface on which you can stand the article (right side up), you can level the top by wedging under the legs until the corners of the top are equally distant from the surface on which the object stands. Then setting the compasses at a distance equal to that at which the end of the shortest leg is raised (Fig. 668), scribe around the other legs, which can then be cut off.[50]
See also Winding-Sticks and Marking.
Setting Saws.—See Sharpening.
Sharpening.—Before attempting to sharpen your tools yourself it would be well to read the advice given on page 22 under Care of Tools.
The general process of sharpening edged tools is first to grind them to as keen an edge as possible on the grindstone, or the emery-wheel, then to smooth down the coarse edge left by the grindstone by rubbing on a fine stone with oil or water, and finally stropping on leather. The grindstone must be kept wet while grinding or the heat caused by the friction of the tool on the dry stone will ruin the temper of the steel. Besides, the water carries off the waste particles of stone and steel. Stand on the side towards which the top of the stone turns. The tool can be ground with the stone turning from you, and, in fact, this usually seems the natural way to a novice, but it is usually more difficult to grind uniformly in that way and too thin an edge (a "wire-edge," ragged but not sharp) is apt to be produced, the removal of which is difficult without further damaging the edge and delaying the final sharpening.
To grind the point of a knife, it can be moved back and forth lengthways with a curving motion, while resting flat on the grindstone, and to grind the straight part of the blade, it can be allowed to bear very slightly harder near the edge of the stone than elsewhere, as it is passed back and forth.
To grind a chisel, grasp the handle with the right hand, hold the blade in the left hand with the fingers uppermost and near the cutting-edge. The arms and wrists should be kept as rigid as possible, the former at the sides of the body, so that the tool may be held firmly against the motion of the stone. Lay the chisel with slight pressure quite flatly on the stone and then raise the handle until the bevel touches the stone. As you grind keep moving the tool slowly back and forth across the stone, which helps keep the edge of the tool straight and prevents the stone being worn away too much in one place. Use plenty of water.
The common way of holding the tool on the stone is the one just described, but it can also be held at right angles to this position, so that, in the case of a chisel, for instance, the grinding action of the stone instead of being from the edge toward the handle is from side to side of the blade. The tool is ground quicker and easier by this means, and it is a good way to reduce the edge to shape, finishing the grinding by the regular method.
You will see that the curvature of the stone will tend to give the bevel a slight curve, in whatever position the tool is held, which is advantageous in the common way of grinding. When held so that the stone grinds from side to side of the blade the tool must be continually turned a little in the hand so that each part of the edge will bear in turn on the stone, as, the tool edge being flat, and the surface of the stone rounding, the tool would otherwise be ground hollowing. It is harder to hold the tool in this way, however, without its slipping or making nicks or grooves in the stone, and you had best learn to grind in the ordinary manner.
Try to grind squarely across the chisel—that is, to have the cutting-edge at right angles to the lengthways edge of the tool. Apply the square at intervals to test the accuracy of the grinding.
The angle for grinding the bevel of such tools as the chisel is about twenty-five degrees, but when used for very hard wood the angle should be slightly greater, or the edge may be broken.
Do all the grinding on the bevel. Do not apply the flat side of the tool to the grindstone. Any slight burr or turning over of the edge on the flat side should be taken off by the oil-stone.
If the edge is badly nicked or broken, you can first straighten or grind it down roughly on the side of the stone or by holding it nearly at right angles to the stone—but with the latter turning the other way—before grinding in the regular way.
To tell when the tool is ground sufficiently, hold the edge in front of you toward the light. If the edge can be seen as a bright shining line it is a sign that the tool is dull. It will not be sharp until this bright line has been removed, and the edge has become invisible, for a really keen edge cannot be seen by the naked eye. Bear this in mind, as it is the final test and the simplest way to tell when to stop grinding.
In grinding on a grindstone and in rubbing on an oil-stone, the great difficulty is to keep the same angle between the tool and the stone, as the natural tendency in moving the tool is to rock it back and forth and thus alter the angle between the blade and the stone. An arrangement can be bought which preserves the desired angle without effort on the part of the grinder. A little ingenuity will enable you to rig up a guide or gauge with a piece of board which will enable you to replace the tool on the grindstone at the same angle.
The plane-iron is sharpened in the same way as the chisel, only, being wider than most of the chisels you are likely to use, it requires more care to sharpen. The plane-irons can be ground to a somewhat more acute angle than the chisels, although the jack-plane, which is used for rough work, may require more strength at the edge.
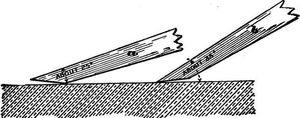
Fig. 670.
In rubbing the edge upon the oil-stone, do not attempt to smooth down the whole bevel made by the grindstone, but first lay the tool lightly on the stone as shown in Fig. 670a, then raise the handle until the upper part of the bevel is very slightly raised,—barely enough to clear the stone (Fig. 670b),—and then proceed with the whetting, thus making a second or little bevel at the edge (Fig. 671).
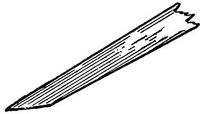
Fig. 671.
The tool must be moved back and forth very steadily or instead of a second bevel the whole edge will be rounded (Fig. 672) and will not have the requisite keenness. The angle of this second bevel is usually about ten degrees greater than the long bevel, or thirty-five degrees, although the angles of sharpening should be varied slightly according to the hardness of the wood and the kind of work to be done; but where you have only few tools and must use them for all kinds of work you cannot always, as a practical matter, pay much regard to such variations, as of course you cannot keep regrinding your tools every time you begin on a new piece of wood. Just how acute to make the edge you must learn by experience, according to the conditions of your work. An edge suitable for delicate work in white-pine would be immediately ruined if used upon lignum-vitæ.
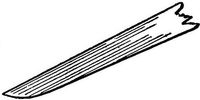
Fig. 672.
Any little wire edge which is produced on the flat side by the process of rubbing on the oil-stone can be removed by drawing the flat side of the iron over the stone once, but be sure that you do not raise the handle at all, as the slightest bevel on the flat side of the edge will spoil it. After the tool has been sharpened a good many times on the oil-stone this smaller bevel (the oil-stone bevel, so to speak) will become so wide that it is a waste of time and strength to rub it down. The chisel must then be reground and a new bevel made on the oil-stone.
It is a good plan to have a separate stone or "slip" for the outside bevel of gouges, because it is so hard to avoid rubbing hollows in the stone, which injures it for the other tools. Care must be taken also with very narrow or pointed tools lest the stone be grooved or nicked. Gouges can be rubbed at right angles with the stone, rolling the tool with the left hand, or by the use of a slip they can be rubbed as described below. For rubbing gouges on the inside, i.e., on the concave surface, rounded pieces of stone, called "slips," are used. These can be bought of various sizes and shapes to fit the various curves. Do not think, however, that you must try to find a slip that will fit each gouge as exactly as if it had been shaped by the gouge itself. The curve of the slip may be a little "quicker" or sharper than that of the tool, but must not be flatter or of course it cannot be made to bear on all parts of the curve.
In rubbing with the slip, hold the tool upright in the hand and rub the slip up and down, moving the slip and not the tool. If you rest the tool against the bench, it will steady it and also avoid any probability of your finger slipping on to the edge. The more common "outside" gouges are not rubbed on the inside, except the merest touch of the slip to remove any wire edge or burr. The draw-knife is also rubbed with a flat slip, in the same manner, resting it on the bench.
In rubbing the knife on the oil-stone give it a circular motion rather than simply back and forth, particularly for the point. The straight part can be allowed to bear a little more heavily near the edge of the stone as it is passed back and forth.
It is much the best way to sharpen tools frequently, as soon as they begin to get dull, when they will require but little rubbing on the stone, rather than to let them get into such condition that it is a long and hard job to whet them; and of course the more careful you are to keep them sharp, the better work you will do.
To test the sharpness of your tools, cut across the grain of a piece of soft pine wood. If the cut is clean and smooth, the tools are sharp, but if the cut is rough or the wood torn, further sharpening is needed. The reason for using soft wood, which at first thought might not seem to require as keen an edge as hard wood, is because the fibrous structure of the soft wood, being more yielding, offers less resistance to the tool and so is torn or crushed apart except by a very keen edge, while the firmer structure of the hard wood can be cut smoothly by a tool which would tear the soft wood. The difference is somewhat like that between cutting a fresh loaf of bread or cake and a stale one.
The edge left by the oil-stone can be improved by stropping on a piece of leather on which a little paste of lard and emery or some similar composition has been spread. This is better than to strop knives and other tools on your boots. Any piece of leather such as barbers use, or even a piece from an old boot, will answer. For flat edges see that the strop rests on a flat surface, so as not to tend to round the edge, as it may do if held carelessly in the hand. See Oil-stone and Strop.
Saw Filing is particularly hard for boys and amateurs to do satisfactorily and you are advised not to undertake it until you have become quite familiar with the use of tools, for it does not need to be done very often, costs but little, and there are very few places where you cannot get it done.
It is not difficult to understand the theory of setting and filing saw teeth, but to fix a saw in really good shape is hard for an amateur,—and for that matter you will find but a small proportion of good workmen who are experts in saw filing. Even in very small villages there is almost always some mechanic who has the knack of putting saws in order better than anyone else and who therefore makes quite a business of such work and people bring their saws to him from all the country round, even though they may be able to fix them tolerably well themselves, so great is the advantage in the quality of the work and the saving of time in having a saw in perfect condition. You had best do the same, and have your saws fixed whenever they get dull. The expense is but slight, and there is nothing that will conduce more to good work, and to your own success and satisfaction, than to have your tools in first-rate working order.
When you get to the point of filing and setting your saws you are advised to take a lesson from a good saw-filer. There are few persons so situated that they cannot do this, or at least watch someone go through the process, and thus learn much more readily than by reading about the process in a book. In fact, it is one of those things that it is so hard to learn from a book that merely a few remarks on the subject are given here.
The saw is firmly fastened in a saw-clamp, expressly for the purpose, so that it will not shake or rattle. The teeth are "jointed," or reduced to the same level, by lightly passing the flat side of a file over their points, lengthways of the saw. The saw can also be jointed along the sides after filing, but this is frequently omitted.
For a cross-cutting saw the file (a triangular saw-file) is held at an angle with the blade depending upon the particular form of tooth adopted, as you will see by examination. The handle being grasped in the right hand, the point of the file should be held between the thumb and forefinger of the left hand (Fig. 526). The file must be pushed across with an even, straight stroke, without any rocking or up and down motion, pressure being applied only on the forward or pushing stroke, the tool being drawn back very lightly or lifted entirely on the back stroke. The filing is begun at one end of the saw, filing only the teeth which bend away from you (i.e., every alternate tooth), carefully keeping the file at the proper angle, pressing only on the tooth you are filing, but keeping the tool lightly touching the adjacent tooth, and making allowance for the fact that when you file the alternate set the passing file will take off a little from the teeth first filed. The saw is then turned around and the process repeated with the other teeth. If you look lengthways along the edge of a panel-saw that has been properly filed and set, an angular trough or groove will be seen along the whole length, so that you can slide a needle along in it from one end of the saw to the other.
The ripping-saw is usually filed squarely across the saw (at right-angles to the blade), as you will see at once on examination of the teeth (Figs. 654 and 655), but sometimes at a more acute angle.
The teeth are set by bending every other tooth outward, first setting those on one side and then those on the other. You should do this with some one of the various adjustable tooth-setting contrivances sold for the purpose, as it requires a skilled workman to set teeth in any other way, and any attempt on your part to do so without some instrument adjusted to the purpose will probably result in damaging the saw.
For soft and loose-fibred wood more set is needed than for hard wood, because the fibres, which are quite cleanly cut or broken in the hard wood, in the more yielding soft wood are bent aside by the teeth to close in upon the blade with considerable binding force; and less set is required by fine work than for coarse. The angles and points of saw teeth can be more acute for soft than for hard wood.
To sharpen the scraper you must have a sharpener or burnisher. The edge of a chisel or any piece of very hard steel can be used after a fashion, but it is better to have a regular tool for the purpose, which can be made easily from an old three-cornered file, such as is used for filing saws, by grinding off the teeth and slightly rounding the angles on the grindstone until the whole tool is smooth. Two opposite edges of the scraper are ground or filed and the edge then turned over by the burnisher. Some workmen grind the edges with an obtuse bevel and use only one angle of each edge. Others grind the edges square and use both angles of each edge. The bevel gives a slightly keener scraping edge than to grind the steel square, but it requires more frequent sharpening and the squared edge turned over on both sides is likely to be more satisfactory.
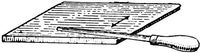
Fig. 673.
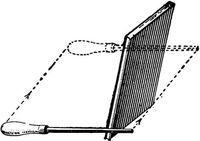
Fig. 674.
First grind or file the two opposite edges squarely across and slightly round each corner to prevent scratching the wood. If there is a burr at the edge it can be removed by rubbing the scraper lightly on the oil-stone, but this is advisable only for final scraping of very fine work. Having thus got the edge at right angles and smooth, lay the scraper flat on its side near the edge of the bench and rub the burnisher back and forth a few times in the position shown in Fig. 673, which is almost flat on the scraper. This rubbing bends a little of the steel over the edge. Do this on each opposite edge of the two sides, giving four edges thus curled over. Next, holding the scraper as shown in Fig. 674, draw the burnisher with a firm, even stroke, once or twice, lengthways of the edge, as shown. The scraper can be laid flat on the bench, if preferred, slightly projecting over the edge. Notice that the tool should be drawn with a slightly end to end motion, as shown, which helps turn the edge. This turns a fine scraping edge, which will take off shavings. All four edges are treated in the same way. After one edge gets dull, use another. When all four are dull, resharpen with the burnisher as before, without grinding or filing the edge. This can be done a few times, but soon the edges will get worn off and rounded, and the scraper then needs refiling.
Shellac.—See Finishing.
Shell-Bit.—See Bits.
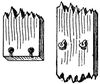
Fig. 675.
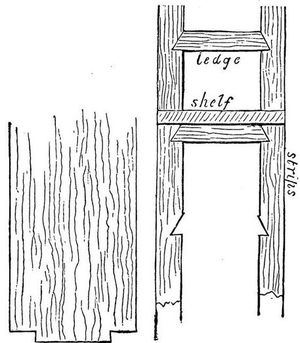
Fig. 676.
Shelves.—Examples of shelves fitted permanently into place are given in Chapter X. (on Furniture). Removable shelves can most easily be fitted to rest on cleats screwed to the sides of the space, but this arrangement does not always look very well and the position of the shelves cannot be changed so readily as by using screw-eyes driven into the sides under the shelves (Fig. 675), recesses of the right shape being cut on the under side of the shelves so that the screw-eyes will be sunk and not be conspicuous. The position of the shelves can quickly be changed by screwing the supports higher or lower as may be required. Pins and other contrivances to fit in a series of holes can be bought for this purpose. A common way to adjust shelves is shown in Fig. 676. The construction is obvious. The vertical strips can be laid on edge side by side, clamped together, and the notches laid out and cut as if there were but one piece. Where a circular saw is available the notches are cut on the side of a narrow piece of board which is then sawed into the desired strips or "ratchets."
Shooting-Board.—The shooting-board is very useful for jointing edges, particularly for short, thin stock. The carpenter or cabinet-maker will make you one for a moderate price, or you can make one yourself as soon as you become a good enough workman (see page 93).
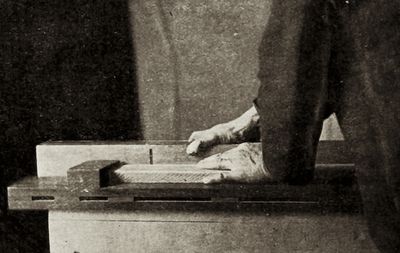
Fig. 677.
To use it, the board to be jointed is laid flat on the raised part of the shooting-board, where it is firmly held with the left hand, with the end of the board pressing against the stop of the shooting-board, and the edge to be jointed lapping over the edge of the raised part. The planing is done with the plane lying on its side on the lower part of the shooting-board (Fig. 677). The cutting-edge of the plane thus being at right angles with the surface of the board, the edge will be planed squarely across. The shooting-board should be fastened on the bench in some way, to prevent it from slipping around.
Attachments to keep the sole of the plane at right angles to the surface of the piece can be had at any hardware store, and serve the same purpose as a shooting-board for thick stock, but not equally well for thin pieces.
You can reverse the sides of two pieces to be jointed for gluing, as described on page 406, giving a joint like that shown in Fig. 678 (which is exaggerated). The iron of the plane is sometimes purposely set to project unevenly beyond the sole.

Fig. 678.
If you have many joints to make, you can have the edges jointed at slight expense at any wood-working mill on a planer made for the purpose. See Jointing.
Smoothing-Plane.—See Plane.
Smoothing Surfaces.—See Plane, Scraper, Sandpaper.
Splices.—See Joints and Splices.
Spline.—A flexible strip, used as a ruler, for drawing curves. See Marking.
Splitting-Saw.—See Saw.
Splitting Wood.—We have seen how a log in drying cracks along the radial lines (page 31), thus showing the natural lines of cleavage or separation in the direction of the medullary rays, that is, radiating from the centre. From this we see that the wood will, of course, split most easily and smoothly on the radial lines. Like all wood-choppers you can often make practical use of this fact in splitting wood with a knife or chisel, or in splitting fuel with an axe. The next easiest way to split wood is as nearly as may be on the line of the annual rings, or tangential to the line of the medullary rays, in the same direction as when the layers separate in forming "cup shakes" (see Appendix). This way is sometimes easier than to rive a stout log through the centre.
Spokeshave.—The spoke-shave is very useful for smoothing small curved and irregular surfaces. Metal spoke-shaves of various patterns can be bought with various adjustments for different curves, etc. Also a "universal" spoke-shave can be had, with movable handles and detachable bottoms which can be adapted for curved or straight work, and a width gauge by means of which it can be used for rabbeting.
The spoke-shave is a very useful tool and works upon the same general principle as the plane, but lacking the long flat sole of the plane is used only for irregular surfaces, which its short and sometimes curved face enables it to smooth with great ease. It also acts on the same principle as a draw-knife with the addition of a guiding stock. It bears somewhat the same relation to the draw-knife that the plane does to the chisel.
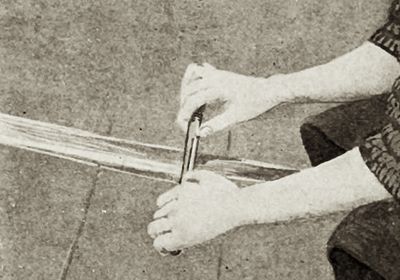
Fig. 679.
Grasp the tool firmly, bearing downward with both hands and pressing forward with the thumbs, pushing the tool from you so as to cut like a plane (Fig. 679). Of course it can also be drawn towards you when the circumstances of the work render it advisable. See Paring and Sharpening.
Spoon-Bit.—See Bits.
Square.—This tool is one of the most useful in the list, for the importance of having your work "square" can hardly be over-estimated.
The try-square should have a metal strip on the inside edge of the wooden arm, head, or beam, or the handle can be wholly of metal. Get a medium-sized try-square (9- or 10-inch blade is good) rather than a very small one, as it is much more useful; and a graduated scale, like a rule, on the blade is sometimes serviceable.
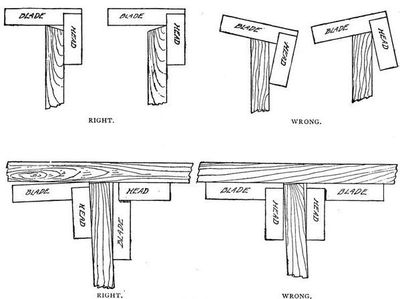
Fig. 680.
The primary use of this tool is to test or "try" the accuracy of right-angled work—hence the name. The one special point to bear in mind in using it for this purpose is to be sure that the head or beam is pressed firmly against the edge or side to which it is applied, determining the accuracy of the angle by the position of the blade (Fig. 680).
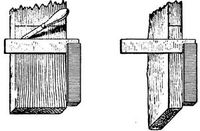
Fig. 681.
You will also use the try-square continually for marking straight lines across boards or timbers at right angles to one side or one edge (Fig. 681). In using it for this purpose be sure not merely to press the head of the square firmly against the edge of the board, but to keep it securely in the same position. When the blade is placed correctly on the given point do the marking as by any straight-edge. Another way is to place the point of the pencil or knife directly on the given point and slide the square along until it bears on the pencil or knife. Then, keeping the head of the square firmly against the edge, the line can be drawn along the blade.
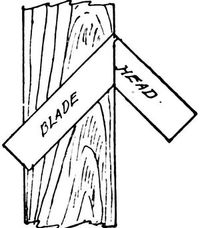
Fig. 682.
The try-square sometimes is made with the end of the head or beam next the blade cut on a bevel. By placing this bevel against the edge a try-square of this construction can also be used as a mitre-square (Fig. 682).
If you buy a second-hand square, or if a square has been wrenched, you can test its accuracy by marking a line with it across a surface from a straight edge, then turning the square over and repeating the operation; the two lines should coincide. But the edge from which you rule must be perfectly straight, or the test will be of no value. If, however, you buy new squares made by the best makers they will be as accurate as any test you can apply to them.
Beginners, particularly young beginners, are very apt to be so engrossed in making the line along the blade that they forget to keep the head in position, or let it slip, when the blade will of course cease to be at right angles with the edge or side (Fig. 683).
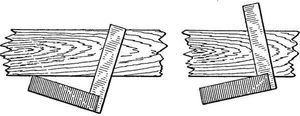
Fig. 683.
The framing-square, "steel-square," or large two-foot carpenter's square, is a very useful and important tool; not merely for framing and large, heavy work but also for small work, and it is of great value in many mechanical operations. Even an iron square is very useful, but a nickel-plated steel-square is the best, as the figures are more distinct and it is less likely to rust. The long arm makes a good straight-edge. See also page 181.
Staining.—When you stain wood, do it for the sake of the colour, preserving the beauty of the grain, and not to try to imitate a more expensive wood. It is better, as a rule, to use good wood of a handsome colour and leave it as it is to mellow with age than to stain or colour it, but there are times when you will wish to stain wood.
The main point to bear in mind for successful staining is to colour the wood itself, not to put on a superficial coat of coloured varnish. For instance, the fumes of ammonia (or the liquid itself) will give oak in a very short time the same dark colour which the ammonia in the air will produce after years of exposure. This is a natural process—merely anticipating the change caused by time.
There are a number of ways of staining dependent upon such chemical processes carried on in the wood itself. These ways are the best, as you can readily see. Having got the right colour, the wood can be oiled, shellacked, varnished, or waxed in the usual way. By this method the natural grain of the wood is not obscured. In fact, the figure of the grain is sometimes made more conspicuous.
Another way is to wash the wood with some thin stain of the desired colour, after which you can finish in the usual way. This is a good method, for the wood itself is coloured to some distance below the surface, and after it is finished it will take considerable bruising to expose its original colour. This method also sometimes enhances the beauty of the grain.
The poorest way to stain, but a very common one with amateurs and in cheap work, is, instead of staining the wood itself, to cover the surface with coloured varnish or shellac. This is often the cheapest and quickest way of getting a desired colour, but it is decidedly the poorest way. Of course, no coating of colour put on outside can be as durable as colour imbedded in the substance of the wood itself, and scarring or injury to the coating exposes the original colour beneath. Besides this, the grain and character of the wood are necessarily obscured by a coloured coating. Wood finished in this way almost always has a cheap, artificial look, and you can usually detect the fraud at a glance. There are many cheap "varnish stains" or coloured varnishes, but you will do well to avoid them, unless for the cheapest and poorest work.
There are two things you will wish to do in staining. One is simply to darken or enrich the natural colour of the wood, so as to give it at once the rich, deep, mellow tone produced by age. This is always the best way to do when it will give the colour you want. But if you want to change the colour entirely—to make pine wood red or green, or cherry black, you must use some chemical process that will develop a new colour in the wood, or must apply a regular stain.
Raw linseed oil alone, well rubbed in and allowed to stand before applying shellac or varnish, will deepen and bring out the natural colouring in time as well as anything else, but it takes a good while. Repeated applications, each thoroughly rubbed in and the excess rubbed off, and after standing some days or weeks, given a light rubbing down with fine sandpaper, then another oiling, and so on, will in time give a surface of beautiful colour, as well as a soft and attractive lustre. But to carry out this process may take months, so that you will not be very likely to practise it; but you see the result sometimes on old wooden tool-handles and plane-stocks which have been so treated. If you do not care about deepening the colour greatly, one or two applications, allowed to stand a week or two before finishing, will often be sufficient and will make a great difference in the looks of your work, and take off that raw, fresh look peculiar to recently cut wood.
If your work is such that you can defer the shell acing for a year or so, as in the case of some pretty piece of furniture to remain in the house, there is no way you can develop the richness of the wood better than to oil it and let it stand to mellow, with occasional applications of oil and rubbing down. Then finally rub down with fine sandpaper and shellac in the usual way.
To hasten the process we must apply something stronger than oil. If the work is of oak, shut it up in a box or tight closet, with a dish of strong ammonia on the floor. Do not stay in the box or closet yourself, as it is dangerous. A simpler way is to wash the work with the ammonia, more than once if necessary. Have the room well ventilated when you do this, and do not inhale more of the fumes than necessary. Wetting the wood is sometimes a disadvantage, however, in glued-up work, and it "raises the grain," which must be rubbed down with fine sandpaper before finishing.
To deepen the colour of mahogany or cherry, simply wash it with lime-water (a simple solution of common lime in water) as many times as may be necessary, which is cheap and effective. After this process, thoroughly clean out all cracks and corners before sandpapering, for particles of the lime which may be deposited will spoil the appearance of the work when finished. This process preserves the natural appearance of the wood. The only drawback is the necessity of getting the work so wet. Some days should be allowed for the water to evaporate before shellacking. To get a darker shade, apply in the same way a solution of bichromate of potash in water.
Whitewood takes stains finely—much better than pine. Oak will stain almost any colour, but the individuality of the wood—the character of its grain and structure—is so strongly marked that it is poor taste to attempt to stain it to imitate other woods. If you stain it, stain it just as you would paint it, simply for the colour.
A good way for indoor work, such as a piece of furniture or anything of the sort you may wish to colour, is to mix dry pigments with japan and then thin the mixture with turpentine, or turpentine alone can be used. After the work is coloured in this way put on a couple of coats of varnish. For outside work you can use oil. This is a cheap way and wears well. It applies only to the cheaper woods which you do not care to leave of the natural colour. For black inside work you can use ivory-black, ground in japan and thinned with turpentine. Ivory-black or bone-black are superior to lampblack, but the latter will do very well for most purposes. Dragon's blood in alcohol is used to give a colour similar to mahogany. Alkanet root in raw linseed oil will give a warm and mellow hue to mahogany or cherry.
There is an almost endless number of recipes for staining, but such others as you need you can learn from some finisher or painter, for the limits of this book do not allow fuller treatment of so extensive a subject.
Steel-Square.—See Square.
Steel-Wool.—Long, fine steel shavings done up in bundles can be used instead of sandpaper for some purposes. There are various degrees of fineness. This is good for cleaning off paint and for smoothing curved surfaces, but should not be used until all work with the edge-tools is done, because of the particles of the metal. It can be used for "rubbing down" in finishing.
Straight-Bent Chisel.—See Chisel.
Straight-Edge.—There are no definite dimensions for a straight-edge. Any piece of wood that is straight and convenient to use can be so called; the size and the length depending on the work for which it is to be used, from a common ruler to a long board. The edge of a large carpenter's square is handy for short work. Clear white pine or straight-grained mahogany is good for straight-edges, but a straight-edge is not the easiest thing for a beginner to make, and you will do well to find something straight to use for a while until you acquire the skill to make one—or get the carpenter to make you one, which he will do for a very small sum or for nothing.
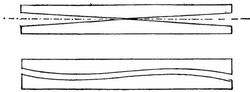
Fig. 684.
To test a straight-edge, mark a line by it, then turn the straight-edge over and see if it still coincides with the line, or mark another line and see if it coincides with the first one. Try your straight-edges by this test once in a while, as they are liable to become crooked. In turning the edge over, however, do not reverse the ends, as in case of an undulating curvature the curves may agree and give you the impression that the edge is straight when it is not. In the first case shown in Fig. 684 (exaggerated) this would not happen, but in the second case (also exaggerated) it might. See Marking.
Strop.—A piece of hard, smooth leather on which to strop your tools you can easily procure. It can be fastened on a piece of wood (see page 85). Spread on it a paste of sweet oil and emery, lard oil and crocus powder, or some similar preparation. A pine board on which "air-dust" has accumulated can even be used. See remarks under Sharpening.
Tacks.—Tacks are sold as one-ounce, two-ounce, and so on according to size.
Do not use tacks for fastening wood to wood, but only for fastening leather or cloth or the like to wood. The pointed wedge-shape of the tack tends to split thin wood, and is not at all suitable to fasten two pieces of wood together, particularly in thin wood or near the edge. Possibly you may have seen some disastrous results from the attempt to tack pieces of wood together.
Tape-Measure.—This article (preferably of steel) is often useful, though not nearly as important for an amateur to buy as many other things.
Tenon.—See Mortising.
Tenon-Saw.—See Saw (Back-Saw).
Tool-Racks.—See page 83.
Toothed-Plane.—See Plane.
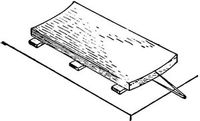
Fig. 685.
Truing Surfaces.—To true a curved or warped surface, as of a board, lay it on the bench with the rounded side down and wedge it firmly underneath to make it as nearly level as possible. Then scribe a line with the compasses across each end of the board at the height of the lowest point of the surface (Fig. 685). Cut a depression or kind of rabbet at each end down to this line (Fig. 686). Next, by the use of winding-sticks placed on each of these rabbets you can easily see whether they are in line (see Winding-sticks). Alter the rabbets if necessary to get them in line. Draw lines on each edge connecting the bottoms of the rabbets, and plane away the superfluous wood down to these lines. When this is done the top of the board will be true or in the same plane. Test it by placing the straight-edges in different positions on the surface and sighting as before, correcting any errors. One side of the board being made true in this way, the other can be made parallel by gauging a line all around the edge, measuring by the thinnest point of the board, and planing off the superfluous wood in the same manner as the first side.