Contact Printing on Bromide Paper.
Reading edition
It is well to bear in mind at the outset that bromide paper is extremely sensitive to light, almost as much so as is a rapid dry plate. For this reason, it is obvious that it must not be carelessly exposed to actinic light. All manipulations except the actual printing must be conducted by red or yellow light, such as is allowed to pass through glass of these colours.
For evenness of result, it is better to use a lantern than daylight, because the fluctuation in intensity of the latter is very misleading and liable to lead to failures through over or under development.
The actual colour of the light, also, is of far more importance than one would suppose: ruby light tends to give one the impression that development is complete long before that is the actual case; it is also somewhat more difficult to handle the paper satisfactorily by this light than by a good yellow.
For these and other reasons I strongly recommend the use of yellow light, a thoroughly safe one being given by gas or lamplight passing through one sheet of yellow glass and one thickness of "canary medium."
This light, while being absolutely safe, gives such perfect illumination that it is as easy to control and estimate results as it would be by ordinary unfiltered gaslight.
If a ruby glazed lantern is already in use for negative work, it can readily be prepared for bromide printing by merely removing the ruby glass and substituting the yellow and canary medium. With these brief hints as to illumination, let us consider the entire process in its various stages.
Unpacking the Paper.—The sensitive paper is generally packed in envelopes sufficiently opaque to protect it from the admission of light. The packet must be opened in the dark-room from which all light (even stray streaks beneath the door) is excluded, excepting only that given by the yellow glazed lantern. The outer envelope being carefully undone, an inner cover will be found and these wrappers should be placed on a dry table while a sheet of the paper is removed.
It is a good plan to have a "light-tight" box (obtainable from any dealer) in which to put the paper after unpacking it; this prevents loss of time and awkwardness of handling in having to replace the paper in its wrappers each time a piece is withdrawn for use.
When several prints from one or more negatives are required, it is an excellent thing to have two of these boxes, one for the unexposed paper and one in which to put the prints as made until all are ready for development.
The Class of Negative.—Bromide paper gives us a great command over results; in fact, so vast is the control we may exercise that it is possible to secure good results from almost all classes of negatives, from mere ghosts to those with density almost equal to that of a brick wall. But there is, of course, a class of negative that gives a good result with the least expenditure of skill, such a one is generally known as of average density, having a full scale of gradation with high-lights dense, yet not so opaque as to prevent you seeing a window clearly defined when looking towards it through the densest parts of the film, such as the sky, for instance. Another way to test the density is to put the negative, film side down, on some large print on white paper, the large letters should be just visible through the sky, but the smaller print should not be readable.
That is the class of negative usually considered in Instructions for Use, as an "average" negative.
The Sensitive Side of the Paper.—A difficulty sometimes occurs in telling which is the sensitive side of the paper: this may be easily ascertained by the appearance of the edge, which turns slightly inwards towards the sensitive side. This is quite apparent to the sense of touch as well as sight. Some people moisten their finger and thumb and squeeze the paper and see which sticks (the sensitive side), but that is a dirty method and quite unnecessary.
Printing from the Negative.—Having unpacked the paper, after making sure that all but the yellow (or ruby) light has been excluded from the room, we are ready to print.
For this purpose, different workers favour different classes of light: one prefers gaslight, another swears by magnesium ribbon, and some even prefer the light of day.
Personally, I favour ordinary gaslight passed through a No. 5 Bray's burner, because it is quite rapid enough for all practical purposes and is perfectly under control and free from serious variation.
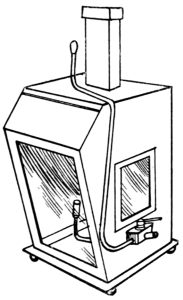
The burner should be within easy reach of the worktable and should be fitted with a byepass to obviate the necessity of continually striking matches. Several years ago I had my bromide printing rooms fitted with an excellent lantern of this class in which the byepass was connected to two jets (one inside and the other outside the lantern) in such a way as to turn down the white light with the same movement that raised the coloured light, and vice versa. By this means no gas was wasted and the simple action of pulling or pushing a lever operated either light at will. By placing the same lever "amidships," both jets were lowered to the point of invisibility and could so remain for days at a time, yet always ready at a moment's notice. The accompanying sketch (fig. 1) will give some idea of its construction.
Fig. 1.
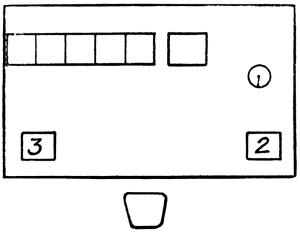
If the dark-room is small, and space is an object, the sink may be fitted with a wooden cover and this may be used as a table for printing the paper, but care must be observed to avoid the slightest moisture upon it or satisfactory work is impossible and the negatives may be ruined. In a large room, it is much better to have an ordinary kitchen table removed some distance from the sink; with this and a comfortable chair bromide printing is a very pleasant occupation. The following sketch (fig. 2) will explain the arrangement of the table, and it applies equally well to the movable top of the sink.
Fig. 2.
Supposing that some arrangement of this sort is devised, we must unpack some bromide paper and put it in its box and then put a negative of "average" density in an ordinary printing frame. On the film side of the negative we must now place a sheet of bromide paper with its sensitive side in contact, replace the back of the frame and it is ready for exposure. Before exposing it, make sure that both boxes are shut or their contents will be ruined the moment the white light is turned up.
Upon reference to the instructions that accompany each packet of bromide paper, you will observe a certain number of seconds' exposure is advised at a certain distance from the light; in the case of the Barnet extra rapid paper the time is given as about four seconds at a distance of eighteen inches.
When all is ready for exposure, place the printing frame upright opposite the lantern at the mark indicating eighteen inches (see fig. 2), note the time on the seconds hand of the clock and throw the lever over for white light for four seconds and then reverse it. Remove the paper and if many are likely to be required from that negative, it would be well to develop the first print in order to judge as to the accuracy of the exposure. If over or under-exposed, the time must be reduced or lengthened as required. When the best time and distance has been ascertained for a certain negative, mark it with a narrow strip of paper bearing full particulars for future guidance, such as: "4 sec., 18 in., No. 5 Bray;" in this way absolute correctness of future exposures is assured. Of course, if gas is not obtainable, magnesium ribbon may be used instead. In this case the negative would be marked "1 inch (or more) ribbon, 3 ft. distant," as the case may be.
Using Masks and Discs.—Prints are sometimes required with an oval (or square) centre and white margins: this is effected by interposing a black mask of the desired size and shape (obtainable from all dealers) between the negative and the sensitive paper. The black paper prevents the passage of light and leaves white margins to the print. If grey margins are required, a disc (to fit the mask) is attached to a sheet of glass the same size as the negative and arranged so that registration is easily effected; the print is first made with a mask and is then placed in contact with the disc and plain glass (the negative being removed from the frame), and again exposed for a second to the light. If a black border is required the exposure of the margin must be extended three or four seconds.
Vignetting.—To vignette bromide prints, the printing frame must be covered with a piece of cardboard in which a small hole (about 1½ inches by 1 inch for a cabinet head and bust) is pierced. The hole must be covered with a sheet of white tissue paper which will diffuse the light and cause it to travel without harsh lines beneath the opening, and make the print with perfectly gradated edges. It is sometimes an advantage to move the negative while printing vignettes; but it is not absolutely essential if the hole in the cardboard is not too large and if the card is removed some little distance from the negative. If the card is too close to the negative, the gradation will be abrupt and the vignette will not look well.
Cloud Printing.—This requires some care in order to avoid harshness and sharply defined lines. If the sky of the negative prints white, the addition of clouds from another negative is not difficult; but if it is at all thin, the entire sky must be carefully painted out with a deeply opaque pigment in order to make it quite dense and unprintable.
As a bromide print cannot be examined while in progress: that is, cannot be seen at all before development, careful registration is desirable in order to prevent printing the clouds across the landscape instead of above it. To do this an opaque mask should be made thus: Make a print from the negative on P.O.P. and, without fixing or toning it, cut it carefully in two parts following the horizon line as nearly as possible, then expose to light, until quite black, that part representing the landscape. Attach this to the glass side of the cloud negative (with the paper side of the P.O.P. in contact) and see that the bottom edge and the right corner of the paper and glass (viewed from the glass side of the negative) exactly coincide. To make use of this arrangement, you first make a print from the landscape negative, making sure that the negative and paper are firmly pressed against the bottom and left-hand side of the printing frame when looking towards the film side of the negative; mark the registered corner with lead pencil thus =L= in order to prevent mistakes in the second printing.
To print the clouds, you put the negative in the frame and press it well home to the left-hand corner and the base of frame (looking at the film side, of course), and then put the print in contact with the same precaution and replace the back. Now take a piece of brown paper with one edge roughly torn in shape of the horizon line of the mask and cover the entire negative on the glass side. Hold the covered frame in your hands at a distance of (say) four feet from the gas and turn on the white light. Directly the light is up, draw the paper slowly downwards until the horizon line is just passed, and then immediately begin to slowly push it upwards towards the top of the sky. Do this steadily and slowly for (say) four to six seconds, according to the density of the cloud negative. With a good thin cloud, four seconds should be quite enough, but you can easily settle this point on developing the first print.
Printing from Dense Negatives.—Dense negatives require much longer exposures than those of "average" (or ideal) density. This may often be prolonged to twice or three times the normal exposure at the same distance. A yellow coloured negative increases the exposure greatly, as much as ten to thirty times the normal frequently being requisite to get a decent print. An over dense negative that gives very harsh prints by other printing processes can be made to yield prints of exquisite softness on bromide paper by giving a full exposure at a short distance from the gas.
CUPBOARD LOVE. T. LEE SYMS.
Printing from Thin Negatives.—Thin negatives on the other hand, require quite different treatment. In order to get plucky prints from very thin negatives, useless in other processes, we must give a very brief exposure at some distance from the gas; and here it may be well to note that removing the negative to a greater distance from the light is equal to decreasing the actual time of exposure and has other advantages in connection with thin negatives with which theory does not seem to agree. To print from a very thin negative, then, instead of four seconds at eighteen inches, let us cover it with a sheet of tissue paper and give it four seconds at a distance of three or four feet and note the result on development. If it appears to be over-exposed, we may reduce the time of exposure to three seconds at the same distance and modify the developer, as will be explained later on.
Development of Prints.—All my remarks in this article apply equally to most commercial brands of bromide paper; but it is only fair to state that they are particularly intended for that made by the firm of manufacturers publishing this book. Development, and so on, is very similar with all makes of paper, but most of my recent experiments have been made on the "Barnet" matt surface bromide.
I shall presently describe the use of several well-known developers, but it must be well understood that, whatever formula is adopted, a preliminary soaking of the print before development must be done.
When we are about to develop a number of prints we must first soak them in plain cold water until quite flaccid, otherwise the application of the developer would cause the dry print to cockle and curl, and the development would not be regular. This rule applies equally in the case of one print only as when a hundred are ready for development; a prolonged soaking in plain water having no ill effect.
The Iron Developer.—This is one of the developers most frequently recommended for bromide work, but personally I never advise its use (especially by a novice) because the use of the acid clearing bath, which is an essential part of the process, is so frequent a cause of disaster and yellow prints. The Barnet formula is as follows:—
A.
Potassium oxalate 1 lb.
Potassium bromide 5 grains.
Hot water 48 ozs.
B.
Iron sulphate 1 lb.
Citric acid 4 drams.
Hot water 32 ozs.
To six ounces of A, add one ounce of B; this order of mixing must be observed or a dense precipitate of ferrous oxalate will be formed.
Place one of the soaked prints face (which may be distinguished by its "slippery" surface) upwards in a clean porcelain dish and pour the developer over it as evenly as possible. With this developer, the image comes up very rapidly, so that it is not advisable to try and develop more than one at a time. If the first print of a batch appears to be over-exposed, that is, if it flashes out instantly and the high-lights become rapidly clouded, add to each ounce of mixed developer from 10 to 30 drops of a ten per cent. solution of potassium bromide which will act as a restrainer, retard development, and keep the high-lights clear while the shadows acquire density. Under-exposed prints can rarely be made to give passable results with ferrous oxalate. The addition of a trace of hypo to the developer has been recommended for bringing up their detail, but the result is far from good.
As soon as development is complete the prints must not be put in clean water, but must be transferred direct from the developer to the following acid bath:—
Acetic acid 1 dram.
Water 32 ounces.
After an immersion of one minute, the operation must be twice repeated in similar baths that have not been previously used; this is to remove the iron from the print. A thorough washing must next be given to remove the acid and the print may then be fixed for at least fifteen minutes in
Hypo 2 ounces.
Water 20 ounces.
After fixing (no matter what developer has been used) the prints must be thoroughly washed in several changes of water for at least two hours.
The chief reasons against the use of ferrous oxalate are lack of control over development and the necessary use of an acid bath. Unless the acid bath is used, the prints will be yellow because of the iron in them, and if the acid is not entirely removed before fixing the prints will be yellow owing to the decomposition of the hypo by the acid in the print which causes deposition of sulphur.
Metol Developer.—With this, and the other developers I shall mention, an acid bath is not necessary and so one cause of failure (and extra work) is obviated. I have somewhat amended the Barnet formula to meet the needs of workers on a small scale and have also arranged A and B to balance each other without disturbing the relative proportions of the ingredients.
A.
Metol 120 grains.
Water (cold) 24 ounces.
Dissolve completely and then add
Sodium sulphite 2½ ounces.
Potassium bromide 15 grains.
Shake until completely dissolved but do not apply heat.
B.
Potassium carbonate 350 grains.
Water 8 ounces.
For use, mix three parts by measure of A and one part of B.
With this developer and a normal exposure, the image should appear in a few seconds and development should be complete in about two minutes. As fast as the prints are developed they should be immersed in
Salt 2 ounces.
Water 20 ounces.
to stop development. When all are developed, they must be rinsed for a minute or two in clean water and then fixed. Over-exposure is remedied by the addition of potassium bromide solution (as in the case of ferrous oxalate); under-exposed prints should be developed in a weak solution such as
A 3 parts.
B 1 part.
Water 4 parts.
Development will take longer, but the weaker solution will help to bring up the detail without the harshness of the shadows that would be the case if the normal developer was used.
Hydroquinone and Eikonogen.—The advantage of combining eikonogen with quinol lies in the fact that one provides what the other lacks, the eikonogen tending to give detail without density and the quinol (in inexperienced hands) giving density without detail. The following formula will be found very satisfactory:—
A.
Quinol 40 grains.
Eikonogen 120 "
Sodium sulphite 480 "
Citric acid 20 "
Water to 20 ounces.
Dissolve the sodium sulphite and citric acid in 15 ounces of water, then add the other ingredients and enough water to make a total bulk of 20 ounces.
B.
Sodium carbonate 60 grains.
Sodium hydrate 30 "
Potassium bromide 5 "
Water to 20 ounces.
For use, mix one part of A, one part of B and two parts of water. The same remarks as to over and under-exposure apply as in the case of metol.
Toning Bromide Prints.—The "tone" or colour of the deposit depends largely upon the accuracy of exposure and the developer employed. Ferrous oxalate gives a rich black deposit, but to my mind metol and the combined eiko-quinol give tones at least as beautiful with pretty gray half-tones.
But some people prefer warmer colours, brown and red for instance, and some get brownish blacks (through over-exposure and the use of bromide) which they would like to change.
The colour of the deposit may be changed in various ways by treating the print in baths of different metals. I will give a brief outline of the methods employed, leaving readers to modify them to suit each particular case.
Black and Blue-black Tone.—Brownish black prints can be much improved after fixing by immersion in a strong bath of gold chloride; the following is the strength used by me:—
A.
Ammonium sulphocyanide 20 grains.
Water 1 ounce.
B.
Gold chloride 2 grains.
Water 1 ounce.
When quite dissolved add B very gradually to A, shaking almost continuously. The fixed print should be washed for at least fifteen minutes before toning and should then be placed in a clean tray while the toning bath is poured over it. The solution must be kept moving and the print must be removed and washed directly the desired tone is reached. Prolonged immersion will cause the print to acquire a deep blue tone.
Brown and Red Tones with Uranium.—Prints immersed in the uranium toning bath gradually become warmer in tone, changing from black to brown and brownish red until they assume a deep red nearly approaching the well-known Bartollozzi chalk.
Prints to be toned by this process must be thoroughly free from hypo or stains will be the inevitable result. The toning bath should be made up as follows, and it must be used at once as it will not keep after mixing A and B:—
A.
Potassium ferricyanide 20 grains.
Water 20 ounces.
Glacial acetic acid 1 ounce.
When quite dissolved add
B.
Uranium nitrate 20 grains.
Water 1 ounce.
Immerse the print and keep the solution in motion until the desired colour is produced, then wash the print for half an hour in several changes of water acidulated (1 dram in 30 ounces) with acetic acid. Weak, under-developed prints are much improved by this method of toning.
At the end of half an hour, if the whites are at all yellow they may be cleared by immersing the print for a minute or two in the following bath:—
Ammonium sulphocyanide 20 grains.
Water 10 ounces.
After immersion, rinse the print for five minutes and dry.
Intensification.—It sometimes happens (especially when too little light has been used to properly judge development) that one acquires a collection of prints that, owing to under or over-development, are useless; let us see how they may be rendered serviceable.
An under-developed print, though weakly looking and "washed out," simply needs intensification to give it the requisite pluck. The foregoing uranium bath acts as an intensifier while conferring a ruddy tone on the deposit. A black deposit can be obtained by intensifying the well-washed print with mercury. The print must first be immersed in a saturated solution of mercuric chloride until the image disappears; it must then be again thoroughly washed to remove all traces of free mercury and may then be redeveloped by flowing over it an old ferrous-oxalate developer. If ferrous oxalate is not at hand, an old metol developer may be substituted, but the former is the more reliable.
When the image is sufficiently intense, the print must once more be thoroughly washed. All the toning and intensifying operations may be conducted by daylight.
Reduction of Density.—Over dense prints can be made fit for many purposes by means of a "reducer" capable of dissolving part of the deposit. The best for the purpose and the one least liable to cause stains is know as the Belitzski's; it is prepared thus:—
Water 60 ounces.
Potassium ferric oxalate 3 "
Sodium sulphite 3 "
Dissolve and add to the red solution so obtained.
Oxalic acid 1 ounce.
Shake until the solution turns green and then immediately pour off the solution from any crystals remaining undissolved. To this solution add
Hyposulphite of soda 15 ounces.
and shake until dissolved, when it is ready for use.
The print to be reduced need not be free from hypo, but should be rinsed for a few minutes after fixing (or soaked until limp, if previously dried) and may then be placed in a tray and flooded with the reducer. The tray must be well rocked and the print, when sufficiently reduced, must be removed without delay and rapidly washed in running water.
Some Cheap and Useful Trays.—If large-sized prints are made, the cost of suitable trays becomes a very serious item. The expense of these may be reduced to a mere nothing, without loss of effectiveness, by the substitution of home-made ones. All that is required to make a tray of any size is a thin wooden confectionery box (or the bottom part of a larger case) lined with the shiny white marbled oilcloth known as "American moleskin." This is fitted inside the box (the corners being turned under) and secured by a row of tacks around the top edge. No further lining or preparation is required and the tray will stand all sorts of ill-treatment. As for durability: I had three such trays made out of old herring-boxes picked up at Calgary and lined with moleskin that had already seen service as cover to a wash-handstand and chest of drawers in a Canadian boardinghouse. For upwards of a year those trays were used daily and travelled many hundreds of miles by mule and dog train, and were not worn out when I returned home. My porcelain trays were smashed by a fall from a refractory mule, but the rough and ready makeshifts were a priceless boon.
It seems to me that by practising economy of this kind and in various similar ways (i.e., where economy is necessary as, unfortunately, it sometimes is) the cost of practising our pet recreation is very materially reduced.
W. Ethelbert Henry, C.E.