BUILDERS’ HARDWARE (continued 3)
Reading edition
154. In fitting strikes to the jambs, it is suggested that the workman locate them as low as possible, to conform to the locks, leaving the margin in the strike below the lock bolts. Doors in new buildings are liable to sag slightly, and if proper allowance is not made, the strikes may have to be readjusted, sometimes even before the contract is completed.
It is also necessary for the carpenter or superintendent to caution the painters not to paint or varnish any hardware, especially the lock faces, as this will also retard the operation of the latch bolt. As previously stated, the hardware should be fitted to the work and then replaced in the original packages, so as to protect it from abuse and damage, applying it permanently only after the painting is completed.
155. In applying cylinder, or front-door, locks, the conditions are still more difficult to overcome. When reversing cylinder locks that have swivel spindles, unscrew the cap and reverse the latch bolt; also, reverse the hubs, that is, the parts of the lock through which the spindles pass. Cylinder locks should always be mortised into the door at the proper height from the floor, and the holes for the cylinders and knob spindles then made. Insert the lock into the mortise, but do not put screws into the face; then apply the escutcheons and adjust the knob, taking care that the swivel of the spindle centers at the joint in the split hub. Now proceed to screw in the cylinder to its full extent, so that the cylinder collar is held rigidly between the cylinder and the escutcheon, and the cylinder is perfectly vertical. Then set the cylinder adjusting screw, and insert the wooden screws in lock face and drive them home with the screwdriver. Hold and adjust the escutcheon so that the knob will rotate back and forth automatically without friction, starting the screw holes with an awl. If the doors are made of hardwood, an automatic drill will have to be used to bore the screw holes. In such a case, follow the directions just given regarding escutcheons; then start the holes with a scratch awl while still holding the escutcheons, and enlarge the holes with the drill. Screws that are off center, when driven home into the countersinking, will surely draw the escutcheon so that the knobs will bind and thus destroy the most desirable feature of the lock.
156. Mechanics will find that the better the grade of the hardware, the more care must be taken in its application. Hardware for fine buildings is generally furnished with high, or bracket-bearing, collars on escutcheons and screwless knobs for adjustment without washers. These are fitted and turned carefully, so that there is very little play between knob shanks and collars, and for this reason they bind more readily when improperly applied. The mechanic should try the lock in every possible way before leaving the work. He should set the stop in the lock face, to be sure that swivel spindles are adjusted properly, and also insert the key in the cylinder, to see whether it operates smoothly while operating both bolts.
SCHEDULES AND DRAWINGS FOR THE HARDWARE CONTRACTOR
157. Hardware Schedules.—The contractor for the hardware usually takes off his own bill of material from the general drawings and the specifications furnished by the architect. However, the architect will sometimes supply the hardware schedule and obtain prices for the same direct from the dealer, thus saving the owner the general contractor’s profit and insuring bids based on material of uniform character and quality. It is well, therefore, to give some thought to the preparation of the schedule, so as to insure a good classification and to avoid omissions.
In drafting a schedule of hardware required for a building, it must be compiled from a copy of the hardware specifications and a list of all openings, cabinets, etc. that has been taken from the drawings. The schedule should be subdivided primarily into building sections, such as first floor, second floor, etc. as headings. Under these headings, each opening or group of openings in each room or division should be listed. Under the name of each opening or series of openings should be grouped all the hardware required, itemizing each and every article necessary and stating the quantity, numbers, sizes, or dimensions, design, and finish.
Schedules thus prepared are readily priced for estimating, and such classification eliminates the possibilities of omissions. Besides, the order can be executed by the manufacturer in exact conformity with the instructions, the hardware for each opening can be combined in a separate package, and each package clearly labeled to indicate its contents and the room or opening to which it belongs. The following shows a typical form of schedule:
First Floor
One Pair of Entrance Doors, 2' 8" × 7' 6" × 2¼" Rt.-Hd. rabbeted.
1 cylinder, front door, Set No. _____. Plain bronze metal.
1 push button, No. _______. Plain bronze metal.
2 extension flush bolts, No. ______, ¹/₁₂", ¹/₁₈". Plain bronze metal.
3 pair of butts, No. ______, 5" × 5". Plain bronze metal.
One Pair of Sliding-Doors, Hall to Parlor,
2" astragal face, 1½" friction strip.
1 set of locks, No. ______, 3" backset. Plain bronze metal.
3 dozen countersunk screws and washers. Plain bronze metal.
2 sets of anti-friction, noiseless, parlor-door
hangers and track, complete, No. _____.
Pantry Cupboard.
2 pair of doors, 1⅛"; 2 single doors, 1⅛".
1 tilt flour bin; 4 drawers (2 narrow).
6 pair of butts, No. _____, 2½" × 2½". Plain bronze plated.
1 pair of butts, No. _____, 3" × 2½". Plain bronze plated.
2 elbow catches, No. _____. Japanned.
4 cupboard turns, No._____. Plain bronze plated.
7 draw pulls, No._____. Plain bronze plated.
Second Floor
Ten Doors, 2' 8" × 7" × 1¾", 6 R. H., 4 L. H. transom, top-hung.
10 inside lock sets, No._____. Plain bronze metal.
15 pair of butts, No. ______, 4½" × 4½". Plain bronze plated.
10 pair of butts, No._____, 3" × 2½". Plain bronze plated.
10 transom lifts, No.______, ⁵/₁₆" × 4". Plain bronze plated.
10 wooden-base knobs, 2½" diameter.
Double-Hung Windows
10 sash fasts, No. ____. Plain bronze metal.
20 sash lifts, No. ____. Plain bronze metal.
10 sash sockets, No. ____. Plain bronze metal.
4 sash hooks, No. ____. Plain bronze metal.
10 dozen adjusting screws and washers. Plain bronze metal.
The foregoing schedule is merely intended as an example of a classified, brief, and at the same time comprehensive hardware schedule. A schedule of this kind shows, almost at a glance, the nature of the hardware to be supplied, and if prepared by the architect, should tend to procure bids based on uniform requirements.
158. Detail Drawings for the Hardware Contractor.—In some architects’ offices, it is the practice to provide, on a single detail sheet, cross-sections of every type of door stile in the building. The time required to make such a drawing is slight, while the results accomplished are most useful. Copies of this drawing are furnished to the contractors for the cabinet trim and to the hardware contractor, so that each of them will have identical information and that the work will assemble properly when the hardware is put in place.
Such drawings should show the dimensions of the transverse sections of the vertical stile, or lock stile for each door, also the overlapping, if any, of panel moldings, together with the shape of bevels, rabbets, astragals, and any other details affecting the size and location of locks, hinges, butts, etc. The hand of the doors is usually, and better, indicated on the floor plans. A further argument is that the character and dimensions are liable to be overlooked when arranging the paneling of doors; whereas, both should be considered. The use of narrow stiles, special rabbets, and astragals, shelf effects, friction strips, etc. is resorted to without sufficiently considering the disadvantages that result from the contracted space in which the lock and its trim must be placed. Where the items just mentioned are proposed, the architect should ascertain what locks are available and should provide space for those selected. Special locks are always expensive, while a cramped space precludes the best construction.
GLASS AND GLAZING
159. Single- and Double-Thick Common Glass.—In the manufacture of the ordinary window glass used in building construction, the glass is first blown in cylindrical form and then cut and flattened, after which it is reduced to salable sizes for shipment. Owing to this method of manufacture, the percentage of first-quality glass is small, the larger proportion of the product being second or third quality. All glass of this kind is wavy or uneven and also has a slight bow, or curve, to its length that is impossible to overcome when making. The only difference in the qualities of common glass is in the amount of the imperfections that it contains. These imperfections consist of bull’s-eyes, blisters, scratches, and streaks that distort objects seen through the glass.
The better grade of common glass is manufactured in what are called continuous tanks, which are heated by natural gas. This glass is put up in boxes containing 50 square feet. Single-thick glass runs from thirteen to fifteen lights to 1 inch of thickness, and double thick from eight to ten lights to the inch. Single-thick glass above 20 in. × 24 in. in size should not be used except for work of a speculative nature. The ability to distinguish single and double thick and the various qualities of glass can only be acquired by observation. In judging glass, it is well to remember that small lights free from defects or uneven surfaces may be obtained much more easily than large ones.
160. Ground, or Sand-Blast Glass.—Common or plate glass, the surface of which is made obscure by the process of grinding, is called ground glass. This treatment, however, does not injure the diffusing qualities of the glass.
The sand-blast process of treating glass produces results similar to grinding. As the name implies, sand is blown against the glass under high pressure and thus makes numerous small cuttings on its surface, producing the appearance of ground glass.

Fig. 159
161. Chipped Glass.—The glass illustrated in Fig. 159 is called chipped glass, and is manufactured in the following manner: The glass is first given a coat of glue and is then placed in a heated receptacle; this process tends to contract and curl the glue, so that when it dislodges itself from the glass, the cohesion will draw or chip off particles of glass, leaving the surface uneven and showing a design similar to that on a frosted window light. Chipped glass can be procured in either the single or the double process (i. e., with a single or a double chipping); and these processes are adaptable to either sheet or plate glass, white or colored.

Fig. 160
162. Figured Rolled Glass.—Glass known generally as figured rolled glass is manufactured for use in offices, public buildings, and private residences where a glass is required to intercept the vision and still diffuse the light. This glass has practically supplanted the varicolored cathedral glass previously used, because of its obscurity without reducing the quantity of light. Figured rolled glass is made in various artistic designs, several of which are illustrated in Fig. 160, and is ⅛ and ³/₁₆ inch in thickness. This glass is inexpensive; the prices range from 15 to 25 cents per square foot.
163. Plate Glass.—The process of manufacturing plate glass is radically different from that of common sheet glass. The latter is blown, while the former is cast in large sheets and placed in annealing ovens to cool. When taken from the ovens the glass is rough and opaque, but it is afterwards ground and polished to make it transparent, the polishing being the most delicate process in its manufacture. Plate glass glistens like a mirror and reflects like one; objects seen through it are sharp and clean-cut; it has no imperfections or wavy effects, and does not distort and deform objects as does sheet glass.
164. Beveled Plate Glass.—The term beveled plate is applied to plate glass the edges of which are ground and polished to form a bevel, or border, around the glass. Plate glass finished in this manner is much used for glazing entrance doors and for ornamental work. The additional cost for beveling is slight compared with the effect resulting therefrom.
165. Floor and Skylight Glass.—Floor glass is made only from rough rolled or hammered glass in ½-, ¾-, and 1-inch thicknesses. The prices range from 30 cents to $1 per foot, according to the thickness.
Skylight glass is similar to floor glass, but can be procured in ⅛-, ³/₁₆-, ¼-, and ⅜-inch thicknesses, and in either ribbed or roughened surfaces. This glass is inexpensive, the prices ranging from 8 to 15 cents per square foot. Large quantities of skylight glass are used for mills, skylights, and various other purposes, but it is not used as a fire-retardant, as wire glass has entirely superseded it for this purpose.
166. Wire Glass.—Glass with wire embedded therein, as illustrated in Fig. 161, is made either ribbed, rough-rolled, “maze” design, or clear, polished plate. The wire netting is embedded in its center during the process of manufacture, thus producing a very strong glass that is a good fire-retardant. The temperature at which the wire is embedded in the molten glass insures cohesion between the metallic netting and the glass, and the two materials become as one; thus, if the glass is broken by shock, by intense heat, or from some other cause, it remains practically intact. Wire glass combines the strength of the wire netting and the glass plate, and the wire is so thoroughly covered as to obviate the possibility of rust or corrosion. This glass possesses extraordinary strength; a piece ¼ inch thick is as strong as ordinary glass of twice that thickness. When wire glass is broken, it will not scatter like plate or skylight glass; consequently, it finds extensive use for overhead work, where falling glass due to accidental breakage would be a source of danger.
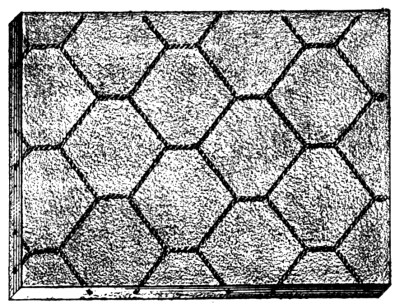
Fig. 161
Wire glass is made ¼, ⅜, and ½ inch thick, and up to 40 inches wide and 100 inches long. This glass is sold at from 30 to 40 cents per square foot for rough, ribbed, or maze pattern, according to the thickness, while polished wire glass costs either 60 cents, 95 cents, or $1.25 per square foot, according to the dimension of the light. Wire glass is practically burglar-proof and missile-proof, and when set in approved metallic frames forms a most efficient fire-retardant window. In its use as a fire-stop, it possesses advantage in that it does not hide the incipient blaze like steel-plate or tin-lined shutters. Windows glazed with wire glass require no shutters for protection, but an opening may be made in it by a blow from a fire-ax. Wire glass as a fire-retardant is approved by the various boards of fire underwriters, and it may be used for windows, skylights, and other exterior openings exposed to fire hazard.
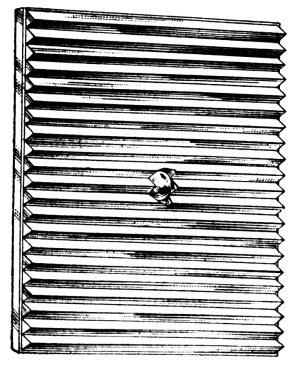
Fig. 162
167. Prisms, or Prismatic Glass.—When a ray of light passes from air to glass, it undergoes the change in direction called refraction. The knowledge of this property of light is utilized in the design of prismatic glass, an example of which is illustrated in Fig. 162. Prisms are made of clear crystal glass, with the outer side usually plain. The inner side, however, is formed into prisms of a great variety of angles made to suit the several conditions under which the lights may be used. Prism plates are made in two styles: Pressed prism plates, which are composed of 4- or 5-inch pressed lenses that are glazed together with a drawn zinc or copper bar, the several bars forming a frame being brazed together electrically, and rolled, or sheet, prisms, which are first rolled in large sheets and then cut to size.
Under average conditions, the direct light from the sky entering a room through sheet or plate glass strikes the floor within a few feet of the window and is mostly absorbed. For this reason, the rear part of the room is dark. By the installation of prisms at the window openings, however, the direction of the entering light is changed and projected horizontally into the room. Prisms do not create light; they simply distribute and diffuse the excess light at the window. Under certain conditions the effective light in a room may be increased fifty times by the installation of prisms. In Fig. 163, the arrows a show the direction of the lowest rays from the sky over the cornice of the opposite building, striking the prism plate at the floors. These arrows also indicate vertical rays, striking canopies and skylights, while the arrows b show the directions of the rays just mentioned after passing through the prism plate; also, the manner in which the light rays are projected into the building.
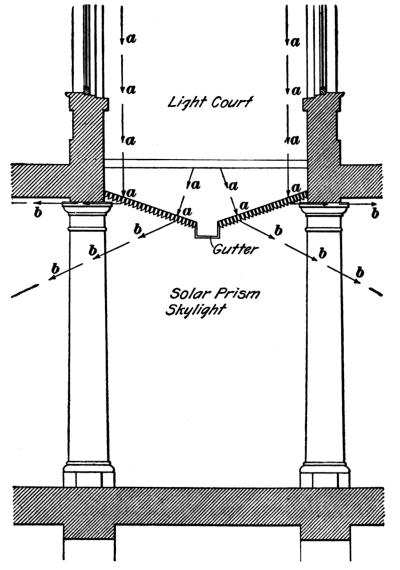
Fig. 163
168. Vault Lights for Basement, or Cellar, Lighting.—Where the sidewalk and the basement ceiling are nearly on a level, basement rooms can be successfully lighted by the installation of vault lights, or glass pavement tile. The ordinary method is to use plain, round, or square lenses, which are set in iron or concrete in iron frames, as illustrated in Figs. 164 and 165, though vault lights are now made with the supporting material of reinforced concrete. Where the ceiling is low or the room at all deep, the system in which plain lenses are used is unsatisfactory, as the direct light from the sky in passing through the lens strikes the floor immediately underneath.
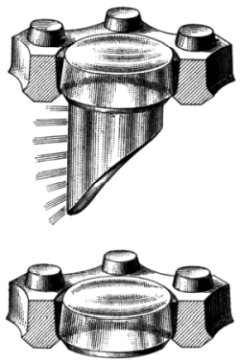
Fig. 164
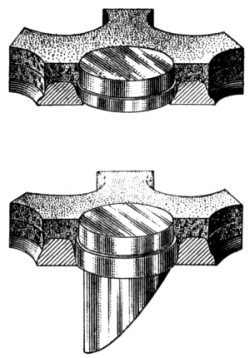
Fig. 165
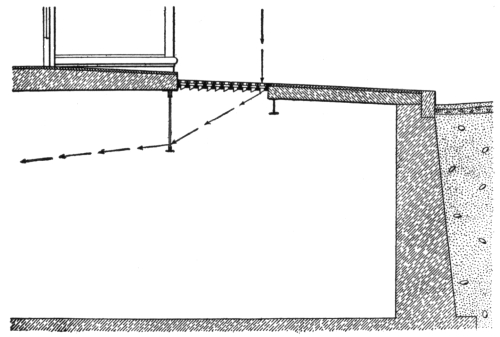
Fig. 166
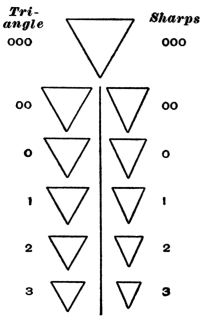
Fig. 167
The more modern method is to use prism tile set in the necessary frames. The prism receives the direct light from the sky on the upper face and turns, or refracts, it back into the basement, as illustrated in Fig. 166. Where the head-beam or other obstructions interfere with the deflection of light direct from the prism, it becomes necessary to use in connection with the skylight or canopy just described an independent vertical frame of window prisms of varying angles. These prisms intercept the light from the pavement tiles and project it into the basement, thus utilizing the light to the maximum advantage.
169. Glazier’s Points.—A necessary adjunct in glazing with putty is the sheet-zinc, triangular glazier’s points, as illustrated in Fig. 167. These points are made in six sizes, which range from No. 000, the largest, to No. 3, the smallest. They are also made in somewhat similar shape, called sharps, but this type is not so popular as the triangle point.
170. Grades of Putty.—Putty is usually graded as follows: Commercial, a very cheap grade; pure, a medium grade; and strictly pure, the best grade, which is made of pure whiting ground in linseed oil. The cheaper grades are made in the same manner, but with an amount of adulteration, either in oils or whiting, commensurate with the cost. Therefore, the cheaper the putty, the more it is adulterated, and none but strictly pure should be used when good results are desired.
White-lead putty is in a class by itself, and costs about twice as much as strictly pure whiting putty; but where permanent glazing is required, its use will show handsome returns on the investment.