Chapter VI · WOMEN’S SHIFTS.
Reading edition
PLATE 6.
Shifts are generally made of fine Irish linen or calico, for the upper classes, and of stout linen, or strong but soft calico for poor children.
Shifts are cut out differently, according to the width of the cloth. If it is wide, the shift takes 2 breadths in the skirt, and gores are cut off from the top to sew on the bottom to widen the skirt.
If the cloth is still wider, so as to admit of only 1½ breadth in the shift, or else very narrow, so that 2 breadths are barely sufficient, the shift is crossed. The tops vary, as do also the shapes of the sleeves. The following are those generally worn.
SCALE FOR GORED SHIFTS.
—————————— Largest size. Smaller size. Second size. First size.
Yds. nls. Yds. nls. Yds. nls. Yds. nls.
Width of material 14 14 13 12
Quantity required for one 3 . . 2 2 . . 14 2 . . 7 1 . . 15
Ditto ditto for six 18 . . 12 17 . . 4 13 . . 12 2 . . 8
Length of skirt, cut in one piece 2 . . 12 2 . . 8 2 . . 2 1 . . 10
Width of piece to gore off at the top 2½ 2 2 1¾
Space to leave for the shoulders 1¾ 1½ 1¼ 1
Depth to hollow the bosom 2¾ 2½ 2¼ 2
Do. to hollow the back 2 2 1¾ 1½
Do. of flaps, if preferred 3 3 2½ 2
Length of sleeve down the selvage for Fig. 1 6 6 5 5
Depth of sleeve 3 3 2½ 2¼
Size of gusset 3 3 2½ 2¼
PLATE 6.
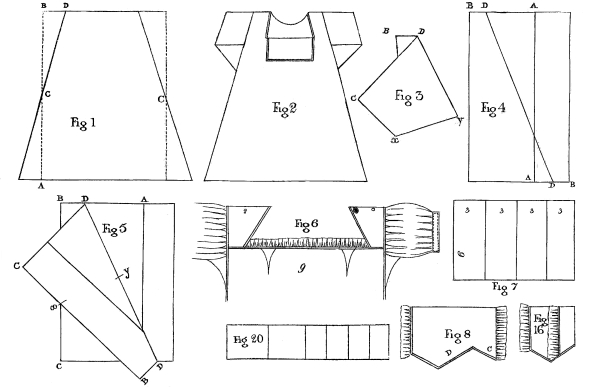
In goring a shift, the 2 breadths may be cut in one length, to prevent a seam on the shoulder. Fold your piece of cloth in two, and pin the sides very accurately together, or with long stitches tack them up the selvages. Next double the shift in half its length, from A to B, and put in pins to mark the crease in the middle, C C. Unfold the shift and double it again very carefully the width-way, so as to let the four selvages lie very evenly one upon another. Measure from the top, B, the space, B D, to be cut off, crease the linen in a straight line, from D to C, and cut it carefully off through the four thicknesses of cloth. The gores thus cut from off the top are reversed and sewed on to the bottom, to widen the skirt. The dotted lines in the Plate shew the width of the cloth, and the dark clear lines are intended to represent the shape of the shift. When the gores are sewed in, shifts are generally hollowed out at the back, and may either be also hollowed in front or have a flap cut, as seen in Fig. 2. The hollowing at the back is not so deep as in the front, therefore, great care must be taken in cutting the one not to injure the shape of the other; and in order to insure the two halves of each side being cut to correspond, it is advisable to cut the shape of the parts to be hollowed out in paper, to lay the paper on the linen, and cut by it. When the breadths are cut separately, as in some cases they must be, the seams on the shoulders should be sewed previously to the parts behind and before being hollowed. If the flap in front is preferred, it may either be cut straight down, as in Fig. 2, or in a slanting direction, as the shoulder in Fig. 6. This last plan is usually followed, and a button-hole is worked near the front of the shoulder-strap, which, being folded over to a button sewed on the shoulder-strap of the stays, neatly confines all straps, &c., in the fold.
SCALE FOR FIG. 6.
—————————— First size. Second size. Third size.
Nails. Nails. Nails.
Length of shoulder-strap 4 3½ 3
Widest width of ditto 1¾ 1½ 1¼
Sloped off to ¾ ¾ ½
Length of plaited sleeve 8 7 6
Depth of ditto 2½ 2 1½
Size of gusset 2 1½ 1½
Length of sleeve-band 4½ 3¾ 2¾
Width of ditto ½ ½ ½
Length of bosom gore 1 full nail 1 ¾
Width of ditto at the top 1 1 1
There is another mode of cutting out the top of a shift, and, from its simplicity and economy, is preferable to any other. The shoulder-straps are cut separately from the skirt, which is, consequently, cut shorter, and is made quite straight at the top. The shift, after being gored or crossed, has little bosom gores put in front. The top is then hemmed, both before and behind, and the straps put on. A neat frill may be added, to give a finish to the whole.
The sleeves are sometimes cut out of the width of one of the breadths of the skirt, when the material is a little too wide; but unless you have linen of an awkward width by you, it is a wasteful plan, as the strip thus cut off is generally twice as long as the quantity required for the sleeves. Observe, if this plan be adopted, to cut off the length for the sleeves all in one piece, and not length by length from each separate breadth, as much waste would arise from so doing. If the sleeves are to be made as in Fig. 2, they may be cut in one length, sleeve and gusset together, down the selvage (see Fig. 17, 18, 19), and so many lengths in the width of the cloth. If they are to be made according to Fig. 6, an extra nail in length must be allowed for the plaiting. The gussets are reduced in size, according to the Scale, and a band to gather the sleeve into, at the bottom, is neatly stitched.
CROSSED SHIFTS.
PLATE 6. FIG. 3, 4, 5.
SCALE.
—————————— Largest size. Second size. Third size.
Yds. nls. Yds. nls. Yds. nls.
Width of material 1 0 14 12
Quantity for one, not including sleeves 2 12 2¼ 0 2 0
Quantity for six, not including sleeves 16 8 4½ 0 12 0
Length of skirt 1 6 1¼ 0 1 0
Width of skirt, when sewed up, should be 1 0 14 12
Part to mark off at top and bottom, at opposite corners 10 9 8
Width of skirt at the top, when sewed up and double 11 10 8
Width of ditto at the bottom, when sewed up, and double 1 4 1 2 1 0
Sleeves for one 6 6 5
Sleeves for six 1 5 1½ 0 15
Before crossing a shift, sew the 2 breadths or the 1½ breadth, whichever it happens to be, together, and next, after flattening the seams with your thumb nail, crease the skirt, so that these two seams shall lie exactly one upon the other, and tack or pin them firmly together; or, to give a neater effect, the seams are brought, one in front and the other behind, so as to divide it in exact thirds. Fig. 4 represents the skirt when sewn up, A A being intended for the seam. Measure off 1¼ nails at the left hand of the top B D, and on the right hand of the bottom B D of the skirt, and double it from D to D, as in Fig. 5; and that you may be sure your measurements are accurate, it is better to double it again upwards, at X and Y, so that B D at the bottom, should lie upon B D at the top, and the corner C upon C, as in Fig. 3. If they do not exactly correspond, the shift is not correctly folded. After pressing these creases with the hand, unfold C from C, as it was before (see Fig. 5), and cut evenly from D to D. The skirt must then be turned. The two wide ends are for the bottom—the two narrow ones for the top of the shift.
It is made up as follows:—After sewing and felling the seams, and hemming the bottom, the hem at the top must be turned down, as if for hemming, and then turned back again and sewed all round, which is much stronger than a common hem. The sleeves are generally set in plainly, excepting, of course, in those intended to be full, as in Fig. 6.
CHILD’S SHIFT.
PLATE 6. FIG. 9, 10, 11.
This is a particularly neat pattern for a child from five years up to any age, and is generally the first shift used after leaving off the little shirt which is seen in the baby-linen.
As these shifts consist of 1½ breadth of 9 yards long, an even number, as 2, 4, or 6, should be cut out at the same time to prevent waste.
SCALE.
Width of Irish linen 12½ nails
Length of ditto 9 do.
Number of breadths 1½ breadth
|Width of shift at the top, when gored, and double 8 nails
Width at the bottom, when double 11 do.
Space left for shoulders 1½ do.
Depth of slit for lappets 2 do.
Depth of arm-hole 2¾ do.
Whole length of sleeve, including gusset 4½ do.
Depth of sleeve 1½ do.
Length of shoulder-flap 3 do.
Width of ditto 1¼ do.
Length of lining 7 do.
Width of ditto 1¾ do.
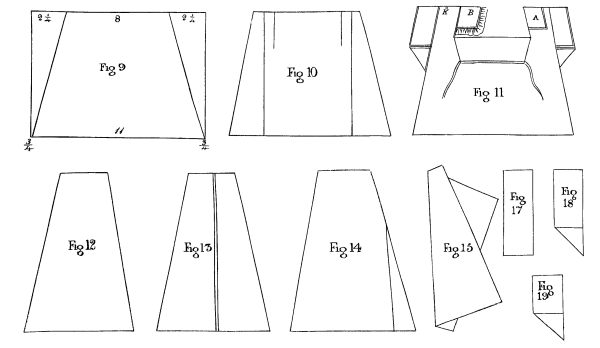
Two gores, of 2¼ nails at the top, and ¾ of a nail at the bottom, are cut off the whole breadth (see Fig. 9), which reduces the body to 8 nails at the top, and 11 at the bottom, which is the proper width of the shift. These gores are sewn on to the half-breadth, which makes it exactly correspond with the other side. After sewing the two halves together, leaving 2¾ nails from the top for the arm-holes, cut down the slits for the bosom flaps 2 nails deep, leaving 1½ nail space for the shoulders. Next, cut out the sleeve flaps (see Fig. 11) of 1¼ nail deep, and 3 nails long, and, after hemming them all round, sew them with firm small stitches to the shoulder. At the edge, B, sew on a piece of tape, in which make a button-hole, which buttons over the shoulder to the button, K, and confines all straps, as seen in the sleeve marked A, in Fig. 11, where the flap is represented as turned back over the shoulder, as it is when worn; whereas in the sleeve, marked B, the flap is unturned. The sleeves are hemmed all round, and then one end is turned up to form the gusset, to one side of which the other end of the sleeve is sewn, as in Fig. 17, 18, 19; they are then put plainly into the arm-hole, which must be previously hemmed.
The lining is put in last, and is turned down once a deep fold, all round. It is neatly felled inside to the shift. The lining is 7 nails long, and 1⅓ nail wide. It is sewn in a little below the arm-hole, and carried over the shoulder to the corresponding place on the other side of the shift. Strings are sewn to the points of the flaps, both before and behind. Children’s sleeves are sometimes fulled on the shoulder. The work should be close and strong. The flaps are sometimes made of fine lawn, edged with a cambric frill or worked muslin, and allowed to lie over the shoulder, outside the dress, which has a clean and neat appearance.
A SECRET WORTH KNOWING.
HOW TO SAVE ONE SEAM AND TWO FELLS IN MAKING UP TWO SHIFTS. PLATE 6. FIG. 12, 13, 14, 15.
This is a useful hint for those who make up much linen at home. It is done as follows:—
Take 3 breadths of the wide-width cloth, and sew them all together like a bag; then lay two of the seams very exactly one upon the other, and either pin or tack them firmly together; fold the whole piece in half, width-wise, so as to have four thicknesses of linen lying upon one another. Cross it like a common shift, Fig. 15, measuring it top and bottom to see if it is even, and it will cut into four pieces, one of which, Fig. 12, will have no seam at all; one, Fig. 13, will have a straight seam down the middle; the other two, Fig. 14, have each a piece like a gore on one side. These shifts, when neatly made, are just as serviceable and as good as those cut in the usual way, and it saves a great deal of work.
PLATE 6. FIG. 8, 16.
This is a pretty variety of sleeve, and is most suitable for young children. It is intended to fall over the frock. Fig. 8 represents the shape of the sleeve when cut out, and Fig. 16 when it is finished. The sleeve is cut all in one piece, taking care that the slope of the flap, C, when turned back, corresponds with the slope of the sleeve, D. The sleeve and flap are frilled with cambric, work, or lace. The advantage of this shape is, that both sleeve and flap are in one.
TROWSERS OR DRAWERS.
PLATE 7.
These are worn by men, women, and children of all classes, and almost all ages, under the different names of trowsers and drawers. They are made in a great variety of ways. Those mentioned here are the kinds most generally approved. Drawers for ladies and children are usually made of calico, twill, and cambric muslin. Those ladies who are invalids, or who ride much, frequently wear flannel or wash-leather drawers, with or without white calico leglets. For men, drawers are composed of very strong twill, calico, linen, flannel, and stockinet.
CHILD’S TROWSERS.
PLATE 7. FIG. 1, 2.
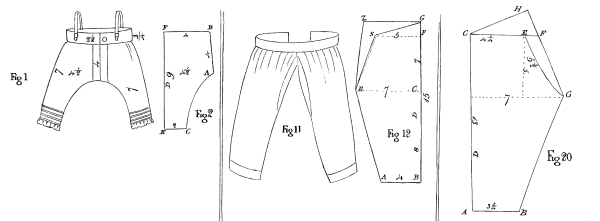
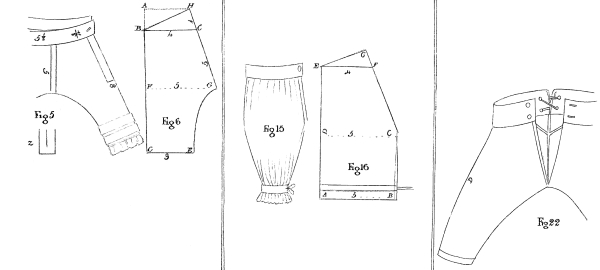
This is a child’s first pair of trowsers, and should be made of fine twill or calico. Each leg is cut in one piece, and, when folded, is 4½ nails wide; therefore, to prevent waste, the material should be 9 nails in width.
Cut off the 2 breadths for the two legs, of the proper length, and observe the following directions:—
SCALE.
Nails.
Width of material 9
Length of each breadth 9
Fold the breadth in half its width —
Measure from A to B, Fig. 2 4
From E to C 2
From F to B 4
Slope off from A to C, and cut from A to B, taking off ½ a nail from the width at the top.
In making, sew up the legs and join them at the seam in front, leaving them open behind, with a broad hem on each side, formed by laying a strip of the same material at each end, which is run at the edge on the wrong side, turned over to hide the stitches, and hemmed or back-stitched near the edge. The legs are then tucked, and the work or frill sewn on. The whole is next set into a band, ¾ of a nail deep when doubled, and 5 nails long, which buttons behind. Shoulder-straps, with button-holes, are attached to the trowsers by means of buttons before and behind. This plan is far more convenient than that of sewing on the straps, as, when they are only buttoned on, if it is necessary to change the trowsers in the course of the day, they may be simply unbuttoned without undressing the child, and the clean trowsers fastened to the shoulder-straps, which still remain over the shoulder.
PLATE 7.
A CHILD’S LARGER TROWSERS.
PLATE 7. FIG. 3, 4.
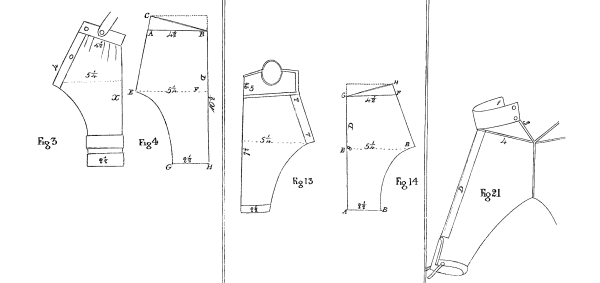
This resembles Fig. 1 and 2 in every respect, excepting that the top is sloped or hollowed at the back.
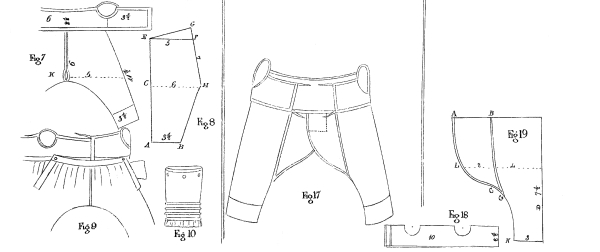
Procure your material 10½ nails wide, to admit exactly of one leg being cut in the width.
SCALE.
Nails.
Length of each breadth 10½
Fold it in half, letting D be the double part —
From the top to B 1
From B to A 4½
From B to F 4
From F to E, or the half-breadth 5¼
From F to H 5½
Slope from G to E, and again from E to C, through A; after which, cut at the top of one fold from A to B, and of the other from B to C. Take care to cut the pair to match, so that the outer, or hollowed parts of the legs should rise, the one towards the right, and the other towards the left side. These are made up in a similar manner to Fig. 1.
GIRL’S TROWSERS.
PLATE 7. FIG. 5, 6.
Each leg of these trowsers is also made in the entire breadth.
Procure your material 10 nails broad.
Cut each breadth 8 nails long, not including the tucks, which, if they are deep, will add about 2 nails more. Supposing it but 8 nails long, cut as follows, after folding the breadth in half its width.
SCALE.
Nails.
From A to B 1
From B to C 4
From C to E 3
From F to G, or the entire half-breadth 5
Slope from E to G. Cut in a straight line from G, past C, to H. Cut one fold from C to B, and the other from H to B.
If the tucks require 2 nails length in addition to the above size, continue the width of the legs, the same as from C to E (3 nails), to the end.
In making up, sew the trowsers up before and behind, and cut two slits, one on each side, to the depth of 3 nails. These slits have broad hems laid on all round them; to form which, cut two strips of 4½ nails long, and 2 nails broad; split each length down the middle, to within 1½ nail from the end (see Fig. 2). This strap is laid close to the edge and run all round the two sides of the slit, turned over, and hemmed down. This false hem greatly strengthens these slits.
The whole is then set into two bands, one for the front, and the other for the back of the trowsers. These bands are 5½ nails long, and ¾ of a nail wide, when doubled. A button-hole is strongly worked, in a slanting direction, at each corner of the bands, by which they are fastened to two buttons sewed upon the stays.
TROWSERS FOR A BOY OR GIRL.
PLATE 7. FIG. 7, 8, 9.
This is a pretty body and trowsers, and is very suitable to little boys, especially if they are at all delicate, being particularly warm.
The body is composed of one middle piece, 6 nails long, and two side pieces, 3½ nails long each. They are 2½ nails deep, and, when sewed together, the middle is hollowed so as to make it only 2¼ nails.
The trowsers are made as follows:—
Width of material, 12 nails.
Length of each breadth, 11½ nails.
Fold each breadth in two (see Fig. 8).
SCALE.
Nails.
From A to B 3½
From A to C 4½
From C to H, half the breadth, or 6
From C to E 6
From E to F 5
Slope from H to B; also from H, past F, to G, at the top of the breadth, whence it is cut to E, for the hollowed fold, while the under one is cut straight from E to F.
This trowser opens at the side; there is also a small opening in front (see K, Fig. 7). The body is hemmed all round, and sewed on plainly to the front band of the trowser, but it is left loose, as in Fig. 7, beyond the arm-holes on each side. The two bands button to each other at the sides, the body ties behind, and may, or may not be fastened also to the band of the trowsers at each side, having button-holes to correspond with the buttons. A little pocket should be sewed inside the slit down the sides, as in Fig. 9, where it is represented as if drawn out, or turned inside out.
LEGLETS.
PLATE 7. FIG. 10.
These are useful to put over the legs of children’s trowsers, when they are soiled or tumbled, before it is necessary to put on an entirely clean pair. They are usually made of some finer material than the trowser itself, and look well for an evening, when they are of fine cambric muslin, with open work, or small tucks. They are fastened by three or four buttons and button-holes or loops, the buttons being sewed to the trowsers. Sometimes the trowser itself only reaches to the knee, and leglets are always attached to it, by means of small buttons; they should be put on pretty closely, to make the leglets fit well, say six or eight on each leg; button-holes are made to correspond in the leglets. They are especially advantageous for children who play a great deal out of doors, or who live in a town, they will sometimes soil one or two pair in a day.
WOMEN’S DRAWERS.
PLATE 7. FIG. 11, 12.
These are formed of two separate legs sewed into a band, which is made to button before or behind, at pleasure. For a moderate size, Fig. 12 will be a good guide.
Width of material, 14 nails.
Length of each breadth, 15 nails.
Fold each breadth in half its width, letting D be the doubled part, and measure as follows:—
SCALE.
Nails.
From A to B is 4
From B to C 8
From C to G 7
From C to E 7
Cut in a straight line from A to E —
From F to G 1
From F to S 5
Cut in a straight line from S to G; cut also from E to Z, the point Z being within ½ a nail from the side. Hem the bottoms of the legs, after sewing up the seams, and hem round the slits, or open part; set them into the band, making them overlap each other (see Fig. 11). The band is 11 nails long, and 3 nails wide.
ANOTHER SHAPE.
PLATE 7. FIG. 13, 14.
Some persons, both ladies and children, wear bodies attached to their drawers, as in the figure, which represents a child’s size.
Procure your material 10½ nails wide.
Cut each breadth 9 nails long.
Let D be the doubled part, and mark as follows:—(Fig. 14.)
SCALE.
Nails.
From A to B 2½
From A to E 4
From E to B 5¼
Slope from B to B —
From E to G 4
From the top to G 1
Cut from G to H, H being 4½ nails from the doubled side.
Cut from H to C.
Let the body be 2½ nails deep, and 10 nails long, fold it in four, cut out the arm-holes, and sew on the shoulder-straps.
In making up the trowsers, sew the legs together in front, after they have been run up, leaving them open behind, and laying on a broad tape (see T T, Fig. 13), sew on the body, and it is completed.
TURKISH TROWSERS.
PLATE 7. FIG. 15, 16.
These Turkish or full trowsers are often worn by little girls.
Procure your material 10 nails wide, to admit one leg exactly in the breadth.
Cut each breadth the proper length, say 9 nails long.
Fold each breadth in half, letting D be the doubled part (Fig. 16.)
SCALE.
Nails.
From A to B, or the width of the doubled breadth 5
From B to C 4
From the top to E 1
From E to F 4
Cut one fold from E to F, and the other from E to G. Cut from G to C in a straight line.
In making, sew up from B to C, and either gather the bottom, A B, into a band, to which a frill is set on, or else make a deep hem to admit of a ribbon, which draws it up to the proper size, and ties in a bow. To this hem is sewed a broad frill or handsome piece of work. The latter is the most convenient plan of the two for the washerwoman, as the leg will lie quite flatly to be ironed.
TROWSERS FOR A LITTLE BOY.
PLATE 7. FIG. 17, 18, 19.
This is a particularly good pattern, and very suitable for a boy.
Procure your material 10 nails wide, to admit of one leg in the breadth.
Cut each breadth 7½ nails long.
Double the leg so as to leave 2 nails unfolded, or rather, fold it to within two nails of the selvage. Let D, Fig. 19, be the doubled part. From A to B is 2 nails, and is not double. From B to C is 4 nails, the one fold being cut in a slight curve from B to C, and in a sweep from A to C. The bottom of the leg is 3 nails wide. Slope from G to C, G being nearly 2 nails from the bottom.
The body is 10 nails long, and 2½ nails deep; fold it in four, and cut out the arm-holes (see Fig. 18).
In making, sew up each leg from K to G, and hem round every other part; next, make the body, hemming it all round, after which, sew the legs firmly to the body, making the flap, A L C, of one leg, overlap or lie across the flap of the other leg. These two flaps, after being firmly set into the band, are farther secured by back-stitching them together along the dotted line. Fig. 17.
MEN’S DRAWERS.
PLATE 7. FIG. 20, 21, 22.
These are men’s strong drawers, made of coarse twill or calico.
Procure your material 14 nails wide.
Cut each breadth 13 nails long.
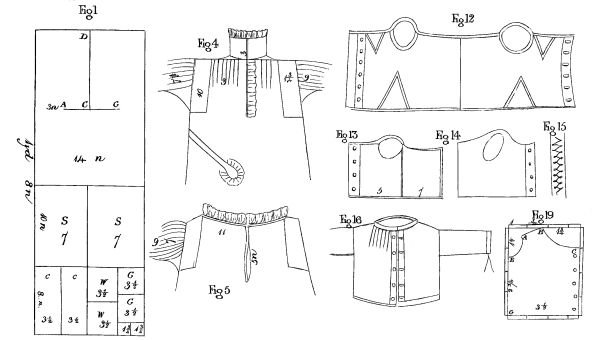
Fold the breadths in half, letting D, Fig. 20, be the doubled part. The drawers are quite straight at the top, the piece, C H F, being an extra bit put in (see Fig. 20).
PLATE 8.
SCALE.
Nails.
From A to B 3¾
From C to E 4¼
From the top to G 5
From F to E ½
Cut from G to B, and one fold from G to E; the other is from G to F.
A triangular piece is put in at the top of the back, of 3 nails in continuation from F to H.
The pair of drawers has two bands of about 7 nails long each, and 1½ nail deep, when doubled.
In making, sew up the legs, and put on the extra piece at the back. Sew the two legs together at the back, and hem the slit on each side in front. Set each leg into a separate band, leaving them open before and behind. Work four little oylet-holes in the band behind, to admit tapes, which are laced through them and tie; in front, metal buttons are put, and button-holes made. Down each leg, in the front, a broad tape or piece of strong calico is laid, to strengthen it. A slit of about 2 nails long is made at the bottom of each leg. Broad tape is laid on round each leg at the bottom, forming a sort of hem, and oylet holes are worked on each side of the slit, for tape to come out at, which draws them to the proper size.
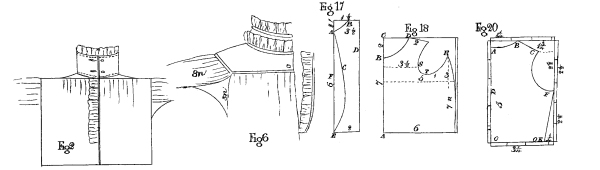
Fig. 20 represents the back of the drawers cut out.
Fig. 21 represents the back of the drawers made up.
Fig. 22 represents the front of the drawers made up.
WOMAN’S NIGHT-JACKET.
PLATE 8. FIG. 1, 2, 3.
SCALE OF DIFFERENT SIZES.
————— Woman. Girl of 18 yrs. Girl of 12 yrs.
Yds. nls. Yds. nls. Yds. nls.
Width of material 14 14 12
Quantity required for one 2 10 2 3 1 13
Quantity required for six 15 1 13 2 10 14
Quantity required for twelve 31 8 26 4 21 12
Whole length of body to be doubled 1 8 1 4 1 0
Space to leave for shoulders 3 2¾ 2½
Length of sleeves down the selvage 10 8 6½
Width of ditto, two in breadth 7 7 6
Length of collar down the selvage 8 7 6½
Width of ditto, or four in the width 3½ 3½ 3
Length of wristband down the selvage 4 3½ 3¼
Width of ditto, or four in the breadth 3½ 3½ 3
Length of binder down the selvage 4½ 3½ 3
Width of ditto 1 1 1
Size of sleeve-gusset 3 2¾ 2½
Size of neck-gusset 1½ 1¼ 1
Width of frill 1¼ 1 ¾
Night jackets for the higher classes are made of linen, lawn, cambric muslin, and fine calico; also of dimity and twilled calico; and for the lower orders, of linen or calico. The calico should be soft and strong; and the unbleached or grey calico, as it is usually called by Linen Drapers, is warmer and often more durable than the white.
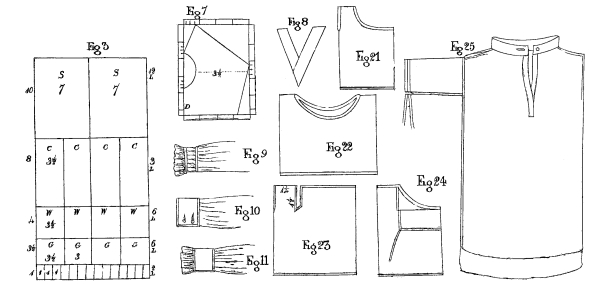
Fig. 1 represents the plan or picture of a piece of cloth of the proper width, on which all the parts for forming a woman’s jacket are accurately marked, with the exception of the shoulder-straps, which, as they do not fit in, might be made of any extra bits.
Cut out the two breadths of the skirt in one length, to avoid a seam on the shoulder. Fold it very exactly in half, and, after leaving 3 nails at each end of the folded side, to allow for the shoulders, slit open the neck from A to G, after which, measure carefully and find the middle of the neck, C, and slit it down to the bottom, D, to form the opening in front of the jacket.
The sleeves, which are 10 nails long, and the two cut in the width, are either sloped off towards the wrist, fulled into a wristband, as in Fig. 10, or else neatly run, at a sufficient distance from the edge, to form a kind of frill (Fig. 9). This running is done in two rows, extended nearly all round the cuff, and neatly stretched upon a piece of tape, which is laid inside, and carried all round the cuff.
Fig. 3 represents a plan for cutting out twelve jackets, which is the most economical number, cut out at once, to avoid waste. The pieces in the Plate are marked with the initial letter for their use, and the width of the piece, thus, S 7, signifies sleeve 7 nails wide. On the left hand of the plan is marked the length of each piece, and on the right hand is set down the number of those lengths required to be cut to form the set complete, thus, 12 L means 12 lengths. The frills are generally of fine lawn or cambric, or else corded, jaconet, checked, or other muslins.
NIGHT-GOWN.
PLATE 8. FIG. 5.
SCALE
————— Woman. Girl of 18 yrs. Girl of 14 yrs.
Yds. nls. Yds. nls. Yds. nls.
Width of material, if gored 15 14 12
Width of gore to be cut off each side at the top 1¾ 1¾ 2
Width of the bottom will be 18½ 17½ 16
Width across the top will be 11½ 10½ 8
Quantity required for one 4 1 3 8 3 0
Quantity required for two 7 13 6 8 5 11
Length of skirt 1½ 0 1¼ 0 1 0
Depth of slit in front 6 6 5
Space to leave for shoulders 2½ 2½ 2
Slope of shoulders 1 1 ¾
Width of binders 2 1½ 1½
Length of ditto down the selvage 8 8 8
Width of sleeves or two in the breadth 7½ 7 6
Length of sleeves down the selvage 9 8 8
Width of wristband (if required) 2 2 2
Length of wristband down the selvage 4 3½ 3
Size of sleeve-gusset 3 2 3
Depth of frill 1¼ 1 ¾
This shape is not so much worn as that of Fig. 4, nor perhaps has it so neat and finished an appearance, but on many accounts it is the most desirable, being in the first place, more economical; it also washes more easily, and above all, is particularly convenient in time of sickness, when it is very essential to a weak or suffering person to be able to draw open the gown at the neck and wrists, so as to have full play for the arms in changing her linen, or having blisters, leeches, &c. applied; whereas those night dresses confined at the neck in collars are very irksome, and cause much unnecessary suffering in being removed. The scale and plans so clearly explain the size, shape, &c. that nothing remains to be said, except that a band is sometimes worn round the waist, with a narrow frill sewn round the ends, which are sloped off, according to fancy.
It is better economy to cut three or six gowns together, as the gussets, binders, &c. take about the third of a breadth, so that in cutting out one, there is an unavoidable waste of the other two-thirds of a breadth. The two sleeves cut in the width, and are, for the largest size, 9 nails long.
ANOTHER NIGHT GOWN.
PLATE 8. FIG. 4.
It is more economical to buy your material of a sufficient width to merely gore it, if only one gown is to be cut out.
It is better to cross the skirt, and use 1½ breadth of very wide material, if six are to be cut.
SCALE FOR CROSSED SKIRT.
————— Woman. Girl of 18 yrs. Girl of 14 yrs.
Yds. nls. Yds. nls. Yds. nls.
Width of material 18 16 14
Quantity required for six 18 14 16 15 15 0
Length of skirt 1½ 0 1 6 1 3
Width of ditto 1½ breadth leaving 9 leaving 9
Piece to mark off at top and 7½ 7 6
bottom for crossing leaving 10½ leaving 9 leaving 8
Width of bottom when crossed 21 18 16
Width of top when crossed 15 14 12
Length of sleeve down the selvage 9 8 7
Width of sleeve 9 8 7
Length of binder down the selvage 10 8 7
Width of binder 1½ 1½ 1½
Length of collar down the selvage 8 6½ 5
Width of collar 3 2½ 2¼
Length of wristband down the selvage 4 3½ 3
Width of wristband 2 2 2
Size of sleeve-gusset 3 2 2
Size of neck-gusset 2 1 1
Depth of slit in front 6½ 6 6
Space to leave for shoulders 3 2½ 2
Width of frill 1¼ 1 ¾
SCALE FOR A GORED GOWN.
————— Woman. Girl of 18 yrs. Girl of 14 yrs.
Yds. nls. Yds. nls. Yds. nls.
Width of material 15 15 14
Piece to be gored off at each end of the top 1¾ 1¾ 1¾
Length of skirt 1½ 0 1 6 1 3
Width of sleeve 7½ 7½ 7
Width of binders 2 2 1½
All the other parts are the same as in the scale for the crossed gown.
In cutting out six crossed gowns, tear off the 9 breadths for the skirts, allowing 1½ breadth to each; after which, cut off the 6 lengths (9 nails long each) for the sleeves; two sleeves cut in the width. Next cut off a piece 10 nails long, which divide width-way into twelve binders of 1½ nail wide each. Afterwards, cut off another breadth of 8 nails long, to divide width-way into six collars of 4 nails width. The gussets will require two breadths of 3 nails deep, to be divided width-way also, in six of 3 nails width.
The wristbands are 4 nails long; and as only nine of 2 nails width can be cut in 1 breadth, the remaining three must be cut off a second breadth, which will leave sufficient cloth over, exactly to cut the 12 neck-gussets, in two rows deep of 2 nails square. By this arrangement, no waste whatever is made.
The one gored gown is cut according to the scale; Fig. 8 is a bosom-bit, which adds much to the strength of the slit. It is impossible to cut out one of these gowns alone, without a little waste.
PLATE 8. FIG. 6.
This is an exceedingly neat looking night-dress, and for full size is cut according to the following dimensions. Cut two breadths of 1 yard wide, and 1½ yard long each, and sew up the seams, leaving 3 nails from the top for arm-holes. Cut out two shoulder-pieces according to Fig. 7, which represents half, the letter D being the doubled part. If it is made of calico, put a neat piping round the one shoulder-piece, as it materially strengthens the night-dress; and after fulling the skirt evenly round to the other, and setting in the sleeves, lay the upper shoulder-piece over the lower one. Pipe and frill it up the neck, and if preferred, a collar may be added, with a second frill above. If the night-dress is made of linen, it must be neatly stitched instead of piped. The sleeves are 8 nails square, and the wristband, as in Fig. 11, 4 nails square, to which a frill is added.
FLANNEL WAISTCOAT FOR A LADY.
PLATE 8. FIG. 12.
Cut a piece of flannel 12 nails wide, and 7 nails deep; fold it in two, and at 2 full nails from the middle or doubled part, cut the arm-holes, which are 2 full nails wide, and 1¼ nail deep, leaving 2 nails for half the back; hollow the front half a nail. At the bottom of the waistcoat, immediately under the arm-holes, cut a slit upwards to the distance of 3 nails, and put into these slits, gores of 3 nails wide at the bottom, sloped off to a point, being 3 nails long. These gores are differently cut to most others, being sloped equally on both sides, instead of having one side straight, so that the point is in a straight line with the middle of the gore at the bottom (see Fig. 12).
Cut two other slits to admit of bosom gores of similar shape, but smaller size, being 1¾ nail broad, and 1¾ nail long. They are put in 1 nail from the shoulder-strap.
In making up, herring-bone all round the waistcoat; the slits and gores, and the seams also, are herring-boned with strong thread, the seams being turned flatly back, and laid side by side on the finger, so that the one row of herring-boning shall join the two compactly together (see Fig. 15). Some persons lay a broad tape, say a nail wide, down the front, on which the buttons are sewed, and button-holes worked. Tape shoulder-straps complete the whole. This waistcoat buttons in the front.
A BOY’S WAISTCOAT.
PLATE 8. FIG. 13, 14.
The following size is suitable for a child of 12 years old:—
The waistcoat is made in three parts; the middle piece should be 7 nails wide, and 6½ nails deep; the side-pieces must be the same depth, and 5 nails wide. Sew up the seams, and fold the waistcoat in four, like a pinafore, then cut out the arm-holes, which, while thus doubled, are 1½ nail in width, and the same in depth; the waistcoat is then opened, and hollowed out in the front (see Fig. 13).
In making up, tape is sewed all round the edge, at the inside, and broad tapes down the sides, in which the button-holes are cut. Straps are sewed on, and the whole is finished.
A WAISTCOAT FOR AN INVALID BOY OF THE WORKING CLASS.
PLATE 8. FIG. 16.
Take a breadth and a half of flannel, each 9 nails long, and sew them together, leaving them open in the front. Fold the waistcoat in four, and cut the shoulders, and slits for the arm-holes, as in a pinafore; the shoulders are 1½ nail deep, and the arm-holes 2½ nails long. Hollow it a little at the top, and after sewing up the shoulders, gather it at the top into a tape the proper length (say 5 nails). Put in sleeves without gussets, which are 7 nails long, and 4 nails wide before being sewed up; hem the fronts, and lay on a broad tape at the inside of the hem, in which the button-holes are made; herring-bone the bottom and sleeves.
A MAN’S UNDER WAISTCOAT.
PLATE 8. FIG. 17, 18.
This is generally made of fine calico, and is cut out according to the Plate.
For the back (Fig. 17), cut your paper pattern 9 nails long, and 7 nails wide: double it in half its width, and, as in the Plate, letting D be the doubled part, mark as follows:—
SCALE.
Nails.
From A to the top 1½
From B to the doubled side 1½
C is half way, and from C to the side F 1½
From E to the doubled side 2
Curve from A to B, and from A through C to E.
The front is cut as follows:—Let your pattern be 11 nails long, and 8 nails wide (see Plate 8, Fig. 18).
SCALE.
Nails.
From A to B is 9
From B to C 2
From C to D 2½
The shoulder, from D, slopes ½
Length of the shoulder 2
The arm-hole is sloped, and is rather difficult to manage, but by looking at the Plate, and following the directions, as nearly as possible, the same shape may be attained.
SCALE.
Nails.
From the arm-hole, S, to the side 3½
From the bottom, T, to the side 5
From the point, R, to the top 2
From the side to R 1
Curve from R to the bottom, also from D to B, and cut out the arm-hole.
In making up, sew the pieces together, lay on a broad piece of calico all down the front, lay a tape round the neck, and set on your buttons down the front, with button-holes to correspond.
This shape, but varying of course in size, will do for boys of all ages.
BOY’S VEST OR UPPER WAISTCOAT.
PLATE 8. FIG. 19, 20.
This is made of cloth, jean, or nankeen. The size here given, would suit a boy ten or eleven years old.
The vest is in three parts, viz.—one back and two fronts. To cut out the front (Fig. 19), let your paper pattern be 3½ nails wide, by 4¼ nails long.
SCALE.
Nails.
From the corner to E is 2¾
From the top to A ½
From the side to A ½
From B to each side 1¾
From C to the top 1
Curve in for the arm-hole, from E to A, cut from A to B, and curve from B to C.
For the back (Fig. 20), let your paper be 5 nails long, by 3¼ nails wide.
SCALE.
Nails.
From the top to A ¼
From the corner to B 1¼
From the side to C 1
From the top to C ¾
From the top to F 2½
From the corner to E ¼
Curve slightly from A to B, cut in a straight line from B to C, hollow for the arm-hole from C to F, cutting into the cloth about 1¼ nail, slope from F to E.
In making up, join the two shoulders together, then sew E G, Fig. 19, to F E, Fig. 20; line it, bind with galloon or tape round the neck, arm-holes, waist, and up the fronts, put on buttons, and make button-holes to correspond in front. Buttons are also put on round the waist, to which the trowsers are to button, as no braces are worn with this vest.
CHILD’S NIGHT VEST.
PLATE 8. FIG. 21, 22.
Some children are in the habit (when in bed) of kicking off their sheets; and it is very desirable for such to wear fine flannel or demet waistcoats under their night-gowns in winter, and calico ones in summer, to prevent their catching cold. These waistcoats or vests, if for children under five or six, may be cut two in the width of the flannel, and about 8, 10, or 12 nails long, according to the size of the child. After cutting off the pieces required, fold each in half its length, and sew up the side-seams, leaving 1½ nail from the top on each side, to form the arm-holes, which are neatly herring-boned round. The top is hollowed thus: leave about 1¼ nail on each folded side for the shoulders, and hollow down to 1½ nail in front, for the bosom, and to 1 nail behind, for the back. Herring-bone flatly all round, and the vest is completed.
CHILD’S DAY VEST.
PLATE 8. FIG. 23, 24.
Delicate children are often recommended to wear flannel shirts or vests next their skin. They should be of the finest flannel, with plenty of nap, which should be next the skin. These are cut much in the same shape as babies’ second shirts (see Plate 2, Fig. 30), excepting that the back is hollowed out, and it has no sleeves. Two shirts might be cut in the width, of 8 or 10 nails long. When folded in two, and sewed up at the seams, leaving 1½ nail for the arm-hole, the front should be cut. Leave 1¼ nail in each folded side for the shoulders, cut down nearly straight to 1½ nail for a front flap, and slope down behind to the same depth.
BATHING GOWN.
PLATE 8. FIG. 25.
Bathing gowns are made of blue or white flannel, stuff, calimanco, or blue linen. As it is especially desirable that the water should have free access to the person, and yet that the dress should not cling to, or weigh down the bather, stuff or calimanco are preferred to most other materials: the dark coloured gowns are the best for several reasons, but chiefly because they do not shew the figure, and make the bather less conspicuous than she would be in a white dress.
As the width of the materials, of which a bathing gown is made, varies, it is impossible to say of how many breadths it should consist. The width at the bottom, when the gown is doubled, should be about 15 nails: fold it like a pinafore, slope 3½ nails for the shoulders, cut or open slits of 3½ nails long for the arm-holes; set in plain sleeves 4½ nails long, 3½ nails wide, and make a slit in front 5 nails long.
In making up, delicacy is the great object to be attended to. Hem the gown at the bottom, gather it into a band at the top, and run in strings; hem the opening and the bottom of the sleeves, and put in strings. A broad band should be sewed in about half a yard from the top, to button round the waist.
WOMEN’S CAPS.
Women’s caps are generally made of checked, spotted, clear, or twilled muslin, widow’s lawn, and if for night-caps for the poor, sometimes of soft fine calico. The borders are of corded, cambric, jaconet, or clear muslin, and are sometimes, for ladies’ caps, edged with narrow lace, or are made entirely of hemmed net.
WOMAN’S DAY OR NIGHT-CAP.
PLATE 9. FIG. 1, 2
This is a favourite shape for a day-cap among the poor.
SCALE.
Yds. nls.
Width of checked muslin 1½ 0
Width of crown to cap, four in the width of material or, 6
Length of crown down the selvage 6½
Width of puffing or head-piece, twenty-four in width of material, or, 1
Length of ditto down the selvage 14
Width of bands to confine the puffing, 48 in the width, or ½
Length of bands down the selvage 7
Width of strings, forty-eight in the breadth ½
Length of strings down the selvage 7
Quantity of material for one cap 14
Quantity of material for twenty-four 4 3
Length of bordering to each, three breadths of 16
Depth of bordering down the selvage 1¼
Observe, that in the Plates the letter D always stands for the doubled part of the muslin.
In cutting out these caps, it is by far the most economical to cut out 24 at a time, as, if half that number is cut, half the width of the length of cloth from which the puffing is cut, is wasted, whereas the 24 exactly fit in.
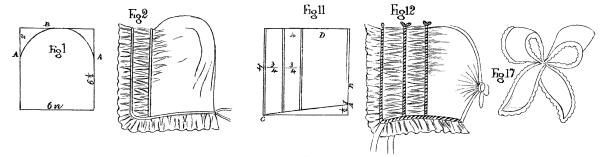
The crown must be rounded off at the top, for which purpose, double it in half its width, and at 2 nails from the top corner each way, round, or slope off the piece from A to B (see Plate 9, Fig. 1).
The cap is made up as follows:—
Double the bands in two, and turn down the edges as if for sewing. Hem the crown-piece with a very narrow hem up each side, to the distance of half a nail, and sew it firmly to each end of one of the bands; after which, whip and stroke evenly the remaining part of the crown, and sew it to the rest of the band in the middle. To the other side of the band, full on the head-piece or puffing, which is afterwards confined on the other side by being whipped and sewed to the second band. The double border is sewed on in front, and a single one behind, where previously there has been a pretty deep hem made, to admit of strings to draw behind. These strings are sewed into the cap, each at the opposite end of the hem to that on which it comes out. The strings are hemmed at the end, being either pointed or rounded, according to taste. Some ladies prefer their being 1 nail wide and rounded at the end, with a narrow frill or edging sewed on to the distance of 3 or 4 nails round the ends.
A VERY NEAT NIGHT-CAP.
PLATE 9. FIG. 3, 4, 5, 6.
This, when made of checked muslin, with a border of corded muslin, has a very pretty appearance, and is particularly comfortable for a night-cap, as it sets close to the head.
PLATE 9.
SCALE.
Yds. nls.
Best width of material 18
Length of head-piece down the selvage 14
Width of ditto 4½
Length of horse-shoe down the selvage 3½
Width of ditto 2½
Length of strings down the selvage 7
Width of ditto ½
Quantity of material for eight 2 3
Quantity of bordering, 3 breadths of muslin in width 16
Depth of ditto 1¼
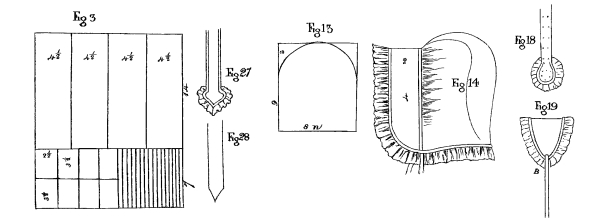
The most economical number of caps of this pattern to cut at once, is eight, and should be done as follows, to prevent waste (see Fig. 3). Tear off two lengths of 14 nails, which, when torn each in four, will form the eight head-pieces. The horse-shoe crowns must be cut in two rows deep, four in each row, of 2½ nails wide, which will require 10 nails of the breadth, leaving a piece 8 nails wide and 7 nails long. This piece will cut the eight pairs of strings, which are each half a nail wide, and 7 nails long. After cutting out the cap, shape the head-pieces according to Fig. 4 in the Plate, by which it will be seen that 1¼ nail is taken off in a direct line from A to B. The piece for the horse-shoe crown must be folded, and rounded carefully at the top, and then sloped off in a direct line, thus cutting off half a nail from each side.
In making up the cap, place the straight part of the head-piece in front, and put two runners, besides hem, at equal distances from each other in front, say ¾ of a nail. Whip the back neatly, and after hemming the horse-shoe crown, sew the head-piece firmly to it. Some people hem a cord round the horse-shoe which gives it a greater firmness, and looks like a piping when the head-piece is sewed in, as it ought to be, to the bottom, instead of the top of the hem. A hem is made at the bottom of the cap for a string to draw. Double borders in front, a single one behind, and the strings sewed on, complete the cap.
A YOUNG SERVANT’S NEAT DAY-CAP.
PLATE 9. FIG. 7, 8.
This shape is generally made of clear muslin, widow’s lawn, or jaconet, and is particularly adapted for girls on first going to service, from its neat simplicity.
SCALE.
Nails.
Best width of material 16 or 24
Width of cap 8
Length down the selvage 5
Quantity required for four caps, if yard wide 10
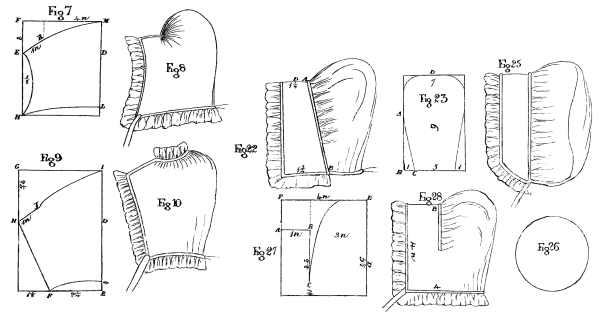
The cap is folded in half the width, and cut according to Fig. 7. The side marked D is the doubled part. Mark on the opposite side 2 nails from the top, E, and slope or hollow out a piece from E to H very gradually, letting the greater width of the piece thus hollowed out not exceed half a nail.
Next slope off gradually from H to L at the distance of ½ a nail from the bottom; after which, cut the straight line E K, which is 1 nail in length, the letter K being situated about ¾ of a nail from the side and 1¼ from the top, and then slope gradually to M. In making up the cap, sew from E to K, and gather in the top from K to M, as in Fig. 8. A single or double border is put in front. This is a small size.
Fig. 18, 19, 27, and 28 are different shaped strings for caps.
ANOTHER NEAT CAP FOR SERVANTS.
PLATE 9. FIG. 9, 10.
This shape is particularly liked by the poor, from the ease with which it is made up and washed, as, upon undrawing the string, it opens readily at the top, and lies quite flat to be ironed.
As the shape is peculiar, if many are to be cut at once, it would be the least wasteful plan to cut out on a doubled piece of paper, the pattern of the cap, according to Fig. 9; open it out and lay it on the material in such directions as to cut to most advantage. If only one is to be cut, procure a piece of muslin 8 nails wide and 5½ nails long; which, when folded evenly in half its width, shape as follows, according to the Plate. The side marked D is the doubled part; from E at the bottom to F is 2¼ nails. From the top, G to H, measure 2¼ nails, and cut off in a sloping line from I, at the top of the doubled corner, to H, again cut from H to F, after which cut off from F to about ½ a nail above E, and then the shape of the cap is formed.
Strings of the usual size, ½ nail wide and 7 nails long, complete the cap.
In making it up, sew from H to Y, and then hem all round the open part along Y to I, and sew on a full frill of ¾ nail deep, and about 18 nails long. Afterwards hem the front and back of the cap, put double borders in front, and a single one behind, of 1 nail deep, and 3 breadths of 16 or 18 nails wide.
ANOTHER SHAPE.
PLATE 9. FIG. 11, 12.
This is a very simple shape, and for washing and making up is equally convenient with Fig 10. It answers well for a bonnet cap for ladies, in which case it might be made of net or tulle, with a quilling or lace border.
SCALE.
Yds. nls.
Best width of material 1 2
Width of cap without runners 4
Length of cap down the selvage 9
Sloped off at the bottom from C to A ½
Fold the cap in half its length, making D the doubled part (see Fig. 11). Sew and fell from A to B, to the depth of 1 nail, and hem round the rest of the opening behind, to admit of a ribbon. Let there be two runners besides the hem in front, to admit of tape or narrow ribbon. The border must depend upon the purpose for which the cap is intended: if for a night-cap, a double border in front and single behind will be required: if for a bonnet cap, a double border or quilling only, in front will be sufficient. It may be as well also to remark, that if it is meant for a night-cap, the length of the cap down the selvage should be greater, say 11 or 12 nails; and the width of the material, to cut to the best advantage, must, of course, be either exactly the same, or double.
A NEAT SCHOOL-GIRL’S CAP.
PLATE 9. FIG. 13, 14.
SCALE.
Yds. nls.
Best width of material 1 8
Length of the crown down the selvage 6
Width of the crown, or three in the breadth 8
Length of the head-piece down the selvage 8
Width of the head-piece, or twelve in the breadth 2
Quantity required for twelve caps without strings 2 0
Quantity required for twelve caps with strings 2 12
This pattern needs little further explanation, the shape and size are so clearly given in the Plate. The head-piece is sloped off at the ears, beginning to cut at 1 nail above the corner, to 1 nail beyond the corner, at the bottom of the cap.
This cap is for school girls, and is particularly neat if of checked muslin with corded muslin frills.
A FAVOURITE CAP FOR LADIES AND POOR WOMEN.
PLATE 9. FIG. 15, 16, 17, 18, 19.
SCALE.
Yds. nls.
Best width of material 1 8
Width of crown-piece, three in the width 8
Length of ditto down the selvage 6½
Width of head-piece, twelve in the breadth 2
Length of ditto down the selvage 8
Length of weepers (if wanted) down the selvage 2½
Width of ditto, sixteen in the breadth 1½
Length of bands down the selvage (if wanted) 1 14
Width of ditto, twelve in the width 2
Quantity required for twelve caps, without extras 2 2
Quantity for twelve, if with weepers 2 5
Quantity for twelve, if complete with bands 4 3
Width of bordering 1
Length of ditto, two breadths width 1 8
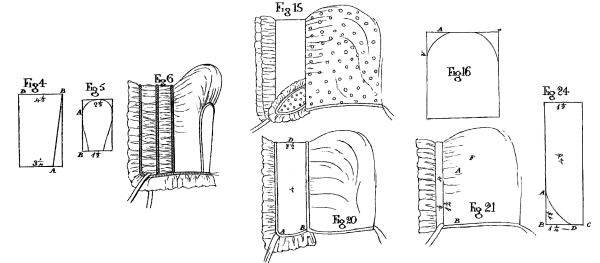
This cap is pretty and not expensive if made without the band and weepers, which, of course, add much to the cost; twelve is the best number to cut out at once. They are generally made for ladies of sprigged muslin, when the head-piece should be of strong muslin or fine calico. The borders are cambric, muslin, or net, edged with Valenciennes lace, or other neat trimming. The weepers are also frilled and edged, as also the rounded ends of the band. The crown is sloped off a little at the corner, as seen in Fig. 16, at A, which is about 2 nails from the corner. The weepers are also shaped to a point, as in Fig. 19 (see B). The band (Fig. 18) is gathered in at about 1½ nail from the end, which is rounded, with edging sewed on. The middle of the band is plaited, and sewed firmly on to the middle of the head-piece, in front.
A NEAT COMFORTABLE DAY OR NIGHT-CAP.
PLATE 9. FIG. 20.
This is a shape particularly suitable for day-caps for young servants, or night-caps for any age or station. If intended for day-caps, they should be made of clear or jaconet muslin; if for night-caps, of check or calico.
SCALE.
Yds. nls.
Best width of material 1 0
Length of head-piece down the selvage 8
Width of ditto, or four in the width 4
Length of crown down the selvage 6
Width of ditto, or four in the width 4
Quantity required for four caps without strings 14
Quantity required for twelve caps without strings 2 10
⁂ Cap strings, for any number of caps not exceeding sixteen,
require seven additional nails, as sixteen pairs exactly cut in
the width, so that sixteen caps would he the most economical
number to cut.
The head-piece is a little sloped off at the ear from A to B, and is made up double, so as to be only 2 nails deep, when the cap is completed.
ANOTHER CAP.
PLATE 9. FIG. 21.
This shape is very suitable for a servant’s day or bonnet cap; it is simple and pretty in appearance, and not expensive.
SCALE.
Yds. nls.
Best width of material 1½ 0
Length of crown down the selvage 7
Width of ditto, or four in the width 6
Length of band down the selvage 8
Width of band[1]
Quantity required for twelve caps with strings 1 13
In making it up, the band is doubled in half, the crown whipped and sewed to it, leaving it plain from A to B, for the space of 1¾ nail. A double border is sewn on in front.
AN OLD WOMAN’S CAP.
PLATE 9. FIG. 22, 23.
This shape is generally preferred by old women, as it sets comfortably over the ears.
SCALE.
Yds. nls.
Best width of material 21
Length of head-piece down the selvage 7
Width of ditto, or twelve in the breadth 1¾
Length of crown down the selvage 9
Width of ditto at the widest part, or three in the width 7
Width of ditto when sloped off at the bottom 5
Quantity required for twelve caps without strings 2 11
Additional quantity for strings 7
It is almost impossible to cut out a number of these caps without a little waste.
The head-pieces, when torn off, are 7 nails long, and 1¾ wide; double them in half their length, and then slope off from A to B, one nail. The straight part is the front, to which a border is sewed. The crown is next shaped, according to Fig. 23, for which purpose, double the piece in half its width, and from the corner, B, measure 7 nails on the side to A, and 1 nail on the bottom, to C, and cut off in a straight line from A to C. Round off the corner at the top, from A to D. The crown is sewed on plain for the space of 1½ nail from the bottom, and then evenly fulled into the remainder of the head-piece.
A POOR WOMAN’S NIGHT-CAP.
PLATE 9. FIG. 24, 25, 26.
This shape is sometimes made of linen, but generally of strong calico or check.
SCALE.
Yds. nls.
Best width of material 18
Length of head-piece down the selvage 9
Width of ditto, or twelve in the breadth 1½
Size of squares in which to cut out the circular crown
or two in the breadth 9
Quantity required for twelve caps without strings 3 15
Additional quantity for twelve pair of strings 7
The head-piece is sloped off, as in Fig. 24, from A, which is 1½ nail above the corner, B, to C.
The crown, after being rounded, is evenly fulled into the head-piece, which latter is sewed neatly together behind, at the opening, D C.
ANOTHER CAP.
PLATE 9. FIG. 27, 28.
This is a pretty shape for almost any purpose, and in any thin material; it is cut out in front very much in the same manner that a baby’s cap is cut behind, which will be seen if the Plate is turned round, so as to place the doubled part, D, at the top.
SCALE.
Yds. nls.
Best width of material 1 8
Length of cap down the selvage 5½
Width of ditto, or three in the breadth 8
Depth from F to A 1½
Space from A to B, to be cut 1
Length to be cut from B to C 2
Then slope gradually, in a circular direction,
from E to C
In making up the cap, sew neatly from A to B, and then full in the part from E to C, evenly to the part between C and B; a hem in the front and at the back, is next made for a ribbon or tape, and a small bow, either of the same material (see Fig. 17), or white or coloured ribbon may be put at B (Fig. 28).
BATHING CAP.
These are made of oil-silk, and are worn, when bathing, by ladies who have long hair. Cut a piece of oil-silk, 4 nails long and 8 nails wide; double it so as to make a square; let the doubled part be the back of the cap, and slope off the corner at the top, towards the back, in a curve, so as to shape it to the form of the back of the head. Sew up along the top of the bathing cap, binding it with tape at the seam, both at the top and in the front. Lay on a tape behind to form a hem, making oylet-holes at the ears, and passing a string through each oylet-hole, which is fastened down at the opposite side; these strings draw up the cap, when worn, to the size required.
It is advisable, however, for those who have not long hair, to bathe in plain linen caps, so as to admit the water without the sand or grit, and thus the bather, unless prohibited on account of health, enjoys all the benefit of the shock without injuring the hair.
These caps are often worn by children when the head is shaved, if subject to diseases in the head, as ring-worm, scald-head, &c.
DRESSING-GOWNS.
PLATE 10.
Dressing-gowns are generally made of warm materials, for the winter, as flannels, either printed or plain, merino, shawl, either the real or imitation, and for gentlemen, of cloth or jean. For summer, they are of dimity, calico, twilled muslin, and sometimes, though rarely, of silk. There are various ways of making them; only a few of the most approved shapes will be here mentioned.
PLATE 10. FIG. 1.
A PLAIN USEFUL SHAPE, ESPECIALLY FOR MEN.
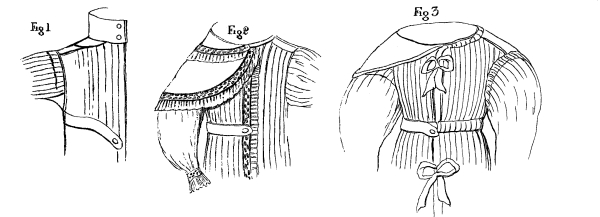
This gown is made with a deep hem turned up, and a strong piping at the top of it. It is divided into four, and the arm-holes left in the two front seams, sloping the flannel 1 nail deep, and 2½ nails long, for the shoulders. The neck-gusset is put in double, and the shoulder-strap laid over it. The gown must be neatly plaited behind and in front, set firmly into the double collar, and stitched with strong thread near the edge. Some people pipe every seam of a dressing-gown with white or coloured muslin, linen, or glazed calico. The back is drawn up by means of a string-case, over which a band should button. A large button is put on the band, and on the collar, and the button-holes should be very firmly sewed round, either with tape or with button-hole stitch. After putting in the sleeves, run or back-stitch the plaits firmly down again, at about ¼ nail below the gathering, to make them lie flat.
PLATE 10.
SCALE.
————— Man’s size. Woman’s size. Girl’s large size.
Yds. nls. Yds. nls. Yds. nls.
Width of flannel 14 14 14
Quantity required for one 10 5 8 10 6 0
Length of skirts 2 0 1¾ 0 1¼ 0
Number of breadths 4 0 4 0 4 0
Length of sleeve down the selvage 12 10 8
Width of ditto 9 8 7
Length of shoulder-strap 4½ 4 3½
Width of ditto 1½ 1½ 1
Size of double neck-gusset 2½ 2 2
Size of sleeve-gusset 3 3 2½
Width of collar 5 6 4
Length down the selvage 10 8 8
Width of wristband 2½ 2 2
Length of ditto down the selvage 4½ 4 4
Width of band 2½ 2 2
Length of ditto down the selvage 20 12 12
Space to cut for the shoulders 2½ 2 2
Depth for the shoulders to slope 1 1 ¾
PLATE 10. FIG. 2.
This figure represents a dressing-gown made of dimity. A deep hem of 3 or 4 nails is made at the bottom, insertion-work is sewed up the fronts, and round the cape, collar, and wrists, at the edge of the work a frill is put on. The gown is fulled in evenly to the shoulder-strap and neck-gusset at the top, and may be confined or not, at the waist behind, according to pleasure. The front is generally left unconfined, so that the band alone arranges it in folds.
FIG. 2, 3.
SCALE.
————— Woman’s large size. Woman’s small size.
Yds. nls. Yds. nls.
Width of material 14 14
Number of breadths 3 breadths 3 breadths
The one breadth crossed off at the top 5 5½
Length of breadths 1¾ 0 1½ 0
Length of shoulder-strap 3¼ 3¼
Width of ditto 1½ 1½
Length of neck-band or case 10 9
Space for shoulder 3½ 3½
Length of arm-hole 3 2½
Arm-hole curved into the cloth 1¼ 1
Length of waist 5 4½
Length of string-case 10 8
Sleeve cut according to Plate 12, Fig. 5 and 6 Fig. 5 & 6 Fig. 5 & 6
Collar cut according to Plate 13, Fig. 7 Fig. 7 Fig. 7
Cape cut according to Plate 13, Fig. 6 Fig. 6 Fig. 6
PLATE 10. FIG. 3.
This gown, made of flannel, either plain or printed, is plaited in small regular folds at the neck, where a string-case of muslin or white ribbon is put for a string to pass through. The gown is again plaited in the same folds at the waist, in two rows, to which another string-case is sewed all round the waist. A deep hem is made at the bottom, and turned up with a piping of white; or if it is a printed flannel, of some coloured glazed calico or muslin; the ribbons in front are the same colour, and a flannel band is piped with it, as well as the wristbands and every seam on the shoulders, round the sleeves, &c. The sleeves should be stitched down about 1 nail below the shoulder, to make the fulness lie close and flat. If made of printed flannel, it is useful to wear at the sea-side, as a walking dress, to and from bathing.
CLOAK DRESSING-GOWN.
PLATE 10. FIG. 4.
This is a comfortable simple pattern; it can be made either of flannel or lighter material, and is equally suitable for men, women, and children; it is very convenient for the latter when taken out of a bath, or for sitting up in bed.
SCALE.
————— Man. Woman. Girl of 16 yrs. Girl of 10 yrs. Child of 5 yrs.
Yds. nls. Yds. nls. Yds. nls. Yds. nls. Yds. nls.
Length of skirt 2 0 1½ 0 1¼ 0 1¼ 0 1½ 0
Number of breadths 4 0 4 0 4 0 3 0 3 0
Space for shoulder 2 1 1 ¾ ¾
Depth of arm-holes 5 4 3½ 3½ 3
Length of string-case 12 10 9 8 7
Length of band 16 14 12 10 8
Shoulder-piece (see Plate 13) Fig. 1 Fig. 1 Fig. 1 Fig. 1 Fig. 4
Collar (see Plate 13) Fig. 7 Fig. 7 Fig. 7 Fig. 31 Fig. 31
Cape (see Plate 13) Fig. 6 Fig. 6 Fig. 6 Fig. 6 Fig. 6
Sleeves (see Plate 12) Fig. 16 Fig. 16 Fig. 16 Fig. 16 Fig. 16
cut smaller cut smaller
After the seams have been herring-boned up, the cloak is folded in four, to find the shoulders, which are cut in a gentle slope to the proper width, and sewed up. The arm-holes having been left, the sleeves are next put in, after which, the gown is fulled evenly into the double shoulder-piece; the collar and cape are next put on; the hem at the bottom should be deep, and turned up with a flannel or tape piping; down the sides and round the cape, collar, &c., should be bound with flannel binding, to give a finish. Some persons omit the sleeves, having merely slits for the arms.
A DRESSING JACKET.
PLATE 10. FIG. 5, 6.
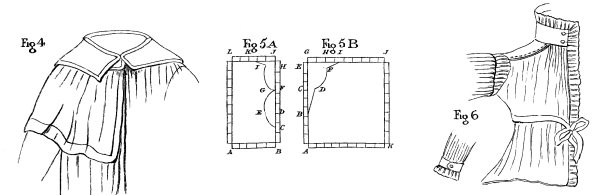
Some persons merely wear a little flannel, calico, or twilled muslin dressing jacket, and as it is usually made to fit the figure, the breadths are much gored; for the purpose, therefore, of better explaining the shape, a figure is made of the breadth when cut out. Fig. 5 A, is half of the back breadth, which is doubled in two, and Fig. 5 B is the whole of one of the front breadths.
SCALE.
————— Woman’s large size. Woman’s small size. Girl’s large size. Girl’s small size.
3 3 3 3
Width of material 12 nls. 11 nls. 11 nls. 11 nls.
Length of each breadth 14 — 12 — 10 — 8 —
Length of sleeve 12 — 10 — 8 — 8 —
Width of ditto 10 — 8 — 8 — 8 —
Length of collar 8 — 6½ — 6 — 5½ —
Width of ditto 3 — 3 — 2 — 2 —
Size of neck-gusset 2 — 1¾ — 1½ — 1¼ —
Length of arm-hole 4 — 4 — 3½ — 3 —
Length of string-case 4 — 3½ — 3½ — 3 —
Space for shoulder 3¾ — 3½ — 3 — 2½ —
Length of skirt-gusset 4 — 3 — 3 — 2½ —
Breadth of ditto 2 — 1½ — 1½ — 1½ —
FIG. 5 A.
Or half the back of the jacket when cut out, supposing the breadth to be folded exactly in two.
Let A L be the folded side.
SCALE.
Nails.
Space from A to B 5½
Do. do. B to C 2½
Do. do. C to D 3½
Do. do. D to E 1¼
Do. do. D to F 2½
Do. do. F to G ¾
Do. do. F to H 3
Do. do. H to I 1½
Do. do. H to J ½
Do. do. J to K 3
Do. do. K to L 2½
FIG. 5 B.
Or the whole of one of the front breadths.
SCALE.
Nails.
Space from A to B 4
Do. do. B to C 4½
Do. do. C to D 1
Do. do. C to E 2½
Do. do. E to F 2¾
Do. do. E to G 1
Do. do. G to H 2¾
Do. do. H to I 2¼
Do. do. I to J 6
Do. do. J to K 12
In making up this jacket, sew the 3 breadths together, putting in at the bottom two gussets or triangular pieces. Make a narrow hem at the bottom, sew up the shoulders, and put in the sleeves. Set the back breadth plainly into the collar, but full it at each end into the neck gusset, and also in front. Put the string-case about a nail lower than the arm-holes.
FLANNEL PETTICOATS.
PLATE 10. FIG. 7.
The breadths of flannel are cut according to the height of the person, allowing a good tuck besides, to be let down after the petticoat has been washed.
SCALE.
First or largest size, for a full grown woman:—3 breadths of flannel sewed simply together; slit behind 6 nails deep, and opened in a seam.
Second size, for a middle sized woman, 2½ breadths; the half is crossed off 5 nails, and the two gores are sewed, one on each side, between the two plain breadths; slit behind 5 nails; it is made in the middle of one of the plain breadths. It is more economical to cut two petticoats at once, as 5 breadths will make two, but it requires 3 to cut one out, and there must be waste.
Third size, for a girl of fourteen or sixteen, 2 breadths. From 1 breadth is cut a gore of 5 nails at the top, sloped off to 1 nail; this gore is sewed at the opposite side of the same breadth, placing the 1 nail width at the narrow end of the breadth. The slit behind must be determined by doubling the petticoat exactly in half, letting it be about 4 nails long.
Another way of cutting this petticoat, is by crossing it like a shift, and then putting the two broader ends to the bottom, while the narrow part is at the top; by this method there is no waste, and it saves both time and trouble.
Fourth size, 2 breadths: 1 breadth is cut in half, and 1 half is gored 5 nails; the two gores are sewed, one on each side of the whole breadth, in front, and the half breadth is put in behind. The slit is torn down the middle of the half-breadth, and is 4 nails long.
Fifth size, for a girl eight or ten, 1½ breadth. The ½ breadth is gored, and the whole breadth torn in half; a gore is sewed on each side between the two half breadths. Slit behind 3 nails deep, in the middle of the ½ breadth, behind.
Sixth size, for a child five or six, 1½ or 2 breadths, sewed simply together without goring. Slit 3 nails long behind.
Petticoats are variously made up. The most usual way is plaiting the top in regular folds on each side, letting it be quite plain, or nearly so, in front; it is then set firmly into a linen, calico, or jean band, of the proper width to encircle the waist, and of 1 nail deep when doubled and turned in. Strong tapes are sewed to the ends of the band, and sometimes a large button-hole is made in the band, about 2 nails from the end, through which the tape of the opposite end is drawn, which makes the petticoat set neatly to the figure.
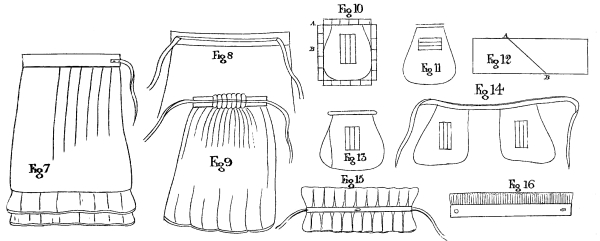
Another manner is to make the petticoat up without any slit behind, so as to be a round skirt; a band of the same size is set on quite plainly, without plait or fulness (see Fig. 8). A runner is made all round in the middle of the band, and two button-holes for the strings to come out of, are made at the two sides of the petticoat under the arm; one tape is sewed firmly down at the end of one of the button-holes, carried all round the petticoat, and drawn out again at the same hole; the other tape, in a similar manner, is sewed down at the other button-hole: when the petticoat is on, and the tapes drawn and tied in front, the fulled part lies behind, forming a sort of bustle to set off the dress properly (see Fig. 9).
The tops for children’s petticoats are generally a kind of stay, to which the skirt is either sewed or fastened by means of buttons, and to which the drawers button also. For children’s stays, see Plate 11.
POCKETS.
PLATE 10.
Pockets are either worn tied round the waist, fastened into the petticoat, or buttoned upon the stays. When fastened into the petticoat, they are made of the same material, otherwise of dimity, calico, jean, twilled muslin, and sometimes of nankeen or brown jean.
Take a doubled piece of six nails width-way, and seven nails selvage-way when doubled, and cut according to Fig. 10. For this purpose, double the folded piece in half width-way, and slope off from A to B one nail. The hole in the pocket is slit down about four nails, beginning at three-quarters of a nail from the top. Cut the slit in the shape of an I, in order to allow of a deep hem being made on each side. The two pieces of the pocket are run firmly together all round, at a little distance from the edge, on the wrong side. It is then turned inside out, the seam well flattened, and back-stitched all round with white silk, about a quarter of an inch from the edge. The top is set into a broad piece of tape, which is doubled over it and forms the strings also. The slit is hemmed or back-stitched neatly down. Sometimes an inner pocket or pockets are made for a watch, &c., and this is done by sewing a square piece of the material inside the pocket. The top is left open, but the sides and bottom of it are firmly sewed down.
ANOTHER POCKET.
PLATE 10. FIG. 11.
This differs from the other merely in having the slit cut the contrary way, so as to open width, instead of length-wise.
ANOTHER POCKET.
PLATE 10. FIG. 13, 14.
This shape is preferred by some persons, as it sets better to the figure than the others. The straight side is worn in front; and, in cutting out a pair of pockets, care must be taken to make them for the right and left side. The shape is exactly the same as Fig. 10, excepting that, after they are cut out, a gore is taken off from the one side and sewed on to the other, by which means the one is straight and the other, in consequence of the addition, is very much sloped. When pockets are fastened into gowns and petticoats, they are a little fulled at the top, and the slit of the pocket is sewed to the corresponding slit of the petticoat. Some people cut out the slit for the pocket differently, as they are considered to lie flatter to the person than the usual shaped pocket. It is formed by making an oblong bag or pocket, about eight nails long and five nails wide, and cutting at one end, in a slanting direction, so as to take off a triangular piece. To save waste, it is better to make two pockets at once, letting the oblong piece be still five nails wide, when doubled, but fifteen nails long (see Fig. 12); crease it in half its length, and then cut, in a slanting direction, across from A to B. The part cut forms the slit or opening to the pocket, which is sewed all round to the slit in the petticoat or gown.
ANOTHER METHOD.
This is simply a lining or square piece of calico, about ten nails wide and eight nails deep, sewed to the inside of the petticoat quite plainly. The petticoat has a slit of four nails deep.
FRILLS.
Frills are in use when high gowns are worn, and are made of cambric, muslin, net, lace, tulle, crape, &c.
A SIMPLE FRILL.
This is merely a strip of muslin, about fourteen nails long and three nails wide, more or less, according to pleasure. It is merely hemmed all round, and simply plaited up, in regular folds, to the proper size.
A PARTICULARLY NEAT FRILL.
PLATE 10. FIG. 15.
This is made of net or clear muslin, and is neatly fulled to the band. The edge, instead of being hemmed, is rolled over a bobbin to stiffen it. The band is about half a nail wide, and doubled, and is nine nails long. The frill on each side is fourteen nails long, and two nails wide. A button-hole is put in the middle to fasten it to the gown, and it ties at the ends with ribbons.
A CRIMPED FRILL.
PLATE 10. FIG. 16.
This is very suitable for young children, especially boys, and is generally made of lawn or cambric. The frill should be double the length of the size round the neck, and about one nail wide. A neat hem at one edge, and the other is sewed to a band of the proper length, say about five nails, and of half a nail in depth. These frills should be crimped very neatly.
PLATE 10. FIG. 17.
This frill is to be made like Fig. 15, excepting that the muslin is only one nail deep, and crimped in the same manner as Fig. 16. It is very suitable for young children.
PLATE 10. FIG. 18.
Another and more ornamental frill, made of muslin or net, with edging sewed on it.
The muslin or net must be about four nails wide, and fourteen or sixteen nails long. The frill is creased down the middle, and on each side of the crease, at a quarter of a nail distance, it is neatly run with a long thread, and drawn up to the proper width, forming a puffing in the centre of the frill. This puffing is first stroked with the needle into an even fulness, and then sewed at each side close to the gatherings, to a band of a quarter of a nail wide only, or still narrower, so as to raise the puffing sufficiently to look well, and yet not too much to admit of a ribbon being drawn smoothly through it. This ribbon ties the frill round the neck.
PLATE 10. FIG. 19.
This is a very simple frill, and, when well made, looks remarkably neat. The net of which it is composed must be about two nails and a quarter wide, creased in the middle, and finely plaited in small neat plaits. It is then doubled, and bound on the outside down the folded centre with a narrow ribbon, so that the two sides of the frill lie close together, instead of being open, like Fig. 18.
ANOTHER FRILL.
This kind, which is sometimes called a Ruche, is made exactly contrary to the usual mode. The frill, instead of being run down the middle, is joined down the sides, and confined at the joining into a ribbon, so that the top of the frill is double; and as it is usually made of tulle, or some rather stiff material, it stands out stiffly from the neck. Pelerines have sometimes a double frill or Ruche, of the same material that they are made of, sewed to them.
CUFFS.
PLATE 10.
There are various kinds of cuffs, for different purposes, of which the most useful only are here explained.
TIDY CUFFS.
PLATE 10. FIG. 20, 21.
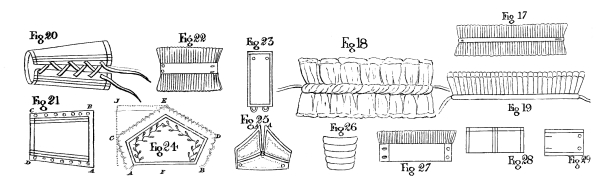
Tidy cuffs are much worn by persons whose employments are apt to injure the sleeve of the gown, either by wearing it out, staining, or greasing it. They are very valuable whilst drawing, writing, pasting, or when in the kitchen; and in these cases are generally made of Holland or nankeen, and when braided with dark blue, green, crimson, brown, or any other suitable colour, with ribbons to lace up of the same, they have a particularly neat effect. The cuff is cut out as follows (Fig. 21):—Procure a piece of Holland four nails down the selvage, and five nails wide; double it in half its width, and slope down by the selvage from A to D, and from B to C, cutting off half a nail in a direct slope, so that, when open, the end, C D, is but four nails wide, while A B is five. Turn down a deep hem along each of the sloped sides half a nail deep, and over the stitches put a braid, with two other rows of the same close together on the hem, leaving sufficient space between to insert a thin whalebone to support the cuff, and keep it from wrinkling when on the arm. The lace-holes are worked with silk the same colour as the ribbon. Fig. 20 represents the cuff when laced up.
PLATE 10. FIG. 22.
This is a neat cuff to lay on the dress, and is either made of plain net, of lace, or of muslin, with or without edging, and sometimes of satin ribbon. If for mourning, the net should have a broad hem. It is gathered and sewed into a band about one nail deep, and three or three and a half wide, according to the size of the wrist. There should be two pearl buttons set on one end, and button-holes made to correspond.
PLATE 10. FIG. 23.
This is a plain band, to be made to fit the wrist exactly, of silk, satin, or velvet, to be laid on a thin evening sleeve. It may be one nail broad or more. A rouleau is sometimes laid on round it, or a narrow piping. If it is made of silk the colour of the dress, or of white silk embroidered, it has a very pretty effect.
PLATE 10. FIG. 24.
This is a dress cuff, to wear with lace or tulle sleeves, and may be made of any rich material, with a piping of satin and an edging of blonde or lace. The inside is sometimes embroidered in floss silk. In cutting it out, procure a piece of paper about two nails and a half deep, and four nails long; double it in half its length, and measure up the side from A to C, one nail and a quarter, leaving from C to the upper edge, J, one nail and a quarter also. Cut off the corner from E to C, curving it a little inwards, and again, from C to A, cut off in a direct line one quarter of a nail. Open it, and it will resemble Fig. 24 exactly.
PLATE 10. FIG. 25.
This cuff resembles the preceding one, but has, in addition, a small second cuff laid on the lower part of it, and a slit cut down from the top to about one nail and a quarter depth from A to B. The top of the second cuff comes just below the slit, and it is a little sloped away at the sides.
PLATE 10. FIG. 26.
A cuff worn in deep mourning, especially by widows, and made either of clear muslin or black crape. It consists of fold lying upon fold, and is either sewed upon the sleeve or made to slip over the hand. The folds are four or five in number, and lie just one above the other, each being about a quarter of a nail deep.
PLATE 10. FIG. 27.
This is to be worn as a trimming or edging, below the sleeve, upon the hand: the band buttons inside the sleeve. The frill is of muslin, cambric, net, or lace. It should be very full, and got up in puffs, or very finely crimped. The ends of the bands should have deep hems, in which the button-holes are worked. The band is about three-quarters of a nail deep, and three or three nails and a half wide.
PLATE 10. FIG. 28.
This is a neat simple little cuff, and suits the collar, Plate 13, Fig. 26. It is well adapted for mourning. Cut two pieces of muslin, net, lawn, or cambric, of two nails square, and hem each round with a broad hem; sew the two together to the depth of about one nail; the parts sewed together form a sort of band inside, while the others, being unattached, fall backwards over the sleeve.
PLATE 10. FIG. 29.
A simple, plain, mourning cuff, with a broad hem above and below. The cuff to be about two nails deep, and three and a half or four nails long, according to the size of the wrist.
APRONS.
PLATE 11.
If for common use, aprons are made of white, brown, blue, black, or checked linen, of black stuff, calico, Holland, leather, nankeen, print, or long cloth; if for better purposes, of cambric muslin, clear, mulled, or jaconet muslin, silk, satinette, satin, &c. The length of the apron is, of course, generally determined by the height of the wearer, and the width, by that of the material, and by the purpose for which it is intended. For working aprons, the width is generally one breadth of a yard wide; for dress aprons, two breadths, one of which is cut in half, and these halves put one on each side of the whole breadth. If the material should be wide enough, one breadth, of from fourteen to twenty nails, will answer very well.
DRESS APRON.
PLATE 11. FIG. 1.
This is made of satinette, or thick satin silk, and consists of two breadths, one in front, and a half-breadth sewed on each side of it. None of them are to be at all sloped. The length is regulated by the pleasure of the wearer, and a broad hem of three-quarters of a nail deep is made all round. The length of the band must vary according to the size of the waist, and must be cut by Fig. L, which represents it when doubled. The part from A to B, or that to which the apron is fulled, is five nails and a half; from A to C is one nail and a half; and from B to D is one full nail. The remainder of the band, from B D, onwards to F, is determined by the size of the waist. A piece of whalebone is stitched into the centre of the band, A C, and on each side of it a little chain-stitch is worked, in thick silk, of the same colour as the apron. The folds are exactly according to the Plate, beginning within the hem, and laid evenly along until below the whalebone, when a space is left. The chain-stitch is next worked in two rows, parallel with the curved shape of the band, allowing little more than a quarter of a nail between the rows. By this means the folds are neatly confined, and it prevents the bustling effect they might otherwise have. These folds are very small and close. The band has a small piping below, but is plain at the top, and fastens behind with hooks and eyes.
PLATE 11.
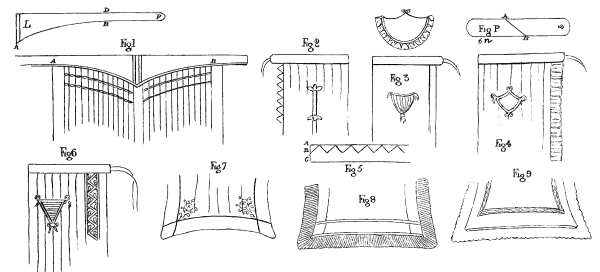
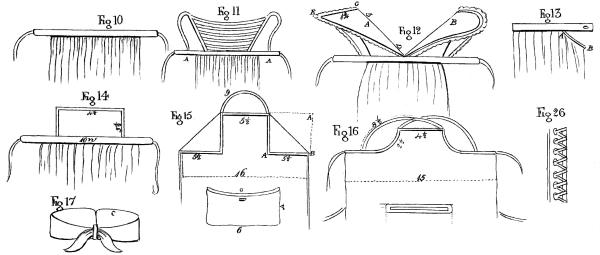
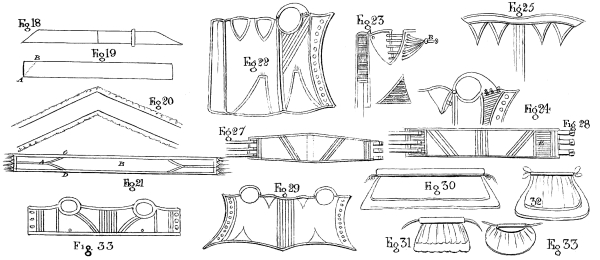
PLATE 11. FIG. 2.
This apron is generally made of silk, but looks well also in muslin. It requires care in the making as well as in the washing. The vandykes are formed by turning the edge of the apron down once, all round, to about three-quarters of a nail deep; and, after tacking it firmly down, vandykes are neatly run, in very small stitches (Fig. 5), from the edge of the apron to pretty near the rough edge of the silk, leaving sufficient to turn in well afterwards:—thus, let the vandykes be run to the depth of from A to B, leaving a small space all the way from B to C. When finished turn each vandyke inside out, and smooth all the wrinkles at the corners and points with a stiletto or scissors. When it is well and evenly pulled out, turn in the rough edge and hem it neatly down. Sometimes a little braid, or a row of chain-stitch, is put over the stitches on the right side. The plaits are regularly laid, those on each side being folded towards the middle. The band is frequently lined with buckram or stiff muslin, and is made with or without piping. Scollops are sometimes substituted for vandykes.
PLATE 11. FIG. 3.
This apron is of muslin, either clear or otherwise. A broad hem is made all round, of the proper width to admit a coloured or white ribbon of the half or three-quarter nail breadth. Some fine work or edging may be sewed to the hem all round. The band should be open at the ends to admit of the ribbon that ties it being drawn out when the apron is washed. The hem all round should also be kept open at the ends for the same purpose, and merely tacked up when the ribbon is put in.