Chapter VI · WOMEN’S SHIFTS. (continued 2)
Reading edition
PLATE 11. FIG. 4.
This is an apron with a broad hem all round, and a full frill of any fine material.
PLATE 11. FIG. 6.
A clear muslin apron, with a broad hem of three-quarters of a nail deep, and a shawl bordering laid all round within the hem, either half or three-quarters of a nail deep. This is a pretty apron for a young person. The bordering must be taken off before the apron is washed.
PLATE 11. FIG. 7.
This represents the bottom of an apron when hollowed out. It has a simple broad hem, turned up with a piping.
PLATE 11. FIG. 8.
The broad hem here is surrounded by a deep crimped frill of about a nail broad. These aprons are generally made of jaconet or cambric muslin, and the frill of cambric or lawn. They are very suitable for ladies to wear in a morning when cutting out, or in the housekeeper’s room.
PLATE 11. FIG. 9.
This is a pretty evening apron, made with a broad hem, and muslin insertion-work let in all round, inside which, coloured ribbon may or may not be run. Edging, either of lace or worked muslin, is put on all round.
APRON POCKETS.
These vary very much, some being laid on the apron as in Fig. 3, 4, and 6; others put on at the back, a slit being made in the apron to correspond with the place of the pockets. These last are made as in Fig. P, from a long double piece, which, being sewed up, is cut diagonally or crosswise, from A to B, and forms two pockets, the part cut being sewed to the slit of the apron. The whole length of the narrow piece, before it is cut, is six nails, and the width, when double, two nails. The slit in the apron is neatly hemmed, and a trimming of ribbon or silk put round it, with a bow at the bottom, or a fringe and tassels.
In Fig. 3 the pocket is a piece of two nails and a half deep and five nails wide. This piece is plaited in regular folds at the top to a lining of only two nails and a half deep, and the same width. The bottom is fulled nearly to a point in small folds, and the lining, being turned in to the same shape, is sewed to it with a piping. The pocket is then stitched firmly on to the apron, and trimmed according to fancy. One or three small bows are put on the pocket.
In Fig. 4 the pocket is cut in the shape of a heart, and put plainly on the apron. It is about two nails and three-quarters wide, and two nails and a half deep. The pocket is piped or trimmed with edging.
In Fig. 6 the pocket is particularly neat and pretty, being made of folds of the same material as the apron, with a coloured piping all round it, and three bows the same colour as the piping.
COMMON APRONS.
The simplest kind, and that generally worn by working men, is a yard wide or more, hemmed at the bottom and at the top, with a string run through to tie round the waist. It is thus worn by brewers, &c.
PLATE 11. FIG. 10.
This is a simple shape, and the one most in use. It is either plaited or gathered into the band, which is about a nail deep. These aprons are usually worn by all servants and women while at work. Blue, check, and brown linen are most used for scouring and cleaning; white linen, Holland, and print, for less dirty employments. Ladies wear them of silk or muslin, with or without pockets.
PLATE 11. FIG. 11.
This is a pretty apron, often worn by girls from eight to sixteen or eighteen years of age. The bib is made of the proper size to fit in front, between the shoulders of the wearer, coming down in a slope to the waist. These bibs may be plain, or they are ornamented with tucks or folds, either upright or length-wise. The shoulder-strap may be of the same material, or of tape or ribbon. The apron is gathered evenly, or plaited so as to reach to A on each side, which is situated exactly between the bottom of the bib and the shoulder-strap behind.
PLATE 11. FIG. 12.
May be worn either as a common or as a pretty dress apron, according to the material and trimming. It may be made of silk, coloured muslin, or print. After being properly gathered into the band, two shoulder-straps, in the form of four lappets, are cut out, either pointed, as in A, or rounded, as in B. These lappets may be piped, and either edged with lace or fringe, or left plain. For a full size, the lappet is five nails along the selvage, from D to C, and one nail and three-quarters from C to B. The two straps are sewed together at C, and fastened with a bow of ribbon. The lappet is piped all round with a strong cord, to make it wear well.
PLATE 11. FIG. 13.
This shape is much worn by men servants, apothecaries, grocers, &c., and is simply gathered into a band, leaving a piece of two nails unattached to it, A B, which is hemmed at the top, and falls negligently down.
A COOKING APRON.
PLATE 11. FIG. 14.
This is a neat pattern for a housekeeper, cook, or kitchen-maid. The bib is quite plain, and pins to the gown at the corners. The size given in the Plate is suitable for a girl, but the bib should be cut to suit the wearer at once, and not made by guess. The apron is made of check or strong linen.
A PANTRY APRON.
PLATE 11. FIG. 15.
A very good shape for men servants to wear when trimming lamps, cleaning shoes and knives, &c. The apron is about a yard and a quarter long, and it is made of strong linen or calico. The tape for the neck should be nine or ten nails long. A pocket may be added in front. The corners of the apron are simply turned down to the distance of five nails and a half from the top (see A A), the letters, A A, being each exactly five nails and a half from B. These corners are either sewed or strongly hemmed down.
GENTLEMEN’S WORKSHOP APRON.
PLATE 11. FIG. 16.
This is very useful for gentlemen when turning, or using tools, and is generally made of Holland or strong white or brown linen. The width is fifteen or sixteen nails; the part for the neck four and a half, five, or more, according to the width across the shoulders of the wearer. The depth of this part two nails and a half or more. The straps, about eight nails and a half long, cross each other from the neck to the half of the shoulder part of the apron; which plan holds it up neatly in front, and makes it set more comfortably. A pocket may be added, according to pleasure, in front, or two at the sides. A slit in the apron, bound round with tape, and a square piece put on behind it, looks the neatest as a pocket.
SENTIMENT, FIANCÉE, OR NECK-TIE.
PLATE 11. FIG. 17, 18.
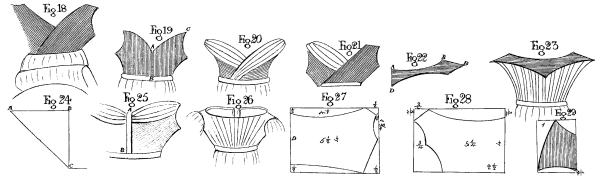
This is made of velvet, satin, or silk, and is worn for the purpose of keeping the neck warm, and as a finish to the dress. It is made of two colours, which are joined in the middle and lined with sarsenet: the silk or other material is cut crosswise and pointed at the ends. The sentiment is six or seven nails long from point to point, when made up, and within one nail and a half of the point at one end, is fastened with strong stitches or a silk ring. When the tie is worn, the other point is passed through the ring and drawn close. Sometimes the neck-tie is of a dark coloured silk in the middle with two coloured ends.
A DRESS SCARF OR CAPRICE.
PLATE 11. FIG. 19, 20.
This is made of the broadest satin ribbon that can be procured, say two nails and a half wide, and is two yards and three-quarters long. Double the ribbon on the wrong side exactly in two, and, while so doubled, run across the width of the ribbon in a slanting direction (Fig. 19, A B), and when opened, the scarf will set to the form of the neck. An edging of swansdown is sewed all round, and the ends may be either embroidered, braided, or left plain, according to the taste of the wearer.
A CACHEMIRE OR INDIANA SCARF.
PLATE 11. FIG. 21.
This is a kind of scarf which is easily made, and is a pretty finish to a walking dress, or may be worn in an evening at home: it is formed of three colours, say black, scarlet, and light blue. To make one scarf, you will want one yard and six nails in length and four nails and a half in width, of the black cachemire.
Sometimes the length of the scarf will lie in the width of the material, in which case it will be a great saving of expense. Procure a piece of each of the other two colours, seven nails long, and of the same width as the black, viz., four nails and a half. Find the middle of each end of the black strip, and slope off one nail and a half from the middle to each side (see Fig. 21, A C A D): next, slope one end of the blue, and one end of the scarlet strip, to accord exactly with the black strip, cutting the nail and a half from the middle to the ends. After this, split the blue and the scarlet pieces down the middle, sew half the blue and half the scarlet very accurately, first together, and then to the black strip, making the points fit in as neatly as possible to the half strips: do the same at the other end, arranging the colours so as to be at cross corners with each other. Observe that the pieces are sewed flatly together, and herring-boned all round on the right side. A narrow silk gymp, one-third of a nail wide, is laid at the edge and upon all the joinings; this gymp should be of some clear bright colour, as yellow and deep brown or gold colour, and at the ends is a silk fringe of blue and scarlet, to match the two half strips.
A SIMPLE SCARF.
This is made of plain net or tulle, the whole width of the material, say three-quarters of a yard, and three yards long. A broad hem is made all round, wide enough to admit of a satin ribbon of a three-penny breadth.
STAYS OR CORSETS.
PLATE 11.
It is impossible to give any particular patterns or sizes of stays, as they must, of course, be cut differently, according to the figure, and be variously supported with more or less bones or runners of cotton, according to the age, strength, or constitution of the wearer; we shall, therefore, confine ourselves to a few observations on the making up: and with respect to the cutting out, it is recommended to those who make their own stays, to purchase a pair from an experienced stay-maker that fit perfectly well, and also a pair cut out, but not made up, so as to be a good pattern for the home-made stays.
WOMEN’S STAYS.
PLATE 11. FIG. 22.
If for ladies, they are made of sattine, or best French jean, which is half a yard wide, and about 20d. or 2s. per yard: if of an inferior quality, they are made of white, brown, grey, or nankeen jean, at 8d. or 10d. per yard, and lined with calico between the doubles. The stay is generally lined between the two pieces of jean with union cloth or Irish linen in every part excepting the gores. Stays are usually cut in four parts, all of which are generally upon the cross, as this assists materially in making them set better to the figure. Two of the pieces reach from each side of the back, nearly to the hips, and the other two from thence to the middle of the busk or steel. There are two gores on each side for the bosom, and two larger ones on each side below, for the hips.
The necessary bones are as follows:
A steel in the middle, which should be narrower at the top than at the bottom, and confined in a strong wash-leather, before being put into the stay-case.
Two bones at the extreme ends, to prevent the holes from bursting beyond the edge.
We may also add, as they are in common use, a second bone down each back, on the other side of the lace-holes.
Bones between the front bosom gores, on each side; but these should be very thin and elastic, and are seldom wanted unless the wearer requires much additional support.
Two other bones, one on each side, from about a nail below each arm-hole to the bottom of the stay.
A few slight rib or cross-bones are sometimes put in.
It is as well to observe that unless particularly feeble, or otherwise an invalid, it is most desirable to wear as few bones as possible; and that for healthy persons, the two back bones, with the steel in front, are quite sufficient. The casing of the steel in front is sometimes made elastic to the depth of four nails from the top, by means of Indian rubber runners; which adds much to the comfort of asthmatic or delicate persons. (See Fig. 23.)
On each side of the steel is a cotton runner, and these are also put in various other parts of the stays, according to fancy.
ON MAKING UP.
The needles used for making stays are called the between needles. Strong sewing silk, called stay-silk, is used for the best corsets, and strong waxed cotton for the common ones. In sewing the seams, take great care to turn in the work properly, so as to have all the rough edges within the stay: for this purpose, first turn down the outside and inside piece of jean lying on one side of the seam, with the rough edges and the lining prepared as if for common sewing; do the same with the other side of the seam, placing the two seams, thus prepared, side by side, and sew them firmly together. It will have the effect of a double ordinary seam, when held between the finger and thumb. The mode of sewing these four thicknesses so as to make them lie flatly when opened, is rather peculiar. Take up with your needle, three of the thicknesses, leaving the fourth unsewed. The next stitch, take again three folds, leaving the other outside one unsewed: continue alternately taking up one outside and omitting the other, letting the stitches lie close together: when completed, open the seam, and flatten it with the finger and thumb.
The gores are next laid between the doubles of jean, and neatly back-stitched all round; the narrow parts at the top being worked in button-hole stitch.
The bone-cases are then made, and the cotton runners back-stitched.
The oylet or lace-holes are next worked, and after the stay-bones are put in, the top and bottom of the stays, with the shoulder-straps, are neatly bound with stay-binding.
As there are many varieties in the shapes of the different parts of stays, they will be described in detail, under their respective heads.
GORES.
These are sometimes made of elastic wires, as in Fig. 23, sometimes of Indian rubber, and sometimes of a kind of elastic twill.
SHOULDER-STRAPS
Are made of the same material as the stays, and back-stitched to the front and back of the shoulder. Sometimes they are buttoned down in the front, which enables the wearer, by unbuttoning them, to dress her hair in an evening with perfect ease. (See Fig. 22.)
Others have oylet-holes to admit of bobbins, which lace them to corresponding holes in the stays. (See Fig. 24.)
A piece of Indian rubber or elastic wire, of about one nail in length, is frequently sewed to the end of the strap, and this is considered the most convenient, as it will lengthen or contract at pleasure.
LACE-HOLES
Are generally worked round in button-hole stitch; sometimes tape is laced from the outside through these holes, being drawn through every other hole till they reach the top, and then brought down again, drawing it round the edge, through the intermediate holes; this preserves them from being worn. (See Fig. 26.) Others insert in every hole a ring, called a patent lace-hole. These are very durable, but are said to destroy the laces.
MODESTY-PIECE.
To the top of the stay is sometimes attached a small modesty-piece, which for some people is an excellent contrivance, as it makes it set more closely and delicately in front. This extra piece is all in one, and is the cross-way; it is carried along the whole of the front of the stay: it is about half a nail deep over the bosom, and sloped off to a quarter of a nail over the stay-bone; at the top of this additional strip, which is bound all round, a bobbin is run to draw it up. When drawn properly, this modesty lies over the bosom so as to shade it delicately, whereas if it were cut all in one piece with the stay it would make it higher, but it would stand out, and not answer the desired end. (See Fig. 25.)
NURSING STAYS.
It is essential to open the front of nursing stays, so as to give the mother the greatest ease while feeding her infant; for this purpose, care should be taken that no stay-bones or hard buttons should come in contact with the child’s face: the two or three best modes of opening them are the following:
Leave open that side of the bosom gore which is next to the shoulder-strap, to the depth of a full nail and a half; neatly bind the side of the gore, and after back-stitching the opposite side, sew on very firmly two buttons, one at the top and the other lower down. To the gore is attached two loops, by which it can be buttoned or unbuttoned at pleasure. (See Fig. 24.)
Another mode is that of leaving open the outer sides of those gores nearest the steel or middle of the stays.
These sides, and the parts with which they accord, have oylet-holes worked down them, exactly opposite to each other. Through each oylet-hole in the gore, pass a bobbin of about two nails and a quarter long, which is fastened at one end firmly to the wrong side, just behind the oylet-hole. The other end of each bobbin is drawn across to the inner side of the corresponding hole, and pulled through. By this arrangement all the ends of the bobbins lace up the whole gore. The bobbins are sewed together at the ends, forming a loop to attach it to a button on each side of the steel (see Fig. 23, A B).
These bobbins should be carefully cut and joined, so as to pull the gores properly in their places. When it is unbuttoned the whole front lets down comfortably. It is advisable to sew a little fold or oblong piece to the stay on the inside, which forms a flap to lie between the shift and the opening, as a guard from cold.
MEN’S STAYS, OR BELTS.
PLATE 11. FIG. 27, 28.
These are worn by gentlemen in the army, hunters, or by those using violent exercise.
They are made of strong jean, duck, leather, or webbing.
Sometimes the stay is merely a strip or belt, as Fig. 28; at others it is a little shaped or peaked, as Fig. 27. Towards the ends is sewed a piece of elastic work (see Fig. 28 E). Runners of cotton are made in various places to strengthen the whole. Long webbing straps are sewed three on each end. These straps are sewed on with pieces of leather over them, and are about three nails deep. The length is, of course, determined by the size of the wearer.
BELT FOR A HUNTER OR COACHMAN.
This is often merely a simple leather belt, with three tongues and buckles.
CHILD’S LITTLE STAY.
PLATE 11. FIG. 33.
This is made of fine jean, doubled, of three nails depth, and of the width required by the child. Cord runners are made in front, and at the backs, and buttons are put on, before and behind, for the drawers and flannels to be attached to.
AN OLDER CHILD’S STAY.
PLATE 11. FIG. 29.
This is formed of double jean, and may be lined between with Irish linen. If it is preferred, all the runners may have cotton drawn through them, so as to admit of no bones.
BUSTLES.
PLATE 11. FIG. 30, 32.
Bustles are worn by those whose shape requires something to set off the skirt of the gown. They should not be too large, or they look indelicate, and in bad taste. They are made of jean, strong calico, and sometimes of glazed calico.
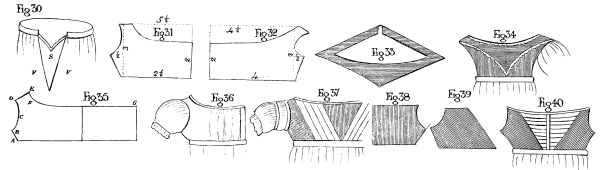
Fig. 30 represents a simple bustle of strong calico. It is composed of one piece the width of the calico, say a yard, and eight nails deep. This piece is doubled in two, so as to make two flounces, the one four nails and a half long, and the other three and a half. At one nail from the doubled top make a narrow case to admit of tapes. The bottoms of the flounces are hemmed with a very thick cord in them. When worn, the bustle is turned inside out, by which means the frill falls between the two flounces (see Fig. 32).
Fig. 31 is merely two flounces of jean, one four nails deep and the other three nails, gathered into a tape at the top and vandyked at the bottom.
Some persons wear down bustles (see Fig. 33), which are made of glazed lining muslin. A flat half circle or oval is cut out, about two nails and a half wide by two nails deep, and another piece, of an oblong shape, rounded at the corners, much longer and deeper, say three-quarters of a yard long by four nails and a half deep, is fulled into the smaller piece on one side, and into a tape on the other or top, thus making a bag to contain the down, which should be either swan’s or the best goose down.
VEILS.
The subject of veils is one that may soon be dismissed, as a few words on the materials of which they are composed, together with the usual sizes, comprises all that can be said upon them.
Veils for ordinary wear may be of a kind of soft tulle, made on purpose, of net, gauze, or crape. The size for a grown-up person is from thirteen nails to a yard long, and about twenty nails wide; for a child, eleven nails long, and the width is determined by that of the material. Demi-voiles are about four nails deep, and the width is regulated by that of the bonnet to which they are attached.
A pretty way of making a net or tulle veil is by hemming a satin ribbon half a nail deep all round it, either the same colour, or, if the veil is white, of some pale shade to suit the bonnet or the dress. This, by strengthening the edges, makes the veil wear better than it would otherwise do.
A crape or gauze veil is simply hemmed all round, the hem being deeper at the bottom to give it a little weight. A ribbon is run in at the top.
Mourning veils are of black crape. They should be made of what is termed the best, or jet black crape, as the blue-black soon wears whitish, and looks shabby. The other, though the most expensive at first, is the best economy in the end. They are made quite plainly, with a broad hem all round—say three-quarters of a nail deep.
Demi-voiles, when not of blonde, Chantilly, or worked lace, are of tulle, with ribbon run in. They should be set on the bonnet slightly, fulled all round the brim, but much more so at the ears, to make them hang well. A demi-voile should also be a little taken up at the ears, so as not to be the full depth, which is apt to give a slovenly appearance.
Riding veils are much shorter than any other kind except demi-voiles, and sufficiently wide to draw nearly all round the hat. They are made either of black lace, worked on purpose, or of brown or green crape. It is a good plan to run a string through a riding-veil, both at the top and bottom, taking care that the ribbon at the bottom is only just as long as the veil is wide, so that it is not seen when not in use. The advantage of this second string is, that in hot weather, and under a glaring sun, the wearer may tie both ribbons round her hat, thus forming a double veil for the protection of her eyes, whilst the lower part of the face has all the benefit of the cool air.
SLEEVES.
PLATE 12.
Sleeves should, when it is possible, be cut upon the cross; for which purpose a corner of the material should be turned up, until the doubled part, which is the cross way, is large enough to admit of the length and width of the sleeve.
Silk is sometimes too narrow for a very large sleeve to be made without joining, when care should be taken to join together two selvages. The joinings must be so contrived as to set either under, or at the back of the sleeves.
PLATE 12.
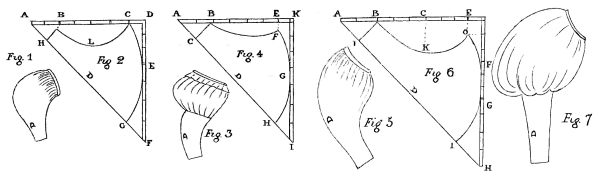
In order to make sleeves set well, they are hollowed out, as it is called, which is nothing more than cutting away a little of the front, at the top, so as to make it less deep than the back, observing always that it is straight in the front, the crosswise part of the sleeve falling behind. This is of great importance, as the set of the sleeve depends upon it. Of course attention must be paid to make them in pairs.
There are so many ways of finishing sleeves, and so many fancies about them, that to describe them all would be equally impossible and useless. A few rows of biassing, both at the top and bottom, or small plaits, confined once or twice by narrow bands, or by back-stitching, give a very neat appearance when the sleeve is at all a full one.
For lining sleeves, see the description in Chapter I.
A CHILD’S FIRST SLEEVE.
PLATE 12. FIG. 1, 2.
This is a neat shape for a child of a year old, before which time their sleeves are generally cut straight, and merely sloped down to the cuff.
Turn up your material seven nails, and, after cutting a pattern according to the figure, lay it on the piece and cut by it.
The pattern is cut as follows (see Fig. 2):—Take half a square of seven nails each way, and from A to B measure two nails; the same from A to H, and mark across, letting the wrist be one nail and three-quarters wide. From B to C is four nails, between which, measure downwards, one nail and a half, and curve from B, by L, to C, which is one nail from D. Measure next to E, three nails, and curve from C to E, and again from E to G, which is two nails from F.
The part marked D in all the sleeves is double. When made up it resembles Fig. 1.
AN OLDER CHILD’S SLEEVE.
PLATE 12. FIG. 3, 4.
Turn up seven nails crosswise, and cut as follows, see Fig. 4:—
SCALE.
Nails.
From A to B 1¾
From A to C 1½
Cut across one nail and a quarter for the wrist.
SCALE.
Nails.
From A to E is 6
From E to F 1
Slope gradually from B to F.
SCALE.
Nails.
From the corner, K to G 3½
From the corner, I to H 1½
Slope from F to G, and from G to H.
In making up Fig. 3, after joining the seams, and hemming or piping it at the bottom, gather it into the arm-hole at the top, and make a string-case just above the elbow to confine it as in the Plate. If preferred, it may be gathered above the elbow, and a narrow band put on.
LONG SLEEVE FOR A GROWN-UP PERSON.
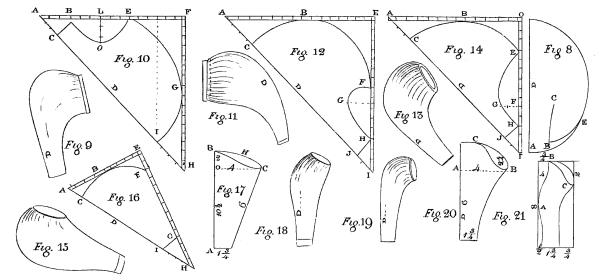
PLATE 12. FIG. 5, 6.
This is cut as follows:—Turn up your paper pattern, or material, nine nails upon the cross (see Fig. 6).
SCALE.
Nails.
From A to B is 2
From A to J is 2
Cut straight from J to B for the wrist.
SCALE.
Nails.
From B to C 3
From C to E 3
From E to the corner 1
Cut straight from B to K, which is two nails below C. Cut in a sweep from K to the point, O, which is a quarter of a nail below E.
SCALE.
Nails.
From the corner to F 3½
From F to G 2½
From G to H 3
From H to I 2
Cut in a sweep from O to F, and from G to I.
The making up is perfectly simple. It is for a small-sized person.
THE CIRCULAR LONG SLEEVE.
PLATE 12. FIG. 7, 8.
This takes rather more of the material than the other shapes, but it is so easily cut out, and looks so well when made up, that it is allowed a place here.
For the full size it is a perfect circle, in a square of about fifteen nails.
After the circle is formed, double it in half (see Fig. 8); measure at A B a sufficient width to admit of the wrist, and slit up, in a slightly curving line, from B to C for about four nails, to form the arm of the sleeve. A little of the circle, from E towards B, is then sloped off to form the hollowing.
When made up, this part, E, is all taken up and gathered into the shoulder-strap. It is considered to hang particularly well, falling over the tight part of the sleeve (see Fig. 7.)
A PLAIN LONG SLEEVE.
PLATE 12. FIG. 9, 10.
Turn up your material a yard or fifteen nails. If it will not permit of this being done without joining, add a straight piece along the dotted line, running the two selvages together. Cut out as follows:
SCALE.
Nails.
From A to B is 3
From A to C 2
From B to L 3
From L to E 3
From E to F 6
From F to G 8
From G to H 8
From H to I 4
Cut from C to within half a nail below B for the wrist. Cut nearly straight from B to O, which is two nails and a half below L, and in a sweep from O to E.
Sweep well from E to G, and from G to I.
The making up is perfectly simple.
A FULL SLEEVE.
PLATE 12. FIG. 11, 12.
Turn up fifteen nails of your material, and mark as follows:—
SCALE.
Nails.
From A to B 8
From B to E 7
From E to F 7
From F to H 5
From the side to G 1¾
From H to I 3
From I to J 2
From A to C 3¼
Curve from C to B; from B to F. Hollow from F to G, and cut nearly straight from G to H.
It is made up either quite simply, or with one or two rows of biassing below the gathers at the top.
ANOTHER FULL SLEEVE.
PLATE 12. FIG. 13, 14.
Turn up thirteen nails of your material, and mark as follows:—
SCALE.
Nails.
From A to B 8
From A to C 2¼
From B to O 5
From O to E 3
From E to F 6
From F to G 2
From F to H 2
From H to I 3
From I to J 2
Slope in a regular curve from C, by B, to E. Curve easily from E to G, and cut nearly straight from G to H. Cut from H to I for the wrist.
A SMALL SLEEVE.
PLATE 12. FIG. 15, 16.
Turn up your material so that the cross part, is seventeen nails long. Cut as follows (Fig. 16):
SCALE.
Nails.
From A to B 3¼
From A to C 2
From B to E 5¾
From E to F 3
From F to G 8
From G to H 3½
From H to I 3½
Slope, in an equal and full curve, from C, by B, to F. Cut straight from G to I.
AN OLD WOMAN’S SLEEVE.
PLATE 12. FIG. 17, 18.
This is an economical kind of sleeve, worn much by the working classes.
Double your material either on the cross or nearly straight, according to taste and economy. From A to B, the doubled part, is ten nails and a half. C is the point opposite O, which is two nails below B. Slope, in an outward curve, from B to C, and then, taking but one fold of the silk, cut the inward curve from B to C, which forms the hollowing or inside of the sleeve.
A BOY’S SLEEVE.
PLATE 12. FIG. 19, 20.
This is for a boy of about six years old, who wears tunics of cloth. The sleeve, when doubled, is six nails long, four nails wide at the top, and one nail and three-quarters at the wrist. A is three nails from the top, opposite to which is B.
Curve from C to B, hollowing out one fold. Fig. 20 represents the sleeve made up.
A BOY’S SLEEVE.
PLATE 12. FIG. 21.
This sleeve is for a boy’s coat or tunic, and has two seams in it, like a man’s coat sleeve.
Take two pieces of cloth eight nails long and three wide. A is half way down the length. Curve from A to the bottom, to within half a nail from the corner. Curve from B to C at two nails from the top, and from A to B at three-quarters of a nail from the side, which forms the elbow. Curve from C to the bottom, at three-quarters of a nail from the side.
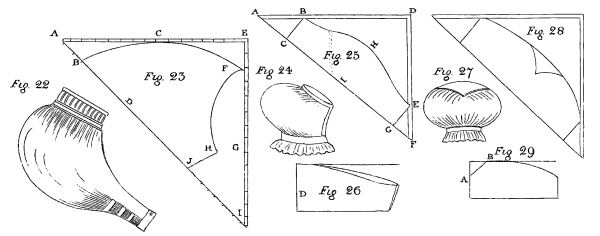
A WOMAN’S LARGE SLEEVE.
PLATE 12. FIG. 22, 23.
Turn up your material fourteen nails, and double it so as to be sixteen nails long at the top, A C E.
SCALE.
Nails.
From A to B is 2
From A to C 8
From C to E 8
From E to F 2
From F to G 6
From G to H 3
From G to I 6
From I to J 7
Sweep gradually from B, past C, to F. Curve again from F to H. Cut in a straight line from H to J.
In making up, the sleeve may be biassed one nail from the top, and a piped band laid on, and again three or four times at the wrist, or it may be confined above the elbow; in which case it must be made a little longer than would otherwise be necessary.
This is a pattern that can only be used when large sleeves are worn; but, being a good shape, it is hoped it may prove acceptable.
SHORT SLEEVES.
PLATE 12. FIG. 24, 25, 26.
These are for dresses, frocks, or even petticoats, when full sleeves are worn and liked.
Cut the pattern of the whole sleeve in paper; and then, turning up your material to a sufficient size crosswise, lay the sleeve open upon it, placing the long side of the pattern upon the cross or doubled part of the material. Both sleeves may thus be cut out at once.
SCALE OF DIFFERENT SIZES.
—————————— Largest size. Second size. Third size. Girl’s size. Small Girl’s size. Child’s size.
Nails. Nails. Nails. Nails. Nails. Nails.
Turn up the material at the side 17 13 12 9 6½ 5½
From A to B 3 2 3 2 1 1
From A to C 3 2 3 2 1 1
From C to B 2 1½ 2 1½ ¾ ¾
From B to D 14 10 8 7½ 5 4½
From D to E 15 11 9½ 7 5 4½
From E to F 2 2 3 2 1½ 1
From F to G 2 3 2½ 2 1½ 1
From H to I 6 5 4½ 3½ 2½ 2
From C to G 20 14 12 9 7 6
Length of band, say 5½ 5 4½ 4 3½ 3¼
When cut out, fold each sleeve in half (see Fig. 26), and hollow one fold out to form the inside.
Take care to hollow the sleeves properly, so as to make a pair, the straight part of the sleeve being in front, which is to be hollowed. If the sleeve should require joining, sew two selvages together (see the dotted line, Fig. 25).
In making up, the bottom of the sleeve may be either set into a band, as in the Plate, or into a piping; at the top it is gathered, and frequently a piping is put round it, which gives it a neat finish: it is set into the dress quite plainly under the arms; the fulness is thrown a little back, for if brought too forward, it is very unbecoming to the figure.
SHORT SLEEVE.
PLATE 12. FIG. 27, 28, 29.
These are cut out exactly like Fig. 25, excepting that after the sleeve is simply cut out, a triangular piece is taken from the top of the doubled part of it, and a triangle of worked muslin inserted. To cut out this piece, double the sleeve, as in Fig. 29, and cut off from A to B: when opened again, it will resemble Fig. 28, and when made up, it will be like Fig. 27.
In making up, after setting the sleeve into a band or piping at the bottom, gather it at the top and sew it to the triangular piece, throwing the fulness pretty equally at the sides, and making it very full at the point of the triangle. Sometimes the triangle is piped to make it firmer.
CIRCULAR SHORT SLEEVE.
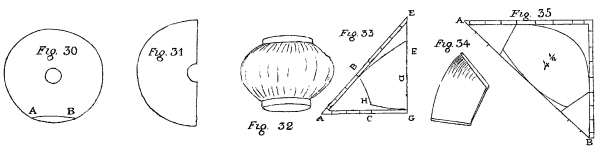
PLATE 12. FIG. 30, 31, 32.
This is another kind of short sleeve, being cut out of a circle. It is hollowed a little (see Fig. 30), A B, for the inside of the arm. A circular hole is cut in the centre, a little larger than the width of the arm; this inner circle is gathered and set into the band, and the outer one, also gathered, is sewed into the arm-hole of the dress.
The following are good sizes for circular sleeves, all of which must be cut out of squares.
SCALE.
—————————— Full size. Second size. Third size. Girl’s size. Child’s size. Baby’s size.
Nails. Nails. Nails. Nails. Nails. Nails.
Size of the square 18 15 13½ 11 9 7
Size of the hole across 3½ 3¼ 3¼ 2½ 2 1¾
Length of the band 5½ 5 4½ 4 3½ 3¼
TIGHT SLEEVE.
PLATE 12. FIG. 33, 34, 35.
This sleeve may be used either for petticoats, or, when tight sleeves are worn, for evening dresses, and children’s frocks, in which case it is ornamented in different ways.
Turn up the material on the perfect cross, and for the better cutting it out, double it again, as in Fig. 33, on which four folds lay your pattern, D being the doubled part.
Turn up your material eight nails, then fold it from A to B, Fig. 35, and cut as follows, see Fig. 33:
SCALE.
Nails.
From A to B is 3
From A to C 3
From B to E 4½
From E to F 2
From F to G 3½
From C to H ½
Cut from B to C, sweep from B to F, and then cut from H, which is half a nail above C, to G.
PLATE 13.
SHOULDER-PIECES, COLLARS, CAPES &c.
PLATE 13.
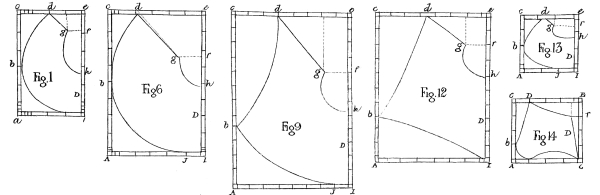
As the above articles, together with pelerines, tippets, and collarettes, are required for cloaks, gowns, pelisses, frocks, and dressing-gowns, it is advisable to class them under a head by themselves, by which means they can be more readily explained, without confusion or repetition, and the pattern wanted for any particular dress, referred to.
Patterns of the prettiest and most varied forms are selected, together with a few scales for different sizes.
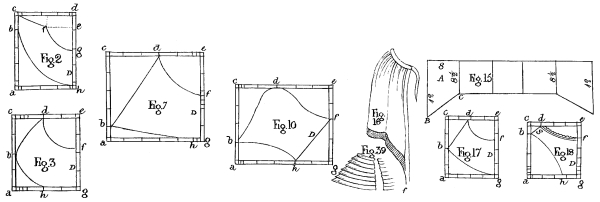
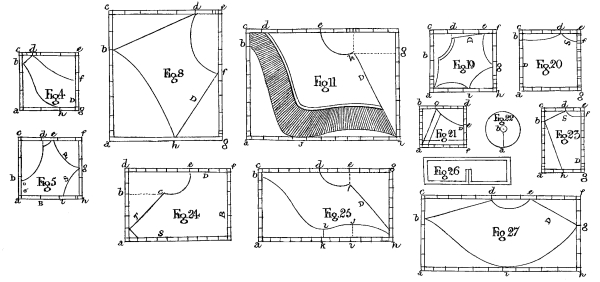
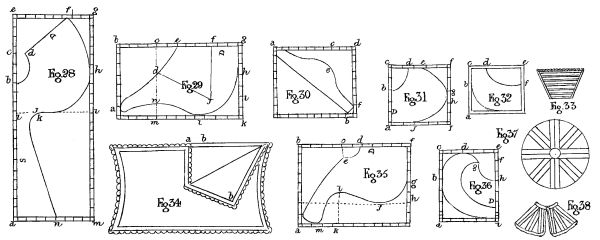
Observe that the Plates represent but half of the pattern, which is supposed to be double at the end marked D; also NOTICE, that they are drawn to a scale of the exact size of the pattern when made up, so that about a quarter of a nail must be allowed all round for the turnings in. It is a good plan, when cutting out any difficult shape, to make a pattern on paper, very accurately, first; and then to lay it on the material and cut by it.
As it would be impossible to describe any intricate shape clearly, without putting it into some regular form, it is deemed necessary to enclose each pattern within an oblong or a square, on the sides of which are marked distinctly the nails, so that by making a figure on paper to a scale of real nails in the same proportion, and marking with great accuracy the parts, which the extreme points of the irregular pattern within, touch, the shape may be easily obtained by curving inwardly or outwardly from point to point, according to the shape to be represented in the drawing. It is always preferable to cut the above articles crosswise, both before and behind, as they set much better to the shape, especially behind; for the sake of economy, they are sometimes cut straight-wise with one end placed against the selvage; sometimes the collar or cape is joined behind with a neat piping, in which case the back of the pattern is frequently laid against the selvage and the points made to lie crosswise. The Plate represents the patterns as cut on the most economical plan, shewing whether the front or back should be straight-wise. Observe that if one side of the back be cut across, the other side must be so likewise, and if one side of the back be cut selvage-wise, so must the corresponding; whereas, with regard to the front ends, one side may be straight, while the other is on the cross.
IN CUTTING CROSSWISE.
Turn up a sufficient quantity of the corner of the material, like a half-handkerchief, and laying the pattern with the part marked D on the doubled part of the material, cut it out, allowing a quarter of a nail all round for the turning in.
IN CUTTING STRAIGHT-WISE.
Double the material selvage-wise to the proper width, and cut out according to the paper pattern, still placing D on the folded part of the muslin.
SHOULDER-PIECES.
Are generally employed in dressing-gowns, cloaks, and capes, also in boys’ high dresses. It is the part to which the skirt or deep cape is fulled, and should be made to set particularly well to the figure, else the whole dress will have an awkward appearance.
In making up, the shoulder-pieces are generally lined, unless they are intended for any light article of dress. If they are meant for a cloak or warm cape, a piece of fine flannel or demet, is often put between the material of which the cloak is made and the lining, with a piping round the edge.
A NEAT SHOULDER-PIECE FOR A WOMAN’S CLOAK.
PLATE 13. FIG. 1.
SCALE.
Nails.
Width of square when doubled 3½
Length of square 5¾
Space from A to B 2¾
Space from B to C 3
Space from C to D 1½
Space from D to E 2
Space from E to F 1
Space from F to G 1
Space from F to H 2½
Space from H to I 2¼
Shape off in a gradual curve from D to B, from B to I. Cut in a straight line from D to G. Slope from G to H.
SHOULDER-PIECE FOR A CHILD’S CLOAK.
PLATE 13. FIG. 2.
SCALE.
Nails.
Length of square 4¼
Width of square when folded 3¼
Space from A to B 3
Space from B to C 1¼
Space from D to E ½
Space from E to F 1¾
Space from E to G 1¾
Space from G to H 2
Cut in a straight line from C to J. Curve gradually from F to G, and from B to H.
A VERY NEAT SHOULDER-PIECE FOR A WOMAN’S CLOAK.
PLATE 13. FIG. 3
SCALE.
———————— Shoulder-piece. Collar for a baby’s cloak.
Nails. Nails.
Length of square 4¼ 4
Width of square when double 3¾ 3½
Space from A to B 2¼ 1½
Space from B to C 2 2½
Space from C to D 1¾ 1½
Space from D to E 2 2
Space from E to F 1¾ 2
Space from F to G 2½ 2
Space from G to H 1½ 2
Form the curve from B to H, so as to end without abruptness, and be lost in the straight line. Round well from B to D.
SHOULDER-PIECE FOR A BABY’S CLOAK.
PLATE 13. FIG. 4.
SCALE.
Nails.
Length of square 3
Width of square when doubled 3
Space from A to B 2½
Space from B to C ½
Space from C to D ½
Space from D to E 2½
Space from E to F 1½
Space from F to G 1½
Space from G to H 1
SHOULDER-PIECE TO A CHILD’S PELISSE.
PLATE 13. FIG. 5.
This shape is much in use for spencers, pelisses, and boys’ high dresses. The part marked S sets over the shoulder when the sleeve is fulled on at the top. The parts marked B and F lie in the middle, exactly behind, and in front; thus the pattern shows half the shoulder-piece, the curve being for half round the neck. The other half is piped and sewed on to it in front, and is fastened behind by buttons. The fulness of the body is then sewed on to this shoulder-piece, which is piped all round.
SCALE.
Nails.
Length of square 3
Width of square 3¼
Space from A to B ¾
Space from B to C 2¼
Space from C to D 1¼
Space from D to E ½
Space from F to G 1½
Space from F to G 1½
Space from G to H, and from H to L 1
VARIOUS SIZES FOR CAPES AND TIPPETS FOR WOMEN AND CHILDREN.
PLATE 13. FIG. 6.
Column 1. A woman’s large cape for walking in.
Column 2. A woman’s large cape for morning dress.
Column 3. A child’s large cape for walking in.
Column 4. A woman’s collar.
Column 5. A child’s pretty cape for morning dress.
Column 6. A child’s cape for a pelisse.
Column 7. Pretty cape for the morning dress of a
child of four or five years old.
The Plate represents the pattern in the fourth column.
SCALE.
—————————— No. 1. No. 2. No. 3. No. 4. No. 5. No. 6. No. 7.
Nails. Nails. Nails. Nails. Nails. Nails. Nails.
Length of square 12½ 9¾ 8½ 7¾ 8 7¼ 6½
Width of square doubled 8¾ 7¾ 5½ 5½ 5 4¾ 4½
Width from A to B 6½ 4½ 4½ 4¾ 5 3 3
Width from B to C 6 5¼ 4 3 3 4¼ 3½
Width from C to D 3¾ 2¾ 1½ 1½ 2½ 2¾ 1
Width from D to E 5 5½ 4 3½ 2½ 2 3½
Width from E to F 2¾ 1¾ 2½ 1½ 2½ 2 1
Width from F to G 1½ 1¾ 1½ 1¾ ½ ½ 1
Width from F to H 2¼ 2 1¾ 1¾ 1½ 1¾ 3¼
Width from H to I 7 5¾ 4¼ 4½ 4 3½ 3¼
Width from I to J 3¾ 3 ¼ ½ 1 ¼
PLATE 13. FIG. 7.
Column 1. A neat collar for a woman’s cloak or dressing-gown.
Column 2. Rather smaller pattern of the above.
Column 3. A very neat collar for a girl of fourteen.
Column 4. A collar for a baby’s flannel cloak.
The Plate represents column 2.
SCALE.
—————————— No. 1. No. 2. No. 3. No. 4.
Nails. Nails. Nails. Nails.
Length of square 5½ 5 4½ 4
Width of square when doubled 5¾ 5½ 5½ 5
Space from A to B 1¾ 1 corner rounded ½
Space from B to C 3¾ 4 4 3½
Space from C to D 3¼ 3 2 2
Space from D to E 2 2½ 3½ 3
Space from E to F 2½ 2¼ 1¼ 1
Space from F to G 3 2¾ 3¼ 3
Space from G to H ½ ½
In column 3, mark one quarter of a nail above the corner, G, and slope off in a direct line from the mark to the opposite corner, A, which is merely rounded off at the corner, about a quarter of a nail on each side.
PLATE 13. FIG. 8.
A pretty collar to put on a silk mourning shawl, or for a dress or cloak. Both the back and front must be on the cross.
SCALE.
Nails.
Length of square 7½
Width of square 6½
Space from A to B 5½
Space from B to C 2
Space from C to D 5
Space from D to E 1½
Space from E to F 3½
Space from F to G 4
Space from G to H 2½
A PARTICULARLY NEAT AND WELL-SETTING CAPE.
PLATE 13. FIG. 9.
SCALE.
Nails.
Length of square 12
Width of square when doubled 8
Space from A to B 4
Space from B to C 8
Space from C to D 3
Space from D to E 5
Space from E to F 3¾
Space from F to G 2
Space from F to H 3
Space from H to I 5¼
Space from I to J 1¾
PLATE 13. FIG. 10, 11.
Fig. 11 is a very pretty pattern for a walking cape, and is often worn in mourning, with black crape gaufiered round the edge a nail deep, as in the Plate. Fig. 10 is a simple collarette, which is sewed on the cape to give it a finish.
SCALE TO FIG. 10.
Nails.
Length of square 4¼
Width of square when doubled 5¼
Space from A to B 1
Space from B to C 3¼
Space from C to D 2¼
Space from D to E 3
Space from E to F 2
Space from F to G 2¼
Space from G to H 2
SCALE TO FIG. 11.
Nails.
Length of square 7½
Width of square when doubled 10½
Space from A to B 6½
Space from B to C 1
Space from C to D 1
Space from D to E 4
Space from E to F 5½
Space from F to G 1½
Space from G to H 3
Space from G to I 6
Space from I to J 7
A REMARKABLY NEAT MORNING COLLAR.
PLATE 13. FIG. 12.
SCALE.
Nails.
Length of square 10
Width of square when doubled 7½
Space from A to B 2¾
Space from B to C 7¼
Space from C to D 3½
Space from D to E 4
Space from E to F 2
Space from F to G 1½
Space from F to H 2¼
Space from H to I 5¾
A PRETTY LITTLE CAPE FOR A BABY’S CLOAK OR PELISSE.
PLATE 13. FIG. 13.
SCALE.
Nails.
Length of square 3¼
Width of square when doubled 3
Space from A to B 1¼
Space from B to C 2
Space from C to D 1¼
Space from D to E 1¾
Space from E to F ½
Space from F to G 1
Space from F to H ¾
Space from H to I 2
SMALL COLLAR TO BE SEWED TO A HABIT-SHIRT.
PLATE 13. FIG. 14.
SCALE.
Nails.
Length of square 4
Width of square when doubled 4½
Space from A to B 1
Space from B to C 3
Space from C to D 1
Space from D to E 3½
Space from E to F 1
Space from F to G 3
PLATE 13. FIG. 15, 16.
Fig. 15, is the pattern of a very handsome long pointed cape, commonly worn to rich silk cloaks and sometimes alone; when that is the case, they are frequently made of velvet or fine cloth, and trimmed with fur or swan’s down.
The cape is made as follows:—Sew together three breadths of the material, eight nails and a half long and about eight nails wide (of course a less number of breadths will be required, if the material be much wider, as merinos, &c.), to each end of the three breadths thus sewed in one length, add another breadth, which, as in Fig. 15 (see A), is eight and a half nails deep at one end, and twelve nails deep at the other, the material being cut in a straight line from B to C.
A GOOD SHAPE FOR A LADY’S RIDING COLLAR, TO BE SEWED TO A HABIT-SHIRT.
PLATE 13. FIG. 17.
SCALE.
Nails.
Length of square 4
Width of square when doubled 4
Space from A to B 2
Space from B to C 2
Space from C to D 1½
Space from D to E 2½
Space from E to F 1¾
Space from F to G 2¼
These collars are made of a doubled piece of lawn, which being run together and turned inside out, are neatly stitched near the edge like gentlemen’s collars.
A CHEMISETTE DE VIERGE, MODESTY, OR TUCKER.
PLATE 13. FIG. 18.
This is but a quarter of the article, and when the paper pattern is made from the drawing, it should be doubled, so that when cut, it forms half the chemisette, which if it is again laid on a piece of muslin or net doubled, the two sides may be cut at once.
Chemisettes are worn under evening dresses, and are trimmed with blonde, lace, or muslin edging, which should just be seen above the gown. The part marked S is the shoulder. The chemisette is put on over the head and draws round the waist by a tape.
SCALE.
Nails.
Length of square 4¾
Width of square 4¼
Space from A to B 3¾
Space from B to C 1
Space from C to D 1
Space from D to E 3¼
Space from E to F 1½
Space from F to G 3¾
A BABY’S COLLARETTE.
PLATE 13. FIG. 19.
This is particularly neat for a baby’s pelisse, and may be sewed on to the shoulder-piece. (Fig. 5).
SCALE.
Nails.
Length of square 3¾
Width of square when doubled 4
Space from A to B 2¼
Space from B to C 1½
Space from C to D 1¼
Space from D to E 2
Space from E to F ¾
Space from F to G 2½
Space from G to H 1¼
Space from H to I 1½
This collarette should be piped all round, and edged with work, excepting the curve, which goes half round the neck. Two half collarettes must be cut, one for the right, and one for the left side of the neck.
A HABIT-SHIRT.
PLATE 13. FIG. 20, 23.
Fig. 23 represents half of the back of a habit-shirt. Fig. 20, one of the two fronts which are sewed on to the back at the shoulder, the parts marked in each figure, S, being the corresponding pieces.
SCALE TO FIG. 23.
Nails.
Length of the square 8½
Width of the square when doubled 4
Space from A to B 6½
Space from B to C 2
Space from C to D 2¼
Space from D to E 1¼
Space from E to F 1
This back, which, of course is cut in the whole piece, has a tape passed through a hem at the bottom, which tape also passes through the hems at the bottom of the two fronts, and ties before.
SCALE TO FIG. 20.
Nails.
Length of the square 6¼
Width of the square 6
Space from A to B 5¼
Space from B to C 1
Space from C to D 4
Space from D to E 2
Space from E to F 1¼
Space from F to G 5
This figure represents one of the fronts of the habit-shirt; the part marked D is the front, S is the shoulder; where the two fronts meet they may be fastened by small buttons, and sometimes work is let in, or narrow tucks made, which have a neat effect. Below the shoulder, and down the front, it is finished with a narrow hem. A collar may be sewed to it at the neck, by a mantua-maker’s hem.
A MOURNING COLLAR.
PLATE 13. FIG. 21.
Made of clear muslin, white crape, widow’s lawn, net or tulle, with a broad hem one nail deep all round.
SCALE.
Nails.
Length of square 5½
Width of square 6
From A to B 5½
From B to C 2½
From C to D 3½
From D to E 2½
From E to F 3
The hems to these collars are generally laid on, by being run at the edge, and then turned back and hemmed, this is a much neater plan than any other. Sometimes two collars with deep hems are worn one above the other.
For mourning collars of net with either a broad hem, frills with deep hems, or gaufiered frills are used. If the mourning is very deep, the muslin collar is covered with black crape.
A ROUND CAPE OR TIPPET.
PLATE 13. FIG. 22.
No scale can be made to this tippet, as the size is only determined according to the purpose for which it is to be used. Form a perfect circle, and slit from the outer edge of the circle A to the centre B, after which cut out a piece for the neck. This is a very good shape for school girls, it also makes a useful dressing or combing tippet.
A HABIT-SHIRT.
PLATE 13. FIG. 24.
This is a very simple neat shape for a habit-shirt. T is the front, and D the middle of the back. It is all cut in one piece, and the part marked B may be laid against the selvage; S is the shoulder.
SCALE.
Nails.
Length of square 6
Width of square 10
Space from A to B 4
Space from B to C 3
Space from B to D 2
Space from D to E 6
Space from E to F 4
Cut in a straight line from C to A, and square the corner off at A.
A PELERINE.
PLATE 13. FIG. 25.
The back is on the cross and the front is straight.
SCALE.
Nails.
Length of oblong 7
Width of oblong when doubled 13
Space from A to B 6½
Space from B to C ½
Space from C to D 6
Space from D to E 3
Space from E to F 1
Space from E to G 4
Space from H to I 4
Space from I to J 1¼
Space from I to K 3
Space from K to L ¾
PLATE 13. FIG. 26.
This is a very simple collar, and much worn by persons of quiet unassuming habits. It is composed of two oblong strips of muslin, hemmed all round with rather a broad hem, and sewed together at the ends half the way up. Each oblong is four nails long and about three nails deep.
A REMARKABLY PRETTY PELERINE FOR A MORNING DRESS.
PLATE 13. FIG. 27.
SCALE.
Nails.
Length of square 5
Width of square 11
Space from A to B 3½
Space from B to C 1½
Space from C to D 5
Space from D to E 2½
Space from E to F 3½
Space from F to G 2
Space from F to H 3
Space from H to I 5
PLATE 13. FIG. 28.
This is the pattern of a very handsome long pelerine. The part marked S must be laid along the selvage. Of course this is in two parts, both of which will nearly lie side by side on the opposite selvages of the same breadth.
SCALE.
Nails.
Length of the square 21
Width of the square 8
Space from A to B 14
Space from B to C 3
Space from C to D 1
Space from D to E 4
Space from E to F 5½
Space from F to G 2½
Space from G to H 6
Space from H to I 4
Space from I to J 5½
Space from J to K 1
Space from K to L 1½
Space from I to M 11
Space from M to N 4
A HANDSOME SHAPE FOR A PELERINE WITH A SQUARE COLLAR.
PLATE 13. FIG. 29.
SCALE.
Nails.
Length of square 7
Width of square when doubled 12
Space from A to B 6½
Space from B to C 4
Space from C to D 2½
Space from C to E 2
Space from E to F 3
Space from F to G 3
Space from G to H 4
Space from H to I 1
Space from I to J 3
Space from I to K 2
Space from K to L 4
Space from L to M 4½
Space from M to N 2
The letters E, F, J, and D, point out the shape of the upper collar.
PLATE 13. FIG. 30.
This is a frill to go over each shoulder of a cape or pelerine, as a finish, and is peculiarly adapted to Fig. 25, 27.
SCALE TO FIG. 30.
Nails.
Length of the square 8
Width of the square 10
Draw a straight line across from A to B, which are situated one nail within the corners of the square.
SCALE.
Nails.
Space from the corner to C 7
Space from C to E 2
Space from C to D 3½
Space from F to the corner 1
Curve, according to the pattern, from the corner to E. The cross part is then fulled on to the pelerine, leaving about two nails from the front and back points.
A CAPE FOR A BABY’S PELISSE.
PLATE 13. FIG. 31.
SCALE.
Nails.
Length of square 5
Width of square when doubled 5
Space from A to B 3
Space from B to C 2
Space from C to D 1½
Space from D to E 1
Space from E to F 2½
Space from F to G 1½
Space from G to H 1
Space from H to I 2½
Space from I to J 3
ANOTHER SHOULDER-PIECE, OR NEAT COLLAR.
PLATE 13. FIG. 32.
If used for the latter, it may be made with a hem all round, through which a coloured or white satin ribbon may be drawn of about twopenny width. A single or double frill of net should be sewed round it, with a corresponding hem for ribbon. This frill, after the hem is made, should be a full nail deep.
SCALE.
Nails.
Length of square 4
Width of square when doubled 4
Space from A to B 2
Space from B to C 2
Space from C to D 1½
Space from D to E 2½
Space from E to F 1¼
A MODESTY, OR TUCKER.
PLATE 13. FIG. 33.
This little front, or modesty, is to put inside a low dress, and may be made very prettily. The materials most in use for them are cambric, lawn, muslin, net, tulle, satin, or crape. They are generally tucked, or in folds, or frilled into strips of insertion-work, either the length or the width-way, and always trimmed with a little work or edging on the top. When made, they are about three nails deep, and five nails wide at the top, and tapering to three nails at the waist. They are almost always made the straight way, particularly when they are intended to wash.
A SIMPLE COLLAR.
PLATE 13. FIG. 34.
This is a particularly simple pretty collar, and is frequently made of net or muslin, trimmed with narrow work or muslin. It has a broad hem all round, through which satin ribbon is passed. The collar is merely a straight piece, eight nails deep and fourteen nails wide. Double it in half length-wise, and also width-wise to find the centre, and then cut in a straight line from A B, at the top, to the centre. The points, A B, each fall over, as seen in the Plate, and give the appearance of a second collar. The ends should be a little hollowed out, to make the whole set better.
ANOTHER HANDSOME PELERINE.
PLATE 13. FIG. 35.
SCALE.
Nails.
Length of square 8
Width of square 11
Space from A to B 8
Space from B to C 4
Space from C to D 1¼
Space from C to E 2
Space from D to F 5
Space from F to G 4
Space from G to H 2
Space from H to I 2½
Space from H to J 2
Space from J to K 7
Space from K to L 3
Space from K to M 2
The corner or tip to be rounded off, beginning at two nails from A, at the bottom, to one nail above A, at the side.
A ROUND COLLAR.
PLATE 13. FIG. 36.
This is a small and simple shape for a round collar, with a smaller one upon it. When the larger is cut, the lesser one may be cut by the eye, only taking notice to shape it off more abruptly in front than the other.
SCALE.
Nails.
Length of square 6½
Width of square 5½
Space from A to B 3½
Space from B to C 3
Space from C to D 1¾
Space from D to E 3¼
Space from E to F ¾
Space from F to G 1½
Space from F to H 2¼
Space from H to I 3½
A SCHOOL-GIRL’S TIPPET.
PLATE 16. FIG. 37, 38.
This is an economical mode of making tippets for poor children, or charity schools, of remnants of cloth, print, &c. Cut a circle in paper, of the right size, and pin it on the carpet or table cloth, whilst you arrange strips of your material on it, in regular lines, as in the Fig. 37; two or three strips may cross each other at right angles; between them should be other straight pieces, and then triangular bits will fill up the circle. Black, orange, crimson, blue, and brown cloth, look very well.
ANOTHER SCHOOL-GIRL’S TIPPET.
PLATE 16. FIG. 39. (Near to FIG. 10, 16.)
This is made of the list of flannel, the selvage of cloth, or any other warm material, and is sewed on to calico; cut a lining in the shape required, and beginning at the bottom, place layer above layer, or strip above strip, something in the way that the many capes of a coachman’s great coat are done: the list or cloth is not put on quite flat, but is a very little fulled. It is then lined with flannel or cloth, and is a most comfortable and strong tippet.
PETTICOATS.
PLATE 14.
Petticoats are made of calico, twill, dimity, cambric, and jaconet muslin, sometimes for mourning, or for wearing under thin dresses of silk and satin: for the middling and lower classes, they are of calico, strong dimity, calimanco, stuff, and bombazine: they are made in various ways, which will be described in the following pages, and the patterns given: the figures and sizes of persons differ so essentially that scales will not be attempted.
Petticoats are in three distinct parts—the skirt, the body, and the sleeves, the varieties of each will be treated of in their turn.
SKIRTS.
Skirts have generally from two, to two and a half-breadths in them, according to the width of the material of which they are made: they are sometimes finished at the bottom with a deep hem, three nails broad, tucks, or worked muslin. Sometimes they are bought with cotton runners, woven in them at the bottom, six or eight nails deep, which make the dress stand out, and if the gown is of a clinging material, causes it to hang better. Skirts are generally made with the opening behind, but for elderly persons or servants, it is at the sides, the seams being left unsewed for about four nails from the top; sometimes they are furnished with pockets on one or both sides; for a description of which, see Pockets. Skirts may be set on to the body, either equally full all round, plain under the arms, and full at the front and back, or with all the fulness behind. Servants frequently wear their petticoats merely set into a tape round the waist, without any body, and with or without tape shoulder-straps, to keep them up. Under or middle petticoats are also made in this manner.
BODIES OR WAISTS.
These are made either full or tight to the figure.
PLATE 14.
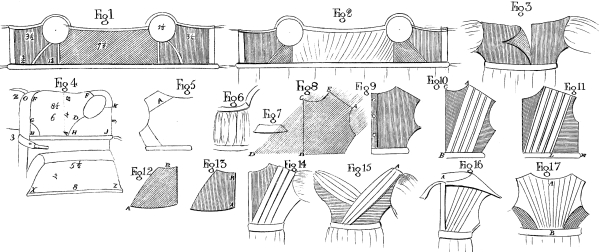
Tight or plain bodies consist of five parts: the front, two side-pieces, and two backs (see Fig. 1). The front is always cut on the cross, and reaches from below one arm to the other: the side-pieces are also cut crosswise on one side, and straight on the other, the straight side being joined to the front, and that which is cross being stitched to the backs, which are straight behind. Fig. 1 represents a tight body made up, for a small person. Observe that the various directions of the lines drawn on the engravings, represents the selvage-way of the material, as a better guide for the inexperienced. In making up, all the parts should be back-stitched together: the band ought to be very strong; it is often made of webbing or stout tape. Petticoat bodies may be made with or without sleeves, according to the taste of the wearer.
Full bodies are made in a similar manner to tight ones, excepting that two nails more are added in width to the front, so that when laid open it is ten nails and a half at its greatest extent, instead of only seven and a half, like the plain body, and half a nail is also given to each back. The front is cut straight instead of cross, in the full bodies. (See Plate 14, Fig. 2.)
SLEEVES.
For figures of sleeves, see Plate 12 and the descriptions annexed.
NURSING PETTICOATS.
PLATE 14.
For the convenience of those mothers who nurse their infants, the petticoat body in front may be opened in various ways.
PLATE 14. FIG. 3.
The most general mode is simply to have the front of the body in two pieces, so as to open in the middle before, hemming it on each side, and letting the parts tie or button together at the top: it is as well to set the two sides of the front into the band, so that they may overlap each other, in order to guard against cold. This petticoat fastens behind in the usual manner.
PLATE 14. FIG. 4.
Another approved method is that of having the petticoat open on each side in front, so as to be close at the back. This petticoat body is made in four parts: one back, two side pieces, one front. The back piece is cut the straight way, so as to let A B, Fig. 4, lie selvage-wise.
SCALE.
Nails.
Depth from A to B 4
Width from G to D 6
Width from F to E 8½
Slope it down to H H 1½
Side-piece from below the arm to the waist 2¼
From H to J 4
From J to K cut straight-wise 3
Length of shoulder-straps 2
Breadth of shoulder-straps 1
The shoulder-straps connect the top of the side-piece with the top of the back. The front of the body is in one piece, being eight nails wide at the top, sloped down to five nails and a half at the bottom; it is four nails deep in the middle, but being hollowed out, is half a nail deeper at the sides. This front has a broad hem all round it, and is set into a band, which is attached to the front breadth of the skirt, the seam on each side of this breadth being open for the space of four nails. Tapes are attached to the band of the back breadth, and tie in front; buttons are set on, to within a nail of the end of the band below the side pieces, to which the band of the front buttons on each side, and by this means overlaps the opening: button-holes are also made at the two corners of the front (see X Z), which correspond with the buttons on the shoulder-strap, Z. The left hand side of Fig. 4 represents the petticoat with the body drawn forward, as if for the purpose of tying it, while the opposite side shows it as if thrown back, ready to put the arm into the sleeve. The front is unfastened and has fallen down.
GOWNS.
PLATE 14.
Gowns being a part of dress much influenced by the fashion or custom of the day, will not be fully entered on in this work, as it would be impossible to give the variety of form and size which is seen in them, and equally impossible, were a selection attempted, to please all tastes, or suit all figures: a few simple patterns for those kinds which are independent of fashion, and especially for those worn by servants, and persons engaged in laborious employments, with a very few other plain ones, will alone come within the limits of the work.
Those commonly worn by servants, and the working classes, are of print, linen, stuff, and for best, light ginghams, merino, or bombazine; ladies wear muslin, gingham, silk, merino, and for dress, either lighter or richer materials, as satins, velvets, gauzes, &c.
GENERAL OBSERVATIONS.
The bodies of working gowns should be lined with strong linen, which is preferable to calico, as it does not shrink in the washing; they should be of dark and good washing colours, deep blue and lilac are the best for wear.
It is a good plan to line silk and merino, or stuff gown bodies, with strong linen or brown Holland, as it keeps them in shape, by preventing them from stretching.
In buying striped dresses, be careful that the stripes run selvage-wise, otherwise they are very unbecoming. In making up the bodies, the stripes should lie in the same direction, and not crosswise from shoulder to shoulder.
Checks or plaids are rarely becoming when they are large: for children they should be particularly small and narrow, the colours should not be too bright or gay, but sufficiently contrasted and decided, to give a clear clean effect; plaids of which the colours are pale and indistinct never look very well; and after wearing a short time appear faded and shabby.
Checks are becoming to tall people, and stripes to short ones, as the former rather diminish, while the latter give an appearance of greater length to the figure than is natural to it, in the same way that a striped paper makes a room look higher, than one which is checked, or of which the pattern goes round instead of from top to bottom.
Broad hems and deep flounces also tend to lessen the height, it may therefore be taken as a general rule that tall persons should endeavour to add to their width, by making all the accompaniments to their dress as full and wide, as is consistent with the reigning taste, while those who are short, should let all theirs be as moderate as possible.
The same observations will also apply to stout and thin persons; for the former, all trimmings of the bodies in front, such as rouleaux, folds, and straps, should, generally speaking, be carried from the shoulder to the waist, in preference to being laid on crosswise; while with those who are of a slighter make, it is merely a matter of fancy, only remarking that every advantage of fulness should be given them.
If the trimming of a dress does not exactly match it, care should be taken to select it darker than the dress itself. Waistbands, when shaded, or of two colours, should be always worn with the darkest shade or colour at the bottom of the waist.
The complexion should determine the choice of colours. Persons of a sallow or muddy complexion should carefully avoid bright and glaring, or on the other hand, undecided colours; such as yellow, cherry colour, light green, buff, or drab; clear tints are more suitable to them, as white, light blue, violet, or black.
Those with pale but clear complexions, may wear all the shades of rose colour, primrose, apricot, buff, light green, lilac, brown, and violet.
Fair persons with a colour, will find few shades decidedly unbecoming; perhaps it will be as well for them not to wear buff.
Dark olive or brown complexions should avoid either very dark or very light colours, but they should be careful to select clear tints: pink, geranium, and violet are the most decidedly suitable to them.
On all occasions let the old saying be kept in mind,
“Gaudy colours strike the eye, And magnify deformity.”
These remarks may seem superfluous to some, but as attention to the minutiæ of dress adds much to a lady-like and refined appearance, and as an endeavour to please by an agreeable exterior, does not necessarily involve a disposition to vanity and frivolity, it is hoped that they will not be hastily condemned.
GENERAL OBSERVATIONS ON CUTTING OUT DRESSES.
It would be useless to form scales for the different kinds of dresses, as shapes vary so much, therefore none will be introduced, excepting for children and young persons; as, however, this article of dress forms one of the most important parts of a person’s wardrobe, all general observations for cutting out, that can be reduced to rule, will be given as clearly as the subject will admit of, at the same time, it is strongly recommended to all those who can afford it, to have their best dresses invariably made by a mantua-maker, as those which are cut out at home seldom fit so comfortably, or look so well, as when made by persons in constant practice. To those who have large families or limited means, it certainly is a great saving of expense having them made at home, and to such, the following rules may be useful. It would be very advisable, as a practice, for persons little acquainted with cutting out, to purchase cheap print for poor children’s dress and by fitting them on, much experience and nicety might be acquired at little waste or expense.
In making a dress for any body, the following measurements should be taken with a piece of common tape.
From the waist to the bottom of the skirt.
From the nape of the neck to the waist behind.
Round the waist.
Round the wrist.
From the shoulder to the wrist, with the arm bent.
In sending to London or elsewhere for a dress or riding habit, of which the exact measure is required, observe the following directions for transmitting measure in inches:—
1. Height of the person, observing if they stand upright.
2. The length of the arm from the centre of the back to the elbow,
and thence to the knuckles.
3. The circumference of the body, over the full part of the chest.
4. The circumference of the smallest part of the waist.
5. Length of the nape of the neck to the waist, and thence to the ground.
6. From the front of the armpit to the centre of the bosom, thence
to the chest.
7. From the nape of the neck, over the shoulder, to the centre of
the bosom, and thence to the waist immediately under it.
PLATE 14.
The bodies of dresses contain various parts, called the fronts, the backs, the side-pieces, the shoulder-straps, the shoulder-pieces, collars, &c., &c. These parts are variously employed and differently cut out, according to the style of the dress, sometimes being on the cross, and sometimes on the straight way.
Observe that the lines in the engravings denote, by their direction, which way the selvage side of the material runs. For the purpose of making this quite clear, let it be supposed that these lines represent stripes which run along or down the selvage.
Linings should always be cut to lie the same direction as the material of the gown.
In cutting out a dress, it is usual to fit the lining upon the figure, and cut out the gown from it, though, with an inexperienced person, it would be advisable to fit on the gown also, if the dress is to be full, or in folds.
Gowns are high, low, three-quartered, plain, or full, open before or behind, all of which sorts will be treated of in their proper order.
SIDE-PIECES.
PLATE 14. FIG. 12, 13.
Most dresses have side-pieces or bits under the arm, to join the backs to the fronts. These side-pieces are cut variously. For stout persons, the selvage-way or stripe should run from the extreme point at the bottom of the back of the side-piece, A, towards the middle of the top, B, of Fig. 12. For slight figures, the selvage-way or stripe should run along, or nearly along the front of the side-piece, thus A B, in Fig. 13.
The size of a side-piece depends much upon the figure and fashion. It should never, however, be brought much forwarder than under the middle of the arm-hole. It varies very much at the back, sometimes being brought but just behind the arm-hole, at others to within a nail of the middle of the back. The side-piece is sometimes cut straight at the back, and at others in a kind of half-arch; the latter is required for stout persons.
BACK SHOULDER-PIECES.
PLATE 14. FIG. 5.
These are not necessary to the set of the gown, and are seldom introduced, unless it is the reigning fashion, or for the better cutting up of the material. When these are used, of course shoulder-straps are unnecessary, as they connect the backs with the fronts. A represents a back shoulder-piece.
SHOULDER-STRAPS.
PLATE 14. FIG. 6, 7.
These are mere straps to connect the fronts and backs, and lie over the shoulder. The straps are always double and are generally sloped at each end, so as to be wider next the sleeve than at the shoulder or neck (see Fig. 7).
SKIRTS.
These vary very much as to the number of breadths, according to fashion and material. Thin clinging materials, as muslin, require more breadths than thick or standing out articles of dress, as silk-gauze, velvet, &c.; six, seven, or eight breadths are worn now for full dresses, but formerly four breadths were deemed sufficient. They are usually lined with thin glazed muslin, unless the dress is very heavy as stuff, merino, &c., it is economical to line the skirt, as it keeps the dress cleaner and makes it look better if turned.
A PLAIN HIGH BODY.
PLATE 14. FIG. 8.
For stout persons, indeed for the generality of figures, it is preferable to have the fronts of the body in two pieces, with a piping up the middle. In cutting out a high plain body, lay the material upon the person as follows:—
Let the selvage-way or stripe of the cloth lie in the direction from the extreme point of the shoulder, A (see Fig. 8), to the middle of the waist, B. In doing this, pin it at a sufficient distance from the selvage of the material to allow of plenty to cover the front. Thus, pin the material on at A B, which is some distance from the selvage, C D. Stroke the material up to the neck in front and hollow out at the neck, putting pins at C E. The front is thus thrown quite on the cross, up the middle. Do the same on the opposite side. Hollow out towards the arm, and cut off where it meets the side-piece. The back pieces, Fig. 9, always have the selvage up the middle, and are properly fitted to the figure till they meet the side-pieces.
In making up, a piping is laid along each seam, and the edges of the lining, and the dress should be well overcast. The sleeves have piping also round them. The backs should have broad hems, and, together with the waist, be lined with a strong tape or calico.
A FULL FRENCH HIGH BODY.
PLATE 14. FIG. 10, 11, 14.
This body is also in two parts in front. The material is pinned for the selvage-way, or stripe to run from the side of the neck or collar bone, A, to the middle of the waist, B (in Fig. 10), so as to throw the part up the front but slightly on the cross. Put strong pins in at A B C, to keep the material firm, and then commence laying the material in plaits (see Fig. 11), slanting from the shoulder towards the waist, folding them much deeper at the waist than at the top; five, six, or seven of these plaits are sufficient. In laying them along they should be arranged so that when the last plait is formed, and the plain part of the body pinned under the arm, the selvage-way or stripe should lie almost parallel with, or along with, the waist (see L M, in Fig. 11).
The backs, Fig. 14, are always selvage-way up the middle; the plaits, about three in number, should lie from the shoulder to the middle of the waist in a fan-like direction. They will almost form themselves properly at the top on the shoulder, if first properly pinned on the waist, and the material held up, and slightly pulled or shaken above the shoulder, with one hand, while the other arranges them. They will naturally fall in deeper folds below than above.
A WRAP HIGH DRESS.
PLATE 14. FIG. 15.
This has two fronts, to be cut out as follows:—
Lay the merino, or other material, selvage or stripe-wise from the top of the shoulder, A, to a little beyond the middle of the waist, so as to throw the body a little on the cross up the middle.
The plaits must be formed, while on the person, one after another, slanting from the shoulder, across the middle, to the opposite side of the waist. These plaits should be so folded, as to make the plain part, under the arm, fall selvage-wise along the band.
The back is made to correspond, the selvage is straight up the back, and the material being held tightly above the shoulder at the top, with one hand, the three or four plaits are the more easily arranged by the other, and should be folded over more deeply at the bottom than upon the shoulder. These plaits should exactly meet the others on the shoulder.
The backs and fronts join under the arm without side-pieces. In making up, the plaits should be secured on the shoulder, with a pipe or strap, and again secured about half a nail on each side of the shoulder. The fronts cross, or wrap over, and are well secured to the waistband.
A HIGH FULL GOWN, TO OPEN IN FRONT.
PLATE 14. FIG. 16, 17.
These are particularly suitable for house-maids, dairy or kitchen-maids, chair and washerwomen; they should be made of the strongest print, at 8d. or 1s. per yard. It is bad economy to buy a cheap poor material for a working dress, under the idea that it will do very well for common purposes, when it is of importance that they should stand a good deal of wear and tear.
For a young person, the skirt is in three breadths of extra-width print, of about eighteen nails; the seams must be sewed up, making one come in the front, which must overlap half a nail down the whole length of the skirt, leaving the hem or seam open for about four nails below the waist. The body is six pieces, having one back, two fronts, two side-pieces, and one collar.
The two fronts are selvage-wise up the middle, and are cut as follows:—Pin the material selvage-wise at A, and at the bottom, lay it in plaits or fullings along the shoulder, to lie towards the waist, and smooth the plain part to fit the shape, till it meets the side-piece, cut it off, and hollow it under the arm. The back-piece, Fig. 17, is in one piece with the selvage, to lie up the middle; therefore, pin it firmly at the middle of the top, A, and at the waist just below, B. Lay the material on each side in fullings or plaits, pinning them down here and there, and, after arranging them at the top, along the back and shoulders, smooth down the plain part, hollow out at the arm-holes, and cut along the shoulders. Cut the side-piece next, and then make a neat simple collar; one like Fig. 7, in Plate 13, would be very suitable. In making up, after cutting out your tight lining, lay each part of the gown upon each piece of the lining, and begin to stitch strongly together all the pieces, laying a piping up every seam, and over-casting the rough edges inside, to make them wear well and look neat. The sleeves are short (see Fig. 24, in Plate 12). The collar and arm-holes are also piped.
Make a broad hem up each side of the front, and put the body into the band; let the fulness be pretty even along the piping on the shoulder, but bring it rather towards the middle of the waistband, in front.
The fulness behind is regular along the shoulders and collar, but drawn towards the centre of the back, at the band. Sew the body on the skirt, put strings or bands, of the same material, of about one nail wide, to tie the dress at the throat. The waistband is one nail deep and about eleven nails long, and can either button or fasten with a strong hook and eye in front.
A HIGH BODY, TO OPEN IN FRONT.
PLATE 14. FIG. 18.
This shape is often worn by elderly ladies, sometimes by servants, and is convenient, as it enables the wearer to dress herself without the assistance of a maid. The gown is open down the two seams at the sides for about four or five nails, so that the front ties round the waist like an apron, being of course well fulled in front into a band, to which strings are attached. The slits at the sides form pocket holes.
The body is sewed on to the skirt behind and opens in front. It has one back, which, if full, is cut with the selvage-way or stripe to lie straight down from the neck to the waist, but if plain, it should be on the cross. The fronts are generally on the cross with the material cut to lie with the stripe or selvage-way, from the extreme point of the shoulder to the middle of the waist. The fronts are continued so as to pin down at the waist, one across the other, over which the front breadth or apron ties.
PLAIN LOW BODY.
Pin the material with the selvage-way or stripe, to lie from the extreme point of the shoulder to the middle of the waist, so as to throw the body quite on the cross up the middle, which is joined with a piping. The backs are always selvage-wise up the middle. Join the backs and fronts with a piping on the shoulder, also at the seams, for the side-pieces. Stitch up the plaits that are made at the bosoms.
ANOTHER FRENCH LOW PLAIN FRONT.
PLATE 14. FIG. 19.
This is in five pieces, two backs, one front, and two side-pieces. The front is all in one piece, and in cutting it out, the material is pinned with the selvage-way or stripe up the middle. Pin it firmly at A and B, at the top and bottom of the middle of the body. Lay the material along to the shoulders, and pin it down again at C. Slope with the scissors from the point of the shoulder to a peak down at the front. The backs are likewise cut selvage-wise up the middle, and peaked from the back to the shoulders: the side-pieces are joined to the front and back by a piping. Make the bosom plaits and stitch them up.
VARIOUS MODES OF TRIMMING LOW BODIES WHEN TIGHT TO THE FIGURE.
PLATE 14.
Tight or plain bodies require some ornament or finish to set them off, a few neat methods of putting on folds, &c., will therefore be explained.
Plate 14, Fig. 20, represents a plain body with the folds sewed on. These folds are in two parts one for each side of the body in front. They are cut crosswise and are only suitable to those gowns which are not of a washing material, they should be from nine to ten nails wide, and as long as will reach from the shoulder to the middle of the waist. In making them up stitch them firmly down on the shoulder in regular plaits, and again about a nail in front of the shoulder. Arrange them as regularly at the waist, sewing them firmly into the middle of the band, exactly to meet or correspond with the folds of the other side.
Plate 14, Fig. 21, represents a plain body with loose folds upon it, the body is made exactly like that of a petticoat, the front may or may not be in two parts, according to pleasure, and convenience; if there is a joining, a piping should be laid between the two parts. If the dress is of a washing material, the folds should be the straight way, and the cross-way if it is not.
The straight folds are merely a piece of muslin or print, six and a half or seven nails long and about seven nails wide, gathered at the top, and neatly biassed two or three times at intervals of half a nail; the upper gathering is then sewed very strongly on the shoulder, where the front joins the shoulder-strap; the bottom is simply hemmed. When worn, this piece is folded in large or small plaits, according to the taste of the wearer, and neatly pinned across under the waist ribbon. This method of making muslin, gingham, or print dresses, is very convenient for the washerwoman.