Chapter V · MISCELLANEOUS.
Reading edition
Hair Suture.—This is useful to bring the margins of small scalp wounds together, where plasters are not employed. It consists in taking a lock of hair ½ or ¾ of an inch on each side of the wound, and tying them together over a double thickness of lint; by this means the margins of the wound are kept together, and the dressing in place. The slits left after the removal of small sebaceous tumours are very conveniently treated in this way.
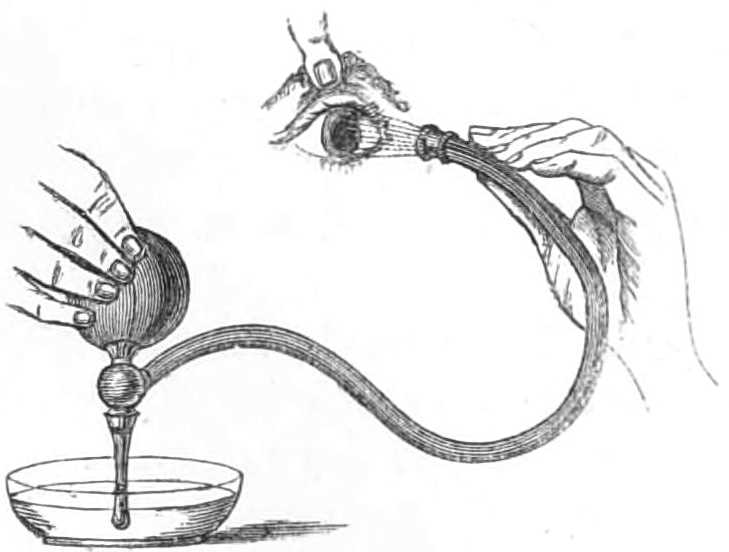
Fig 70.—Eye Douche.
The Eye Douche is a small elastic bottle fitted with a nozzle and flexible tube, ending in a rose, through which, by means of a valve, the water is drawn from a vessel and driven in a fine spray over the eye held open to receive it (see fig. 70). The syringe in fig. 70 is very useful for a variety of purposes.
Eye-Drops.—Little bottles are sold by chemists for this purpose, with a tubular stopper; at one end of the stopper is a fine jet, the other is closed by a piece of indian rubber stretched over it; on pressing this a drop escapes from the jet. In dropping astringents into the eye the patient should put his head well back; while the surgeon raises one lid from the eye, drops in the lotion, and then raises the other and drops it in again, and tells the patient to move his eyelids about a little to force the lotion over the whole conjunctiva.
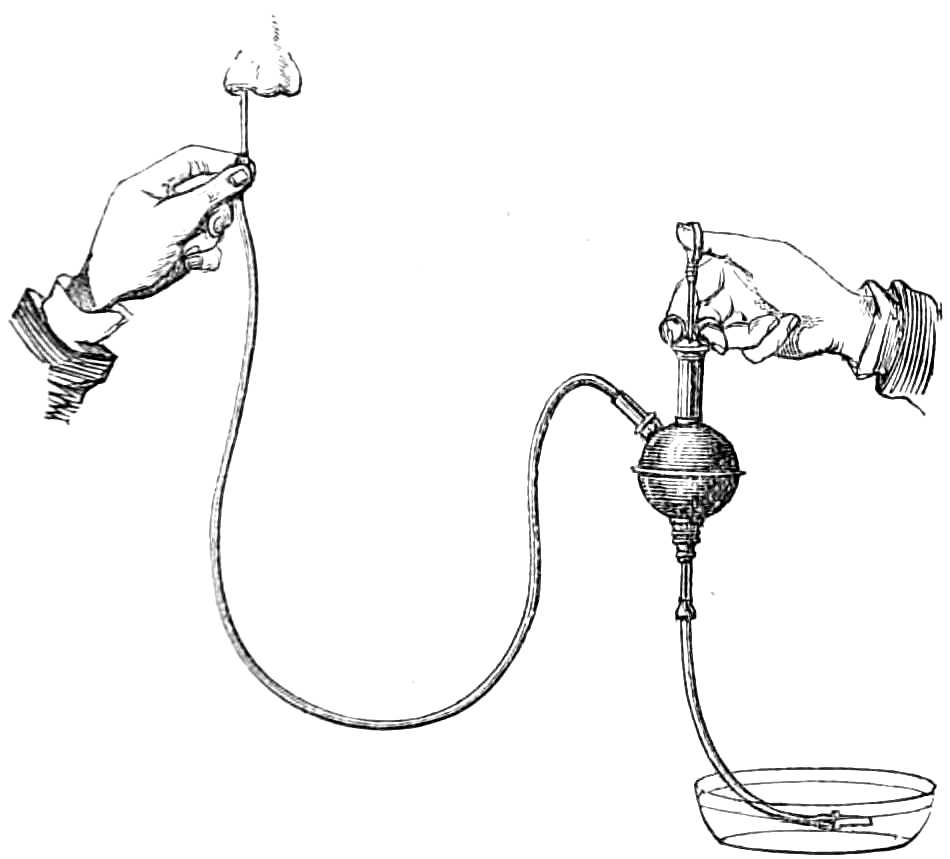
Fig. 71.—Syringe for sending a continuous current into the nose or ear, &c.
Syringing the Ears is best performed by a syringe having a long nozzle to direct the current of soap and water down the meatus on to the wax. Figure 71 consists of a syringe with double opening and air chamber; when in action it supplies a continuous gentle current, which breaks up the concretions more speedily and with less discomfort to the patient than the intermitting jet of a common syringe; but an important part of the apparatus is the long slender nozzle to direct the stream well into the meatus. The instrument-makers supply a little spout or shoot to hang under the ear, to turn off the water into a basin clear of the neck. If time permit, the patient should keep the ear charged with olive oil for a few days before syringing, that the wax may be softened. After the wax is removed, the irritation of the canal is best allayed by a little glycerine or olive oil put into the meatus, and covered by a pledget of cotton wool, large enough to fill the concha and too large to enter the passage, where it may be lost sight of.
Ice-Cold Injection.—In obstinate epistaxis the nares are sometimes plugged, but, before proceeding to this painful mode of treatment, a simpler plan should first be tried; namely, the injection of ice-cold water into the nostril along which the blood flows. The stream should be directed upwards that the water may first dislodge the clots entangled in the meatuses, and then flow over the bleeding surface. This is best done by employing a clyster or douche bottle (see fig. 71), one tube of which lies in a vessel of ice-cold water (containing solution of gallic acid or other styptic if desired, though cold water alone usually suffices), the other tube, having a long narrow nozzle, is passed up the nostril and directed upwards among the spongy bones. With this apparatus the water is injected steadily for half an hour, before being abandoned as unsuccessful. The patient is kept still, sitting upright in a cool room. If these means fail to check the flow of blood, the nares may then be plugged.
Plugging the Nares.
Apparatus.—1. A flexible catheter, No. 7, or Belloc’s sound.
2. Whipcord.
3. Lint.
4. Scissors.
Step 1. Roll up a strip of lint tightly into a mass, 1 inch broad and ½ an inch thick, trim the ends away with scissors till the mass is of a size to enter a posterior naris, then tie the wedge in the middle of a yard of doubled whipcord. If blood trickle down both nostrils both must be plugged, and two such plugs must be prepared; next, make two similar rolls of lint, and tie these up with a short piece of silk or twine to prevent their unrolling.
Step 2. Pass along the interior of the catheter a yard of twine, and draw its end through the eye of the catheter a few inches, then introduce the catheter through the naris directly backwards, not upwards nor downwards, because, when the patient is upright, the floor of the nose is nearly horizontal. When the catheter has reached the pharynx, the finger, or a forceps, must be passed through the mouth to catch the string hanging from the end of the catheter and bring it out of the mouth, where it is held while the instrument is withdrawn from the nose. The step is repeated in the other nostril if required.
Step 3. Next wash out the nostrils with a few syringefuls of ice-cold water, in which some tannin is suspended.
Step 4. Fasten the double string of the plug to the end of twine hanging out of the mouth (see fig. 72), and then draw out the other end through the nose; this will carry the plug to the pharynx, where the finger guides it over the soft palate and thrusts one of its ends into the naris, where the strings draw it tight. The plug for the anterior nostril is then put in place, and the strings tied tightly over it (see fig. 73). Thus the plug in front keeps the plug behind in place and vice versâ. The end of string from the posterior nares, left hanging out of the mouth, must next be tied to the string of the anterior plug to keep it out of the patient’s way, till wanted to withdraw the posterior plug, when that is to be removed. If blood run from both sides, the other nares are stopped by a repetition of this operation.
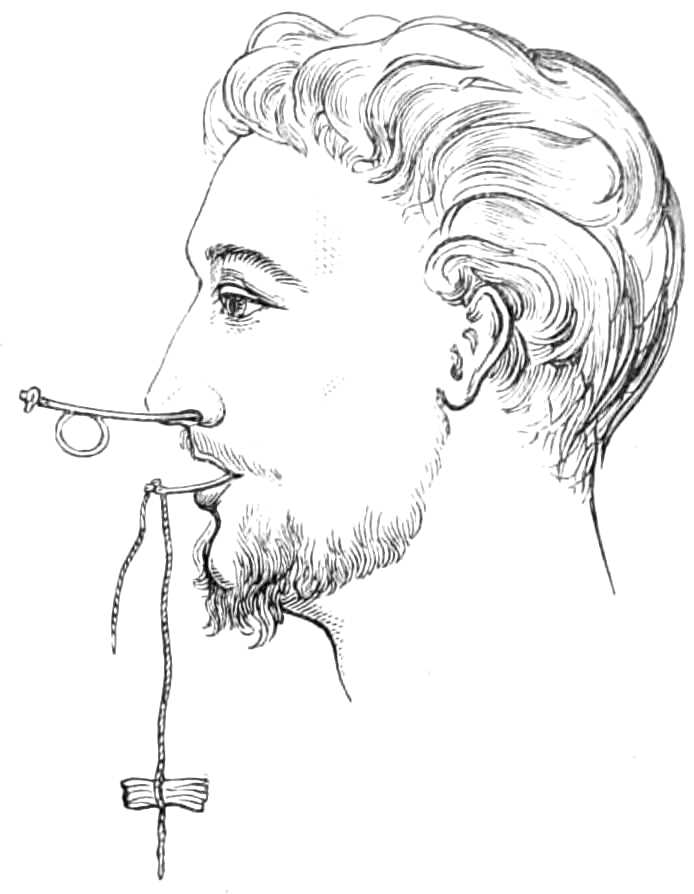
Fig. 72.—Plugging the nares. Belloc’s sound passed through the nares, and projecting at the mouth.
This apparatus is very painful, and, if borne so long as a couple of days, should always be taken out then. If bleeding recur, which is very unlikely, fresh plugs must be introduced. Sometimes the posterior plugs are soaked in styptic solutions; this is bad, because the bleeding part is not at the posterior nares, and the styptics increase the soreness the plugs themselves produce.
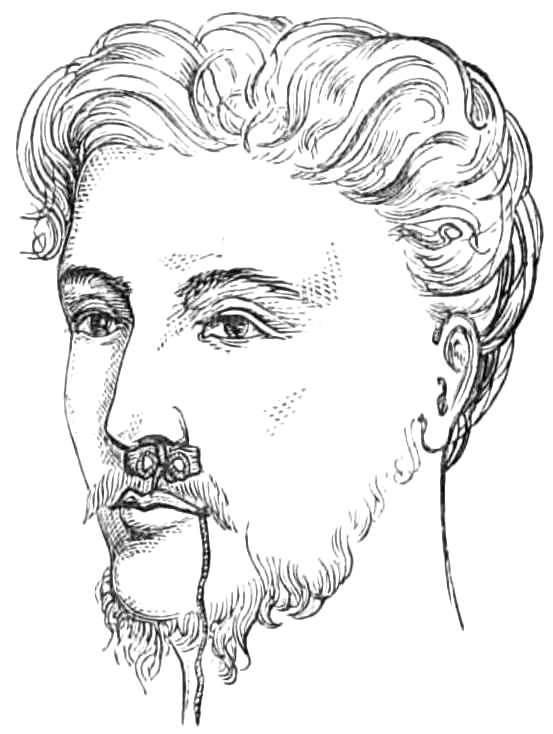
Fig. 73.—Plugging the nares; the strings from the posterior plug tied over the anterior plug.
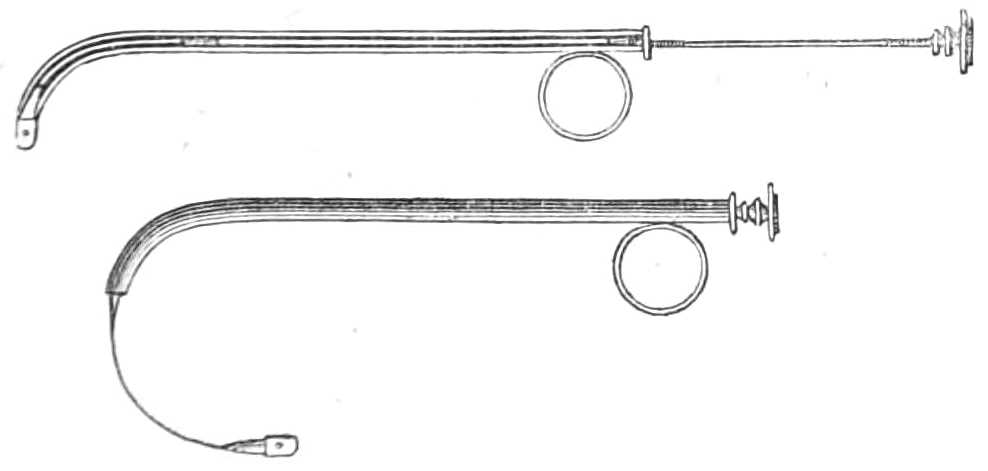
Fig. 74.—Belloc’s Sound, for drawing a thread from the mouth along the nares.
Belloc’s Sound.—Fig. 74 is a curved silver cannula like a female catheter, furnished with a long spring stylet, that arches round in a circle when thrust out of the cannula, and has a hole at the end to carry a thread. The long stylet can be unscrewed into two parts, when not in use. The figure represents the instrument with the stylet ready for protrusion, and the same arching forwards after it is protruded.
The cannula is passed along the nares till the end reaches the pharynx, then the stylet is protruded and arches forward till it reaches the teeth, when a thread is passed through the hole, and the stylet being withdrawn, the thread is carried with it into the pharynx and through the nostril, where it can be used to draw the plug into its place at the posterior nares.
Tooth Drawing.—A surgeon is frequently required to draw a tooth on emergency, and should be provided with instruments (see fig. 75). Seven pairs of forceps and an elevator are sufficient for all he is likely to deal with. They are differently shaped for the different teeth, which vary much at the neck, the part grasped in the forceps.
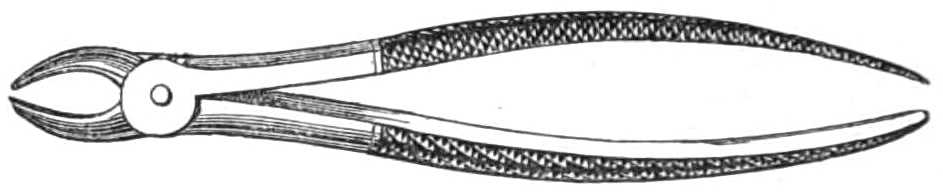
Fig. 75.—Tooth Forceps.
For the operation the patient should be seated in a high-backed chair; the surgeon stands at his right side, holds the jaw with his left hand, while with the right he thrusts the beaks of the forceps between the gum and the tooth on its lingual and buccal aspects; having reached the neck, he holds the tooth firmly, pushing it inwards and outwards with a rotary motion of the wrist (except for the molar teeth). Sudden tugs break the tooth and leave the fang behind; when loosened by rotation and lateral motion, the forceps readily lift the tooth out of its socket.
For the upper incisors the beaks of the forceps are straight, slightly hollowed inside, to give them hold of the teeth, and have crescentic edges (see fig. 76).
The upper incisors and canines can be drawn by the same pair, as the shape of these teeth at the neck varies to a small extent.
For the lower incisors a very narrow forceps is necessary. The beaks (fig. 77) should be curved at the joint sufficiently to form an angle of 25° with the handles, that the latter may clear the upper jaw. The edge of the beaks is crescentic, similar to that of the upper incisors. These forceps are also very useful for removing roots, as their fineness enables them to sink between the stump and the alveolus with ease.
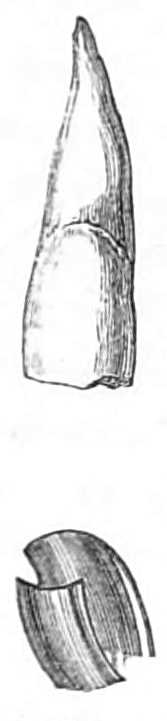
Fig. 76.—Upper incisor tooth and forceps.
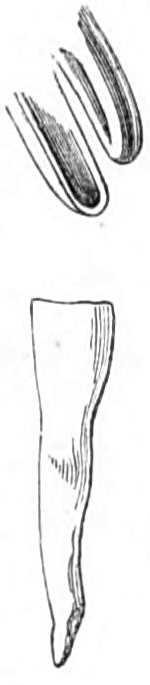
Fig. 77.—Lower central incisor and forceps.
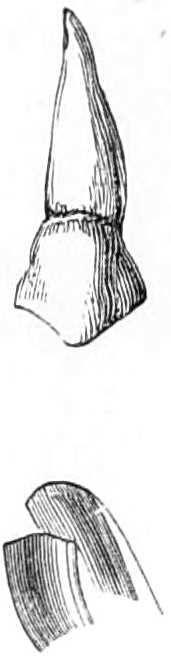
Fig. 78.—External aspect of upper bicuspid tooth, and bicuspid forceps.
For the bicuspids, beaks with crescentic edges also are used, but the inside of the beak is more hollowed to fit the round neck of these teeth (see fig. 78). All the bicuspids can be drawn with the same pair, but it is convenient to have forceps bent at the joint to clear the upper jaw when extracting a lower bicuspid (see fig. 79).
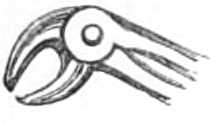
Fig. 79.—Lower bicuspid forceps.
For the upper molars two forceps are required, one for each side of the jaw; the beaks of these are well hollowed to admit the crown of the tooth. The inner beak terminates in a crescentic border to fit the large internal fang (see figs. 80 & 81); the outer beak has two smaller grooves separated by a point, that passes between the two external fangs.
In drawing these teeth the forceps should be thrust as high as possible and held firmly, while the fangs are loosened by moving the tooth from side to side, but from the multiplicity of fangs, rotary motion is not available.
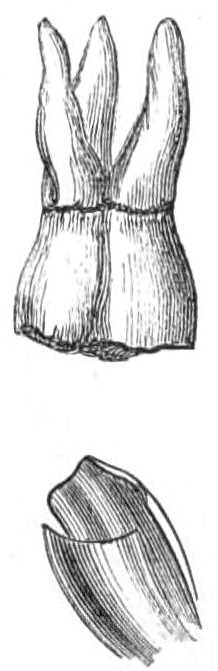
Fig. 80.—Left upper molar tooth and forceps.
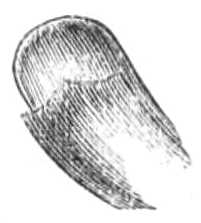
Fig. 81.—Right upper molar forceps.
The wisdom molars are often difficult to seize from being almost buried in the jaw; as they resemble a bicuspid in shape, bicuspid forceps (fig. 78) should be employed; if this fails to penetrate between the tooth and the alveolus, the narrow incisor forceps (fig. 77) can be driven up till it grasps the tooth. Not unfrequently the fang of this tooth in the lower jaw is curved backwards and prevents extraction when the tooth has been loosened; this difficulty may be overcome by pushing the crown of the tooth a little backwards so as to tilt the fang forwards out of place.
When the molars are closely set, or the tooth to be extracted is overhung by its neighbour, it is often difficult to avoid tearing the gum extensively and even carrying away more than one tooth; tearing the gum is easily avoided by lancing it before applying the forceps, and slow and steady movements of the wrist usually prevent the latter accident, or the overhanging tooth may be filed away before the forceps are applied.
The inferior molars (fig. 82) have forceps, whose beaks are doubly grooved and pointed, to enable them to seize the neck on each side between the two fangs.
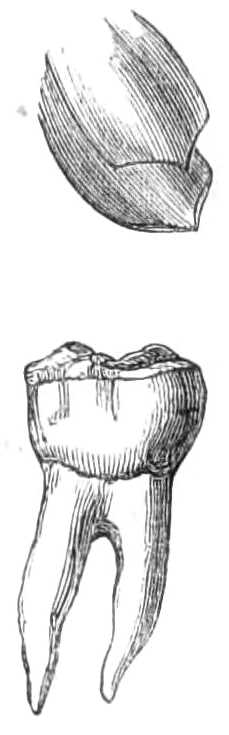
Fig. 82.—Inferior molar tooth and forceps.

Fig. 83.—Elevator.
In raising stumps, so much decayed that the forceps will not hold them, the elevator must be employed; this instrument (fig. 83), straight, pointed, and a little grooved at the point, is thrust down between the alveolus and the tooth; the jaw being then the fulcrum, the elevator is the lever to push forwards the fang; when thus loosened it is easily lifted out. In working with an elevator there is some risk of thrusting the point through the alveolus, and wounding the tongue or floor of the mouth, hence it should always be guided and covered by the left forefinger. In removing the fangs of incisors the narrow forceps are most useful, and should it not be possible to penetrate between the fang and the alveolus, the alveolar border may be included in the grasp of the forceps and brought away with the tooth. The injury thus inflicted is very unimportant and much pain is saved.
After the tooth is extracted the mouth should be well washed with warm water a few times, the attending bleeding being of no importance, except in individuals of hæmorrhagic diathesis, in whom measures should be at once taken to arrest the flow.
To stop a bleeding socket the alveolus must be well cleared of clots, and fragments of sponge, soaked in a solution of perchloride of iron, one part of the salt to three of water, packed into the cavity. A plug of cork is placed between the jaws, and a four-tailed bandage (see page 32) carried round the head to keep them firmly closed. Should this plan fail, the socket must be cleared again, and the wire of the galvanic cautery pushed well down to the bottom and then heated till it has cauterised the cavity (see page 168).
Nipple Shields and Artificial Nipples made of flexible ivory, vulcanized india-rubber, &c., are required when the nipple is chafed and excoriated by the child’s sucking, especially if his mouth be attacked by thrush, as is usually the case. When the nipple is sore it should be well washed and dried after suckling, covered with glycerine of starch or plastic collodion and protected by a shield. If much inflamed it may be wrapped in lint dipped in alum water or solution of sulphate of zinc (one grain to the ounce), and deep chinks should be freely rubbed with lunar caustic. The breast should be regularly emptied by the breast-pump if the child’s sucking gives much pain, lest the accumulation of milk in the ducts cause milk abscess.
Plugging the Vagina is employed in cases of rapid hæmorrhage from the womb, &c.
Apparatus.—1. A silk pocket-handkerchief.
2. A dry new fine sponge or pellets of cotton wool.
3. Silk thread.
4. A body roller or folded sheet.
The sponge should be cut into pieces the size of nuts; if the sponge is compressed it answers better. When prepared, the vagina should be cleared of coagula by a syringeful of ice-cold water; the handkerchief, unfolded and thrown over the right hand, is passed up the vagina till its centre reaches the os uteri, the borders and ends then project from the vagina. The interior of the handkerchief is next filled by firmly packing the sponge in bit by bit until the vagina is distended by the mass; the ends of the handkerchief are then tied together. The sponge swells as it absorbs the blood, and compresses the bleeding vessels by its distention.
The abdomen and uterus are then supported by a body roller, or folded sheet, wrapped tightly round the hips and waist, while the patient, lightly clad, is kept quiet in a cool chamber.
When the plug has answered its purpose it is removed, by withdrawing the sponge bit by bit, and the vagina is washed with tepid water.
The kite’s-tail plug.—Masses of cotton wool the size of a hen’s egg are tied at two inches distance from each other along a long string. When about a dozen are tied on, a speculum is introduced, and the first ball of wool is passed to the bleeding point and pushed firmly against it, and then another, and so on, until the vagina is firmly packed. An end of string is left hanging out of the vulva, whereby the plug may be removed when necessary. Each mass comes away successively with ease as the string is pulled out of the vagina.
Injecting the Urethra often fails from the inefficient mode in which it is done. The syringe employed should be short enough to be worked easily with one hand, and need not contain more than one or two tea-spoonfuls, as the capacity of the urethra does not exceed that amount. One of such a size is just 2 inches in length, and easily worked by one hand. The opening through the nozzle should also be wide, that a forcible stream may be injected into the urethra.
The patient should fill the syringe, then place on a chair or stool before him a chamber pot, and, having just made water to clear out the discharge collected in the urethra, he inserts the slightly bulbous nozzle into the meatus urinarius. He then grasps the sides of the glans with the left forefinger and thumb to close the mouth of the passage. The right forefinger next presses down the piston slowly, so that the whole of the injection passes into the canal and distends it; keeping the meatus shut with his left finger and thumb, the patient lays down the syringe and rubs the under part of the penis backwards and forwards, that the injection may be forced into any folds or follicles of the mucous membrane. Having thus occupied about thirty seconds, he releases the mouth of the passage, when the fluid is ejected sharply into the vessel placed ready to receive it. This rapid ejection is a test of the proper performance of the operation.
In counselling the use of astringent solutions, the surgeon should always caution the patient not to employ one that produces severe smarting, which lasts more than a few minutes after injection. If it causes much pain, the solution is too strong.
Catheters and Bougies.—Silver catheters are made in sizes, increasing from No. ¼ to No. 12, the first having a diameter of 0·64 inch, the latter 0·25 inch. Larger ones than these are seldom employed.

Fig. 84.—Silver catheter.
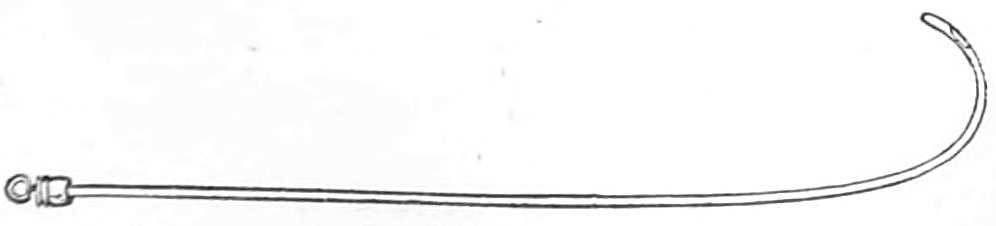
Fig. 85.—English Flexible catheter.
The curve preferred by different surgeons varies much; that depicted in fig. 84 is the one used by Sir Henry Thompson; it begins at 3¼ inches from the point, and ends when the point is at right angles with the stem. Each catheter is fitted with a wire stylet.
The flexible catheters are of many kinds; the English gum-elastic (fig. 85), the French black flexible (fig. 86), and the vulcanised india-rubber (fig. 87), catheters, being the three varieties most generally employed. English flexible catheters should be kept on stylets well curved at the last 3 inches, that, when the stylet is withdrawn, for the catheter to be passed, the latter may retain sufficient curve to pass over the neck of the bladder easily.

Fig. 86.—French bulbous-ended catheter.

Fig. 87.—Vulcanised india-rubber catheter.
Sounds are solid, being of steel, plated or gilt. Their curve varies, and is generally 20 or 30 degrees more obtuse than that of the catheters.
Bougies are made of the same materials as the flexible catheters; they are kept straight, and the more supple they are the better, the black bulbous-ended bougies being the most useful variety for dilating the urethra.

Fig. 88.—The Olive-headed bougie.
Olive-headed Bougies (Bougies olivaires) are used for exploring the urethra in cases of gleet, where the discharge is often kept up by a stricture or a tender patch of chronic inflammation of the mucous membrane. They are made of metal, or of black gum mounted on a very flexible leaden wire; the latter kind are far preferable. The stem of the instrument is slender, no bigger than a No. 3 or No. 4 bougie; the end terminates in a conical point about ¼ or ⅜ of an inch long, expanding at its base to any required size. These bougies are most useful from No. 4 to No. 16 of the English scale, or from No. 10 to No. 24 of the millimetrical scale. The stem should be marked with white rings an inch apart, so that when the instrument is passing over a tender part, or is arrested by a stricture, the distance of the impediment down the urethra can be at once estimated. In withdrawing the instrument, the wide base of the olive shows the exact position and length of those strictures which are not too narrow for the olive-head to slip by, for it is nipped by the stricture and released as soon as the narrowing is passed. By using instruments large enough to fill the normal urethra, an induration beneath the mucous membrane can be detected in its earliest stage before it has produced symptoms diagnostic of stricture.
Rigid instruments have one advantage over flexible ones, in that their points can be guided by the surgeon; the points of flexible instruments cannot be directed, hence the introduction of the latter into a stricture is less easily managed, consequently bougies with various kinds of points should be kept. But flexible instruments cause far less irritation than rigid ones, and should always be employed instead of the latter when possible: with patience and practice much of the difficulty attending their introduction is overcome. The French bougies, with tapering ends and bulbous points, slip more easily through a stricture than instruments having the same diameter throughout, and bougies with fine tapering points can sometimes be introduced where others fail.
Passing Catheters.—In passing instruments along the urethra the conformation of its interior should be borne in mind. From the meatus to the triangular ligament, the normal urethra, when gently stretched, becomes a straight tube; having, nevertheless, just within the meatus, a pouch in the roof, the lacuna magna, where the point of the instrument may catch if not turned downwards. At the bulbous part the urethra enlarges in capacity by having a slight downward curve in its floor, just before the triangular ligament is reached. In this depression, the beak of the catheter is apt to sink below the level of the passage through the ligament, which is always a fixed point. Beyond the triangular ligament the urethra curves gently upwards, has a floor beset with irregularities, in which the point of the instrument easily catches, if not raised as it passes along the curve.
A Silver Catheter is passed most easily while the patient is in a horizontal position, with the shoulders low and the thighs separated. The surgeon stands on the left side of the patient, and holds the catheter, previously warmed and lubricated with oil or lard, lightly between the thumb and two first fingers of the right hand, the beak downwards and the stem across the patient’s left groin. Then taking the penis between the middle and ring fingers of the left hand, the palm being upwards, he pushes back the foreskin with the thumb and forefinger, and steadies the meatus while introducing the beak of the catheter. This done, he draws the penis gently along the catheter as the point is lowered to the perinæum, but without raising his right wrist until the instrument has travelled 5 or 6 inches along the passage and reached the triangular ligament. The surgeon then carries his right wrist to the middle line of the patient’s body, and while pushing the point onwards, raises the hand round a curve till it again sinks between the patient’s thighs. When the bladder is reached he withdraws the stylet that the urine may escape. Three points of difficulty are usual in passing catheters; the lacuna magna just within the meatus, the triangular ligament, and the prostatic part of the urethra just before the bladder is reached. The first is escaped by keeping the beak along the floor of the urethra for the first two inches; the second is best avoided by raising the wrist as the instrument passes the triangular ligament, and directing the beak against the upper surface of the urethra, lest, being in the enlarged bulbous part, it sink below the opening in the ligament; the third difficulty is overcome by depressing the hand well as the point approaches the bladder.
To pass the catheter in the upright position, the patient is placed against a wall or firm object, with his heels eight or ten inches apart and five from the wall, that he may rest easily during the operation. The surgeon sets himself opposite the patient and grasps the penis with the two middle fingers of the left hand, the palm upwards; he next exposes the meatus with the thumb and forefinger, and his right hand holding the catheter by its middle obliquely across the left side of the patient, he draws the penis on to the instrument till the triangular ligament is gained. He then carries the shaft of the catheter to the middle line and, holding it by its end, brings the right hand downwards and forwards, to carry the point upwards over the obstruction at the neck of the bladder.
The operation should be done slowly and with great gentleness, giving the urethra time “to swallow the instrument,” as the French surgeons express it. Hasty or forcible movements tend to thrust the point against the wall of the urethra, where it hitches, if it does not penetrate and make a false passage. However easy the introduction may have been, the withdrawal of the catheter should be always done slowly to avoid giving pain to the patient.
When the canal suddenly contracts, as from a stricture, the point of the sound often stops at the obstruction; by withdrawing the instrument a little, and diverting its point to another side or along the upper part of the urethra, a part where the obstruction is less abrupt will often be found to let the catheter glide into the stricture. The floor of the urethra should always be avoided, as false passages nearly always branch off from the floor close to the stricture.
Difficult narrow strictures are most easily overcome by injecting a drachm of warm olive oil into the urethra, and then passing fine black gum or whalebone bougies (bougies filiformes) along the urethra. These, from their fineness (their diameter is only ⅓ or ⅔ of a millimetre, about 1/100 inch), are very apt to catch in false passages; if so, the bougie should be left engaged in the false passage, and held in the left hand while another bougie is passed along the urethra; if, in its turn, this one gets into a false passage, it also should be left, and a third passed; and so on till all the false routes are occupied, or a bougie enters the stricture and reaches the bladder, which is known by the readiness with which it will pass backwards and forwards. The other bougies should then be withdrawn, and the bougie which has passed the stricture be tied in for twenty-four hours, until the passage is sufficiently dilated to allow a small catheter to replace it. If the patient is not suffering from retention of urine, there need be no anxiety about evacuating his bladder, as urine will find its way alongside the bougie when he attempts to make water. In passing to relieve retention, No. ½ English flexible catheter should be used instead of bougies; but when the stricture is too narrow for these, a bougie may still be tried, as the urine will generally dribble alongside the bougie with sufficient rapidity to relieve the patient.
English flexible Catheters should be kept on stylets curved as represented in fig. 85, that the first 3 inches of the instrument, when the stylet is withdrawn, may retain sufficient curve to ride over the impediment at the neck of the bladder. In warm weather, after being oiled, they should be dipped in cold water just before using, to render them a little stiffer, and less likely to lose their curve while traversing the urethra.
They may also be passed while the patient lies or stands, and the movements are the same as for the silver catheter.
Bulbous-ended or probe-ended Catheters and Bougies (Bougies à boule) are always straight; their suppleness, their tapering ends, and their smooth rounded point enable them to glide along the urethra, and to accommodate themselves readily to the windings of the passage; for which reason they are the easiest to pass both for the patient and the surgeon. In passing them they are slightly warmed, if the weather is cold, to restore their flexibility, and gently pushed along the canal till the bladder is reached.
Vulcanised India-Rubber Catheters (fig. 87) are used when the bladder is to be kept empty; their suppleness renders them very unirritating, and as phosphates crust on them very slowly, they may be worn for a week without being changed.
They are easily passed by threading them on a stylet with the appropriate curve, and lubricating them with white of egg or water, not with grease, which injures them. The stylet is withdrawn after they are passed.
To pass a Catheter in the Female.—The patient may lie on one side or on her back; if on her side the knees should be well drawn up; if on her back, the thighs must be somewhat separated. Before introducing the catheter, a wine bottle or narrow-necked bed urinal should be placed in the bed ready to receive the urine. If the ordinary slightly curved female catheter be not at hand, a No. 7 or 8 flexible one does just as well.
Having oiled the instrument, go to the patient’s back, and take the catheter in the right hand if the patient lies on her right side, and in the left hand if she lies on her left side; if she lies on her back, go to either side and take the catheter in the hand nearest her feet. Hold the stem of the catheter in the palm, so that the beak lies against the tip of the forefinger, while the thumb and second and third fingers grasp the stem. Then passing the hand under the bed-clothes, seek the buttock; from that pass the forefinger to the perinæum, and let it enter the vulva, keeping the back of the finger against the posterior part, then pass it between the nymphæ to the entry of the vagina. This is known by the tip of the forefinger being lightly grasped, unless the vagina is very wide. Keeping the finger just within the entry, feel for the arch of the pubes in front; having found this, withdraw the tip of the finger slightly from the vagina: in doing this, it will strike a small projection of mucous membrane hanging just at the anterior margin of the entry. Keep the finger steady against this, while the other hand pushes the catheter gently onwards, which then rarely fails to enter the urethral opening close above the projection of mucous membrane. Having penetrated the urethra, arrange the catheter in the receptacle for the urine, and push the instrument into the bladder.
To Wash out the Bladder.
Apparatus.—1. A flexible catheter; Nos. 8 or 9 are convenient sizes; but a smaller one can be employed.
2. A caoutchouc bottle, holding six ounces, and fitted with a tapering nozzle and stop-cock. (Fig. 89.)
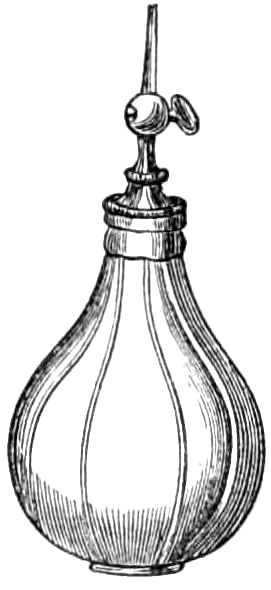
Fig. 89.—Elastic india-rubber bottle for injecting.
During the operation the patient should stand, if possible, as the mucus is thus more easily cleared from the bladder. The surgeon first fills his bottle completely with tepid water, that no air may remain; then directing his patient to stand against a wall or some firm object, passes the catheter and draws off the urine. He next inserts the nozzle into the catheter, and, turning the cock, compresses the bottle slowly until two or three ounces of water have run into the bladder; this he lets escape by removing the bottle for a minute, and then repeats his operation till the water returns clear, without exhausting the patient’s strength. Three or four small injections wash the sediment and mucus from the bladder as quickly, and with far less fatigue or risk of spasm than a prolonged flow of water through a stiff double current catheter. In this way the bladder may be washed twice or thrice daily to the great comfort of the patient.
Injections of solutions of nitrate of silver, carbolic acid, alum, &c., in the proportion of 1 part to 100, or to 50 of water, can be used instead of water for this purpose.
To Tie in a Silver Catheter.
Apparatus.—1. A few yards of tape ¼ inch wide.
2. A roller.
3. A spigot of wood; or,
4. A yard and a half of fine india-rubber tubing.
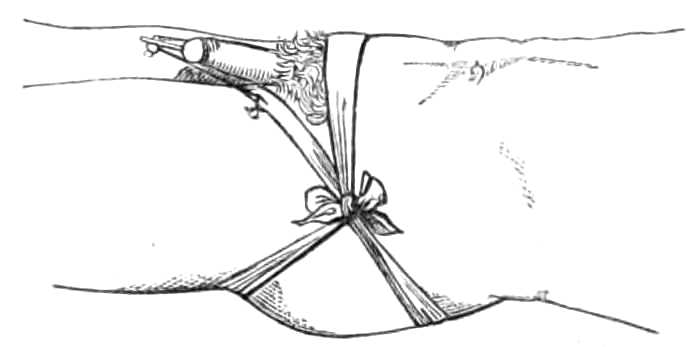
Fig. 90.—A silver catheter tied in the urethra.
A narrow roller is tied round the hips; from this, on each side, a tape is passed round the thigh at the groin, and fastened before and behind to the roller round the hips (see fig. 90); a narrow tape run through the rings of the catheter connects them with the loops in the groins. The tapes are tied short enough to prevent the catheter slipping out; a yard or two of narrow india-rubber tubing, fixed on to the end of the catheter, conveys the urine to a pan under the bed, and keeps the bed dry, or a spigot of wood fitted to the catheter may be inserted, for the patient to draw out when he desires to void his urine.
To Tie in a Flexible Catheter. (Fig. 91.)
Apparatus.—1. A piece of soft twine, or Berlin wool, about 15 inches long.
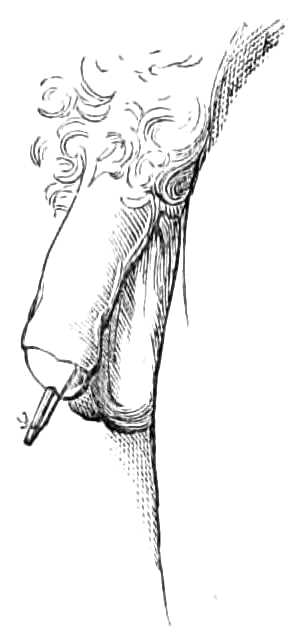
Fig. 91.—A flexible catheter tied in the urethra; the string fastened behind the corona glandis, and concealed by the foreskin.
A catheter is first passed into the bladder, and the urine runs off. The catheter is then gently withdrawn, till the stream ceases, that the end of the instrument may remain just without the neck of the bladder. The string should be tied round the catheter ½ an inch from the meatus, its ends gathered together and tied in a knot about 1 inch farther on. The foreskin is then drawn back, the ends passed beneath the glans and tied round the penis behind the corona; the superfluous string is snipped off, and the foreskin brought forward. The catheter is cut off obliquely ½ an inch beyond the string and then stopped with a spigot, direction being given to the patient to withdraw the spigot, and push the catheter a little further in when he wants to make water.
To Tie a Patient in Position for Lithotomy.
Apparatus.
Two bandages, each 3 yards long and 2 inches wide, of calico or saddle-girth, with tapes sewed on the ends.
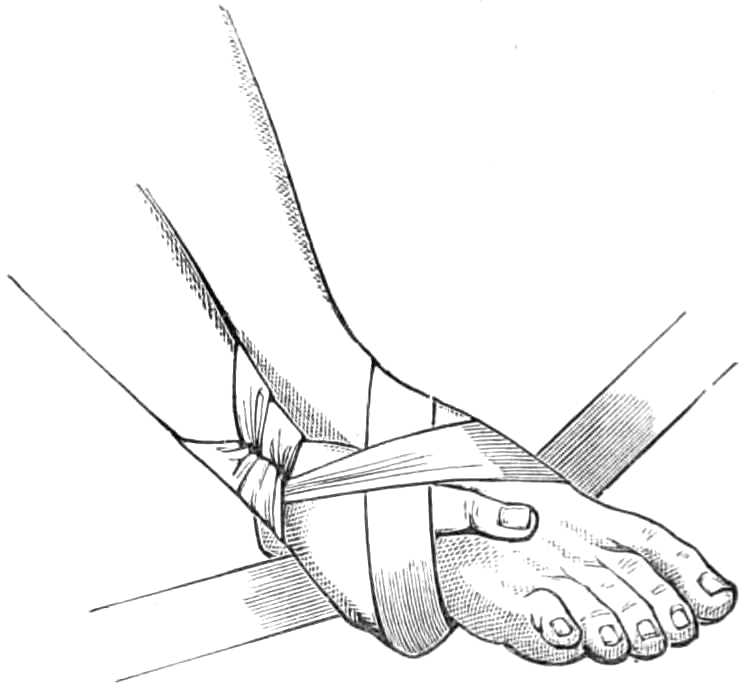
Fig. 92.—Tying for lithotomy.
The patient is laid on his back, a slip-knot made in the middle of the bandage and passed over the wrist; the hand is then made to grasp the foot, the thumb above, the fingers under the sole (fig. 92); one end of the bandage is carried behind and inside the ankle to the dorsum of the foot, where it meets the other end passing in front of the ankle. The ends are then carried under the sole, brought up and tied in a double bow over the back of the hand.
Bedsores are best treated by great cleanliness, and by washing the skin exposed to the discharges with spirit of wine every day. Brown-Sequard recommends cold and heat to be applied daily, by means of an ice bag for ten minutes, followed by a warm poultice for an hour. The pressure of the skin over the sacrum or trochanters is prevented by a ring of soft thick felt, covered on one side with adhesive plaster, and applied like a corn plaster around the prominent bone.
In addition to these local applications, the pressure of the body should be evenly distributed over its under surface by placing the patient on a water cushion, or, better, on Arnott’s water-bed.
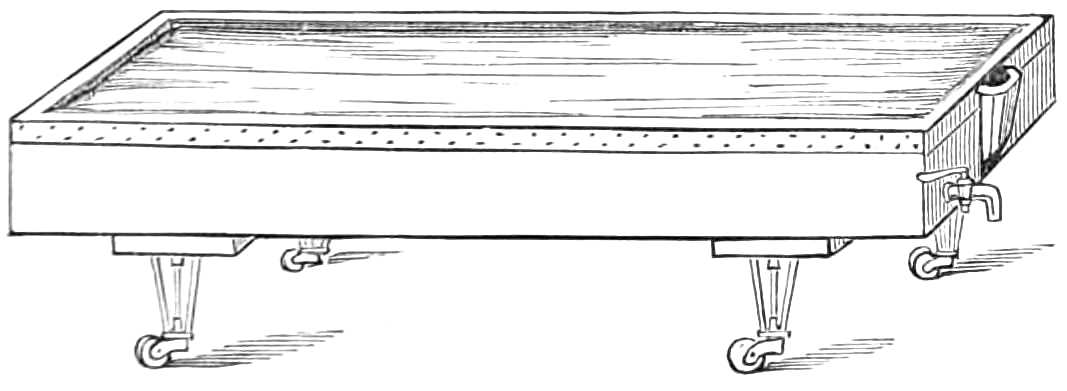
Fig. 93.—Water-bed.
Arnott’s Floating Bed.—In the hydrostatic or floating bed of Dr. Arnott, the patient floats on the surface of a trough of water, into which he sinks until he has displaced his own weight of water; his floating apparatus, or raft, so to speak, being a sheet of waterproofing, and a thin mattress or folded blanket, on which he lies. The bed consists of a trough running on large castors, about 8 feet long, 2 feet 8 inches wide, and 1 deep, with a tap at the bottom for letting out the water, and a spout in one corner to fill it by. Over the top a macintosh cloth is spread, its edges being firmly nailed to the margin of the trough, but the cloth is left slack enough to float easily on the surface of the water when the trough is partly filled. This slackness is requisite to allow the water displaced by the weight of the patient’s body to rise up around him without tightening the cloth, or the floating principle of the bed is not carried out, and the pressure of the patient’s weight not evenly distributed over his body (see fig. 93). Three or four blankets are laid evenly over the macintosh, and these again protected from the moisture of the patient by a macintosh under-sheet. If a mattress is used, it must be very thin, and supple enough to let the surface of the water adjust itself to the patient’s body and receive the pressure evenly. The water employed to fill the bath should be about 50°.
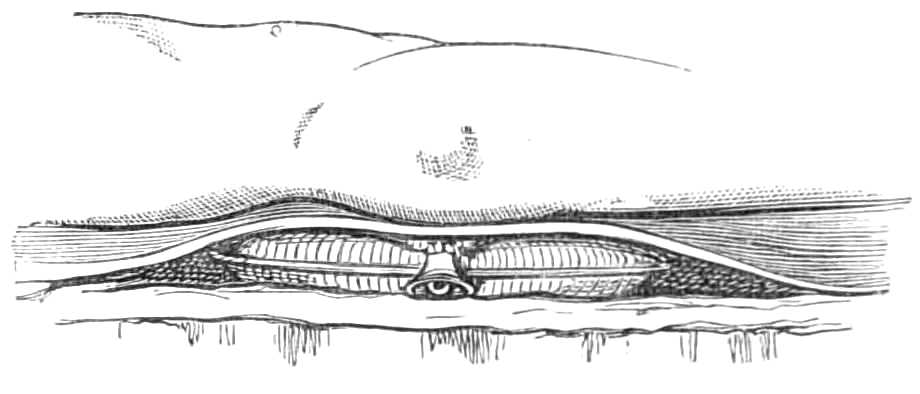
Fig. 94.—Water-cushion.
Water Cushions are flat cushions of stout macintosh cloth, half or two-thirds full of water, and laid on the mattress beneath the blanket and sheet (see fig. 94). They are more portable than the water-bed, but they are simply soft pillows, and do not counter-balance the weight of the patient in the manner of the floating bed.
The Stomach-Pump is used for emptying the stomach, or for injecting fluid food when patients refuse to swallow.
It consists of a brass syringe holding 4 ounces, of which the nozzle is connected with two tubes, one at the end, the other at the side. The passage through these is directed by a valve which is governed by a lever lying on the barrel (see fig. 95). When the lever is at rest, the current passes in and out of the syringe by the lateral tube; when depressed, by the direct tube. The elastic tubes with smooth nozzles, about 2 feet long, are fitted to the syringe. There is also a gag of hard wood, having a hole in the middle, through which the tube passes on its way to the stomach, to protect it from the patient’s teeth.
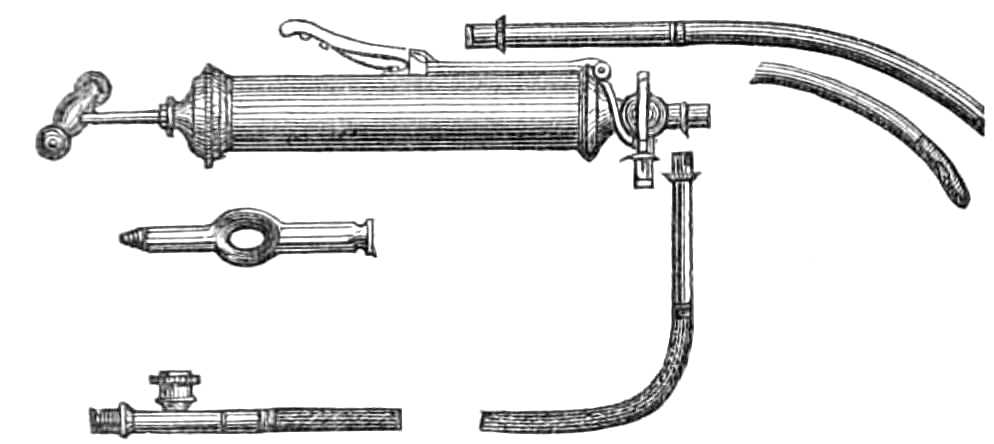
Fig. 95.—The stomach-pump.
When the pump is employed to remove the contents of the stomach, two washhand-basins are placed at hand, one empty, one full of tepid water. The patient is seated in a high-backed chair to steady his head; one assistant holds his hands, while a second screws the small end of the gag between the teeth and forces open the mouth, across which it is then easily fixed. The flexible tube, being well oiled, is next passed across the pharynx and down the gullet slowly and cautiously, without staying for any effort of vomiting it may induce; when about 20 inches are passed through the gag the nozzle has reached the stomach. First, two or three syringefuls of water are injected into the stomach; then, removing the second tube from the basin of water to the empty basin, the action of the syringe is reversed, by pressing on the lever as the piston is raised, and letting it fly up when the piston is depressed. Thus two syringefuls may be withdrawn, then fresh water is again injected and withdrawn, until the contents of the stomach are removed and the water returns clear. Precaution must be always taken not to exhaust from the stomach before water is injected, lest the coats of that organ be injured by being sucked against the nozzle of the tube.
If desirable, antidotes may be dissolved or suspended in the water injected. When the pump is used for feeding patients, one or two pints of beef tea, eggs beaten with milk or wine, Liebig’s soup, &c., are the kinds of food suited for the purpose. Each time the pump is used, it should be thoroughly cleaned by syringing through it plenty of warm water, and the tubes must be unscrewed to wipe the joints carefully.
Transfusion of Blood.—The points of greatest importance in performing this operation are:—
1. That the supply of blood come from a vigorous adult.
2. That the transfer be made within two minutes of the blood’s escape from the vein of the supplier.
3. That, to prevent coagulation, the blood should pass over as small a surface, and suffer as little exposure as possible in transit.
4. Care must be taken to prevent air entering the vein with the blood.
The apparatus described below is that devised by Dr. Graily Hewitt, and depicted in the Obstetrical Society’s Transactions for 1864, page 137. It consists of a glass syringe holding two ounces (fig. 96), with a piston easily attached and removed; its nozzle is curved and fits the mouth of a cannula of silver. The nozzle of the syringe is provided with a little stopper attached by a chain; a stylet likewise fills the cannula, to be withdrawn when the blood is injected through the latter.
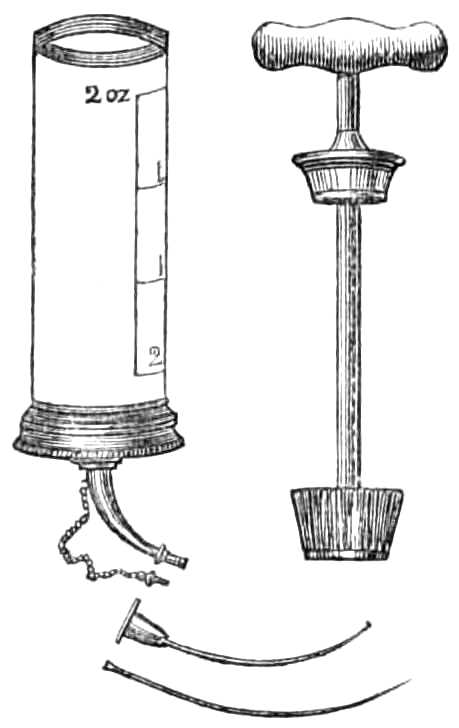
Fig. 96.—Graily Hewitt’s syringe for transfusion of blood.
The success of the operation depends in great measure on the rapidity with which it is performed, and requires the aid of two assistants that the various steps may follow each other as quickly as possible.
Apparatus.—1. Syringe, cannula and stylet.
2. Lancet.
3. Scalpel.
4. Forceps.
5. Three yards of tape, one inch wide, and lint.
6. A silver wire suture.
7. A basin of cold water.
8. Brandy and Sal Volatile.
Step 1. See that the piston-rod works properly in the syringe, and that the instrument is fit for use; then place it in the basin of cold water with the cannula to lie till wanted.
Step 2. Place the person supplying the blood on a couch or easy chair in the same chamber, but so that he cannot see the recipient, lest he faint and his blood consequently flow feebly. Tie up the arm as for venesection; lay ready the lancet, and direct the assistant, in charge of the supplier of blood, to keep his thumb on the vein when it is opened, that the flow may be checked when blood is not required.
Step 3. Place a tape round the arm of the recipient, above the point for injection, and another below it at a convenient distance, and lay bare a vein (usually the median basilic) for an inch and a half of its course; holding the vein by the forceps, make a slit with the scalpel and introduce the cannula, which is then intrusted to the second assistant. The stylet is withdrawn, and a minute drop of blood escapes through the cannula, showing that the point has been properly introduced into the vein. The assistant replaces the stylet and slackens the ligature, while the surgeon proceeds to fill his syringe.
Step 4. The surgeon, going to the supplier of blood, makes a large opening in the vein with a lancet, or if the first assistant be a surgeon also, he may do this while the chief operator is preparing the vein of the recipient. When the vein is open and the blood flowing freely, the barrel of the syringe is inverted over it and filled with blood; when full, the nozzle is stopped by the plug and the piston attached while the syringe is carried to the recipient.
Step 5. This being reached, the plug is pulled out, the nozzle inserted into the cannula, and the blood slowly injected by depressing the piston gently, but without quite emptying the syringe. A minute should be spent in injecting one ounce and a half, and a pause of five minutes ensue before a second supply is introduced. This interval may be employed in cleaning the syringe, &c., and procuring a fresh supply of blood; 3-4 ounces of blood are usually sufficient, but 10 ounces have been injected on some occasions. The perturbation of the supplier (generally a near friend of the recipient), renders it necessary he should drink freely of brandy and water, that the blood flow forcibly when required.
Step 6. When sufficient blood has been introduced, both patients’ wounds are dressed, as after venesection (see page 20), the long incision of the recipient being closed by a point of suture under the pad.
Tourniquets.—Tourniquets are of several kinds.
The Ring Tourniquet (fig. 97) is used when pressure is desired on the main artery of such a limb as the arm. It is less easily displaced than the Signoroni, but, like that, soon becomes irksome by its continual pressure.
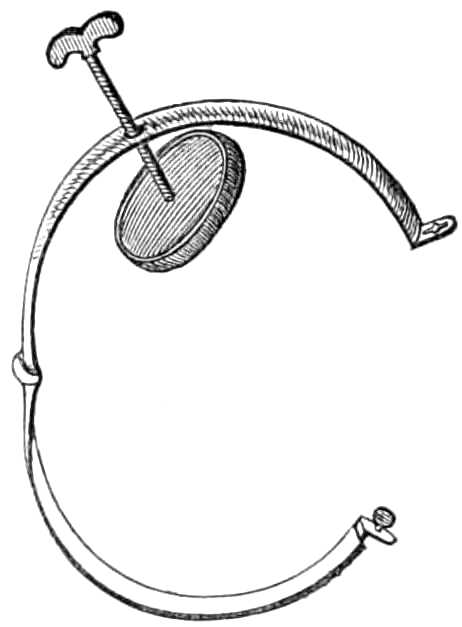
Fig. 97.—Ring tourniquet.
When hæmorrhage has to be temporarily arrested, that of Petit (fig. 98) is generally used. It consists of a strap of stout webbing and buckle, that can be rapidly tightened by a few turns of a screw. To use this tourniquet, lay a roller over the artery and carry the end once or twice round the limb to steady the roller, then pass the strap over the roller, keeping the buckle about two inches away from the screw and the screw on the anterior or outer aspect of the limb, not over the pad, lest that be displaced when the screw is tightened. The tourniquet should be screwed up as quickly as possible, that the limb be not charged with blood by obstructing the venous, before the arterial flow is checked.
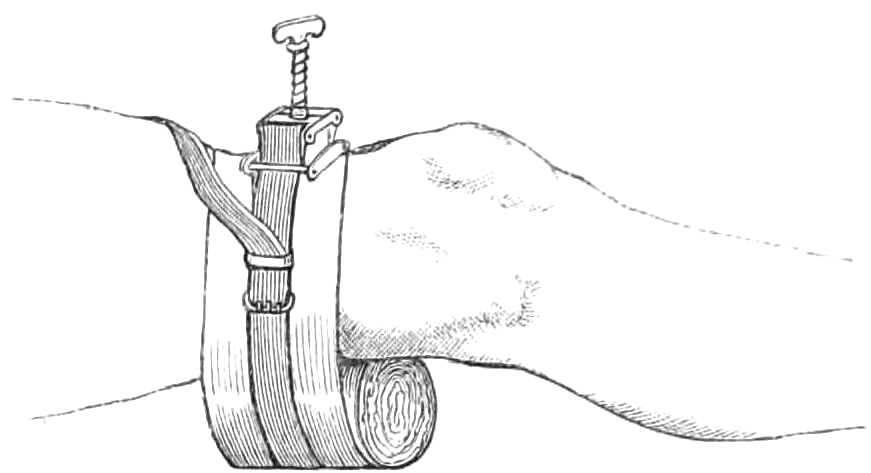
Fig. 98.—Petit’s tourniquet applied to the popliteal artery.
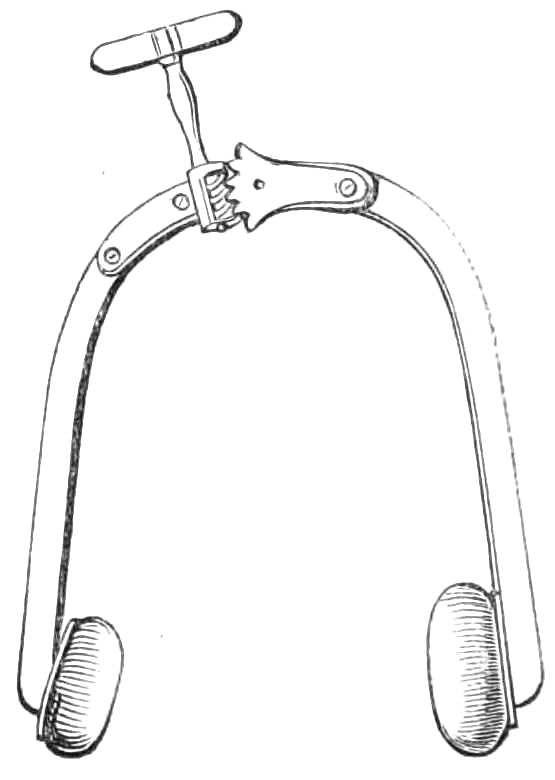
Fig. 99.—The horse-shoe tourniquet.
In Signoroni’s Horse-shoe tourniquet (fig. 99) the extremities of the shoe can be approximated to each other by a rack screw working a hinge. The ends are furnished with pads, one broad and flat to bear on the limb away from the artery, the other rounded to compress the vessel itself. This tourniquet does not arrest the whole circulation in the limb. It can therefore be applied for a longer time than Petit’s. However, it easily slips out of place, and soon becomes very irksome and painful.
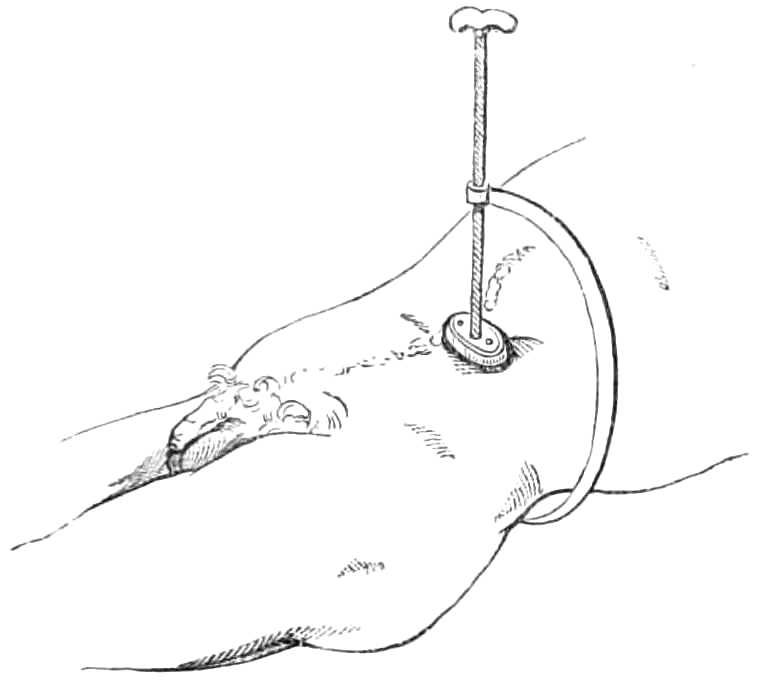
Fig. 100.—Lister’s tourniquet for compressing the aorta.
The Abdominal Tourniquet of Professor Lister is a very effectual contrivance for compressing the aorta during amputation through the hip joint, and operations where a tourniquet cannot be placed on the limb. It consists (see fig. 100) of a semicircular bar, with a broad pad to fit on the lumbar vertebræ behind, while in front it holds a long screw-pin carrying a pad. This instrument passes round the left side, and its pad is forced down into the abdomen, one inch to the left of the umbilicus, until the aorta is compressed against the spine.
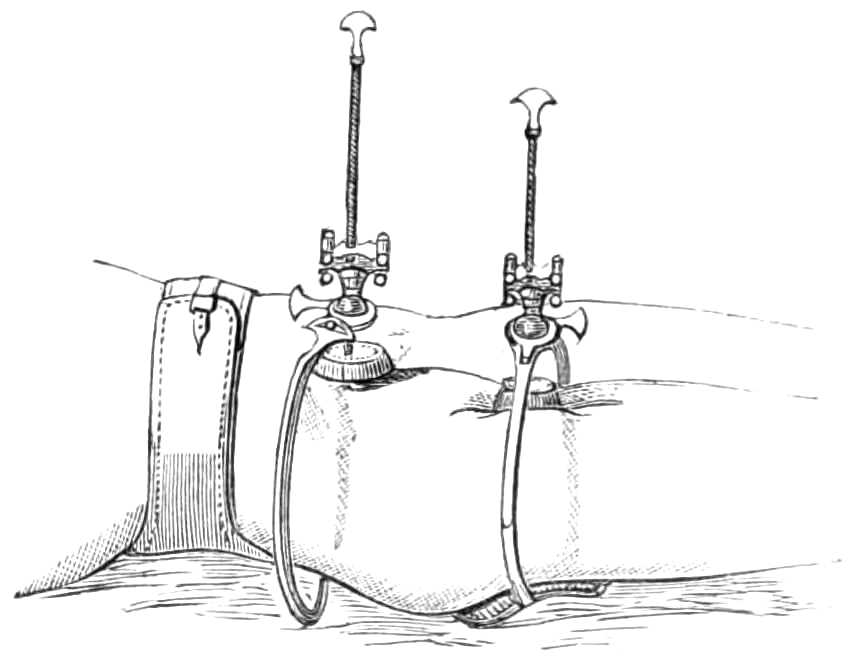
Fig. 101.—Carte’s tourniquets for femoral aneurism.
Carte’s Tourniquets (fig. 101) are employed to control and diminish the flow of blood through an aneurism. They are intended to be worn for several days, and are fitted with many contrivances for obtaining a continuous pressure on the artery without completely arresting the flow of blood. They are always used in pairs; in the figure, one presses the external iliac on the pubes, the other the femoral artery. The first is fastened to the body round the hips, the second round the thigh. They are constructed as follows: an arm attached to a pad reaches round the limb to the artery, over which it supports a ball and socket joint turning in any direction, but fixed by a screw clamp. This joint has a long screw carrying the compress down to the artery. There is a little play of the screw in the ball of the joint, controlled by india-rubber bands, that the compress may yield slightly before the arterial pulse. In the solidification of an aneurism by this means, the flow of the blood is intended to continue; hence the current through the vessel need not be completely obstructed by the pressure of the tourniquet, and the elastic bands prevent that pressure from becoming insupportable.
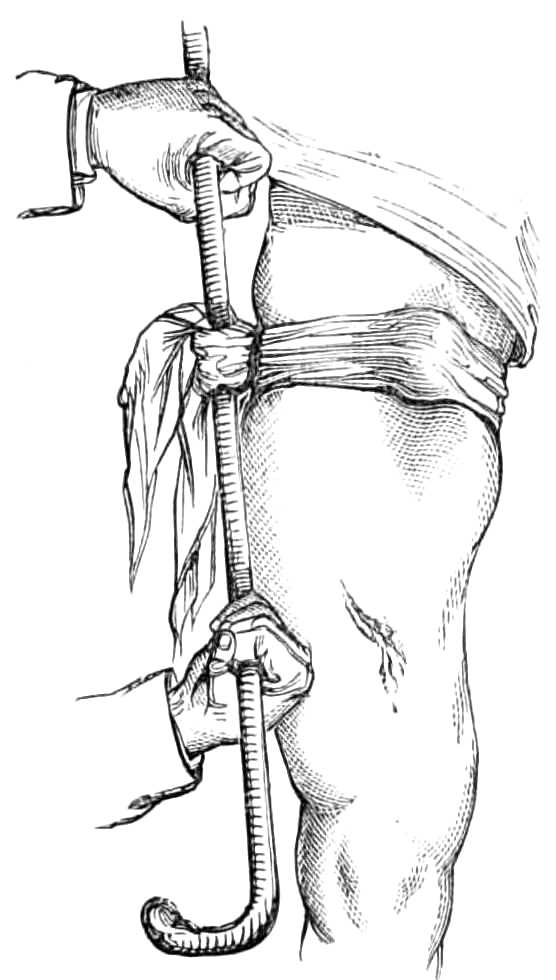
Fig. 102.—An improvised tourniquet.
When the tourniquets are applied, the patient must lie on a flat hair mattress, have his limb well washed and dried, lightly but evenly bandaged, and somewhat raised. If the thigh is hairy it should be shaved where the pads will press, and dusted with powdered French chalk. The tourniquets are next adjusted, as seen in fig. 101; the patient is taught to change the pressure when it grows irksome, by screwing down the second pad, and then releasing the first.
To improvise a Tourniquet.—A tourniquet may readily be formed on emergency from a handkerchief, a stone, and a stick. Fold a stone the size of an egg in the middle of a handkerchief, lay it over the main artery, tie the ends of the handkerchief round the limb, slip the stick underneath and twist it round, till the tightened handkerchief draws the stone on to the artery and arrests the flow of blood (see fig. 102).
Fumigation.—Mercurial vapour baths are contrived in various ways. The following plan succeeds perfectly well when the whole surface of the body is to be exposed to the vapour (fig. 103).
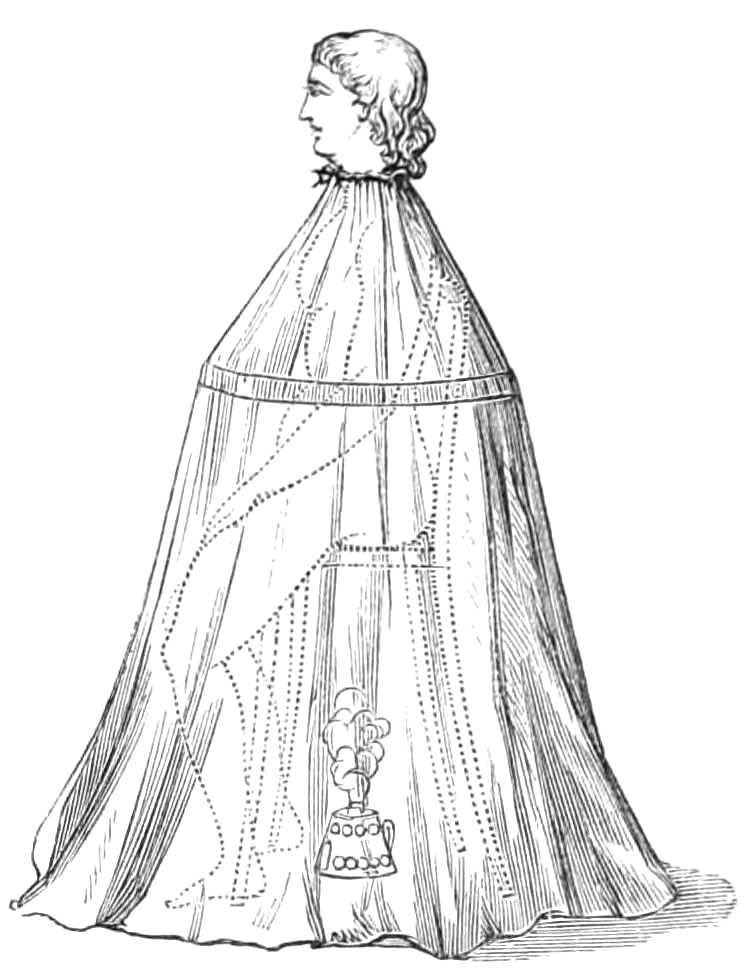
Fig. 103.—Mercurial fumigation.
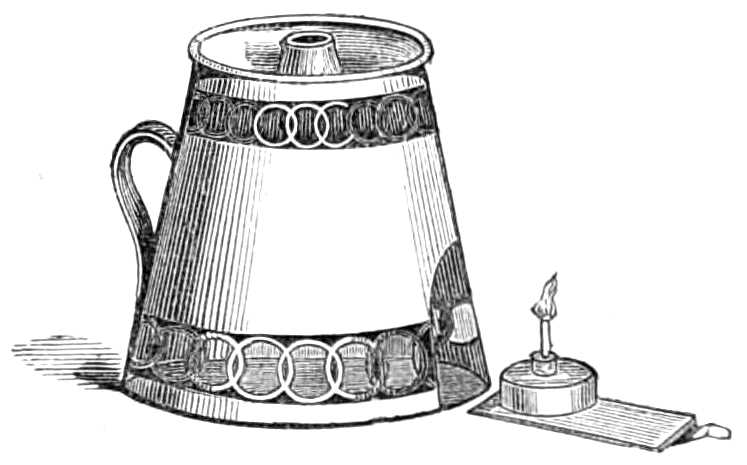
Fig. 104.—Lamp for fumigating.
Apparatus.—A Langston Parker’s lamp made by Savigny and other instrument makers. In this a spirit lamp, holding the required amount of spirit is protected in a cage, on the top of which is a receptacle for the calomel, and a small saucer for water (fig. 104). The flame beneath boils the water and volatilises the calomel. Water is added, because the calomel vapour, when associated with steam, acts more efficiently than with dry air.
The lamp is placed under a high wicker chair, on which the patient sits undressed, and round his neck, a frame is tied, made of cane hoops, with a calico cover sewn over them; this falls to the ground and encloses his body in a chamber, where the vapour is confined while absorbed into the skin. A blanket thrown over the frame completes the preparation. If a hoop frame be not at hand a lady’s wire-hooped petticoat answers the purpose quite as well.
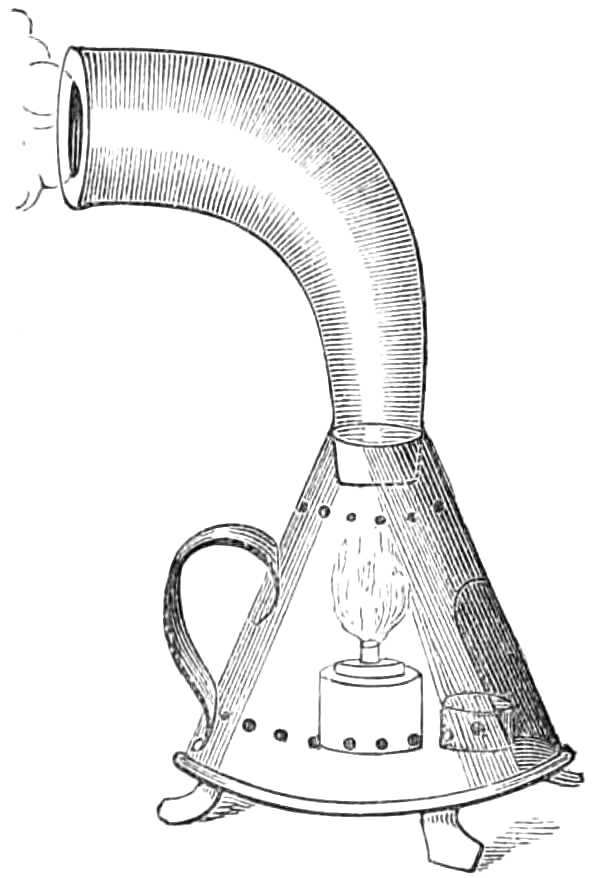
Fig. 105.—Lamp for local fumigation.
The patient, in four or five minutes, usually breaks into a violent perspiration, his pulse quickens much, sometimes even syncope occurs; hence, he should not be left alone until the bath is over. This, if the flame is strong and the quantity of calomel not very great—one or two scruples being a common dose—occupies a quarter of an hour. When the bath is over the patient should at once get into bed, and lie there a few hours; then he may rise and be well sponged with tepid water. Moderate but tolerably speedy mercurialisation of the system is thus induced.
Local Fumigation is employed when the disease is confined to a few obstinate patches of eruption. For this purpose an earthenware alembic (fig. 105) is fitted to the lamp used for general fumigation; the calomel is thrown into the bottom of the alembic. The flame plays over the outside, and heating it, sublimes the calomel; which reaches the mouth of the alembic and condenses on any part to which it is applied.
The throat may be fumigated by inhaling the vapour as it escapes from this alembic, or by sucking air through the spout of an earthenware teapot in which the calomel has been placed, and heated by a spirit lamp underneath.
The Hot Air-Bath is easily obtained by undressing the patient, putting him to bed on a mattress, and fastening across the bed two or three lengths of cane or stout wire, over which a blanket is next thrown. The patient’s body is thus enclosed in a small chamber, the air of which is then heated by putting inside, on an earthenware plate, a spirit lamp, surrounded by a kitchen lemon-grater to protect the bed clothes from its flame. Sheets should be dispensed with while the lamp is alight, lest they catch fire. The temperature of the air should be watched, lest it grow hot enough to scorch, but it must be kept up till the patient breaks into a sharp perspiration, when the lamp may be removed and the patient allowed to cool slowly down.
The action of the bath is greatly accelerated by sponging the patient all over as he lies in bed with tepid water, when the air grows warm.
Lamps protected with wire gauze, and furnished with a cradle to keep the bed clothes up, are sold at the instrument-makers, but the above arrangement answers just as well as more elaborate apparatus.
The Vapour Bath.—The patient is put to bed as in the hot-air bath, and a few feet of vulcanised india-rubber tubing, fastened to the spout of a tea-kettle on the fire, bring a supply of vapour into the bed.
The vapour bath may precede the hot-air bath, and will quicken the action of the latter very greatly.
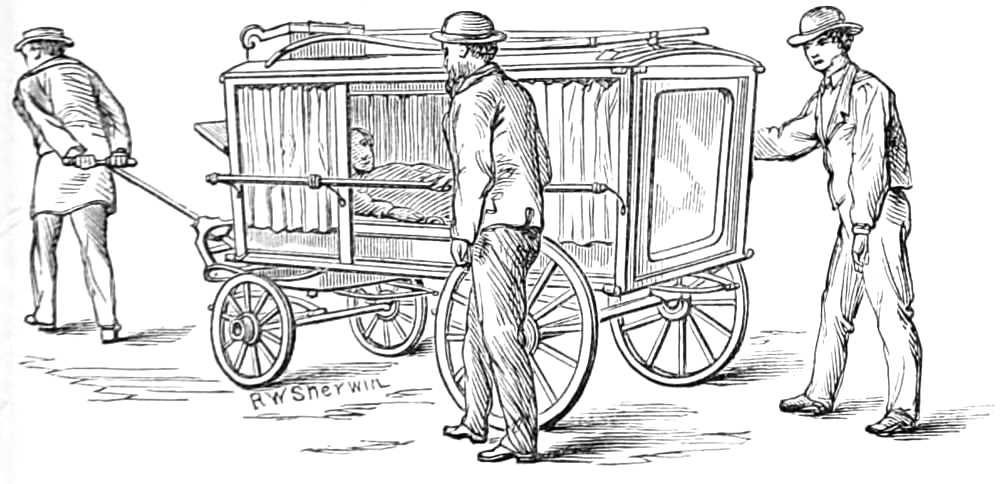
Fig. 106.—Dr. Horace Swete’s village ambulance or sick carriage.
Carriage for transporting the Sick.
The army ambulance and the carriage of the Invalid Carriage Society are excellent means for transporting sick from their homes, or wounded persons from the scene of injury to the hospital. As their cost is somewhat considerable, a cheap carriage (see fig. 106) has been devised by Dr. Horace Swete, of Weston-super-Mare, for the use of the district in which he is residing, and which may be kept for use at workhouses, hospitals, and in remote districts. It is constructed of varnished wood and iron, and in the following manner.
The dimensions of the carriage are—length, 7 feet 6 inches; breadth, 3 feet 9 inches; height, 4 feet 9 inches. Its weight is under 3 cwt., and its total cost 21l.
The body is like a skeleton hearse, without fixed floor or sides. The sides are closed by vulcanised india-rubber curtains, or by glass sliding panels. The back, a wooden panel, opens like a door. A wooden tray slides on three rollers at the bottom, and on this a mattress covered with vulcanised india-rubber is placed to receive the patient. For infectious cases straw should be used instead of the mattress, as it may be burnt when the patient is removed. The tray is narrow, and fitted with handles, that it may be carried up a narrow staircase. The vehicle runs on four wheels, is fitted with lamp, handle, shafts, and driving box, and is well hung on good springs. The material of the carriage admits of being washed, and thus readily purified, after conveying an infectious case.
Cupping—Dry, and Bleeding Cupping.
Apparatus.—1. A series or nest of exhausting glasses.
2. Different sized boxes of lancets for incising the skin, called scarificators.
3. A spirit lamp (fig. 107).
The glasses are 6 oz., 4 oz., 2 oz., and 1 oz. in size, of rounded shape, with thick smooth edges.
In dry cupping the object is to relieve internal congestion by drawing the blood into the subcutaneous cellular tissue. The back and loins, where the skin is tolerably loose, are most suitable places for this proceeding.
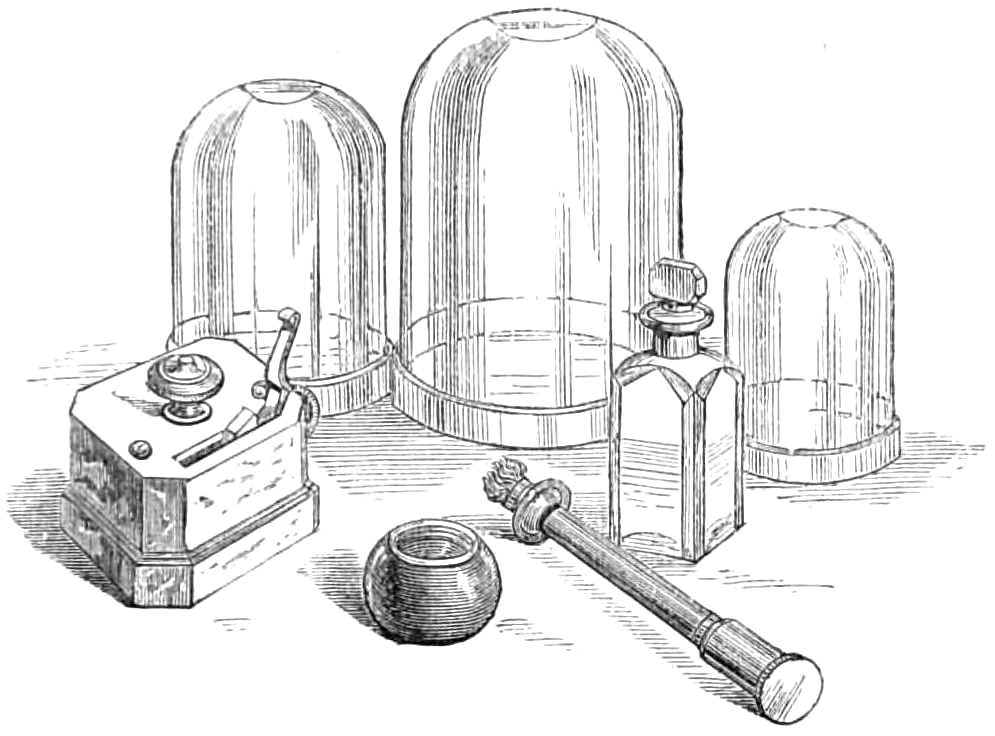
Fig. 107.—Cupping glasses, lamp, scarificator, and spirit bottle.
The Operation.
Step 1. Light the spirit lamp, direct the patient to sit forwards, and lay bare the back ready for the glasses, which should be placed on the bed within reach of the operator’s right hand.
Step 2. Rarify the air in a glass by plunging the flame into it a few moments, and then quickly clap the mouth of the glass on the skin; leave it there while a second and third glass are heated and applied, when the first should be removed and its vacuum restored before it is replaced. In putting the glasses on again, their rims should not lie exactly in the rings marked on the skin by previous applications, or the bruises may inflame and slough afterwards at these parts. The application and removal of the glasses should be done as lightly as possible to prevent all unnecessary pain.
A few repetitions of this incomplete vacuum causes the skin to puff up readily into the glasses, and much blood is thereby attracted into the cellular tissue.
Bleeding or Bloody Cupping.—When it is desired to take blood from the body the skin is punctured or scarified by the scarificators, half a dozen incisions being made at a blow by as many lancets protruding from a box, when a spring it holds is touched; the glasses are then laid over these incisions, and the necessary amount of blood removed by their exhausting power.
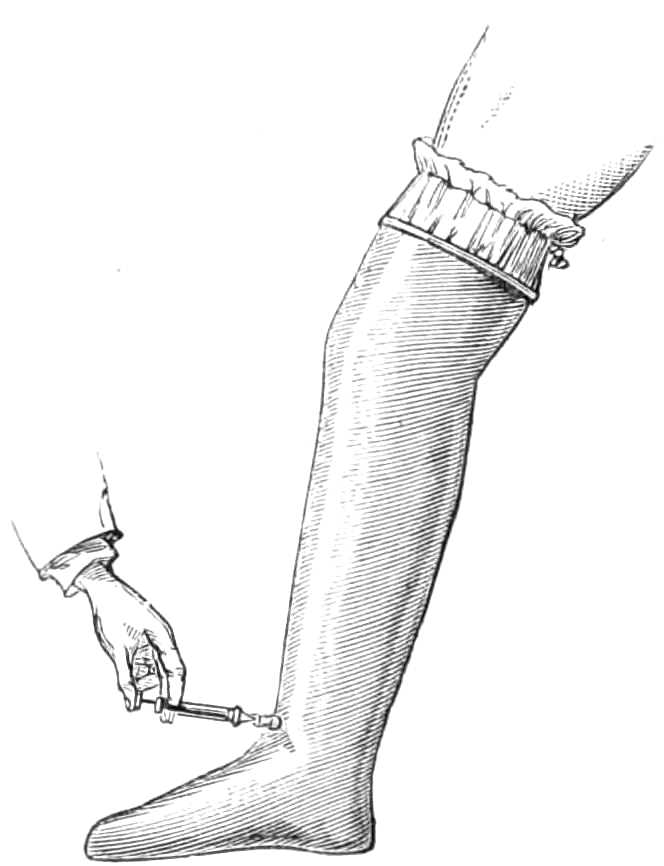
Fig. 108.—Junod’s vacuum boot for attracting the blood to the lower extremities.
Junod’s Boot is a tin case, shaped like a boot (see fig. 108), but capacious enough to allow a limb when placed within it to swell freely. It is sometimes employed to draw blood and serum into the lower extremities during congestion of internal organs. When used, the leg is passed into the boot, and the mouth of the boot closed round the limb by a packing of india-rubber tied firmly round the boot and limb, and well smeared with simple ointment. The air is then exhausted from the inside of the boot by a small brass syringe, which screws into a hole in the leg of the boot, as depicted in the figure. The patient should wear the boot some two or three hours, while the vacuum is kept up by an occasional exhaustion of the syringe. Both limbs may be subjected to exhaustion, but the patient must remain in bed for twenty-four hours after the operation; this is generally necessary for other reasons, and he must wear a bandage for a few days when he gets about.
Leeches.—Each leech should draw about 2 drachms of blood, and if the bite is well fomented, another drachm will escape from the wound afterwards.
Before the leeches are applied, the skin should be well washed with soap and warm water, and carefully dried. The leeches should not be taken from their box, but the box inverted over the part, when they will quickly fasten themselves. If the leeches are applied in a dependent position, a soft napkin may be pinned round the box to support them as they grow heavy, and to enable them to suck as long as possible. They should be allowed to drop off; if pulled off they are apt to tear the wound, or leave part of their suckers in it, which causes much irritation afterwards.
The leech is put in a little glass when applied to the gums or the cervix uteri, and held against the part he is to suck.
If the leeches do not bite readily the part should be smeared with blood or warm milk, and the leeches put into lukewarm water a few minutes; immersion in small beer is also said to stimulate them to bite.
If the bites bleed longer than is desired, they may be stopped by pinching the skin between the finger and thumb, wiping the bite thoroughly dry, and filling it with a little bit of amadou or fine sponge, soaked in solution of perchloride of iron; a larger piece of amadou is placed over the first, and the whole compressed with a turn of a bandage or long strip of plaster. If this fails, a sewing needle may be passed through the skin beneath the floor of the bite, and the bleeding surface constricted by twisting a thread round it under the needle.
Leech-bites should never be left bleeding, especially in children, for a dangerous amount of blood may be lost from them in a few hours.
Tents are instruments made of some substance that enlarges as it absorbs liquid; they are employed to dilate apertures of sinuses or natural passages, as the cervix uteri, &c., and are generally short rods 2 to 3 inches long, and 1/10 to ¼ inch in thickness, made of a whalebone stem, wound round with compressed sponge, which is smeared with wax to keep it in shape. Slips of gentian root, or of laminaria digitata, which rapidly enlarge as they imbibe moisture, are also employed for this purpose.
Setons are strips of varnished calico, 6 or 8 inches long and ⅓ broad; a thread is fastened to each end, which are tied together while the seton is worn. It is employed to excite irritation either along the course of a sinus, or in some superficial situation, as the nape of the neck, to relieve congestion of internal parts. In sinuses, a few threads of silk usually produce the required amount of irritation.
Chassaignac’s Drainage-tubes are a form of seton; they are india-rubber tubes of the calibre of a wheat straw, of any requisite length, and perforated with holes at frequent intervals; they are carried into the cavity to be drained, by hitching the prong of a forked probe, made for the purpose, through one end of the tube and thrusting it along the sinus, or across the abscess. The skin is then incised over the further end of the sinus to bring the probe out, and the ends of the tube are tied together.
The advantages of these tubes are, the small amount of irritation they provoke, and the ready exit furnished for the matter along their interior.
Issues are a contrivance for keeping up irritation of the surface. A piece of diachylon plaster the size of a half-crown, with a hole in the centre as large as a pea, is laid over the skin where the issue is to be formed. A bit of potassa fusa is laid in the hole and kept in sitû by a second plaster, for an hour or till the skin is destroyed under the hole. The plasters are then removed, the wound washed, and a fresh piece of the same size put on, having at its centre a slit ¼ inch long, under which a pea is slipped into the sore and covered over by another smaller piece of plaster. The discharge that soon sets up must be washed away twice daily, and the plaster and pea renewed from time to time as they become soiled.
Trusses for ruptures. These are various, in shape, strength of spring, &c.
Whatever variety of truss is employed, care should be taken that the pressure is made in the right direction, and that it is sufficient, but not too great for the strain it has to support.
In reducible hernia the pressure for inguinal rupture should be exerted on the inguinal canal and directly backwards (see fig. 109). For umbilical rupture, the pressure should be also backwards, and confined as much as possible to the aperture in the wall of the belly. In femoral rupture the pressure should be directed upwards as well as backwards into the femoral ring (see fig. 110). The pad in all should be large enough to well cover the passage through which the rupture passes. The ease and comfort of a truss much depend on the completeness with which it fulfils these conditions.
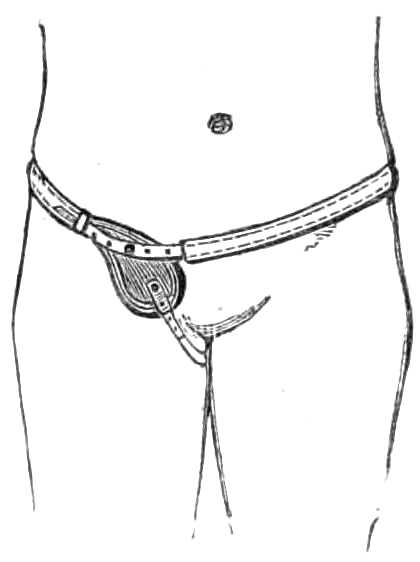
Fig. 109.—Inguinal truss.
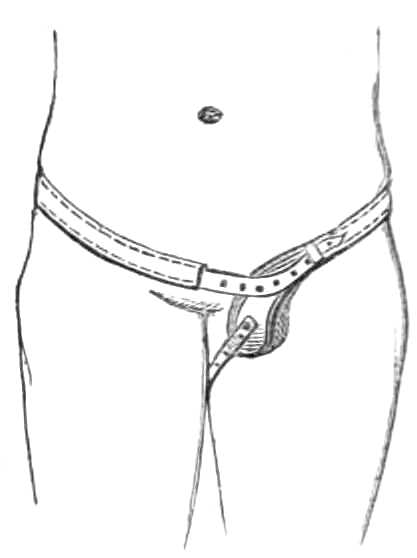
Fig. 110.—Femoral truss.
The adequacy of a truss should always be tested by directing the patient to separate his legs, lean forward over the back of a chair, and cough or strain deeply. If the truss support the rupture during this exertion it fits satisfactorily.
For irreducible hernia large air-, or spring-padded trusses are made, which prevent further descent of the viscera, but they are exceedingly difficult to fit and often unsatisfactory in use.
In inguinal hernia the truss consists of a pad, a spring, and a neck, with guide straps.
The pad is made of various materials, fine carded wool is among the best when well stuffed into a proper shaped leather pad, and in most cases a fixed pad is better than a moveable one.
The pad should compress the canal and be convex if the patient is stout. Its size ought to be sufficient to compress the canal and the margins for a short distance on each side, but the pad should be as small as will ensure fair compression. A very flaccid bellywall, and a large gap or protrusion require a large surface on the pad. The spring should be supple and padded behind to rest on the two sacro-iliac synchondroses, without bearing on the spine. The spring, narrowing as it comes forward, embraces the pelvis; and opposite the anterior iliac spine inclines downwards, because the hernia is a little lower than the resting-place of the spring behind. When the rupture is almost reached, the spring takes a slight elbow or bend (the neck), that its pressure may be directed against the hernia more fully. Understraps, generally not necessary, should be omitted if possible.
In trusses for children when the testis is not descended, the pad should have a notch at its lower border in which the testis may rest uncompressed.
In the truss for femoral hernia, the spring bears behind the body and encircles the hips in the same manner as in the inguinal truss, but when opposite the femoral artery it turns abruptly downwards to reach the saphenous opening. The pad should fit the hollow where the rupture issues and be not oval, but rounded. The under-strap should be attached to the stud at the lower end of the pad, and pass round the perinæum and fold of the buttock, and be attached to the neck of the spring close to the pad. It should be made of knitted bandage that it may be changed and washed frequently.
When measuring a patient for an inguinal truss, the circumference of the body round the hips (between the crista ilii and the great trochanter) should be first taken, and then that between the symphysis pubis and the anterior iliac spine, half of which distance denotes the position of the internal abdominal ring, which with the inguinal canal has to be supported by the pad of the truss. For a femoral hernia the same measurement should be taken round the body, and also the distance of the saphenous opening from the symphysis pubis and from the anterior superior iliac spine. This will enable the maker to put the pad at the proper angle with the spring, so that it compresses the saphenous opening, and clears the crest of the pubes.
Every patient should, while he wears a truss, show himself from time to time to the surgeon to see that any defect in his apparatus may be quickly remedied. It is a useful precaution also to keep two trusses at hand, so that if one breaks, the patient may at once apply the other.
Salmon and Ody’s truss consists of a spring passing round the hip from a circular pad b, which bears on the sacrum to a second oval pad a. Both pads are attached to the spring by a ball and socket joint. There is also a slide for shortening or lengthening the spring if desired (fig. 111). This truss is worn round the sound side of the body and reaches beyond the middle line to the hernial opening, with the object of directing the pressure of the spring outwards and backwards, or exactly counter to the course of the hernia inwards.
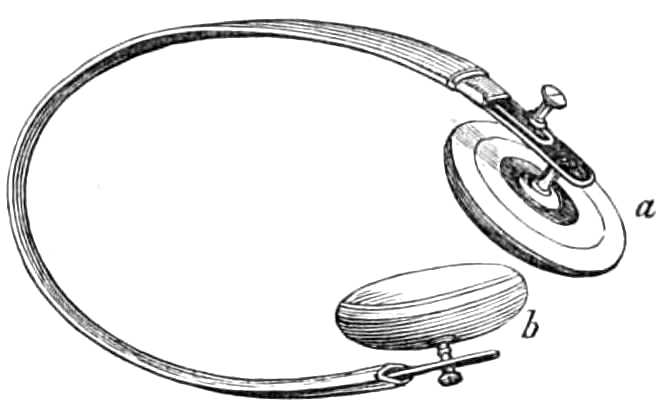
Fig. 111.—Salmon & Ody’s truss.
Umbilical hernia.—Spring trusses are not adapted for restraining umbilical hernia. The support consists of a broad belt fitted to the belly, made in front of elastic webbing, and on each flank, of white jean. Behind, the belt is fastened by straps and buckles, or by lacing, the better plan. In the centre, the elastic part carries a nearly flat air-cushion, measuring about 3 inches transversely and 2½ vertically. This cushion is placed against the aperture of the belly, and presses back the protrusion. The size of the pad varies with the size of the hernia, but it should always largely exceed the extent of the gap in the abdominal wall. The pad, when the apparatus is used for an infant, should not be too prominent, as it is then more difficult to keep in place, and also by pressing into the aperture hinders it from closing. The pad for an infant is best made of a disc of ivory, 1½ inch broad and ½ an inch to 1 inch thick, stitched in a little case in the centre of the girdle. The quantity of elastic tissue should be much less in the infant’s belt than in those for adults that the belt may be frequently washed. The difficulty of keeping the belt in place is obviated by attaching two bands to the upper border, to pass over the shoulders and cross behind before fastening to the belt, like braces. Two similar ones may be fastened to the lower border and carried under the thighs. These bands should be of soft webbing, and several pairs kept in store, that they may be frequently changed and washed.
Cauteries.
Cautery irons.—These are masses of iron of different shapes; some pointed, others rounded like buttons, &c., set in a stem a foot long, fixed in a thick wooden handle. They are heated in a charcoal brazier or common fire to bright redness if required to destroy deeply, but short of redness if intended only to scorch the surface.
As these irons are inconvenient for many cases from their bulk, and yet soon lose their heat if made small, other cauteries have been devised to which the heat can be quickly renewed.
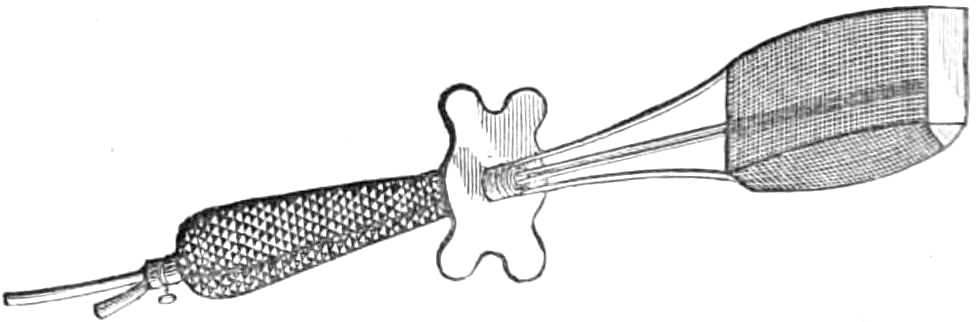
Fig. 112.—Gas cautery for large surfaces.
Gas Cautery.—The late Mr. Alexander Bruce perfected an instrument which employs the gas flame as a source of heat (see figs. 112, 113). A blowpipe flame plays on platinum discs of various sizes, and keeps them at a glowing heat. This hot solid point can be thrust into the tissue wherever it is desired.
A larger form is also made for cauterising the pedicle in Ovariotomy, &c. In this a large flame is blown on a wedge-shaped surface of platinum, 1 inch long and ½ inch broad, and continued backwards for 2 inches by wire gauze to confine the flame against the platinum. The flame behind these platinum discs quickly heats them again if cooled by the blood. This cautery is very portable, and easily made ready for use.
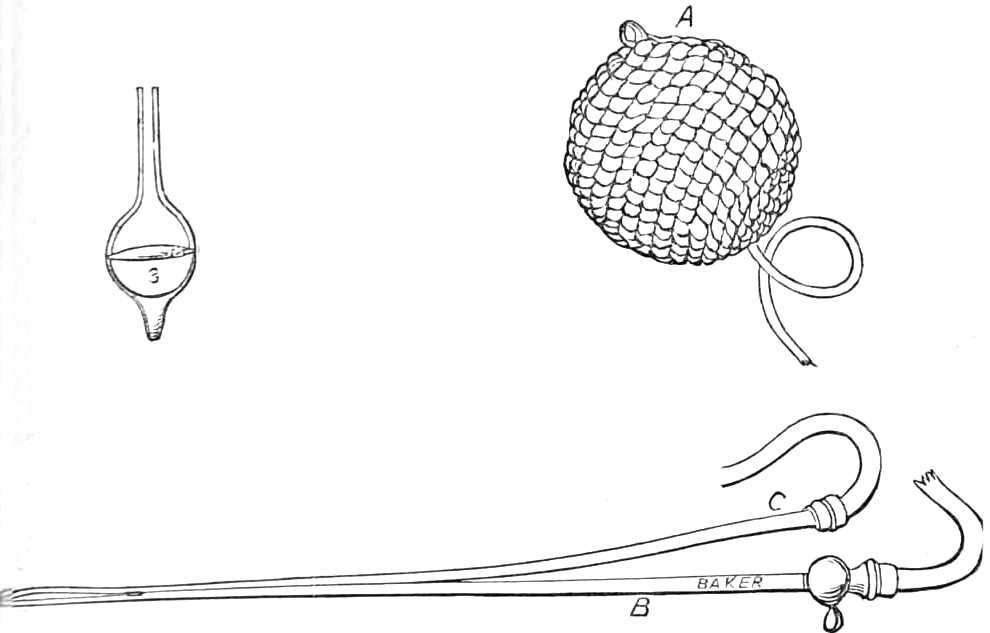
Fig. 113.—Gas cautery. A. Elastic gas reservoir. B. Gas jet. C. Tube for convoying air to the flame. 3. Platinum disc to be heated by the flame.
Mr. Clover has also devised a cautery, very useful for small growths. A silver bead, the size of a pea, is set at each end of a horizontal metal rod 4 inches long, which rotates on a vertical pivot half a circle backwards and forwards, so that one or other bead is thrown into the flame of a spirit lamp placed at a proper distance; when the bead is heated, a touch of the finger causes the central pivot to rotate, which brings the hot bead away from the lamp, and carries the cold one into the flame, to be heated while the first is used.
Galvanic Cautery.—The instrument consists of a platinum wire, made to glow by passing through it a powerful galvanic current. The wire should be thick (about 1/12 of an inch), and all the other conducting surfaces sufficiently large to offer no impediment to the current where heat is not desired. The battery best adapted for this purpose is a Grove’s battery.
The main advantage of a galvanic cautery is that the wire can be passed while cold exactly where it is required, and then heated when it is in place. It is exceedingly useful in fistulæ between the urethra and rectum, or in destroying vascular growths, nævi, &c., where it is desirable not to destroy all the skin covering the tumour. Again, by this means, an intense heat can be applied to a very limited area, and more quickly renewed than by any other plan, for the wire, even when plunged in the tissue, is never far below a red heat.
Of chemical caustics a host exist; those most commonly employed are:—nitrate of silver, solid, or in saturated solutions (2 drachms to the oz. of water, &c.); fuming nitric acid; solution of nitrate of mercury in nitric acid; oil of vitriol made into a paste with powdered charcoal; chloride of zinc mixed with dry starch, then rolled into cakes and cut in slices; Vienna paste, that is, equal parts of potassa fusa and quick lime worked into a paste with spirits of wine; potassa fusa itself; solution of chromic acid. Some surgeons prefer one, some another; as a rule, the liquid caustics are employed where the surface to be destroyed is uneven and spongy, and solid caustics where the surface is smooth, and a long continued action is desired.
Vesicants and irritants.—Of the commonest are mustard poultices, made by mixing mustard flour in a basin with luke-warm water, i.e. about 100° F., to a paste and spreading it on muslin, which is again folded over the exposed surface of the mustard. Boiling water and vinegar should not be used, for they lessen the pungency of the poultice. If the full effect be desired the poultice should remain on the skin fifteen or twenty minutes. If only slight reddening is wanted, the mustard flour should be diluted with its bulk of linseed meal before mixing it with water.
A stronger vesicant is Corrigan’s hammer, a button of polished steel with a flat surface, fixed to a handle; when used it should be plunged for a couple of minutes in boiling water, or heated over a spirit lamp, but care must be taken not to overheat it, or it will bring the cuticle away with it. It is pressed on the skin for ten or fifteen seconds; this is sufficient to cause reddening and vesication.
Blisters are raised by the emplastrum lyttæ, lin. cantharidis, or pâte epispastique, which is milder in its effect than the two preceding preparations of Spanish fly. Solution of iodine and iodide of potash, in three times their bulk of spirit of wine, also produces a blister when laid on freely.
Poultices are made of linseed meal, bread, or starch, and are means for applying warmth and moisture without absolutely wetting. Bread poultices sodden the parts to which they are applied most, and starch least, of the three kinds.
Before making a poultice all the materials should be at hand and thoroughly warmed before a good fire. They are—boiling water, a broad knife or spatula, soft old linen or muslin, oil silk, tapes, strapping plaster, bandages, a piece of old blanket, flannel or cotton wadding, safety pins, or needle and thread.
The linen on which the poultice is to be spread should be cut of the intended size, and when for use about the neck or shoulder should have some tapes sewn on to it to tie it on to the body. The oil silk should be large enough to cover the poultice next which it is laid to keep in the moisture. The flannel or wadding are used to wrap over and keep in the heat of the poultice; the strapping or bandage to fix every thing in situ as required.
When poultices are continued long, their surfaces should be smeared with lard before application; this protects the skin somewhat from the irritation that arises; also when the poultice is to be laid between folds of skin or on hairy situations, as the buttocks and perinæum, it is better to cover the poultice with a thin cambric handkerchief lest some of the meal stick to the parts.
The Linseed Poultice is made as follows: pour boiling water into a well-heated basin till the basin is half full, then scatter meal with the left hand on the water while that is kept continually stirred with a broad knife, adding more and more meal until the mass becomes quite soft and gelatinous, but too stiff to cling to the knife; then turn it out on the linen, also well heated at the fire, and spread it in a layer about ½ an inch thick, turn up the edge of the linen for ½ an inch all round, and carry the poultice at once to the patient. If it has to be carried far the poultice should be laid between two very hot plates; apply it to the part to be poulticed, lay on the oil silk, and cover that with the hot flannel or cotton wadding, and fasten these in place with pins or a stitch. Wadding is put where the part is irregular, as the neck or axilla; unless the wadding is well placed and the poultice is fastened by strings, it will soon fall into a narrow band leaving the part exposed that it should warm and moisten.
The Bread Poultice is made as follows: the materials being all at hand, as detailed in the directions for making a linseed poultice, crumble the inside of a moderately stale loaf until about half a pint or a pint of crumbs are prepared; then pour boiling water into a basin, and throw in crumbs gradually in the same manner as the linseed meal, until a soft porous mass is prepared. The remaining steps are the same as those for making the linseed poultice.
The poultice can be made to hold more water if it is turned into a saucepan after mixing, and a little more water added while it simmers for half an hour at a slow fire. Any superfluous water must be drained off, and the poultice covered with muslin when it is made in this way.
The Starch Poultice is made as follows: rub a little starch in a basin with cold water till it has the consistence of cream, then mix in boiling water till the starch is a thick jelly, and spread it on the linen while hot. Starch poultices retain their heat a long time, but yield very little moisture to the part. They are chiefly used as emollients to inflamed affections of the skin, &c.
Hot fomentations are a means for applying heat when moisture is not desired. A ready mode is to take a piece of blanket or thick flannel, soak it in boiling water and dry it by wringing in a folded towel, and then wrap it over the part to be fomented with a piece of oil silk or a hot dry flannel over it. Laudanum, turpentine, and other applications are sprinkled over the flannel, when soothing or counter-irritating effects are required in addition to the warmth. A bag of bran makes a light warm fomentation if heated in a steam kitchen, or steamer for boiling potatoes.
When absolutely dry heat is desired, chamomile flowers, bran, or sand, may be heated in an oven, and poured into hot flannel bags.
Dry heat is also very agreeably obtained by filling india-rubber bags and cushions with hot water: they are rather heavy, but retain their heat many hours.
Lister’s Method of Dressing Wounds with Carbolic Acid.—The properties of carbolic acid which concern the surgeon may be briefly recapitulated as follow:—
It is highly volatile, and the putrefaction of organic fluids is indefinitely postponed where its vapour is present. Carbolic acid is soluble in different degrees in water, alcohol, ether, glycerine, fixed oils, gutta percha, india-rubber, and shell-lac. Its varying affinity for these substances enables the surgeon to modify the application of carbolic acid in various ways; these modifications are necessary to fully utilise its properties. Water dissolves the crystallised acid but sparingly, 1 part in 20 being a concentrated solution, and allows it to escape readily. The aqueous solution is therefore useful where the effects of the acid are required copiously, but only temporarily. Glycerine and the fixed oils dissolve a far greater amount of the acid, and part with it unwillingly. Their solutions are adapted for the continuous but abundant application of the antiseptic. Shell-lac, and some other substances, hold the carbolic acid still more tenaciously, and are valuable as solid storehouses which yield up the antiseptic in small quantity for a considerable period.
Carbolic acid stimulates raw surfaces, and when concentrated even destroys animal tissues. It is a local anæsthetic; with moderate doses, wounds lose their sensibility after the first smarting of the application has passed off. When given in large quantities the acid produces a peculiar kind of delirium, and temporary paralysis of sense and motion: fatal results have followed its internal application.
It is rapidly absorbed into the blood from wounded surfaces, and through the skin, whence it is discharged from the body by the lungs and kidneys. The urine of patients dressed with carbolic acid, though of normal colour when passed, assumes a dark greenish-brown hue after a few hours’ exposure to the air and light.
How much of the antiseptic must float in the atmosphere to prevent fermentative changes has not yet been determined; Bucholtz found that 1 part of carbolic acid in 600 of milk almost entirely prevented lactic fermentation, while 1 in 285 did so altogether. Alcoholic fermentation in sugary fluids was arrested by a similar quantity.
When using the acid in dressing wounds, the watery solution, the solid mixture, and the oily solution are necessary. The first to neutralise the effects of exposure to the atmosphere and water before the wound is closed; the second solid mixture in the form of plaster to provide a very scanty but continuous supply of carbolic vapour close to the wound: too scanty to irritate the raw surface, yet enough to check putrifaction in the discharge oozing from it. The third, or oily solution, is to supply the carbolic vapour abundantly to the linen dressings, appointed to receive the discharge when it has passed from the vicinity of the wound. The tin is used to afford as close a cover as possible to the breach of surface; for this purpose it must be as flexible as possible that it may fit the wound exactly.
The carbolic plaster is made of 3 parts of shell-lac and 1 part of carbolic acid crystals melted together and spread on calico. To render the lac plaster non-adhesive that it may not stick to the tender wound, it is painted with solution of gutta percha, which dries and leaves a thin film of that substance covering the plaster. This film is easily removed by rubbing the surface with a rough towel should an adhesive quality be desired. In either state the carbolic acid continues to volatilise slowly when the plaster is laid over the wound.
When adopting this method of treating wounds the following materials are necessary:—
1. Aqueous solution of crystallised carbolic acid (1 part in 20).
2. Carbolic oil: 1 part of carbolic acid in 5 of olive oil.
3. Lister’s shell-lac plaster.[1]
4. Sheet tin.
5. Lint; old linen.
6. Diachylon plaster.
7. Glass syringe.
8. Scissors.
9. Thin calico or muslin.
10. Bandage.
11. A wooden splint to rest the limb upon.
To Dress recent Wounds.—When the apparatus is ready, the piece of tin is cut and fitted to the wound, so that it shall overlap the wound to a small extent on all sides; then a piece of lac plaster, large enough to overlap the tin one or two inches all round; this plaster may be cut and notched when the surface is irregular to make it lie pretty closely; then strips of diachylon, about two inches broad, are cut ready. The parts around the wound are well cleaned; dirt and clots cleared from the wound with cold water, containing about 1 of carbolic acid to 40 of water, and the interior of the wound is freely syringed with water containing 1 of acid in 30 or even 1 in 20 parts. The sides are brought together with sutures, if necessary, in the ordinary way, and the tin laid on the wound; the tin is freely wetted with carbolic water, and the lac plaster laid over it and kept in situ by strips of diachylon plaster. In dressing recent wounds the most dependent side of the lac plaster is left unattached, that the serous discharge, which is often copious, may readily escape. To receive this discharge, a piece of calico, soaked in carbolic oil, is laid over the wound now covered in, and all kept in place by a folded towel or a roller bandage. This oily cloth is to be changed from time to time as it gets soaked with discharge: at first this change is necessary every night and morning, but after three or four days once a day is often enough. The shell-lac plaster and tin need not be removed for a week unless the wound grow hot and painful, when they can be removed at any time if the surface of the wound is immediately smeared with carbolic oil, and kept well imbued with the antiseptic while it is being examined. Should it contain pent-up discharge, the sutures must be loosened and the discharge washed out by injecting the 1 in 30 aqueous solution. The tin and lac plaster may be then replaced, and the dressing renewed. The same precaution must be followed when the sutures have to be removed. Usually there is very little swelling and no pain, and the healing process goes on tranquilly if undisturbed. Should bruised parts slough, they may be trimmed away with scissors dipped in carbolic oil. When the wound has once been washed with carbolic acid, the antiseptic should not enter the wound a second time, as its irritant qualities excite inflammation in the wound.
Chronic abscesses, besides recent wounds, are treated with carbolic acid. The surface to be punctured is covered with a piece of thin muslin soaked in carbolic oil, and the knife to be used is dipped in the oil also. Then, a second piece of muslin being ready, the surgeon opens the abscess through the muslin, and as he withdraws the knife an assistant lays on the second piece of muslin over the wound. The matter drains away from under this curtain, and the access of atmospheric air is prevented. When the matter ceases to flow, the lac plaster is laid on, and the oily cloth outside, which can be changed as often as is requisite. Abscesses so treated usually soon cease to secrete matter, shrink, and fill up without delay. If the abscess has burst or had communication with the external air, the interior must be filled with watery solution 1 to 20 before it is dressed, that fermentation in the cavity may be prevented; the further treatment is the same as for a recent wound.
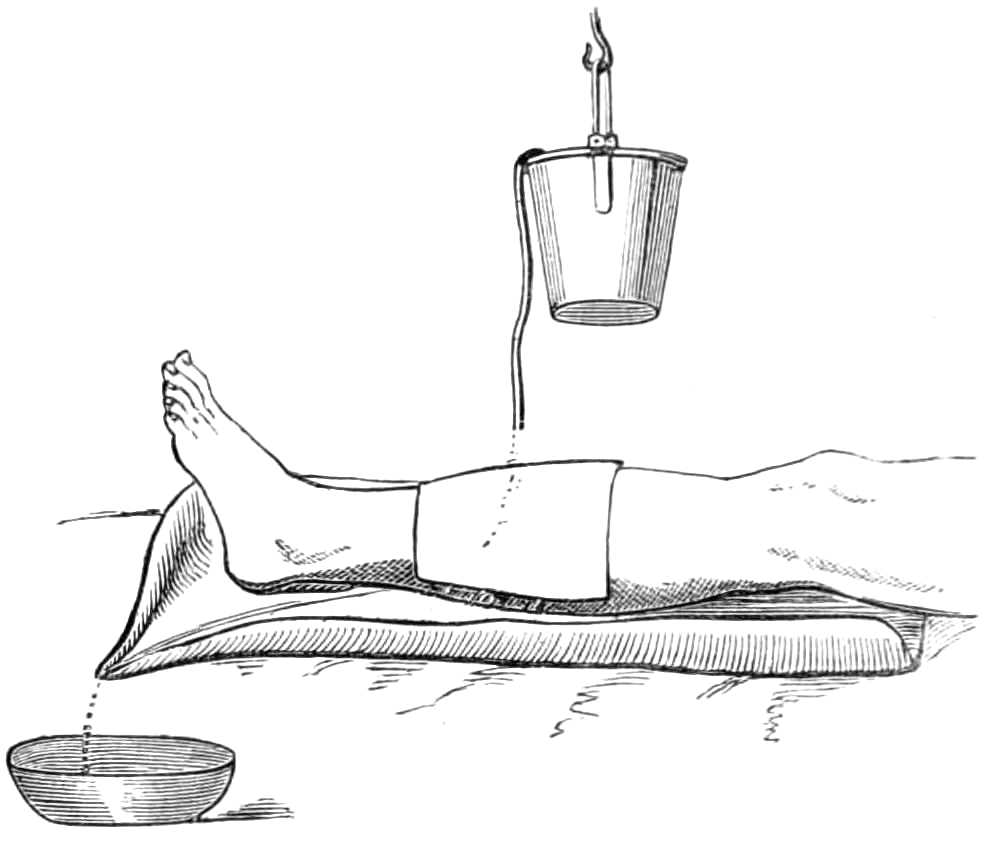
Fig. 114.—Irrigating a wound.
Irrigation.—The continual flow of ice-cold water is used to prevent inflammation of certain wounds. In using cold, it is particularly necessary that the temperature of the water remain steady, for alterations of temperature cause alterations in the capacity of the blood vessels, and promote congestion rather than diminish it; hence irrigation, badly attended to, becomes an evil instead of a benefit. The simplest way (see fig. 114) of contriving irrigation is to lay the limb in an easy position on pillows, protected by a sheet of india-rubber cloth, weighted at one corner to draw the cloth into a channel, down which the water trickles into a receiver under the bed; over the limb a jar, wrapped in blanket, is suspended. This is filled with water from time to time, and kept charged with lumps of ice. A syphon is made by a few feet of fine india-rubber tubing reaching from the bottom of the jar to the wound, the escape of water through the tube being moderated by drawing the end more or less tightly through a bit of cleft stick. It is sufficient that the wound should be kept constantly and thoroughly wetted; more than that is waste of cooling power.
Esmarch’s Irrigator.—This is a simple contrivance for washing out wounds and sinuses with a stream of water. It consists of a tall can of block tin (see fig. 115), with an orifice at the lower end, to which a couple of feet of india-rubber tubing are attached. The tube is fitted with an ivory nozzle and a hook, so that when the stream is not wanted the flow of water is stopped by hanging the nozzle on the upper edge of the can. The stream can be made more or less forcible by raising or lowering the can above the wound.
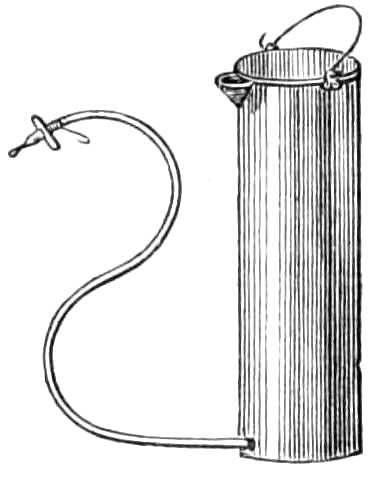
Fig. 115.—Esmarch’s Irrigator.
The Administration of Chloroform.—In administering chloroform the main points to be borne in mind are—1. If the patient is fit to undergo an operation at all he may inhale chloroform. 2. The patient should be fasting; this is the most effectual preventive of sickness. 3. He should be in an easy position, clad in a loose but warm night-dress, which does not interfere with ordinary or artificial respiration, should that be suddenly required. 4. The patient must never inhale more than 4 per cent. of chloroform vapour in the air he respires; on the other hand, the vapour may circulate in the blood without harm for an indefinite time, provided it never pass beyond a certain concentration. 5. Chloroform is a sedative and depressant; the pulse gives the earliest indication of syncope, and the respiration should be constantly watched the whole time chloroform is inhaled. It should be noted that the pulse often fails suddenly at the first flow of blood in an operation. Again, when the patient is deeply narcotised, the jaw may gape and the tongue sink back till it closes the glottis. From this cause respiration sometimes ceases, and danger quickly arises if the chin is not drawn up to raise the epiglottis. In beginning to inhale, the quantity of vapour should be small, and gradually increased. The patient must be cautioned not to talk, to avoid the irritation and coughing chloroform sometimes excites while he is speaking. He should also shut his eyes lest the vapour make them smart. After inhalation has been continued a few minutes the patient is often quiet and inattentive, though easily roused by pain. His condition at this stage should be tested by asking him to give his hand, or by pinching him gently; if no notice be taken of these, the conjunctiva should be touched, and the amount of winking thus excited will enable the chloroformist to judge if the patient will resist when the knife is applied. Patients vary much in the time passed before recovering consciousness; if they remain soundly asleep, breathing freely and with good pulse, it is better to avoid rousing or moving them until they wake spontaneously; such patients suffer less confusion and vomiting than those who are quickly alive to what is going on around them.
Signs of Danger.—Sudden failure or irregularity of the pulse, with pallor and arrested breathing, are of great importance; if these occur, the chloroform must be at once removed, a free supply of fresh air ensured, the tongue drawn gently forward, and if the breathing do not quickly begin, it must be set up artificially (see p. 183) without loss of time, and continued, if necessary, for at least an hour before recovery is despaired of. Stertorous breathing is not alarming unless accompanied by feeble pulse, shallow respiration, and dilatation of the pupils; with these it becomes a sign of a comatose condition.
As subordinate adjuvants for faintness the following are useful:—moistening the tongue and lips with brandy from time to time, or letting the patient sip a small quantity from the spout of a feeding cup. In complete syncope, galvanism to the epigastrium, a hot iron or scalding water to the præcordia may be employed, but should never interfere with the maintenance of artificial respiration, which is of far greater efficacy in restoring suspended animation than anything else.
Chloroform is safely given on a handkerchief, or in various ways, if the administrator is careful to watch the pulse and respiration, and to guard against the patient, by a sudden deep inspiration, taking too large a dose of vapour at once. Exact measurement of the quantity of liquid poured on the handkerchief at a time is of no value, as it is no index of the concentration of the air respired by the patient. Of far greater consequence is it to insure a free supply of atmospheric air, by keeping the evaporating surface a few inches from the mouth and nostrils.
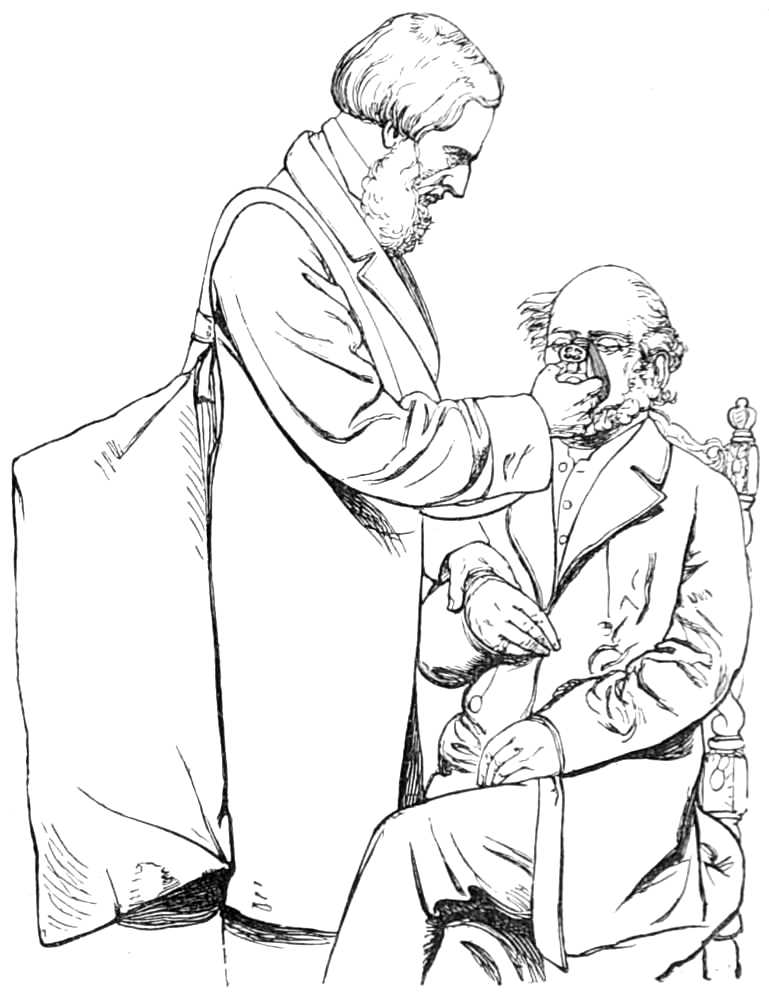
Fig. 116.—Clover’s apparatus for administering chloroform.
The safest mode of giving chloroform is by Clover’s Inhaler (fig. 116), now used in many London hospitals and elsewhere. It renders it impossible to give the patient too strong a dose, by preparing an atmosphere of known strength for him to breathe. Clover’s apparatus consists of a bag of 8,000 or 10,000 cubic inches capacity, suspended by a loop behind the chloroformist’s back, from this a flexible tube brings the vaporised air to a mask, fitting over the nose and mouth of the patient. This mask has a flexible metal border for adjusting it to different faces; and a valve that opens and closes, to allow more or less common air to be respired with that drawn from the reservoir if desired.
The reservoir is supplied by injecting into it, from a bellows, 1,000 cubic inches of air, drawn through an evaporating box heated by hot water, into which 32½ minims of chloroform are injected from a graduated syringe each time the bellows are filled. By these means, an atmosphere of known strength is prepared for the inhalation; that is one containing about 4° of vapour. This apparatus is very easy to use, and the most efficient in producing anæsthesia quickly and pleasantly.
Artificial Respiration.—Many plans are employed; but the two most efficient are those to be described.
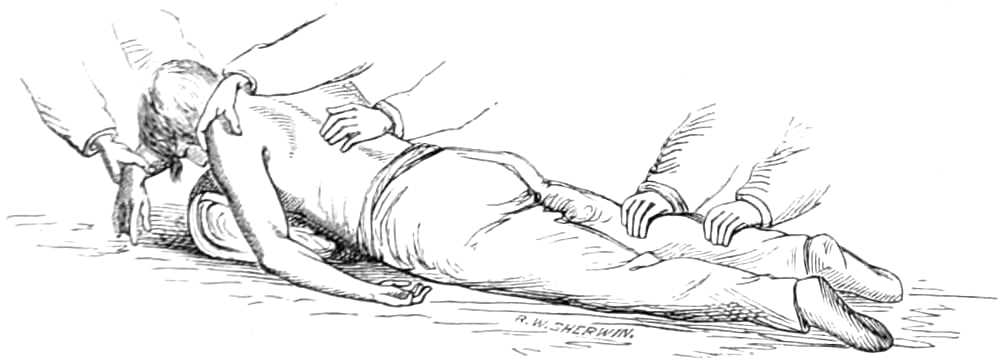
Fig. 117.—Artificial Respiration. Marshall Hall’s method. 1st position.
Marshall Hall’s Method.—Lay the patient on the floor, with the clothing round his neck, chest, and abdomen loose; if wet, remove it, and throw over his body a warm blanket. Clear out the mouth, and turn the patient on his face, one arm being folded under his forehead (see fig. 117), and the chest raised on a folded coat or firm cushion. Next, turn the patient well on his side, while an assistant supports the head and arm doubled underneath it (see fig. 118), and confines his attention to keeping the head forward and the mouth open during the movements to and fro. When two seconds have elapsed turn the body again face downwards, and allow it to remain so for two seconds, and then raise it as before. This series of movements, occasionally varying the side, should be repeated about fifteen times a minute, and continued until spontaneous respiration is restored, or, until two hours have been thus spent in vain.
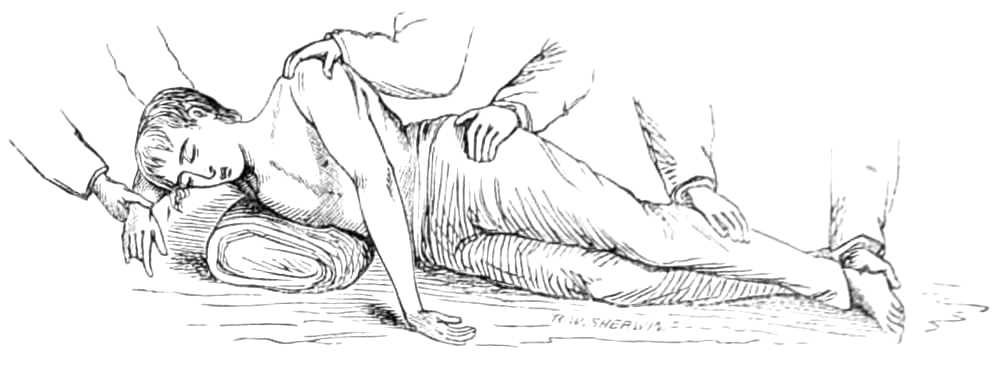
Fig. 118.—Artificial Respiration. Marshall Hall’s method. 2nd position.
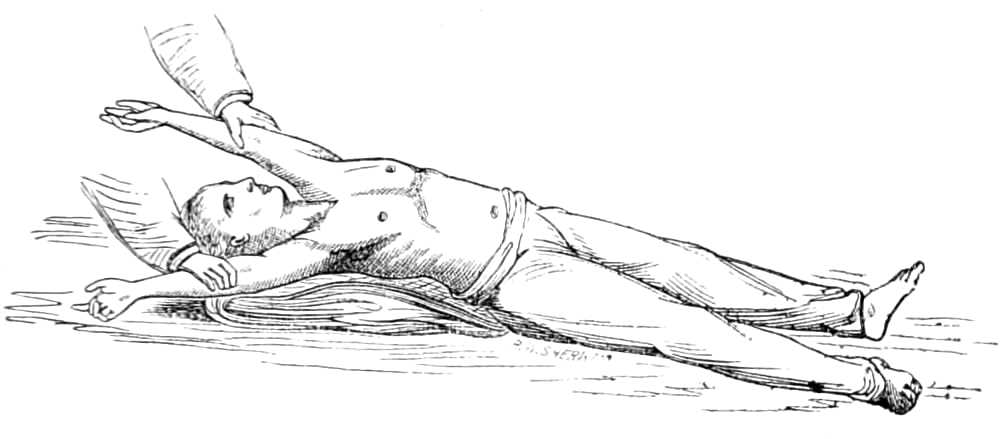
Fig. 119.—Artificial Respiration. Silvester’s Method. Expanding the Chest.
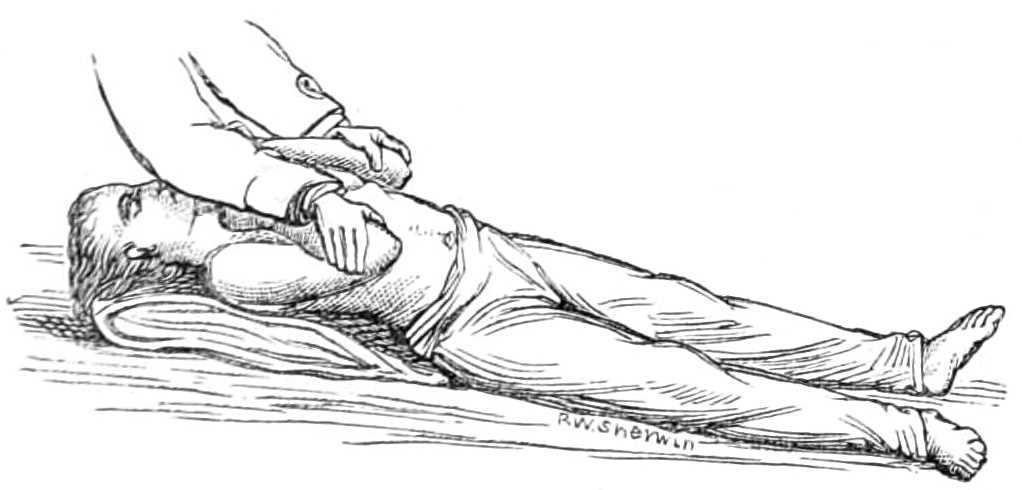
Fig. 120.—Artificial Respiration. Silvester’s method. Compressing the Chest.
Silvester’s Method.—Lay the patient on a flat surface, the head and shoulders supported on his coat folded into a firm cushion. Loosen all tight clothing, and if wet replace it by a warm dry blanket, his arms being outside the blanket. Clear the mouth of dirt, blood, &c., draw the tongue forwards, and fasten it to the chin by a piece of string or tape tied round it and the lower jaw. Next, standing at the patient’s head, grasp the arms at the elbows, and draw them gently and steadily upwards till the hands meet above the head (see fig. 119); keep them so stretched for two seconds. Then slowly replace the elbows by the sides, and press gently inwards for two seconds (see fig. 120). These movements are repeated without hurry about fifteen times in a minute, until a spontaneous effort to breathe is made, when exertion should be directed to restoring the circulation by rubbing the limbs upwards towards the body, and by placing hot bottles at the pit of the stomach, to the armpits, between the thighs, and to the feet. Should natural breathing not commence, artificial respiration should be continued for two hours before success is despaired of.