WINDMILL FORCE-PUMP—Plate 35.
Reading edition
WINDMILL FORCE-PUMP—Plate 35.
If this pump is properly connected with an air chamber, as explained later, it will send a small stream of water some ten feet. In a gale, the windmill is strong enough, in fact, to force the valves from the glass tubes. Like any model of considerable mechanism, this will require patience to get it in working order. The post is made short for stability. If it can be held in place firmly, a trestlework tower like a real windmill might be built of stock 1/2" × 1/2" for the corner posts and 1/2" × 1/8" for the braces.
The post is slanting on two sides to fit the journals at the top. It is fastened to the base with two 2" screws. Make the wheel center 2-1/8" square, and thru its center bore a 1/4" hole. If it does not revolve true, make another block and try again. Make the block octagonal by cutting off each corner 5/8". On each of the eight faces saw notches 1/8" wide and 5/16" deep into which the vanes will fit. (See page 64 on cutting notches.) Make and glue the vanes in place and lay the wheel flat to dry.
Procure three pieces of water-gage glass 2" long, 7/16" to 1/2" inside diameter. Glass tubes can be broken apart by filing a slight notch, grasping the tube firmly each side of the notch, and pulling and bending the tube away from the notch. If the file starts a little break, this will be comparatively easy, if it does not, file some more. Into two tubes little valves must be cemented. These can be made of a firm piece of leather. Sole leather that is not too hard is best. With knife or chisel, pare two pieces on the cutting board to fit in the tubes. The cement will make them water tight later. Push the sharp point of a penknife into the smooth side of the leather disk and make a circular cut, as one would remove a speck from an apple, but do not cut the flap completely out, because it must be left hinged to the disk. Turn this flap up straight out of the way so as to be able to work a 1/4" hole thru the disk. This can be punched, drilled, or cut out with a 1/8" chisel, and finished with a penknife. Of course, the edges of the flap should cover this hole completely. The valve in the lowest tube should be cemented about 1/2" from the lower end with the flap up, that in the horizontal tube about 3/4" from the outer end with the flap out.
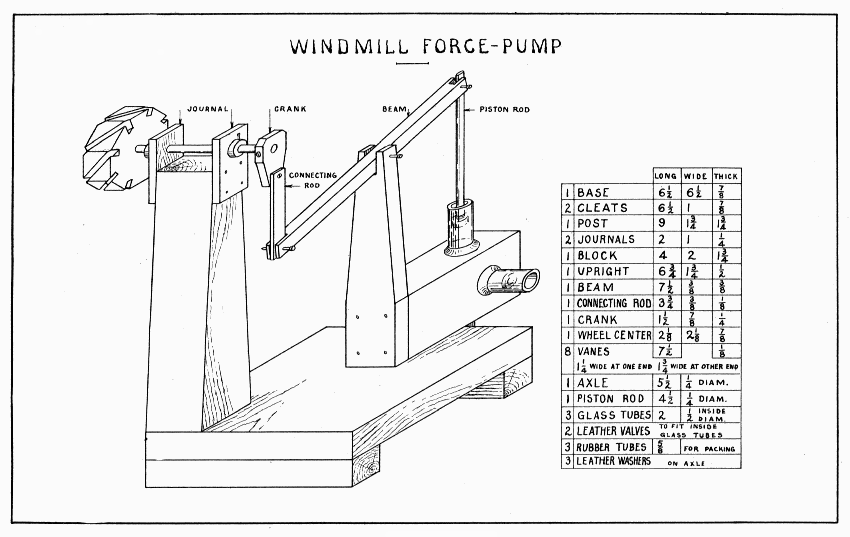
WINDMILL FORCE-PUMP — Plate 35
To make sealing-wax sticky enough to cement these valves in the tubes, melt one teaspoon of wax with one-half teaspoon of turpentine in a large spoon, and allow it to cool. Break it in pieces small enough to go in the tubes. Put the valve in the tube a little to one side of its final position; put in some of the wax mixture; heat the tube in an alcohol flame, rolling the tube till the wax begins to melt; remove from the flame; and when the wax is all melted, push the valve to its final position with a pencil. While it is cooling, see that the wax does not flow into the valve. All three tubes must have a piece of rubber tubing on the outside to serve as packing in the wooden block. With an expansive bit, holes can be bored in the block so that the rubber tubing will fit tightly. Lacking that, bore a smaller hole and enlarge it with a round file. The center of the vertical hole is somewhat to the left (as viewed in Plate 35) of the center of the block to allow the horizontal tube more support. This will require the notch in the upright also to be to the left of the center. After the holes are bored, the pores of the wood must be filled with paraffin. In a little dish, melt some paraffin and put it into the holes with a rag tied to a stick. When the holes are well covered, drive the wax into the wood with an alcohol or candle flame held in the hole till the wood is fairly hot. The outside of the block might well be treated in like manner. It will be best to cement these tubes in their places. Melt a tablespoon of sealing wax with about as much turpentine. With this, not too hot, build up a good fillet over the rubber tubing 1/4", perhaps, on the glass tubes.
Make a good fitting piston for the upper tube; it must not slide hard (oil it) and yet it must be air tight. To make the piston file two grooves 1/2" apart around and near the end of the piston rod. Wind a hummock of yarn between these grooves till it almost fills the tube, then wrap a piece of soft cloth (knitted underwear) smoothly over the hummock, tying it in each groove with thread.
Lock the crank to the axle with a 1/2" screw. Adjust the axle and keep it in position with two leather washers locked to the axle just outside the journals. Clamp the block to the base, adjust it in line with the crank, and fasten it with two 1-1/2" screws up thru the base. The last connection to make is between the crank and connecting-rod. To make this, raise the piston to its highest position, and turn the crank to its lowest; choose what seems the best point for the screw, marking the point on crank and connecting-rod; now lower the piston and raise the crank; if the two points do not come together, the screw should be placed half way between them. This screw should be tight in the crank. The wheel can now be glued to the axle or locked with a brad slanting from the front of the wheel center.
Before they will work, the valves must be made limber with water, and to start the pump, water may have to be put on each side of the valves. Water may be pumped to any height by fastening a pipe to the horizontal tube. To obtain a steady stream, like a fire-engine, connect the horizontal tube with an air-tight bottle. The pipe which goes into this bottle should reach just below the stopper. The outlet pipe should nearly reach the bottom of the bottle, and it should have a nozzle smaller than any other opening in the whole apparatus. The bottle should be partly full of water. Quarter-inch glass tubing can be melted and shaped in an alcohol flame, and, if some rubber tubing is used as a connection, the nozzle can be played anywhere.
Back to Contents