ELASTIC GUN—Plate 28.
Reading edition
ELASTIC GUN—Plate 28.
If cash carrier elastic cord about 5/16" in diameter and 18" long is used on this gun, it will shoot buckshot, peas, small arrows, etc., with considerable force; in fact, if the cord is fastened far enough forward, it will require all a boy's strength to pull the rider back to the hook. The gun may be made of pine, whitewood or clear spruce.
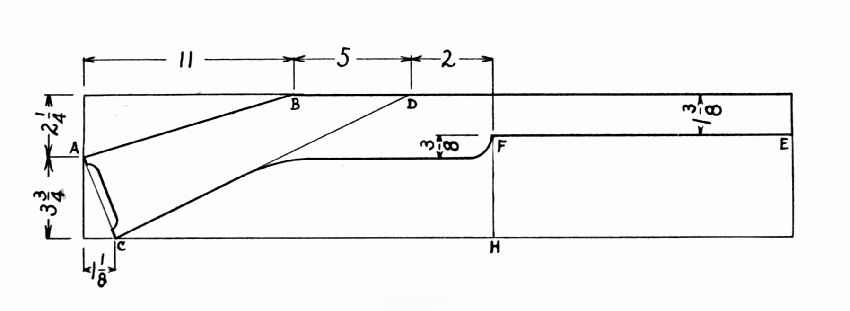
To lay out the gun (see Fig. 7) first draw A B, then A C, then measure B D and draw C D; next measure the width of the barrel and draw E F; add 3/8" below this for the gun-stock, and finally draw the curves freehand. To saw it out, first rip it along E F, then cross cut it at H F, then rip it as far the curve along C D, and then along the lower side of the gun-stock to meet C D, finally along A B. Of course, none of this sawing should quite touch the lines. Plane to these lines wherever possible, then use the spokeshave. The curve and corner at F should be pared with a chisel. The lower edge of the gun-stock and barrel is made half-round, but the upper edge, especially where the spring is screwed, is only slightly round. The curve at the butt of the gun-stock should be cut out with the turning-saw, and rounded with a half-round file. The groove can be made as in the bow pistol. (See page 86.)
All parts of the gun should be well sandpapered, especially where the elastic will rub on the barrel.
Make the trigger of tough wood.
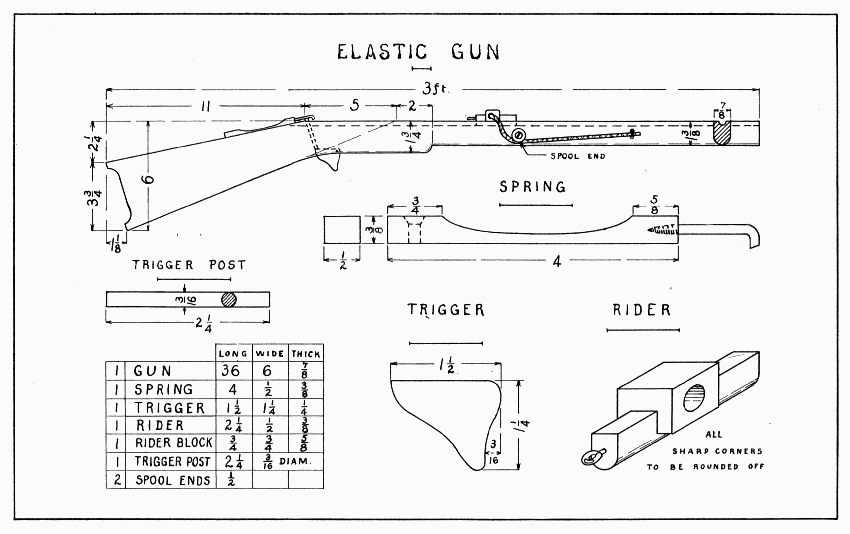
ELASTIC GUN — Plate 28
Bore a 1/4" hole for the trigger post about 3/4" from the back end of the groove, making it slant forward about 3/4". Make this hole smooth as possible. Where the hole comes thru the gun-stock, start the mortise in which the trigger belongs. This should be 3/8" deep and an easy fit for the trigger. Put the trigger in place, and drill a small hole straight thru the gun-stock and trigger. Consider carefully where to bore this hole so that it will not come too near the edge of the trigger. Insert a good-fitting brad and see if the trigger post will move up and down about 1/4". Do not make the mortise so long that the trigger post will slip by the trigger.
Now make the spring of hard wood. Pare the curve from each end with a chisel, holding the spring endwise in the bench-hook. The holes for the screw and the hook must be large enough so that the spring will not be split, and yet the hook must be screwed in strongly to hold the elastic. The hook must be filed off enough, and slanting, so that the screw-eye in the rider will slide under it and be caught.
The rider is the hardest part to make because it is small and must be of hard wood; also, the block must be nicely fitted into the long piece. Make the lower edge of the long piece round so as to slide well in the groove. Bore a 5/16" hole thru the block endwise the grain, countersink the ends, and smooth them so that they cannot injure the elastic. Next lay out, saw, and chisel a notch 5/16" deep in the long piece in which the block will fit snugly. Glue it and nail it from the under side, or put in a 1/2" screw. Holes will have to be bored carefully for either brads or screw. Bore a hole, and put the screw-eye in such a position that it will slide under the hook with a snap. Be careful not to twist the eye off in this hard wood. The back end of the eye might well be filed somewhat slanting so as to slip under the hook better.
Put the elastic thru the rider, snap the rider on the hook, and pull the ends of the elastic as far as seems best,—don't have it too strong! Where the ends of the elastic are pulled, bore two 1/4" holes thru the barrel one above the other. Bind the elastic securely between these holes; to make it doubly secure, wind a string between the elastic and the barrel to pull the first strings closer together.
Now saw off the ends of a spool about 1/2" and screw them to the barrel in such a place that they will hold the elastic, without stretching, against the sides of the barrel. These spools should turn easily. They cannot be placed exactly opposite because the screws will interfere.
Snap the rider to the hook, pull the trigger, and notice that the rider goes up with the trigger post. To hold it down, put a slender 3/4" screw on each side of the groove in such a place that the screw heads will come over the outside of the screw-eye; or, 1" brads may be bent over the screw-eye. When everything is in working order, drive a 1" brad on each side of the spring to keep the hook always in place.
Back to Contents