PENCIL-BOX—Plate 10.
Reading edition
PENCIL-BOX—Plate 10.
To make this box, saw out one long piece for the sides and ends, 22" × 1-7/8" × 1/4", or two shorter pieces, 12" × 1-7/8" × 1/4". The reason for having them so long is because it is difficult to make the groove nicely to the end of the board; and they are wide enough to try twice to make the groove.
File a nail (about 3/32" in diameter) sharp like a chisel, and drive it tightly into a small hole, drilled in a block of wood which has one corner rabbeted, that is, sawed away as shown in Fig. 3. The outside of the nail, measured from the shoulder of the rabbet, must be exactly 1/4" away, so that the lower edge of the groove will be 1/4" from the top of the box. Practice with this tool till a good groove can be made in waste lumber, then make the groove along one edge of the board. When well done, plane the board 1-3/8" wide, and saw it to the proper lengths for sides and ends. In the front end there is no groove, so plane it away from one piece just sawed. Sandpaper the flat sides before gluing and nailing them together. Prepare the bottom as directed for the magic box, page 38, then sandpaper, glue and nail it in place. Set all nails. Plane the bottom to fit. Prepare the cover somewhat too long but exactly the width between the grooves. As in making the whistle, page 32, so here draw pencil lines for the bevel 3/8" wide on the cover. Practice planing a bevel on waste wood first. The bevel at the further end of the cover can be planed by holding the cover upright in the vise. When it slides smoothly in the grooves, saw it the right length. For the notch, make a deep cut with a gouge, and cut the chip straight across with knife point or small chisel. Hold it in the bench-hook while doing this.
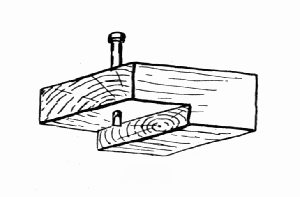
Fig. 3
Back to Contents