Hotchkiss Portable Machine Gun.
Reading edition
COMPONENT PARTS.
1.
Barrel.
Assembled—
Trunnion ring.
Gas nozzle ring.
Orifice screw.
Gas cylinder support.
Front sight carrier.
Front sight.
2.
Regulator.
3.
Receiver.
Assembled—
Bottom plate.
Front feed guide.
Rear feed guide.
Cartridge base stop.
Feed piece cover.
Closing spring.
Rear sight base.
Rear sight screw.
4.
Hand guard.
Assembled—
Catches for legs.
Catch springs.
5.
Locking nut.
6.
Locking screw.
7.
Cocking handle.
8.
Guard with stock.
Assembled—
Recoil spring seat.
Hinged strap.
Elevating screw tube.
Elevating screw slide.
Slide spring.
9.
Barrel rest.
10.
Elevating mechanism.
Assembled—
Outer screw.
Inner screw.
Base.
11.
Piston.
12.
Fermeture nut.
13.
Breech block.
14.
Extractor.
15.
Firing pin.
16.
Ejector.
17.
Ejector cap.
18.
Cartridge stop.
19.
Cartridge stop holder.
20.
Sear.
21.
Trigger.
22.
Feed piece.
23.
Feed spring.
24.
Recoil spring.
25.
Ejector spring.
26.
Sear spring.
27.
Cartridge stop spring.
28.
Extractor spring.
68
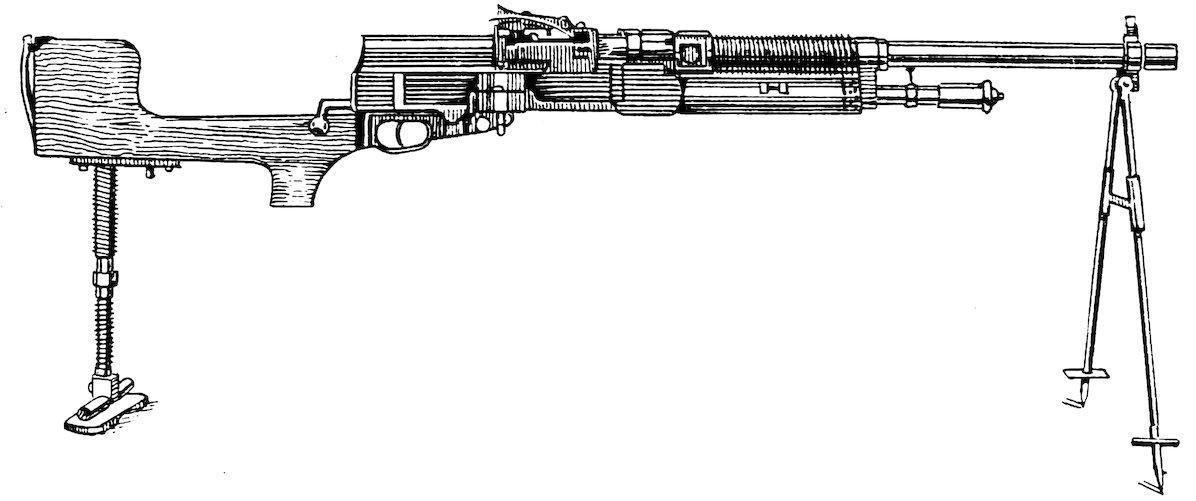
Plate X. Infantry Model with Elevating Gear.
69
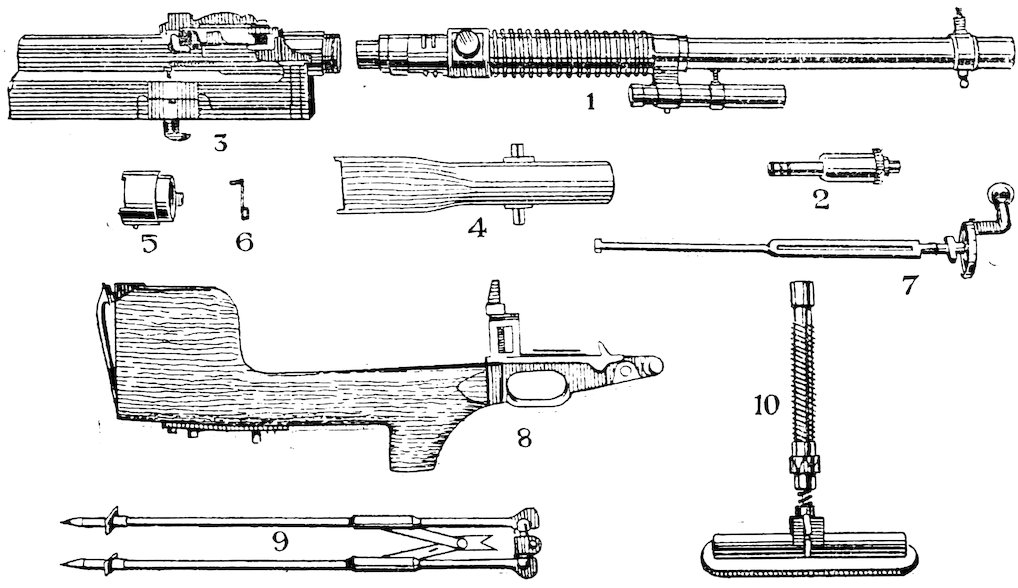
Plate XI. External Parts.
70
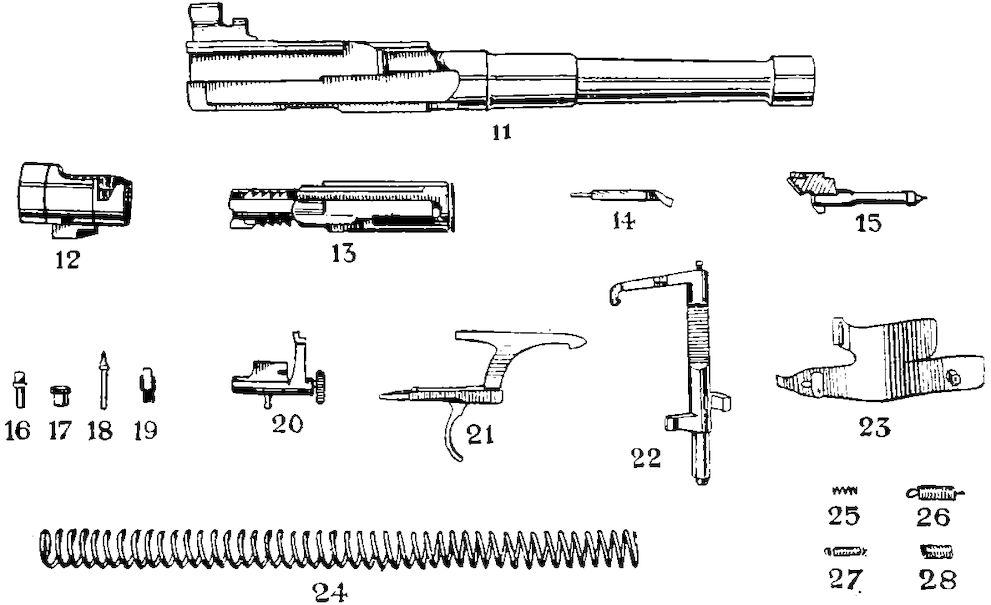
Plate XII. Working Parts.
71
ACCESSORIES.
One dismounting wrench.
One ejector key.
One hand extractor.
One cleaning rod complete.
Two wire brushes.
One cleaning brush.
One gas cylinder cleaner.
One oil can.
One front sight cover.
GENERAL DESCRIPTION.
The gun comprises a single barrel, receiver, guard and stock, rigidly assembled. Guided in the receiver, parallel to and below the barrel, is the piston, which by its reciprocating motion assures the automatic action of the gun. This reciprocating motion is brought about as follows:—When the bullet in its passage through the bore has passed a port connecting the bore with the gas nozzle, a small portion of the powder gas issues from the nozzle, and impinging in the cup-shaped forward extremity of the piston, throws in the rear. The recoil spring compressed by the piston in its rearward movement now returns the piston to its initial position.
In its movement to the rear the piston, which is accompanied by the breech block, opens the breech, extracts and ejects the spent cartridge case, and brings a fresh cartridge to the loading position. In its forward movement the breech is locked and the shot fired.
Feed.
The cartridges are fed into the gun on flat, tempered steel strips, of 30 rounds each.
A folding barrel rest is provided for steadying the barrel when firing in the prone position which will ordinarily be taken.
For aircraft the gun is mounted on a crutch, and the stock may be replaced by a pistol grip.
The operation of the gun requires but one man, who loads and fires. If a second operator loads the speed of fire is increased from 250 to 400 rounds per minute.
ACTION OF THE MECHANISM
To load, the breech must be opened by means of the cocking handle. As the piston is drawn back, cams on its upper face turn the fermeture nut a partial revolution, 72disengaging its interrupted threads from corresponding threads on the nose of breech block. This unlocks the breech. Under the action of its spring, the feed piece engages with a shoulder on the piston and locks it in its rearmost position.
To permit the introduction of the feed strip, the feed piece must be lifted to its highest position by pressing up on its lower end. This frees it from the shoulder of the piston, which latter moves forward slightly under the action of its spring and engages with the sear. The feed strip may now be introduced into the guides, cartridge side down, and should be pushed forward until the pawl forming part of the feed spring engages with it, so as to prevent any backward movement.
When the trigger is pulled, the piston, accompanied by the breech block, is propelled forward by the recoil spring; the breech block pushes a cartridge from the feed strip into the chamber; the cams on the upper face of the piston act on the fermeture nut, locking the breech; the firing pin is driven against the primer and the shot fired.
When the bullet in its passage through the bore has passed the port leading to the gas nozzle, a small portion of the powder gas, conducted by the port and the gas nozzle, impinges in the cup-shaped forward extremity of the piston, and drives it to the rear. As already explained, the breech is now unlocked by the action of the piston cams on the fermeture nut, the breech block is withdrawn, along with the extractor holding the spent cartridge case, which later is ejected when its head strikes the ejector.
Towards the end of the backward stroke of the piston a cam on its side imparts a slight rotary movement to the feed piece, which advances the feed strip sufficiently to bring the following cartridge to the loading position.
The last cartridge having been fired, the strip is ejected from the gun. Under the action of its spring, the feed piece, which has been held up by the strip, now descends, and, engaging with the shoulder of the piston, locks the breech open. All is now ready for the introduction of another strip.
The firing gear may be set for continuous firing, single shots, or safety, by turning the cocking handle to the positions marked “A,” “R” and “S,” respectively.
73When set at “A” (automatic), so long as the trigger is held back, the piston is free to move forward again under the action of the recoil spring. As a result the gun fires continuously until the strip is exhausted or the trigger released.
When set at “R” (repetition), a separate pull of the trigger is required for each shot, as the sear engages with the piston each time the latter recoils, thus stopping the firing.
When set at “S” (safety) the trigger is locked, and cannot be pulled back. As a result the gun cannot be fired.
TO STRIP AND ASSEMBLE THE GUN.
1st.—Close breech.
(a)
Lift feed piece to its highest position by pressing up on its lower end as for loading. This releases shoulder of piston from feed piece and allows it to move forward slightly and rest on the sear.
(b)
Pull trigger, cocking handle being set at “R” or “A.” As this releases sear, the piston is propelled forward by recoil spring and breech closed as when firing.
2nd.—Remove cocking handle.
(a)
Throw cocking handle knob to left, slightly past vertical and against stop.
(b)
Draw cocking handle back about ½ inch and then throw knob to right as far as possible to an angle of about 45 degrees. By this movement cocking handle is released from piston.
(c)
Withdraw cocking handle to rear.
3rd.—Remove guard.
(a)
Unscrew locking screws on left side of receiver three turns.
(b)
Grasp receiver firmly with left hand and stock or pistol grip with the right. Push stock forward about ⅜ inch and then bring it straight down, separating it from receiver. This combined movement will be learned after a few trials.
Firing gear (sear, sear spring and trigger) remains with guard.
4th.—Withdraw recoil spring from receiver.
745th.—Remove recoiling mechanism.
(a)
Insert cocking handle in piston and push it forward as far as it will go, knob inclined at about 45 degrees to right. When home, turn knob to vertical position so as to engage lugs at forward end with piston.
(b)
Draw cocking handle to rear, and with it the piston, breech block, extractor and firing pin.
6th.—Remove feed spring.
(a)
Disengage feed spring from button at top of feed piece, springing it up with forefinger of right hand by means of the hooked portion projecting to rear.
(b)
Dismount feed spring by pushing it to rear with left hand by means of knurled button, at the same time springing it up sufficiently with right hand to clear pawl from rear feed guide.
7th.—Remove feed piece.
(a)
Throw open feed piece cover by means of knurled knob.
(b)
Lift leaf of rear sight.
(c)
Lift feed piece to its highest position and turn through an angle of 180 degrees so that lever points to rear. As flattened portion of axis is now opposite corresponding slot in upper bearing, feed piece may be removed to rear.
8th.—Remove ejector.
(a)
By means of key unscrew ejector cap and remove it.
(b)
Lift out ejector spring and then ejector.
9th.—Remove barrel.
(a)
Unscrew barrel locking nut one-sixth of a turn to a stop with right hand, using dismounting wrench.
(b)
Remove barrel by drawing it straight to front.
10th.—Remove hand guard.
(a)
Turn locking nut to left sufficiently to free its stud from engagement with hand guard. (This stud serves to hold hand guard in place while barrel is being mounted or dismounted.)
(b)
Remove hand guard by drawing it to front.
7511th.—Unscrew and remove locking nut.
12th.—Remove fermeture nut.
13th.—Remove firing pin.
Reverse breech block and firing pin will fall into the hand.
14th.—Remove extractor.
(a) Grasp breech block with left hand and hand extractor with right; insert hook portion of latter between last and before last coil of extractor spring, compress the spring, tilt the end out of its seat and remove it.
(b) By holding breech block upwards, extractor will fall out.
15th.—Remove firing gear from guard.
(a)
Hold stock between knees, the guard to the front.
(b)
With right hand lift hooked arm of trigger sufficiently to clear it entirely from vertical lever of sear.
(c)
With left hand catch knurled button forming outer extremity of sear axis and draw to left sufficiently to free right hand end of axis from its pocket. Now lift sear vertically from guard.
(d)
Lift trigger upward and forward, separating it and sear with spring attached from guard.
(e)
Detach respective ends of spring from sear and trigger.
16th.—Remove cartridge stop.
(a)
Unscrew cartridge stop holder by means of the dismounting wrench.
(b)
Withdraw cartridge stop spring and cartridge stop.
ASSEMBLING.
1st.—Mount in order the following parts: fermeture nut, barrel nut, hand guard, barrel, ejector, spring and cap, feed piece, feed piece spring.
2nd.—Assemble the trigger, sear and sear spring, and then mount them in guard.
763rd.—Mount the recoiling parts in receiver.
(a)
Assemble extractor with breech block.
(b)
Mount the firing pin, bringing it to its rearmost position and turning head to left behind shoulder in breech block.
(c)
Engage piston tang in the under slot of breech block. (Rear face of tang should abut against the rear wall of slot, and under tang of firing pin should engage in corresponding groove in piston tang.)
(d)
Turn fermeture nut to the open position by passing first finger of left hand in ejection slot of receiver. (When in the open position the ejection slot in the fermeture nut coincides with the ejection slot in the receiver.)
(e)
With the right hand grasp rear of piston assembled with breech block, placing thumb on head of firing pin so as to hold it turned to left behind shoulder of breech block.
(f)
Insert piston assembled with breech block in rear of receiver and push it forward with right hand until it comes to a stop. (Its rear face will now be about 1½ inch in front of rear of receiver.)
N.B.—It is imperative that the head of firing pin be turned completely to the left, and that fermeture nut be at the open position. The mechanism should slip into place easily, forcing being neither necessary nor permissible.
(g)
While pressing on the lower end of feed piece with the right hand so as to bring it to its highest position, push forward piston with left hand until breech is closed.
4th.—Insert recoil spring in piston and push forward, allowing a few inches to project to rear of receiver.
5th.—Mount guard.
(a)
Grasp pistol grip with right hand as for firing, making sure that firing gear is properly mounted by pulling trigger several times.
(b)
Engage projecting end of recoil spring in its seat in the guard. 77
(c)
Bring the guard to a position under receiver so that the two lugs on its head are opposite their mortises in rear of receiver, the trunnions at the front being below and slightly in advance of their sockets in the bottom of receiver. In order that the end of recoil spring remains engaged in its seat in the guard it may be held in place by means of the end of the cocking handle shank.
(d)
Engage lugs in their mortises and trunnions in their sockets by raising guard vertically.
(e)
Draw guard to rear until solidly seated in receiver.
(f)
Screw up locking screw.
6th.—Mount cocking handle.
(a)
Insert shank of cocking handle in opening in guard, the knob inclined at 45 degrees to right, and push forward to a stop.
(b)
Throw knob to left to a stop.
(c)
Push cocking handle forward until home, and then throw knob to right and down as far as it will go.
In order to replace a defective extractor or firing pin proceed as follows:—
1st.—
Close breech.
2nd.—
Remove cocking handle.
3rd.—
Remove guard.
4th.—
Withdraw recoil spring.
5th.—
Remove recoiling mechanism.
Replace defective part by a spare, and mount by reversing operations.
The extractor and extractor spring can also be removed without stripping gun as follows:—
1st.—
Insert an empty cartridge case in the ejection slot, perpendicular to chamber.
2nd.—
Close breech gently, i.e., by holding it back with cocking handle, on to empty cartridge case, thus giving access to extractor and extractor spring.
3rd.—
Remove extractor spring and extractor by means of hand extractor.
Replace defective part by a spare, cock the gun and withdraw empty cartridge case.
78
POINTS TO BE ATTENDED TO BEFORE FIRING.
1. Cock gun.
2. Pass cleaning rod down the bore to make sure that barrel is clear.
3. See that regulators of all available barrels are properly set.
4. Oil mechanism. A moderate quantity of oil will suffice. It is useless to flood the mechanism. As the essential parts are sufficiently accessible through the ejection slot and by opening the feed piece cover, dismounting is not necessary.
5. Test action of both ejector and cartridge stop by pushing on their points. They should work freely, their springs being elastic but without stiffness.
6. Test action of mechanism by rapidly opening and closing breech several times. It should work freely and smoothly.
OPERATING THE GUN.
In firing, the prone position will be taken ordinarily, the barrel rest being used to steady the gun.
In high grass or under conditions where more height is desirable, ammunition boxes may be placed under the barrel rest so as to increase height.
In short, any sort of rest available may be used, for instance, the top of a parapet or the limb of a tree.
In going into action the following operations must be performed:—
(1) Set barrel rest.
(a)
Free legs from their catches.
(b)
Turn legs forward until at right angles to barrel.
(c)
Open legs with a sharp movement such that the separators catch in one another.
(d)
Place the feet in desired position and force points into the ground.
(2) Mount elevating mechanism.
(a)
Place elevating mechanism foot on ground in such position that it is at right angles to axis of gun.
(b)
Bring gun to approximately the required elevation by turning outer elevating screw.
79(3) Take firing position.
(a)
Take prone position, resting on the elbows.
(b)
Grasp pistol grip and trigger with right hand, pressing stock well into hollow of right shoulder.
(c)
Grasp outer elevating screw with left hand.
(d)
In case elevating gear is not used, left hand grasps stock to rear of receiver and pulls shoulder strap down solidly against shoulder.
(4) Cock gun.
(a)
Throw cocking handle knob to left to a stop.
(b)
Draw cocking handle to rear as far as possible with a sharp quick movement.
(c)
Return cocking handle to its original position, and set at “R” for single shots, “A” for automatic and “S” for safety.
(5) Loading is ordinarily performed by a second operator, who takes the prone position to the right of gun, with ammunition conveniently at hand.
(a)
Raise feed piece to its uppermost position by pushing up on its lower extremity with left hand, placing thumb on feed piece cover.
(b)
With right hand introduce a feed strip into guides, cartridge side down, and push home until the pawl catches.
N.B.—If gun is operated by but one man, loading will be found more convenient if the elevating mechanism is not used; the firer performs both operations of lifting the feed piece and introducing the strip with the right hand, the left hand meanwhile steadying the gun by grasping the stock.
(6) Firing.—The gun is fired by pulling the trigger.
(a)
Single shots: Set cocking handle at “R” (repetition). One shot is fired each time trigger is pulled.
(b)
Automatic firing: Set cocking handle at “A” (automatic). If trigger is held back the entire strip of 30 rounds is fired automatically.
(c)
Volley firing: Set cocking handle at “A” (automatic). The trigger may be released after some 3, 5, or 10 rounds, as circumstances require, aim quickly altered and firing resumed, i.e., the strip of 30 rounds is fired in volleys, as required. 80
(d)
Safety: Set cocking handle at “S” (safety) and remove strip, unless firing is to be promptly resumed.
N.B.—The trigger must be released at the end of each strip, so that the sear will hold the piston at the cocked position during the introduction of the following strip. Otherwise, as soon as the feed piece is raised preparatory to loading the breech will close, necessitating recocking the gun before continuous firing.
(7) Unloading.—In order to remove a partially spent strip, proceed as follows:—
(a)
See that breech is open, cocking if necessary.
(b)
Hold claw of pawl free from strip by pushing upon lower extremity of feed piece with left hand while withdrawing strip with right.
N.B.—As a live cartridge never remains in the chamber the mere presence or absence of the strip shows whether the gun is loaded.
RAPID CHANGE OF BARREL IN THE FIELD.
In prolonged firing it is sometimes desirable to replace a hot barrel by a fresh one, so as to allow the former to cool.
This operation, which is performed without dismounting any part of the mechanism, requires some 10 to 15 seconds.
Proceed as follows:—
Suppose the gun in the firing position.
The firer unscrews the locking nut one-sixth of a turn with the right hand, using the dismounting wrench.
While the second operator grasps the legs of the barrel rest, quite near the barrel, No. 1 separates the barrel from the receiver by drawing the latter to the rear.
Resting the butt on the ground No. 1 now mounts the fresh barrel and pushes it home.
Meanwhile No. 2 handles the hot barrel by means of the barrel rest, which he then detaches as follows:—
(a)
Fold the legs.
(b)
Turn the legs forward until in line with the barrel.
(c)
Pivot the legs half a turn around the lug of the front sight carrier, thus permitting the separation.
81The fresh barrel being mounted, No. 2 attaches the barrel rest and resets it.
A hot barrel may be carried by means of dismounting wrench.
COOLING BARREL.
To reduce wear of rifling, the barrel should be kept cool if circumstances allow.
Water is not harmful, and when available may be copiously applied to barrel by means of a sponge or rag.
A hot barrel may be dipped in water, but all traces of latter must be removed from barrel bore and gas cylinder, by blowing through same, by means of cleaning rod, or by firing two or three loose cartridges.
Until all water is blown out of gas cylinder, the gas pressure may be insufficient for ensuring automatic action.
USE OF THE REGULATOR.
In order that the working of the gun may be regular, sufficient power must be available to ensure complete recoil of the piston. The amount of power necessary must vary because of insufficient oiling, dust, or fouling in the mechanism, &c. Then, again, pressure of the powder gases may vary because of temperature, deteriorated powder, or badly worn rifling.
The regulator affords means of varying the power which works the gun. Under normal conditions it should be set at 25.
To test the automatic action, fire several shots with regulator set at 25 and cocking handle at “R,” and observe:—
(a)
One shot should be fired at each pull of trigger. If more than one shot is fired at a time, it shows that piston does not recoil sufficiently after each shot to catch on sear.
(b)
Claw of pawl should catch in the opening in strip at each shot. If pawl rides on top of strip instead of catching, it shows that piston does not recoil sufficiently to throw feed lever through a complete stroke.
(c)
The ejection should be regular and energetic.
82If these three points are not satisfactory it may be concluded that there is a lack of power, and regulator should be screwed up from 5 to 10 divisions.
On the other hand, too much power is not desirable, as the vibration due to the violent action of the mechanism necessarily affects accuracy.
ACCIDENTAL STOPPAGES IN THE AUTOMATIC ACTION OF THE GUN.
In case of a jam always proceed as follows:—
(a)
Open breech completely by means of cocking handle.
(b)
Remove jammed cartridge through ejection slot by using hand ejector or cleaning rod as the case may be, and see that chamber is clear.
(c)
Withdraw the strip if some remedy is to be applied. Otherwise push it forward, bringing the next cartridge to the loading position.
STOPPAGES AND THEIR REMEDIES.
(1) Jam on the first round of a strip.
The strip was probably not pushed completely home before trigger was pulled. Always push forward strip until pawl catches, so that both strip and cartridge are positively held in loading position.
(2) Missfire.
Eject defective cartridge by cocking gun, and continue firing.
N.B.—A loose primer falling into the mechanism may cause repeated missfires. Dismount the piston and breech block so as to remove primer, which will usually be found either in the piston cams or in the fermeture nut near the entrance to the chamber.
Missfires may be also due to a weakened recoil spring. In this case replace the spring with a spare.
(3) Bad introduction.
The cartridge jams at entrance to the chamber when being pushed forward by breech block. The bullet of 83the cartridge in question may have been imperfectly seated due to defective crimping, or the cartridge insufficiently held by the clips of the feed strip.
In the latter case the strip should be put aside for re-sizing.
Another cause of bad introduction is incomplete feeding due to lack of power. In this case screw up the regulator 3 to 10 divisions.
(4) Incomplete ejection of the spent cartridge case.
This is due to lack of power. Screw up the regulator 5 to 10 divisions.
CLEANING AND CARE.
This arm requires the same care as the service rifle. It must be kept clean and free from rust, and all parts lightly oiled. No gritty substances or emery should be used.
As soon after firing as practicable the barrel should be thoroughly cleaned and oiled, particular attention being paid to the chamber.
The gas cylinder should be kept free from fouling by means of the cleaner so that the regulator can be easily screwed up without using the dismounting wrench.
When the gun is not in use the breech should be kept closed so as to avoid weakening the recoil spring.
FEED STRIPS.
The feed strips hold 30 rounds each. There are three rows of clips which hold the cartridge near the base, the middle and at the neck. A stop lug which catches behind the head of the cartridge case prevents longitudinal motion.
FEED STRIP FILLING MACHINE.
The feed strip filling machine is constructed for clamping to a bench or plank, as, for instance, the lid of a cartridge box.
The hopper and clamp are removable for compactness in packing.
84The machine must be so placed that the crank can be conveniently turned with the right hand.
Proceed as follows:—
(a)
Fill the hopper with cartridges.
(b)
Push a feed strip, stop lugs to the rear, in its guides on the machine until the feed tooth catches back of the first middle clip.
(c)
Turn the crank. At each complete turn of the crank first a cartridge is pushed forward into the clips, and then the feed strip fed ahead one notch into position for the succeeding cartridge.
(d)
When filled remove the feed strip.
This machine is operated most efficiently by two men. One supplies the machine with feed strips, turns the crank, and removes filled feed strips; the other supplies the hopper with cartridges.
N.B.—The feed strips may also be readily filled by hand; care should be taken that the rims of all cartridges bear back against their stop lugs.
RE-SIZING THE FEED STRIPS.
When the feed strips have been used repeatedly, the middle clips sometimes lose their curvature to such an extent that the cartridges are not firmly held. This is quickly remedied by passing the strips through the re-sizing tool so as to restore the middle clips to their original form.
As a rule, very little re-sizing is necessary, slight contact between the re-sizing roller and the top of the middle clip sufficing.
85