Tips for easier sewing
Reading edition
Trace guide lines on fabric
CLOTH
TRACING PAPER
PATTERN
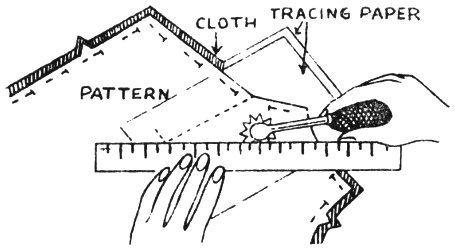
It takes very little time to trace the markings for darts, seams, and buttonholes from the pattern on the fabric if dressmakers’ carbon and a tracing wheel are used. Trace the markings while the pattern is still pinned to the fabric. Place the carbon waxed side to wrong side of fabric. Both sides may be marked at the same time. Use white or light-colored paper wherever possible. Dark colors have a tendency to work through to the right side. Trace all pattern markings that are essential to making the dress—darts, notches, pleats, openings, and buttonholes. Use a ruler to trace straight lines. Make a bar at ends of darts and tucks. Use tailor’s tacks for white or pastel fabrics.
Tailor’s tacks
Using tailor’s tacks
SEAM LINE
CLIP THROUGH LOOP
SHORTEN ENDS
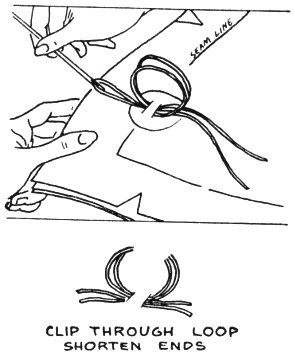
Use double thread of darning cotton to make tailor’s tacks.
Before taking your first stitch make a hole in the pattern with the point of your needle. Take one stitch through pattern and double thickness of fabric, then go over with another stitch, leaving loop and long end.
After all marked stitches have been made, remove pattern, separate fabric carefully, and clip threads between the two layers of fabric.
Stay-stitch the bias edges
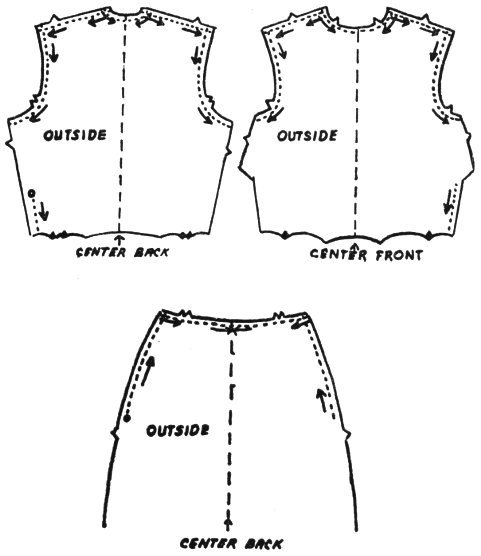
One of the most important steps you take to keep the cloth from stretching out of shape is to stay-stitch the edges. Stitch along the curved and bias edges. These edges would be the neck, shoulders, waist, armscye, and upper hip line. Stay-stitching is done on each piece separately, through a single thickness. Stitch ½ inch from the edge of the cloth, or ⅛ inch from seamline.
OUTSIDE
CENTER BACK
OUTSIDE
CENTER FRONT
OUTSIDE
CENTER BACK
Pin and sew darts
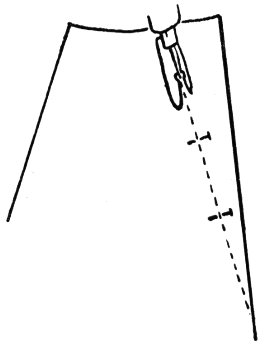
The purpose of the dart is to shape the fabric to the body. After the dart is properly marked, pin the two markings together and stitch from the large end of the dart to the point. Near the point, guide the fabric so that the stitches will be only a thread or two from the edge of the fold. Fasten the threads by back stitching or by tying the threads.
Sew from the highest to the lowest point or from the widest to the narrowest point, 14 as shown by arrows on the diagrams to prevent stretching during stitching.
Make strong seams
The life of your clothing is determined by the kind and quality of its seams. There are many types of seams and seam finishes. Each one has a special purpose.
Plain seam
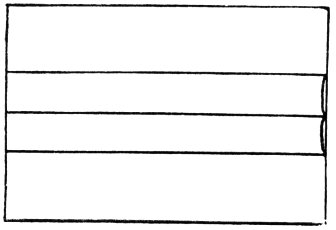
The plain seam is the most commonly used and is the first step in making other types of seams. The plain seam is made on the wrong side of the garment. To make a plain seam, place the right sides of the fabric together. Pin and sew a seam the desired width. This is usually ⅝ inch. Follow the instructions in your pattern. Use this seam on your blouse, skirt, and dress.
Seam finishes
Finishes are used on fabrics to prevent the edges from fraying. Use one of the following finishes:
Pinked edges
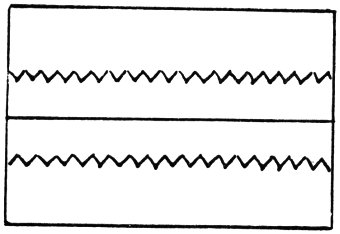
Use pinking shears, if you are able to handle them. Trim off only the very edge of your seam. Be very careful.
Edge stitching
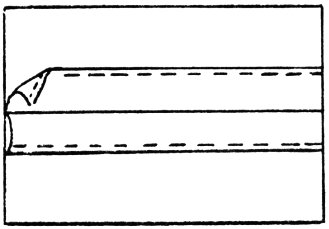
After the plain seam is pressed open, machine stitch along each edge of the seam. This is a stronger finish than the pinked edge.
Selvage
The selvage may be left as a seam finish on your skirt. Clip the selvage every 2 or 3 inches. The clip should be no deeper than ⅛ inch. A deeper cut will ruin the seam.
Your seams are not complete until you have pressed them. Remember, always press a seam before joining it to another seam.
Make a fitted facing
Edges that cannot be hemmed may be finished with either bias or fitted facings. Facings can be turned to the right or wrong side of an article. They may be part of the decoration if used on the right side.
Fitting and stitching
1. Stay-stitch neck and shoulders.
2. Insert a basting line to mark center front and back of the facing and blouse. Use darning cotton.
3. Sew shoulder seams of blouse and facing. Press.
15
4. Press a ¼ inch hem around the facing. Miter the corners and stitch.
5. Pin facing to blouse, matching shoulder seams and centers. Baste centers of front and of back together.
6. Machine stitch
a. Stitch around the neckline, ⅝ inch seam. b. Stitch center front. Start at point ¼ inch from center fold, stitch to point B. B. is almost on center fold. Turn, take 3 small stitches (14-16/inch), turn again, and stitch to point C, ¼ inch from center fold.
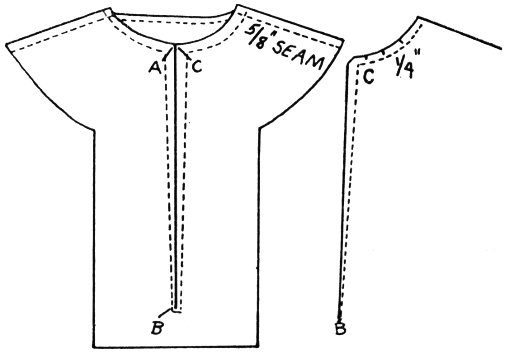
7. Cut along center fold to point B. Trim neck seam to ¼ inch and clip seam every ½ inch.
8. Trim off corners at neck openings.
9. Turn facing and press. After facing edge is finished, tack it to the shoulder seam of blouse.
Finishing edges
If the facing is to be used for decoration, the edge of the facing will be stitched to the blouse or dress.
Make good hems
Straight hems
You made straight hems on your scarf and on your apron last year. Here is a general review on how to make a hem. If you need more help, see your last year’s bulletin.
Narrow hems
Make a fold ¼ inch wide; press. Fold this over and press again. Pin and stitch.
Wide hems
Make ¼-inch fold along the edge. Then measure the width your hem is to be when finished. Pin, press, and stitch.
Hems for your skirt and dress
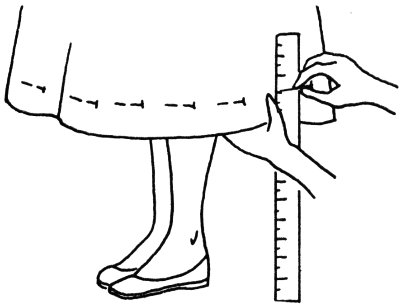
1. Use a yardstick or other device to measure the distance you want your skirt from the floor. Mark with pins, about 3 inches apart around the skirt.
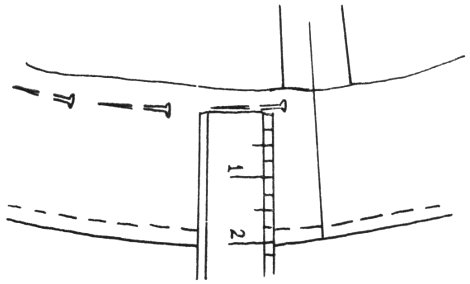
2. Fold along the pin-line. Pin and baste along edges of hem. Pin top of hem to skirt.
3. Try the dress on to check length and evenness of hem.
4. Trim hem to desired width. The width of the hem is determined by weight of fabric and fullness of skirt.
Suggested widths—
Moderately flared and medium weight 2 to 3 inches
Straight skirt of sheer fabric up to 4 inches
Heavy skirts of wool or cotton 2 inches or less
Flared skirts 1½ inches
Circle skirts ¼ inch or rolled
16
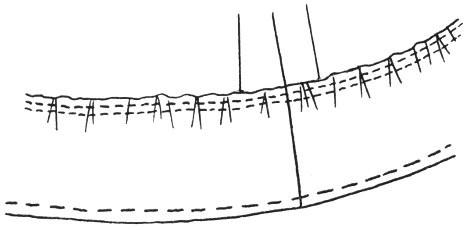
5. In circular skirts the top of the hem is always much fuller than the bottom of the hem. To avoid a bulge, draw this fullness to lie flat against the skirt. Lengthen the stitch on the machine and sew around top of the hem ¼ inch from the edge. Place another row of stitches ¼ inch from the first row. Pin the seams and centers of panels and draw the bobbin thread until the top part of hem is only slightly larger than the skirt. Ease in the fullness. This step is not necessary on straight skirts.
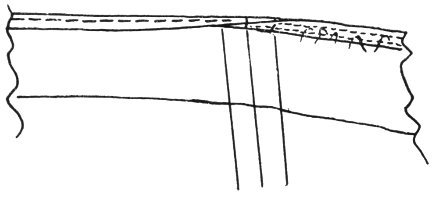
6. Make a ¼-inch fold at the top of the hem. Machine stitch along edge. Pin and baste in place. Hem on the machine or by hand. Use matching thread.
Blind hemming
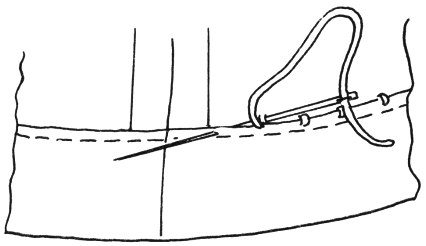
1. Fasten thread securely in the hem.
2. Take a stitch directly across from the spot where you first placed your thread. Then take a ½-inch stitch through the top of the hem.
3. Take a stitch in the skirt in the same spot where you pulled needle from the hem.
4. Repeat for each stitch.
This stitch hides the threads in hem and wears well.
Choose fastenings you can make yourself
What type of fasteners does your pattern suggest? You have skill enough now to make any one of several types. Remember, choose the kind of fasteners you can make yourself and do them the very best you can.
You have already learned the method of sewing on buttons, snaps, and hooks and eyes. If you use any of the fasteners, sew them on securely. See Phase 2. Make your buttonholes with a machine attachment.
A zipper may be necessary if you make a dress. Read the instructions that come with your zipper and study your pattern for help in putting it in your dress.
Belt keepers
You might like to put belt loops on your dress at the side seam if your dress has a belt. Worked loops are fun to make.
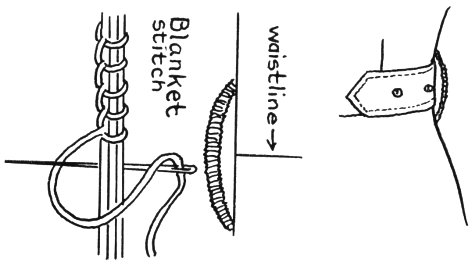
Blanket stitch
waistline
1. Use matching double thread.
2. Hold the belt in place on dress and loop thread back and forth across it three or four times. Take a knot stitch each time you sew into fabric.
3. Remove the belt.
4. Work across the threads with blanket stitch. Keep stitches close together.
Select a belt for your dress at your local store or have one made to match your dress. You will learn to make belts when you have had more experience in sewing.
17