Make clothes for school or play
Reading edition
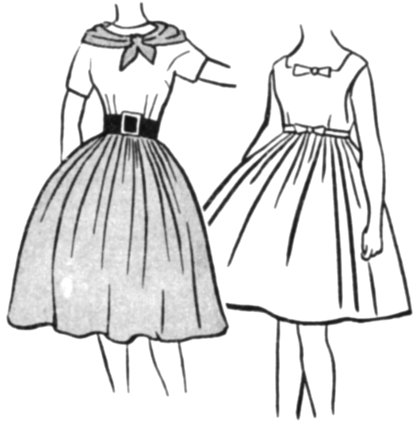
If you have completed and judged your small article, you are ready to start your main article. You may make a skirt and blouse, or a dress. You talked this over with your mother and leader at your first meeting. By now you should have your fabric and pattern and all the other things you will need to make your chosen article.
Easy-to-make blouse
If you make a blouse, select a pattern which will be easy to make. Choose a pattern with few pieces and without set-in sleeves or collar.
Follow the directions in your pattern for making your blouse. Learn what all the markings mean. Stay-stitch the bias edges. Page 13 tells you how to stay-stitch.
Select cloth for your blouse that will look good with your skirt. Be sure the cloth is firm, pre-shrunk, and colorfast.
Gathered skirt
Select fabric that is colorful and gay for your skirt. Closely woven cloth will be easy to sew and will hold a sharp crease.
You will need from 3 to 3½ yards of fabric for your skirt. The more fabric you try to gather in your skirt the harder it will be to make. For the girl of average height cut your skirt as follows:
How to cut your skirt
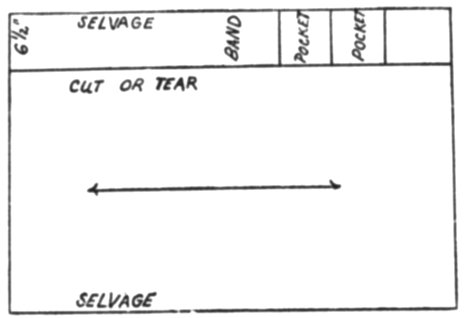
Cut or tear a 6½-inch strip from one side of your skirt fabric. Measure in from the selvage edge. Use this for the skirt band and pockets. There will be some left over.
Tear off the selvage edge from the large piece.
You may have to cut the band from the end of your fabric instead of the side if you are tall and need the extra length.
The above method of cutting gives you one seam on the placket side.
10
6½″
SELVAGE
BAND
CUT OR TEAR
SELVAGE
Sometimes the design in the fabric will be more attractive if the skirt is cut in several lengths. When this is necessary, you will have three or four seams in your skirt. This may make a difference in the amount of fabric you will need, so decide how you will cut your skirt before buying your fabric.
Make your skirt
5″ 1¼″ SEAM
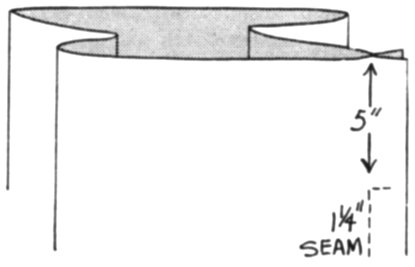
Pin the short edges together to make the side seam. Make the seam 1¼ inches wide. It is to be used for the placket. When finished the placket will be on the left side.
Stitch the side seam. Stitch the seam from the bottom up. At a point 5 inches from the top, turn and stitch half way across the seam. Turn both edges of the seam toward the front section and press.
5″ TRIM TO ⅝″
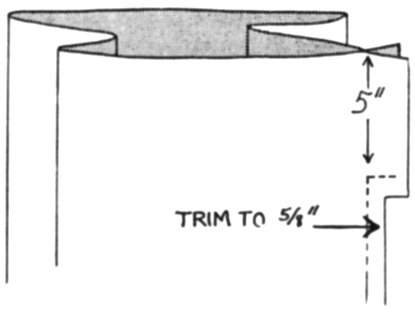
Trim the seams. Start at the bottom of the wide seam and trim it to ⅝ inch wide up to the placket. Do not trim above this point.
Finish the placket
1. Baste and stitch a ¼-inch hem on the back edge of the placket.
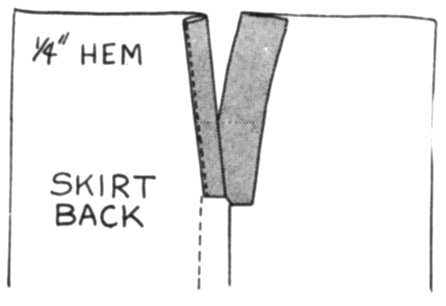
¼″ HEM SKIRT BACK
2. Fold the front edge of the placket even with the seam line. Press. Now fold again to make a complete hem. Baste.
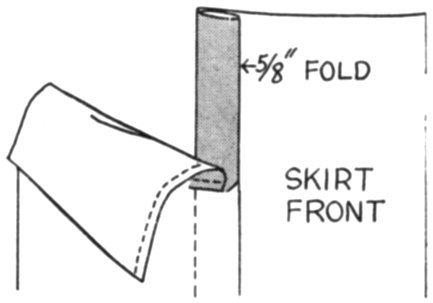
⅝″ FOLD SKIRT FRONT
3. Pin placket together, stitch from the top to the bottom of the placket, turn and stitch across the end on top of first stitching. Pull threads through and tie ends. This is a strong, easy-to-make placket.
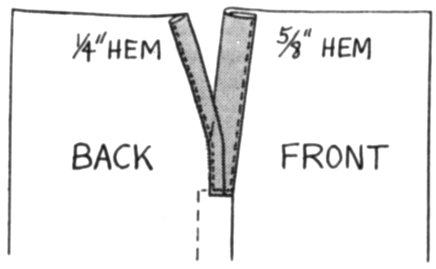
¼″ HEM BACK ⅝″ HEM FRONT
11
Hem the skirt
Skirts look best with hand-stitched hems. Make the hem before placing the band on the skirt. Unless you have poor posture, it will hang even. Decide how long you would like your finished skirt to be. Be careful not to make it too short. Measure from the top edge to the length you would like the skirt to be and press in the hem. Turn the top edge of the hem under ½ inch. Your skirt will be prettier if you make a wide hem—3 inches or wider.
When the hem has been carefully pressed and put in place, ask your leader to show you a hand hemming stitch.
Place gathering threads at top of skirt
Make a long stitch on your machine. Use size 50 top thread and heavy duty for bobbin thread.
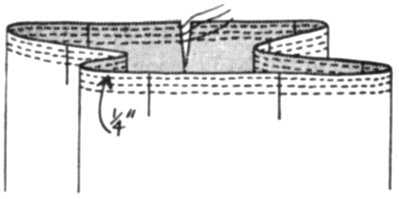
Using the guide on your machine, stitch around the top of your skirt ¼ inch from the edge. Make two more rows ¼ inch apart. You are now ready to make your skirt band.
Make the skirt band
1. Measure your waist. Add 2½ inches. This will give you the length needed for your skirt band. Cut your band 6½ inches wide.
2. Press a ½-inch fold along one side of your band. From the folded edge divide the rest into three sections. This gives three 2-inch sections. Make the section with the ½-inch fold slightly shorter than the other two sections. Press.
3. The section with the ½-inch fold is the front of your band. Stitch criss-cross through the back part of the band. You can stitch straighter if you make a guide or pattern. Cut a strip of waxed paper the length and width of your band, 24 x 2 inches.
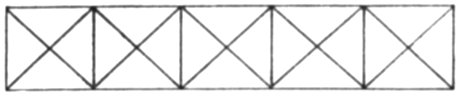
Fold it in six equal sections. Then fold it diagonally; then diagonally again. Open the paper and pin it to the band and follow the creases in the paper. This will give practice on starting and stopping the machine and on turning corners. Tear the paper away after the stitching is completed.
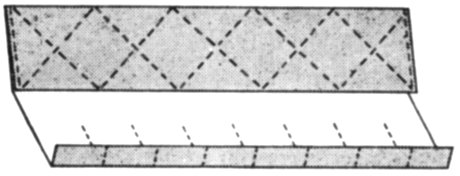
4. Stitch a ½-inch seam at the ends of the band. Turn and press. Do not sew the ½-inch fold at bottom of band into the seam.
Gather in fullness
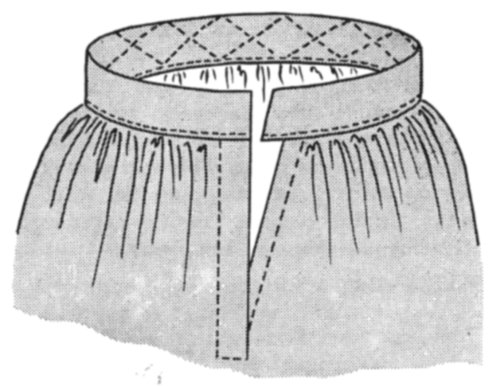
Divide both your skirt and the skirt band into eight equal parts to help you make the gathers even in your skirt. Do not include the placket or 1-inch overlap at the end of the band. Mark with colored threads. Mark the skirt band so the extension or extra length will be on the back of the placket. The front of band will be even with the front edge of the placket.
Pin and stitch band to skirt.
Pin the pieces together, right side of skirt to right side of band. Match dividing marks that you have made. Gently pull on the gathering threads at the side seams, the center front and the center back. Pull the threads until they are the same length as the band. Work with the gathers until they are even. Baste and stitch along half-inch fold on the skirt band.
Top stitch the band
Fold the double section of your band toward the back and baste the edge of the band to the skirt. Baste it so the folded edge hangs just below the stitching you just made on the front side of the band. Machine stitch from the front side of the band. Place the stitching as near the edge of the band as you 12 can. Press before you stitch. Pressing will flatten the seam and make stitching easier.
Press your skirt
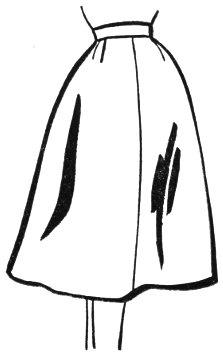
Press your skirt. Use a dampened cheesecloth and an iron set for ironing cotton, or use a steam iron. A skirt must be well pressed and fresh looking to be pretty.
Fastenings for the skirt
See Phase 2.
Gored skirt
You may make a four-gored skirt. If you do, you will need a pattern. Follow the instructions on the guide sheet.
School dress
This is your first dress. Avoid set-in sleeves, collars, yokes, and gussets. Use cotton fabrics. Study the instruction sheet in your pattern and follow it as closely as you can. Know what every mark on the pattern means before you start to sew. This will make it easier for you.
Pin your cloth so it is straight. Place the pattern on the “straight of the grain” and cut with long, even strokes. Cut all the notches pointing out.
After the cloth is cut, transfer the marks onto the fabric before removing the pattern. Use a tracing wheel whenever possible. Use tailor’s tacks on white or pastel colors.
Stay-stitch around all the bias and curved edges as soon as you remove the pattern.
Remember to press as you sew. Press each seam as it is made. Pressing makes sewing easier and improves the looks of your dress.
Hem your dress on the sewing machine if it has a full gathered skirt or by hand on flared or straight skirts or on plain colored fabric. Use a matching thread.