Practice on an easy-to-make article
Reading edition
Draw-string bag
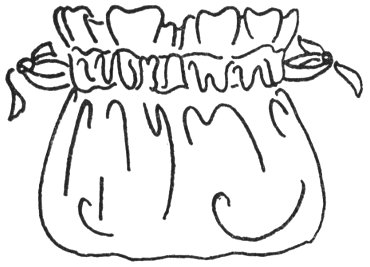
You may make a draw-string bag to review what you learned last year. This may be any size. It can be used for your sewing, swimming suit, as a hand bag, or for many other purposes.
Materials needed
Fabric: Percale, sail cloth, denim, terry cloth, or towel. If you use a towel, select one approximately 14 x 23 or 18 x 28.
Lining: Plastic bag.
Cording: Cotton or nylon cording.
Make your bag
First decide how long and how wide you would like to have your bag. Make it just large enough for the purpose you plan to use it for. Don’t make it too large.
Follow these suggestions
1. Pull threads to straighten material and cut on these lines.
2. Cut two pieces of cloth for the bag, the size you want your bag to be. If you have enough cloth, you may cut one piece twice as long and eliminate the bottom seam. When a towel is used, remove the hems at both ends.
3. Place the two pieces with right sides together or fold through the center if one piece is used.
4. Pin or baste sides leaving the top open.
5. Measure from the top or open end of the bag ½-inch and mark with chalk.
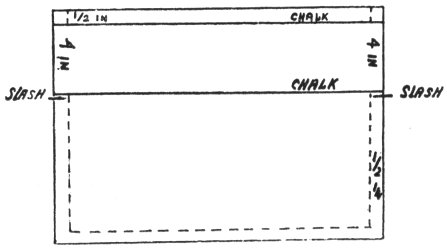
6. Take another measurement from the top, this one 4 inches down and mark.
7. Stitch a ½-inch seam from top to first mark, and fasten or back tack thread. Stitch below second markings. Leave the space between markings open on both sides of bag.
8. Make a ¼-inch slash in the seam at lower markings and finish openings with ½-inch hems.
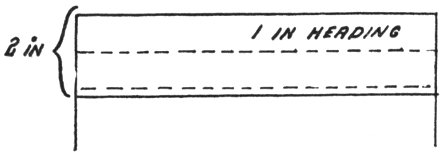
9. Make a 2-inch hem at top. Stitch through the center of the hem to make a 1-inch wide casing and heading. If you are making a swimming bag, why not line it with plastic. Either use a sheet or plastic bag. Make it the same size as your bag.
At this point place the plastic under the hem. Pin or baste into position. Turn right side out. Stitch hem. Use long stitches 6 or 8 to an inch when sewing plastic. Small stitches will cut it.
10. Make or buy the cords for your bag. Make two cords ¾ inch wide finished, 1 yard each in length. (See apron sashes—Phase 2.) You may buy cotton or nylon cord. For a small bag use size 100; use size 150 for a large bag.
11. Run cords through casing. Start each cord at opposite ends. Sew ends of cord together or tie a knot.
8
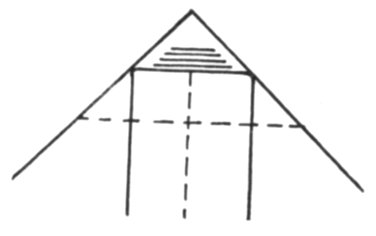
12. Box the bottom of the bag. Fold from corner so that side and bottom seams are together. Mark and stitch across triangle.
Swimming robe
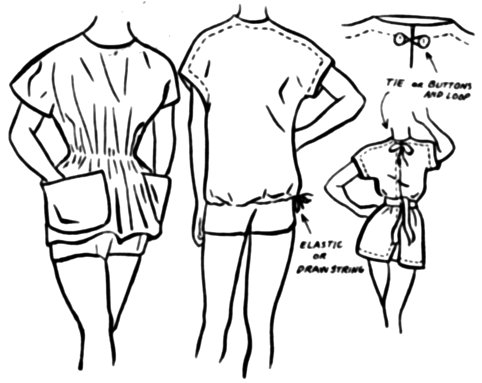
TIE or BUTTONS AND LOOP
ELASTIC or DRAW STRING
Swimming is now a popular sport in Oregon so you may want to make a swimming robe.
You may make one like the one pictured or select an easy-to-make pattern from your favorite pattern book. Or, adapt an overblouse pattern. Just cut it long enough to cover your swim suit.
Here is an easy one to make. It is mostly hems.
Fabric: Approximately 1⅔ yards of terry cloth, sail cloth, percale, denim, or other absorbent cotton.
How to cut
1. Fold fabric in half lengthwise.
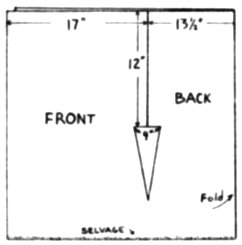
2. Measure in from cut end 17 inches and mark.
FRONT
BACK
Fold
SELVAGE
3. Measure down from top 12 inches to mark arm hole. Then measure across end 2 inches on each side of mark. Cut along these marks. This marks the top of the side dart.
4. Mark dart. Measure 4 inches from bottom and mark. Then mark from this point to top ends of dart. (See diagram.) Make final marks for darts with tailor’s tacks or dressmakers’ tracing paper.
How to Make
1. Fold robe through dart and armhole. Pin and stitch shoulder seams. Make shoulder 10½ inches long. Measure from arm hole. Make a 2-inch seam.
2. Pin underarm dart—2 inches wide at underarm and slope to a point 4 inches from bottom. Stitch. (See darts page 13.)
3. Press a 1½-inch hem all around robe including shoulder seams and armholes (see phase 1). To make hem turn edge back 2 inches and press, then press ½ inch under to make 1½ inch hem.
Press, pin, and stitch hems in this order: First—front; second—neck; third—armscye; fourth—bottom.
Stitching the hems in this order will leave the ends of the hem open so a draw-string can be placed in the top and bottom hem. If a draw-string is not used, the front hem may be made last.
4. Reinforce underarm with bias or hem tape.
Machine stitch around edge.
9
Fastenings
1. Draw-strings or ties
2. Belt
3. Velcro
4. Large buttons and loop buttonholes
5. Large snaps
6. Buttons and buttonholes
Apron or scarf
If you did not make an apron or scarf in your second year of club work, you may choose to make one of these now. Turn back to your second-year outline for these instructions.