THE CARE OF A WHEEL.
Reading edition
BY DUDLEY D. F. PARKER.
It is astonishing, considering the number of riders of the wheel at present, the comparatively small percentage that know really anything about their "mounts." A visit to any bicycle repair-shop will conclusively dispel all doubts as to the truth of this assertion. Here you will find long lines of wheels awaiting repairs, some of the damages, of course, being serious, but the majority are unruly valves, punctures, and bearings out of adjustment. It is particularly noticeable the number of wheels in which a slight knowledge of their construction would have enabled the repairs to be made at home.
How frequently one sees a rider, wrench in hand, dubiously surveying his wheel at arm's-length, now tightening a nut here or loosening one there, in a vain endeavor to fix in this manner something that is out of order and prevents his wheel from running properly! But beyond the fact that something is wrong, he has not the slightest idea of the nature of the trouble.
Or again, another enthusiast is deluging every visible chink in his bicycle with oil, in the hopes of finding some mysterious squeak, the location of which would be an easy matter if the position of the different bearings were understood. It is conceded without exception by all wheelmen that a fair knowledge of the construction of a wheel is essential to its proper care.
SECTION OF BALL-BEARING.
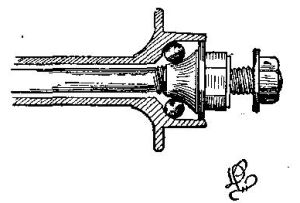
Perhaps the most important thing to be considered is the care of the bearings. In the advanced stage which bicycle construction has reached to-day there are a large number of ball-bearings in a machine—in fact, there are balls wherever there is friction, however light. These bearings should have careful adjustment. Perhaps a glance at the sketch of a wheel bearing will make the construction clearer. Of course the bearings of different makes of wheels vary, but the principle is the same in all. The little steel balls are the only medium by which the weight on the bearing is transmitted between the rim and the cone (hub and axle). To have the bearing work properly and with least possible friction, the cone must not be screwed in so tightly as to jam the balls in the rim, or the wheel will run hard; at the same time it must not be unscrewed so as to allow too much play of the balls, or the wheel will "wobble." Most bearings have a flattening on the projection of the cone, between the hub of the wheel and the fork, that can be caught by a wrench, enabling the cones to be tightened or loosened by screwing this one only. Some have a thumb-screw in place of the device mentioned, and other makes adjust the cones by screwing the axle.
In the adjustment of a wheel's bearings, whether front or rear, a good test to use against too tight a cone is to raise the wheel clear of the ground, and, turning it so that the valve of the tire is on top or nearly so, see if the weight of the valve will cause the wheel to rotate so that the valve will describe an arc, like a pendulum, each swing gradually diminishing in length. If the cone is properly adjusted, the valve should swing back and forth for some time. Of course the rear wheel will not swing as long as the front, the valve having to impart motion to the sprocket and pedals. If the cones are too loose, by gripping the wheel by the rim you will be able to slide it back and forth on the axle. The most important bearings in the whole wheel are those of the crank-axle. Here the whole strain of the propelling power comes. The adjustment of these cones is on the same principle as those of the wheels; the same test may be used as for the rear wheel. The two bearings in the steering-head may be adjusted by screwing the cone of the top one, and, of course, the wheel may be made hard steering or easy, to suit the taste of the rider. This is not a matter of material importance. The adjustment of the pedal bearings is not of so great importance, but it should be seen that they run evenly and quietly, as it is at this point that the propelling force is applied. This is usually accomplished by tightening or loosening the outside cone, which may be gotten at by removing the dust-cap.
Perhaps it would be as well to speak here about the quite frequent mishaps of a broken ball in the bearings. As soon as one is found broken, waste no time in removing it; a ball less will do no harm; but if the wheel is ridden with a broken one, it will soon cut the cone and rim all to pieces.
A word about oiling. Do not go to the excess of either too little or too much oil. In the first case the cones and rim will wear more quickly and the bearings run hard; and in the latter, the oil will gum, causing hard running, or, if it does not do this, it will ooze out of the joint, and, collecting the dust, will become gritty and mar it. The amount and frequency of the oiling, of course, depend on the use of the bicycle. For a wheel moderately used, a fair oiling once a week I should deem amply sufficient. Most of the bearings have openings in which to apply the oil, and the oil should not be applied at any other place than this. In the case of the head-bearings, unscrewing the cone of the upper one will expose it, and will permit the head to be raised so as to expose the one on the crown for oiling. The pedals may be lubricated by removing the dust-cap and applying the oil on the outside bearing, tilting the machine so as it will run down to the inside one.
PARTS OF THE WHEEL. A. Crank-axle. B. Front Sprocket. C. Crank. D. Barrel. E. Pedal. F. Head. G. Upper Cone. H. Lower Cone. I. Handle-bars. J. Grips or Handles. K. Front Hub and Axle. L. Handle-bar Clamp. M. Saddle. N. Saddle-post. O. Saddle-post Clamp. P. Rear Sprocket. Q. Rear Hub and Axle. R. Chain. S. Rear Fork. T. Tire. U. Rim. V. Valve. W. Front Forks. X. Crown.
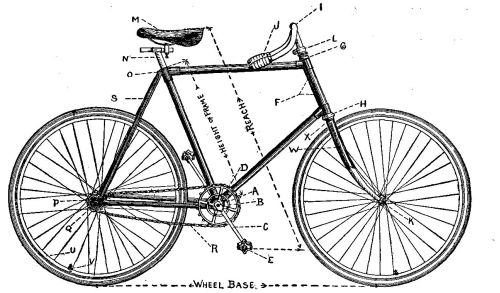
To have the bearings in "tip-top" condition, they should be cleaned every month or six weeks. In cleaning them the cone should be taken out, carefully wiped, the balls put in kerosene oil to remove all possible grit, and the rim wiped clean of all remains of previous oilings. The easiest ones to get at are those of the front wheel and pedals. In the former case, all that is necessary is to undo the nuts and spring the wheel out of the fork, unscrewing the movable cone, and taking out the axle. In the pedals, remove the dust-caps and the outside cone, and slip the pedal off. The rear wheel is a little more troublesome, the chain having to be removed from the rear sprocket before the wheel can be taken out. To remove the chain, unscrew the small screw-bolt that holds two of the links together. The bearings in the head will also be a little troublesome, having to remove the handle-bars and top cone, and take out the front fork. The only remaining bearings to be spoken of—those of the crank-axle—are in some respects the most important to have clean, and at the same time the most difficult to get at, as it is necessary to take off the cranks before the axle can be removed or the bearings exposed. After the cranks are removed, the rest is usually an easy matter.
METHODS OF FASTENING CRANKS TO CRANK-AXLES.
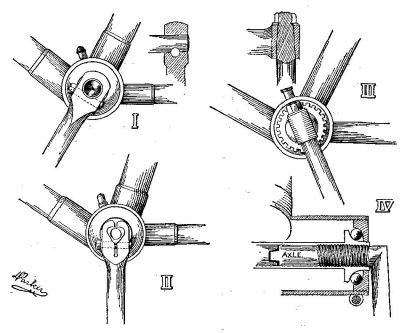
To give any general rule for the cranks removal is impossible, as there are so many manners in use for attaching them to the axle; but, however, the way to remove the several prominent patterns might be useful. We will select four of the general methods, and these will suffice to cover most of the ground. These may be best understood from a study of the accompanying sketches. First, the most common way of putting the cranks on, with a key or pin (No. I). To remove these, unscrew the nut on the pin and drive it out. This might be done at home, but as a rule the pins are put in or become wedged in so tightly that it is frequently advisable to have them driven out at a shop. In the absence of proper punches, there is a great chance of badly mutilating the pin in removal. The second general class is the clamp attachment. There are several patterns in use, but the one described below is most commonly seen (No. II). To free it from the axle the bolt is removed, and it is frequently necessary to insert a wedge to spring the clamps free from it. In the third class the crank fits in a continuation of the axle, usually projecting a little, so as to permit locking with a nut (No. III). Sometimes it passes a little to one side of the centre, and, again, exactly through it. The fourth and last general class is where the axle and cranks are made in two forgings, as shown by No. IV (sketch represents a cross-section of barrel), the part shown being half, and the two sections fitting together by teeth. These cranks are removed by unscrewing in the opposite direction to which they revolve in the propulsion of the machine.
DEVICES FOR TIGHTENING CHAIN BY MOVING REAR AXLE.
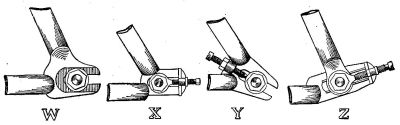
The next part of the wheel we will turn our attention to is the chain—the medium through which the motion is imparted from the driving-gear to the rear sprocket. Frequently after a long ride on rough roads, or perhaps a few days of usage, the chain will be found to have slackened up considerably. There are many devices in use for taking up this slack—all of them, however, working on the principle of moving the rear axle back and forth, and being more or less improvements of a few general patterns. In device "x" in the sketch, after loosening the nut, the axle is moved backward or forward by turning the screw in the proper direction. If it is desired to move the axle back in "y" the screw is tightened, or if it is desirable to move it forward (nearer the cranks), the screw is unscrewed, and the axle pushed forward by gentle taps with a wrench. In "z" the whole bar swings with the axle. This adjustment is tightened or loosened in the same manner as the preceding one, with the exception that the nut on the bolt holding the upper end of the bars has to be loosened a trifle. In "w" the axle is adjusted without the aid of a screw. When in the right place, it is held by the tightening of the nuts, teeth in the washer engaging others around the edge of the slot.
No part of the machine collects the dirt more quickly than the chain, it being found liberally sprinkled with grit after every ride. As long as it runs smoothly and quietly it does no harm, though when it gets rather thick it would be best to wipe it lightly with a rag or a stiff brush. When a chain is dry or very dirty it shows a tendency to kink, at the same time producing a rattling noise, joined with sharp snappings. When in this condition, it should have a thorough cleaning. First wipe with a rag, and then remove the chain from the sprockets; put it in kerosene oil to soak, wiping dry with a rag. The only troublesome part of the cleaning operation will be to replace the chain. This is effected by passing one of the ends of it over the rear sprocket, joining them with the screw-bolt, then, catching some of the links on the top teeth of the front sprocket, revolve it, and this will spring the chain on.
The mentioning of a "dry" chain brings up the subject of chain lubricants. There are a great many on the market, and as to their relative values riders differ in opinion. Two facts are clear, however. If a lubricant is too liquid it collects grit very quickly; on the other hand, if too dry, it does not work in the joints of the chain properly. Oil is obviously, from the above, very bad, and should only be used on the road when a chain unexpectedly runs dry or hard. The prominent constituent of most lubricants is graphite, the different makes varying usually in the amount of oil or other dissolving agent contained. Some wheelmen recommend powdered graphite alone, but my experience has found a mixture of graphite and oil having about the constituency of vaseline to be very satisfactory. Whatever the lubricant, they should all be applied in the same manner. Rest the step of the bicycle on a box or anything, so that the rear wheel may revolve freely, and apply lubricant rather sparingly; too much will only serve to collect dirt. Spin the wheel rapidly for a minute so as to permit it to work into the joints, and then, slowly revolving, wipe the waste off the top of the chain.
We have now reached in our discussion of the bicycle a part just as essential to the running ability as anything previously mentioned—the tires. On account of the wear and tear upon the tires, from one cause or another, they require much care. It is the tires that take up the jolts from the inequalities of the road, and upon their proper degree of inflation depends the easy running of the wheel. Quite a study may be made of this, the pressure varying for the different uses the wheel is to be put to. Without exception the rear tire should be harder than the front; if the latter is more tightly inflated than need be, it creates unnecessary jarring, which manifests itself in a numbing of the wrists. For riding over city pavements the softer the tires, without endangering the rims, the less jolting; but on good roads hard tires are best, as there is less friction, due to a smaller surface presented to the ground. From the inflation we will turn to the valve, the most important part of the tire. This is frequently a source of much annoyance from leakage. Whenever in doubt as to the valve's effectiveness, immerse it in water, and the air-bubbles will soon show the size and location of a leak, if there is one.
TIRE VALVE.
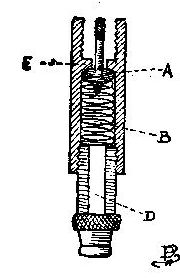
In all experiences with pneumatic tires you will find water the greatest enemy of leaks, and in all cases where one is of sufficient size to be an annoyance, water will surely locate it. The weak point in most valves seems to lie in the plunger that closes the opening through which the air is admitted. Most valves work on the principle explained in the sketch. When the air is forced in, the plunger A is pushed down, admitting the air into D, and so into the tire; and when the downward stroke of the pump ceases, the spring B, assisted by the pressure of the air in the tire, is supposed to push A tightly up against the partition E, and so close the opening. Right here the trouble occurs. For various reasons the spring sometimes does not push the plunger up, and if the pressure is not sufficient to do it, when the pump is removed the air forced in with so much labor blows out in a few seconds. In this case, first drop a little benzine in, as perhaps the valve may be dirty or stuck in some manner, and if this has not the desired effect, it will be necessary to remove the valve. The most common cause of the above annoyance is the spring becoming too much compressed, this being remedied by removing and stretching a little. Frequently the plunger becomes jammed against E, and in pushing it in it disappears entirely within the body of the valve. Here also it is often necessary to take the valve apart.
Puncture.—That is a word that makes every wheelman wince. A little hole in the tire makes the bicycle, that a few seconds ago was a means of travelling, a useless encumbrance. But in this case it does not always follow that it is an encumbrance, for if a pocket repair kit is carried, or the rider can make the best use of things at his disposal, some kind of stoppage of the escape of wind can frequently be accomplished. The single tube, or "hose-pipe," is the easiest to patch up on the road. The leakage can usually be stopped by cementing a piece of rubber over the puncture and binding it on securely with tire tape. Perhaps if the rider is skilled he may effect a permanent repair by plugging it. Now a hint to the rider who goes on the road with only a wrench in his pocket; and if he is given to the chewing-gum habit, it may be of use. A very novel and effective repair for a single-tube tire may be made by a little chewing-gum and some bandages. After locating the opening, apply some freshly chewed gum and work it in, leaving a fair-sized piece on the tire, and binding it with a handkerchief if nothing better offers.
Sometimes a difficult part of a puncture on the road is its location. After examining the tire and noting the likely places, apply saliva at these spots, and when the right one is found, bubbles will be noticed.
The permanent repair of a double-tube tire is to patch the inner one. Let the air out, and if the tire is "cemented" pull it off, and, if the "clincher," spring off, being careful in pushing the valve through the hole in the rim. If it is the "clincher" pattern the inner tube may be readily removed, but if a "cemented" tire, it is a trifle more difficult. In the latter there is a slit about eight inches long in the outer tube, where the valve comes through, which is held together with lacing. Cut this lacing, and the two ends of the inner tube will be seen to come together here. Fasten a string to one end, and catching hold of the other end, pull the tube out, being careful to leave the string in the casing. When removed inflate tightly, and grasping firmly a section between your hands about a foot long, immerse in water and stretch to the utmost; and if the puncture is in this section this will sufficiently enlarge it to permit the free escape of bubbles. Continue this way throughout the whole tube, and when the puncture is located, bite a little piece of the rubber out from around it so that it may be more readily found; let the air out, and cut a piece of rubber to fit over the hole, covering the edges of the puncture and this piece with a rubber cement made for this purpose; and when a trifle dry, place the patch on and put a weight on top. Inflate and test in water for leaks, and if all is right let the air out and fasten one end to the string, which was carried into the outer tube on the removal of the inner one, and by this haul it in place again, lacing up the slot with string. Inflate again, and, after covering the rim of the wheel with cement, place it on and let it dry, revolving the wheel with the rim and tire in water so as to make the cement set.
The method of making permanent repairs in a hose-pipe or single-tube tire is simple—namely, by plugging. A rubber plug with a head like a rivet is covered with cement and inserted in the puncture, head within the tire, and when it sets, the projecting part on the exterior is trimmed off evenly.