Chapter III · EQUITATION AND DRIVING.
Reading edition
25. Standard required of men and horses.
1. The efficiency of horse and field artillery depends so largely on the riding of the men and on the training and condition of the horses that the maintenance of a high standard of equitation must be the aim of the commander of every unit.
2. Horsemanship and horsemastership are as essential to success as good eyesight or a knowledge of gunnery. The development of a horse’s powers by means of a progressive course of physical training and by the adoption of uniform methods of control is as important as the training of a man to ride.
3. Horsemastership is a necessary qualification for all artillery commanders, and horse-training should also be studied to ensure a high standard of equitation in a unit. Every section commander should be capable of instructing his men in horsemastership. In addition to being good military horsemen and instructors in riding, all officers must be able to train and direct the training of remounts.
4. The qualifications of a good horseman from an artilleryman’s point of view, are as follows:—
i. He should have a strong seat, quite independent of the reins;
in this way alone can he have good hands.
ii. He must understand and be able to apply correctly the “aids”
by which the horse is controlled.
iii. He must be a good groom, have a practical knowledge of the care
of horses both in barracks and in the field, and must understand
how to detect and treat the minor ailments to which horses are
liable.
iv. He should be able to cover long distances on horseback
with the least possible fatigue to his horse.
If a driver, he should be able to drive a pair of horses in any position in a gun team and make them do even work, without distressing them. He should also be able to get a fallen horse out of harness or out of a ditch.
No mounted man who does not attain this standard can be considered a really efficient horseman.
In every unit a limited number of men should be able to train an unbroken horse, and improve a badly-trained one.
5. The requisites of a useful artillery horse are as follows:—
i. He must be a quiet ride, and capable of conveying a heavy weight
over long distances, without undue fatigue.
ii. Handy and quick in obeying the correct “aids.”
iii. Steady both in and out of the ranks or team and capable of being
ridden with one hand at any pace either in the company of other horses
or alone.
iv. Be a good jumper and ready to face water and swim.
26. Horsemastership.
1. General instructions.—The importance of being a good horsemaster should be impressed upon the mind of every recruit from the moment of his joining. He should understand that the efficiency of any body of mounted troops on service depends first and foremost on the condition of each horse, and that one tired horse in a gun team puts more work on the other five, and may necessitate extra weight being put on some other vehicle.
This important part of the soldier’s education demands individual attention on the part of every battery officer and non-commissioned officer, and it is their duty to see that the principles of horsemastership are so thoroughly explained to each man that the care of his horse becomes a second nature.
The recruit should receive careful instruction in the prevention and cure of the minor ailments of a horse, in his feeding and watering, and in his treatment on the march, in the field and in quarters. (See also Animal Management.)
2. Watering.—Men should be impressed with the importance of watering their horses when opportunity offers, particularly on hot days. Many a horse has died on service through his rider not taking what proved to be the only chance of giving him water during a long day. Horses which are accustomed to be watered in buckets drink slowly at a shallow stream, and consequently they should be given plenty of time. They never suffer ill-effects from being watered when heated, unless they are put to very severe exercise soon after it or are left to stand and get chilled.
All horses will benefit if water is available in their stalls.
3. Feeding.—Every opportunity should be taken when on service, or on a long march or field day to allow the horses to water and feed. Even a few mouthfuls of grass during a five minutes’ halt are worth consideration.
4. Weight off the back.—Even the lightest driver is a heavy burden (generally more than 11 stone including the saddle), and every minute that weight is removed from the horse’s back is a refreshing period of relief.
Instructors should impress this on recruits by frequently making them dismount for a few minutes at a time, so that it may become second nature with them to dismount and walk a good deal, especially down hill, if they should be called upon to work alone at any time. It should hardly ever be necessary for a man to remain on his horse at the halt, except in the case of teams that may come under fire.
5. Off saddling.—The two most frequent causes of sore backs are:—i. continued friction on one spot; ii. the stoppage of the circulation by continued pressure. Either of these is liable to occur if the saddle is left on for hours without being shifted or the girths slackened.
The “off saddle” can be effected very rapidly by all outriders and by horse artillery gunners if it be regularly practised. It is advisable in warm weather to do so once a day on the drill ground, or in the open county, whenever the horses are absent from their stables for any length of time. When the saddles are removed, the backs should be immediately hand-rubbed, slapped, or massaged by means of the flat of the hand for a few minutes, with steady pressure against the direction of the hair, in order to restore circulation. In cold weather, the girths should only be slackened, and the saddle shifted, as its removal may result in a chill.
The horses of gun teams cannot readily be off saddled, but any opportunity for loosening their girths and shifting the saddles should be taken. Such action relieves the horses in the same way that the removal of a tight boot does a man.
6. Shoeing.—From the first men should be taught to pay attention to their horses’ shoes, both in stables and in the field. The least sign of a shoe loose or clinches broken or knocked up should be reported and put right without delay.
A shoe lost in the field is a reflection on the man in charge of the horse as well as on the section commander, No. 1 and farrier.
7. Rolling in the sand.—Nothing rests a horse and freshens him up more than a good roll in the sand, and, when it can be arranged, a sand bath in barracks is most useful for teaching horses to roll in when sweating. The bath should be about 20 feet square, with sand 1 foot deep. A handful of sand poured over the back often induces a horse to lie down and roll. After rolling, any sand remaining on the horse’s back must be removed before he is again saddled.
27. Paces of the horse.
1. The following are the regulation paces for drill and manœuvre:—
i. Walk 4 miles an hour, at which rate 117 yards are passed
over in 1 minute, or ¼ mile in 3 minutes 45 seconds.
ii. Trot 8 miles an hour, at which rate 235 yards are passed
over in 1 minute, or ¼ mile in 1 minute 52 seconds.
iii. Gallop is 12 miles an hour, at which rate 352 yards are
passed over in 1 minute.
2. The canter, about 9 miles an hour, and the jog or slow trot, 6 miles an hour, should be constantly employed, both in teaching recruits to ride and in training young horses. Except in the case of artillery moving with infantry horses should always be made to walk up to the regulation pace of 4 miles per hour.
3. In marching, especially along a road, and when men are riding singly or in small groups not at drill a much slower trot should be used than the regulation drill or manœuvre trot of 8 miles per hour.
28. Terms used in equitation.
1. “Right rein” and “Left rein.”—A horse is said to be on the “right rein” when he is going round the school to the right, or on a circle to the right. The term “left rein” is used when he is proceeding to the left in a similar manner.
To avoid confusing the pupils the instructor as far as possible should use the terms “Right” or “Left” instead of “Outward” or “Inward” when giving explanations.
2. “The true canter” is a pace of three time. The legs of the horse should move in such a manner that whichever fore leg leads, the hind leg on the same side also leads. (See Sec. 43 (8)).
3. “The true gallop” is a pace of four time, in which the feet follow one another in succession, with an interval of suspension between the coming down of the leading fore foot and that of the opposite hind foot. As when cantering whichever fore leg leads, the hind leg on the same side must also lead.
4. “Cantering disunited” or “galloping disunited.”—When a horse is cantering or galloping in such a way that the leading hind leg is on the opposite side to the leading fore leg, e.g., when he leads with the off fore and near hind leg, he is said to be “disunited.” It is a common fault with bad riders in changing the bend of their horses to allow them to change their fore legs but not their hind legs. This results in the horse going “disunited,” a faulty action which should not be allowed.
5. “Cantering false” or “galloping false.”—A horse is said to be cantering false or galloping false, when at either of these paces, he goes on a circle to the left with the off fore and off hind leading, or to the right with the near fore and near hind leading.
6. Balance.—A riding horse on the move is said to be balanced when he carries his head and neck in the right position for balancing his weight and that of his rider.
7. Collected.—A horse is said to be collected when he is made to bring his limbs properly under him so that he has the maximum control over them. The collected paces are the school, or regulation, walk or trot, and the canter. The extended paces are the walk out, the trot out, and the gallop.
Fitting Saddlery.
(See also Animal Management.)
29. How to fit a saddle.
1. There are four axioms in saddle-fitting:—
i. The withers must not be pinched or pressed upon.
ii. The spine must have no pressure on it.
iii. The shoulder-blade bones must have free and
uncontrolled movement.
iv. The weight must not be put on the loins, but upon
the ribs through the medium of the muscles
covering them.
2. In fitting a saddle the bare tree should first be placed on the back, the front arch resting in the hollow behind the shoulder.
The arch and seat should be clear of the spine. This is not always possible with horses possessing high withers, but it is desirable in order to ascertain the fit of the side bars.
The front arch must be wide enough to admit the hand on either side of the withers, and its points must clear the ribs.
The side bars must not be too long and must bear evenly on the back, or as nearly so as possible. Care must be taken that their edges do not press the withers or ribs.
3. The numnah pannels should then be fitted on and the tree replaced on the back, but without a blanket.
The proper thickness of the blanket having been estimated, it is folded and placed on the horse’s back with the tree on it. The blanket must be pressed up well into the front arch, and before girthing up it should be noticed whether the burrs are off the shoulders and the fans off the loins; if they are not, the thickness of the blanket beneath the side bars must be increased by turning it up on either side.
4. The girths should now be pulled up and a man placed in the saddle. The first thing to ascertain is whether there is freedom from wither pressure. The hand must readily find admission beneath the blanket and over the top and along both sides of the withers. To make the test effective, the man should lean forward, and the examiner must not be satisfied with anything less than the introduction of his entire hand.
The next thing is to ascertain whether there is freedom for shoulder-blade bone pressure. This is done by passing the hand beneath the blanket to the play of the shoulder. It should be possible to advance the horse’s foreleg to its full extent without the examiner’s fingers being pinched between the blade-bone and side-bar, even if the man is leaning forward in the saddle. If the fingers are pinched the blade-bone will also be pinched, and the saddle must be raised by fitting thicker numnah pannels on the side bar or by an extra fold of blanket.
5. To ascertain whether the pressure of the side-bars is evenly distributed, the saddle, having been ridden in for about half an hour, is carefully ungirthed, and the tree lifted from the blanket without disturbing it. The blanket will be found to bear the imprint of the side-bars, and a glance will show whether they are pressing evenly from top to bottom and from front to rear.
The examination must be made without delay, as the elasticity of the blanket soon causes it to lose the impression of the side-bars.
If there is a deeper impression on one part of the blanket than elsewhere, the pressure is not evenly distributed, and a sore back is liable to result.
Irregularity in the fit of the side-bars may be remedied by the introduction of pieces of numnah to fill up the space between the side-bars and the blanket.
In peace these strips of felt can be fixed in position with glue, but in the field they may have to be tied on, or secured with tacks, or best of all, bound in position by means of a piece of leather (basil) which can be tacked to the edge of the side-bar or laced with string across the top.
By means of these strips of felt the most radical alterations in the fit of a side bar can be effected in a few minutes by a man who has no technical skill.
30. Saddling.
1. The saddle should be placed in the middle of the horse’s back; the front of it so much behind the withers as not to interfere with the play of the shoulder.
The fans should clear the back, and the front arch should clear the withers to the breadth of not less than 2 fingers when the rider is in the saddle. The saddle, to afford a suitable seat for the rider, should have a level bearing on the horse’s back.
2. The blanket is not to rest on the horse’s withers, but should be slightly raised by placing the hand under it.
It can be folded in several ways. With a horse of normal shape and condition the following method is recommended:—The blanket is folded lengthways in three equal folds, one end is then turned over 24 inches, and the other turned into the pocket formed by the folds; the blanket thus folded is placed on the horse’s back with the thick part near the withers. Size when folded 2’ O“ × 1’ 8”, when unfolded 5’ 5“ × 4’ 8”. The folding of the blanket may be modified to suit special horses and to meet alterations in shape consequent upon falling way in condition, or from other causes. In the case of a horse which has fallen away in condition, and for certain shapes of back, a useful method is the “channel fold” The blanket is folded lengthways in three equal parts, each end is then turned over and folded towards the centre (two or three folds may be taken as required to suit the horse’s back), leaving a channel in the centre.
3. The girth should be sufficiently tight to keep the saddle in its place and no tighter. In saddling a horse, the girth must be tightened gradually, and not with violence. It is recommended that the girths of all except young and growing horses should be fitted with the buckle in the second or third hole from the free end of the tab.
4. The surcingle should lie flat over the girth, and be no tighter than the latter.
5. Adjustment of the “V” attachment.—The V attachment, fitted to the saddle as issued, admits of limited adjustment to suit the conformation of the horse.
The front straps of the V attachment, Marks II and III, should not be buckled and unbuckled daily when girthing, nor utilised for shortening or lengthening the girth.
The normal position of the attachment is with the buckle in the centre hole of the three—6½ inches from the rivet—this position will suit a very large number of horses; the upper and lower holes are provided for the adjustment; additional holes are not to be punched.
On animals with straight shoulders that carry the saddle too far forward, the strap should be buckled in the lower hole.
On animals that have deep chests and sloping shoulders, and are thick in front of the saddle, the front strap should be worn long.
But in no case is it to be worn as a true V, i.e., the front and rear straps of equal length, which would depress the hinder part of the saddle, and cause other difficulties.
Care should be taken in all cases to buckle the “near” and “off” straps in corresponding holes.
31. Bridling.
1. Care should be taken to fit each horse with a bit of the correct size. A narrow bit pinches the horse’s lips, and a wide bit moves from side to side and bruises them.
The bit should be fitted so that the mouthpiece is 1 inch above the lower tusk of a horse, and 2 inches above the corner tooth of a mare.
This can only be laid down as a general rule, as much depends on the shape and sensitiveness of the horse’s mouth and on his temper.
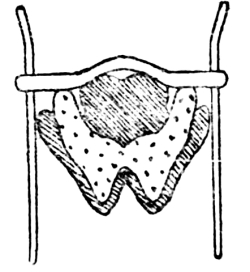
2. Figs. 1 and 2 represent bits, with and without a port, with a section of the horse’s tongue and lower jaw.
The tongue is less sensitive than the bars of the mouth. A straight mouthpiece, Fig. 1, rests on the tongue and bars of the mouth. When the reins are pulled the tongue is able to take the greater part of the pressure. A mouthpiece with a port, Fig. 2, rests chiefly on the bars. When the reins are pulled the tongue slips into the port and is unable to relieve the bars of the greater part of the pressure. A bit with a straight mouthpiece is therefore less severe than one with a port.
Fig. 1.
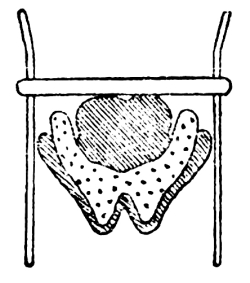
Fig. 2.
3. The curb should be laid in the chin-groove and be so adjusted that when the bit is pulled back to its greatest extent the angle which the bit forms with the mouth should never exceed 45° even with the lightest-mouthed horse, and should vary between that and 30° according to the degree of hardness of the mouth. The curb should be fixed permanently on to the off curb-hook. The chain should be adjusted by twisting it to the right, putting the last link on to the near curb-hook, and then taking up as many more links as may be necessary. It should admit two fingers easily between it and the jawbone.
4. The headstall should be parallel to and behind the cheek-bone.
5. The noseband should be the breadth of two fingers below the cheek-bone and should admit two fingers between it and the nose.
6. The throat lash should fit loosely, being only sufficiently tight to prevent the headstall slipping over the horse’s ears.
7. The reins should be of such a length that when held by the middle, in the full of the left hand, with a light feeling of the horse’s mouth, they will touch the rider’s waist.
32. Miscellaneous details.
1. The head rope is put on as follows:—The point of the rope is passed through the lower ring of the jowl piece from the near to the off side, and then through its own ring. It is next passed over the horse’s neck from the off to the near side, and fastened off by doubling back the end, and laying the loop so formed on the standing end of the rope 6 inches from the ring. The free end is then wound round the three returns, passed through the loop, and the loop is hauled taut to it. The number of times the free end is wound round the returns will vary according to the length of the horse’s forehand.
Special for mountain artillery ponies.—Buckle the strap at the end of the rope, buckle down, to the rear D of the head collar: pass the free end from off to near side over the animal’s neck, fasten off by doubling a piece of the rope long enough to make five complete turns, and lay this loop on the standing end of the rope 6 inches from the brass ring; the free end is now wound five times completely round the three returns, and passed down through the loop which is hauled taut to it. The bight of the rope is fastened off the front D on the saddle by a leather tie.
2. The wallets (officers only) are to be placed on the pommel of the saddle with the hollowed side of the connecting piece to the front. The wallet strap is to be passed from the rear through the rearmost staple on the saddle, then through the rear keeper of the wallet, next through the front staple of the saddle, and finally through the front keeper of the wallet and buckled, the point of the strap pointing to the rear, the buckles being in line with the front edge of the wallet.
3. The sword frog is attached to the rear arch of the saddle on the near side, the girth being passed through the steadying strap.
4. The breast-piece should hang horizontally from the supporting straps, the bottom of it about 1 inch above the point of the shoulder, and should admit the breadth of the hand between it and the horse’s chest.
5. The breastplate should be so fitted that the upper edge of the rosette or leather is the breadth of three fingers above the sharp breast bone, and it should admit the breadth of the hand between it and the flat of the shoulder.
6. The martingale should be used only for exceptional horses. It may be either running or standing, according to which suits the horse the better.
It should be of such a length that it will not interfere with the horse until he gets his head above the proper position. If it is shorter than this it will tend to make him set his head and neck, and lean against it.
If a running martingale is used on reins other than those sewn to the bit or bridoon they should be fitted with “stops” to prevent the rings of the martingale getting caught by the buckles or studs, which fasten the reins to the bit or bridoon.
Running martingales should, as a rule, be put on the bit reins and sufficiently loose to have no bearing on the reins till the horse attempts to raise his head.
The standing martingale should, as a rule, be fastened to the noseband, but under exceptional circumstances it may be fastened to the bridoon or cheek of the portmouth bit.
Riding.
33. General instructions.
1. The instructions should be divided into three periods, and the pupil should be gradually advanced from one to the other.
The proper sequence of instruction is a matter of extreme importance, in order to obtain early and satisfactory results and to avoid spoiling horses.
2. The first period should be devoted to the attainment of a firm seat independent of the reins, and its natural consequence—suppleness of the body from the hips upwards. Individual instruction should be the rule during this period.
It is important to give the recruit confidence from the first, and to start with he should be given a quiet, well-trained horse. He should be allowed a saddle and stirrups for the first few days, after which some of his work each day should be without stirrups. The greater part of the instruction at this stage should be without reins. To save the horse’s mouth the pupil should only be allowed to hold his reins when he is riding with stirrups.
As soon as the recruit begins to be at home in the saddle and can rise in his stirrups, cantering and jumping should commence.
3. Before he enters the second period the recruit should be able to control his horse in straightforward movements and simple turns in the school or manège and be able to ride over low jumps at all paces without reins. From now onwards a considerable portion of the work should be outside the riding school.
This second period should be devoted to teaching what are commonly called the “aids,” i.e., the use of the hand and lower part of the leg and the distribution of the rider’s weight to indicate the rider’s will to his horse. (See Sec. 43.)
The instructor should aim at cultivating freedom and elasticity in the shoulders, arm, and wrists. Stiff shoulder-action cramps the play of the elbow-joints and wrists and makes good hands impossible.
The recruit should be instructed to keep the knee firm to the saddle when the lower part of the leg is used.
4. In the third period more advanced instruction in horsemanship is given. This should commence when the pupil has attained to suppleness of the body and the limbs, and consists in combining the play of both so that the rider may learn to move in unison with his horse.
Exaggerated movement of any sort must be discouraged, and the necessity of quietness and of sitting still emphasized. The best horsemen attain their ends with the minimum of exertion to themselves and to their horses.
During this period the horse artillery recruit should be taught to use his sword, and mounted men should receive instruction in riding with the rifle.
5. After the first few lessons the recruit’s horse should be constantly changed, and he should not be passed in riding until the average animal goes pleasantly with him at any pace.
Concurrently with his instruction in riding the recruit should be taught the principles of saddling and bitting, also the points of the horse and other elementary but useful knowledge connected with horses and stables.
6. By following out the methods described an average man, with careful individual instruction, should be able to ride at a trot and canter and over small jumps without reins after about 30 continuous lessons. He should be fit for dismissal in about 60 lessons.
34. Hints to instructors.
1. It is necessary that an instructor should himself be a practical horseman.
2. Recruits should be carefully taught from the first how to put on and fit their saddles and bridles. The ill effects resulting from bad fitting saddlery should be explained to them.
Examples of horses badly saddled and bridled should be shown to the men, and they should be made to point out what is wrong, and how the mistake should be put right, e.g., if the front tab of the V-shaped girth attachment is not buckled tightly up, the saddle will slip forward. They should also be taught clearly how the bit acts on the bars of the mouth, and how it should be fitted.
3. An instructor should be mounted, and in addition to a short verbal description, should give a practical illustration of what he requires. A recruit who may have great difficulty in learning his work by mere verbal instruction will quickly do so by copying an expert horseman.
4. A feature of all instructional work should be its quietness; an instructor should never shout and must always keep his temper. He must endeavour from the first to create a spirit of emulation amongst his pupils, and avoid keeping the more forward amongst them back for the sake of the others.
5. An instructor should aim at making his lesson progressive, and as interesting as possible. In order to give recruits confidence, they may be allowed occasionally to amuse themselves in the riding school with their horses, by doing anything they like without interference from the instructor, beyond his taking care that the horses are not ill-treated.
When teaching men in the open they should be encouraged to ride about independently, so as to get into the habit of making their horses go where they like and do what they wish. As the men improve, the instructor should accustom them to riding under as varied conditions as possible.
6. The first portion of the early training can be pushed on much more quickly in a riding school than in the open. The horses are under better control, the nervousness natural to beginners and usually felt by recruits is greatly lessened, for they know that the horse cannot run away, and there is nothing to distract the attention of men or horses. The more advanced training must, however, always be carried out in the open, in order that the pupil may learn real control over his horse and improve his hands.
7. The first object of the instructor is to give his pupils confidence, to teach them balance, the knee and thigh grip, and to sit well down in the saddle. The lungeing whip should not be allowed inside the school, it does more harm than good, frightens the other horses and upsets the men; if necessary, the recruit should be allowed to carry a stick or whip. No riding school lesson should exceed one hour.
8. Falls should be avoided: they tend to spoil the beginner’s nerve and retard his progress. To this end the recruit’s stirrups should be connected in the initial stages by a strap passing under the horse’s belly, of such a length that the man’s knees are not drawn away from the saddle. The strap saves falls, because it prevents the rider’s legs from flying out far in any direction and the confidence it engenders enables him to acquire balance more quickly. It should not be used when jumping obstacles over 2 feet high.
9. More horses are spoilt from being “jobbed” in the mouth than from any other cause; particularly when jumping; hence the immense importance of teaching the men from the first to leave their horses’ heads alone except for the purpose of control and for applying particular aids.
Men may, with advantage, be taught to ride with their reins fully long.
10. An instructor should be careful not to keep horses reining back, passaging, or bending for more than a few minutes at a time. Generally speaking, half the length of the school is sufficient for one of these exercises.
11. In order to teach a man to have a strong seat, with the knee firmly in the saddle, and at the same time to keep his feet pressed down home in the stirrups with the leathers practically taut, he should frequently be practised in standing up in his stirrups. At first this should be done with the horse standing still, the man resting his hand on the horse’s neck, if necessary, to assist his balance. Afterwards at the walk, trot and canter.
35. Preliminary training.
1. Before a recruit is allowed to mount a horse his riding muscles should, if possible, have been strengthened on a wooden horse, either under a riding instructor or under a gymnastic instructor who is a good horseman. At the same time he should be taught the correct seat. (See Sec. 38 and Fig. 4.)
2. The following are good exercises:—
i. Rising from the knee with stirrups.
ii. Rising from the knee without stirrups.
iii. Touching the foot with the hand on each side, with
and without stirrups.
iv. Leaning forwards and backwards in the saddle, with
and without stirrups.
v. Swinging the lower part of the leg, with a circular
motion to the rear, and towards the horse’s side.
vi. Without stirrups and with arms folded, making the
horse rock by swinging the body backwards and
forwards, maintaining a firm grip with the thighs.
iii and iv should be practised on the move when riding proper begins. Before commencing, the pupil must be placed well down in the saddle, and he must be taught to keep his knees firm to the flap and not to cling with the lower part of the leg.
3. These exercises on the wooden horse may be usefully employed during subsequent training, but should not immediately precede or follow a riding lesson. Exercising tired muscles is not only useless, but harmful.
36. First lessons to the recruit.
1. Squads should not exceed 8 in number, and should parade in line, leading their horses.
“Stand to your horses.”—The man stands at attention on the near side of the horse, toes in line with the horse’s fore feet; the reins, taken over the horse’s head, are held in the palm of the right hand near the ring of the bit, little finger between the reins, back of the hand up; the right arm bent, the hand as high as the shoulder; the end of the reins in the left hand, which hangs down by his side without constraint. This is the position of attention when the man is leading his horse.
When the horse is about to be ridden, the position of attention will be the same as above, except that the reins will not be taken over the horse’s head and will be held by the right hand only near the bit.
“Stand at ease.”—The right hand slides down the near rein to the full extent of the arm, the end of the reins being retained in the left hand. The position of the man’s legs and feet are the same as at dismounted drill.
Note.—If the reins have not been taken over the horse’s head, they will be held in the right hand only, the left arm hanging by the man’s side without constraint.
“In front of your horses.”—Each man being at attention will take a full pace forward with the right foot, turn to the right-about on the ball of it, and take one rein in each hand near the rings of the bit, still holding the end of them in the left hand if the reins are over the horse’s head; hands and elbows to be as high as the shoulders.
This is the position in which a man should stand when showing a horse at the halt.
“Stand to your horses.”—Each man will take a full step forward to the horse’s near side with the right foot, and turn left-about on the ball of it.
“Quick march.”—Each man will move off holding the reins as above.
“Single files right (or left)” “Quick march.”—Each man will move off in succession, one horse-length from the file in front of him.
2. A man when leading a horse through a narrow gate or doorway should walk slowly backwards, taking care that the horse’s hips clear the uprights. The head collar should be held in both hands, one on either side of the horse’s head, which, however, should be sufficiently free for the horse to see where he is going.
When a soldier, leading a horse, passes an officer he will look towards him.
3. How to pick up a horse’s foot.—The recruit should be taught the right way to pick up a horse’s foot. To do this he should face the rear and run his hand lightly down the leg from the shoulder or quarter along the back of the knee or hock before attempting to lift the foot from the ground.
4. How to run a horse in hand.—The reins should be held as described above in “Stand to your horses” and the horse led off. As soon as he breaks into a steady trot the man should leave go the reins with the hand nearest the horse, and only hold the end of the reins in his outer hand. In turning a horse about when in hand, the man should always move round the horse and not swing the horse round himself. In leading a horse past an officer for inspection, the man should place himself on the side nearest the officer.
37. Mounting and dismounting.
1. Without stirrups.—The reins hanging evenly on his neck, the command will be given:—
“Prepare to mount.”—Turn to the right and close 6 inches to the right. Take the reins in the left hand properly separated as for riding (see Sec. 39), and place the left hand on the front of the saddle. The reins should be of such a length that the horse’s mouth is not interfered with while mounting. The right hand will grip the back of the saddle.
“Mount.”—Spring up, straightening the arms to assist, pass the right leg over the horse and drop gently into the saddle. When mounting without a saddle the left hand will be placed in front of the horse’s withers, and the right arm on his loins, forearm well to the off side, fingers closed.
“Prepare to dismount.”—Place both hands, with a rein or reins in each, on the front of the saddle, and rise from the horse’s back by straightening the arms. Without saddles, both hands will be placed on the horse’s withers.
“Dismount.—Vault lightly to the ground and assume the position of ”Stand to your horses.”
Mounting and dismounting should also be practised on the offside.
2. With stirrups.—“Prepare to mount.”—Turn to the right about. Take the reins in the left hand properly separated as for riding (see Sec. 39) and with a light and equal feeling on the horse’s mouth. Place the left hand on the horse’s withers, and grasp his mane, or the front of the saddle if he has no mane; then place the left foot in the stirrup, and the right hand on the back of the saddle.
“Mount.”—Spring quietly into the saddle, place the right foot in the stirrup without looking down and assume the position of attention (see Sec.40).
Mounting on the offside will be taught in the same manner, and recruits should be made to practise it regularly.
“Prepare to dismount.”—Shorten the reins (see Sec. 39) and grasp the mane with the left hand, place the right hand on the front part of the saddle and take the right foot out of the stirrup.
“Dismount.”—Carry the right leg over and lower the body gently to the ground; place the left foot in line with the horse’s fore feet, turn to the left and come to the position of “Stand to your horses.”
3. Whenever the men are dismounted and have been allowed to Stand easy from the position of Stand at ease, they will be recalled to attention by the command “Stand to your horses.”
4. For instructional purposes the order for mounting and dismounting is given by two words of command, e.g.:—
“Prepare to mount.”—“Mount”; “Prepare to dismount.”—“Dismount”; but for trained men there is only one word of command in each case, i.e., “Mount” or “Dismount.”
38. The seat.
1. The recruit must be made to sit evenly on his seat, well down in the saddle, and not on his fork; the flat of the thigh and the inside of the knee pressed against the saddle, but not so tightly that the man rides on his thighs, as the weight of the body should rest principally on the seat. Below the knee the leg should hang free, and in the early stages much attention need not be paid to the position of the body, though from the first the recruit should be taught to get his seat well under him.
2. Great care should be taken to fit the stirrups to the right length to suit the build of the rider. The man should be made to place himself in the saddle with his knees at the height which appears to suit his thigh. The stirrups should then be adjusted so that the bars are in line with the soles of his boots. If a man standing in his stirrups can just clear the pommel with his fork the stirrups are about the right length.
The end of the stirrup leather should be passed under both returns and then under the surcingle. It should not be passed downwards through the buckle.
A man with a short thick leg, however, requires his stirrups shorter in proportion than a man of equal height but with a flat thigh and thin leg. The stirrups are intended to be an aid and convenience to the rider; if they are too long he will lose his seat by leaning forward in his endeavour to retain them; if they are too short, the seat becomes cramped and the rider is prevented from using the lower part of the leg correctly.
In ceremonial work the stirrups should be kept on the ball of the foot, but at other times the feet may be pushed right home.
39. How to hold the reins.
1. The recruit should next be taught how to hold the reins as described below. In the early stages he should only be allowed a snaffle or single rein attached to the cheek of the universal bit, and no curb, and should ride with the reins in both hands. The instructor should impress upon him the importance of not hanging on by the reins and explain that if he does so he will not make progress, but by injuring his horse’s mouth will make him difficult to ride.
2. The hands should be low and close in front of the body, thumbs uppermost, back of the hands to the front. Wrists should be rounded and supple and the movements of the horse should be followed by means of the play of the shoulders, elbows (which should be kept close to the body), and wrists.
3. Reins in left hand. i. Bridoon or check reins only.—Take the two reins in the left hand, the right rein between first and second fingers, the left rein outside the fourth finger, slack passed across the palm and secured between the thumb and first finger.
ii. All four reins.—Place the right bit rein between the second and third fingers, and the left bit rein between the third and fourth fingers. The right bridoon rein between the first and second fingers, and the left bridoon rein outside the fourth finger, the slack of all four reins thrown back over the first finger and secured by the thumb.
At riding drill drivers when holding the reins in the left hand should place the right hand on the thigh, as described in Sec. 55.
4. Reins in both hands.—In the first place, whether using single or double reins, take them in the left hand as described above, then take up the right rein or reins in the right hand by placing it in front of the left, pulling sufficient of the slack forward through the left hand to obtain an even bearing on the mouth with both hands held low, just in front of the body and close to the horse’s withers.
In the case of single reins only, the right rein should be held between the third and fourth fingers; with double reins, the two right reins should be separated by the third finger. In each case the right hand should hold only the right rein or reins, the slack of these being secured between the right thumb and forefinger and passing thence into the left hand which holds both the left and right reins. (See Fig. 3.)
Fig. 3.
(Bit reins shown shaded.)
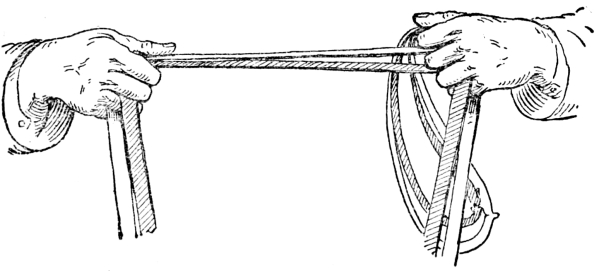
VIEW FROM FRONT.
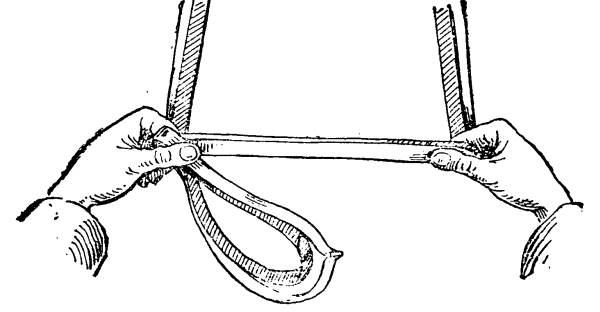
VIEW FROM ABOVE.
5. To lengthen the reins.—Allow sufficient rein to slip gently through the fingers.
To shorten the reins.—Keep the reins in the left hand but drop the slack from between the thumb and forefinger, and take hold of this in the right hand behind the left, slide the left hand forward until the desired length is obtained. Then as before secure the slack, and if riding with both hands on the reins, take up the right rein or reins again in the right hand.
6. The recruit should be well grounded in the proper manner of holding the reins, and frequently practised in changing them quickly from one hand to both and vice versâ, also in shortening and lengthening them at all paces. The importance of keeping the reins supple and unpolished should be impressed on him.
7. Normally the reins should be held in the left hand only, bit reins inside except in the case of beginners, and when riding young or awkward horses, when both hands should often be used. Occasionally the left hand may be required to be free, as when leading another horse, in which case the reins of the ridden horse can be held in the right hand.
40. Position in the saddle at attention.
Fig. 4.
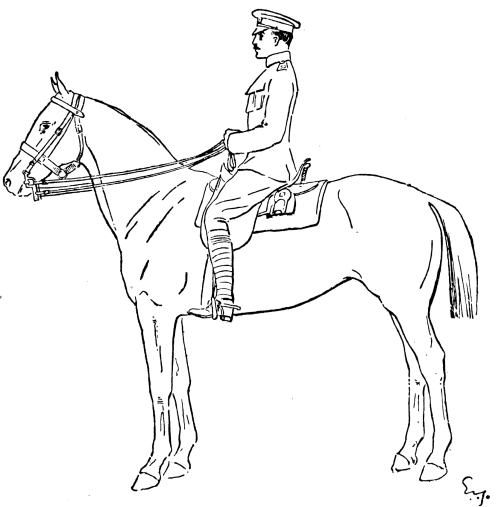
1. The correct position of the rider at attention is shown in Fig. 4. The head and body should be erect and square to the front; upper arm hanging perpendicular; forearm nearly horizontal; thighs flat on the saddle; legs from the knee down nearly vertical; knees turned inwards so as to enable the toes to point towards the front; the heels should be sunk lower than the toes and the feet pressed down into the stirrups (see Fig. 4).
2. On the command “Sit at ease” the reins should be relaxed by dropping the left hand on the front of the saddle. The right hand should rest on the left, back up.
41. First movements on horseback.
1. The recruit should now be shown how to start his horse off at a walk from the halt, i.e., he should be made to ease the reins slightly, though still keeping a light feeling on the horse’s mouth, and press him forward with the legs from the knees downwards. He should be prevented from jogging his horse in the ribs with his heels and from advancing his hands to slacken the reins. At the same time he should be taught how to halt without jerking his horse’s mouth.
The trot should be slow and for short periods and there should be no cantering for the first few lessons.
2. How to rise in the stirrups.—The loins must be perfectly lissom, so that the seat may be easy and comfortable; the back should not be hollowed, but the upper part of the body should be inclined a little forward.
The recruit should not try, by rising, to follow or to anticipate the movements of the horse, but should let himself be raised.
His knees (and ankle-joints if riding with the stirrup on the ball of the foot) will sustain his movement and will allow him to descend softly into the saddle. It is advisable to let the recruit commence this at a walk.
3. At the trot without stirrups the recruit should allow his body to be thrown up at each step, and fall on his seat.
In cantering, the knees, the inside of the thighs and the seat itself must remain close to the saddle, the whole body pliant and accompanying the movement of the horse, so that with each stride the rider feels a forward thrust through his seat from the animal’s back.
4. A few turns and circles may now be introduced, and in executing them the recruit should be told how to use the weight of his body. He should be instructed, whilst preserving the grip of his knees and thighs, to incline his weight from the hips slightly backwards and to the side to which he is turning.
5. As soon as he has gained some confidence, the recruit should ride without reins; he should then be taught to jump, at first over small obstacles, such as the bar lying on the ground. (See Sec. 42.)
The recruit should not be allowed to cling with the back of the calf; it should be explained to him that the principal use of the lower part of the leg will be taught to him later.
6. Much of the early training should be without reins, the arms being folded in front of the body, never behind, as the latter tends to throw the upper part of the body forward.
42. Teaching the recruit how to ride his horse over a fence.
1. Jumping, when carried out with discretion, is an excellent training for men and horses. Constant practice throughout the recruit’s training will enable the man to acquire, and afterwards to maintain, a firm seat, whilst at the same time the muscles of the horse’s back and thighs are developed and strengthened.
2. Riding over the bar laid on the ground makes a good beginning, the men trotting round the school with suitable distances between horses and jumping it in turn. This has the advantage of leading both men and horses to think that they are doing nothing out of the common, and results in an orderly and quiet procedure.
The recruit should at first be allowed to hold the end of the rein in the flat of the hand to give him confidence, but should be encouraged as soon as possible to drop the reins altogether. The arms should be folded across the chest. Stirrups should be allowed until the instructor considers it advisable for the beginner to jump without them.
In the first jumping lessons the recruits may be allowed to hold the mane, head rope, or front of the saddle in one hand and the reins loosely in the other. With this assistance they will be found to get confidence, attain their proper balance in a short time and be in a position to control their horses without jerking their mouths.
3. As the horse takes off, the pupil should be instructed to lean forward and to tighten his leg-grip; if he is successful in this his body will soon swing in harmony with the horse. The movements of the body from the hips upwards when riding over a jump vary so much with different horses and different fences, that it is impossible to lay down any rule. It is a matter of the rider balancing his body assisted by a leg-grip. The horse should be eased up gently after a jump, on no account should his pace suddenly be checked.
When the initial stage is passed frequent change of horses expedites progress.
4. The pupil should be gradually trained to handle the reins when jumping, and the greatest care must be exercised to avoid ill-treatment of the horse’s mouth during the process. If the shoulder-joints are given free play when the horse requires more rein, all jerky movements of the arms and wrists will be avoided as the hands go forward. Reins must be held long, and the man taught to keep his hands low and allow them to come freely forward as the horse is on the downward plane. When riding with the reins in one hand, the left shoulder can be brought forward as the horse is descending.
5. Jumping low obstacles is very little exertion to the horse, and the more the recruit has of it the sooner he will be ready to enter the third period of instruction. Before he enters this stage he should sit his horse with ease, both with and without reins, and, when jumping, should be able to keep a light feeling on the horse’s mouth without in any way interfering with it.
6. The pupil should then be given horses that require “riding” at their fences, and be taught to handle them with resolution. A combination of the qualities of determination and patience are invaluable in a horseman, and should be developed and encouraged at this stage of the training.
The method of dealing with refusers is given in Sec. 81.
43. The aids.
1. General principles.—The “aids” are the signals used by the rider to assist him in directing his horse. These signals are made by means of the reins, legs, spurs, shifting the weight of the body, whip, and voice. For instance, the reins can be used to bend the neck, to raise, lower, or turn the head to any one side; and to make the horse decrease his speed, halt, or rein back.
The necessity of impressing on all recruits the importance of preserving the sensitiveness of the horse’s mouth cannot be over-rated.
The pressure of both legs is an indication to the horse to go forward, and should normally be applied just behind the girth; the leg should only be drawn back when the horse fails to respond to ordinary pressure. The pressure of the leg drawn back on one side is employed to make the hind quarters turn towards the opposite side, or to prevent them from turning towards the side on which the pressure is applied.
When it is necessary to use the spur it should be applied as described in Sec. 45. If when the horse is on the move the weight of the body is shifted, say to the right, the horse will be inclined to put out a foot on that side, in order to equalize the distribution of weight on its limbs. The hind quarters and forehand are respectively lightened by the rider’s body being brought forward and back, or by lowering or raising the horse’s head. The movement of the body as an “aid” should be slight, except in the case of a man riding a heavy horse, when more movement may often be necessary, but it should not lead to interference with the horse’s mouth.
The indications of the whip are closely akin to those of the leg and spur.
2. To walk or trot.—Without drawing them back, close both legs to the horse according to his temperament, and slightly ease both reins by a slight turn of the wrist or wrists. As soon as the horse advances at the desired pace relax the pressure of the legs and feel the reins again as before.
3. To halt.—Close both legs and feel both reins, at the same time bring the weight of the body slightly back. As soon as the horse halts relax the pressure of the legs.
4. To turn to the right on the haunches.[3]—Close both legs to the horse, using more pressure with the left leg drawn back to prevent his haunches from flying out to the left. At the same time feel the right side of the horse’s mouth, press the left rein against his neck, and lean the body slightly back and to the right.
To turn to the left on the haunche.s—Reverse the above.
5. To turn right about on the haunches.—The same as “right turn,” except that the rider should lean his body slightly back as well as to the right and as required apply more continued pressure on the right rein and firmer pressure with the drawn back left leg to compel the horse to turn on his haunches.
6. To collect the horse.—Make the horse bring his hindquarters well under him by a pressure of both legs, and induce him to flex his jaw and bring his nose slightly in by a light feeling of the bit rein. The pressure of the legs should precede any feeling of the reins. In this way the rider causes the horse to stand, walk, trot or canter, at attention.
7. To rein back.—Collect the horse as described in the previous paragraph, then feel the horse’s mouth as an indication for the horse to step backwards; the rider must never have a dead pull on the horse’s mouth, but when the horse has taken a step back, should ease the reins and then feel them again. The horse should be kept up to his bit by a pressure of both legs.
The trained horse should rein back collectedly, with head carried fairly high, and the body balanced on all four legs. He must move in a straight line, and must not be allowed to run back out of hand, but must make each movement in obedience to the properly applied indication of the rider. He should not be allowed to halt in an uncollected position.
8. To canter off fore and off hind leading.—Collect the horse, and by a strong pressure of the drawn back left leg make him strike off into a canter. Prevent him from turning his quarters to the right by a supporting pressure of the right leg as required. When cantering the horse’s body, head and neck should be kept in the direction in which he is moving. The horse should be collected and slightly bent in the direction of the leading leg. The horse must be made to canter true and united.
To canter near fore and near hind leading.—Reverse the above aids.
Methods of telling if a horse is cantering true:—
i. Look at his shoulders and fore feet: the shoulder and foot of the leading leg should be the most advanced.
ii. Look at his hind legs. The leading one of these should be on the same side as the leading fore leg. The horse’s croup will be slightly turned towards the side of the leading legs.
If “disunited,” the movement felt in the seat will be a jolting and twisting motion.
9. To change from off fore and off hind to near fore and near hind at the canter.—Close both legs to the horse and turn his head slightly to the right; prevent him from turning his body to the right by the pressure of the left leg, put the weight of the body slightly backwards and cause him to change by a stronger pressure of the drawn back right leg.
To change from near fore and near hind to off fore and off hind, at the canter.—Reverse the above aids.
10. To circle right at canter (from the halt, walk, or trot).—Apply the aids described for the “Canter, off fore and off hind leading,” and guide the horse round to the right.
To circle left at the canter.—Apply the aids described for the “Canter, near fore and near hind leading,” and guide the horse round to the left.
44. Bending.
1. Bending affords the advanced recruit a lesson in applying the “aids.” It is tiring exercise for the horse and should be practised with discretion.
In all bending work it is very important to get the horse to yield his jaw slightly as this conduces to lightness of hand.
As a rule, bending should be done on the move.
2. To bend a horse:—
i. On the snaffle.—If to the right, the rider should bend the horse by a gentle pressure on the right rein, at the same time giving to him slightly with the left rein but still retaining a gentle feeling on the left side of his mouth, and using the pressure of the legs as required; as soon as the horse bends to the hands cease bending and make much of him.
ii. On the bit.—The left hand, holding the reins, should have an equal feeling on all four reins. In bending to the right, place the third finger of the right hand between the two right reins and slightly feel the horse’s mouth, using the pressure of the legs as required; when the horse yields to the feeling by relaxing his jaw and bending as required, the hand should immediately yield to him.
The outer rein in bending should always retain a steady feeling to support the inner and to ensure the bend being made at the poll.
3. Bending lesson.—With beginners it is advisable that this should take place in the riding school or closed-in manège, but as the instruction progresses it should be practised outside.
The following movements should be practised (see Fig. 5):—
Right shoulder in.
Left shoulder in.
Right pass }
} To move across the school or to a flank.
Left pass }
In all these movements the horse’s neck should be kept straight from the withers onwards to near the poll, his head itself being turned in the direction in which he is moving.
In the “shoulder in” the horse’s body should be inclined at about a half turn to the direction in which he is to move.
In “right” or “left pass” the horse’s body should be kept approximately at right angles to the direction in which he is moving, being inclined only just sufficiently in that direction to enable him to cross his legs.
These movements should all be made in the same way. Thus in “right shoulder in,” the left rein bends and leads the horse assisted by the right rein. The pressure of the rider’s right leg makes the horse cross his legs (except in the case of the half passage) whilst the rider’s left leg keeps him up to the hand and prevents him from swerving.
Fig. 5.
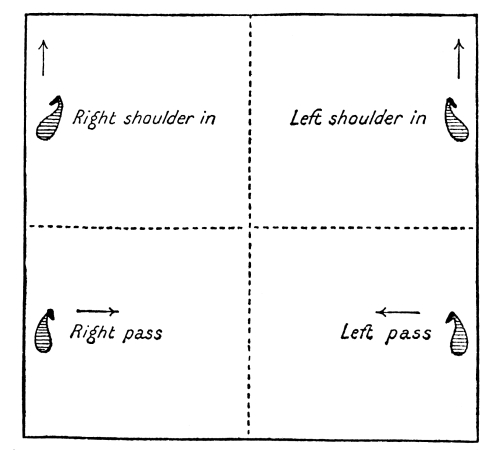
Horses should not be turned at the corners when in the position of “shoulder in.” On reaching a corner each horse should be walked on and again “shoulder in” after passing it.
To turn to the right when passaging to the right:—Stay the hind quarters with the right leg, lead the forehand round with the right rein, keep the left leg closed to prevent the quarters from flying out.
In working the shoulder in and passages, fore and hind feet should move on four distinct lines parallel to each other.
45. Spurs.
When the recruit has learned to preserve his proper seat and balance, and has a knowledge of the “aids” made with hands and legs, he may ride with spurs. In making use of them he must not open his thighs or move his body forward; the leg from the knee downwards only should move. Spurs with sharp rowels should only be allowed in exceptional circumstances.
The spurs should be used as little as possible, but when they are necessary the horse should be made to feel them; a continual light touch will either make the horse kick or cause him to become insensible to them; a jogging motion of the leg with the heel drawn up should, therefore, never be allowed.
46. Various exercises.
1. General principles.—The recruit’s course should proceed by degrees according to the progress made, and any or all of the following exercises may be found useful.
Others which suggest themselves to the instructor may be added. Each exercise or game, however, should have some definite object, and should be looked on merely as a means to an end.
2. To circle.—The ride being told off by fours, on the command “Nos. 1 Circle right (or left),” each No. 1 will ride his horse in a circle and fall-in the rear of his section of fours, Nos. 2, 3 and 4 doing the same when ordered by the instructor.
“Odd (or even) numbers circle right (or left).”—Each odd (or even) number will ride in a small circle and fall-in behind the even (or odd) number immediately behind him.
“Heads of fours circle right (or left).”—The leading man of each fours will ride in a circle followed by 2, 3, 4, and will continue in the circle until he gets the command “Go Large,” when he will cease circling and resume his original direction; or the rein may be changed by the word of command “ Heads of fours—change.”
3. Figure of 8.—For preliminary training in this movement the horse should be cantered quietly on a large circle or an oblong of about the same length as the school.
i. In the riding school or manège.
Fig. 6.
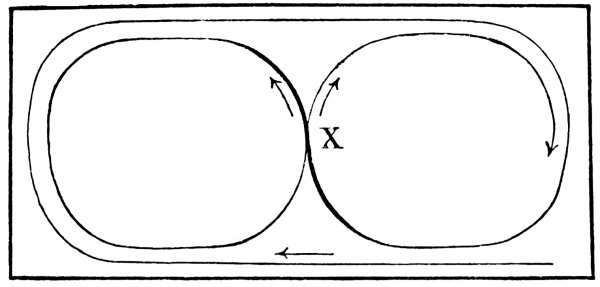
The change of rein and leading legs should be made as soon as the new circle is commenced at X. (See Fig. 6.)
ii. Outside.—First start off at a canter on a moderate sized circle on either rein. As soon as the horse is moving correctly and collectedly, turn inwards and describe a small circle still on the same rein, but about half the size of the first, when this is completed change the bend of the horse and the leading legs, and make a similar circle on the other rein, the two circles describing the figure of 8 within the original circle. (See Fig. 7.)
Fig. 7.
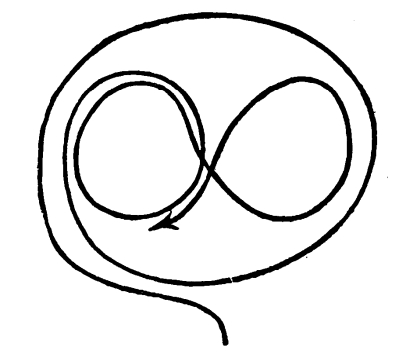
In changing the bend, jerking the horse’s head across from one side to the other should not be allowed; to compel the horse to change legs it is necessary to turn his head slightly outwards, the rider at the same time inclining his weight to the side to which he wishes the horse to change, and pressing with his outer leg; these movements should be made gently, and as soon as the horse has changed the leading legs, both fore and hind, his neck and head should be turned to look the way he is going.
4. The “Ladies Chain” is a useful practice for both man and horse. The leading file turns about, and rides a slightly zig-zag course through the remainder of the ride (who will be at three or four horse-lengths distance from each other), passing on their right and left hands alternately. When each man in succession has done this, the rear file, at increased pace, will zig-zag through the ride from the rear, and the remainder will follow in succession.
5. Practice in crossing a big V-shaped ditch, about 18 feet wide and 10 feet deep, i.e., large enough to compel the horses to go down one side and up the other, is a particularly valuable exercise, as no horse will face the opposite bank unless his head is left absolutely alone.
47. Paying compliments mounted without arms.
When riding with both hands on the reins a soldier passing an officer turns his head and eyes in the direction of the officer without moving his hands. When holding the reins in one hand only he should drop the right hand to the full extent of the arm behind the right thigh, fingers half closed, back of the hand to the right, and turn his head in the direction of the officer.
48. Leading horses.
1. When riding one horse and leading another, the led horse should be on the near side, so that when meeting or being overtaken by traffic the man, by keeping on the left of the road, will have the ridden horse between the led horse and the traffic. The end of the led horse’s rein should be held in the left hand lying flat against the reins of the ride horse. If the led horse is fresh his rein should be held short, about 1 foot from his head. If he tries to break away, the man should circle the two horses to the left.
2. When leading two horses one should be on each side.
3. When leading three horses one should be on the near side and two on the off side. When leading two horses on the same side the reins of the outer horse should be passed between the jaw and the jowl piece of the head collar of the inner horse before being gathered up.
49. Securing horses.
1. Tying up a horse.—The chief considerations in securing a horse by the reins or head rope are to prevent him injuring himself (wire fences or spiked iron railings should obviously not be used) or breaking his reins by treading on them. The knot used should be capable of being quickly tied and untied and should not be likely to come unfastened through the horse fidgetting about.
Fig. 8 shows how a horse may be secured to a suitable branch by first placing the loop of the reins under and round it, and then doubling back the end of the branch and passing it through the reins. A piece of stick will answer the same purpose. The more the horse pulls the tighter the knot becomes.
2. Single horses can also be kept from straying as follows:—
i. By knee-haltering. One end of a rope is made fast above the knee by a clove hitch, fairly tight, with a keeper knot (half-hitch) round the rope to prevent it from coming loose. The other end is then carried back to the head collar and so secured that the horse cannot tread on it. The rope should be from 1 foot to 1 foot 6 inches from the knee to lower ring of jowl piece of head-collar.
Fig. 8.
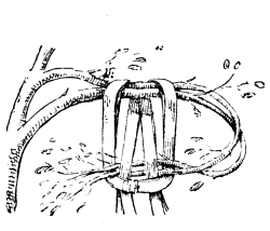
Fig. 9.
ii. By securing the bit to the stirrup iron by means of the rein or a strap.
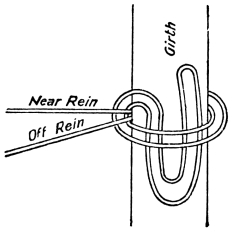
iii. By securing the bridoon rein to the girth on the near side; this is done by taking the bridoon reins over in the usual way and passing them under the girth from front to rear. They should then be drawn sufficiently tight to bend the horse’s head to the left and fastened by a single hitch, but without drawing the slip end through. (See Fig. 9.) When mounting in haste the rider can easily loosen the slip knot after mounting, and then pull the reins clear and pass them over the horse’s head.
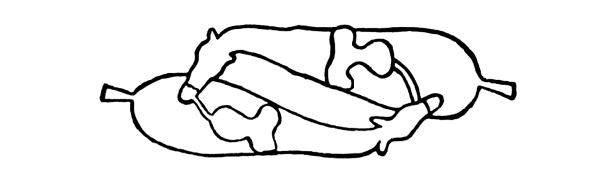
3. Coupling horses.—Horses can be securely coupled by turning them head to tail and tying each with the bridoon rein to the off back-strap or arch of the saddle of the other, taking care that the reins, when tied, are not more than 6 to 8 inches long. (See Fig. 10.)
With three horses one can be tied to the head collar of either of the two horses so coupled. Four horses are secured by tying a horse to each of the two originally coupled. No horse should have more than 1 foot length of rein, and the best knot to be used is a slip knot round the rein itself.
Fig. 10.
4. Linking horses.—The head ropes are brought over the horses’ heads clear of the reins, without unfastening the coil or knot. Each man hands his rope to the man on his right, who passes it through the upper ring of his own horse’s head collar, and ties it with two half-hitches.
50. Riding with the sword.
1. To draw Pass the right hand smartly across the
swords. body, over the bridle arm, draw out the blade
the sword knot on the wrist, give it two turns
Draw— inward to secure it, and then grasp the handle
Swords. with the right arm close to the body, shoulders
One. square to the front.
Two. With an extended arm draw the sword
slowly from the scabbard, in the rear of the
left shoulder, and bring it smartly to the
“Recover,” that is, with the bar of the hilt in
line with the bottom of the chin, blade
perpendicular, edge to the left, elbow close to
the body.
Three. Lower the sword smartly to the “Carry,”
that is, with the top of the guard resting on
the top of the hand, blade perpendicular, edge
to the front, the first and second fingers
gripping the handle under the resistance
piece, the little finger behind the handle to
steady it, the wrist resting on the leg and the
pommel pressed against the side of it, upper
part of the arm close to the body, and the
elbow lightly touching the hip.
2. To slope Bring the lower part of the arm at right
swords. angles to the upper, hand in front of the
elbow, relax the grasp of the second and third
Slope— fingers, and allow the sword to fall lightly on
Swords. the shoulder, midway between the neck and
point of the shoulder, the top of the hilt resting
on the top of the hand, the little finger
still in rear of the hilt.
3. To sit at Keeping the sword at the slope, place the
ease. hands on the front part of the saddle, with the
Sit at Ease. right hand over the left.
4. To come
to position
of attention. Come smartly to the position of “Slope
swords.”
5. To Resume the grasp of the second and third
carry fingers and bring the blade perpendicular,
swords. the hilt resting on the thigh, as in the third
Carry— motion of drawing swords.
Swords.
6. To Carry the hilt smartly to the hollow of the
return left shoulder, blade perpendicular, edge to
swords. the left, elbow level with the shoulder; then
by a quick turn of the wrist drop the point
Return— in rear of the left shoulder slowly into the
Swords. scabbard, and resume the position at the end
of the first motion in “Draw swords,”
One. shoulders being kept square to the front
throughout this motion.
Two. Push the sword lightly into the scabbard,
release the hand from the sword knot by giving
it two turns outwards, the right hand remaining
across the body in line with the elbow,
fingers extended and close together, back of
the hand up.
Three. Drop the right hand smartly to the side.
7. When “Draw swords” is ordered at the walk, the men after drawing will remain at the “Carry” until ordered to “Slope”; but if “Draw swords” is ordered at the trot or gallop, the men will come to the “Slope” after drawing.
8. Proving.—In proving with a drawn sword, the sword is brought to the “Carry,” and again sloped on the command “As you were.”
9. Paying compliments with drawn sword.—An officer or soldier should “Carry” his sword and turn his head and eyes in the direction in which the compliment is to be paid.
10. Officers’ salute.—i. The officers’ salute in marching past commences ten yards from the reviewing officer, the sword being at the “Carry.”
First motion: Carry the sword direct to the right to the full extent of the arm, hand as high as the shoulder, back of the hand to the rear, blade perpendicular.
Second motion: Bring the sword by a circular motion to the “Recover,” keeping the elbow as high as the shoulder.
Third motion: Still keeping the elbow the height of the shoulder, bring the hilt to the right shoulder; during this motion let the finger nails come in line with the edge of the sword.
Fourth motion: Lower the sword to the front to the full extent of the arm, blade 3 inches below the knee, edge to the left, thumb extended in the direction of the point, hand directly under the shoulder. There should be no pause between these motions, but all should be combined in one graceful movement.
The head is slightly turned towards the reviewing officer whilst passing him.
After passing the reviewing officer ten yards, the sword is brought to the “Recover” carrying it well to the front, and to the “Carry” in two deliberate movements.
ii. The officers’ salute at the halt.—The sword being at the “Carry.” First motion: Bring the sword to the “Recover,” but with the thumb pointing upwards.
Second motion: As described in fourth motion of the salute when marching past.
Third motion: Bring the sword to the “Recover.”
Fourth motion: Bring the sword to the “Carry.”
51. Riding with the rifle.
1. To Take hold of the barrel of the rifle with the
mount. left hand, about 3 inches below the muzzle,
butt downwards, and prepare to mount, but
Prepare to with the rifle held in the left hand on the
Mount. off side of the horse.
Mount as usual, raise the rifle with the left
Mount. hand, seize it with the right hand in front of
the magazine, and place it in the bucket.
2. To
dismount.
Prepare to Seize the rifle with the right hand at the
Dismount. small of the butt.
Two. Draw the rifle out of the bucket far enough
to allow the hand to re-grasp it just in front
of the magazine; raise it so as to clear the
front of the saddle.
Three. Lower the butt under the bridle hand, and
hold the barrel with the left hand about
3 inches below the muzzle.
Four. Place the right hand in front of the saddle,
and quit the right stirrup. On the command
“Dismount,” dismount as usual, bringing the
rifle to the position of the “Order” in the left
hand, and hold the bridle with the right hand.
If required for dismounted service, as soon
as the horse is given up, the rifle is passed
from the left hand to the right.
3. The The rifle is held with the right hand in front
advance. of the magazine resting on the upper part of
the right thigh, thumb and fingers round the
rifle, muzzle pointing to the left front and
just clear of the horse’s near ear, trigger guard
to the front.
4. To draw
arms. Grasp the rifle at the small of the butt.
Draw—Arms.
Draw the rifle out of the bucket far enough
Two. to allow the hand to re-grasp it just in front
of the magazine.
Three. Retaining the same grasp, bring the rifle to
the “Advance.”
5. To carry From the “Advance.”—Without moving the
arms. right hand from its grasp of the rifle, place,
the butt on the upper part of the right thigh,
Carry. with the right eye, trigger guard to the left,
—Arms. back of the hand down, arm slightly bent,
elbow close to the side.
6. To return This is done in one motion as follows:—Raise
arms. the butt of the rifle and lower the muzzle
into the mouth of the bucket, pressing the
Return rifle well home with the right hand, trigger
—Arms. guard to the rear, taking care that the bolt lever
does not catch on the edge of the bucket.
52. Revolver shooting.
1. Revolver shooting is to be practised mounted by all ranks armed with that weapon.
2. At least 10 days’ preliminary instruction, including snapping, should be given immediately before firing the first year’s course, while 5 days’ practice will generally be advisable before subsequent courses. This preliminary instruction is important, in order to inculcate correct methods and to train the eye and muscles of the hand, wrist and arm.
3. The allowance of blank ammunition is required to accustom men to the shock of discharge and horses to the noise. Firing should be carried out first at a walk and finally at a canter.
4. When loaded the revolvers should be carried muzzle down and the finger away from the trigger.
5. To take aim the revolver should be raised on to the mark, keeping the wrist stiff with the forearm, wrist and barrel in the same vertical plane, or it may be brought direct into the alignment. The arm may be kept straight or slightly bent.
Mounted men should learn to shoot, without taking aim along the sights, at the centre of the body of the target. With a little practice they should learn to keep their eyes on the object and, as it were, “throw the bullet” at it.
6. Practice with ball ammunition should be divided into two parts, dismounted and mounted. The latter should not be carried out until a man thoroughly understands the handling of the weapon.
Driving.
53. General principles.
1. All officers, non-commissioned officers, and drivers must possess a thorough knowledge of the principles of driving and of fitting harness.
2. Even and steady draught is a matter of paramount importance; the respective weights behind teams are calculated on the assumption that every horse will do his fair share of work; this is impossible unless the driving is of a high order. If the driving is not good, neither quick manœuvre, long marches, nor efficient transport serviceman be assured.
3. When draught is even and steady every trace in the team is taut, and the horses’ heads are facing straight to the front. If, for example, an off horse’s head is pulled inwards, his draught power is reduced and he is liable to become collar galled.
4. The lead driver is responsible for direction, distance, and pace; it is the duty of the centre and wheel drivers to keep the traces taut and cover him.
5. Temperament should be the first consideration in teaming horses. A slug should therefore, if possible, not be included in a team of very willing horses.
6. The position of the horses should frequently be changed; a hand horse, for example, loses his back muscles if he is never ridden, and is also apt to acquire the habit of leaning on the off side of the bit.
54. Fitting harness.
1. The saddle, saddle blanket, girth, surcingle, bit, curb, chain, head rope, nose band, and throat lash will be fitted as for the riding horse. (See Secs. 30-32.)
2. The riding rein[4] should be fitted of such a length that the driver has complete control over his horse.
In the leading rein the short piece on the near side should be carefully fitted so that the bearing of the bit in the horse’s mouth may be even when the rein is held in the driver’s hand.
The side rein, if required, should be buckled to the cheek of the bit of the horse, the end being buckled to the saddle.
4. The breast collar should hang horizontally from the padded neck straps, the lower edge about one inch above the point of the shoulder. The higher it is in reason the less chance there is of the horse galling.
5. The pole bar supporting straps should be sufficiently short to carry the bar the width of a hand above the sharp breast bone; if lower, the bar will gall the horse’s chest. Care must be taken to have the bar horizontal.
6. The loin straps should be so fitted that the traces shall be in a straight line when the horse is in draught.
7. The length of the traces must depend on the size of the horses. The distance between horses in a team should not be less than one yard from nose to tail, but the traces of each pair of horses must be the same length.
8. The breeching should be fitted about 16 inches below the upper part of the dock; it is kept horizontal by the long loin straps. When put back in the breeching the horse should be at least a foot from the footboard.
9. Pole chains should be so fitted that when wheel horses are standing up to their collars there is no pull on the chains. By the use of a tug neck piece in connection with the pole bar supporting straps, horses with wheel harness can be harnessed to G.S. wagons whether the latter are fitted with pole chains or pole straps.
10. The kicking strap should be so fitted as to give the play of a hand’s breadth between it and the horse’s croup when he is standing in his collar.
55. Position of a driver standing to his horses and mounted.
1. The driver stands to his horses on the near side of his riding horse in line with the fore feet, holding the reins of both horses (the leading rein passing over the riding horse’s neck) in his right hand, right arm extended and level with his shoulder; left arm hanging down by his side; whip, stock upwards, in his legging.
2. On the command “Prepare to mount,” the driver turns to his right about, places the leading rein over the riding rein in the palm of his left hand, puts his left foot in the stirrup, and takes hold of the front of the saddle with his left hand and the back of the saddle with his right; if he cannot reach the back of the saddle, he must take hold of the flap.
With the universal reins, the riding horse’s rein is held in the full of the hand, the end hanging down between the first finger and thumb, little finger dividing the reins. The leading rein is held in the full of the hand, the end hanging down from the opposite side of the hand to that of the ride horse’s reins.
At “Mount” he raises himself in the stirrup, passes his right leg over the horse and drops quietly into his saddle. He then adjusts his reins so that he has an even feeling on both horses’ mouths, takes the whip out of his legging with his right hand, which he passes through the loop at the end of the stock and places on his right thigh back up, grasping stock and thong close together, with his elbow a few inches from his body.
This is the position of attention, mounted.
3. On the command “Sit at Ease,” both hands are placed on the pommel of the saddle, the right hand holding stock and thong of whip over the left.
4. On the command “Prepare to Dismount” the driver places the whip in his legging.
At “Dismount.”—If the driver cannot reach the ground with his right foot while the left is still in the stirrup, he takes both feet out of the stirrups, and the body, at first supported by both hands, is gently lowered to the ground. He then comes to the position of standing to his horses.
5. On the command “Stand at Ease,” keeping both legs straight, he carries the left foot about one foot-length to the left, and slides the right hand (retaining hold of the leading rein) down the riding rein of the riding horse as far as it will go; his left hand hanging down the thigh.
“Stand Easy.”—He fastens the leading rein to the riding rein by means of a thumb knot.
56. Use of the whip.
1. The whip is chiefly used to control the off horse: i.e., to start him, to keep him in the collar, and to guide him when turning. It should be applied lightly on to the off side of the neck just in front of the withers, fingers closed on stock and thong.
2. The driver also salutes with his whip when at a walk, in the following manner:—He brings it to the recover as with a sword, passes it over the withers of the off horse, right arm extended, but with the elbow raised and slightly bent, hand in a line with the waist, back of the hand up and inclined to the front, fingers firmly closed on the stock and thong. The driver should hold his body erect with the shoulders square to the front, and look the officer full in the face. When the salute is finished, the whip is brought to the recover and then down to the position of attention. The salute commences four paces from the officer, and finishes four paces beyond him. A driver when halted, or at the trot, salutes by coming to attention and looking the officer full in the face.
3. On rare occasions the whip may be used to punish a horse, when the thong should be applied once on the shoulder. This procedure is seldom justified, and is liable to upset the other five horses in the team.
At all other times the thong should be held close against the stock with the end of the lash hanging down.
57. Driving without vehicles.
1. Before recruits are allowed to drive horses in draught they should be practised in manœuvring the team alone. The centre and wheel drivers thus learn in the initial stages to keep the traces taut, and all likelihood of either spoiling or overtiring horses is avoided.
2. The riding school is well suited for this training; three teams can be worked together in an ordinary sized building, and they are more under the instructor’s eye than in the open.
3. The positions of the drivers in the teams should frequently be changed.
58. Hooking in and unhooking.
1. Hooking in and unhooking should be done as in action, that is in complete teams with drivers mounted, and by the same men who perform the duty in action. The supporting bars for the poles are brought up from the footboards of the carriages and attached to the neck pieces of the wheelers. If possible the team should come up on the left of the carriage, as it is easier for the wheel driver to get his horses into position from the near than from the off side.
2. Traces should be fastened and unfastened at the swingle-trees. The two highest available numbers at the gun and wagon respectively hook in and unhook the teams of their own carriage. All numbers work on their own side.
3. The inside traces of the centre horses pass over the supporting bar to prevent the pole tipping up. When hooking in, the outside trace of each horse is attached before the inside one. In unhooking, each man unfastens what he fastened when hooking in, commencing where he left off.
4. In the case of heavy artillery, should additional horses (over the normal team of eight) be required, they should be attached to the outriggers on the limber and not hooked in front of the team, as the traces are not designed to stand the extra strain.
5. Hooking in.—At “Hook in” the higher number holds up the pole near the footboard, and the lower number goes round by the head of the off wheeler, and as the wheel driver backs his horses guides the ring of the supporting bar on to the pole. As soon as the ring is on the pole the two gunners fasten the wheel traces (see paras. 2 and 3).
Drivers only.—The centre driver dismounts, and having secured his leading rein to his driving rein, raises the pole at the point and guides it into the ring on the pole bar. He then fastens the wheel traces (see para. 3).
6. Unhooking.—The two gunners unhook the wheel traces (see paras. 2 and 3), and as soon as the attachments are released, the wheel driver gives the word “Drive on.” The team drives on, allowing the pole to fall to the ground.
Drivers only.—The centre driver dismounts and unhooks the wheel traces.
7. In exceptional circumstances the team can be unhooked in the following manner. The wheel driver releases the trace attachments of both wheel horses at the breast-collars, and the team drives on, allowing the pole to fall to the ground. The breechings and traces should be replaced on the horses as soon as possible.
59. Traces.
1. When not in draught, the traces of lead and centre horses are crossed in rear of the saddle and the ends passed forward under the neck strap of the breast collar. In the case of spare horses the ends of the traces are brought forward and fastened by the quick release attachment to the rings on the breast collars, the short traces being carried on the footboards of the vehicles.
In the case of wheel horses the traces are passed through the trace bearers, then turned up under the loin straps and fastened back to the bearers by their quick release attachment.
60. Moving off.
1. On the command “March” the drivers ease the reins and close their legs to the riding horse, laying the whip over the neck of the off horse, to ensure both horses starting together. On the command being given every man in a team should start his horses to prevent loss of distance.
2. In all alterations to a quicker pace the drivers use their legs on the riding horse, and the whip on their off horse as described in Sec. 56.
61. Halting.
1. The lead and centre drivers raise the whip hand as high as the head, the whip horizontal across the front, as a signal to the wheel driver.
All three drivers feel their reins and take their horses out of the collar. The wheel driver, with his right hand on the leading rein, puts his horses back in the breeching.
As soon as the carriage stops, every horse is again put into the collar.
2. At any pace but the walk the lead and centre drivers must allow the wheel driver sufficient time to stop the carriage before they come to the halt.
62. Wheeling to the right.
1. The lead driver wheels his riding horse by leaning his body to the right and feeling the right rein; he brings his off horse round at the same time by feeling the leading rein with his right hand.
The centre and wheel drivers follow the track of the lead driver, laying their whips over their hand horses’ necks in front of the withers to keep them from flying out or hanging back.
Note.—On a horse that is not properly trained the lead driver may have to apply his right leg as an additional aid. No application of the left leg is necessary, as the traces prevent the horse’s quarters from flying out. (See Sec. 43.)
63. Wheeling to the left.
1. The lead driver wheels his riding horse by leaning his body to the left and feeling the left rein; he brings his off horse round at the same time by applying the whip over his neck.
The lead driver may have to apply his left leg on an untrained horse (see note above).
The centre and wheel drivers follow the track of the lead driver, applying the same aids at the point of wheel.
Riding horses must not be allowed to hang back.
64. Wheeling about.
1. In this case the drivers lean their bodies slightly back, and to whichever side they are turning. In going to the right about the wheel driver should take the leading rein in his right hand instead of placing his whip over the neck of the off horse. In wheeling to the left about it may be necessary for him to use both hands on the riding horse to keep him from turning too soon. Otherwise the aids are the same as for wheeling to the right or left, but are continued longer.
2. In order to prevent the carriage from locking, the wheel driver must be very careful to keep up his hand, or riding horse, as the case may be, and the lead driver must on no account make the circle too small.
3. Carriages should be advanced one yard before being wheeled about from the halt.
65. Unlimbering.
1. On the command “Action Front” the guns are unlimbered and brought into action as detailed in the respective handbooks. As soon as the limber is free, the order is given “ Limber drive on.” The drivers advance one yard, wheel to the right about at a trot, and proceed direct to the wagon line.