THE BLACKSMITH'S SHOP
Reading edition
XX BLACKSMITHING AND TOOLS
Let's go to the blacksmith's shop and tell the blacksmith what we have done. You see I've shown you all he taught me about copper, brass, and silver. I promised to take you there when we got through. Come on. Here we are! This is his shop. Mr. Blacksmith, this is my friend. I've shown him how to do work in metal and he can do all that you taught me. We both want to learn how to make things out of steel and iron. Are you ready to take us on?
Yes, boys, you are just in time to help me out. And while you are lending a hand I can show you how to make many things that every boy can learn to do with iron and steel. Come into the shop. First I'll tell you about the blacksmith shop equipment. This is my forge and bellows, with the coal heap at the side; here is the anvil and here are my tools. You see it doesn't take a blacksmith long to name the things he needs to equip his shop. But you must know how each thing is used and what it is used for. Let me draw you a picture of the forge on this board and explain to you how it is built.
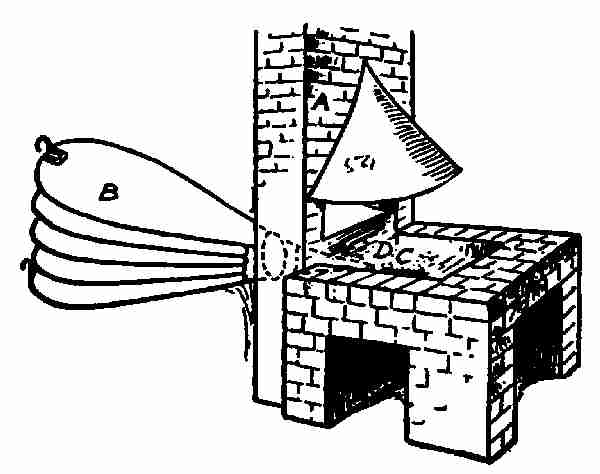
A is the chimney. You see it has an opening in the bottom to let the smoke go up. B is a leather bellows. It is placed back of the chimney out of the way of sparks from the forge fire. The nozzle of the bellows goes through a hole ending on the hearth of the forge. C is the hearth where the coal is placed. D is a nest in the centre of the hearth, called a tuyere. Through this opening the blast from the bellows enters the coal heap.
The whole forge is built of brick and mortar. Modern forges are made of iron and steel and have a sheet iron hood in place of a brick chimney. But the principle of the tuyere, where the blast enters the forge, is the same as we blacksmiths have always used. Now I'll build the fire in the forge. Here in this box are some shavings. I save all my shavings and put them here to start my fire with. Place the shavings over the tuyere and light them. Let them burn for a little while, then cover the whole with this soft bituminous coal. This kind of coal is free from sulphur and phosphorus, and it cokes very nicely when the gas and tar are burnt out. Now it's time to use the bellows. You can take hold of this handle and pull down. The weights on the bottom pull the handle up again. Sometimes weights are placed on the top board. This helps to increase the air pressure. Notice that the bellows hang in a frame and the centre axis is fastened to the upright, allowing the upper and lower half to rise and fall. When the lower half falls it sucks the air in through a little trap door on the bottom, and when raised the trap door closes and the air is forced through the nozzle into the tuyere on the forge. This alternates, first taking the air in and then forcing the air out. Pump gently at first, then the coal will not smother the fire. That volume of smoke coming up is mostly from the burning shavings and it goes right up the flue. This blue flame that you see now shows that the gases are burning in the coal. When they are burnt out the coals give a red glow. Now the bright fire is shown through the coal. Put your poker into the coal heap and raise it gently. The opening made on the top is a vent for the heat to escape and prevents the fire blowing into the shop. An opening like this should always be left at the top, on account of the oxygen which is being pumped in constantly. Sprinkle a little water on the coal around the outside of the fire. This helps to pack the coal down tight and keep the fire in a confined space, for it is apt to spread and use up much more coal than is needed.
You see, boys, this is an old-fashioned blacksmith shop. Most of the work done here is horseshoeing, though we have many complex things brought in for us to repair, none of which can be turned away. All these shoes hanging on the rafters are for horses and mules. The mule's shoe, you see, is a different shape from the horse's shoe. I make these in my spare moments and we call them stock shoes. Notice that the stock shoes have no heels or toes on them. These are put on when the shoe is made to fit the horse's foot.
Shoes are now made by machinery and I buy them when I haven't time to make them. But they, too, must be fitted to the foot, for they come only in stock form.
Now I'm going to show you how to make a horseshoe. I'll make it out of this piece of steel tire from a wagon wheel. We use all this kind of scrap to make the stock shoes. That's why our made shoes can be sold cheaper than the manufactured shoes, if we have the time to make them. Steel is being used in place of iron in all branches of industry. A steel shoe weighing half a pound will wear as long as an iron shoe weighing one pound.
This piece of steel tire which I am using is 1 in. wide and 1⁄2 in. thick. I want to keep the thickness 1⁄2 in., but reduce the width to 3⁄4 in. To do this the end of the piece of metal is put into the forge fire. As soon as it is hot enough, I take it out and place it, edge up, on the anvil, and with the hand hammer draw it out any length I wish. You see that driving down on the edge of the hot bar thickens it. Now turn it over and drive on the flat side. You must keep driving first on the edge and then on the side until it is the right size. This is called stretching the metal out. Now the bar is long enough to bend in the shape of a letter U. Heat about 6 ins. of this bar and then place it on the largest part of the anvil horn. Strike on the projecting end with a hand hammer. It bends easily into the shape.
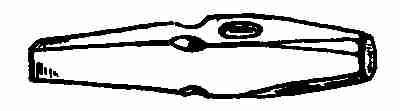
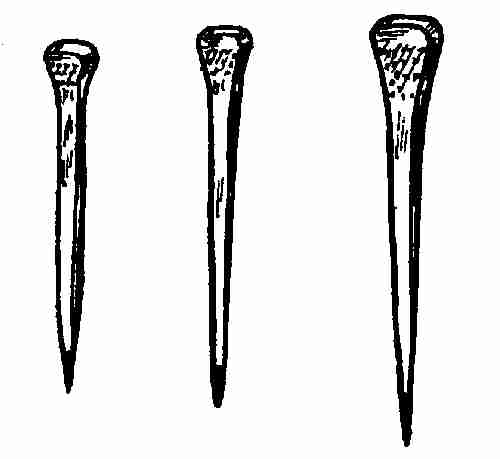
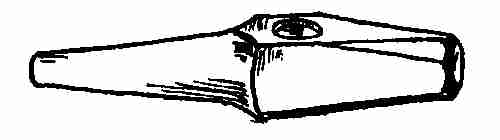
Take the chisel-shaped tool. The edge of this tool makes the groove to fit the nail heads. Every horseshoe has eight rectangular holes for nails, four on each side. These are punched through with this punch, and are made just large enough to fit the horseshoe nail heads. Now you see a stock shoe, and it is just like the dozens I have hanging on the rafters. But before the shoe is placed on the horse's foot it must have the front piece, called the toe calk, welded on and the ends of the shoe turned up for heels. To make the toe calk I take a piece of iron or steel about 2 × 3⁄4 × 1⁄2 in. The end of this piece is prepared like this:
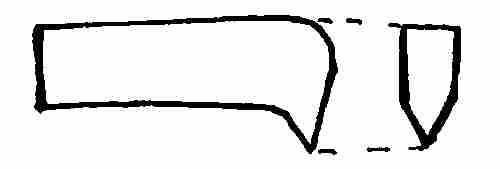
The little projection is made very sharp so that it can stick into the hot iron. In this way it is kept in place during the process of welding. When the calk is made I heat the shoe and place the calk in the proper position. The calk is cold and the little projecting point is easily driven into the hot iron. Now that it is held in place it must be welded on. Iron and steel are welded together only by the use of a flux. There are many kinds of fluxes used. For this I shall use borax. I buy it by the pound and it comes in boxes like this. Sprinkle a little on the calk, heat it in the fire, watch the fire. When the metal is hot enough to weld you will notice a brown smoke coming from the fire. That tells you the borax is burning. There, see the smoke! Now I must take the shoe out quickly and place it on the anvil. A few quick, light blows upon the calk and the welding is done! The hammering must be done quickly after the shoe has been taken out of the fire, or the cold air will lower the temperature and prevent the metal from uniting. There, it's welded! Now I shape it and fit it to the horse's foot. The heels can't be bent up until I know just how long the horse's foot is. I measure by placing it on the hoof. Then the two ends of the shoe are bent and driven down so that the height of the heels equals the height of the calk. Now, boys, this is a hand made shoe. When you know how to use the fire and the tools it is an easy problem to make a horseshoe.
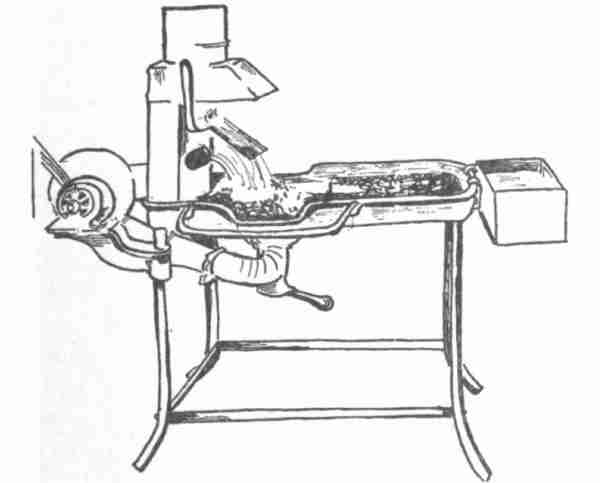
The modern forge. An ideal forge for use when electric power is available
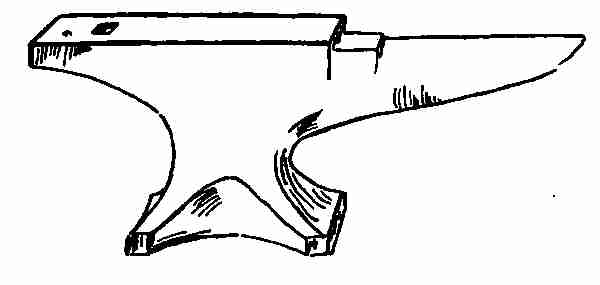
So it is with all blacksmiths' work. There is not anything about it you can't do. Any boy can build his own blacksmith shop if he has a shed or shelter large enough to keep the rain from a forge, anvil, and some tools. You needn't have the big, old-fashioned brick forge like mine. Here is a picture of a portable forge that I can recommend. It can be bought at almost any store that deals in hardware supplies. It is small and handy and can be easily taken from place to place. You can buy any size anvil you wish. They come in all sizes, weighing from five pounds to five hundred pounds. Here is a list of tools which will do all the work, both ornamental and plain, which you may wish to do. Get this equipment, then build your shop.
BLACKSMITHS' TOOLS
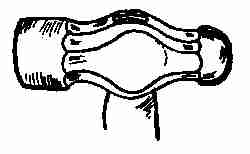
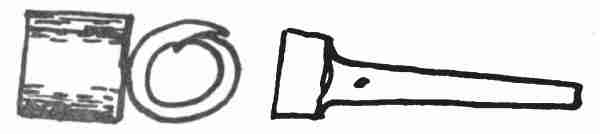
Some of these tools you have used in your copper, brass, and silver work. You will need your vise, files, your various punches, dividers, hand cold chisel, and square. In addition, you should have the following:
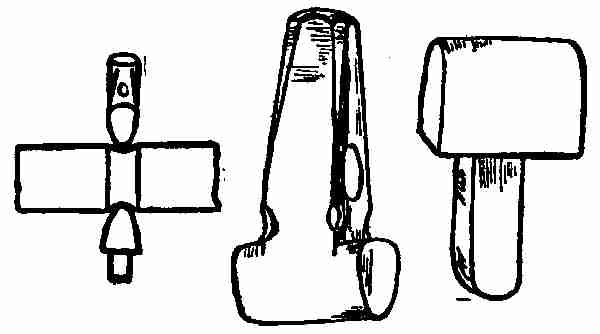
Position of fullers. Top fuller. Bottom fuller
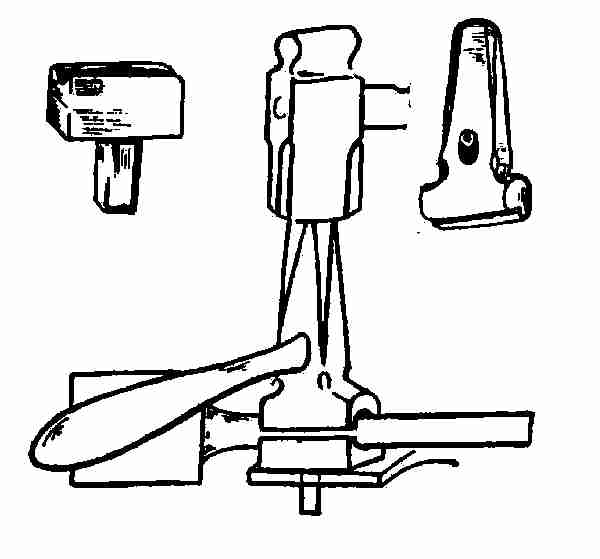
Bottom swage. Swages in position. Top swage
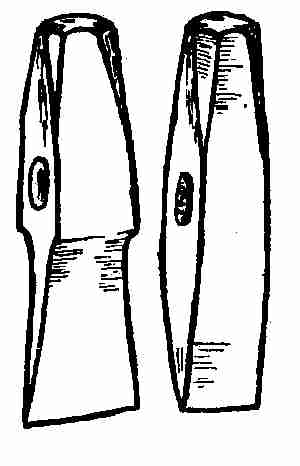
Hot chisel. Cold chisel
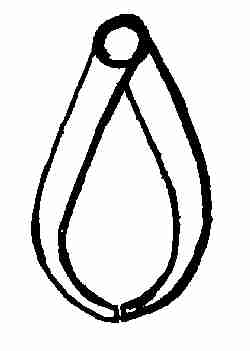
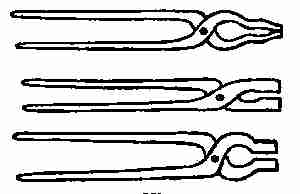
Hand hammer: A hand hammer is used more than any other tool in the shop. The flat face is used for shaping material and the round plain for riveting, etc. The top and bottom fullers are used for making depressions in iron and steel. This process is called fullering. The top and bottom swages are used for rounding square iron or steel or reducing large sizes to smaller ones. Hot and cold chisels are both used for cutting iron. As the name shows, one is used for hot iron and one for cold iron. Gouges are for cutting ornamental shapes on sheet iron or steel, hot or cold. Calipers are used for measuring diameters. The broad flat surface of the flatter smoothes rough places. The set hammer is used to make square shoulders. It is a small hammer and does the work in narrow places which larger tools cannot reach. This sledge weighs about eight pounds. It is used where heavy hammering or driving is needed, and in conjunction with such tools as swages, fullers, set hammers, etc. The hardie is a sharp cutting tool used to cut small pieces of iron and soft steel while hot or cold. Tongs are of all sizes. Those most called into use have the following shapes: The shovel for the fire must be small and strong so the clinker formed on the bottom can be shoveled out without carrying too much coal with it. A poker, rake, and dipper also are needed for use about the fire.
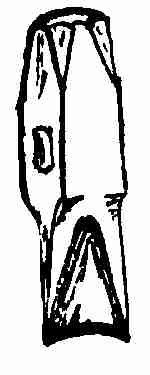
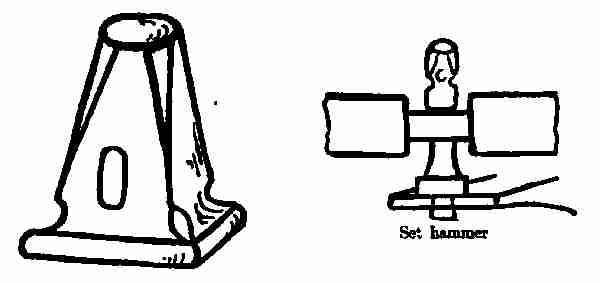
You know now all the tools needed to equip a shop. I want to tell you about the fuels, such as coal and charcoal, which you will use, and something about pig iron and wrought iron which I think you ought to know.
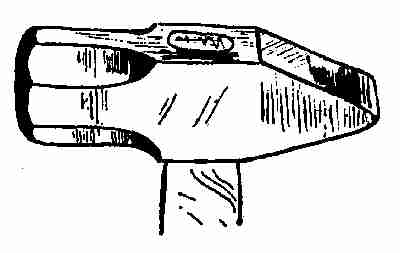
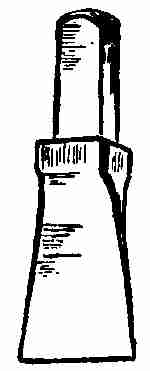
Hardie
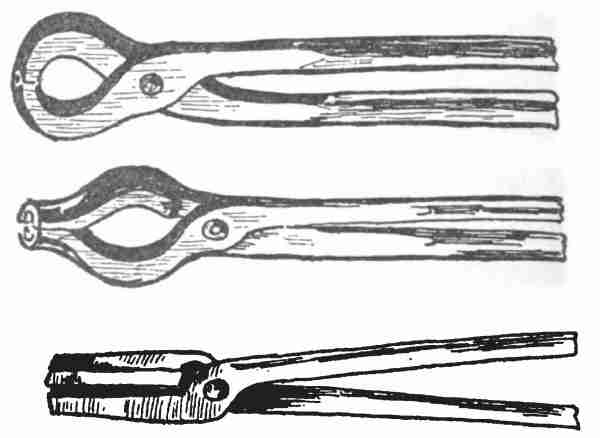
Tongs
The smoke is the most troublesome thing in a blacksmith's shop. The old-fashioned forge is perhaps the best made to draw the gases and smoke out, except when exhaust fans are used for that purpose. Hoods are fitted to pull down over the fire, completely covering the smoke area, and the suction made by the fan will draw all the smoke from the fire. This, of course, is possible only in modern equipped shops. The portable forges that we use have none of this drawing-out system, except through a natural draft chimney, made either of bricks or by extending an iron pipe from the hood through the side of the shed or through the roof. The down-draft system is a hood placed to one side of the fire. It falls over the fire by means of a hinge placed on the hood. This is not as effective as the overhead system on account of the smallness of the hood. The pipes are all underground, otherwise the system is the same as the overhead system.
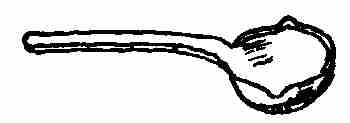
Water dipper
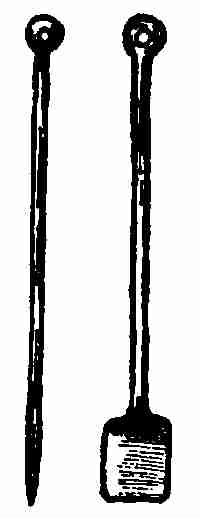
Fire tools
Danger of explosion: Coal gases leak into the tuyere when the blast is shut off. When the blast is put on these gases are blown up into the hot fire and they explode from the heat. They do no harm, except the noise made by the explosion.
Fuels: The coal used in a blacksmiths' shop is a soft coal called bituminous coal. It is supposed to have less phosphorus and sulphur than any other kind of coal. Coal containing either of these ingredients should not be used. Sulphur makes iron hot short and phosphorus makes the iron cold short that is, the iron is made brittle while hot by means of the sulphur, and brittle when cold through the effect of the phosphorus. When this soft coal is heated the coal tar is burned out and the coal burns into a coke.
Charcoal: Charcoal is a solid fuel and the very best fuel for heating purposes. It is free from the impurities mentioned here. It is made by burning hard wood in a closed oven or kiln. This kiln in turn burns the wood into lumps of charcoal. The cost makes the only real objection to the use of charcoal as fuel.
PIG IRON
Iron ore is an oxide of iron containing from 35 per cent. to 65 per cent. iron. The rest is oxygen, phosphorus, sulphur, silica, and other impurities. Iron ore is charged into a blast furnace, mixed with limestone as a flux, and melted down, with coke as fuel. The metal which results from this melting is known as commercial pig iron.
WROUGHT IRON
Wrought iron is made from pig iron. The pig iron is remelted in a so-called puddling furnace by charging about half a ton at one time into the furnace. While in a molten state it is stirred up with large iron hooks by the puddler. It is kept boiling so as to expose every part of the iron bath to the action of the flame in order to burn out the carbon. The other impurities will separate from the iron and run out of the furnace as slag.
The temperature in the puddling furnace is high enough to melt pig iron but not high enough to keep wrought iron in a liquid state. So, as soon as the small particles of iron become purified the partially congealed portion forms a spongy mass, in which small globules of iron ore are in a semi-plastic state. These are gathered up by the puddler and his helper and are formed into a ball on the bottom of the furnace by means of long rabble bars used for this purpose. The ball is about 150 to 200 pounds in weight. These lumps of iron are taken to a large hammer or squeezer.
There they are shaped into long blooms to fit the rolls. They are taken right from the squeezer to the rolling mill and rolled out into bars 4 ins. or 5 ins. wide and 3⁄4 in. thick. These bars are called muck bars owing to their spongy-like appearance and the large quantity of cinders which they contain. The muck bars are now cut into lengths of 3 ft. and 4 ft. and are piled on top of each other in blocks of 200 lbs. The blocks are put into a heating furnace and heated to a welding heat. While at this heat they are put through the rolls, thus welding the whole mass together, at the same time reducing the pile to sizes required by the market. When cold these are cut into lengths for use. This is the iron used in most blacksmiths' shops.
XXI FIRST PROBLEMS IN FORGING
HOW TO MAKE A STAKE PIN
Stake pins are used for holding ropes in place, such as those on tents, etc.
Material: 1⁄2 in. round × 18 ins. long of wrought iron.
Tool: Hand hammer.

Stake Pin
Directions: This sketch is made full size and it shows a round stake pin with a four-sided tapering end about 3 ins. long. Place one end of the bar of iron into the fire. It should be placed so that the iron will be parallel to the bottom of the hearth.
All the heating done for this kind of work must be done in a reducing fire. There are two kinds of fires, the oxidizing fire and the reducing fire. The oxidizing fire is one where the quantity of air blown in is not all consumed by the fire. There is an excess of air and an oxide is formed on the iron. This prevents it from heating sufficiently. The reducing fire is one where the blast is in proportion to the consuming power of the fire—that is, just enough air is blown in to be used up by the fire.
The greater the temperature the more coal and likewise the more blast required. So that a temperature of 2500° Fahrenheit can be easily gotten on an ordinary forge fire. While the iron is heating it should be drawn out of the forge fire once in a while to be examined. When it has reached a white heat, not sparkling, place it on the anvil, and with a hand hammer begin at the end and drive it into shape according to your sketch. Hammer this until the iron begins to darken. Place it again in the fire and repeat as before until the thing is finished. A piece of iron may be heated a dozen times while working it into shape. All depends upon the skill and experience of the worker.
You will probably learn in this problem that metal will burn in this high temperature the same as a piece of wood and very much quicker. It does not smoulder like wood; it just melts away. It would be well to have the point of the iron stake melt or burn off in this particular case so that you can learn all about the heating, melting, and burning of iron. The fine point on the stake is made by keeping the metal on the extreme outer edge of the anvil, so that the outer half of the hammer face will project over the anvil edge, thus reducing any metal between the two into a very small space. (See position of hand hammer in the article on tools.)
When the work is finished the temperature of the metal should be low. This prevents the metal from scaling and gives an opportunity for a smooth finished surface.
HOW TO MAKE A STAPLE
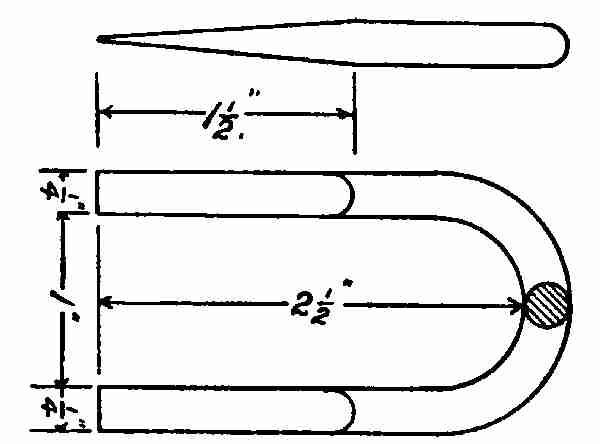
Staple
Staples are small U-shaped pieces of iron with pointed ends. They are driven into wood for the purpose of holding some attachment in place. We have staples for barn doors, to catch the gate hook, to fasten chains, etc.
Material: One piece of 1⁄4-in. round iron 41⁄2 ins. long.
Directions: Heat one end of the iron piece. Draw it to a square point as was done on the staple pin. Flatten this point as shown in the drawing. Cut it off square at the extreme end so that it will be quite sharp when finished. Repeat on the other end. The piece will now be about 61⁄4 ins. long, about 1⁄4 in. round in the middle, with square, tapering points. The centre is now heated and the piece is bent over the horn of the anvil to the shape shown in the drawing.
In bending this over the horn of the anvil strike with light blows so that the two ends will be the same length. If it is warped or twisted, flatten it out again on the anvil till the flat sides lie in the same plane.
GATE HOOK
This hook is used for fastening doors as well as gates. The drawing shows a gate hook twisted in the middle. Material: One piece of 5⁄16-in. square iron about 61⁄4 ins. long.
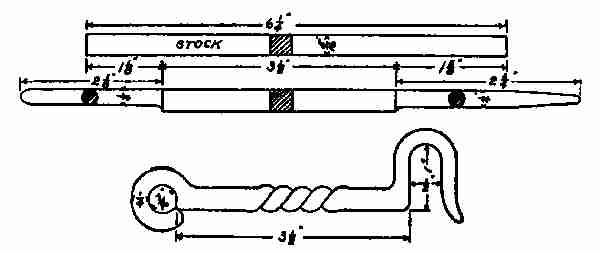
Gate hook
Directions: Mark off with the centre punch 11⁄8 ins. on one end and 15⁄8 ins. on the other. Put the short end into the fire and draw it out until it is 1⁄4 in. square. Hammer the corners down, thus rounding the end until it measures 1⁄4 in. in diameter and is about 21⁄8 ins. long.
Repeat on the large end and draw this out until it measures 23⁄4 ins. long. Bend the end as shown by the drawing. When both ends are bent in shape put the piece into the fire and heat it red hot between the eye and the hook. Place it in the jaws of the vise about 1 in. from the eye, and with a pair of tongs and a wrench grasp the piece about 1 in. from the hook and give it one complete turn. This twists the hook in the centre like the drawing. If it has become bent while twisting it may be straightened by hammering it between two blocks of hard wood. This prevents bruising the sharp edges of the twist.
HARNESS HOOK
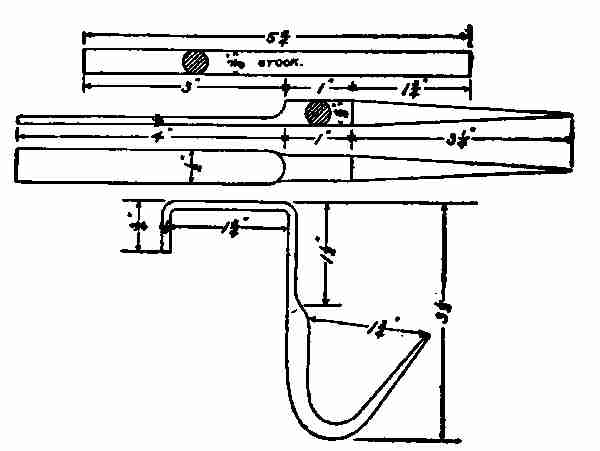
These large hooks are most useful around a stable and are used to hold harness, bags, etc.; in short, they are general utility hooks. They are simply and quickly made.
Material: Stock 3⁄8 × 6 ins. long round iron.
Directions: Flatten the iron down by heating it red hot. With the hand hammer flatten out one end 4 ins. long, 1⁄2 in. wide × 1⁄8 in. thick. One inch from the shoulder made by the flattening begin to draw out the end to a round straight taper, 31⁄4 ins. long. Bend the flat part over the flat end of the anvil, to fit a joint or any wooden beam (as shown by the sketch), and hook it over the horn.
This hook may be made any size according to the purpose for which it is to be used.
TWO-PRONGED FORK
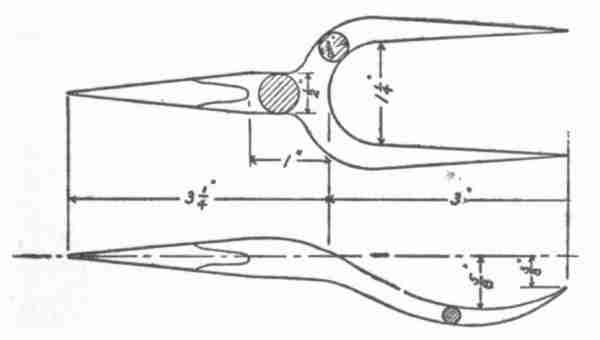
This two-pronged fork is found useful for pitching hay, fishing, etc.
Stock: 3⁄4 × 1 × 5 ins. long, soft steel.
Directions: Two inches back from the end of the bar punch a small hole in the middle of the iron. (See method of punching). Split the piece with the chisel up to this hole. Open the part split and spread at right angles to the shank. Heat the piece up at the crotch. With a fuller, fuller down to 1⁄2 in. back of the spread arms. Draw the stem out 1⁄2 in. round. Now the fork is blocked out ready for finishing. This is done by following the drawings for the dimensions and size. Notice that the two ends of the fork are drawn out to a sharp round taper. The stem is drawn out to a sharp square taper, which is to be driven into a wood handle.
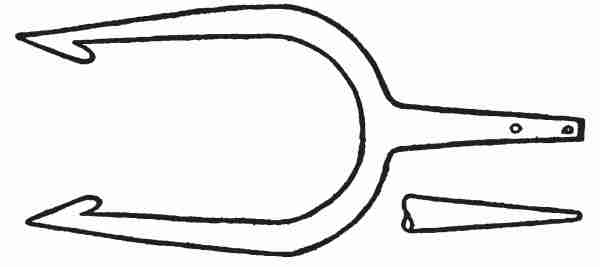
Fish spear
Fish spear: If this two-pronged fork is meant for a fish spear, used so often in rivers where the current is very swift, the extreme ends are flattened down to a spear point as shown in the drawing.
BOLTS
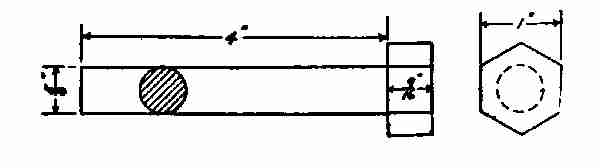
A bolt consists of a stem and a head. Bolt heads are of all shapes—square, hexagonal, round, flat, etc.—while the stem is always round. As a rule, the thickness of the head equals the thickness of the stem, and the diameter of the head is about 11⁄2 times the thickness of the stem. This proportion is generally kept for square and hexagonal bolts.
Bolt
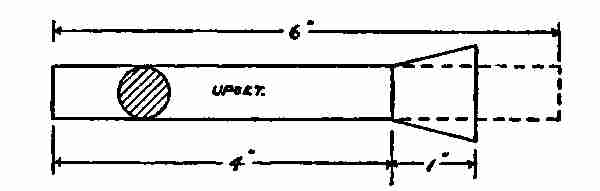
Directions: Out of the piece of iron used enough of the end is upset to make the head. To do this, heat 21⁄2 ins. from the end of the bar to a bright red heat. Take the piece out of the fire, place the hot end on the anvil, and with the bar in a vertical position hammer upon the cold end. The cold end is driven into the hot end, thus shortening or upsetting the bar. This is repeated. The end is heated again and the hammering is continued until the enlarged end has the right proportion for the head of the bolt. (See drawing.) Heat the enlarged end again and pass the cold end of the stem through the heading tool. Place the heading tool upon the anvil in such a position that the stem passes through the hole in the anvil. The upset end is hammered down against the heading tool until the head is the required thickness. Take it off the heading tool and square it up with the hand hammer. If, after squaring up, the head is found to be too small in diameter and too thick, it is again put into the heading tool and hammered down. This is repeated until the head is finished according to the drawing shown.
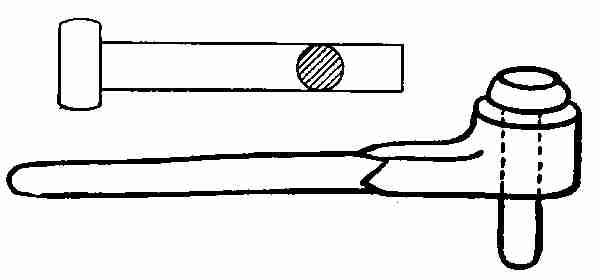
Bolt in heading tool
All hand-made bolts are made on this principle, whether they are very large or very small.
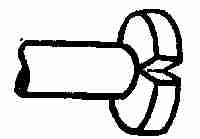
Collar
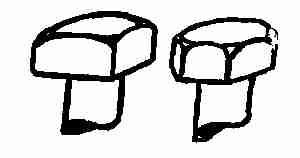
Bolt heads
If a six-sided bolt is desired the same method is used. The head is made six-sided instead of being squared as was done in the first case. The bolt is finally cut to the required length and the end is bevelled off ready for threading. Bolts may be made without going through the process of upsetting the stock. In that case the bars used are of any diameter, depending upon the size of the stem needed. Bend a piece of iron for a collar to give you the amount of stock required for the bolt head. Heat the end of the iron bar. Put this hot end into the collar. Upset it so that it fills the space in the collar. Put it into the fire, then weld and finish as you did in making the head with the end upset.
All bolts that are on the market except special bolts are made by bolt heading machines. Up to 3⁄8 in. in diameter all bolts are made without the use of heat. Those above that size are all heated red hot and the principle is exactly the same as you used when you made the bolt by hand. The machine upsets the head and at the same time shapes it into any desired shape.
NUTS
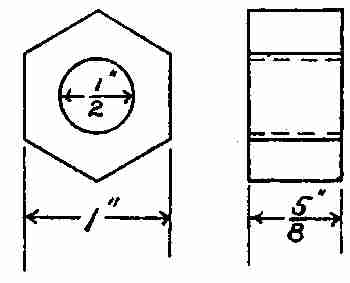
Nuts are used in conjunction with bolts for fastening things together or tightening up parts of machines. There are two ways of making nuts; one is to cut a piece of metal off the right length, punch a hole in the middle, and finish it by shaping it on the end of a mandrel or punch. The second way is to weld a collar and shape this on a mandrel. Though the second method involves welding and is the more difficult of the two, it is the better method. However, the grain of the metal in the second method runs around the nut, while in the former case it runs lengthwise. For this reason the nut is apt to split when tightened up too tight on the bolt. The method explained here is the easier one of the two: it is the simple process of making the nut by punching the hole.
Material: Stock 1 × 5⁄8 in. of wrought iron, any length.
Tools: Hammer, punch, hot chisel, pair of calipers.
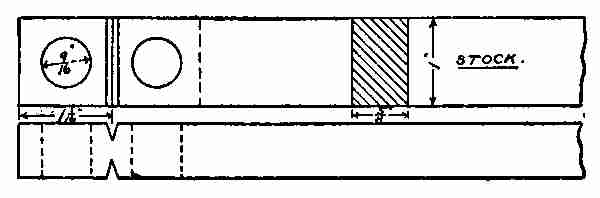
Directions: The drawing here shows each step in the process of making the square nut. Measure off 11⁄16 in. on the bar and with the hot chisel nick on each side almost through. Find the centre of the piece and, with the punch, punch a hole through it after heating it red hot. Place it on the anvil. Place the punch in the centre and drive down from one side until the impression of the punch shows through on the other side. Withdraw the punch and turn the piece upside down. Place the punch upon the impression shown through, driving down till the centre piece is loosened. It is now put over the hole of the anvil and this loosened centre piece driven out. This leaves a hole in the hot iron. All holes made in hot iron are punched through in this way whether they be large or small. The size of the hole is determined by the size of the punch.
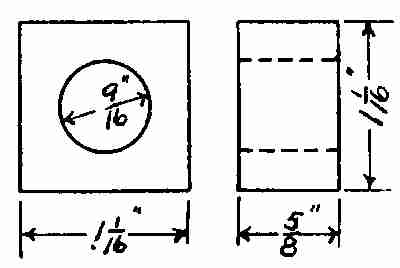
Re-heat the iron, push the punch into the hole made, and by a bending motion break the piece off where it is nicked. The piece now is sticking on to the end of the punch. Place them on the anvil and square up the nut while the punch is still in the hole. This prevents the hole from changing its shape while the nut is being driven into shape. It is now taken off the punch and flattened down to the desired thickness. Repeat this edging up and flattening down till the nut is finished.
Hexagonal nuts are made in the same way, except for the squaring up. When the piece is ready for shaping it is made round while on the punch and then made six-sided. It is flattened and edged up in the same manner until the desired size is reached.
XXII WELDING
It is often necessary to join together two pieces of iron, or the ends of the same piece, as in forming a circle, so that the joint will form one solid mass. When this is done the pieces are said to be welded together. Most of the problems treated so far have had to do with single pieces of iron. Often many pieces are welded together to make one forging, as in making the horseshoe. This is called built up work.
It is possible to weld any iron surfaces provided no oxide of iron is formed upon the surface. If such a coating occurs welding is impossible. Iron heated in the air absorbs oxygen, which results in the oxide formation. There are two ways of guarding against this difficulty: (1) Suitable fluxes, and (2) reducing fires.
The best flux is a sharp sand, usually beach sand. This is sprinkled over the ends to be welded. The sand fuses on to the ends of the iron and excludes the air. The reducing fire is one that consumes all the oxygen that is forced into it by the blast. This is obtained by having a thick bed of fire for the air to pass through before coming into contact with the iron and by keeping the blast pressure low enough to enable the fire to burn all that is admitted. A thick fire, so to speak, should always be kept.
TO MAKE AN IRON RING
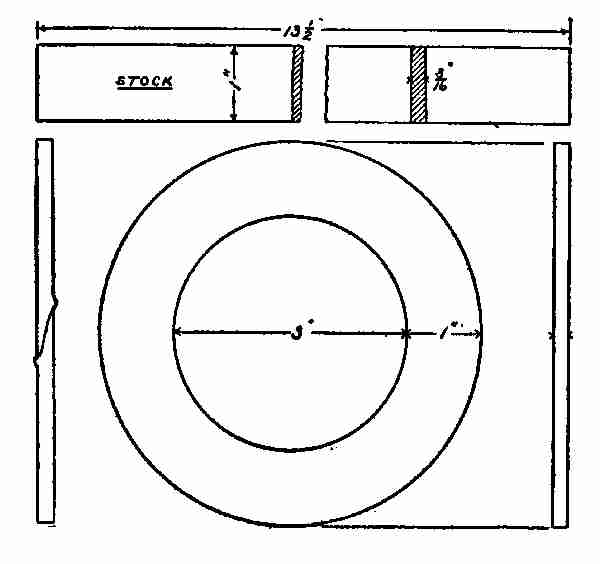
The simplest problem for a first weld is a flat iron ring. This drawing shows a ring 3 ins. in diameter on the inside and 5 ins. on the outside.
Stock: Flat piece of iron 131⁄2 × 1 × 3⁄16 ins.
Directions: The making of this ring involves the processes of bending and welding. Before the bending is done the two ends are upset and made about 11⁄16 in. thicker than they were, for about 1 in. back from either end. To do the upsetting, place the hot end on the anvil vertically and strike on the cold end with the hammer until the required thickness is obtained. If the end which is being upset was not heated more than 11⁄2 in., it will probably upset without bending. If heated more than this the probabilities are that it will bend during the process. If it does so, it should be laid upon the anvil and the bend hammered out. When the desired thickness has been obtained scarf the ends as shown in the drawing, using the round end or peen of the hammer to do so. (See scarfing.)
Do the same to the other end, putting the scarf on the opposite side to the first one. Now heat the piece, about half its length, quite hot. Place it upon the thickest part of the horn of the anvil, strike upon the end that projects beyond the anvil, and bend it into a ring. The scarfs, being opposite, will now fit and come together. (See drawing.) Bend over till the two edges lap. This gives plenty of material where the joint comes, to allow for the waste of the material from the high welding heat and also that needed for the hammering of the metal during the welding. The upsetting is done to allow for this waste, and to give opportunity to reduce the pieces to the required thickness. All welds should be a trifle large at the joint. The driving down edgewise on the horn of the anvil bends the material, but prevents one shaping it to its proper dimensions. That is why in flattening down the weld care must be taken not to widen the iron at that place so that it is too thin. A few trials will make this perfectly clear. A finish on the iron depends upon how skilfully one can use the hammer without unduly marking the metal.
SMALL CHAIN
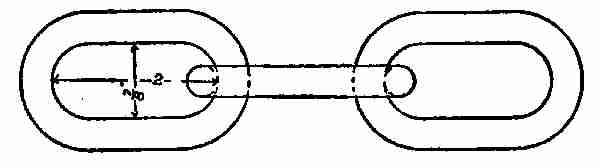
Most chains are made by hand, especially those used for the purpose of lifting heavy loads. Small chains, where no special strain is called for, are welded by electricity. There are special factories for the making of chains. Most of these factories have rolling mills attached. The material is here rolled out to suit the different size chains that are made. Machinery forms the bars of iron into special shapes the size of the links. These in turn are cut by machinery. These links are all of the same size and are cut off on an angle, thus making the scarf. They are taken by the workmen, the ends lapped over slightly, then put into the fire and welded. Within the last few years the Navy Department has taken up the method of welding the large anchor chains by machinery.
Stock: 3⁄8 in. round, 6 ins. long.

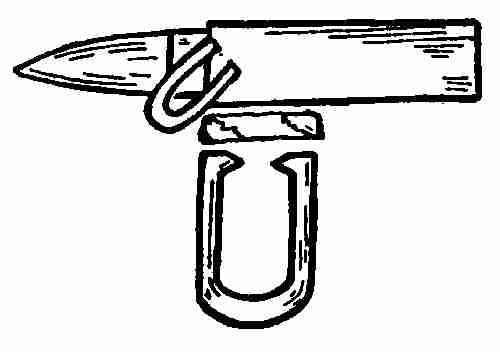
Scarf for chain welding
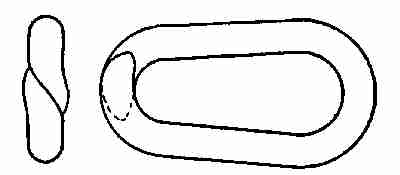
Link ready to weld the end
Directions: The drawing shows the size of each link in this chain. Heat the 6-in. piece in the middle. Place it on the horn of the anvil and bend it U-shaped, as you did the piece for the staple. (See articles in welding for chains.) The two ends are the same length. This is perhaps the only weld that is made without upsetting. When the scarfs are made like the drawing, bend the ends so that the scarfs overlap. Now it is ready for welding. Place the link in the fire. Be careful to have the link well covered both above and below with hot coals. Let there be just enough blast to increase the heat of the fire. In a little while the sparks will flow up from the iron. At this time the link should be turned upside down in the fire without changing its position. The hottest part of the fire being underneath, the iron will heat there quickest. This turning it upside down finally brings all the parts to be welded in the hottest part of the fire. When these iron sparks begin to show, it is time to take the piece out. Place it on the anvil and lightly tap upon the joint. The iron is very soft on account of the intense heat and if the blows are too heavy the iron will flatten out until it is too thin. In that case it would be impossible to finish the piece and make the weld the size it should be when done. If you examine the links of any chain you will have difficulty to find the welded end. The process of welding is not easy at first, but a few trials with the heating of the iron and handling the tools at the critical moment will prove encouraging. Chains are usually made by making first one link, then putting the stock for the next link into the first, before bending the second end.
All hooks, swivels, or shackles are put on the chain when made, in the same way that you add a link in order to lengthen the chain.
WELDING
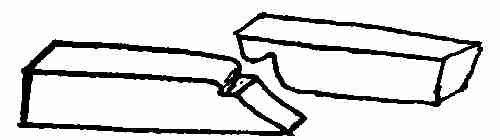
Axle Welding
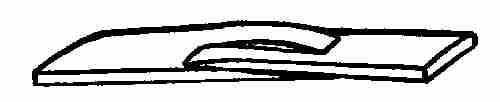
Flatten the ends out; split and push together
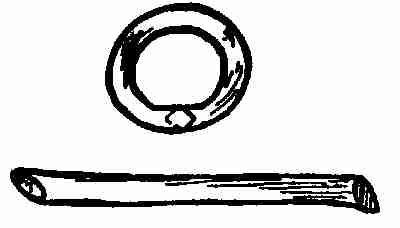
Ring Welding
Welds are named according to the manner in which the pieces are put together. The principal welds are: (1) flat welds, (2) butt welds, (3) lap welds, (4) cleft welds, and (5) jump welds. The selection of the kind of weld to be used in any problem depends upon the form of the pieces of metal to be worked upon.
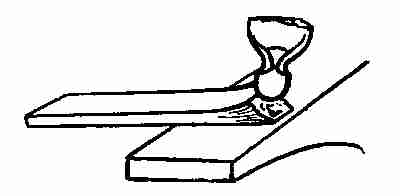
Hammer peen
Flat welds: For flat welds the ends of the pieces of metal are first upset. Use the peen of the hammer and draw the metal out thin at the end, flatten it out and narrow it up edgewise at the extreme end. The metal is forced first forward and backward by the hammer strokes. Large scarfs are sometimes made by using a fuller. This is a very much quicker way for large work than the one just explained, but one requires a helper to handle the sledge hammer in this case, to strike down on the fuller.
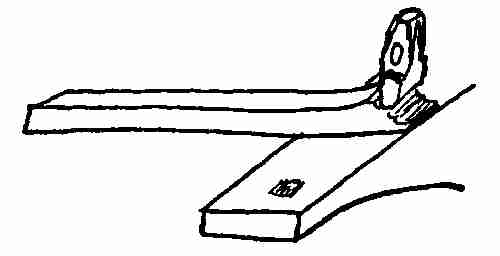
Use of fuller in making scarfs
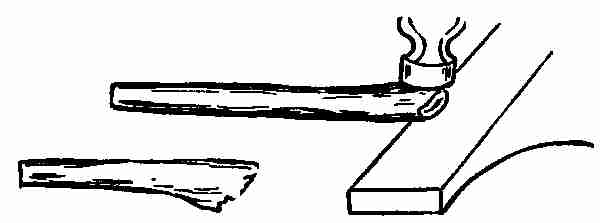
Scarfing on edge of anvil
Most smiths use the edge of the anvil for making scarfs. Place the edge of the metal, after it has been upset, on the edge of the anvil and strike down on the top with a hammer or sledge. This moves the metal with each blow and the end of the bar is increased, making, as it were, a series of steps. It is a process much the same as fullering except in place of the fuller you use the edge of the anvil. This is the quickest way to make a scarf, and the weld depends wholly upon how the scarfs are made in any one of the operations spoken of here.
If the scarf is well made it will be a little higher in the middle than at the sides, so that when the pieces are placed together the slag that forms will squeeze out. The welding is done as follows: Place the scarfs of both pieces separately in the fire, the scarfs downward. (When we speak of scarfs we refer to the bevelled edge of the roughest part of the scarf.) This prevents any impurities melting on the scarf surface. When the scarf begins to get hot enough to weld, iron sparks will blow out with the blaze. This is the sign to get things in readiness. One cannot linger for a moment when the iron is hot enough to weld. See that the anvil is clean. Have the hammer ready in hand. If one has a helper he will handle one piece while the smith handles the hammer and the other piece.
If there is no helper a hammer is placed conveniently near the anvil. The two pieces of iron are grasped by the smith, one in either hand, drawn out of the fire and given a sharp rap on the edge of the anvil or forge to remove any dirt or pieces of coal clinging to the scarfs. One piece is placed on the anvil and the other piece is put on top of this. The weight of the second piece holds the first piece in place until such time as the smith can get his hammer ready to strike. As soon as the pieces stick together the ends of the scarfs are welded first. They are the thinnest and will cool the quickest. The body of the piece welds while you are welding the scarfs. Both sides are worked upon, first on one and then on the other, till the piece is hammered down to the required size. In trial work it is best for one to use pieces of iron long enough to avoid the use of tongs.
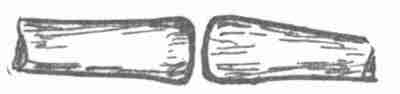
Butt welds
Butt welds: If the butt weld is carefully made it is perhaps the safest weld of all. This method is used mostly in welding round iron bars, 11⁄2 ins. in diameter up to 21⁄2 ins. They are made as follows: the ends of two bars are heated to a welding heat. Then they are brought out of the fire, put in a swage, end to end, and struck on the ends with a sledge hammer. While driving upon the ends the iron upsets when the contact takes place and at the same time the smith is driving the weld down. Two processes are acting here, one lengthwise and one downward. This makes the best weld, from the fact that the two ends that come together have a welding heat on the whole surface of each, a condition hard to get in any other kind of weld.
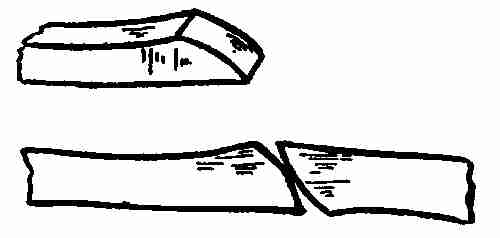
Flat Scarf
Lap weld: Two flat pieces are laid face to face, as shown in picture, and are welded. One must be careful that the two pieces have the same temperature, otherwise the colder piece would cut into the hotter and make a defect.
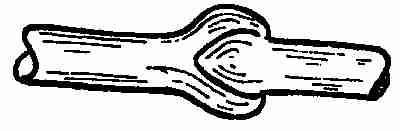
Split scarf, cleft weld
Cleft weld: If the weld is required to stand much strain, such as in parts of a locomotive frame, pieces are generally joined by the cleft weld. One piece is upset and split with a chisel. The two sides are spread apart. The other piece is scarfed on both edges to fit into this opening. If the pieces are very large much of the welding can be done while in the fire. The two pieces are placed together, in the proper position, in the fire. When the heat is hot enough to weld they are driven endwise. This drives the point of the one piece into the crotch of the other. Take them out of the fire and place upon an anvil or under a hammer. Small pieces are welded in the same way, except they may be driven with a hand hammer on the end just before driving upon the surface. The piece is reduced to the proper size and finished.
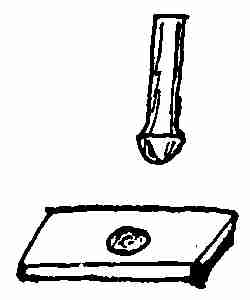
Jump weld: When one piece of metal is to be welded at right angles to another piece, a jump weld is made. Many are made by using a bob punch, making a hollow depression in a flat piece, and a rounded or button head shape on the end of the upright. Heat the end of the upright and also the flat piece around the bob punch hole to a welding heat. Take them out of the fire and drive the button head down into the hole made by the bob punch.
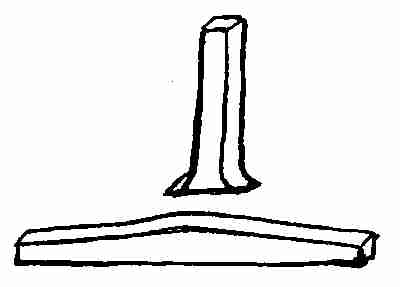
Jump weld
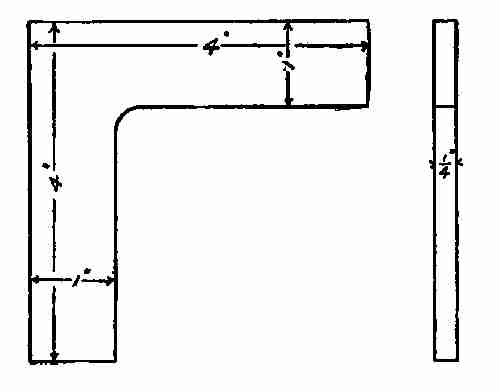
Corner plate
Another jump weld can be made in the following way: when square iron is to be welded to square iron, one end is upset and flattened. The other end is simply upset a little when the upright is to be welded to it. These ends are brought to a welding heat, and the work is finished as in the first jump weld. The hammer plays an important part in these jump welds, for the scarf projecting at the base must be welded by the hand hammer.
WORK INVOLVING FLAT WELDS
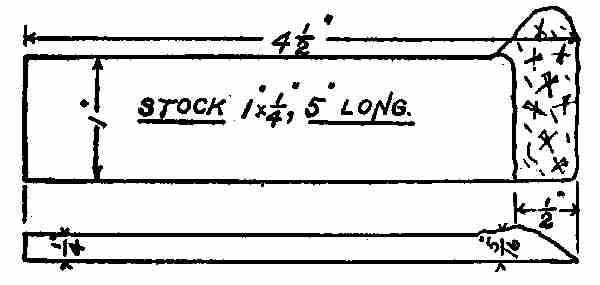
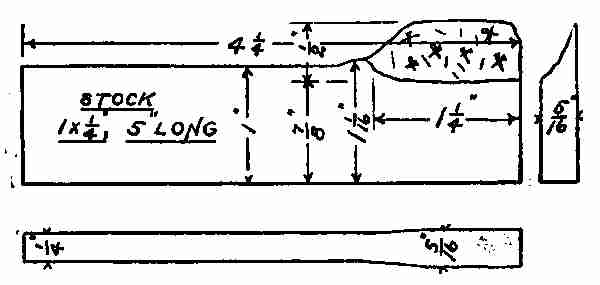
Making a corner plate: This corner plate shows two pieces of metal, 1⁄4 × 1 × 6 ins. welded in the corners, upset. The ends of the pieces to be joined are scarfed as explained in the flat weld. Both pieces are heated, then one placed on the other, driven down, and welded. They are shaped upon the edge of the anvil, and the ends are cut off to the length shown by the drawing.
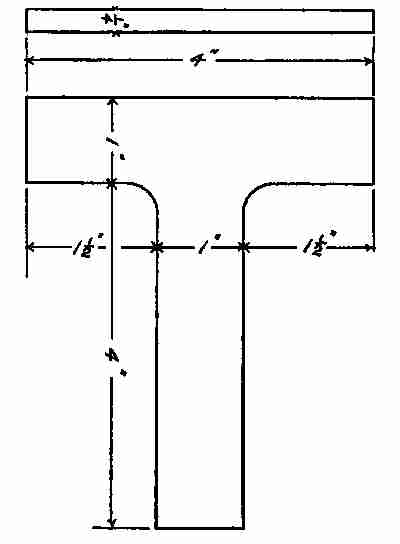
T Weld
T weld: This is used in making a T plate. The cross piece is upset in the middle and scarfed by using the peen of the hammer as shown.
The upright piece is upset on the end and scarfed, same as was done on the corner weld. Both pieces prepared are then heated and welded as described in the making of the corner plate. The sketch given here shows fairly well the different steps.
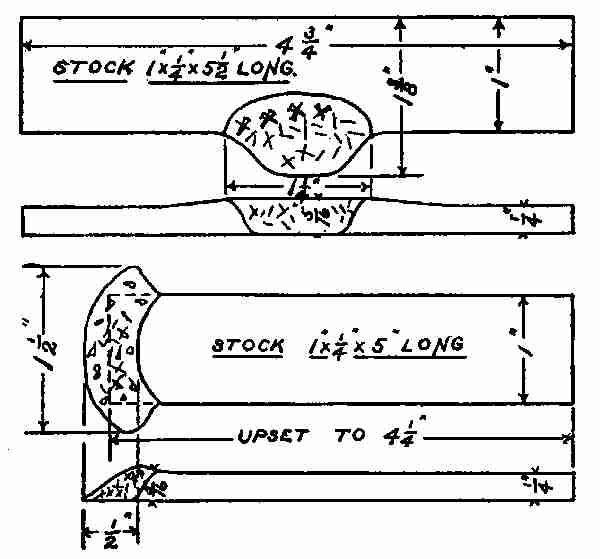
Detail of T weld
XXIII MILD STEEL OR SOFT STEEL
Mild steel, or soft steel, is supplanting wrought iron in many shops. Any smith who has worked with this metal will always prefer it to wrought iron. It is much stronger and can be bent, forged, and twisted in all manner of shapes, without cracking or splitting. This cannot be said of wrought iron. Therefore, when mild steel is used one is sure of finishing his problem, provided he understands the process of heating it. The matter of heating mild steel is the vital thing. It should never be worked at a welding heat or below a red heat. If worked either above or below this point it will show it by splitting or cracking before the problem is finished. Large crystals formed by working at or above the welding heat will cause the breaks, and internal fractures when working at the low heat will cause the cracks. However, this can be worked at a black red heat if the blows delivered affect only the surface and do not penetrate to the centre. This metal lends itself to forging better than wrought iron does. It is very good for most kinds of forging and particularly good for making weldless rings. One of the best problems to illustrate one of the many uses to which soft steel may be put is the making of a weldless ring.
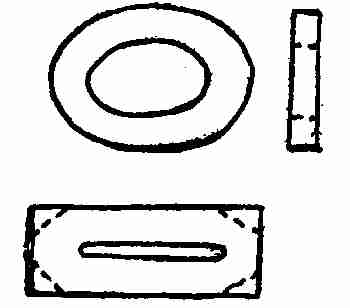
Weldless rings
A piece of soft steel 1 in. wide, 1⁄4 in. thick, 4 ins. long, is the stock used for this ring. With a centre-punch mark off 3⁄4 in. from each end. (See sketch.) In each centre-punch mark punch a 1⁄4-in. hole through the piece. With a hot chisel cut between these holes half way through on one side. Turn it upside down and finish cutting through from the other side. Now drive the chisel through, widening the slot out. Trim up the inside of the slot. Cut away all rough edges. Upset the piece on the anvil after heating and drive down on the ends. This will increase the size of the hole by shortening the length and bulging the sides out. The piece is now put on the horn of the anvil and rounded into a ring. The ends are now trimmed off or driven down into the thickness, as shown in the drawing. This is the method of making a weldless ring. It is easily made out of soft steel. It would require a very fine grade of wrought iron to do a piece of work of this kind, for wrought iron is fibrous and unless great care is exercised in forging it will split at the ends along the grain when opening it after the slot is cut in.
Steel is much cheaper than wrought iron, another good reason for its use. For the making of nuts, too, it is better than wrought iron. All one needs to do is to cut a piece off the end of a square bar, the proper thickness, punch a hole in it, and square it up. If wrought iron were used, to get the same strength one would need to bend the iron around a mandrel in the shape of a ring so that the grain of the iron would run around the hole of the nut. Then it should be welded and shaped into a square nut.
CHAIN HOOK OF SOFT STEEL
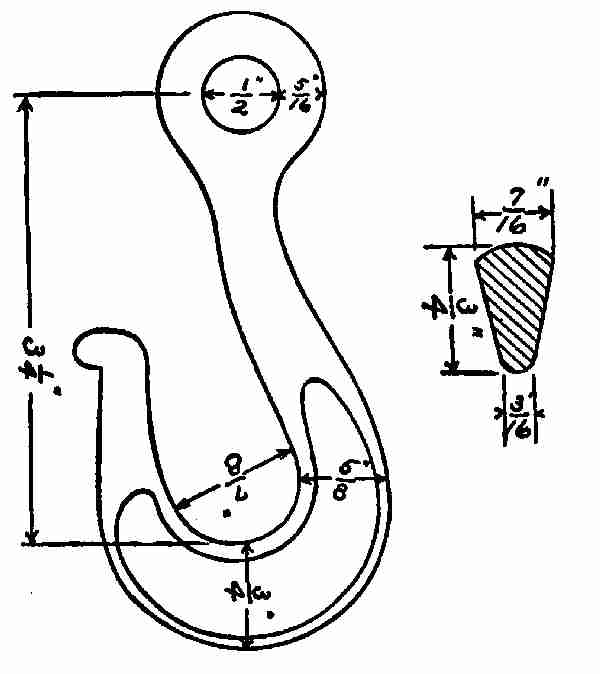
A chain hook
Up to the present time our work has been with wrought iron entirely. This hook is to be made out of soft Bessemer steel, which of course is very different from high carbon steel. It is the cheapest of the steels. All building material, railroad rails, boiler plates, steel cars, etc., are made of this cheap soft metal. The process of manufacture is quite simple. Molten cast iron, taken from the cupola, or blast furnace, is poured directly into a so-called Bessemer converter—a pear shaped vessel. Air is blown through the mass of molten metal. The air adds oxygen to the bath, and increases the heat to a temperature high enough to burn out all the impurities from the cast iron. This converts it into steel. It requires no more than nine or ten minutes to convert fifteen tons of cast iron into soft steel. The air is shut off and a sufficient amount of ferro-manganese is added so as to give the proper amount of carbon. The liquid steel is poured into ingots and these ingots while still hot are rolled into the shape used for the market. A piece of this kind of steel you are going to use to make a hook. Soft steel can be worked in the same way as you work wrought iron. It is not fibrous like wrought iron and is not apt to split unless worked at a low temperature.
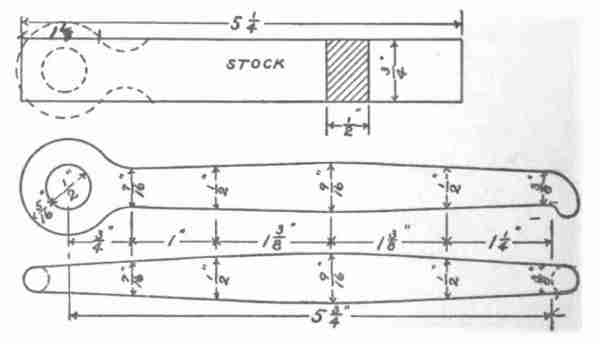
Stock: Soft steel, 51⁄4 ins. long, 3⁄4 × 1⁄2 in.
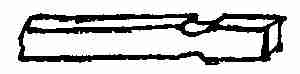
Stock for hook
Directions: The drawing gives all the steps necessary for the making of this hook. Notice in the drawing when the stock is given it is fullered down 11⁄8 ins. from one end. This is the amount needed to make the eye. After fullering the stock it is placed on the anvil and squared up.
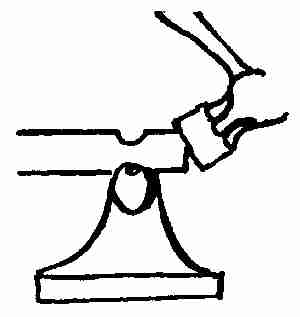
Rounding
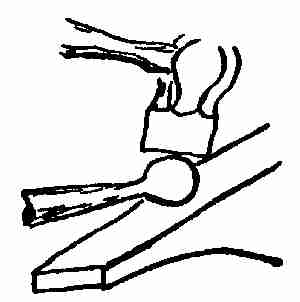
Finishing
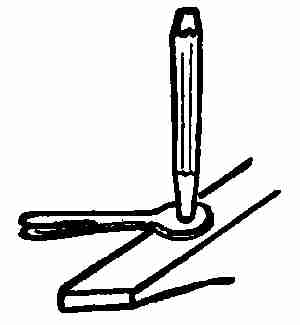
Punching hole
These square corners are knocked down, making it round. When the body of the hook itself is drawn out, like the drawing, a hole is punched through the eye, using the same kind of punch as you did to make the nut. While using the punch keep cooling it off in cold water to prevent its getting hot; if you do not, the end is apt to burr and rivet itself into the iron. It also prevents its sticking into the hole. Place the ring of the eye on the point of the anvil and round up carefully with light blows from the hammer.
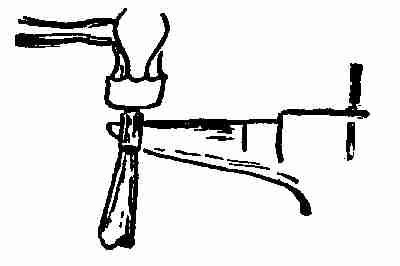
Rounding the eye of hook
When rounded up drive the punch in again to the required size. This finishes the eye. The body of the piece is now gone over carefully with calipers and square to get the diameters and length. Bend the small point at right angles to the axis of the hook, like the drawing. Now it is ready for bending in the middle. Heat the middle very hot. Cool off the point about 1⁄2 in. Place the middle on the horn of the anvil and strike upon the small turned up cold nib to bend the hook from this point. By striking upon the cold end to bend it one can do so without destroying the shape. It will stand a lot of work upon it when cold.
When the hook is bent around as nearly like the drawing as you can, flatten it out at its widest part by laying it upon the anvil and striking with the hammer. The cross section of the drawing shows the shape that this flattened part should be.
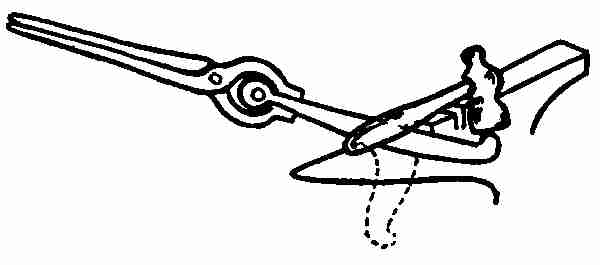
Shaping the hook
This is what we call a solid eye hook. Another way of making an eye is to take round material of sufficient length to bend an eye on the end by placing the piece over the horn of the anvil. The body of the second hook can be made out of round iron, pointed down at the end and finished up the same as the first.
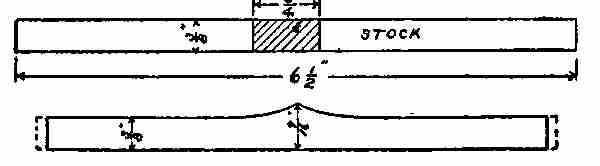
Bending a corner in iron and upsetting while bending: In this problem we bring in the making and bending of iron, so that the thickness at the corner must be sharp on the top side and rounding on the inside—without flaws or cold-shut. This bending method applies to all metals, whether of square iron or wide flat iron.
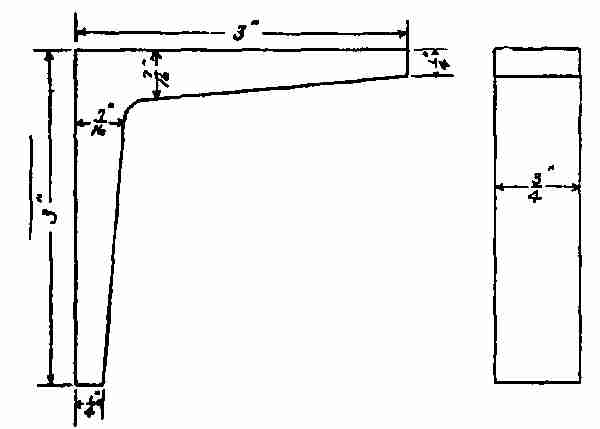
Corner plate
Stock: Piece 61⁄2 × 3⁄8 in. square.
Directions: Heat the metal in the middle and bend it over the rounding edge of the anvil.
When the piece is bent we still have to make it square on the outside and rounding on the inside. The bend just made should be placed in the fire and re-heated. Cool the stems off in the water to within one inch of the bend. Place the point of the cold stem on the anvil and strike on the hot corner. This is repeated on both outside corners until the piece assumes the shape of the drawing. This same result can be obtained by upsetting the metal in the centre before bending, as shown in the drawing.
FLAT WRENCHES
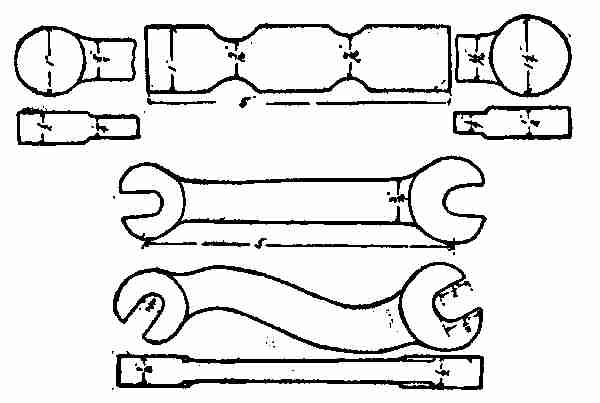
Wrenches are used for screwing nuts on bolts. They can be made in two ways: (1) One known as the solid wrench is made without welding, (2) the other, is made of wrought iron and is welded.
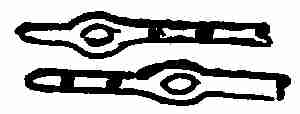
S wrench of soft steel: The sketch here is of a wrench made from soft steel 1⁄2 × 1 × 5 ins. Fuller down the stock edgewise as shown. Draw out the centre 1⁄4 in. thick and taper it from 3⁄4 to 5⁄8 × 5 ins. long. Cut the corner off, as shown by the dotted lines, and round the two ends up to the size given. Punch a 1⁄2-in. hole in the large end and a 3⁄8-in. hole in the small end of the bar. With a sharp chisel cut a V-shaped plug out of each end, tangent to the circles.
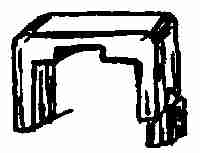
Wrench hardie
Jaws: The jaws of the wrench are finished with a tool called a wrench hardie, placed usually on the anvil for the purpose of finishing up work of this kind. Finish up both ends in the same way. Heat the wrench at the nick and cool the jaws off in water. Place the nick on the horn of the anvil and bend it as shown. Repeat on the other end. If the wrench is carefully made it will require no filing to fit the nut. These wrenches are sometimes polished and case hardened to prevent the jaws from wearing while in use.
Large flat wrench: A quick way to make a large wrench is to make it of wrought iron. A piece of iron 1 × 1⁄2 × 4 ins. is bent at almost a right angle. The inside corner is the corner made by the natural bend the metal takes when shaping it.
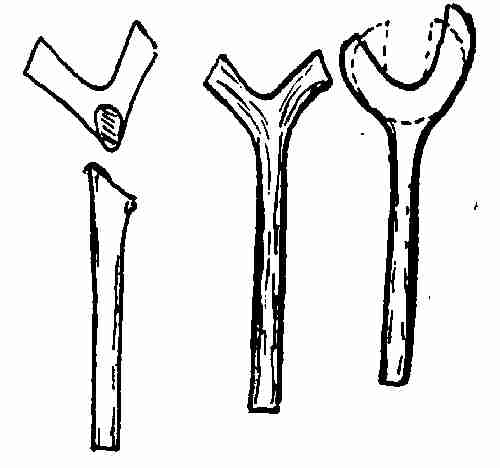
Wrenches
Scarf this corner by placing the peen of the hammer on the corner and striking the face of the hammer with the sledge or by using a bob punch if one is available, or it may be made by using the peen of the hammer without the use of a helper. Select a piece of round iron 7⁄8 in. in diameter. Upset the end of this and scarf it to fit the scarf made in the angle piece. Heat both pieces to a welding heat. Place them on the anvil and weld the handles to the jaws. The inside is rounded up at the same time the scarfs are being welded into place. Draw the points out to a short taper and bend them up in the shape of a wrench on the heel of the anvil. This is a simple way of making a large wrench that can be used for all kinds of work.
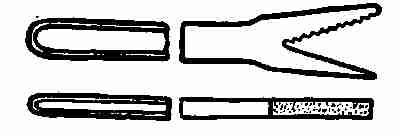
Alligator wrench
Alligator wrench: Stock 1 × 1⁄2 × 5 ins. steel. The alligator wrench is one of the handiest tools to have in a home or shop. For general repair work it is indispensable and is easily made. Mark off 11⁄2 ins. from the end of the stock. This is the jaw part. Place the other end of the stock in the fire. Take it out and from the centre-punch mark draw the handle out 3⁄4 in. wide, 3⁄8 × 8 ins. long, and tapering to 3⁄8 × 1⁄4 in. at the extreme end. The edges of the handle should be rounding. Place the jaw ends in the fire and heat red hot. Punch 1⁄4 in. hole back 11⁄2 in. from the end. Draw out the end and shape as shown in the drawing. With a three-cornered file, file the teeth on a slant and close together. This slanting will allow the wrench to let go of the work better than those filed at right angles to the axis of the piece. The teeth should slant backward and should be put only on one side of the jaw. Both jaws should be hardened and tempered a blue colour. To do this, heat the body of the steel back of the jaw to a red heat and plunge the whole into water one inch beyond the depth of the jaw. When cold take it out and polish. Draw the temper in the same way as you would for a knife blade. (See article on tempering and hardening.)
SOCKET WRENCHES
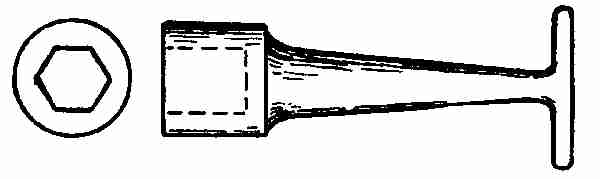
Socket wrenches are useful for tightening nuts in places that are difficult to reach. It is most convenient when many nuts of the same size are used, as bolting shaft irons for vehicles, etc. Some are made to fit an auger brace; some have solid handles with a cross bar, and some have holes punched in the shanks to place the iron bars in while twisting the nut on the bolt. This drawing shows a style of wrench in general use. It can be made in two different ways. One is called the welding method, the other is the solid method.
Welding method: Cut a piece of metal 1⁄4 × 1 in. of Norway iron. The length of this bar must be determined by the size of the nut it is to be used for. Heat one end of the piece of iron and scarf it. Repeat on the other end. Bend the piece into a collar or ring, weld the two ends together, forming a cylinder about 1 in. deep—any diameter. Select a piece of round iron for the shank, the size depending upon the size of the socket. Upset one end of the round iron to fit the collar made.
Weld collar, then put stem in, and weld
Drive the shank into the collar about one half the depth of the collar, place it in the fire, and at a welding heat weld the collar to the shank. If the wrench is to be for a hexagonal nut, make a hexagonal drift pin (a square one for a square nut), and drive the pin into the collar. Place it all on a swage and round up with a top swage. Drive the collar down until it takes the shape of the drift pin. To do this successfully requires many heatings, and it can be done only while the metal is hot enough to yield always under the hammer blows. Should the drift pin stick after the collar is driven into it, place the pin on the anvil, giving it a slanting blow. This will loosen the pin and it will come out easily.
The shank should now be driven down as shown in the sketch, and two holes punched in at right angles to each other. These are holes to place iron bars for turning the wrench. These holes can be made in two ways: one, by forming lugs or bosses on the shank and punching holes in each one, or, a sharp tapered round punch, flat and sharp on the end, can be used to split the metal and force the sides out as the punch is driven in.
If the cross bar is to be used in place of the holes, a cleft scarf made in one end of the shank and a 3⁄8-in. bar of iron welded to this about 4 or 6 inches long on either side of the shank will act as a handle.
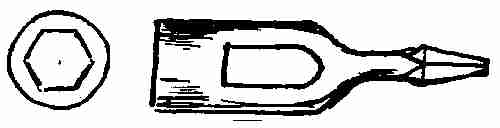
Open-sleeve or socket wrench: The wrench given here is for practically the same use as the one just described. It is lighter than the other. The opening is longer and allows the bolt to protrude through the nut without forcing the wrench off. This wrench is made of machine steel, and the size must be determined by the size of the nut.
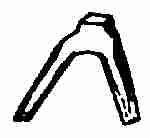
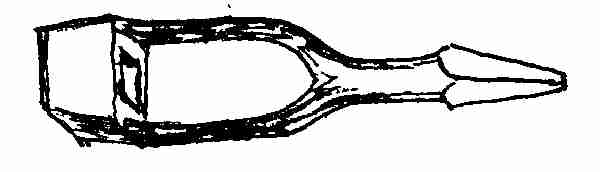
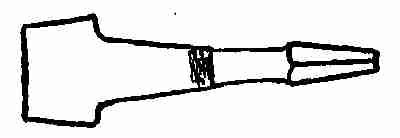
Socket wrench for square nuts
For a small wrench take a bar of 3⁄8 × 11⁄4 × 6 in. soft steel. Mark off on the bar 2 ins. from each end and on these centre-punch marks fuller down on the top and the two sides so that the bottom of the fuller will measure 1⁄2 × 1⁄4 in. Draw these ends out to 1⁄2 × 1⁄4 in. any length. Cut the four corners off and make the centre round. Bend the two arms as shown and punch 1⁄2 in. hole through the boss. Be careful to prevent cold-shuts while doing this. Drive a drift pin into the hole and forge the shape as shown. Bend the two arms as shown and weld together. These should be worked down to a 1⁄2-in. round. The ends can be made into a brace shank by squaring the end and tapering it to fit the jaws of the brace. Or weld a piece of 1⁄2-in. round iron long enough to bend it into the shape of a brace, putting a round knob on the end for a hand hold. This makes a simple wrench and one that can be used in many places where flat wrenches are not convenient.
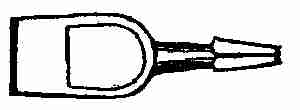
OPEN WIRE ROPE SOCKET
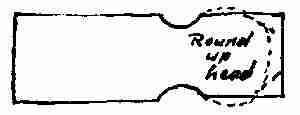
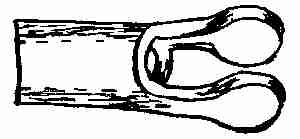
These sockets are made for wire cables, ropes, etc., and are best made of mild steel. Place the end of a 11⁄2-in. square bar in the fire and reduce it as shown in the sketch. Cut two outside corners off, as shown by the dotted lines. Round the ends up. Punch a 1⁄2-in. hole 2 ins. from the rounded end in the centre of the piece. Then cut a piece out with a sharp chisel, equal to the width of the hole. With the fuller, open the jaws out. Now cut the socket off 4 ins. from the rounded end and drill a 1⁄2-in. hole through this end of the socket. A drift pin 3⁄4 in. on one end and tapered to 3⁄8 in. on the other is now driven into the 1⁄2-in. hole at the jaw side.
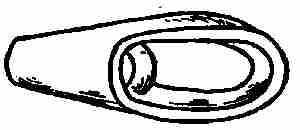
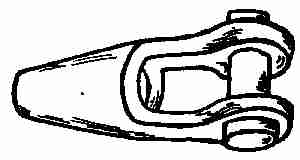
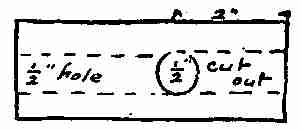
Forge the shank as shown in the drawing while the drift pin is in. While forging keep driving the drift pin into the hole. When finished the hole should measure 3⁄4 in. at the large end and 1⁄2 in. at the small end. When the socket is finished cut the ends square and smooth up. During all the time the steel should never be worked below a red heat and most of the time at a high heat, below welding heat, until it is ready for finishing. Now the jaws are ready to be closed. This is done by placing a piece of flat iron, 3⁄4 in. thick and the width of the jaw, in between the opening, and close the jaws on this either with the hand hammer or a flatter. Drill a 1⁄2-in. hole in the middle of the end. This is made for the pin. Make a pin to fit this hole out of 1⁄2-in. round stock. Upset the end of the bar a little and place it in a heading tool, driving down and forming a head 1⁄8 in. thick and 3⁄4 in. in diameter. Take it out of the heading tool, cut the bolt off 1⁄2 in. longer than the width of the jaws. This allows for a 3⁄16-in. hole and pin. A small 3⁄16-in. hole is now drilled in the shank of the bolt and a split pin is put into the hole to prevent its falling out. The split pin is made by flattening down a piece of 1⁄8-in. wire in a small swage to a half round. Now double over to form an eye on one end of the two flat planes coming together. When this is put in through the hole, a chisel put in the opening will widen out the ends, thus preventing them from falling out.
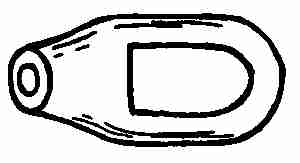
HINGE AND BUTT
The hinge and butt are used on doors and gates. This fastening is made similar to the other hinges, except the eye is welded, instead of being a solid eye.
Stock: 1⁄4 × 1 × 71⁄2 ins. wrought iron.
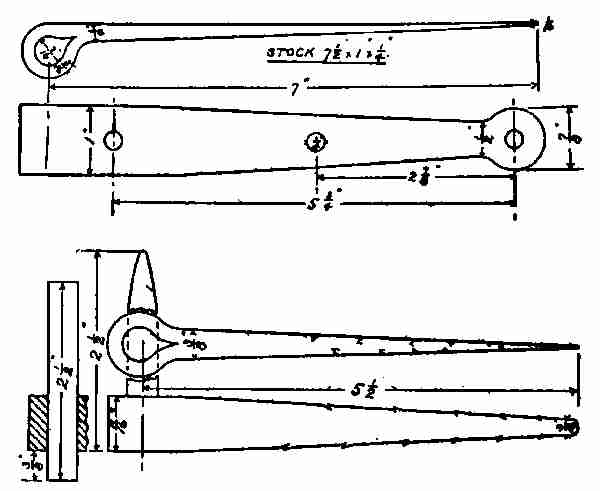
Hinge
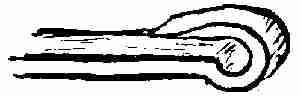
Welded hinge eye
Directions: The end of this piece of stock is bent around a drift pin as shown in the drawing and welded along the dotted lines. This is done by scarfing the end of the bar into a short tapered point. Bend it down at right angles about 3 in. from the end. Bend it in the opposite direction about 2⁄3 of the way around. Put in the drift pin. This now forms a hook shape. Continue the driving over until the scarf lies flat on the straight side. Take out the drift pin and weld the scarf to the body of the hinge. Drive the drift pin into the hole, shaping it up. The back of the hinge is perfectly straight so that it will lie flat upon the wooden door. The other end is drawn out, tapered and the end rounded up, and 1⁄4 in. holes punched in as shown.
The butt is made in the same way as you made the ornamental butt and hinge.

Turned eye
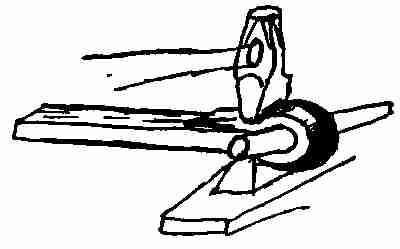
Bent hinges, such as are used on tail boards for wagons, railroad cars, etc., are simply ends of the iron piece bent around at a given diameter, with the under side flat, and the stock rolled up on one side. These hinges may be used in pairs. In that case a long rod is pushed through, connecting the two hinges.
TONGS
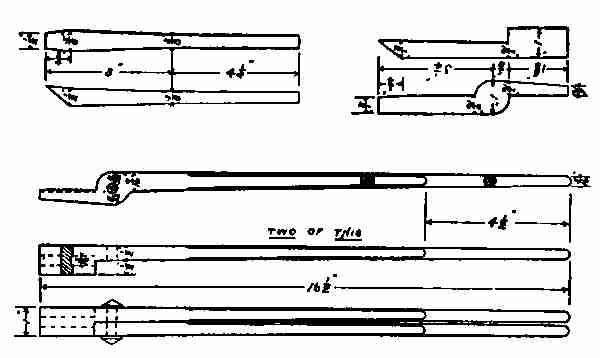
Tongs are used by blacksmiths to hold pieces of hot metal while working upon them.
Stock: Two pieces iron, 7⁄8 × 7⁄8 × 18 ins. Two pieces iron, 3⁄8 × 3⁄8 × 12 ins.
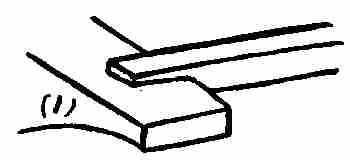
Tongs
Directions: Mark off 2 ins. from one end of the 7⁄8 × 7⁄8 × 18 in. piece and heat it quite hot. This marked end is now placed on an anvil and flattened down to 1 × 2 × 7⁄16 in., leaving the shoulder as shown. (1) Heat the piece again. Place it upon the anvil, with the flattened piece extending beyond the anvil, and, with the shoulder on the outer edge of the anvil, flatten this down 1 in. wide, and 7⁄8 in. thick. (2) Then the shoulders should be at right angles to each other, as shown in the sketch. Re-heat the piece 1 in. from the last shoulder made. Reduce the shoulder (2), the iron to 9⁄16 × 7⁄16 in. (3) Notice that this shoulder is directly opposite the other. This completes the jaw of the tong. Draw out the end to about 3 ins. in length. It is now cut off the bar and another piece made just like it for the pair.
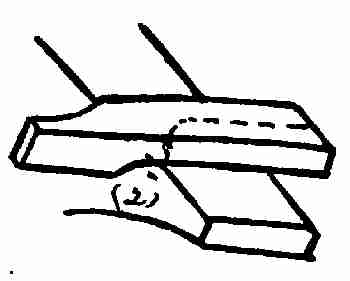
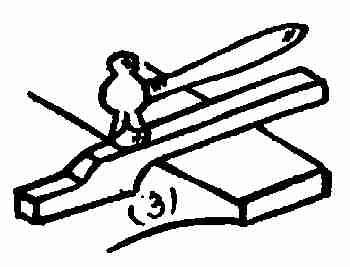
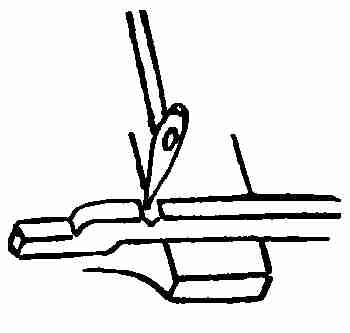
The reins or handles are welded to the small ends and tapered down as shown in the drawing, then rounded 41⁄2 ins. on the ends to 3⁄8 ins. in diameter. A hole is now punched through the eye of the jaw and a 3⁄8-in. rivet inserted. The little groove which you see in the jaw is put there with a fuller. This is done so that you can use it to hold small round iron as well as flat iron. The two parts are now riveted together. This is done either by making a head on a rivet and cutting it off, allowing about 3⁄8 in. for a head on the end that goes through the tongs, then heating the tongs and completing the riveting, or, as many smiths do, by putting a piece of straight 3⁄4-in. iron in, allowing 1⁄2 in. on each end plus the thickness of the parts of the tongs for riveting. This piece of iron is made very hot, put into the hole, and both heads are riveted on at the same time. It frequently happens that the rivet bends in the holes while hammering on the ends. This prevents the tongs from opening easily. If such is the case, put the rivet and jaws into the fire and heat red hot. Hold the handle, open and close the jaws while cooling. This not only centres the rivet but prevents sticking. The tongs should work smooth and free when cooled off in water.
XXIV HARDENING AND TEMPERING: TOOL MAKING
EFFECTS OF CARBON ON STEEL
What is commonly known as carbon steel is a metal composed of iron containing varying amounts of carbon. Steels containing much carbon are called tool steels to distinguish them from the low carbon steels. Tool steel, when heated red hot and plunged into cold water, will harden, while low carbon steel treated in the same way will not do so. This is an excellent way of testing two bars of steel for carbon when one is not able to distinguish grades of steel accurately. It is carbon that gives the hardening quality. When steel is heated it becomes red at 1000° F. At 1300° F. it passes a point at which it absorbs considerable heat without any increase in the temperature, showing that some change in the structure of the metal must be taking place. If the steel is heated above this point and allowed to cool slowly, a brightening of the colour may be noticed as it passes this point, known as the point of recalescence. The brightening is due to a liberation of the heat previously absorbed.
Method of heating steel in forge fires: All steel work, including tool dressing, hardening, and tempering, was formerly done in an ordinary forge fire. Now we have special furnaces for that purpose. However, in using a forge fire, care must be taken to insure good work. The fire must be very deep—that is, a large body of coke must be put between the tuyere, and the tool, so as to prevent the blast reducing the carbon on the surface of the steel. Sulphur will injure the quality of any steel tool. Hence, a fuel low in sulphur should be used. Charcoal is the best for this purpose, but the cost and the difficulty in maintaining the heat prevent its general use in blacksmith shops. If the coal does contain sulphur a great deal of it can be extracted or reduced by one making his own coke. This is done by burning the green coal to a coke and in this way driving off much of the sulphur. Gas furnaces or oil furnaces are used. This is much better than coal, for a uniform heat can be kept and an oxidation of the steel prevented. Whether natural or artificial gas is used, all that is necessary is to adjust the supply of gas in such a way that there will be a very slight excess of gas present beyond the proper amount for combustion. The presence of this gas excludes all air from the steel and therefore prevents its oxidizing the surface of the metal.
Heating in lead: In order to prevent oxidation molten lead makes a most satisfactory bath. The lead is melted in a cast-iron pot and heated in the forge. The steel must be left in the bath until it has all been heated to the required temperature. As the steel will float in the molten lead it must be weighted down to keep it submerged.
Hardening solutions: In many cases clear cold water is used in hardening steel. Some use soft or rain water. The temperature of the water for general work should not fall below the temperature of the shop; otherwise it would extract the heat too quickly from the steel and cause cracks or breaks in the work.
Salt solution: Salt is often added to water which is to be used as a hardening solution. (1) It increases the rate at which the bath will extract the heat from the steel; (2) it prevents the formation of steam on the surface of the water. Put as much salt in rain water as it will dissolve. This is considered one of the best and easiest made solutions for hardening steel.
Oil solution: Linseed oil, lard, cotton seed oil, whale oil, and melted tallow make good hardening solutions. They are used mostly for fine work. The oil prevents the sudden chilling of the steel and lessens the chances of cracking and breaking. Springs are mostly tempered in oil.
Metallic hardening baths: For very delicate tools mercury is sometimes used. It has a greater heat conductivity than any solution mentioned. However, the fumes given off are poisonous and for this reason it is not extensively used.