TEMPERING: THE PART COLOUR PLAYS
Reading edition
When you buy steel for tools from a merchant he will assure you that the steel he sells you will harden at a cherry-red heat. This is true provided the metal has not been spoiled either by overheating it or working it at too low a heat during the making. This causes cracks or internal fractures.
If these directions for working steel are followed out a tool should harden at a cherry-red heat when plunged into water. When the steel is heated to the proper temperature, usually a cherry red, and plunged into a hardening solution, it will be very brittle, so that a file will not cut it. One test often used is to take a fine mill cut file and try to cut the hardened part of the tool. If it slips over the surface without cutting, the steel is considered hard; if the file cuts, the steel is not hard enough. Re-heat the steel hotter than before, cool it off in water, and test again. All cutting tools should possess a certain amount of hardness or toughness. When the steel has been plunged into cold water it is too hard for use. It is necessary to then reduce this hardness so that one can use the tool for the particular kind of work it is made to do. This process of reducing the hardness is commonly called drawing the temper, and the colour scheme plays a very important part in this operation. Perhaps the steps will be clearer if the process of drawing the temper on a cold chisel is explained: After the chisel is forged the proper shape, place the body of the tool in the fire, heat it red hot back of the point. Now heat the point to a uniform cherry-red heat, plunge 11⁄2 in. of this hot point into the water and hold it there until it is quite cold. This is determined by water clinging to the point when the chisel is taken out. Polish the part cooled off with a piece of emery stone, an old brickbat, or any rough polishing material. You will notice a group of temper colours starting from the point where the tool came into contact with the water. The heat in the body of the tool gives rise to these colours as it is conducted through the cold point of the steel. In this group of colours the first will be (1) pale yellow, (2) a full straw colour, (3) brown, (4) purple, (5) dark blue, (6) full blue, (7) light blue, (8) gray. This colour scheme corresponds to varying temperatures in the metal. The first colour (pale yellow) accompanies a temperature of 430°, while the last colour, gray, means a temperature of 700°. The colours show, too, a varying in the hardness or toughness of the steel. A cold chisel should be tempered a blue; so when the blue reaches the cutting end of the tool the end should be plunged immediately into water and cooled off. This is the principle of hardening and tempering all common tools.
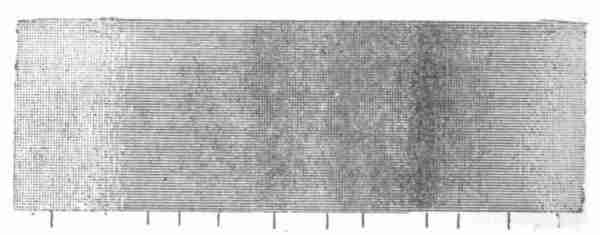
Colors, left to right: pale yellow, straw color, brown, purple, dark blue, full blue, light blue, gray
However, these colours mean nothing so far as tempering is concerned unless the cutting edge of the steel has been thoroughly hardened. Then the colours have a real value. To prove that these colours are no test unless hardening precedes, take a piece of brass, or copper, or soft iron. Polish, then heat the piece in the fire to the temperature given here. You find the same set of colours, but you cannot use any of these metals for cutting tools.
The table of temper colours given in this book shows the colour required for tempering tools most commonly used.
Tempering of springs: Under the head of springs we may include every variety, from the small spring used in locks and fire-arms to the largest springs in use. They are made of spring steel of the required thickness, forged into shape, then hardened and tempered.
This hardening and tempering of springs is done in some cases by polishing and heating over a fire and drawing them to a blue colour. Then they are plunged into oil to fix the temper. Sometimes springs are heated red hot and cooled in oil, then held over the fire until the oil burns with a bright flame on the spring. It is then allowed to cool in the air. If the spring is found too hard, more oil is put on it and the operation is repeated until the desired spring movement is obtained.
TOOL MAKING
It is possible for you to learn to make all of the tools you may need to use, including hammers. And not only will you be able to make blacksmiths' tools, but such as are used by carpenters, bricklayers, stone-masons, machinists, etc. You must not expect to be able to do this work at first, but in a little while you will be able to replace your first working tools with those of your own make. From time to time, as the tools break or wear out, you can repair them or replace them with new ones. This gives excellent practice in forging and handling steel, and prepares you for more and more advanced work, an experience necessary for doing any work well.
Steel: There are many different grades of steel, depending upon the percentage of carbon contained in each. Steel low in carbon can be easily welded but cannot be tempered. Carbon steel is very difficult to weld and it can be done only by the use of borax or some other flux. High carbon steel or so-called tool steel, can be tempered. It is used for making cold chisels, files, drills, cutting tools, etc. Crucible steel: All tools are made from crucible cast steel. The cast steel is made by placing in a graphite crucible a certain amount of wrought iron and soft steel, and carbon is added in the form of manganese. These are all melted in furnaces. When melted they are poured into ingots and drawn or shaped to sizes for the market under different kinds of power hammers. These various size bars are used for the making of all kinds of tools. The tools we are going to make are (1) centre-punch, (2) cold chisel, (3) cape chisel, and (4) lathe tools. There are five lathe tools; (1) round nose, (2) diamond point, (3) side tool, (4) cutting off or parting tool, (5) inside or boring tool.
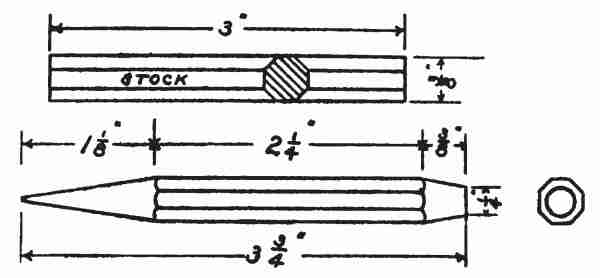
Centre-punch
Centre-punch: You will find the centre-punch a most useful tool to have on hand. It is used for marking centres before drilling holes, starting points in work, etc. A small one is made out of a piece of 3⁄8-in. hexagonal tool steel, 3 ins. long. Put one end into the fire and taper it 3⁄8 in. long to 1⁄4 in. in diameter, as shown in the sketch. Make this end flat. Put the other end into the fire and draw it into a sharp tapered round point to about 1⁄16 in. on the end. This extreme point is ground to a very sharp point. The angles of the extreme should be about 45°. This is hardened and tempered a blue colour. Then it is ready for use.
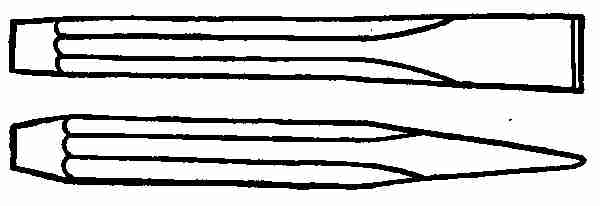
Cold Chisel
Cold chisel: Cold chisels are usually made out of 5⁄8-in. hexagonal tool steel, 6 in. long. The form and dimensions are given here.
Heat one end of the bar and place it upon the anvil. Draw it out for the short end. This is the part upon which the hammering is done when the tool is finished. The surplus stock is cut off with a hot chisel and the short end is flattened. When cutting tool steel of any kind the chisel should be very sharp and the steel red hot. Put the other end of the bar into the fire, beginning back about 21⁄2 ins. from the end. Flatten it down to a chisel shape, as shown in the drawing. Cut the surplus stock off, harden and temper as explained before for the cold chisel.
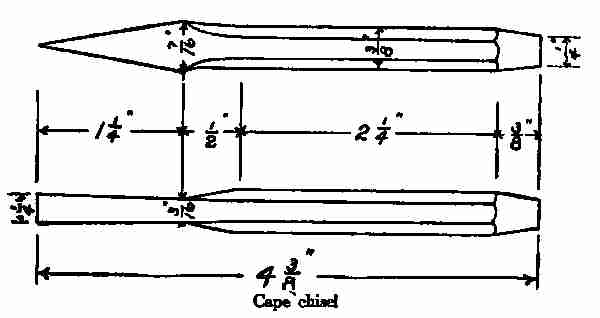
Cape chisel
Cape chisel: The drawing gives the form and the dimensions. The small end of this tool is forged out in the same way as you forged the small end of the cold chisel. Reverse the bar and heat the other end. Two inches back from the end fuller the metal down as shown in the drawing. Draw it out tapering. This end, too, is cut off, hardened and tempered as you did the cold chisel. Cape chisels are used mostly for cutting key ways in shafting. The point being wider than the rest of the blade gives clearance while cutting.
LATHE TOOLS
Round nose: The drawing gives the form and the dimensions.
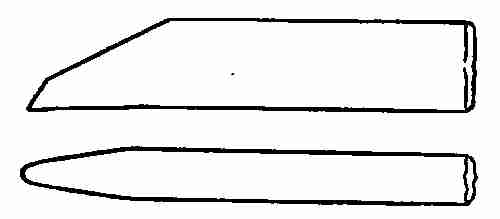
Round nose
Stock: A piece of 7⁄16 × 7⁄8 × 7 in. tool steel.
This size best fits the tool post of the lathe. You see by the sketch that one end is bevelled. This end is always made first. It is done by heating and chamfering the edges down with a hand hammer. Place the other end in the fire and draw it out to a sharp point in both directions. Throw the bevel on one side by placing the tool on the anvil and driving one side of the metal down to the other side. The point is now cut off on a bevel for clearance.
The drawing shows a cross section view of the tool. Notice that it is smaller on the bottom than on the cutting edge. This is done by reducing one side more than the other. The cutting edge of the tool should extend about 1⁄32 in. above the common level.
Hardening and tempering: All lathe tools of this type are hardened and tempered in the same way as you did the cold chisel. The temper colour of this tool is a very light straw. When this colour reaches the extreme point plunge the tool into water. The slight change of temperature does not materially lessen the degree of hardness, but it does toughen the tool so that it will do more work.
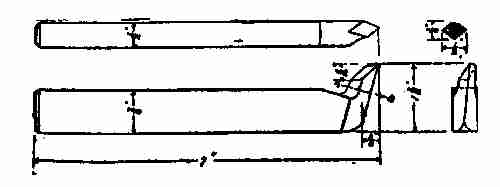
Diamond point
Diamond point: The form and dimensions are given.
Stock: 7 × 7⁄16 × 7⁄8 ins.
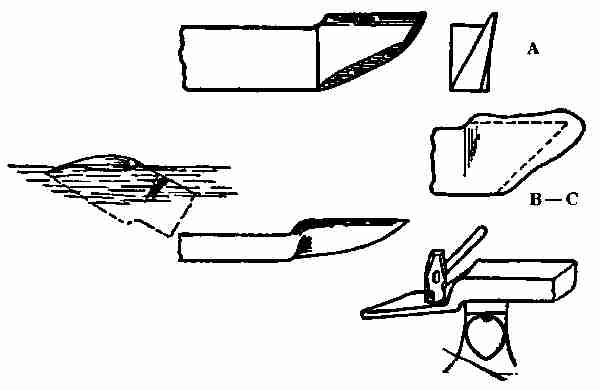
Side tool
Heat one end and bevel it off as you did when making the round nose tool. Place the other end in the fire, 5⁄8 in. from the end, and fuller down to one half the thickness of the bar. This fullering is done on the bottom fuller, which is placed on the anvil. Re-heat this end, place it again on the fuller in the depression made, and with the hand hammer draw this end out and at the same time square it up into a diamond point by turning the tool at an angle of 45° with the anvil. Turn again, in exactly the opposite direction. Repeat this until the point of the tool is drawn out as shown by the sketch. The clearance should not be more than that shown. It is now cut off by placing the face of the diamond on the outer edge of the anvil. Place the cold chisel above this edge, strike the chisel with the sledge hammer and cut it off. If this is carefully done it will cut the proper bevel for the cutting edge. The drawing shows the slope of the cutting edge to be parallel to the top of the tool. The tool is hardened and tempered the same as the round nose tool.
Side tool (right hand): The form and dimensions are given here.
Stock: 7 × 7⁄8 × 7⁄16 in.
To make a tool of this kind bevel off the end of the stock, place the other end in the fire, and heat about two inches to a red heat. Take it out and place about one inch of this on the round edge of the anvil. With the hand hammer reduce the thickness of this steel, driving on the edge nearest you (see sketch marked A). The hammering reduces the thickness of the edge, which will be the cutting edge when finished. The part opposite to where you are working will be reduced very little. A chisel is now used for cutting the cutting edge on the tool (see B). Place the tool on a piece of soft iron, place the chisel along the line and cut through to the soft iron below. This gives not only a clear cut but prevents the chisel from driving in if it should strike the hard anvil. The clearance is cut off along the other lines. (C) The cutting edge is now offset. To do this use a set hammer. Push the part made beyond the anvil 1⁄4 in. Place the set hammer in this shoulder, drive down until the offset is driven down about 1⁄8 in. (D).
The method of tempering this tool is a little different from the way you have tempered other tools, on account of the length of the cutting edge, which should be hardened its full length. Place the end just finished in the fire and heat to a red heat. Plunge the whole tool into water. Take it out and polish the cutting edge with emery stone. Now place in the fire a piece of any kind of iron; 1 in. square will do. Heat it red hot, then place it upon the anvil, and lay the part of your tool that has been hardened on the hot bar. It will draw enough heat from the hot bar to produce the temper colours. This is one way to give a piece of hardened steel the heat to temper it when the body of that piece does not contain heat enough to do so.

Boring tool
Boring tool: Boring tools are made for the purpose of enlarging holes in cylinders, or any hole which should be enlarged after it has been drilled. The work to be done must determine the size and length of the boring tool. This is not true of any other one of the lathe tools.
Stock: 7 × 7⁄16 × 7⁄8 in.
Bevel one end. Place the other end in the fire and heat about 3 ins. of it. Draw it out to a tapering octagonal shape, as shown in the sketch. The end is pushed over the anvil about 1⁄2 in. Drive it down at right angles. The clearance for the cutting edge is cut off with a hot chisel and made ready for hardening and tempering.
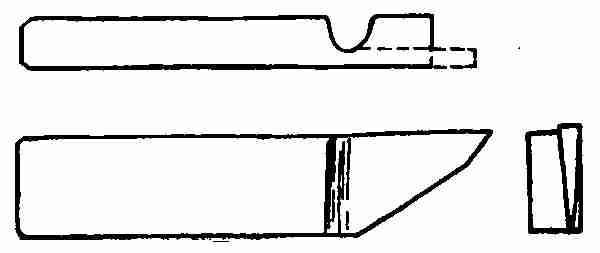
Cutting-off tool
Cutting-off or parting tool: This tool is made for dividing bars of metal into different lengths. The form and dimensions are here shown.
Stock: 7 × 7⁄8 × 7⁄16 in. tool steel.
Bevel one end. Place the other end in the fire and heat about 1 in. Place the fuller on the anvil. Put the top fuller on this, then put the steel between the two fullers about 1⁄2 in. from the end. Using the sledge hammer, drive down so that the centre thickness will measure 1⁄8 in. Draw the lump left on the end to 1⁄8 in. thickness, the same width as the tool. The drawing shows that the clearance on this tool is one half the thickness of the cutting edge, or 1⁄16 in. This clearance must be put on as shown in the drawing, otherwise the tool will not clear while doing the cutting. Finish up as shown in the sketch. Harden and temper in the same way as you did the round nose tool. Cutting off tools are made with the shoulder all on one side. (See sketch and see article on tempering steel.)
XXV HOW TO HARDEN, SOFTEN, AND STRETCH STEEL
ANNEALING OR SOFTENING OF STEEL
All steels that are worked under hammers and heated to any degree of temperature, when finished should be softened by heating, so that the unequal strains caused by the working of the metal may be neutralized. When the work is entirely finished it is placed in a furnace or forge fire and heated red hot. Then the fire is either withdrawn from the furnace, or the blast is shut off from the forge, and the metal is allowed to cool off as the fire goes down. This softens the metal and saves it from the danger of unequal strains.
Hard or high carbon steels are treated in a different way. The metal is heated red hot, then it is placed in a box filled with slack lime. The lime completely covers the piece. The cold air is prevented from striking it and cooling it off too quickly. When no lime is at hand wood ash can be used.
Sometimes the steel is heated red hot, then held until the red entirely disappears. Then it is plunged into cold water. This process is known as water annealing and is a process used for tool steel when quick work is required. It softens the metal so that it can be filed and worked quite easily.
CASE HARDENING
We have learned that carbon gives the hardening quality to steel. Since there is little carbon in soft steel and none in wrought iron, they will not harden as carbon steel does when heated red hot and plunged into water. But there are many small articles which are best made of this soft steel and iron and which must be hardened in some way to make them useful. In order to supply the lacking carbon the metal is put through a process known as case hardening. There are two methods of case hardening. The first method is to heat a piece of soft steel or iron red hot and cover the part to be hardened with cyanide of potassium. The metal will absorb the carbon out of the cyanide and when cooled in water will have taken on a hardened surface. If this is repeated two or three times the hard surface deepens.
Any drug store will sell you some cyanide of potassium. It comes in cakes. The cakes are broken up into small pieces. Be careful to keep the hands as much as possible from contact with the cyanide.
SET SCREW
Set screws are made of soft metal, but the points must be hardened to resist the wear. This is done by heating the set screws red hot, then sticking the point into the cyanide until it cools off. Re-heat and repeat the work. During this time the iron is absorbing carbon. Heat again, plunge into cold water. The carbon forms a case on the end of the screw. Now you have a screw hard on the outside but of soft material in the inside. It is able to resist any shock that carbon steel itself could not stand.
The second method calls for the use of pulverized charcoal and bone. The principle is the same as in the first method. The iron articles to receive a case hardening are placed in a cast-iron box with a layer of charcoal above and a layer of bone dust below, alternating in this way until the box is filled to the top. The box is then placed in a heating furnace and heated to a temperature 1200° F. It is kept at this temperature from three to four hours. The articles all this time are absorbing charcoal from bone dust. The box is taken out of the furnace and plunged into a bath of cold water. From this cold bath it is plunged into a bath of boiling water, then taken out and dried. The pieces are oiled over slightly to bring out the colours. They have not only a hard exterior after this process, but they have a beautiful mottled surface of grays and blues, colours one often sees in parts of small guns, wrenches, etc.
Surgical instruments, guns, small wrenches, etc., are hardened in this way. The equipment for the second method is much more expensive than that for the first; however, the principles involved are the same in both cases.
BRAZING
Brazing is a process of joining two pieces of metal by the use of another metal, such as brass or copper. The use of solder has been explained in the article on soldering. This article will tell about brazing of wrought iron, cast-iron, and steel in the forge fire.
One must bear in mind that when a forge fire is used for brazing, the fire should be free from green coal on account of the presence of sulphur. A reducing fire is best for that purpose. It is well to mention here that a forge fire that has been used for brazing must be thoroughly cleaned before it can be used again for any welding purposes. The brass will run down and clog the tuyere. If the least bit of smelter is left on the forge it is apt to mix with the coals. In that case it would find its way into the fire, melt, and collect on any iron that may be in the fire heating. The success of any of these operations depends absolutely upon a clean fire and a clean piece of work to be done.
To prepare the pieces to be brazed: All parts to be brazed should be free from any foreign matter. They should be filed or polished with emery cloth or sand-paper. This refers not only to the parts that come into contact with each other, but both sides of the contact edge for the depth of at least 1⁄2 in. When the parts are clean, put them together. See that the joints fit. Paint the joints with a flux made of boracic acid. Mix one part boiling water with one part borax and two parts boracic acid. Keep it pasty so that it can be handled with a brush. Ordinary borax can be used if the other is not at hand. The smelter (brass) can be bought at supply stores. However, brass filings, common sheet brass, or brass wire is just as good. If brass filings are used these should be mixed with the flux. Any old tin can will do for the mixing. A spoon for dipping the flux out when wanted can be made on the end of a rod 1⁄4 in. in diameter, about 20 ins. long, by flattening out an inch of the end, drawn out quite thin and fashioned spoon shaped. Place the parts to be brazed in the fire and heat till they are red hot. Dip the spoon into the brazing material and put a little of the smelter on the joints. Increase the heat. When the smelter begins to run add more. When it shows a bright streak all around the parts to be joined shut off the blast and let it cool before removing it from the fire. When it is black hot remove it from the fire and file into shape. Be very careful to see that the pieces to be brazed are so fastened together that they will not move apart when once put into place. This can be done by packing brick or clay around them or by clamping them in place. Do not put any weight that would cause any strain upon them, for when heated this would change the position and might cause a bend in the brazed parts.
Brazing of cast-iron: Cast-iron is prepared for brazing in the same way as steel or iron is prepared. The flux, however, is not the same. It is made up of boric acid, 8 oz.; pulverized chlorate of potash, 4 oz.; carbonate of iron, 3 oz. Mix these together thoroughly, breaking up all lumps that may be there. Keep this mixture in a glass jar. Place the pieces to be brazed in a fire as you did the iron and steel. Heat it all red hot. Mix the flux with the smelter and put it on. Do not put this on at any time before the metal is red hot. Increase the heat and add more flux and smelter. When the brass has flowed into the joints, shut off the heat and let the metal cool off in the fire. Cast-iron requires a higher temperature for brazing than iron or steel. If a brass rod is used in place of the smelter, push the end of the rod in the joint to be brazed. It will melt off as fast as it is pushed in. When brazing some cast-iron, the break should be reinforced on the unexposed side by a plate of wrought iron or steel. If this is cleaned off thoroughly and placed against the break the smelter will not only fill up the break but it will hold this piece of metal fast.
Brazing steel band saws: Band saws break very often while in use. They can be repaired only by brazing the broken ends together. Do so by filing each end of the broken pieces, tapering to a very sharp edge 3⁄4 in. in length for lapping over. The length of this lapping depends upon the width of the teeth of the saw. When the ends are filed, place them in a vise that can be bought for this purpose. If no vise is at hand two wood clamps, or iron clamps, or an ordinary shop vise will answer the purpose. Put the two ends overlapping in place, and clamp close enough to these ends to keep them in a straight line and, also, for shifting while brazing. Paint the joint with flux, using the first flux mentioned in the article. Put a piece of silver solder between the laps. Now heat the jaws of a pair of close tongs white hot, and grasp the joints between the hot jaws, and pinch them together. The heat in the tongs will melt the silver and braze the two parts. Hold the tongs steady; if not, they will bend, and the saw will be rather hard to straighten when the tongs are removed. Do not remove the tongs until they are black hot. Now place the saw in a vise and file the teeth to correspond to those on either side of the joint. Smooth the roughness from the joint.
The value of brazing: A knowledge of how to braze is most useful to any one working with the metals. Many things break that can be repaired only by this process. For instance, tubing, automobile parts, very complex parts of machinery, etc., when broken cannot be welded; they must be mended by brazing. The success of the process depends upon the care taken to make the parts perfectly clean and well fitted together. If this is well done the brazing material will find its way to the closest joints and fix them.
PROCESSES OF STRETCHING IRON OR STEEL
(1) Drawing: Stretching a piece of metal in one or more directions either by hammering, or pulling, or rolling, is called drawing. In the blacksmiths' shop the term drawing always means a decrease in the size of a cross section of the piece and an increase in the length.
(2) Bending: Bending means making the metal take a shape from a straight line. It may be made into a circle or curved or bent at right angles.
(3) Twisting: In the process of twisting no change is made in the axis of the piece. The faces of the piece are changed; as for instance, when you twist a piece of paper holding one end fast and turning the other in the direction of its axis.
Upsetting: Upsetting means increasing the thickness of a piece of iron by shortening its length.
Forming: Forming is the process of giving a piece of iron shape, either by hammering or by using some forming machine; for example, the bulldog.
Welding: Welding means joining two pieces of iron together by heating them to the right temperature and hammering or pressing them together.
XXVI FORGING HAND HAMMERS
Cross peen hammer: The sketch shows the form and gives the dimensions of this hammer.
Stock: 7⁄8 in. square, 21⁄2 ins. long.
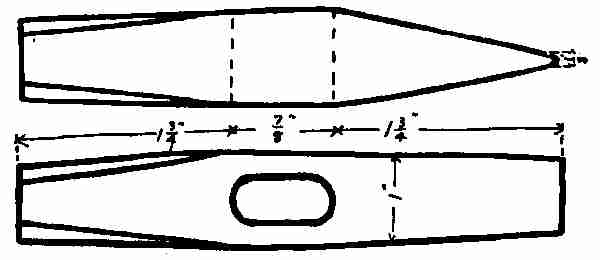
Cross peen hammer
It is best to make this hammer on the end of a bar. In this way you dispense with the handling of tongs, and you are able to get the best control of your material. Mark with a centre-punch, the centre of the 21⁄2 in. piece. Through this, punch a hole with an eye punch. (See eye punch in tool list.) The hole will be a little less than the finished size. Draw the face end slightly tapering. Drive the four corners down and make the face of hammer octagonal in shape. The sketch will show just where to begin this knocking down. The hammer is now cut off and the face squared up. The centre of the face should be a little higher than the outer edges. Now drive into the eye a drift pin. This pin is made of 3⁄4 × 3⁄8 × 4 in. steel. It is tapered for the whole length down to 1⁄2 × 3⁄8 in., and oval in shape. It is driven into the hole. This gives the real shape to the eye of the hammer. Take the pin out and re-heat the hammer. Draw the cross peen out to a taper as you would if you were making a cold chisel. Be careful to keep all within the dimensions given. The hammer may now be filed and polished if one wishes a bright hammer; otherwise, it needs only to be tempered: then it is ready for use.
To temper the hammer: Place the whole hammer in the fire and heat it red hot. Grasp it with a pair of pick-up tongs through the eye. Dip the face in water half way up to the eye, and hold it there until the face is chilled off. Reverse by placing the peen end into the water. While this is cooling dip up enough water with the hand to keep the face of the hammer cold. Take it out and polish both ends with a piece of emery cloth wrapped around a piece of wood. The colours now are beginning to run from the middle toward the ends. When the purple colour reaches either end plunge that end into water, holding it in the water until the purple colour reaches the other end. Then plunge the whole hammer in water. This tempering darkens the hammer if it has been previously polished. Rubbing well with emery cloth again will restore the brightness. The hammer is ready for the handle. A hammer of this kind can be made without the help of a second person.
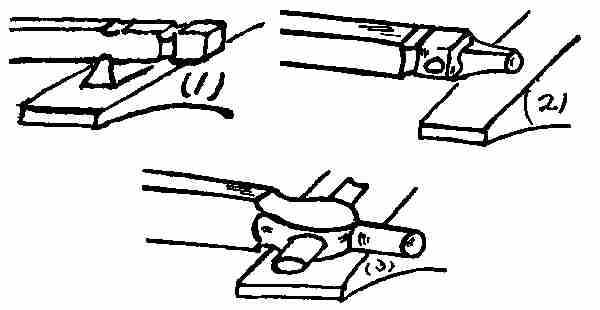
Processes in making peen hammer
Round peen hammer: The form and dimensions for this hammer are given here.
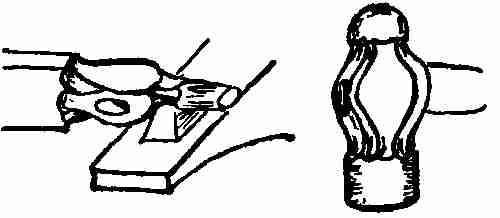
Step in making hammer
Stock: A piece of 11⁄2-in. square tool steel. This hammer, too, is best made on the end of a bar about 20 ins. in length. With a centre-punch mark off 2 ins. from the end. This spot marks the centre of the eye. Place this end in the fire. One inch from the end fuller down on the four sides of the bar (1). This makes a neck one inch in diameter and having eight sides. Place it back in the fire and heat again. Now put the bar again on the fuller 2 ins. from the first fuller (1). This time fuller only two sides, the two sides opposite the centre-punch mark. Fuller so that the thickness measures 11⁄4 ins. This means only 1⁄8 in. depression on the two sides. Put again into the fire and draw the first end out so that it measures 1 in. octagonal, any length. (See sketch 2.) Heat again, this time the whole body of the piece. Punch a hole with the eye-punch where the centre-punch was made. The hole will be a little less in size than the finished hole will be (see sketch) to allow for the increase in size while working the metal into shape. Put the drift pin into the hole. Drive it through until the small end just shows through on the other side. Place a fuller over the hole and work the metal out sidewise by striking on the top of the fuller with a sledge hammer. This requires a helper to do the heavy work. While the heavy work is being done the steel must be heated many times, but always without the drift pin. Keep the drift pin in water while the hammer is being heated, as the pin must always be cold when driven into the eye. Drive it in a little farther each time, so that by the time the centre is finished the hole will be the proper size (3). The thickness of the metal around the eye should be about 1⁄8 in. on the outer edges and 3⁄16 in. in the centre. This tapers a little from the centre outward, as is shown in the drawings. Put the 3⁄4-in. bottom fuller on the anvil and place the neck of the hammer on this and a top fuller above that. Strike on the fuller and reduce the neck until it measures about 3⁄4 in. in diameter, keeping the octagonal shape all the while.
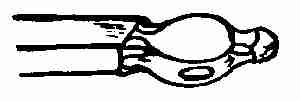
Heat the hammer again where the face should be, and fuller down between the body and the face so that this will measure about 11⁄8 in. square, using the same large fullers as before and making it octagonal. This finishes up completely the body of the hammer between the face and the peen.
With a sharp chisel cut the hammer off an inch and a half from the body. You will then have enough stock for the face of the hammer.
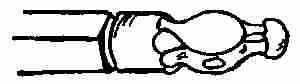
The surplus stock on the peen allows for holding with the tongs, and the face of the hammer is rounded up to about 15⁄8 in. in diameter. Bevel the edges down 1⁄16 in. back of this face and, with a sharp chisel, trim the face off flat or square with the axis of the hammer. The centre of the face should be a little higher than the outside edges.
Grasp the face with the tongs and place the peen in the fire. Take it out and cut it off 1 in. in length and make the edges rounding. To shape the peen, place the neck on a large fuller and round up as shown in the picture. Be careful each time to give it one eighth of a turn so that the octagonal shape will not be lost. If the hammer has been carefully forged it will require little finishing in the way of filing, unless one wishes to make a fancy polished hammer. If such a one is desired some draw filing and polishing must be done. This makes the hammer look better, but it doesn't increase its efficiency. The tempering is done in the same way as the tempering for the cross peen hammer was done. However, this hammer is larger and heavier than the cross peen hammer and is more difficult to temper. While the same principle is involved in the tempering of both hammers, greater care must be taken in tempering this one.
The handle is placed. You will find that the driving of the drift pin into the eye, first on one side and then on the other, makes both outside openings larger than the centre. This should be so, as it helps to hold the handle firmly in place.
TOOL STEEL AND THE MAKING OF TOOLS
Here are a few problems which deal with the making of your own tools. When buying steel for this work always tell what the steel is to be used for. The merchant will probably recommend to you a grade of steel from which you can make tools that will last.
Hardie: Take a piece of 11⁄8-in. square tool steel. Make this tool on the end of a bar if the bar is long enough. It is easier handled in that way. The dotted lines on the drawing show the amount of material required to make the shank. This should be made to fit the hole in the anvil; 3⁄8 in. from the shank fuller down on the two sides of the steel, leaving 5⁄8-in. thickness between the fuller marks. Draw the end out to a 3-in. taper on one side and widen it out to 13⁄4-in. taper on the other. (See drawing.)
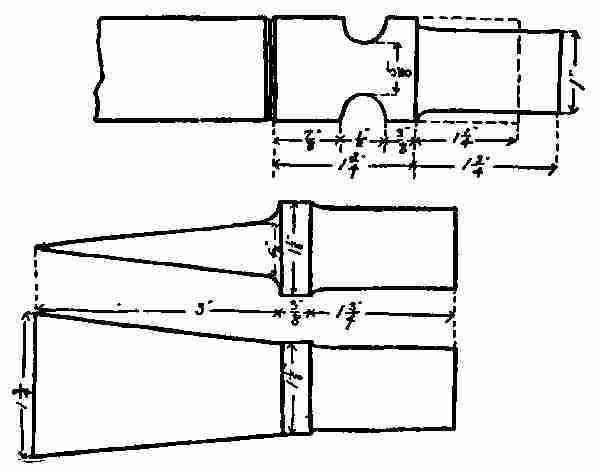
Hardie
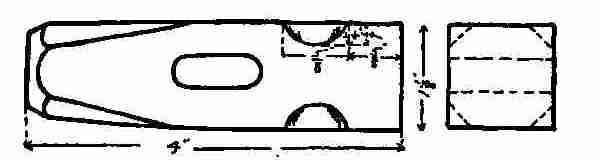
Set hammer, second process
Set hammer: A set hammer is made with a piece of 11⁄8-in. square steel; 15⁄8 in. from one end mark the hole. Put one end of the bar into the fire and heat it. Take it out and punch a hole with the eye punch in the piece of steel when it is marked. Knock the four corners down, bevelling them as shown in the sketch, and trim the end off rounding for the head. Cut it off 4 ins. long; fuller the four corners 11⁄4 ins. from the face as shown in the sketch. The end view of the drawing shows the depth of the fuller marks.
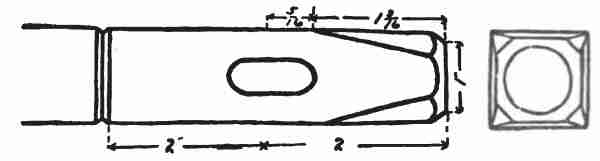
Set hammer, completed
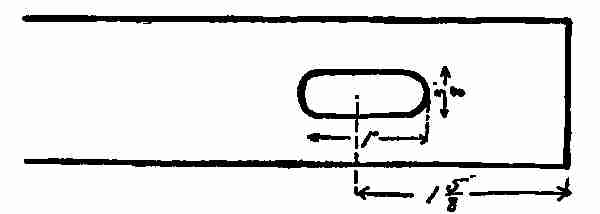
Set hammer, first process
Hot chisel: This tool is made much as you make the set hammer. However, where the set hammer is fullered on the corners the hot chisel is fullered on the two sides, and the end is drawn out tapering. Used to cut hot iron. (See drawing).
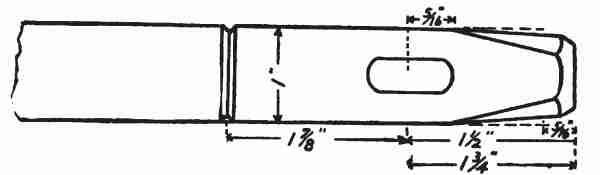
Cold chisel
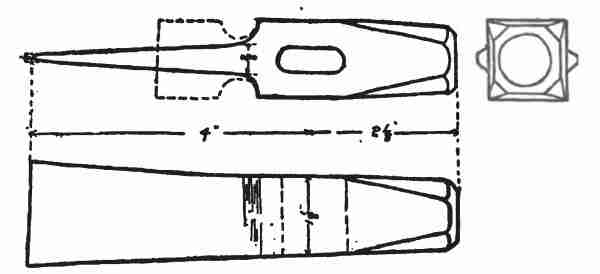
Hot chisel
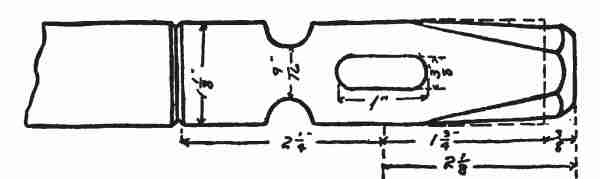
Hot chisel, details
Cold chisel: This tool is made out of 1-in. square stock. The punching of the eye and head part of this chisel is made in the same way as the other tools described here. A blade is tempered from the centre to 23⁄4 ins. in length, and the cutting edge is finished a little rounding. This tool is made to cut cold iron, hence its name.
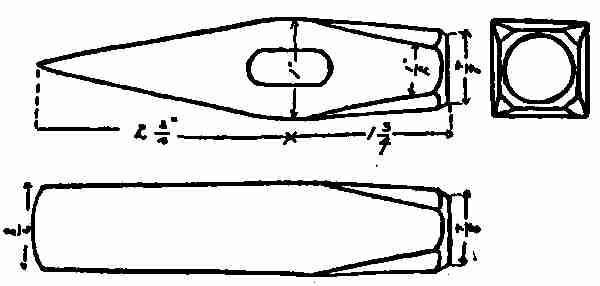
Another cold chisel
XXVII SOME GENERAL FORGING PROBLEMS
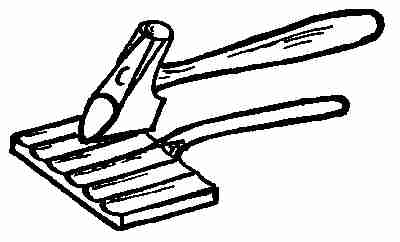
Ice shaver: Ice shavers are useful as shavers, breakers and choppers of ice. They are made out of a piece of low carbon steel for the blade and a piece of 5⁄8-in. round iron for the handle.
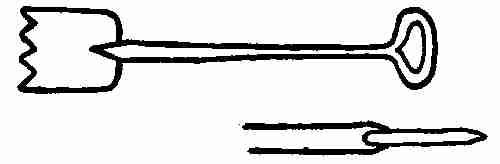
Ice shaver
Directions: Take a piece of 1⁄2 × 6 × 4 ins., and cut along as shown by the lines. When these two corners are cut out, point the centre piece for a cleft weld. Slit the end of the rod, scarfing its points thin, and slip this point into the crotch of the scarf, and weld with borax. This now gives you a piece that looks like a shovel. On the other end of the handle bend a ring about 4 ins. in diameter. Place the flat end in the fire, heat it up, and taper this flat end down very thin, about 1 in. long. With a file, file four teeth in the end, the same shape as shown here. It is now ready for tempering. This is done by heating all the teeth well back toward the handle red hot. Plunge the whole thing into water to cool it off. Take it out and polish. Heat a piece of large iron in the fire red hot. On this piece of metal place the teeth of the pick. When the blue colour appears on the point and cutting edges of the teeth, cool in water. It is now ready for use.
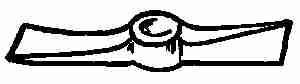
Grub hoe: The form and dimensions of this tool are given, also the different steps in the process of forging.
Stock: 11⁄4 × 3⁄4 × 5 in. steel.
Directions: Mark off with a centre-punch the middle of the piece of stock, and then mark off 1 in. from the middle in either direction. Fuller, as shown in the sketch, on the first end, to a depth of 1 in. Heat the piece and fuller the other end to a depth of 1⁄2 in. (A). The centre lug is now 2 ins. long. To make this 2 ins. long it is necessary that the fuller be placed on the piece on the outside of the centre-punch marks. Draw out the two ends, as shown by the sketch, one being directly opposite the other. Punch a hole with the eye punch in the middle of this lug almost through on one side. Take the punch out, turn the piece upside down, and finish punching the hole. The punch used for doing this part of the work should be straight and tapered and quite thin on the end. The problem is not to cut out a large piece but rather to split the metal. It's only 3⁄4 in. wide and will not allow for the cutting away of any material. A punch of this kind will heat up on the end while driving, when it is apt to bend. To avoid this keep it cold by dipping it into water from time to time. Place a little green coal in the hole after you have started the punch in. This prevents its sticking in the hole and it also prevents the end of the punch from getting hot. A very deep, narrow slot can be punched successfully in this way.

The drift pin used to shape the eye upon should be made the size of the finished hole—that is, 11⁄2 × 3⁄4 in. and 6 ins. long—oval-shaped, and tapered on the small end to 3⁄8 × 1⁄4 in. This taper should be the whole length of the drift pin. Drive the pin into the hole about half way down. This widens the hole so that it can now be placed on the horn of the anvil and fullered to the required thickness, which should be 1⁄8 in. on the extreme edge of the eye. Drive the drift pin again about 4 ins. or 5 ins. At the same time work the metal down on the outside. Repeat this till the hole fits the drift pin. The pin is now driven in through from the other side, thus making both outside openings of the eye the same size. The hoe is now finished up as shown in the sketch and ready for hardening and tempering.
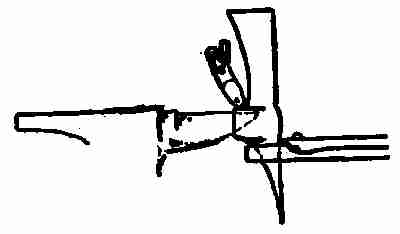
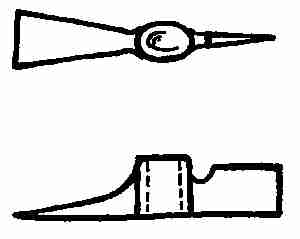
This is done in the same way as you did the chisel and the same temper colour is used for both. Five pounds is considered about the right weight for a hoe of this kind. The problem of working out the eye for this is the same as for making the eyes of picks, hatchets, and tools of similar design.
TURNBUCKLES
Turnbuckles, made either of steel or iron, are used for truss rods. There are many ways of making turnbuckles. Out of all, three methods are here given: (1) Solid forged buckle, (2) welding up, (3) pipe method.
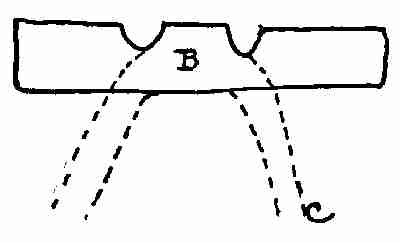
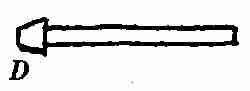
Solid forged buckle: This is made of soft steel. Select a piece of 11⁄2-in. square stock 6 ins. long. Mark off 2 ins. with a centre-punch on each end. Draw the ends out 1 in. round. Bend the ends down as shown at B. Forge the buckle part to 11⁄4 in. round at the end, as shown at C. Make the other end just like this one and weld the two ends together so that the total length will be 10 ins. Now drill holes in each end for a 3⁄4-in. tap. Tap a right-hand thread in one end and a left-hand thread in the other end, or you can put a swivel hook in one end in place of the thread. To do this the hole should be drilled 7⁄8 in. without a thread. Select a piece of 7⁄8-in. round soft steel 10 ins. long. Upset the end and work a tapered round head on as shown at D. The head should be 1 in. long and large enough to work loosely in the slot. Put this into the hole with the head between the wings and point the end forming it into a hook.
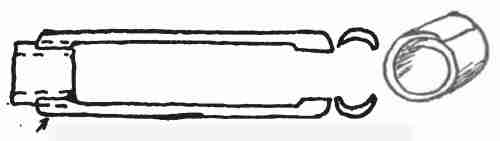
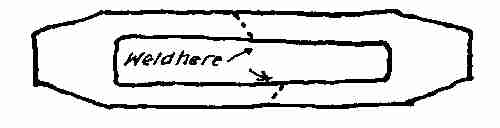
Welded turnbuckle: To be welded at arrow point
Second method: This is done by welding the two rods to collars. Make two collars out of wrought iron, the size depending upon the size of the turnbuckle. Scrape the ends of this flat iron, bend each into a circle, and weld on the horn of the anvil, thus making two collars. The arm should be drawn out of a piece of flat iron and made half round by a swage on the anvil. This leaves the original thickness of the bar on each end of the piece drawn out. These ends are now flattened and scraped as shown at A and should be wrenched to lap on the inside of the collars. Place one collar on one end and the wings opposite each other. Push a bar of iron into the opening within an inch of the collar. This bar prevents the tongs from squeezing the two wings out of shape and loosening up the collar while welding. Grasp the turnbuckle with a pair of tongs and place the end in the fire. Take a welding heat and weld this down on the horn of the anvil. At the same time shape it as shown at B. Draw out the piece of iron, place the other collar in the open end, and weld it as you did the first. This is finished up in the holes made. Threads can be cut or swivel hooks can be placed in.
Third method: Take a piece of pipe, length and size desired. Heat one end and upset it, enlarging and thickening it slightly. Cut a round iron plug to fit this end tightly. Heat the plug and drive it into the pipe. Place it on the fire and weld the pipe to the plug. At the same time forge the end square or hexagonal. Drill a hole in this end, pin the swivel hook same as explained in the second method. Select the iron, make the head on the rod, and put it through the pipe into the hole, head inside, before the plug is welded in the other end. Be sure that this rod will turn freely. Shape the hook before the plug is welded in the 2-in. end. This gives one an opportunity to push a rod into the pipe and hold the head of the hook while shaping it in the form of a hook or eye as required.
Now weld a plug in the other end the same as you did in the first. Drill a hole in this end and cut a thread to receive the truss rod end. This last method is much simpler than the other two. It has this advantage, that the thread will not rust so quickly, since it is always enclosed in the pipe. However, there is danger of a very weak spot right back of the plug, because you know when two pieces of metal are welded together the temperature should be the same. If not, the cold one will cut into the hot one and form cold shuts. In this case it is impossible to get the plug the same temperature as the outside. As a consequence there is a defect in the forging.
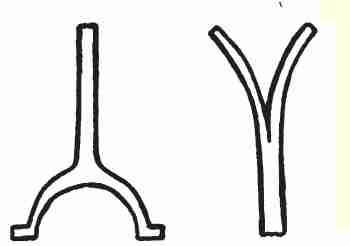
Eccentric strap
Eccentric strap: The principles applied in the working out of this problem are used in making many articles of wrought iron. Eccentric straps are much used in foundries, machine shops, and general shop work.
Stock: Bar of wrought iron or soft steel 11⁄8 ins. square, 16 ins. or 20 ins. long.
Round the bar down on one end to 1 in. in diameter. Split the other end up the length of the bar 8 ins. to within 1 in. of the shoulder made by the rounding down of the stock. These two arms are now thrown at right angles to the stem, forged down to 1⁄2 × 1 in. the entire length. The arc of the circle made by the arms is determined by the size of the thing the eccentric strap is meant to fit when it is finished. The ends are now turned up at right angles and are bent to fit the circle. A gouge chisel will cut the end off rounding. All ladle handles can be made in this way.
Garden hoe: The drawing shows the form and dimensions of the hoe, a garden tool very simple in construction and very useful.
Stock: 6 × 4 × 1⁄2 in. steel.
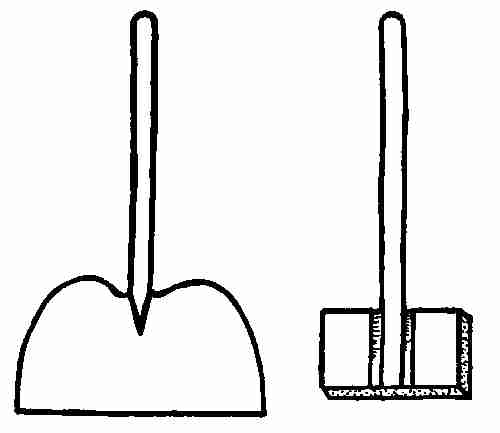
Hoe
Directions: Mark off 2 ins. at one end and cut down 1 in. deep on both edges. Cut out a wedge-shaped piece as shown in the sketch. Draw out the piece 1⁄2 in. in diameter and 6 ins. long. This forms the handle. Fuller down on each side of the handle where it joins the body as shown by the full lines. With the fuller spread out the metal on either side of the handle until it forms a blade 8 × 5 ins. This blade should be 3⁄16 in. thick at the top and 1⁄8 in. at the cutting edge. Bend the handle into shape. File or grind the edges of the blade to make it smooth. This should be tempered by heating it red hot. Plunge into oil. Take it out when cold and hold it over the fire until the oil flashes off. Then allow it to cool in the air. Grind it and polish if a bright finish is required. If not it is now ready for the wood handle.
Wood chisel: Chisels for cutting wood can be made from a piece of gas pipe and a piece of steel, or from old cold chisels too short for use. If no piece of old tool steel is at hand take a new piece, 5⁄8 × 4 ins., hexagonal.
If a piece of gas pipe is used, 1⁄2 in., heat one end and place it on the point of the horn of the anvil. With the peen hammer thin the point down around the end. This thinning stretches the metal and gives you a funnel-shaped opening, and a scarf to use for welding. The short chisel end should be pushed into this for about 1 in. and the scarf should be tapped down gently on this chisel. Sometimes it is necessary to upset the end of the chisel in order to make it fit the scarf. If required to do this, put it into the fire and heat it red hot, and upset it on the end where the weld is to be. Now put it into the pipe, put borax on the scarf, and heat it hot enough to weld. Take it out and weld it up in a bottom swage and reduce the weld to 1⁄2 in. in diameter. Cut the shank off about 31⁄2 ins. from the weld and heat this end again. Stretch it on this end so as to enlarge it to fit the wood handle which will be placed in later. Heat the steel end. Flatten it down to the shape of a wood chisel, the width to be according to the size needed. Out of this piece of steel a chisel 1⁄2 in., 3⁄4 in., or 1 in. can be made. It should be tapered down 3⁄4 in. on the cutting edge. File the cutting edge on the chisel. It gives a much better finish. The chisel is hardened and tempered almost the length of the whole blade, a blue colour, by heating it red hot, plunging it into water, polishing, and drawing the temper on a hot piece of iron. The handle is made by using what is known as a hollow auger. This shapes the wood to fit the pipe. A piece of the same pipe can be sawed off with a hack saw about 3⁄8 in. wide. This makes an iron ring, which should be driven in the end of the wood handle to prevent it from splitting. These chisels make the best kind of tools for rough, heavy work.
Door hasp: Door hasps are found most commonly on barn doors and gates, and in conjunction with a staple and lock form a complete fastening. The drawings make clear the different steps in the work.
Stock: 1⁄4 × 1 × 6 ins.
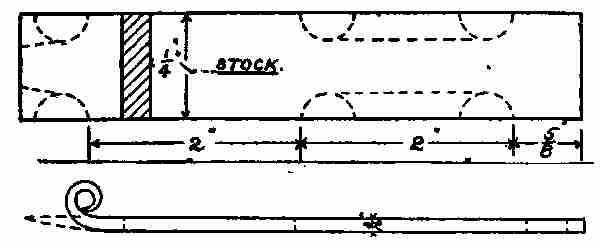
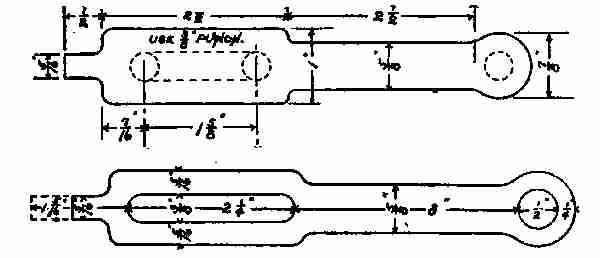
Directions: The eye is made first. Heat the piece red hot. Fuller down the stick 5⁄8 in. from one end, and 2 ins. from the fullered mark put in another. The distance between the fullered marks should be 2 ins. Draw out the space between the fullered marks to 5⁄8 in. in width, 21⁄2 ins. long. Cut the corners off the piece left on the end, as shown by the drawing. Round this up with the hammer on the anvil. Punch a hole in the middle of the eye, but keep the thickness the same during all the work. To make the body of the piece, where the slot is, 2 ins. from the shoulder fuller the end down to 5⁄16 in. from the end. Draw out this end to 15⁄16 in. in length. This forms the loop, and at the same time it tapers to a sharp end. (See drawing.) The piece is now ready for punching. Mark places for the punch holes, then cut between the holes with a hot chisel. In this way the centre piece is cut out, forming the slot. If this is carefully done little work will be required to finish it. The slot is filed out if any rough places are left. The end is bent up. Sometimes a ring is put in it, as a door pull, and sometimes the latch itself is used for the pull.

Dividers
Pair of dividers: Perhaps the simplest way to make a pair of dividers is to get a pair of buggy top joint butts, 1⁄2 in. size. Weld to each of the legs a piece of steel to form the two legs for the dividers. Begin about 1 in. back of the weld and draw the legs out tapering, octagonal in shape and rounding toward extreme sharp points. Place a washer on each side of the joint, and rivet the ends together with a steel rivet. If carefully done the dividers will require no wings. If wings are required they can be made by punching a slot 1⁄2 × 1⁄8 in. in each of the legs, 2 ins. from the joint. In each of these slots drill holes, in one a 1⁄8-in. hole and in the other a hole for a 3⁄16-in. tap. Drill both sets of holes through the legs. Tap out the one and make a thumb screw to fit. This is done by drawing out a 3⁄8-in. stem on the end of a 3⁄8-in. rod and cutting off 3⁄8 in. of this to form the head of the thumb screw. Heat this end and flatten down. Finish up with a few strokes of the file. Cut a 3⁄16-in. thread on the end. Screw it into the dividers. Draw out a wing 3⁄8 in. wide, 1⁄8 in. thick, to fit the slot. Bend it into a semicircle and place it into the slot. Open the dividers. See that it swings round on this circle. Drill a small hole in the end of the wing to fit the 1⁄8-in. hole drilled into the leg and rivet it into the slot. This makes a pair of dividers that can be used for all classes of work.
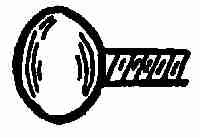
Thumb nut
STONE CHISELS AND PICKS
1. Stone chisels:
Stock: 1⁄4, 1⁄2, 5⁄8, 3⁄4-in. octagonal steel, 5 ins. long. Stone chisels are made out of the above sizes of steel, in sets, for the cutting of marble, sandstone, granite, etc.
Directions: Put one end of the stock in fire. Heat about 1 in. Draw this hot end to a taper 1⁄4 in. at the small end and 11⁄2 in. long. Place the extreme end again in the fire, take it out and strike it on the end by placing it upright on the anvil. Upset this end and form the round top shown in the drawing. If this top is not completed in one heating, heat it again and repeat the hammering on the end. All stone chisels are made with this rounding end so that wood mallets can be used for driving purposes. The ones shown here are the shapes used on most stone chisels.
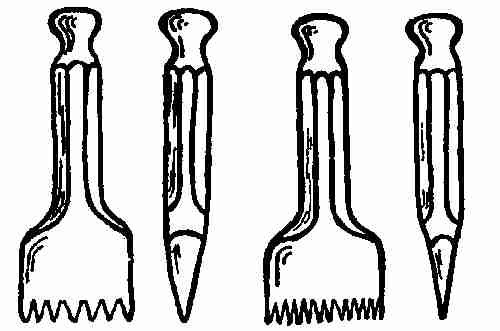
Stone chisels
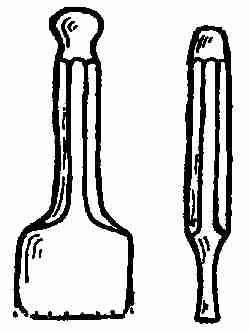
Stone chisels
The size of the teeth depends upon the hardness or softness of the material to be cut. The large teeth are used for hard stone cutting and the small teeth for soft stone cutting. Place the other end of the tool in the fire and flatten it down as shown in the sketch given here. Notice the dotted lines show that the extreme cutting edge of this tool is narrower than the body. This is an allowance made for the spreading out of the tool while cutting the teeth. Space off the teeth with a 3-cornered file as shown in the same sketch, and cut the teeth with a chisel made in the following way: Take a piece of 1⁄2-in. octagonal steel. Draw it out in the shape of a cape chisel. (See sketch.) Heat the end of the steel tool, then place it in the vise. With the end projecting up place the chisel on the mark made by the file, strike down sharply on the chisel, and drive it down to the required depth. This is repeated until the teeth are all cut. Flatten the cutting edge carefully on the anvil, and all teeth that may have been driven out of a straight line by the cutting. Heat the tool to soften it. File between the teeth the roughness made by the forging of the tool. A small flat jewellers' file will be found best for this purpose. Harden the tool as you did the cold chisel, and temper it at the purple colour sign.
2. Pick:
Stock: 1⁄2-in. square tool steel, 8 ins.
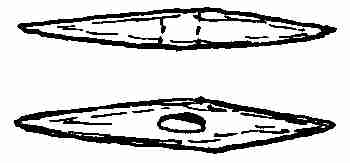
Directions: Mark the middle of the bar with a centre-punch. Punch the hole through with the eye punch. Put in a drift pin and flatten down the bulged sides of the bar made by punching the hole. Draw the two ends out to a sharp square point. This should make the pick not more than 10 ins. long. The drawing should show the shape it will be when finished. These picks are hardened the same as cold chisels, and tempered at the purple colour.
ROCK DRILLS (USED WITH MACHINERY)
As the name indicates, these drills are used for making holes in rocks when blasting is to be done. The form and shapes most in use are shown here.
The double drill, used so much in power drilling machines, is made in the following way: Take a 1-in. octagonal bar of steel, any length. Heat one end, and upset it to 11⁄4 in. in diameter. Put a small 1⁄2-in. fuller on the anvil and place the end of the bar lengthwise on the fuller. Put the top fuller directly above this and strike with a sledge hammer. The result is two fuller marks driven down within 1⁄2 in. of meeting. Reverse this and do the same on the other two sides. This marks a cross.
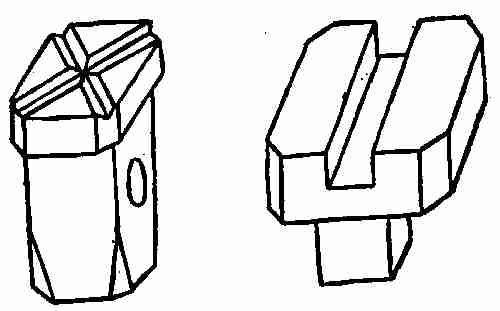
Tools for rock drills used in machines
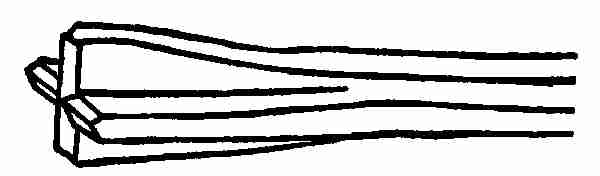
Machine drill
Place the forming tool in the anvil, and with a set hammer forge out the wings as shown in the sketch. The diameter of the drill depends upon the size of the hole to be drilled and is made accordingly. Use a sharp chisel for cutting the cutting edges of the drill. It is now ready for tempering. Drills are made in this way from the raw material. When once made they are kept in shape by what is known as the drill dressing tool shown here. These rock drills wear out on the sides, thus reducing the diameter. When re-dressing they are always upset to the required diameter. The re-dressing is done in the following way: Heat the end of the drill in the fire and place the dressing tool so that the cross impression fits the end of the drill. Drive on the end lengthwise of the bar, upsetting the drill to the required diameter, at the same time retaining the original shape of the cutting edge of the drill.
To temper rock drills: Take two small tubs of cold water, one clear and the other made soapy by cutting up a bar of cheap soap into bits. Heat the end of the drill to be tempered to a dull red and put it into the tub of clear water, the cutting edge only under water until it is cooled off. Take it out to polish. When the straw colour appears plunge it into the tub of soapy water. This does away with any red heat that might be in the bar when the temper colours appear. Soapy water is a poor conductor of heat and it allows the steel to cool off without suddenly chilling it.
DRILL FOR HAND DRILLING
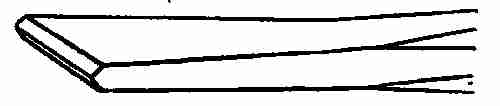
These drills are used for drilling holes in rocks where it is impossible to place machines or where machines are not available, such as on farms, where great rocks and nigger heads are to be removed by drilling and blasting out.
They are made as you would make a cold chisel. The taper, however, is much shorter and the ends are usually either rounded or diamond shape. (See sketch.) The cutting edges are ground, but in many cases they are forged and filed to shape. They are tempered in the same way as cold chisels are treated.
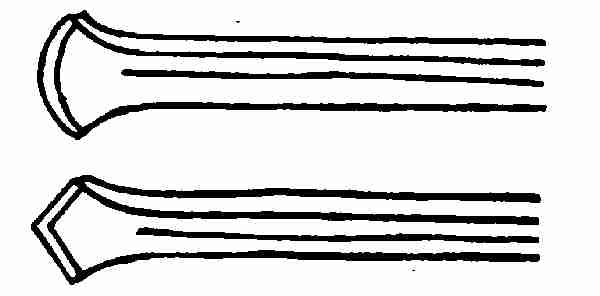
Round and flat hand drill
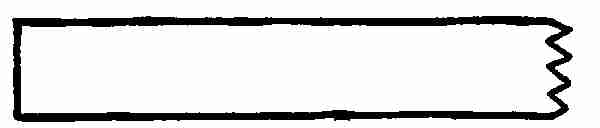
Pipe drill
Round and flat hand drill: Take a piece of octagonal steel, the size and length depending upon the size and depth of the hole to be drilled. These should not be over 20 ins. in length, for the blow would have little effect upon the cutting edge of the drill. Put one end into the fire, take it out and finish it up as you would the short end of a cold chisel. Reverse the piece of steel, and heat this end, for about two inches, red hot. Place it on the side of the anvil face and flatten it down tapering. Make it very short and just wide enough for the size hole to be drilled. With a hot chisel cut the end into the proper shape, either round or diamond shape. With the hand hammer work the cutting edge on the end. This end should be from 1⁄8 in. to 3⁄16 in. in thickness. Either file or grind the bevel which forms the cutting edge sharp. Harden and temper it the same as you would a cold chisel. If it is found, on trial, to be too soft, re-heat, harden, and temper at a higher colour. One of the best hand drills for drilling holes in soft material like bricks or sandstones is a piece of gas pipe any length. File teeth in the end, like a saw tooth. Case harden the end. This drill will go through a wall almost as quickly as a twist drill and with much less labour.
SHACKLE
Shackles are used for connecting chains, wire, ropes, etc.
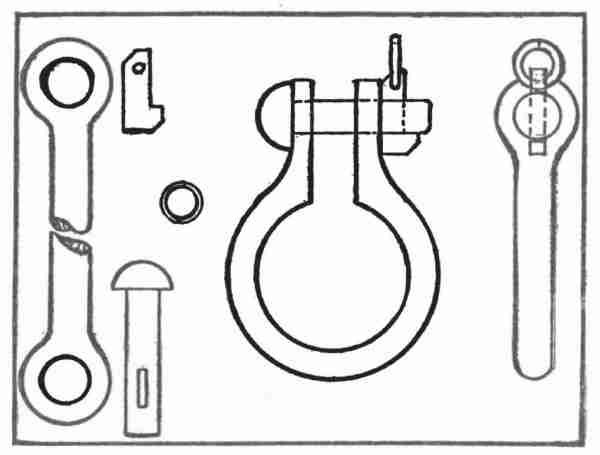
Shackle.
Stock: One piece of 3⁄4-in. round iron, 121⁄2 ins. (for shackle). One piece of 1⁄2-in. round iron, 4 ins. (for pin). One piece 1 × 1⁄8-in. flat iron, 13⁄4 ins. (for key). One piece 3⁄16-in. round iron, 21⁄4 ins. (for ring).
Directions: Heat the 3⁄4-in. round iron bar two inches, then bend this end on the anvil at right angles to the rest of the bar. Place the heel on the anvil, with the end sticking up. Strike on the end with the hand hammer and drive it down into the heel of the piece. Repeat on the other end of the bar. As one can always force the metal into any shape one desires by first driving it one way or the other, skill in making the two ends of the bar depends upon one's way of using the hammer. This method of making the eye on the end of the bar does away with welding and upsetting of the metal. A round finished eye is the result of the natural bending of the metal. This holds good not only for the shackles like this one but for many other tools, such as hand holds for cars, wagons, etc.
Bending: The shackle should be bent as shown in the sketch. First bend it right back of the eye, each one at about 45°. Heat the body of the piece and shape it around the horn of the anvil until the opening measures 1 in. wide. The sledge and swage are best used for this purpose. Place the swage on the metal and have the helper strike the swage. The shape is not apt to be changed or the metal marred if these tools are used.
Pin: Take the 1⁄2 × 4 in. piece of stock. The end is heated and upset about 1⁄2 in. Place this end in a heading tool and work a button head on the end with either the cupping tool or a hand hammer. The pin should have a slot cut through it 2 ins. from the head. To do this make a punch to cut the slot the shape required. After the piece is marked punch the slot by driving the punch half way through on one side. Turn the piece over and drive the hole through on the other side. This enlarges the metal a little. Reduce it to the 1⁄2-in. size to fit the hole in the shackle. Cut a little piece of iron the thickness and width of the key, 1⁄2 in. long. Heat the end with the hole in and drive this drift into the slot. With 1⁄2 in. top and bottom swage and the drift in the slot, reduce the pin to fit the hole. Drive the drift out. You now have a nice rounded pin with a hole in, 3⁄8 × 1⁄8 in.
Key: Take a piece of 1 × 1⁄8 in. flat iron or steel. Mark the shape of the key. Cut it out and file to fit the slot. Drill holes in the small end of this to prevent it falling out of the pin.
Ring: Bend the piece of 3⁄16-in. wire around a 5⁄8-in. rod in the shape of a spiral and saw off each ring as required. The ring should fit the hole in the key. This method of making a shackle is the same whether the material is 1⁄4 in. in diameter or any size up to 2 ins. in diameter.
CROW-BARS, AND WELDING OF TOOL STEEL TO WROUGHT IRON
Crow-bar
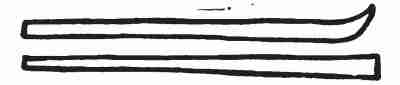
Crow-bars are made by welding a piece of round No. 2 flat steel into the end of a wrought iron bar any length or any size, depending upon the use to which the bar is to be put when made. This drawing shows a bar for shifting rails for railroads. When the size is determined, select the wrought iron to be used. Upset the end and split it with a chisel 3⁄4 in. for a cleft weld. Re-heat the end to a white heat. Place it upon the edge of the anvil nearest you and with the peen of the hammer work the scarf out to a sharp point. Repeat on the other side. (See picture.) Place the piece of steel selected for welding, in the fire; shape this end down to a sharp point at an angle of 45°. With the edge of the chisel placed on this scarf, strike on the top of the chisel with a sledge hammer. This will cut a nick and at the same time it raises up a sliver which will help hold the piece of steel in the iron between the cleft. Cool this scarf off in water until it is black hot. Heat the piece of iron (scarf end). Place the end of the steel scarf between the cleft and close the scarf on to the steel by striking gently. The steel will now stay in the end of the piece until it is welded. Place the scarf in the fire and when it is red hot cover it with borax. Get a welding heat on the wrought iron close to the joint first. Gradually work this heat toward the steel till the borax begins to burn, emitting a dark brown smoke. Take it out of the fire and place it on the anvil. One or two sharp blows on the end of the steel will drive it up into the crotch of the scarf. Now strike gently on the top of the scarf. Increase the force of the blows when you are sure the two pieces are welding together. If the pieces are not welding, which will be readily seen by the points of the scarf opening while working them down, place them again in the fire, put on borax and re-heat. A few trials will teach you how hot to get it for welding. Flatten down the end and shape it as shown in the drawing. Harden and temper the crow-bar as you would a cold chisel. If the point is not quite sharp enough grind it on the stone.
NAIL PULLER OR CLAW TOOL
This tool is made in much the same way as you make a crow bar. However, before bending the end up into a crow-bar shape, cut a slot in the end, as shown in the picture. Now bend it into shape. The handle should not be over 20 ins. in length and tapered usually from 3⁄4 in. at the large end to about 3⁄8 in. at the smaller end. The end is now flattened and a hole punched in it to hang it up when not in use. This is one of the handiest tools to have around any shop, not only as a nail and a bolt puller, but it may be used in place of the crow-bar. The drawing explains the various steps in the making of the tool.
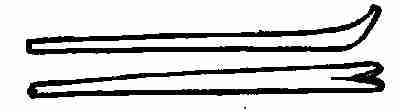
Nail puller
BUTCHER KNIFE
Stock: Spring steel, 7⁄8 × 1⁄16 in. × 9 ins. long.
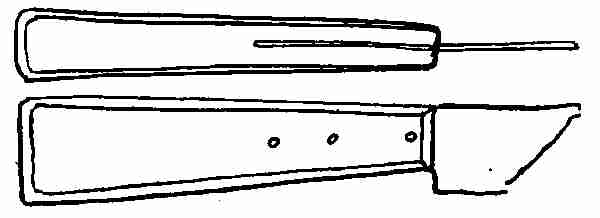
Butcher knife detail
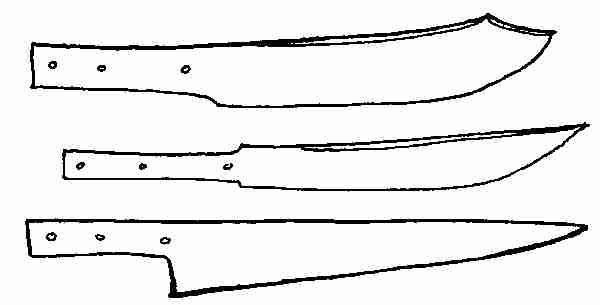
The spring steel used for carving knives or any steel used for that purpose should be a grade that will harden in oil just hard enough to feel a mill-cut file cut the steel. Cut the stock off 9 ins. and forge the shank first. On this size steel this forging of the shank consists in reducing the thickness of the material and widening it about 1⁄16 in. to 2 ins. in length. This tends to toughen the steel, and it makes a better knife by this extra work.
Butcher knives
To forge the blade, heat 7 ins. and bend it a little edgewise before reducing the one side for cutting edge. Allow the stretching and thinning out of this edge to straighten the blade, and the curve on the back will form itself, naturally, by the extra length of the cutting edge. Do not try to forge the exact shape of the knife. It is much better to reduce it to the required thickness, outline the shape, and cut it with a hot or cold chisel. At this thickness the knife can be worked either hot or cold when doing this particular kind of work. Cut along the outline, thus giving it shape. A fine file will finish the roughness on the outline and trim up any uneven spots caused by the shaping. When the knife is finished, so far as the forging is concerned, anneal it by heating the whole blade and allowing it to cool in slaked lime. This relieves any strain due to forging. Handles are made of bone, birch, or beech, and can be shaped to suit one's taste. They should measure about 1 × 5⁄8 × 5 ins. Rivets hold them in place. (See cut.) These are of brass wire, easily made by cutting off the length required to go through the wood to hold the blade in place. Place the blade in the slot of the wood handle and drill four holes through the wood and through the blade. Do not make the holes more than 1⁄16 in. in diameter. Take the blade out, harden, and temper. All drilling of holes and fitting should be done before the blade is tempered, while it is in the soft state. It is difficult to drill the holes after the tempering has been done.
To temper the blade: The blade is tempered by heating it on a coke fire. Place the back of the blade down, on a piece of flat iron. The iron will heat red hot. The iron under the knife prevents the flame striking the blade and heating it unevenly, in spots, as it were. When the blade is red hot plunge it into a bath made of linseed oil. Take it out of the oil and polish it. Use the piece of iron the blade was heated on to draw the temper. This hot iron is put on the anvil, the back of the knife edgewise is placed on the iron and moved forward and backward to insure a uniform heat. As soon as the straw colour appears take out any buckle or bend caused by the hardening. Place the other side of the blade on the anvil. A few quick, sharp blows with the peen of the hammer will straighten the blade. Continue the tempering until the purple colour shows. The blade should be tempered so that a very smooth, sharp file will just cut it when rubbed over the surface. Place the blade in the handle and rivet it in place, polish it, and then grind.