XI DECORATIVE WORK IN LEATHER, COPPER, AND OTHER MATERIALS
Reading edition
To become an artist in dealing with tools and materials is not a matter of choice or privilege; it is a moral necessity; for a man's heart must be in his skill and a man's soul in his craftsmanship—Hamilton Wright Mabie
LEATHER WORK
Leather work, like weaving and pottery, is of very ancient origin. The New Testament text concerning "new wine in old bottles" referred to bottles of leather, or wine skins. We read of leather as having been used in still earlier times for shields, saddles, harnesses, parts of chariots, and as an accessory to clothing. In the middle ages the "gentle craft of leather" was not confined to the shoemakers' useful productions but included much ornamental work. There were wall coverings of leather with designs carved, or modelled, or stamped with hot tools; seats were upholstered and books were covered with tooled leather. Some of this work was richly adorned with painted and gilt figures like the celebrated Spanish leather.
Why Leather is Suited to Decoration.—Leather seems, therefore, to have won the right to a high place among the materials suited to decoration. Its beautiful texture, the rich brown tones of its natural colour, the ease with which it takes dyes, and the readiness with which under proper treatment, it receives and retains the marks of the modelling tool, qualify it to minister to the artistic sense no less than its durability enables it to serve the more common uses.
Limited Decoration Desirable.—The tooling of leather is based upon the fact that, when wet, the fibre yields readily to compression and receives impressions that are retained after the leather is dry. But the beauty of design depends upon the colour and texture of the surface quite as much as upon the figured impressions upon it. It is therefore a good point in design not to cover the surface so completely that the peculiar beauty of the material itself be lost. The decorations should be bold and rich, but the tooling should be confined to a small part of the surface. Calf skin and cowhide are well suited to tooling. They are supplied in two general forms, viz., the smooth, generally as Russia calf, and the rough or split cowhides, known as ooze. Leather may be stained a variety of colours by aniline dyes; but since the natural colour of leather is brown, brownish tones are more satisfactory than the blues, greens, violets, grays, etc., because they seem more sincere.
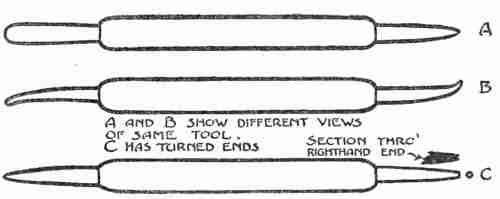
Leather-working tools
Tools.—The simple tools required for tooling leather may be purchased at small cost, or they may be made from cheap nut picks by filing these to shape, polishing them, and buffing them. The illustrations show two different tools, each double pointed. A and B are different views of the first tool; C is the second tool. The narrow pointed end of the first tool is for outlining and working into corners. The broad, flat end is for smoothing down and for general use; the broad tool should be used whenever possible. The round point on the left end of C is used for outlining and transfering the design to leather. The right hand end of C is known as the background tool. It is cupped out like a nail set, as indicated by the lengthwise section just above and by the end view at the extreme right; in fact, a nail set may be used for the same purpose. The background tool, however, is to be used sparingly. If used to excess, especially on large surfaces, the result is likely to have a mechanical and "shoppy" appearance.
PROBLEMS TO DESIGN AND TOOL A BELT
The sizes given in the illustration on page 325 are typical, but it is expected that in this and other problems, dimensions will be varied to suit conditions. When the size has been determined the leather should be cut a little longer and wider than the final dimensions are to be, to allow for attaching the belt pin or buckle. The strip of leather should be thoroughly soaked in cold water and then rolled in dry cloth until the leather is dry enough for tooling. It is essential that there should be absolute uniformity of moisture. If on applying the tool, water follows pressure, the leather is still too wet. If it should get too dry to retain the mark of the tool it may be sponged on the back. There is danger of water stains, however, if the entire back is not wet.
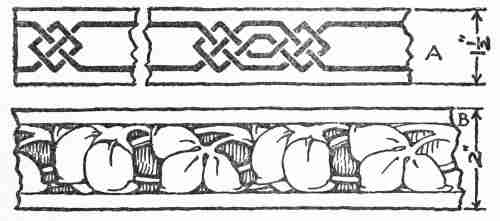
Two belt designs
The Design.—The illustration shows two treatments. An interlaced pattern is shown in A which concentrates the interest at the ends and in the middle of the back. The pattern shown is tooled solid and the background is left untooled. If the pattern be tooled in outline it is well to shade these outlines out into the background in order to give relief to the interlaced bands.
Modelled natural forms are shown in B. In this the background is tooled down, but is heaviest at the ends or in the spaces against the raised forms. This gives the background a richer appearance than it has when tooled absolutely flat. Both patterns here shown are straight with parallel sides. Other shapes are possible—for example, those wider in the middle and tapering toward the ends.
When a satisfactory design has been worked out and drawn it is transferred to thin bond paper. The greatest care should be taken not to have any pencil marks on the back of this paper, for they leave a dirty gray stain on the leather which is difficult to remove. It may be added here that whenever it is desired to mark the leather for any purpose a tool should be used, not a pencil.
The Process.—As soon as the leather has dried just enough to retain the marks, the pattern should be placed upon it, pencilled side up, allowance being made for trimming to the desired width. The paper may be held in position by thumb tacks, which must not, however, pass through the leather inside the part that is to be cut off. The pattern may now be traced through the paper, over the lines of the drawing, with the round pointed tool. Care will have to be exercised to make sure that the pattern is completely transferred to the leather. When this is accomplished the pattern should be removed and the lines, which will be found somewhat dimly traced on the leather, should be immediately deepened by going over them with the same tool.
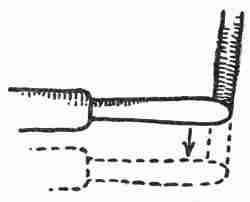
Method of using the broad tool
The next step is to tool down the design; and in doing this the work should be turned under the tool rather than the tool itself on the work, in order that the pressure of the tool may be applied at the edge of the pattern farthest from the hand. This not only insures a correct and convenient position of the tool, but allows a perfect view of the work. In this part of the process the broad tool should be used, moved sidewise, as shown by the direction of the arrow in the accompanying cut. In working up into corners the narrow tool may be used if necessary. The movement may be described as "ironing the leather down." The surface should not be roughed up or cut up into "shoulders." It is a process requiring time. One should not try to get the full depth with the first pressure of the tool. One should coax the surface and add pressure with each succeeding stroke, taking care that the tool does not scrape. It should glide; and yet, on the other hand, beginners will perhaps need to be cautioned not to wear out the surface by feeble scratching and patting. A firm, even gliding pressure does the work. As the leather dries it will be seen that the tooling has given it a dark, glossy surface. When the process is completed the belt may be trimmed down with a firm, sure cut of the knife, using a straight edge wherever straight lines are desired.
TO DESIGN AND TOOL A MAT
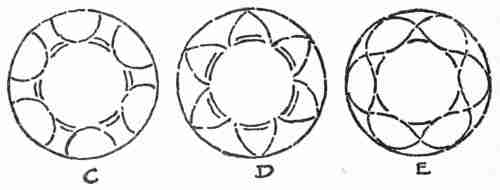
Supported and unsupported circles
The Design and the Process.—The purpose for which a mat is used requires as one condition of design that there should be a plain surface in the middle. If the general form be square the design at the corners should be strengthened. If circular, the design should be so arranged that it will lend support to the perfect curves of the circle rather than weaken them. In the three outlines given below, C shows a form supporting the circle; D and E show forms tending to weaken the circle. Conditions determining size are more variable in this problem than in others, because of the great variety of uses which a mat may serve. In a design like that shown in A of the accompanying illustration, the portions left untooled—i. e., the leaves and fruit—may be raised still more by pressing out the leather from the back by means of a tool. To do this the leather should be placed face down in the palm of the hand or on modelling wax, which has been covered with a piece of chamois or sheepskin. Then by gently forcing the leather down with a round, blunt tool such as the blunt end of a nut pick the desired relief in the figure may be obtained. After this is done it will probably be necessary to turn the mat over and correct the modelling. In order to preserve the higher relief it is well to back it up with cotton batting, soaked in paste, and finally to cover the entire back with a lining of silk or leather.
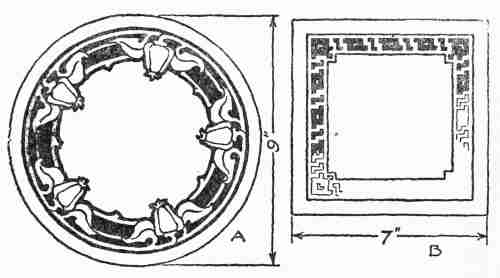
Two mat designs
TO DESIGN AND TOOL A PEN WIPER
A pen wiper consists of a cover, which in this case must be made of leather suitable for tooling, and several leaves of soft material like sheepskin or chamois, which should match the cover in colour. The process of tooling the pen wiper does not differ essentially from that already employed in the foregoing problems. It should, of course, be carried through to completion before the book is made up. These parts are to be tied together with knots of sheepskin thongs of the same colour.
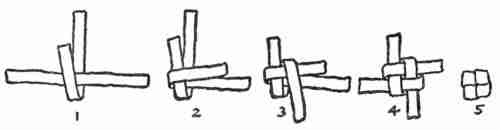
Steps in tying a knot
The series of cuts given below show the progressive steps in forming the knot, which should finally take the shape of Figure 5. After it has been formed the thongs are passed through holes punched in the cover and leaves of the pen wiper, and secured by a second knot formed on the back, resembling Figure 4 with the ends cut as close as will leave them securely tied.
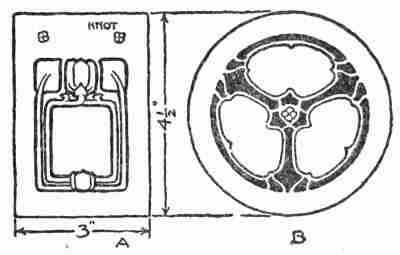
Two designs for pen wipers
Another illustration gives two suggestions for the design: A, a rectangular pen wiper tied with two knots at the end; B, a circular pen wiper tied with one knot in the middle. In these designs, and indeed in all others, decoration should recognize (not antagonize!) the outer form of the article to which it is applied. This point is made in the illustration.
TO MAKE A SLIP COVER FOR A NOTE-BOOK FILLER
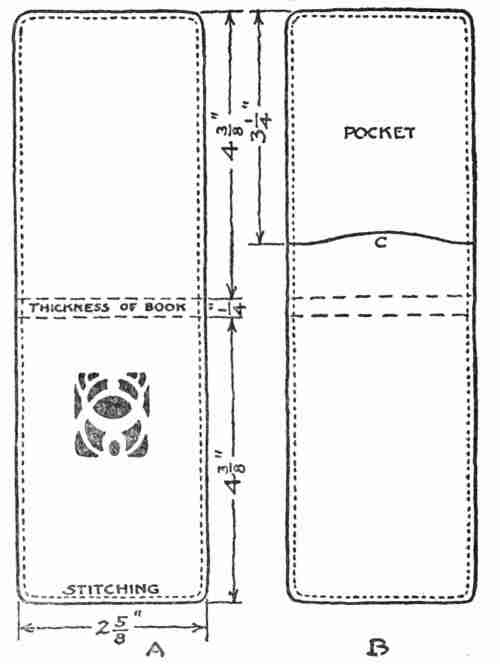
Design for slip cover
Planning the Cover.—The object in this problem is to make a permanent protection for fillers. It is well known that the fillers themselves may be purchased for a trifling sum and that they are provided with a backing of stiff paper which is designed to be slipped into a pocket in the back of a leather cover and thus form a neat pocket note-book. It is evident that the dimensions of the filler determine the size of the cover; but, in planning the cover, care should be exercised to allow sufficient play for width, length, and thickness after all the cutting and sewing are done. This means that the stock for the cover and lining should be cut a little larger than called for in the final size. The design illustrated shows both the outside (A) and the inside (B) of the cover. As it is planned the cover is to be lined with sheepskin of harmonizing colour; but this may be left out if desired, though it, of course, gives a much better finish to put it in.
Assembling the Parts.—The first step after cutting out the leather for the cover is to prepare the leather and tool it, if it is to have any decoration. A piece of leather should be cut for the pocket, and the edge (C) shaped. The edges of the lining and the pocket should next be lightly pasted and pressed on the cover. A line is then to be ruled with a leather tool (not with pencil) on the outside to serve as a guide for stitching. A machine stitch may be employed or it may be done by hand. If by the latter method it will be necessary to pierce the leather at equal distances along the tooled line. Hand stitches may safely be a little longer than the machine stitches.
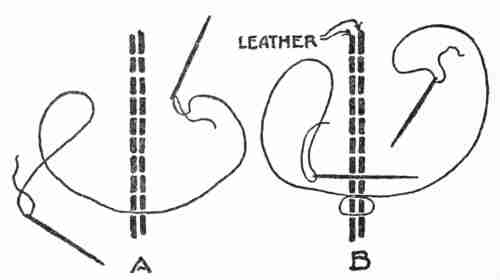
Stitching with two needles
Stitching.—A good way to secure equally spaced stitches by hand sewing is to make use of bow springs or spacing dividers set to the required distance. A more rapid way to accomplish the same thing is possible by making use of a tracing wheel, if one is available of suitable size and of the right spacing between the teeth. The hand stitching may be done either with one needle or with two. If with one it is best to sew a running stitch once around the seam and then return, covering the alternate spaces left on the first round. It is better, however, to use two needles, one on each end of one thread, selected long enough to finish the sewing without piecing it, and to proceed as illustrated in A and B, i. e., to draw one needle with its thread through to the middle of the thread, as shown in A, and then the other through the next hole, and so on alternately from opposite directions, producing a stitch like that illustrated in B. It will, of course, be understood that, in the illustration, the length of the stitch is exaggerated in order to show the process plainly.
Trimming and Finishing.—When the sewing is finished the thread is fastened by doubling over one or two of the stitches and drawing the ends inside between the cover and lining. Then a line should be tooled on the cover about 1⁄16 of an inch outside of the stitching, and on this line the cover, lining and pocket are trimmed together. The raw edges may be treated with water colour to give them a finish. Finally the cover is moistened a little and folded back with firm pressure in order to establish an even and permanent bend in the leather.
TO DESIGN AND MAKE A DESK PAD
The Design.—The problem of design in this case is, first of all, to determine the dimensions of the pad, which depend, of course, upon the use to be made of it. Then a dimensioned sketch should be drawn in outline, including the spacing for the corners as illustrated in the drawing (A). The only detail that will need elaboration is the corner. The shape and decoration of one of the corners should be carefully laid out on thin paper, from which in due time it may be transferred to the leather and tooled as in other problems.
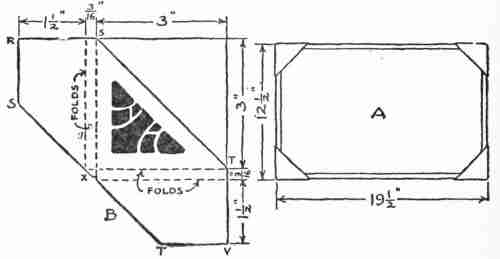
Detail of the leather corner(left) Outline of desk pad(right)
Material and the Process.—For making the pad it will be necessary to secure a piece of binders' board—i. e., heavy pulp or straw board—of the required size. The medium weight is the best, and it may generally be obtained at the bookbinder's. If this cannot be obtained, two sheets of 10-ply card-board may be used instead. The size given in the drawing will carry a half sheet of commercial blotting paper. The edges of the paper board should be bound with passe-partout binding of a colour to harmonize with the leather that is to be used; the strips of binding should be long enough to extend under the leather corners but they need not reach up to the corners of the board. After the binding has been put on, the top of the board should be covered with paper also harmonizing in colour with the leather, and the paper should be cut of such size as to lap over the edge of the binding and yet leave a suitable width of the binding. The so-called "cover papers" will be found satisfactory.
Making the Corners.—The next step in the process is to lay out and cut the leather corners according to the original design. The form in which the leather is to be cut and the dimensions are shown in the illustration B. The little flap at x should be noted. It is designed to tuck under and close the corner. The edges of leather at x should be "skived" or thinned down so as to add to the neat appearance of the work. Further improvement will result from skiving down the edges S R S and T V T of the large flaps, which are to be folded over underneath and pasted down to the back of the board. The ordinary photographers' paste is satisfactory for this work. When the leather corners are placed in position for pasting, two or three thicknesses of blotting paper should be used at each corner, in order to secure the necessary space for the reception of the blotters when the board is in use. After the corners are pasted on, the back of the board should be covered with paper in the same way as the front, care being taken to leave a portion of the binding and leather exposed. Finally a number of blotters of full size should be inserted in position under the corners to keep them in shape and the whole placed under light pressure until dry.
TO DESIGN AND MAKE A CARD-CASE
The Design.—In the illustration (A), showing a card-case unfolded, the dimensions give the finished size. The same card-case is illustrated in B somewhat reduced in scale and with the flaps turned in. The design on A is a rectangle broken at the corners. In this case, as it may be with all similar forms, the design is treated as a sort of binding, extending across the middle fold. C shows an alternative design which is treated as a panel and may be placed on one or on both sides of the card-case. The question of which is the top and bottom in such a design as that in C can be determined only by the owner's habit of holding a case. Sometimes a monogram is placed in one of the inner flaps, as illustrated in A, or on one of the outer surfaces.
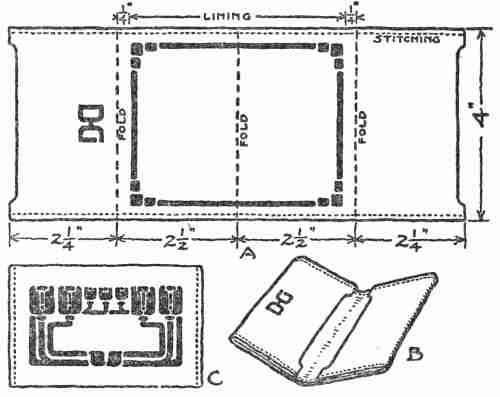
Design for a card-case
The Process.—In cutting the leather for a card-case it is necessary to provide a piece a little larger than the finished dimensions in order to allow for trimming. The design should be transferred, the line of stitching determined, and the tooling done, according to the description already given for the other problems.
The Lining.—A card-case may be lined either with silk or with sheepskin, in a colour to harmonize with the outside. If lined with silk it must be trimmed down to size accurately after tooling, great care being exercised to have the sides parallel and the corners true and square. Then the silk is to be turned in at the edges and lightly pasted along the edges to a width of 1⁄8 of an inch, care being taken, however, not to paste those portions of the edges that will be visible when the flaps of the cover are turned in, i. e., the middle of the fold B. This precaution should be taken because the paste may strike through and spot the lining. The flaps should then be moistened a little and folded down with firm pressure; but before stitching they should be fastened down with a little paste to form pockets. This takes the place of basting and is followed by stitching as described in the problem of the note-book. If lined with sheepskin, the ooze side showing, the cover need not be trimmed down until after the stitching; then both may be trimmed at once.
TO MAKE A LEATHER PURSE
The Design.—The details of design and construction are shown in the accompanying illustrations. In A the outer flap is shown tooled. It will be noticed that the cap of the snap fastener is taken as the central point in design. The tooling is done as directed in the other examples of this class of work.
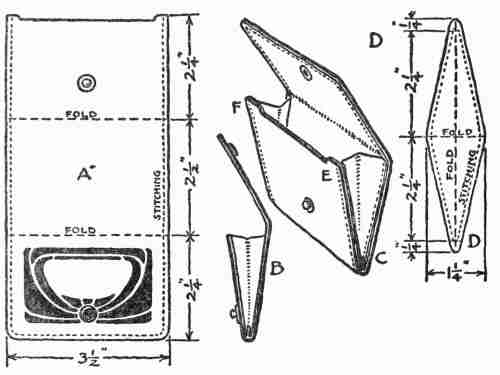
Design for a purse
The purse is lined throughout with leather. It has bellows ends, as shown in the perspective at C and in the end view at B. The pattern of the bellows end shown in D is intended to fold in the middle, bringing both ends of the leather together and thus giving an end of double thickness. With thin leather, such as is used in the present instance, this pattern is practicable. If thicker leather be used the bellows must be made of single thickness. In this case the pattern would simply be like that shown in the lower half of D.
The Process.—After the lining is pasted to the cover a snap fastener should be attached. Proper care, of course, should be taken to see that the fastener comes in the right place so that the purse will fold properly. The cover and lining should then be trimmed and the leather surface ruled for stitching. It is well to fold the inner flap of the purse while it is moist from pasting. Finally a little paste is applied along the edges of the bellows ends and they are placed in position.
Stitching is started at the point E shown in the perspective. Hand stitching is the most practicable. The direction is down one side, up the other, and around the outside flap to the other bellows end, stopping at the point F. When the stitching is completed the inside flap should be folded down.