TO MAKE A LIMP LEATHER BOOK COVER
Reading edition
The Design.—The first step is to choose the book to be bound. For the sake of simplicity, as perhaps the first piece of bookbinding undertaken, it should be a folio or "section." And it should be worth binding in leather. The subject, the paper, and the typography should be worthy of the distinction.
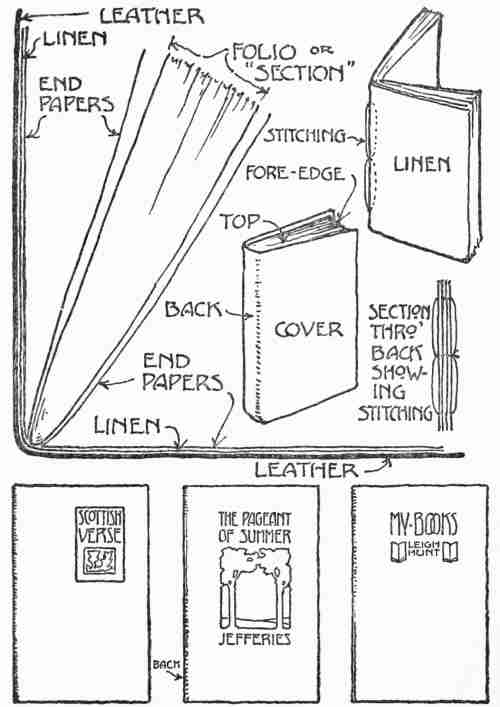
Typical arrangements suitable for tooled leather covers of books. Details of tooling, relief, etc., worked out as in other problems.
The Process.—If the book selected is already bound or "cased" it is necessary first to remove the binding or casing. Then at least three fly leaves should be added, made up to match the other leaves of the folio. A piece of bookbinders' linen or buckram is now cut to the size of the open folio, placed upon it like a cover, and, with the fly leaves and the folio itself, stitched through the back with silk of a colour to harmonize with the leather.
The next step is to prepare the leather cover. To do this, first place the leather in position on the closed folio and, allowing 1⁄4 of an inch at the top and bottom and 3⁄8 of an inch at the fore edge, mark and cut out the stock for the cover. The decoration, if there is to be any, may now be tooled on. If the design is heavy enough in relief to need a backing, it may be at once filled with cotton batting, pasted in as directed in the problem of the mat, and covered with thin paper.
Stock for the end papers is now selected. They may be of cover paper, or of silk, and they should harmonize in colour with the leather. They are formed of two thicknesses of the material chosen, by folding it over to fit into the part between the linen and the first fly leaf. If of paper they are to be cut to the length of the folio leaves, but the width is to be left with an allowance for adjustment after the linen is pasted in. If the end leaves are to be of silk, an allowance of 1⁄4 of an inch must be left for turning in at the top, the bottom and the fore edge.
We are now ready to paste the linen to the leather. Strong paste, with perhaps a little thin glue added, is needed for this part of the process. Now paste the outside end leaves to the linen on the inside of the cover; and, if silk has been used for these leaves, paste the other two to the outer fly leaves. Finally, the book should be placed under very gentle pressure and kept in this condition until dry. Care should be exercised to adjust this pressure to the character of the tooling, if there is any, so as not to crush it.
COPPER WORK
There is a limited field for metal work in home decoration; but there are some things of metal that combine beauty and utility to a remarkable degree and, in their making, introduce us to most interesting operations. Beginning with the gate, which may be of wrought iron, or with the door knocker, which may be of antique brass, we may find in every home problems of design involving work in metals. Ornamental hinges, key escutcheons, fastenings of various kinds, andirons, and other accessories of the hearth, lamp holders, card trays, crumb trays, bon bon dishes, and many other useful things that may be made in attractive forms readily suggest themselves. How some of these may be made is suggested in the following simple problems:
TO MAKE A LETTER RACK
This is an easy problem. Only four constructive operations are required, viz., cutting out the stock, sawing the design, bending, and finishing. The illustration shows the form and the dimensions and suggests a simple design. The material required is 18-gauge soft copper.
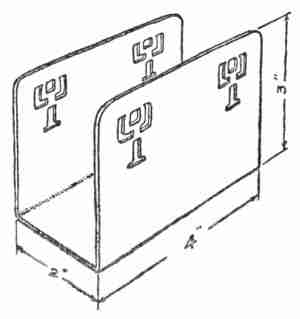
Design for a letter rack
The first step in the process is to cut out a strip of copper 8 inches long and 4 inches wide. If necessary the edges may be trimmed even and then the round corners should be cut. The design is traced on strong, thin paper and securely pasted on the copper in the proper position by using cold liquid glue. A hole is drilled through each unit of the design by means of a hand drill, a jewellers' saw inserted, and the design cut. Time and patience will be required for this operation. Saws are easily broken, and new ones must be attached to the saw frame and again applied to the work. After sawing the design it is necessary to give the edges a smooth finish. This is done with a file. The surface which is to form the inside of the rack is then thoroughly cleaned and polished with water and pumice.
The copper is now ready to be bent to the required shape. To do this prepare a block of hard wood 8 inches long and 2 inches wide, grip it in a bench vise, and clamp the strip of copper squarely across the block in such a position that the sides may be bent over the edges of the block. When this has been done it only remains to clean the outside surface and finish it on the felt buffing wheel. If a fine polish is desired, the buffing should be preceded by careful grinding with a Scotch water stone and water.
TO MAKE A LETTER OPENER
This requires the same kind of material as the letter rack and the same operations, with the addition of riveting. After the stock is cut out, trimmed and trued up at the edges, an outline of the design is pasted on, as in the previous problem, and the design cut out. The top is then bent over and riveted with a copper tack, having shaped the head of the tack in the vise before inserting it. While the tack is being riveted the finished head should be protected by placing it on a lead block. Finally the edge should be filed to the shape shown in the cross section, and the whole cleaned and polished.
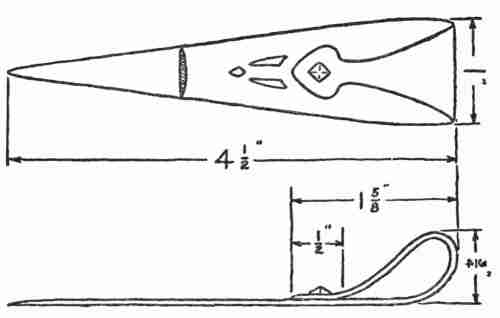
Design for a letter opener
TO MAKE A HAT PIN
For this problem 12-gauge copper will be needed. The operations required are cutting out, sawing, and soft soldering. After the necessary stock has been cut to the required shape and the edges filed, the design is outlined, pasted on, sawed, and finished as before. It is desirable to grind with the Scotch stone and water to a good polish. The head will then be ready to be attached to the pin.
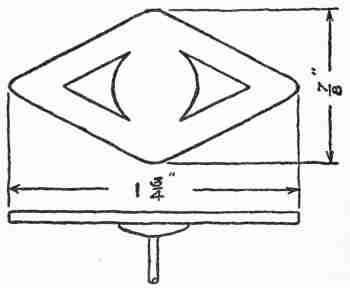
The hat pin
Carefully scrape with a knife the portions of the surface where the pin is to be attached (shown in the drawing), select a steel pin of desired length, scrape the surface of the little disk attached to one end of it, apply to this disk a little soldering paste by means of a small stick, and then, with a gas (or alcohol) blowpipe, melt on a bit of soft solder, which should cover the whole disk. Now place the copper, outside face down, on an asbestos pad, applying the soldering paste to the central portion, place the disk with its bit of solder on this portion of the copper, and fuse as before.
When the copper has cooled, clean off the oxide, which will have formed, by dipping in diluted sulphuric acid, and polish on the buffing wheel.
TO MAKE A BELT PIN
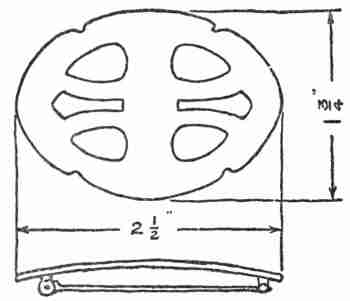
The belt pin
Eighteen-gauge copper is required for this problem. The operations are like those for the hat pin except that hard soldering is necessary. The slight bending of the copper, required in this case, is done by means of a horn mallet and a sand pad. For hard soldering, the surface must be scraped as before and covered with a little borax ground in water and applied with a small brush. The belt plate should then be placed on the asbestos pad, with its convex face down, and blocked up so that the end where the soldering is to be done is horizontal. The catch should then be placed in position with a small piece of silver solder at the base. The solder should be melted as before by means of a mouth blowpipe and gas or alcohol flame. The hinge is soldered on in the same way, and finally the pin is cleaned and polished for use.
TO MAKE A SET OF BOOK ENDS
This problem is much like the first one described under metal work. Sixteen-gauge copper is required. It may be bent by placing it between two hard wood blocks in a vise and hammering it with a rawhide mallet.
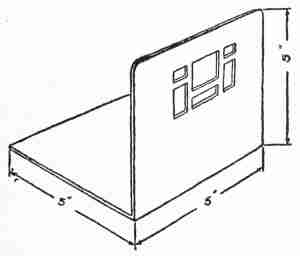
Design for book ends
TO MAKE A TEAPOT STAND
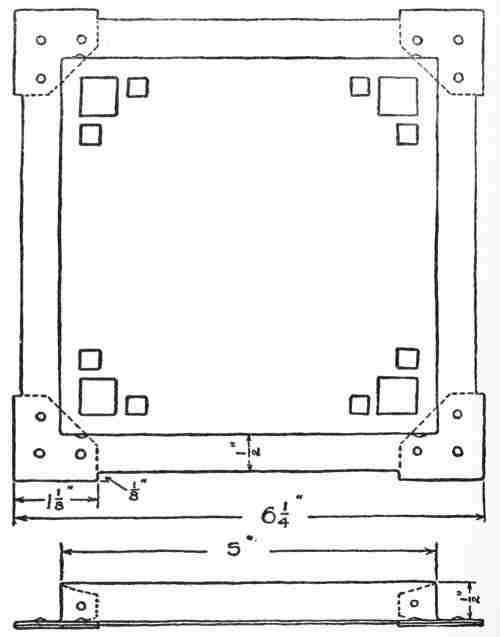
Design for a teapot stand
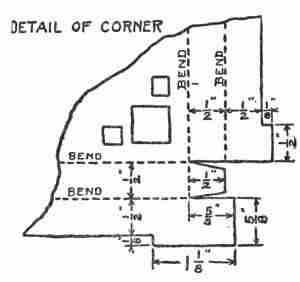
Detail of a corner
Twenty-gauge copper is required for this problem. The operations are similar to those already described; but the cutting and bending are much more difficult. After determining the design it will be necessary to make a drawing showing fully developed surfaces, as illustrated in the detail of the corner. The four corners must be marked and cut exactly as shown in the drawing. A piece of hard wood is then cut to the size of the top, 5 inches square in this case, to be used as a form on which to bend down the sides and turn the flanges. If the corners are correctly cut the parts will fall naturally into place, to be bored and riveted, as the drawing plainly shows. In order to protect the tablecloth, the under side of the rivet holes should be countersunk so that the ends of the rivets may be finished smooth and flush with the under surface. As an additional protection, a felt mat may be glued on the bottom.
TO MAKE A WATCH FOB
This problem introduces engraving and enamelling, two interesting but somewhat difficult operations. The process to be carried out is as follows: Using 12-gauge copper, saw the outline, and apply the design for the part to be enamelled to the copper by sketching it with a pencil or transferring it by means of carbon paper. Then strengthen the pencil or carbon lines by scratching lightly with a scratch awl. Imbed this fob in pitch, either in a pitch bowl or in a small quantity of pitch placed on a piece of board clamped to the bench or table. Using an engraving tool, remove the copper from the spot to be enamelled to the depth of 1⁄32 of an inch. It is well to have the bottom of the spot reasonably level but not necessarily smooth and the sides slightly undercut. Before applying the flux, clean, by pouring a small quantity of concentrated nitric acid over the cut and immediately rinsing it off under the water tap. Flux should be kept in a closed jar under water after grinding, and taken out as needed on the tip of a small strip of copper previously cleaned with acid. Enough flux should be applied to cover the bottom of the spot to be enamelled; but the depth of the spot must not be filled up.
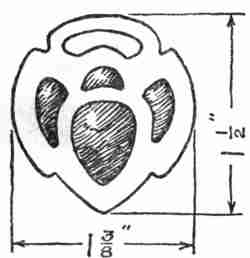
Design for a watch fob
Now place the fob on a piece of wire gauze on an iron tripod, and apply the flame of the blowpipe to the under side. Heat very slowly until all the water is driven off, then force the heat until the flux is fused. Allow it to cool slowly, then remove any flux that may have adhered to the surface of the fob by grinding with Scotch stone. Clean with acid as before, fill the spot with enamel in the same manner as the flux was applied, and fuse again. After fusing, the surface should be stoned again to remove inequalities and again fused, cleaned with water and buffed on the wheel.
If it is desired to apply enamel to sterling silver the flux may be omitted and the enamel applied directly, but the silver should be cleaned with sulphuric acid instead of nitric acid, and great care should be used in heating as the fusing point of silver is but little above that of enamel. The depth of the engraving on the silver need not be as great as on the copper.
TO MAKE A CARD TRAY
Eighteen-gauge copper should be used for this problem, and two new operations, viz., raising and chasing, are introduced. After cutting out a circular piece of copper to the diameter indicated, allowing one half an inch extra for raising, it is annealed by heating it to red heat under the blowpipe flame and cooling by dipping in a sulphuric acid pickle bath. A circle indicating the inner edge of the rim is lightly scratched, and a hard wood block is cut on the end grain to the shape indicated in the sketch, and placed in a vise. Now holding the copper on the block, it is raised to shape with the round end of the roughing hammer. It is well to anneal frequently.
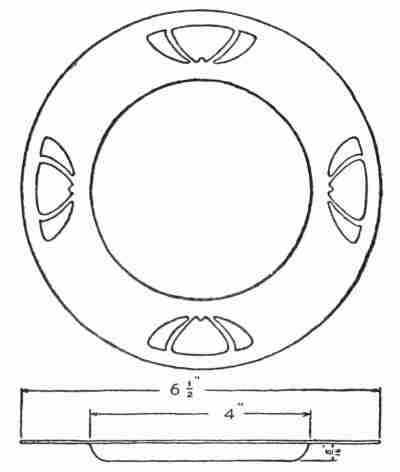
Design for a card tray
After shaping, the design may be applied by means of transfer paper and the lines lightly scratched on the surface. Then imbed the tray in pitch and outline the design by following the lines with a narrow chasing tool. Reverse the tray on the pitch and, with a chasing tool of suitable shape, raise the body of the design to the height desired. Reverse on the pitch again and with a flat tool true the outlines and smooth the background. Remove from the pitch, trim the edge of the tray if it is forced out of line, clean with pumice stone and buff.
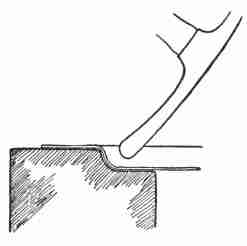
Method of shaping with the hammer
All the foregoing articles may be agreeably coloured by painting them with, or immersing them in, a weak solution (boiling) of liver of sulphur. If soft solder has not been used, another pleasing finish may be secured by applying a thin coat of lubricating oil and heating gently until the oil is volatilized. An antique green or verdigris finish may be obtained by painting with a mixture of acetic acid and copper carbonate. Several coats may be necessary; and it is desirable to lacquer the surface to ensure permanency.
Work in Other Materials A CANDLE SHADE
The materials and tools for this problem are six ply card-board in dull shades of gray, brown or green, and with mat surface; Japanese paper of average thickness; passe-partout binding a little darker than the card-board and of harmonizing colour; paste; a penknife with a thin blade; and a water colour outfit.
Of the drawings included in the group on the opposite page one shows a development of the surface of the candle shade which is the subject of this problem. Referring to the elevation it will be seen that if the edges AE and DH be continued until they meet at O, OE and OH are really equal to the radii of the outer arc of the development shown in the upper part of the group, and OA and OD, to the radii of the inner arc. This upper developed surface really forms the pattern of the candle shade.
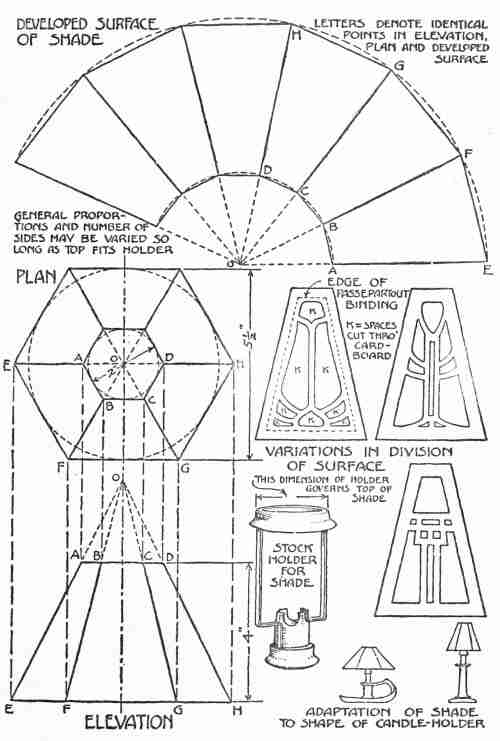
Details of candle shade
The decoration consists of openings cut through the card-board segments. These are covered with Japanese paper, thus allowing light to pass through, but adding the effect of colour. A margin of 3⁄8 of an inch is allowed along the openings, the remaining spaces being divided by partitions of card-board, as shown in the different typical designs at the right of the illustration. It will be noticed that the group of openings forming the decoration of one side conforms in the main to the shape of that side. It will also be noticed that there is a variety of size and shape in the openings, but that they all show a certain unity and harmony of space division.
The openings are cut with a penknife, care being taken to make as clean a cut as possible. Japanese paper, of pale green, orange, or some suitable light colour, is pasted under the openings. The process of pasting is one that requires some care. It is well to paste only a portion of the pasteboard at a time taking care not to use more paste than necessary and not to let any get over the edges of the openings. The paper should be pressed on while the paste is still moist, and the paper itself should, of course, not be pasted at all. It should be placed with colour side next to the openings.
When the paste is dry the card-board should be lightly scored on the lines AE, BF, etc., and bent on these lines, bringing the sectors together into the form of the shade and fastening them at the top and bottom temporarily with a bit of passe-partout binding. If the binding is of the ordinary width (7⁄8 of an inch), it should be cut lengthwise into two strips of equal width, to be used for mounting the edges. No attempt should be made to run the binding along more than one edge. The separated strips should then be cut the exact length for each top and bottom edge and applied one at a time. Then the side edges are bound, with the apex of the angle at the middle of the binding. When the binding is firmly fastened it is carefully trimmed off at the top and bottom.
ELECTRIC LIGHT PENDANTS
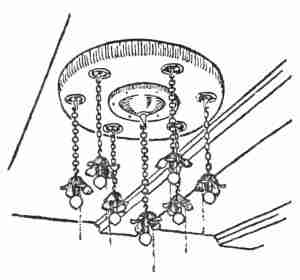
A seven-light fixture
Two designs for such pendants are illustrated in the accompanying drawings. They were derived from suggestions in the Craftsman, and were successfully worked out in remodelling a house. The seven-light fixture consists of a circular pendant-board about 30 inches in diameter, made from 2-inch plain oak stock, cut into 60-degree segments and, with splined joints, glued up to form a circular piece which was turned up on a large lathe. An open space 7 inches in diameter was left in the larger circle, which was covered by a cup-shaped cap turned from plain oak stock and attached to the larger circle by screws. The considerable opening covered by this cap contained the cut out and the wiring necessary for connecting with each of the seven lights. Seven medium-sized hooks of composition metal were procured which had large, coarse threaded screws. A 3⁄16-inch hole was drilled lengthwise through the shanks of these hooks. Holes were bored near the centre of the arc of each segment in the board circle to receive these hooks. When the fixture was assembled the wires for each light were carried from the cut out across a channel made for that purpose on the upper surface of the board, passed down through the hole in the shank of the hook, woven into the links of the chain pendant and connected with the corresponding bulb socket after passing through another hook, like those described above, which linked the socket to the chain. As a finish around the hooks shallow cups of beaten copper were fashioned over a wooden form, turned for the purpose, and oxidized to a tone somewhat darker than the brown of the oak board. Copper cups in a conventional petal design were made to place over each of the bulbs. The chains were also oxidized to conform with the other metal work. The entire combination was satisfactory.
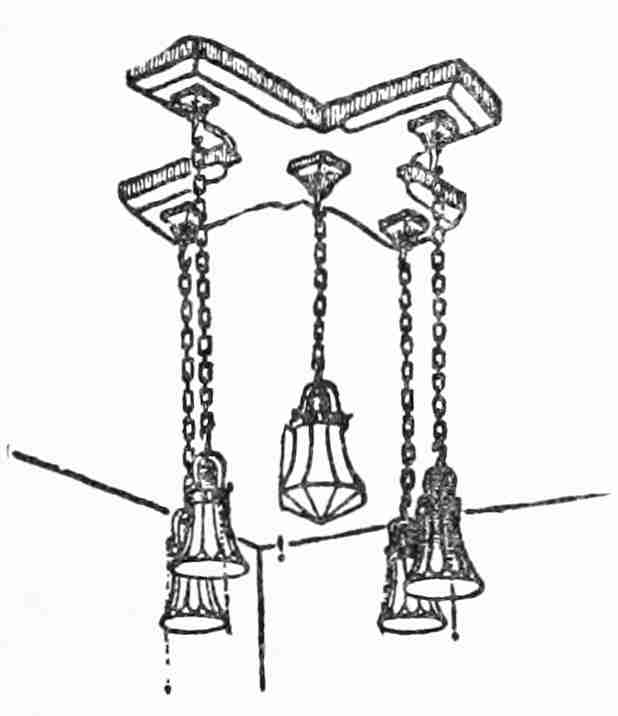
A five-light fixture
Another design for the dining-room of the same house and much easier to construct is also illustrated. It will be observed that the square form instead of the circle is carried out consistently in the woodwork and metal caps. These caps and the chains are in natural brass of a dull finish. The shades are of ground glass, decorated with a flower design in heavy black lines. The central light has a larger shade than the others, wholly enclosed. In this one is placed a red incandescent bulb for use whenever such decorative effect is desired.
DECORATIVE FORGINGS
In the story of the designing and building of the model house reference was made to contributions from the forge shop. Among these were the andirons, door knocker, lantern bracket, and other articles shown in the accompanying illustrations.
It should be understood that all wrought iron work that has any reality in it requires an equipment especially adapted to its production. There must be a good forge and fire, an anvil, and proper tools, all in the hands of a workman of some experience and skill. Successful forge work can hardly be considered among the handicrafts easily adapted to the needs of the amateur working without instruction and with poor equipment. But with good tools, proper equipment, and a little experience any clever boy will be able to design and fashion many useful articles for the home which have real artistic merit.
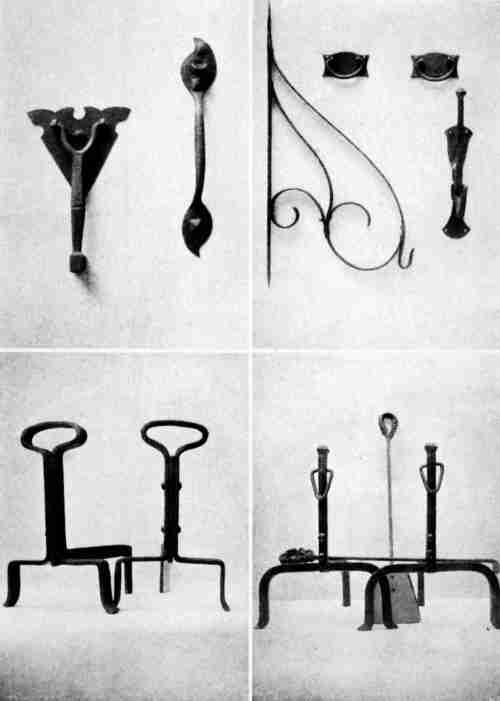
Decorative Forgings
[Plate XVI]
For the fireplace, in addition to andirons, there may be made the shovel, poker, and tongs, and possibly the old-fashioned crane and pot hooks. Other fixtures that may be made are ceiling hooks, lantern brackets for the wall or for lantern posts, standards for the newel post, the hall lantern or the porch lantern, the latch and the knocker for the door, and, if the architectural design permits, hinges, plates, and bolts for the door. This list by no means exhausts the uses of wrought iron in house decoration. It may be extended to include draw pulls, key escutcheons, furniture handles and hinges of great variety, nails with ornamental heads for use with heavy construction, and many small articles such as trivets for steam kettles, toasting forks, candle holders, and many other useful articles which have also decorative value.