Chapter XIV · TESTING
Reading edition
The determination of the composition of dairy products is a very simple yet important part of the ice-cream business. The fat and the solids not fat are the constituents usually determined. The most accurate method by which to buy all raw materials is on the basis of their composition. The finished product should be tested to determine its composition, regardless of whether or not it is sold on this basis. The testing of the finished product is necessary to check up the amount of materials used. By this means an accurate cost account can be kept and any variation in the composition of the product quickly discovered.
THE BABCOCK TEST[43]
The amount of fat in milk, cream and skim-milk can be ascertained quickly and accurately by means of the Babcock test. The essential requirements are that the operator be careful not to break the glassware and that the measurements are accurately made.
142. Testing whole milk for fat.
—The sampling is the most important operation of the test. “The sample to be tested should be thoroughly mixed before it is measured out. Mixing is done by shaking the vessel in which the milk is contained, or better still, by pouring the milk from one vessel into another. The fat in milk is lighter than the other constituents and soon rises to the surface. Unless great care is exercised an unfair sample will be taken. If the sample is an old one, such as a composite sample, it should be heated to a temperature of not over 85° F. in order to soften the fat. The sample should not be heated above 85° F., since the fat is likely to separate in the form of an oil and when so separated it is impossible to remix it evenly throughout the sample.”
143. Composite samples of milk.
—The purpose of taking composite samples is to reduce the labor and expense of testing. The true composite sample consists of aliquot portions of milk of several deliveries from the same patron. Composite sample jars must have a tight seal in order to prevent evaporation of moisture. Pint jars sealed with glass stoppers, cork stoppers, metal caps or screw tops may be used for this purpose. Bottles with paper caps and jelly glasses with tin lids do not furnish tight seals; they should not be employed.
A separate jar is used for each patron and each jar must bear the respective patron’s number. The jars should be thoroughly clean and, in order to guard against errors, they should be arranged on convenient shelves near the weigh-can in numerical order, grouping the jars of patrons of the same route together. Correct composite samples may be obtained by the use of a milk thief or a graduated pipette. If the milk thief is used, it is inserted into the weigh-can of milk of the entire delivery of one patron. The milk in the tube rises to the level of that in the weigh-can. The milk thief is then emptied into the sample jar. In case the graduated pipette is employed, a certain quantity of milk is taken for every pound delivered by the patron (usually about .1 cubic centimeter for every pound of milk delivered). The milk thief is the handier instrument of the two, but when the amount of milk delivered by different patrons varies considerably, the samples of milk from the larger producers are often too ample to be practical.

Fig. 62.—Babcock milk pipette.
Other so-called composite samples are taken by using the same measure for all milk receipts. In this case a small dipper holding about one ounce is commonly employed. With this dipper a sample of milk is taken daily from the weigh-can of each patron’s milk and transferred into the sample jar. This method of composite sampling is not mathematically correct and the results tend to be less reliable, although experimental data show that the results average practically the same as when aliquot portions are taken. Evaporation causes the percentage of fat and other solids to increase, yielding misleading tests. It also tends to dry the milk on the surface, causing the formation of a tough, leathery layer. In this condition it is difficult to secure a representative portion for the test. This can be prevented: by giving the sample jar a gentle rotary motion after each addition of milk; by replacing the stopper properly after each addition of the milk; and by protecting the sample from excessive heat. Fermentation may be prevented by the addition of a small amount of preservative, such as corrosive sublimate, potassium bichromate or formaldehyde. It is usually best to have the temperature of the milk from 60° to 70° F. when measured into the test bottle; however, variation within reasonable limits will not affect the test since the coefficient of expansion of the milk is not high enough appreciably to affect the amount measured by the pipette.
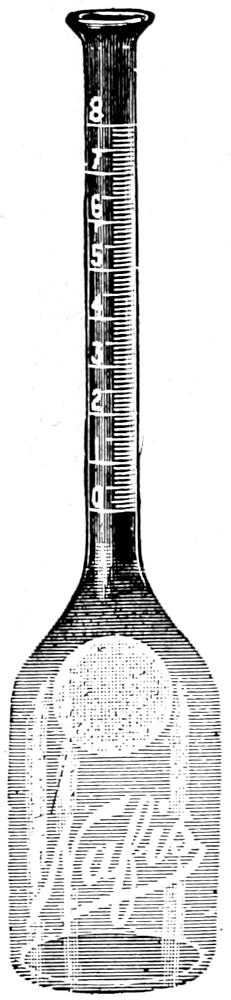
Fig. 63.—Babcock whole milk test-bottle.
144. Measuring the sample.
—The instrument for measuring the milk for the test is called a pipette. (Fig. 62.) It has only one graduation, 17.6 cubic centimeters, equivalent to 18 grams. The sample is measured by drawing the milk above the graduation and then placing the index finger over the end of the pipette. By carefully releasing the finger, the column of milk can be lowered until the bottom of the meniscus is on a level with the 17.6 c. c. mark on the pipette. It is absolutely necessary that the mark on the pipette be held on a level with the eye, so as to show when the column of milk is on a level with the mark. The milk is then transferred from the pipette to the test-bottle. (Fig. 63.) The pipette and the test-bottle should be slanted so that the milk will run down the bottle neck and not be forced out by the air coming from the bottle. Whole-milk test-bottles are of two kinds, those reading as high as 10 per cent and graduated in fifths, and those reading as high as 8 per cent and graduated in tenths. In each case the graduations give readings directly in terms of percentage, since the graduated part of the neck is made to hold a column of fat which is a definite percentage of the weight of the milk taken.
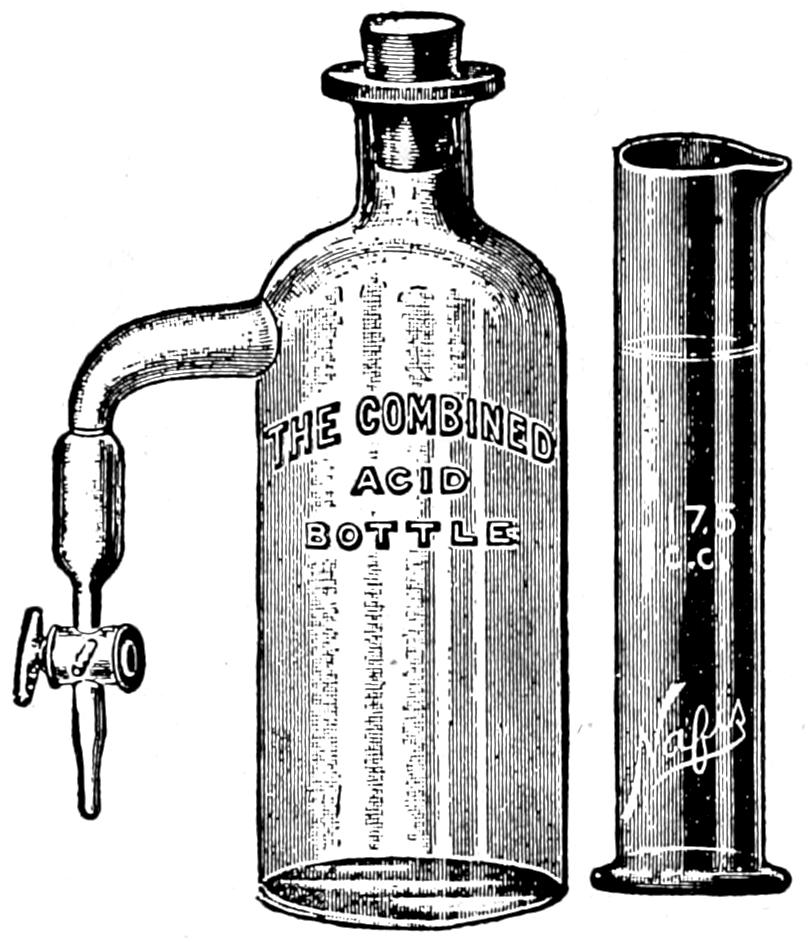
Fig. 64.—Acid measures for Babcock test.
145. Adding the acid.
—Sulfuric acid is added to the milk in the test-bottle, by means of a special measure which has only one graduation, 17.5 cubic centimeters. (Fig. 64.) The purpose of adding the acid is to destroy all the milk solids except the fat, which it does by moist combustion. In this process great heat is produced. This is advantageous, since the fat must be kept in a liquid condition in order to perform the test properly. The neck of the test-bottle gives percentage readings only when the fat is in a liquid condition. In adding the sulfuric acid, the bottle should be slanted, the same as in adding milk. As the acid is poured in, the bottle should be revolved so that the acid will wash down any milk that adheres to the neck. If this is not done, the milk dries on the neck and is lost in the test; it also causes a cloudy bottle-neck and obscures the fat column when the test is completed. The acid and milk should be mixed thoroughly as soon as the acid is added to the bottle, else portions of the sample might be charred and so lock up small particles of fat. It is well to mix the contents of the bottle for at least half a minute after all the milk has apparently been dissolved by the acid. The mixing is done by holding the bottle by the neck between the thumb and the index finger, and giving it a rotary motion from the wrist (Fig. 65); if an up-and-down motion is used, the contents of the bottle are likely to be spilled.
The strength of the acid is reckoned in terms of its density, which should be 1.82 to 1.83. A special instrument is used for testing the density, and, since this instrument is seldom available in a dairy or a creamery, one of the best ways of testing the acid is actually to perform a test with it and note the results. The acid should be of such strength that it will turn the contents of the bottle to a dark brown as soon as mixed, and the mixture should turn an intense black after standing for about one minute. The best acid is colorless, yet it may be fairly dark and yet be fit for use. The acid should never contain any undissolved material, since this is likely to rise with the fat and obscure the reading.
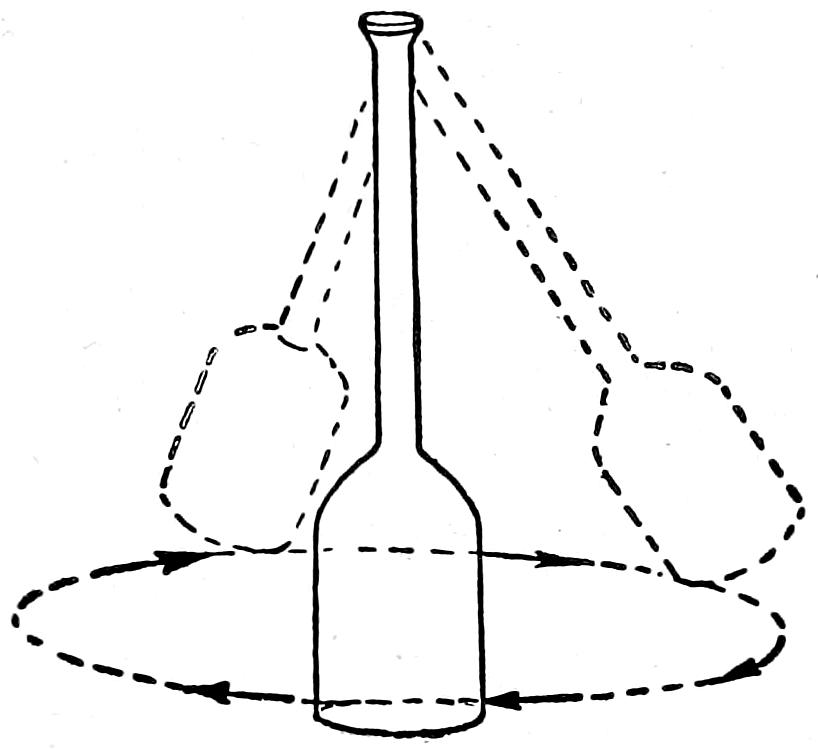
Fig. 65.—Diagram showing the motion and position of a test-bottle while mixing the milk and the acid.
146. Whirling the sample.
—After the acid and milk are thoroughly mixed, the samples are ready for whirling. The centrifuges used are of three main types (Fig. 66), those driven by hand power, by steam, and by electricity. The steam machines usually are considered best, since with them it is easy to maintain the proper temperature during the process of whirling. The hand and electric machines should perform equally as good work, provided a high enough temperature is maintained to keep the fat in a liquid condition. The frame of the hand machine should always be filled with hot water before the bottles are whirled. In case of the four-bottle machines, which have no frames, the bottle cups, which are made large for that purpose, should be filled with hot water. Great care should be taken to have the machines balanced; by this is meant that for every bottle on one side of the machine there should be a bottle on the opposite side. The machines should also be well oiled, especially those driven by steam, which, because of the heat, soon dry out.
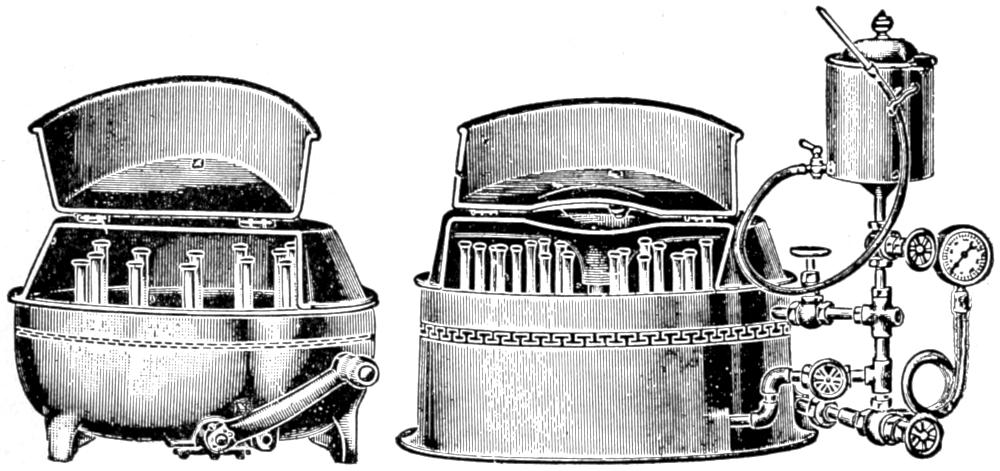
Fig. 66.—Hand and power Babcock centrifuges.
The sample is whirled for five minutes and then filled with hot water to the base of the neck, then whirled for two minutes and hot water again added so as to bring the fat within the graduated part of the neck. The sample is then whirled for one minute in order to bring all the fat into the graduated neck. Some operators of the Babcock test make two separate runs instead of three, filling the bottles to within the graduated neck after the first run. While this may give fairly good results, it is better to make three separate runs as indicated above and fill to the base of the neck the first time. This washes the fat free from any sediment and gives a clearer reading than would otherwise be obtained.
147. Reading the test.
—The sample should be read at once, before the fat column has had time to cool. In reading, the bottle should be held between the thumb and the index finger and the fat column should be on a level with the eye. The fat column in a whole-milk bottle is not large enough to be greatly affected by temperature unless it is extremely hot or cold. With a steam centrifuge, the temperature may be extremely high and thus the reading may be slightly increased. This danger may be avoided by allowing the bottles to stand for a minute at room temperature before reading. There is greater danger of reading the fat column at too low than at too high a temperature. It does not take long for the fat column to harden, and if the room is at all cold it is safer to set the test-bottles in water at about 140° F., having the water come above the fat column in the bottle. The extreme points of the column should be included in the reading (Fig. 67) since this method makes up very closely for minute particles of fat which are not brought to the surface during the process of testing.
There are two methods of reading the percentage of fat in the neck of the bottle. The first is to obtain the difference between the bottom and the top of the fat column; if, for example, the bottom of the fat column rests on the 1.7 per cent mark and the top on the 5.8 per cent mark, the percentage of fat is 4.1 (5.8 - 1.7 = 4.1). The second method of reading is to count the whole percentage and the tenth percentage marks covered by the fat column. Some operators make use of dividers in reading the fat column. The exact space covered is obtained, and one point of the dividers is placed on the zero mark and the other point against the graduated mark. The latter point will indicate the percentage of fat. There is no objection to this method, provided the fat column is never measured when it is above or below the graduations on the neck of the bottle. This is often done, yet there is no certainty that the space above or below the graduations is of the same size as it is within the graduations; in fact, it is usually larger. It is, therefore, easy to see the inaccurate results that may be obtained by taking a reading when the fat column is without the graduated part of the bottle neck.
148. Appearance of a completed test.
—In a completed test the fat should be straw-yellow in color; the ends of the fat column should be clearly and sharply defined; the fat should be free from specks and sediment; the water in the neck just below the fat should be clear; and the fat should be in the graduated part of the neck. Some of the defects and remedies are explained in the following paragraphs.
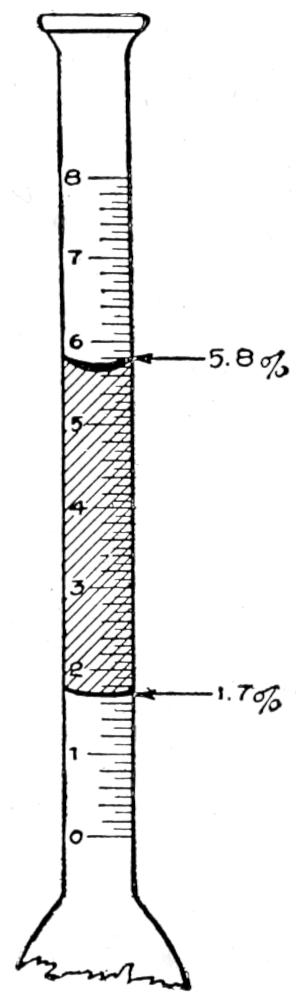
Fig. 67.—Proper way to read the percentage of fat in a Babcock whole milk test-bottle.
If the fat column is too dark in color, the acid may have been too strong, or too much may have been used, or the temperature of the milk and the acid may have been too high just before mixing, Mixing too slowly might also permit charring of part of the fat. The charred or darkened condition of the fat may be corrected to some extent by using less acid, by cooling both milk and acid below 60° F. just before mixing, and by rapid, vigorous mixing continued for about a minute after all casein has been dissolved.
If the fat column is too light in color, the acid was either too weak or too cold. This condition may be corrected to some extent in succeeding tests by using more acid and by having the milk and the acid at a slightly higher temperature when brought together.
If the acid is not of the correct strength (specific gravity 1.82 to 1.83), it will be difficult to obtain a correct test, but the trouble may be overcome partially by using more acid when it is weak and less when it is too strong.
149. Care of the test-bottles.
—As soon as all the bottles are read, they should be emptied. If allowed to stand until cold, they are more difficult to clean. The cleaning will be accomplished much more easily if the bottles are shaken violently up and down as the contents run out. A viscous sediment is formed by the action of the sulfuric acid on the milk, and the hot acid helps to loosen this if the bottles are well shaken. All Babcock glassware should be kept clean and bright. This can be done best by washing in hot water and washing-powder, and then rinsing in hot water. If many bottles are employed, a block and a top-board are very useful. The block has holes bored in it, of a size just large enough to hold the bottles, and it may be made to contain any desired number. The holes in the top-board are large enough to admit the passage of the necks through them and the board rests on the shoulders of the test-bottles. In using this block and board, a number of bottles can be emptied at once and the hot bottles will not burn the hands of the operator.
150. Testing cream.
—In testing cream there are three main factors to be considered: first, taking the sample; second, getting the correct quantity of cream into the test-bottle; and third, correct reading of the completed test.
151. Cream testing apparatus.
—There are several forms and sizes of cream test-bottles. (Fig. 68.) The six-inch nine-gram bottles are preferable, especially for use in hand testers. This form has a scale graduated to read from 0 to 50 per cent, the smallest scale divisions equaling .5 of 1 per cent.
The balance for weighing cream test samples should be sensitive to .1 of a gram. There are several different types on the market.
An ordinary four-quart pail would serve as a vat in which to bring the fat in the cream test-bottle to the proper temperature before adding the meniscus remover and reading the test. The vat should be of such depth that when it is nearly full of water and the cream test-bottles are placed upright in it, the upper surface of the water and of the fat columns will be on about the same level.
The thermometer should be of a form that registers each temperature degree between the freezing and boiling points of water. That would permit of its use for a variety of purposes.
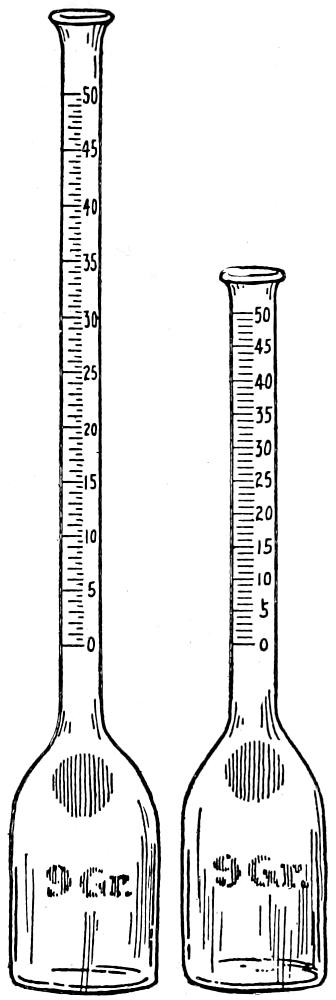
Fig. 68.—Babcock cream test-bottles.
152. Sampling cream.
—Cream differs from milk in containing a higher percentage of fat. Cream testing 30 per cent of fat would contain 70 per cent of skimmed-milk substance, or milk-serum. Before sampling, the fat should be distributed evenly by thorough mixing or pouring. If the cream is old or lumpy or some has dried on the container, it should be warmed to about 95° F. and the lumps passed through a strainer before mixing. Then about two ounces should be placed in the sample bottle.
153. Making the cream test.
—The test sample must be weighed instead of measured because:
1. The percentage of fat and the specific gravity of cream vary widely, and the weight of a definite volume would vary accordingly.
2. Cream may contain bubbles of air or of carbon dioxide.
3. Cream varies so widely in viscosity (sticky quality) that the amount delivered or the amount remaining in the pipette would be unknown.
In testing cream 9 grams are used. The bottle should be balanced on the scales, and a 9-gram weight placed on the opposite side. The sample is mixed thoroughly, and by means of a pipette the cream transferred to the test-bottle until the scales exactly balance. About 9 cubic centimeters of water are next added to the test-bottle. (This water may be measured with sufficient accuracy in the acid measure by filling it a little over halfway to the mark.) About 15 cubic centimeters of the acid should be placed in the test-bottle, and the contents mixed thoroughly. The cream and acid mixture should not turn black, but should remain coffee color. About 15 cubic centimeters of acid give the proper concentration to dissolve the solids not fat, since the fat forms such a large part of the mixture and does not go into solution. The bottles should be centrifuged and the water added exactly as in testing whole milk.
154. Tempering the fat and reading the percentage.
—When the last whirling is completed, the test-bottles should be transferred to the tempering vat containing water held at a temperature of 140° F. The water should be tempered in advance, and should be deep enough to surround the necks of the bottles to the top of the fat columns. After four minutes the bottles should be taken from the water, and the meniscus remover added at once by placing the tip of a dropping pipette containing some of the substance against the inside of the bottle’s neck, which is held in a slightly slanting position. The red liquid is allowed to run slowly down the inside of the neck and spread over the fat to a depth of about one-fourth of an inch. It should not mix with the fat.
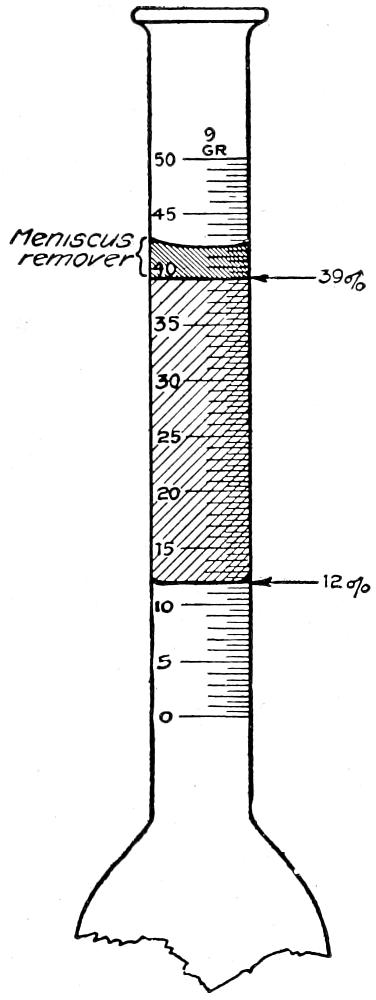
Fig. 69.—Method of reading the percentage of fat in a Babcock cream test-bottle.
The meniscus remover is made from a purified mineral oil that has been colored red with alkanet root. It is sometimes called glymol. When placed on the top of a fat column in a cream test-bottle, it flattens the curved surface, which is known as the meniscus. The test should be read immediately by subtracting the number on the scale at the bottom of the fat column from the number at the line of division between the fat and the meniscus remover. (Fig. 69.) Thus, if the bottom line of the fat column reads 12 and the line between the meniscus remover and the fat at the top, 39, the percentage of fat would be 27.
155. Testing skim-milk.
—A special bottle is used for testing skimmed-milk. (Fig. 70.) The graduated neck of the test-bottle has a very small bore in order to measure the fat accurately. A second neck with larger bore is attached to provide a convenient means of filling the bottle. The smallest divisions on the scale usually indicate .01 of 1 per cent, but on some bottles .05 of 1 per cent.
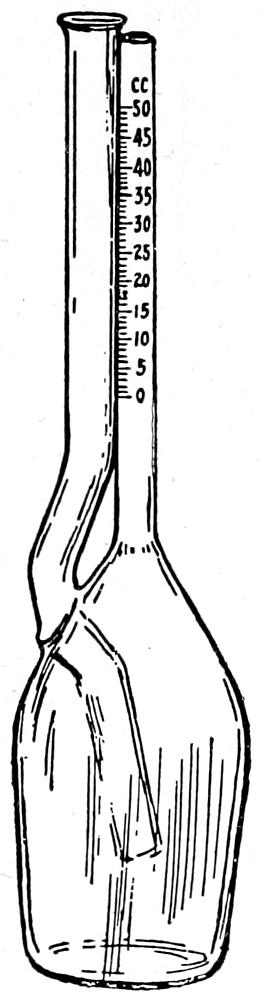
Fig. 70.—Babcock skim-milk test-bottle.
The same care is necessary in mixing and sampling skimmed-milk and buttermilk that is required for whole milk, and the same pipette is used in measuring out the sample. The skimmed-milk is added to the test-bottle through the larger neck. Since a little more acid is necessary thoroughly to free the fat in skimmed-milk, the measure should be filled to about a quarter of an inch above the mark. About one-half of the acid should first be added, and the mixture shaken thoroughly; then add the remainder, and again shake it vigorously for about a minute. One should avoid throwing undissolved casein into the small neck while mixing the milk with the acid. The bottles are then centrifuged and filled in the same manner as in testing whole milk, except that the first whirling should be continued for ten minutes instead of five, in order to bring up all the smaller fat globules. The percentage of fat is read immediately on completing the final whirling.
156. Modifications of the Babcock test for ice-cream.
—The Babcock test as already explained cannot be used to test ice-cream, because it contains a large percentage of sugar. This sugar would char or burn and so interfere with the reading of the test. The following[44] are three modifications of the Babcock test.
157. The glacial acetic and hydrochloric acid test.
—“A representative sample of the ice-cream is taken and melted and thoroughly mixed; a 9 gram sample is weighed into an 18 gram Babcock cream test bottle. A mixture is prepared using equal parts of glacial acetic acid and concentrated hydrochloric acid. Twenty cubic centimeters of this acid mixture is added to the 9 gram sample of ice-cream in the test bottle and is then well shaken. The bottle is placed in a water bath of 120° F. to 130° F., and shaken at intervals until a brown color appears. It is then placed in the Babcock centrifuge and the test completed in the same way as for testing cream and the reading multiplied by two.”
158. The sulfuric acid test.
—“To make the test with sulfuric acid, a 9 gram sample is weighed into an 18 gram test bottle. About 9 cubic centimeters of lukewarm water is then added to dilute the sample, in order to have about 18 cubic centimeters of mixture in the bottle. The sulfuric acid is then added slowly, a little at a time, at minute intervals, shaking well after each addition until a chocolate brown color appears in the bottle. No definite amount of acid can be stated as the quantity will vary with different ice-creams. As soon as the chocolate brown color appears in the ice-cream a little cold water may be added to check the action of the acid. The bottle is then placed in the centrifuge and the test completed in the usual way. The reading is multiplied by two.”
159. Acetic and sulfuric acid test.
—“Weigh a 9 gram sample of ice-cream that has been thoroughly mixed. About 9 cubic centimeters of water are then added to dilute the sample. Add 5 cubic centimeters of acetic acid and then add carefully 6 to 8 cubic centimeters of sulfuric acid. Centrifuge, and then add water the same as in other tests. If using an 18 gram bottle, multiply the reading by two, to obtain the per cent fat in the ice cream. A 9 gram bottle which is graduated to give the percentage of fat directly needs no correction when reading.”
160. The lactometer.
—Because not only the fat but all the solids are utilized in the ice-cream, it is important to know the amount of total solids and the solids not fat in the milk. This is ascertained by determining the specific gravity of the milk and knowing the fat-content; the solids not fat can then be calculated. The specific gravity of liquids is measured by an instrument called a hydrometer. Its use is based on the fact that when a solid body floats in a liquid, it displaces a volume of liquid equal in weight to its own. Hydrometers are in many cases so made that the specific gravity can be read at the point where the scale is even with the upper surface of the liquid. A hydrometer especially adapted to milk is called a lactometer. There are two in common use, the Quevenne and the Board of Health.
The Quevenne lactometer is a long slender hollow piece of glass weighted at the bottom to make it float in the milk in an upright position. (Fig. 71.) The upper end is slender and contains the scale which is graduated from 15 at the top to 40 at the bottom. Each reading on the scale corresponds to the point marked specific gravity on a hydrometer, except that the figures are not complete. For example, 15 on the Quevenne scale means a specific gravity of 1.015; a reading of 30 means a specific gravity of 1.030, and so on. The Quevenne lactometer is graduated to give correct readings at 60° F. The milk should be at this temperature; if above or below this, a correction must be made to the reading. The temperature should not be more than 10 degrees above or below 60° F. The correction for each degree in variation can be made by adding or subtracting 0.1 from the lactometer reading, as the case may be. If the temperature is above 60° F., the correction is added to the lactometer reading; if below 60° F., it is subtracted. The reading should be taken when the lactometer is floating free in the milk. The scale is read exactly at the surface of the milk. The better lactometers have a thermometer with the scale just above or opposite the lactometer scale.

Fig. 71.—Quevenne lactometer.
The Board of Health lactometer is very similar to the Quevenne except that the scale is graduated from 0 to 120. (Fig. 72.) The point on the scale that floats at the surface in water is represented by 0, and 100 represents the specific gravity of 1.029. On the Board of Health lactometer the 100 degrees or divisions from 0 to 100 equal 29 divisions on the Quevenne. Therefore, one division on the Board of Health equals 0.29 of a division on the Quevenne. To convert Board of Health reading to Quevenne, multiply by 0.29 and to convert Quevenne to Board of Health, divide by 0.29. The correction for temperature above or below 60 F. is made the same as with the Quevenne, except 0.3 is added or subtracted from the lactometer reading instead of 0.1 as with the Quevenne.
161. Calculating the solids not fat in the milk.
—When the lactometer reading and the fat-content of the milk are known, there are several formulas for calculating the solids not fat. In the following, L equals Quevenne lactometer reading at 60° F.; F. the percentage of fat in the milk, and S. N. F. the solids not fat in the milk.
L + 0.7F3.8 = S. N. F. L + F4 = S. N. F. L4 + 0.2F + 0.14 = S. N. F.

Fig. 72.—Board of Health lactometer.
162. Testing milk for acidity.
—Several tests on the market are used to determine the amount of acid in milk. Each is based on the principle of chemistry, that acids and alkalies tend to neutralize each other. The acidity of milk is of two kinds, apparent and real. The apparent acidity is due to the acid reaction of the acid phosphates and casein. It usually varies from .08 to .1 per cent. The real acidity is due to the action of the bacteria on the milk-sugar. It is usually assumed when determining the acidity of milk, that all the acidity is due to the presence of the lactic acid.
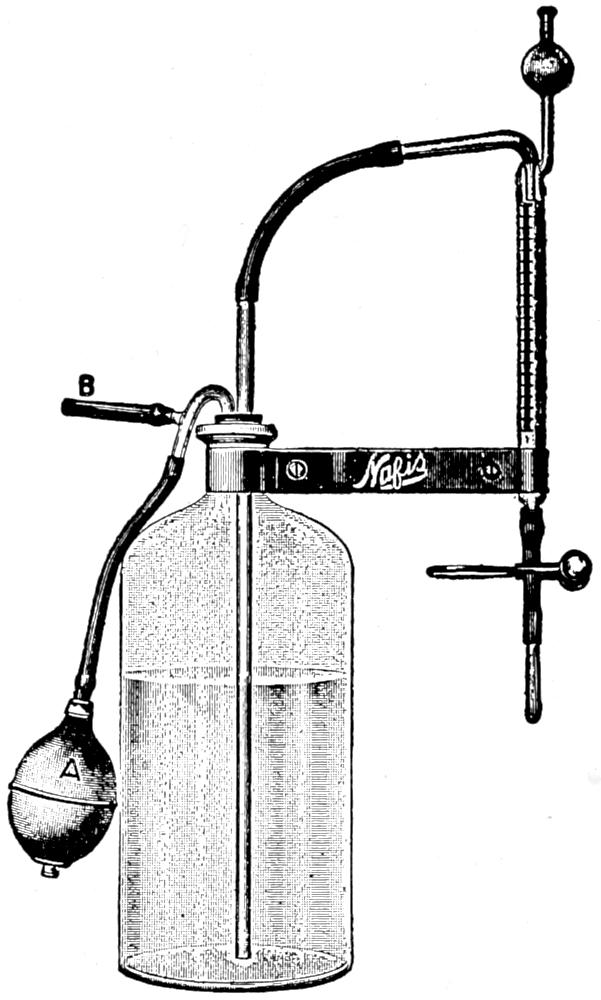
Fig. 73.—Nafis acid test.
The process by which the acidity is determined is called titration. A known quantity of milk is placed in a cup or flask and an alkali of known strength measured into it by means of a burette. (Fig. 73.) The unit of measure is the cubic centimeter. The burette is usually graduated into tenths of a cubic centimeter. The point at which all the acid in the milk is neutralized by the alkali is told by means of an indicator. The one commonly used is phenolphthalein. This is colorless in the presence of acid and pink in the presence of alkali. If two or three drops of indicator are put in the milk, the color will not change because it is acid. When just enough alkali has been added to neutralize the acid, the color will change to pink. The alkali should be added slowly and gradually the acid will be neutralized by the alkali until at last a uniform pink color appears, which will slowly fade away. All the acid has been neutralized and the amount of alkali used should be read from the burette, when the first change to a uniform pink color is noted.
The different acid tests on the market are sold under various trade names, such as Nafis, Manns, Marschalls and Farringtons. Each is based on the same principle but uses different amounts of milk and alkali solutions of various strengths. However, in each test the amount of milk and strength of the alkali solution are such that the number of cubic centimeters of alkali used are read directly as the percentage of acid in the milk. This eliminates all calculations. If the strength and amount of the alkali solution required to neutralize the acid in the milk is known, and the amount of milk used, accurately measured, the percentage of acid can be calculated.
It is a chemical fact that one cubic centimeter of a normal solution of alkali will neutralize exactly .09 grams of lactic acid. In actual practice an alkali solution weaker than a normal solution is employed. This is because the latter is so strong that only a small amount would be used, hence a small variation in the amount would make a big variation in the final percentage. A ¹⁄₁₀ or ¹⁄₂₀ normal solution (expressed n/10 or n/20) is commonly used. One cubic centimeter of a n/10 alkali solution would neutralize .009 grams of lactic acid. An example will illustrate how to figure the results. Suppose it took 4 c. c. of n/10 alkali solution to neutralize the acid in 18 grams of milk. What is the percentage of acidity in the milk? One cubic centimeter of n/10 alkali will neutralize .009 grams of lactic acid. Four cubic centimeters will neutralize 4 × .009 = .036 grams of acid; .036 grams of acid divided by 18, the grams of milk used, multiply by 100, equals .20 per cent acidity in the milk. This may be expressed thus:
.009 × No. c. c. alkali usednumber of grams material used × 100 = per cent of acidity
Then the above problem would be expressed thus:
.009 × 418 × 100 = .20 per cent acidity
163. Test for formaldehyde.
—Sometimes formaldehyde is added to the milk to preserve it. It can be detected easily when making the Babcock test. The required amount of milk is measured with the pipette into the test-bottle and a few drops of ferric chloride added. The required amount of sulfuric acid is next put in. If formaldehyde is present, a lavender-colored ring will appear between the layer of acid and the layer of milk. If the contents of the bottle are slowly mixed, the dissolving casein will take on a lavender color. The test will not work if the milk is too old or too much of the formaldehyde has been added. Because of the presence of ferric salts in the sulfuric acid as impurities, it is not always necessary to add the ferric chloride although it is best to do so.
164. Test for boiled milk.
—It is often desirable to know whether or not milk has been boiled. The following test will give this result: Two sets of reagents may be used: (1) hydrogen peroxide, potassium iodide and starch, (2) hydrogen peroxide and paraphenylenediamine hydrochloride. In milk there is an enzyme glactase which may be destroyed by heat. When the milk has not been heated, this enzyme sets free the oxygen from the oxidizing agent. In case of the first materials, the glactase splits up the hydrogen peroxide. The free oxygen splits up the potassium iodide and liberates free iodine. The starch in the presence of free iodine turns blue. In the second case, the free oxygen acts on the paraphenylenediamine hydrochloride and turns the solution blue. In either case if a blue color results, the milk has not been boiled. Hydrogen peroxide often contains sulfuric acid. When this is the case, the reagent is useless for the test with starch as the free acid would break up the potassium iodide. If this condition exists a blue color would result, whether or not the milk had been pasteurized.
TESTING BUTTER FOR FAT, MOISTURE, AND SALT
When large quantities of butter are used in the making of ice-cream, it is important that it be tested. Sweet or unsalted butter is best adapted for the making of ice-cream. If a sample is suspected or tastes salty, a test should be made to determine the exact percentage. In order to make cream of a desired percentage of fat, the composition of the butter must be known.
165. Preparing the sample.
—Experiments[45] indicate that the salt and moisture in the butter are not uniformly distributed. This shows the need of careful sampling and preparation of the sample before testing. The sample should be placed in a wide-mouth ground-glass stoppered glass jar. The bottle should be kept stoppered to prevent evaporation. A hardwood stick is best for stirring. The bottle containing the sample to be tested should be warmed to a temperature of 110°-120° F. until the butter is the consistency of thick cream. This may be done by placing the bottle in warm water. While it is being warmed, it should be stirred to obtain a uniform mixture. It should not be heated too much or the water and fat will separate and it is almost impossible to mix them again. When the butter is about the consistency of thick cream, it should be cooled and stirred thoroughly while cooling. This insures a uniform composition in the butter. The cooling should continue until the butter is quite firm.
166. Testing butter for fat.
—After the sample has been prepared to test as outlined above, 3-5 grams of this butter should be weighed into a cream test-bottle. The addition of warm water, warm enough so that the fat will melt, will bring the weight of the butter and water to approximately 18 grams. Sufficient acid to give a light brown color should be added. It will take less acid than for cream because there are fewer solids not fat. The procedure is the same as in testing cream for fat. After the test has been read, the percentage of fat in the butter must be calculated.
167. Testing butter for moisture.
—Several moisture tests[46] are on the market. The following is a very simple one:
The apparatus used is an alcohol lamp, iron stand, asbestos sheet, hot pan lifter, aluminum cup for holding the sample, and a very sensitive scale. To make the test, 10 or 20 grams of the prepared sample of butter as described in paragraph 165, should be weighed into the aluminum cup. The cup should be dry and about the same temperature as the room. The alcohol lamp is then placed under the iron stand and the asbestos sheet on the stand. The lamp is lighted and the cup put on the asbestos sheet. It is well to light the lamp at least two or three minutes before placing the cup on the asbestos in order to heat it and save time. The heat of the flame may be increased or diminished by raising or lowering the wick. The cup should always be handled with the hot pan lifter, as by so doing it will be kept clean and errors in weight due to dirt on the cup will be avoided.
While the sample is heating, it should be shaken from time to time as this breaks up the blanket of casein on the surface and hastens the escape of moisture. As soon as the casein has lost its snow-white color, the cup should be removed from the flame. When the moisture has all been driven from the sample, a slightly pungent odor may be noticed. This may also be used as a guide to tell when the sample has been heated enough. The foam begins to subside at this point. Often one or two small pieces of casein are slow to give up their moisture. This is indicated by the snow-white color of the pieces. Evaporation can be hastened by shaking the sample with a rotary motion and thoroughly mixing these pieces with the hot liquid. If this is not done, one might have to heat the sample so long that some of the fat, which had already given up its moisture, would volatilize.
After all the moisture is driven off, the sample is allowed to cool to room temperature. While cooling, the cup should be covered with something (a sheet of paper will do) to prevent the sample taking up moisture from the atmosphere. After cooling, the cup is placed on the scales. The sample is lighter than before heating, because it has lost its moisture. The loss in weight divided by the weight of butter taken gives the percentage of moisture in the sample of butter.
168. Testing butter for salt.
—The following test has been devised by H. C. Troy of Cornell. The materials used are: One ten cubic centimeter burette graduated to tenths of a cubic centimeter; Babcock milk pipette; one white cup; one pint bottle marked to show the line at the upper surface of the liquid when the bottle contains 300 cubic centimeters; standard tenth normal silver nitrate solution (dissolve 17.5 grams of so-called chemically pure silver nitrate in water and make the volume up to 1000 cubic centimeters); 10 per cent solution of potassium chromate for indicator.
To make the test, three or four ounces of the butter should be softened by warming to a pasty condition in a fruit jar or wide-necked bottle. It should be mixed thoroughly with a table knife or strip of wood in order evenly to distribute the moisture. Ten grams of the mixed butter should be weighed into a dish and washed with hot water into the pint bottle. (If a moisture test was made on ten grams of the butter, the substance remaining in the cup may be used for the salt test.) Enough hot water should be added to bring the surface up to the 300 cubic centimeters mark on the bottle, the stopper placed in the bottle and shaken vigorously for about half a minute. The bottle should rest for about five minutes, and a Babcock milk pipette of the watery portion drawn (17.6 cubic centimeters) and placed in a white cup. Three or four drops of the potassium chromate solution should be added, stirred, and run in the standard silver nitrate solution from the burette, with constant stirring until the color of the substance in the cup changes to a permanent brownish red. On the burette scale the amount of standard silver nitrate solution used may be read.
Each one-tenth of a cubic centimeter of standard silver nitrate solution employed equals one-tenth of 1 per cent of salt in the butter.
169. Test for viscosity.
—It is often desirable to test milk, cream or the ice-cream mix for viscosity. There are several viscometers for the purpose. The simplest way to determine the viscosity is to heat and draw out the end of a pipette so that it has a very small opening. The pipette can then be filled with the material to be tested. The length of time required to empty the pipette determines the viscosity. The more viscous the material, the longer it takes to run out of the pipe. In order to make comparisons, the materials should be at the same temperature each time. This is a very important factor.
170. Standardization.
—One of the main requirements for a successful ice-cream business is uniformity of quality. In order to obtain this, it is necessary to have a product each time containing the same percentage of fat. As it is impossible always to secure cream of a uniform fat-content, the cream and milk used in the ice-cream must be standardized.[47]
Standardizing milk or cream consists in raising or lowering the fat-content to a fixed standard. This is done by adding to the material milk or cream of a higher or lower percentage of fat. In standardization two classes of problems are involved: first, one in which a certain fixed amount of milk is to be made up or a certain amount of standardized milk is desired; and second, in one in which a certain amount of milk or cream is to be used and enough of another product added to make the mixture test a certain percentage of fat. In the latter case, the amount of the mixture is indefinite.
The original method of computing problems in standardization is long and difficult, but a comparatively simple scheme has been devised by R. A. Pearson. The method is as follows:
Draw a rectangle and place in the center of it the percentage of fat desired. Place at the left-hand corners of the rectangle the percentages of fat in the materials to be mixed. Subtract the number in the center from the larger number at the left of the rectangle. Place the remainder on the diagonally opposite right-hand corner of the rectangle. Subtract the smaller number on the left-hand corner from the number in the center and place the remainder on the diagonally opposite right-hand corner of the rectangle.
The two numbers on the right-hand corners of the rectangle represent the number of pounds of material required. If these two numbers are added they will express the number of pounds of the mixture, which will contain a percentage of fat expressed by the number in the center of the rectangle. In each case the number on the right-hand corner corresponds in fat test to the number on the left-hand corner directly opposite.
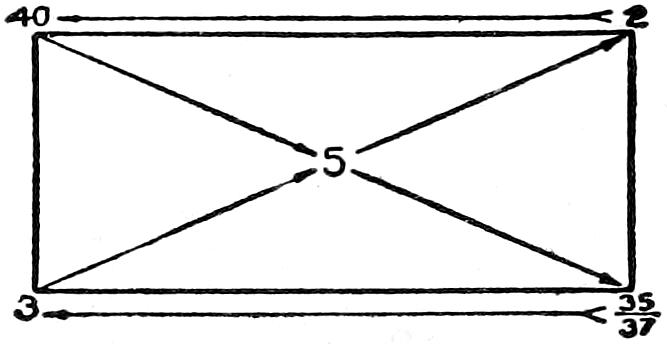
Problem: How many pounds of 40 per cent cream and 3 per cent milk must be mixed to make milk testing 5 per cent? Using the diagram as described, the result shown in diagram above is obtained.
This means that if 2 pounds of 40 per cent cream are mixed with 35 pounds of 3 per cent milk, the result will be a 37 pound mixture testing 5 per cent. Answer.
Problem: How many pounds of 28 per cent cream and 3 per cent milk will be required to make 500 pounds of a mixture testing 4 per cent? In this problem a definite number of pounds of the mixture is required.
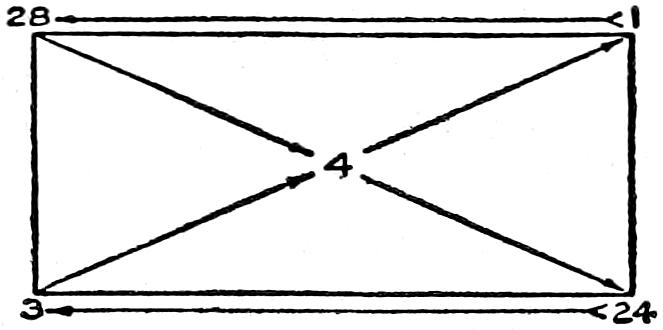
According to the diagram, 1 pound of 28 per cent cream is required to every 24 pounds of 3 per cent milk to make a mixture testing 4 per cent. This would make 25 pounds of the mixture, but 500 pounds is the amount desired. In other words, the number of pounds desired is 20 times larger than the number of pounds on hand (500 ÷ 25 = 20). The amounts must be kept in the proportion of 1 : 24. Therefore, in order to get a 500 pound mixture it is necessary to multiply both the 1 and the 24 by 20. This would give a result of 20 pounds of 28 per cent cream and 480 pounds of 3 per cent milk, which mixed will equal 500 pounds of 4 per cent milk. Answer.
This problem may also be worked by simple proportion:
1 : 25 :: x : 500
25 x = 1 × 500
25 x = 500
x = 20, number of pounds of 28 per cent cream there will be in the 500 pound mixture. Answer.
If there are 20 pounds of 28 per cent cream in the 500 pound mixture, the remainder will necessarily be 3 per cent milk.
Therefore, 500 - 20 = 480, number of pounds of 3 per cent milk. Answer.
The number of pounds of 3 per cent milk can be found directly by simple proportion:
24 : 25 :: x : 500
25 x = 24 × 500 = 12,000
x = 480, number of pounds of 3 per cent milk. Answer.
Proof: In working problems in standardization it is always wisest to prove the answer, as this is the best method of checking the work for mistakes.
According to the conditions of the problem there would be 500 pounds of 4 per cent milk. This amount of milk would contain 20 pounds of fat (500 × .04 = 20). According to the results the 500 pounds would be made up of 480 pounds of 3 per cent milk and 20 pounds of 28 per cent cream. The 480 pounds of 3 per cent milk would contain 14.4 pounds of fat (480 × .03 = 14.4). The 20 pounds of 28 per cent cream would contain 5.6 pounds of fat (20 × .28 = 5.6). 14.4 + 5.6 = 20
Since the 500 pounds contain 20 pounds of fat, and the materials of which the 500 pounds are made up furnish the 20 pounds of fat, the problem is worked correctly.
Problem: How many pounds of 3 per cent milk must be mixed with 150 pounds of 28 per cent cream to make a mixture testing 4 per cent? In this problem the number of pounds to be made up is not definitely known.
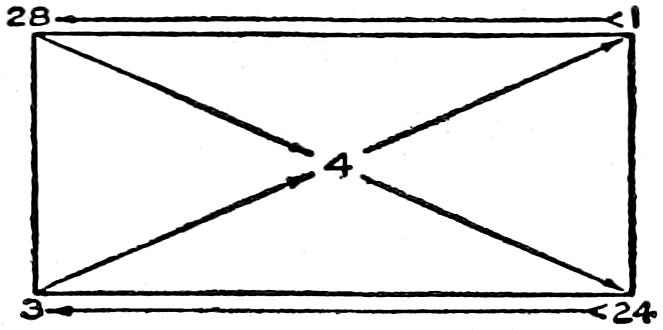
Working the problem by the rectangle method, 1 part of 28 per cent cream is required for 24 parts of 3 per cent milk. According to the terms of the problem, 150 pounds of 28 per cent cream must be used, and this is 150 times as large as in the above proportion.
The 28 per cent cream and 3 per cent milk must be kept in the proportion of 1 : 24, and since the amount of 28 per cent cream is to be increased 150 times, the 3 per cent milk must also be increased 150 times. This would give 150 pounds of 28 per cent cream (1 × 150) and 3600 pounds of 3 per cent milk (150 × 24 = 3600), making in all 3750 pounds (150 + 3600 = 3750) of a 4 per cent mixture.
This problem may also be worked by simple proportion:
24 : 1 :: x : 150
x = 3600, the number of pounds of 3 per cent milk required.
Proof: The 3750 pounds of 4 per cent milk will contain 150 pounds of fat (3750 × .04 = 150).
If the 150 pounds of 28 per cent cream and 3600 pounds of 3 per cent milk furnish 150 pounds of fat, the problem is correct.
3600 × .03 = 108, number of pounds of fat in milk.
150 × .28 = 42, number of pounds of fat in cream.
108 + 42 = 150, number of pounds of fat in mixture. Answer.
The percentage of fat, or solids not fat, or total solids in a given batch may be computed if the percentage composition of the materials is known. Compute the total number of pounds of the desired material in each of the products used and divide by the total weight of the batch. For example, to find the percentage of fat in a batch, compute the pounds of fat in each material and find the total number of pounds of fat. Dividing the result by the total weight of the mix will give the percentage of fat in the mix. The solids not fat or total solids may be computed in the same way. By reversing these calculations, the percentage of fat necessary in the milk or cream to yield a mixture containing a certain percentage of fat can be computed.
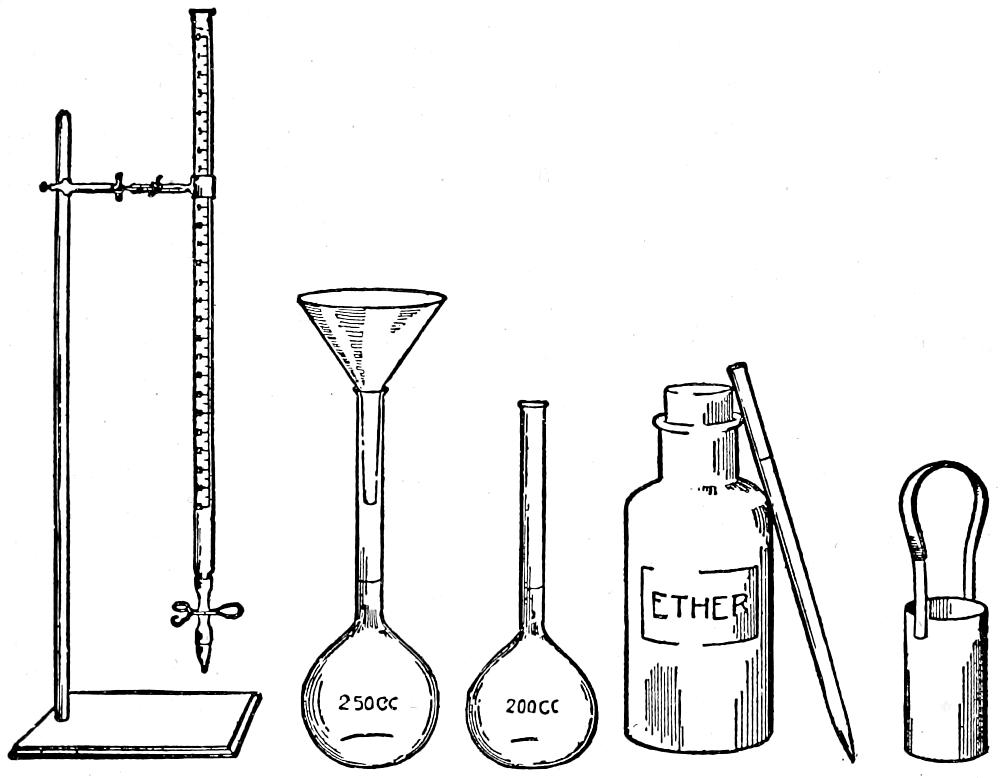
Fig. 74.—Apparatus for testing ice-cream over-run by the Benkendorf method.
171. Benkendorf[48] test for over-run in ice-cream.
—With this simple outfit (Fig. 74), it is possible at all times and without data as to the volume or weight of the “mix,” for the manager of the factory to determine the over-run in any lot of ice-cream made by his employees.
Method of making the over-run test.
To obtain a 50 cubic centimeter sample, the metal sampler should be pressed down into the hardened ice-cream until it is entirely below the surface, and allowed to remain there for a minute or two, to become chilled. Then it should be drawn out and the protruding ice-cream removed from both ends of the sampler with a case knife or small piece of flat metal. (When a continuous freezer is used, a metal sampler with a closed bottom, like a cup, can be held under the spout of the freezer until heaping full, then the surplus scraped off.)
The 200 cubic centimeter flask should be filled exactly to the mark on the neck with hot water and the sampler held in the funnel, the stem of which is inserted in the neck of the 250 cubic centimeter flask, a little of the hot water poured over the sampler until the ice-cream slips out of it, then all the remaining hot water slowly poured over this.
The foam which appears in the neck of the 250 cubic centimeter flask should be destroyed by adding 1 cubic centimeter (or 2 cubic centimeters if necessary) of ether with the pipette. As soon as the foam has disappeared, the flask may be filled with water exactly to the 250 cubic centimeter mark by means of the burette, which has previously been filled to the zero mark.
How to make the calculations.
The number of cubic centimeters of water and ether used to bring the volume up to the 250 cubic centimeters mark, represents the shrinkage which the 50 cubic centimeter sample of ice-cream has undergone when melted. Subtracting this shrinkage from 50 gives the original volume of the “mix” before freezing. To determine the percentage of over-run, the number of cubic centimeters of shrinkage should be divided by the number of cubic centimeters that were in the original mixture.
Example: Cubic centimeters
Sample used 50
Ether used to reduce foam 1
Water used to bring to 250 c.c. mark 15 .5
Water and ether used (15.5 + 1) 16 .5
Volume of “mix” before freezing (50 - 16.5) 33 .5
Per cent of over-run (16.5 ÷ 33.5) 49 .25 per cent
172. Test to determine the hardness of ice-cream.
—The apparatus[49] used for determining hardness was reproduced from the description of a similar piece of apparatus by A. E. Perkins. It consisted of a wooden frame made of 2 × 4-inch lumber, with cross pieces on the bottom so that it stood firmly in an upright position. A cross piece, about one foot from the bottom of the frame, made the support for holding the sample. At the top of this support was an adjustable wooden screw for holding the electro-magnet. By adjustment with this screw, the magnet could be lowered or raised several inches. This adjustment was necessary so that the height of the needle could be made constant with all samples. The drop frame which holds the needle and which is held up by the magnet until the electric current from the batteries is broken, was made from very light ³⁄₈-inch piping, the width being sufficient to give a free drop without touching the mold, and long enough to reach below the platform when the magnet was at its highest point. The wires from the magnet led to a cut-off key on the side frame and from there to a pair of dry cells from which the current was derived. The needles were of different sizes but the same weight, thus eliminating the necessity of adjustments to obtain constant weight. The needles were marked from their points upward, in centimeters and fractions thereof, to show the depth of penetration. The height of the drop was always 100 millimeters, being measured carefully with a metric rule before each determination.
In making the determination, the frame with a suitable needle and weights is suspended from the electro-magnet, and the material to be tested placed in position beneath the needle, the height being regulated as already described. The frame is then released by means of the key. The depth of penetration is ascertained from the marks on the needle and confirmed by measuring with the metric rule. The suspension of the weights far below the needle brings the center of gravity of the falling portion of the apparatus below the point of the needle, causing the latter invariably to assume a vertical position, rendering it much easier to ascertain the true depth of penetration than would be the case if the point of the needle were at or below the center of gravity. After its release by the electro-magnet, the apparatus meets with no resistance in its fall, except that offered by the air, until the point of the needle reaches the surface of the cream. The amount of weight acting on the needle is known and the distance through which it falls is constant. If, however, too much weight or too small a needle is employed, the latter continues to sink slowly, making an accurate reading of the depth of penetration impossible. In the reverse case, with too large a needle or too little weight, the penetration is of course much less and the percentage of experimental error proportionately greater. As there was a large variation in the hardness of the various fillers, three sets of needles were employed and in this way much of the error was eliminated. The size of the needles were: large ⁵⁄₁₆ inch or 7.93 millimeters, medium ⁴⁄₁₆ or 6.35 millimeters, and small ³⁄₁₆ or 4.76 millimeters in diameter. The tests were made by allowing each needle to penetrate the ice-cream three times. The point of penetration was varied from center to points near the edge as there was a possibility of the cream being harder near the edge than in the center. The depth of penetration of each needle was expressed in millimeters. The work was done in a cold storage with the temperature near 0°C.
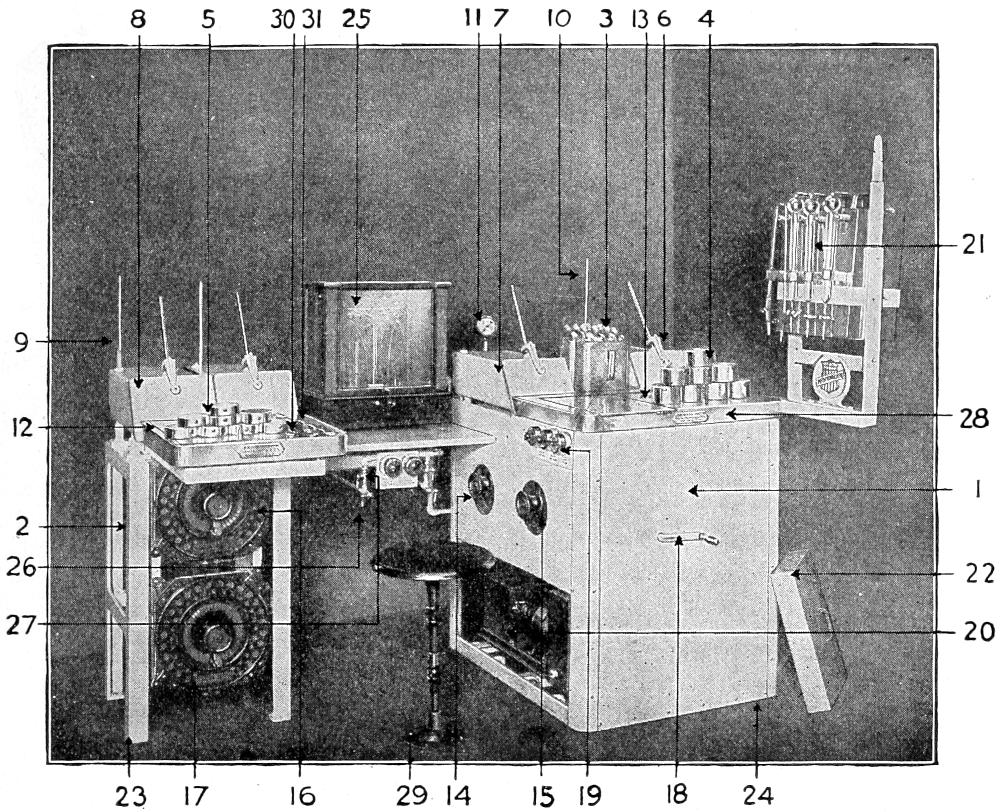
Fig. 75.—Mojonnier tester for fat and total solids.
MOJONNIER TESTER
Considerable time is required to make some of the tests, after the chemical method, such as those for solids in the different milk products. Mojonnier Brothers have devised a test both for fat and solids which is accurate and saves much time. A description of this test follows. The machine is shown in Fig. 75. The numbers on the arrows refer to numbers in the text, as follows:
(1) All tests for butter-fat are made upon this side.
(2) All tests for total solids are made upon this side.
(3) Butter-fat extraction flasks in centrifuge baskets.
(4) Eight 3½ inch aluminum dishes for butter-fat tests (the larger ones). The one tall counterpoise counterbalances each dish. Fat dishes have no covers.
(5) Eight 3-inch aluminum dishes for solids tests (the smaller ones). The one short counterpoise counterbalances each dish. Cover prevents absorption of moisture from the air during weighing. Counterpoise balances both dish and cover.
(6) Fat vacuum oven. The temperature in this oven is maintained at 135 deg. C. Thermometer (10) extends into vacuum oven and rests on hot plate. The mercury bulb fits snugly in removable brass mercury well. Once a month this mercury well should be refilled with mercury. Be careful to see that the well always forms good contact with hot plate. Regulate temperature by rheostat (15).
(7) Cooling chamber. Water at room temperature from the tank (28) in bottom part of the fat tester, is pumped by means of circulating pump in power unit (20) through the flat hollow sheet brass plate inside the cooling chambers and from there into pipe back of tester back into tank. Operator must watch outlet on cooling chamber and see that water is flowing at all times while the motor is turned on. If water is not running, you may know that the water in the storage tank is low. Keep tank filled at all times. In winter to prevent freezing, put a gallon of denatured alcohol into tank.
(8) Solids oven. Maintained at 100 deg. C. Regulate temperature by means of rheostat (16). Follow instructions in (6) above closely for method of placing thermometer. Keep joints at door clean, and grease with vaseline sliding surfaces. This insures a more perfect vacuum.
(9) A 250 deg. C. thermometer for solids oven. Wire on rubber connections.
(10) A 250 deg. C. thermometer for fat oven.
(11) Vacuum gauge is on main suction line from vacuum pump. This registers vacuum of either oven, or of both ovens simultaneously.
(12) Solids plate. Maintained at 180 deg. C. The thermometer can be placed in nickel plated mercury well with base that rests directly upon plate. See that this side is level.
(13) Fat plate. Maintained at 135 deg. C. During the evaporation of ether from the dishes, the temperature falls. Some operators prefer to keep temperature at 150 deg. C. to start and place dishes only halfway upon plate. As the plate cools, the dish may be pushed over until it is entirely upon hot plate.
(14) Rheostat for fat plate. Turning rheostat handle forward increases temperature. Turning handle backward decreases temperature. It is important to see that the lever on handle makes good contact with separate buttons and not with two buttons at a time. As soon as right button has been found that maintains constant temperature, mark this point upon rheostat rim. In starting up tester, each day, you may turn handle on full and then when temperature is up to within 10 degrees of right point, turn handle back to previously marked button. Same instructions apply for all rheostats.
(15) Rheostat for fat oven.
(16) Rheostat for solids oven.
(17) Rheostat for solids plate.
(18) Handle for centrifuge.
(19) In case the operator forgets temperature and time for treating samples at various points, he may notice the temperature and time below each snap switch for each hot plate.
(20) The power unit consists of a high vacuum pump, a water circulating pump, and a suction fan all driven by a single motor. Vacuum pump must be submerged in oil furnished with tester. Fill chamber up to air cock with oil.
(21) Automatic burettes. The cans holding the water, ammonia, alcohol, ethyl ether and petroleum ether are placed in this order. This is the order in which these reagents are added to the flasks containing the weighed sample of milk. Each division delivers the proper amount for a single extraction.
(22) Place this hood over fat dishes when evaporating off ether, so that the suction fan may draw off ether fumes to outside of building.
(23) Fasten these legs to floor with lag screws.
(24) This side need not be fastened to floor. In case it is necessary to take out power unit, it is necessary only to disconnect connections in rear of machine and move this part of machine forward.
(25) The balance is the heart of the machine. Operator must keep it level, clean and handle it carefully. Raising and lowering knife edges must be done gradually and with care. Make it a habit of cleaning balance daily. The weights must be kept clean, and as soon as you notice that some of the smaller weights are wearing out, order new ones.
(26) This cock exhausts vacuum from oven when cock (27) is closed. It must be kept closed when vacuum is turned on oven.
(27) This cock puts vacuum from main line into vacuum oven. Set of cocks at right is for solids oven, and at the left for fat oven.
(28) In top of fat plate holder there is a hole communicating with suction fan on power unit. When the exhaust pipe on suction fan is run out of window of laboratory and the hood is over the dishes, all fumes of ether will be driven from the room.
(29) Screw stool to floor.
(30) A wash stand for washing all glassware should be provided.
173. General preliminary information.
—In the operation of the Mojonnier tester, several steps remain the same regardless of the product being tested. Among these are the following:
(1) How to use the balance.
Two types of balances are in principal use—namely, the old type with graduated beam and rider, and the new type called “Chainomatic” with the chain and vernier. The care to give to either type of balance is the same. The difference is in the method of balancing the object to be weighed, and of reading the weight. These points will be discussed separately.
A balance is a delicate instrument, and care needs to be exercised in its use at all times. The weights likewise require careful handling. Lack of care in the weighing operations may lead to entirely erroneous results, and thus defeat the object aimed at, namely, accuracy of the tests.
The balance is inclosed in a glass case to shield it from dust, air currents, and moisture. Perhaps the largest factor affecting accuracy in weighing,—granting other conditions to be right, is temperature. If the object to be weighed is of a lower temperature than the balance case, it will weigh apparently more than its actual weight. If of a higher temperature than the balance case, it will weigh apparently less than its actual weight. The object should, therefore, be as closely as possible of the same temperature as that of the air in the balance case. The water cooled desiccator used upon the Mojonnier tester has been designed primarily to facilitate the equalizing of the temperature between the dishes to be weighed and the balance case. See, therefore, that the temperature of the water in the circulating system is as nearly as possible the same as the temperature of the balance case.
All parts of the balance and weights should be kept free from dust. A cover to be placed over the balance case at night serves a very useful purpose. Use a camel’s hair brush to remove the dust from both the balance and the weights. A small beaker partly filled with sulfuric acid should be kept in one corner of the balance case. Replace the sulfuric acid when it becomes saturated with moisture.
Protect the balance against vibration, and see that it is in exact level. The air bubble in the spirit level should be in the exact center. This can be readily accomplished by means of the leveling screws under the balance case.
The balance should be in exact equilibrium at all times. That is, the pointer should oscillate an equal number of divisions on each side of zero upon the pointer scale. If the pointer swings too far to the right, turn the adjusting screw upon the beam to the right. If it swings too far to the left, turn the adjusting screw to the left.
Place object to be weighed upon the left hand pan, and the weights or counterpoises upon the right hand pan. Handle the weights with the forceps only, using the right hand. Use the left hand to release the beam from the support, and to raise or lower the balance door. The weights should be placed upon the pan in a systematic order, beginning with a weight that is judged to be somewhat too heavy. Lower weights are then tried in succession in a systematic order until equilibrium results.
Upon the old style balance, adjustments under 5 or 10 milligrams (depending upon the construction of the balance) are made by means of the rider. Keep the balance door closed while the final adjustment is being made. Determine the relation between the divisions upon the rider beam, and the pointer scale. This relation varies with different balances, but when once ascertained upon a given balance it remains a constant value, and if applied in making a weighing, a great deal of time can be saved. For example, if the pointer oscillates six divisions to the right of zero, and four divisions to the left, with a balance having a relation of .0002 gram to one division upon the pointer scale, the rider is moved .0004 gram to the right to bring the balance into equilibrium.
Upon the Chainomatic balance, adjustments under .0500 gram are made by means of the screw and vernier. Determine the relation between the divisions upon the vernier, and the pointer scale. If the pointer swings too far to the right, lower the slide,—if too far to the left, raise the slide. About .003 gram upon the vernier usually equals one division upon the pointer scale.
Exercise great care in recording the weights. A double check should be made by reading both the weights upon the balance pan, and the weights that are missing from the set. The weights should be placed upon a paper near the front of the balance case, with the values of the weights marked upon the place where the respective weights are kept. Remember that one misread weight will spoil an entire test. Upon the Chainomatic balance read weights as follows:
(a) Sum of all gram weights equals whole number.
(b) Sum of 100 or multiple of 100 milligrams equals first decimal.
(c) Sum of 10 or multiple of 10 milligrams equals second decimal.
Out of a possible total of 100 milligrams, 50 milligrams are obtained from the fractional weight, and 50 milligrams from the vernier beam.
(d) The third decimal is obtained from the vernier beam. Read the value of the line just above the small 0 upon the slide.
(e) The fourth decimal is the value upon the slide that is in an exact line with any given line upon the vernier beam.
(2) Care to give to the power unit and the water circulating unit.
Keep the water tank well filled with water. Add about one quart light machine oil to the water in the tank to keep the water pump well lubricated. If the tester is located in a cold room in winter, add one gallon denatured alcohol to the tank to prevent freezing.
Keep the vacuum pump chamber properly filled with the right kind of oil. The oil should just about reach the top of the pistons, as indicated by the glass upon the side, or cock upon the end.
Give the motor proper care. It should receive the same attention as given to any motor, that is, it is to be kept cleaned and well lubricated.
Should any knocks develop upon the power unit, remedy the same immediately. The construction is very simple, and with a little study, the care and operation of the power unit should be readily learned.
(3) Care to give to the vacuum ovens and coolers.
Keep sufficient mercury in the mercury well to insure good contact between the thermometer and the mercury well. The mercury well should rest directly upon the hot plate. Otherwise incorrect temperature will be indicated by the thermometer. Keep the ground joint between the lid and the oven thoroughly cleaned. In case that it is difficult to get the proper amount of vacuum, look first to this place for trouble. Sometimes it may be necessary to use a small amount of vaseline, but as a rule, the best results are obtained by keeping the ground joints thoroughly clean. Be sure that the thermometer opening, and the openings upon the bottom of the oven are thoroughly sealed. It may be necessary to replace the rubber tubing at these points in case that leakage develops.
Be sure to see that the cooling desiccators are kept from freezing temperatures. If the water in the cooling plates should freeze, it would ruin the plates. Watch the water coming out of the coolers, in order to be sure that the circulation is correct.
(4) General care of the tester.
Keep the tester clean and free from the accumulation of unnecessary material at all times. It is impossible to do accurate work if the apparatus is not in the best of condition. All japanned parts can be cleaned either with engine oil, applied to a clean cloth, or by washing with good soap and water.
(5) How to clean the dishes and the glassware.
The solids dishes should be soaked in water after the test has been completed, and the solids then removed by means of a brush suited to the purpose. They should then be thoroughly cleaned and dried, and placed in the vacuum oven until required for further use. The fat dishes should be treated with a small quantity of gasoline until the fat is all dissolved, and this treatment repeated a second time. Finally, the dishes are to be cleaned with a dry cloth, and placed in the vacuum oven until needed. Do not use any water upon the fat dish.
All glassware should be washed either immediately after being used, or it should be placed in water until washed. Extraction flasks should be thoroughly washed with tap water and then washed out with distilled water. If flasks become dirty, wash with washing powder and shot, or use washing powder with a brush specially designed for this flask. Clean pipettes with brush and water. Use washing powder, if necessary. Rinse successively with water, alcohol, and ether, and then dry by holding at exhaust cock leading to the vacuum oven, or place upon pipette holder between fat oven and cooler.
(6) How to heat the dishes before weighing.
Give both the solids and the fat dishes the same treatment before weighing the same empty as is given to them when the same are to be weighed with the solids or the fat respectively in the same. Do not attempt to weigh dishes that have not been heated previous to being weighed.
(7) How to cool the dishes.
Transfer the solids and the fat dishes from the respective vacuum ovens to the respective coolers, and weigh the same as rapidly as possible. Weigh the solids dish with the cover on, and the fat dish without any cover.
(8) How to adjust temperatures.
The temperatures upon the two outside hot plates and the two vacuum ovens can be closely regulated by means of the rheostats. If the voltage is constant, the temperature will remain very near to the point desired for a long period of time after the rheostats have been properly adjusted. Ascertain by test, just where it is necessary to hold the rheostat in order to get the required temperature. After this point is once ascertained, the rheostat can be set at the point required and the temperature allowed to come up automatically, when starting in the morning.
(9) How to prepare the samples.
Care and good judgment requires to be exercised in preparing samples of the various dairy products preparatory to weighing out samples of the same for the test. This is explained more in detail in the more extended descriptions following the various products outlined in these directions.
(10) How to weigh samples for the fat test.
Several methods are in use for weighing the samples for the fat test, depending on the product that is being tested. The weighing cross with the short pipettes can be used successfully on a number of dairy products. Numerous advantages are gained by using this method, provided the product to be tested permits of its use. Five different samples can be weighed with only six weighings, and if care is taken, great accuracy is obtainable. Several products can be pipetted out, taking ten grams and where possible, this is a very accurate method. The pipettes are graduated to discharge ten grams of whole milk at 60 deg. F., allowing 15 seconds for draining the pipette after the milk has all run out, and then blowing out the last drop of milk in the pipette. Again, when sample shows signs of separation of fat, the only satisfactory method is to warm up the sample until the fat is melted, and mix thoroughly. While stirring the well mixed sample, pipette out a sample into a cleaned, dried and weighed extraction flask suspended from the balance beam. If flask is wet on inside it should be weighed with cork.
(11) Size of samples to take for the fat test.
The size of sample to use varies, depending on the product being tested, and it ranges from one gram in the case of butter, to ten grams in the case of raw milk. See instructions in diagram.
(12) How to add the reagents.
The reagents should be added in the following order: Water, ammonia, alcohol, ethyl ether and petroleum ether. The burettes upon the dispensing cans are graduated to deliver the proper charge required. See instruction diagram.
(13) How to shake the flask.
If only one sample is being tested, this can be shaken by hand. As many as four samples can be shaken at one time in the shakers furnished with the equipment. The flask should be held with large bulb down and small bulb extending upward. In this position they are shaken vigorously lengthwise of flask. After shaking five or six times, allow liquid in small bulb to run back into large bulb. Repeat this operation at least four times. There is no danger in shaking the samples too much, but rather of not shaking them enough.
(14) How to centrifuge the flask.
If only one sample is being centrifuged at a time, place a counterpoise upon the opposite side of the centrifuge in order to balance the head. Always see that there is about the same weight upon both sides of the centrifuge.
(15) How to pour off the ether solutions.
Remove the cork by twisting carefully from the flask. Pour off the ether solution as completely as possible, taking care not to allow any of the liquid under the ether to flow out of the flask. This can be avoided if the dividing line between the ether solution and the remaining solution is carefully watched, while pouring off. In the first extraction, a larger amount of the ether solution can remain in the flask than in the second extraction. In the second extraction the fat dish should be placed on the tester top, and the operator should look down on the ether solution as it is being poured off, observing the point where the ether has been all removed. By following this method, all but one or two drops of the ether solution should be recovered, provided the dividing line was in the right place before pouring off.
(16) How to bring up the dividing line.
Inability to pour off the ether solution closely is due to the fact that the dividing line between the ether solution and the remaining solution is too low in the lower bulb of the flask. At the end of the first extraction, the dividing line can remain without change, taking care to pour off the ether solution as closely as possible, regardless of the position of the dividing line. At the end of the second extraction, remove the stopper from the flask, and drop in sufficient distilled water from the burette into the extraction flask to raise the dividing line to the desired point. This should be done just before pouring off the ether. If this procedure is followed, it becomes possible to remove the ether almost to the last drop.
(17) How to evaporate the ether from the dish.
It is important to maintain the proper temperature upon the outside hot plate. If the temperature is allowed to go below 135 deg. it takes too long to evaporate the ether solution. On the other hand, if it rises much above 135 deg. there is danger of the ether boiling out over the top of the dish. If the plate is too hot, it is best to place only part of the dish in contact with the plate. We recommend that the hood be placed over the dishes, and that the ether fumes be blown out of the room by means of the blower. It is dangerous to allow the ether fumes to evaporate into the working room, and besides it makes it very unpleasant for the operator to work in contact with these vapors.
(18) How to heat the fat dish in the oven.
Do not transfer the fat dish to the vacuum oven until all of the ether solution has been evaporated upon the outside plate. If this is not done, the contents of the dish are quite likely to spatter in the oven. It is very important to maintain the proper temperature conditions, and also the proper vacuum upon the fat dishes, while the same are being heated in the oven. If for any reason, there should be difficulty in attaining either the proper heat or the proper vacuum, the trouble should be immediately investigated and removed.
(19) How to weigh the fat dish.
The fat dishes are to be transferred from the vacuum oven to the cooler, in which they are to remain for seven minutes before being weighed. The weighing should be done as promptly as possible.
(20) How to calculate the percentage of butter-fat.
Divide the weight of the butter-fat by the weight of the sample taken. Multiply the result thus obtained by 100 in order to arrive at the percentage of butter-fat in the sample.
(21) Weight of sample to take for the solids test.
This varies with the product to be tested, ranging from .25 of a gram in the case of sweetened condensed milk, to 2 grams in the case of fresh milk.
(22) How to weigh the solids sample into the dish.
The samples can be weighed from the weighing cross, or in several cases it is advantageous to weigh the samples directly into the solids dish.
(23) How to add water to the samples in the dish.
For this purpose, always use best distilled water. It is well to run a blank upon the water to determine if it is free from solid matter. Reject any water that may contain any solid matter. Add sufficient water to make up the total volume, not to exceed 2 cubic centimeters. Agitate the sample with the water in the dish so that the remainder will be uniformly distributed over the bottom of the dish.
(24) How to treat the sample upon the outside hot plate.
It is very important to have the outside hot plate as nearly 180 deg. as possible. If the temperature is less than 180 deg. there will be insufficient bubbling of the sample, so that the surface will be improperly broken. If a temperature above 180 deg. is used, there is great danger of the samples spattering out of the dish. Heat the samples in the dish until they just begin to turn brown. This is one of the most important steps in the entire operation, and unless properly watched, an error may be introduced at this point. Insufficient heating may give high results, and over heating may give low results.
(25) Temperature and vacuum to maintain in solids oven.
Keep the solids oven at a temperature of as nearly 100 deg. as possible. This applies to all products to be tested. Also see that there is at least 20 inches of vacuum upon the vacuum oven. If the tester is properly operated, it should be possible to maintain 25 inches of vacuum at all times.
(26) How long to retain the dish in the solids oven.
This varies with the products to be tested. The minimum time is ten minutes and in the case of sweetened condensed milk, in order to get absolute results, it is best to dry the samples an hour and a half.
(27) How to cool the solids dish.
Transfer the dish from the oven to the cooler promptly, and keep the same in the cooler for five minutes with the water circulating during this time.
(28) How to heat the solids dish.
Always weigh the solids dish with the dish cover upon the dish. Make the weighings as rapidly as possible, as otherwise the sample is quite likely to absorb moisture from the atmosphere.
(29) How to calculate the percentage of total solids.
Divide the weight of the total solids by the weight of the sample taken, and multiply the result by 100, which will give the percentage of total solids in the sample.
(30) Order of operations in testing evaporated milk for butter-fat and total solids with Mojonnier tester.
In the following outline, the procedure described is that used in the case of evaporated milk. The procedure in the case of other products is much the same, but as described in directions, differences may occur in the methods of weighing the samples; the size of the samples to use; the quantity of water or the reagent to add; the method of shaking, and the method of centrifuging. The outline presumes that only one operator is doing the work. When speed is required, a helper to the operator can materially shorten the time required. In that case, the order of operations will need to be slightly modified.
(1) See that respective dishes have been in vacuum oven at least five minutes while ovens are heated with vacuum on.
(2) Place respective dishes in cooling ovens, turn pump on, and set bell for five minutes for solids and seven minutes for fat.
(3) Weigh solids dish first—being careful to put cover on dish, and record weight and number upon laboratory report. Put dish back into cooling oven.
(4) Weigh fat dish without cover. Record weight and number upon laboratory report, and put fat dish back in cooling oven.
(5) Fill one 5-gram and one 1-gram pipette with milk, and place upon weighing cross.
(6) Weigh above and note weight on laboratory report under “pipettes plus milk” column.
(7) Transfer milk in 5-gram pipette to extraction flask, and return empty pipette to weighing cross.
(8) Weigh again, and note weight in fat column under “pipettes.”
(9) Put above weight in solids column of laboratory report, also under heading of “pipettes plus milk.”
(10) Transfer milk from one gram pipettes to the weighed solids dish, and return pipette to weighing cross.
(11) Place weighing cross upon balance, weigh, and record weight under the heading “pipettes.”
(12) Add equal volume of distilled water to solids dish, distribute evenly, and place on solids hot plate.
(13) When evaporation has taken place, put in solids oven.
(14) Turn on vacuum and set bell for ten minutes.
(15) At this point take extraction flasks with milk in and make first extraction, centrifuge and pour ether into fat dish.
(16) Make second extraction, same as 15.
(17) During above period solids bell will ring and solids dish should be transferred to cooling oven, and bell set for five minutes.
(18) As soon as ether has evaporated, place dish in fat oven, turn vacuum on, and set bell for five minutes.
(19) When solids bell rings, weigh dish and record weight.
(20) When fat test bell rings, transfer to cooling oven, and set bell again for seven minutes.
(21) Complete subtractions on laboratory report.
(22) Weigh fat dish, turn pump off, and finish calculations.
(23) From tests obtained, determine what material to add to standardize batch.
174. Testing evaporated, sweetened condensed, bulk condensed milk ice-cream (mix or melted), for fat and total solids.
—The process is outlined in the following steps:
(1) Wash solids dishes with warm water and fat dishes with gasoline. Dry with a towel and place into heated vacuum oven for five minutes, with vacuum on. At the end of five minutes, put these dishes into cooler and with pump still running, keep them there for five minutes before weighing. Do not turn off motor until last dish is weighed out of cooling chamber.
(2) While dishes are being heated and cooled, wash pipettes with water, alcohol and ether, and dry by applying vacuum at exhaust cock upon tester. Always use clean and dry pipettes for each different sample. Aim to clean pipettes as well as all glassware, immediately after using.
(3) It is very important to keep the extraction flasks clean. Wash these with warm water immediately after extraction is finished. Wash with washing powder and shot when necessary.
(4) Keep solids dishes in cooler for at least five minutes, weigh accurately to .0001, using the proper counterpoise. Weigh solids dishes with cover on. Keep fat dishes in cooler for seven minutes before being weighed. Fat dishes do not have cover.
(5) Use pipettes as follows: Fill 5-gram pipettes up to 5 gram mark for butter-fat and 1 gram pipette up to 1 gram mark for total solids. If duplicates are to be run, fill two pipettes from the same sample. As pipettes are filled, place lower end into cleaned and dry rubber tubes which are pressed upon knobs at ends and center of weighing cross. Either five or less samples for butter-fat or five or less for total solids may be pipetted out.
(6) Weigh the cross with the pipettes containing the milk on chemical balance accurately to .0001 gram. Run milk from pipette into proper flask, or 3 inch dish if making solids test. The pipettes may be distinguished by the number upon each cross. Replace pipette and weigh again. Difference in weight gives weight of sample. Repeat until all samples are run into proper flasks, and into weighed solids dishes if solids are determined along with the fat.
For fat in sweetened condensed milk use a 5-gram sample. The 5-gram pipette delivers approximately 5 grams between the 5 gram mark and the base of the bowl of the pipette.
Some operators prefer to mix 200 grams of sweetened condensed milk with 200 grams of water, weighing these carefully upon a Harvard trip scale sensitive to .1 gram. In this case, care must be exercised to obtain the exact weight of both milk and water and to stir these thoroughly with glass or metal rod before taking sample. A tall tumbler, a one-pound bottle or a quart cup, make good containers in which to make mixture. A 10-gram sample of this mixture is used. This is best weighed out by using two 5-gram pipettes on weighing cross.
For total solids, weigh out ¹⁄₂ (.5000) to ³⁄₄ (.7500) gram of this mixture. If the undiluted milk is used, take as nearly ¹⁄₄ (.2500) gram as possible.
For regular 8 per cent plain bulk condensed milk, use same size samples and treat same as evaporated milk. For 12 per cent superheated condensed milk, mix 100 grams milk with 300 grams water upon Harvard trip scale. Weigh 10 gram sample of this mixture into flask for fat, and a 2 gram sample into solids dish for solids. Multiply percentages obtained by 4 for correct percentages, when a 1 to 4 dilution is made.
175. Fat determination.
—The following steps should be followed when making the fat test.
(1) Remove flask from holder and run 4 cubic centimeters water (one charge on water burette) into each flask. Be careful not to add more. Shake well until all of sample is mixed with water. This can be done without inserting cork.
For sweetened condensed milk, if not diluted with water, add 8 cubic centimeters of hot water with a pipette. To get hot water, place fat dish filled with distilled water upon solids plate. If sweetened milk has been previously diluted with water and a 10 gram sample has been used, it is not necessary to add water. It is very necessary to shake the flasks containing the sweetened condensed milk very thoroughly after the addition of each reagent. Sweetened condensed milk requires more shaking than any other liquid milk product.
(2) Before replacing flask into holder, add 1¹⁄₂ cubic centimeters C. P. ammonia, one charge on burette. Shake well so that all of sample is well mixed with ammonia. This can be done without inserting cork.
(3) Add 10 cubic centimeters of 95 per cent alcohol. Insert cork, twisting cork in firmly, using best quality corks only. Replace the flask into flask holder. Shake thoroughly, and see that no milk adheres to any part of flask undissolved. In case particles of milk stick to side of flask, shake thoroughly until these are washed away. It is of utmost importance to shake thoroughly at this point.
(4) Add 25 cubic centimeters ethyl ether, insert corks and shake vigorously, lengthwise of flask, with liquid in large bulb of flask, and small bulb extended upward. Stop shaking at end of five seconds until all liquid has run into large bulb and repeat vigorous shaking for four five-second periods.
(5) Add 25 cubic centimeters petroleum ether and shake in same way.
(6) Place extraction flasks into centrifuge and whirl for thirty turns at speed of about 600 revolutions a minute. Have centrifuge balanced with small oil sample bottles furnished with tester. Double time for sweetened condensed milk.
(7) Place four 3¹⁄₂ inch dishes in line on shelf adjoining hot plate, keeping them in order in which their weights were posted on record sheet. Aim to have numbers on flasks correspond with number of dishes.
(8) Pour ether extraction above dividing line into proper dishes and slide dishes over onto hot plate which should be held at a temperature of 135 deg. C, as indicated by thermometer inserted in nickel plated mercury well. Be careful to pour off no solid matter. Cover dishes with hood.
(9) Repeat the extraction, shaking first to prevent formation of precipitate, then adding successively 5 cubic centimeters of 95 per cent alcohol, then 25 cubic centimeters ethyl ether and then 25 cubic centimeters petroleum ether, and shake vigorously after the addition of each of above three reagents for four five-second periods.
(10) Whirl in centrifuge for thirty turns.
(11) Move aluminum dishes back upon shelf adjoining hot plate, when almost dry, and pour the second extraction into proper dishes. Never pour extraction into hot dish. Remove dish from hot plate as soon as ether is all evaporated.
(12) When all of ether has evaporated, place dishes into vacuum oven which should have a temperature of 135 deg. C. Keep them there for five minutes after the vacuum gauge shows at least 22 inches of vacuum.
(13) Place dishes into cooler for seven minutes, with pump outfit running. See that water is running through cooling plates.
(14) Place counterpoise for dish and the approximate weight for fat on right hand balance pan.
(15) Transfer dish to left hand balance pan and weigh quickly to 0.10 milligram (0.0001 gr.).
(16) Weight of fat divided by weight of sample taken, multiplied by 100 represents percentage butter-fat.
176. Total solids determination.
—The steps in making the test are as follows:
(1) The temperature of the hot plate in the solids vacuum oven must be 100 deg. C. The temperature of the outside solids plate must be 170 deg. to 180 deg. C.
(2) To weighed milk in solids dish, add about 1 cubic centimeter water and distribute mixture evenly over bottom of dish, immediately after weighing. For sweetened condensed milk, use hot water, or place momentarily on hot plate and distribute evenly over dish by shaking sidewise very carefully after cold water is added.
(3) Place not more than two dishes at once upon hot plate, which must be perfectly level. Allow all visible moisture to evaporate. During the evaporation turn the dishes around with crucible tongs slowly so as to produce an even boiling over the whole bottom surface of the dishes. The dishes must be watched carefully during the evaporation. This step should require not more than two minutes. The end point is reached when bubbling and crackling ceases and sample shows first trace of brown. Vigorous boiling without spattering and complete evaporation are fundamentally essential.
(4) Place dishes into vacuum oven which must be at 100 deg. C. and turn on the vacuum. Heat for ten minutes. In the case of sweetened condensed milk keep it for ninety minutes in vacuum oven, or heat for twenty minutes and deduct 30 per cent from result. The gauge should register not less than 22 inches of vacuum. If for any reason you cannot obtain at least 22 inches of vacuum, then leave your dishes in oven for twice the regular time.
(5) Remove from oven and place into cooler. Allow dishes to cool for five minutes.
(6) Weigh dishes with covers on, being careful to weigh quickly and very exactly.
(7) Weight of dry solids divided by weight of milk taken, multiplied by 100, represents percentage total solids.
177. Testing butter.
—Both the fat and the moisture may be determined by this test. The sample may be prepared in either of two ways:
Method I. Remove about one-half pound butter from the different parts of the churn or tub with a butter trier, and put this into wide-mouthed bottle or Erlenmeyer flask fitted with rubber stopper having a thermometer in the center of the stopper, and reaching down into the mass of butter. Heat bottle in hot water until thermometer reaches 40 deg. C. or 104 deg. F. If this temperature is not exceeded, there is very little danger of the butter-fat spreading rapidly from the curd. Shake vigorously.
Method II. Another very satisfactory method of preparing butter for sampling is to put butter as it comes from churn or tub into Mason jar, beaker, glass tumbler, or wide-mouthed bottle, any of which may be covered tightly to prevent evaporation. Allow these to stand in warm room or in warm water until the butter is soft enough so that it may be stirred thoroughly with table knife, spatula, or a mechanical stirrer. At temperature of about 75 deg. to 80 deg. F. butter stirs into a waxy form from which water or casein will not separate. In this form, it is put into boat or flask to be weighed.