CHRONOLOGICAL TABLE—Vol. III.
Reading edition
DECEMBER 1899.
17.—Field-Marshal Lord Roberts, K.P., G.C.B., V.C., &c., appointed Commander-in-Chief in South Africa, with Lord Kitchener of Khartoum as his Chief of the Staff.
War Office issued orders under which the remaining portion of the Army A Reserve were called up; and large reinforcements were to proceed to South Africa without delay.
General Gatacre advanced from Sterkstroom to Putters Kraal.
General French established his headquarters at Arundel.
Offers of Second Contingents by the Colonies accepted.
18.—Additional Battalions of Militia embodied. There were now fifty-four Battalions of Militia embodied.
Sir Charles Warren and the Staff of the Fifth Division left Cape Town.
Reconnaissance by General French. Sortie from Ladysmith.
19.—Important order issued from the War Office, announcing that the Government had decided to raise for service in South Africa a Mounted Infantry force, to be called “The Imperial Yeomanry.” The force to be recruited from the Yeomanry.
21.—Mr. Winston Churchill arrived at Lourenço Marques after an adventurous journey.
23.—Departure of Lord Roberts from London and Southampton for the Cape.
24.—Dordrecht occupied by General Gatacre.
Sortie from Mafeking.
Two British officers captured by Boers near Chieveley.
25.—Bluejackets blew up Tugela Road bridge, and cut off Boers with their guns.
Colonel Dalgety with Mounted Police and Colonial troops held Dordrecht. (Gatacre’s Division.)
26.—Sir Charles Warren arrived at the Natal front.
Boers appeared at Victoria West.
Mafeking force attacked a Boer fort.
27.—Boers unsuccessfully bombarded Ladysmith.
28.—H.M.S. Magicienne captured German liner Bundesrath, near Delagoa Bay, with contraband of war on board.
30.—Skirmish near Dordrecht. Boers defeated with loss. Two British officers captured through mistaking Boers for New Zealanders.
JANUARY 1900.
1.—Enrolment of the first draft of the City Imperial Volunteers.
Surrender of Kuruman, after a stout resistance, to the Boers. Twelve officers and 120 police captured.
General French occupied a kopje overlooking Colesberg. Flight of Boers, leaving their wrecked guns and quantities of stores.
Brilliant manœuvre by Lieutenant-Colonel Pilcher at Sunnyside. Captured the entire Boer camp, made forty prisoners, advanced and occupied Douglas on Vaal River.
Colonel Plumer and Colonel Holdsworth from Rhodesia continued their march to the relief of Mafeking.
2.—Loyal inhabitants of Douglas escorted to Belmont.
General French still engaged with enemy at Colesberg.
3.—General French reinforced from De Aar. Boers being surrounded; fighting in the hills.
General Gatacre repulsed Boer attack on position commanding Molteno.
Colonel Pilcher, for “military reasons,” evacuated Douglas.
4.—General Gatacre occupied Molteno; Boers retreated to Stormberg with loss.
General French manœuvring to enclose Colesberg; further fighting.
5.—General Gatacre hotly engaged at Molteno by Boers from Stormberg; drove them off, inflicting heavy losses.
6.—Great battle at Ladysmith. Boers repulsed on every side with heavy loss.
General Buller made a demonstration in force to aid General White.
General French inflicted severe defeat on Boers at Colesberg. A Company of the 1st Suffolk Regiment captured.
9.—British troops invaded Free State territory near Jacobsdal. The Queensland and Canadian Volunteers cleared a large belt across the Free State border.
10.—Lord Roberts and Lord Kitchener arrived at Cape Town.
Forward movement for the relief of Ladysmith from Chieveley and Frere.
11.—Sir Redvers Buller crossed the Little Tugela, and occupied the south bank of the Tugela at Potgieter’s Drift.
Lord Dundonald and Mounted Brigade crossed the Tugela at Potgieter’s Drift.
General Gatacre made a reconnaissance in force towards Stormberg.
13.—The City Imperial Volunteers left London for South Africa.
15.—Boers attacked General French and were repulsed at Colesberg.
16.—General Lyttleton and Mounted Brigade crossed the Tugela at Potgieter’s Drift.
17.—Sir Charles Warren crossed, with his Division, at Trichardt’s Drift.
Lord Dundonald had an action with the Boers near Acton Homes.
18.—Tugela bridged and crossed by a Brigade and battery.
20.—Sir Charles Warren moved towards Spion Kop.
Reconnaissance by Lord Dundonald.
21.—Heavy fighting by Clery’s force; they attacked the Boers and captured ridge after ridge for three miles.
22—Sir Charles Warren’s entire army engaged.
23.—Spion Kop captured by Sir Charles Warren; General Woodgate wounded.
25-27.—Abandonment of Spion Kop. Sir Charles Warren’s force withdrew to south of Tugela.
27.—Brigadier-General Brabant, commanding a Brigade of Colonial forces, joined General Gatacre.
28.—General Kelly-Kenny occupied Thebus.
30.—British force reoccupied Prieska.
FEBRUARY 1900.
3.—Telegraphic communication restored between Mafeking and Gaberones.
4.—General Macdonald occupied Koodoe’s Drift.
5.—General Buller crossed the Tugela at Manger’s Drift.
6.—General Buller captured Vaal Krantz Hill.
7.—Vaal Krantz Hill abandoned, and British force withdrew south of the Tugela.
9.—General Macdonald retired to Modder River.
Lord Roberts arrived at Modder River.
10.—Colonel Hannay’s force moved to Ramdam.
12.—General French with Cavalry Division, proceeding to the Relief of Kimberley, seized Dekiel’s Drift.
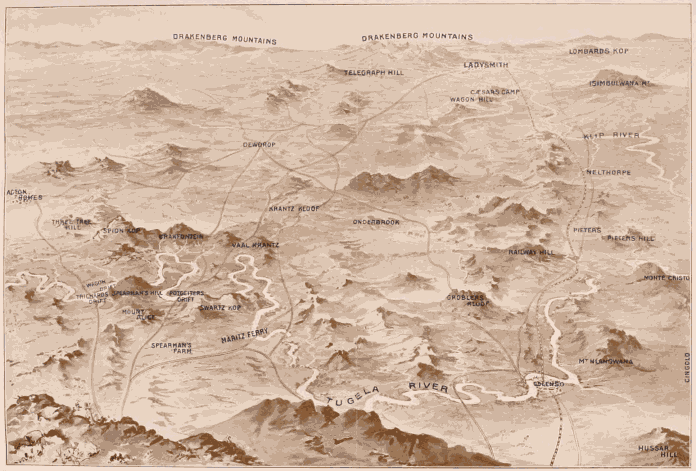
BIRD’S-EYE VIEW OF THE COUNTRY COVERED BY GENERAL BULLER’S OPERATIONS FOR THE RELIEF OF LADYSMITH. EDINBURGH and LONDON: T. C. & E. C. JACK
SOUTH AFRICA AND THE TRANSVAAL WAR