SECTION XI (continued 2)
Reading edition
1. The care necessary for the child's bones.
2. When it should exercise its muscles.
3. Its rest.
4. The air, sun and food and water which it needs.
5. How to keep it clean.
Bones—Great care must be taken in handling a baby. Its bones are soft and easily injured, and for this reason a baby should not be handled more than necessary. When very young its entire spine should be supported, and no undue pressure made upon the chest, as often happens if the baby is grasped under the arms. In lifting a young baby from its bed, the right hand should grasp the clothing below the feet, and the left hand should be slipped beneath the infant's body to its head. It is then raised upon the left arm. An older child should be lifted by placing the hands under the child's arms, and never by the wrists. If children are jerked or lifted by the arms, serious injury may be done to the bones. The bones, when a child is growing, are partly composed of soft tissue which is easily destroyed, and further growth is prevented. Many children are brought to the hospitals with injuries done to their arms from being jerked across the street. Do not let a child walk too soon, especially a heavy child. Bow legs and knock knees come from standing and walking when the bones are soft.
Exercise—At least twice a day an infant should be allowed for fifteen or twenty minutes the free use of its limbs by permitting it to lie upon a bed in a warm room, with all clothing except the shirt and diaper removed. In cold weather leave on the stockings. Later, when in short clothes, the baby may be put upon a thick blanket or quilt, laid upon the floor, and be allowed to tumble at will.
Rest—Healthy children never sleep too much. A new born baby should sleep nine-tenths of the day. A child should have a nap during the day until four years old, and, if possible, until seven or eight years old. It should go to bed before six. It should have a crib or bed to itself, placed where it will have fresh air, but protected from draughts, and its eyes protected from direct rays of light.
Air and Sun—A little child is in its room so much it is very important that fresh air and sunlight should be brought to it there. Rooms may be well aired twice or three times a day, removing the baby to another room while the windows are open. The child may be placed in its crib or carriage before on open window, dressed as if for the street. After children are three months old they may be taken out, but the sunny part of the day should be chosen, between 10 a. m. and 3 p. m. in cold weather. At night the windows should be partly opened, but care should be taken that the infant does not become chilled. Be careful that sheet and blankets do not get over a baby's head. The clothes may be pinned to the side of the bed.
Food and Water—Even little babies should be given water twice a day. The water should be boiled, cooled and kept covered. It is hardly possible for children or older persons to drink too much water. During hot weather a child needs more water than during cold weather.
Mother's milk is the only perfect food for an infant during the first nine or ten months. If it is necessary to give artificial food from a bottle, the greatest possible care must be taken. The milk used should be the best obtainable. To obtain clean milk it is necessary that everything that touches it be clean, sterilized when possible, and that the cows, and men who handle the milk be healthy. In New York City all milk is classified according to its cleanliness and butter fat content. The cleanest and richest milk is called "certified milk" and is sold raw. The other milks are classified according to cleanliness. Grade A, B and C are all pasteurized. Only certified and Grade A should be used for infant feeding. You know that sterile means free from germs or bacteria. Milk or water may be made comparatively sterile by boiling. Pasteurized milk is milk which has been heated to 155° Fahrenheit, kept at that temperature for thirty minutes and cooled quickly by placing the bottles in cold running water.
Punctual feeding makes good digestion, and even if the baby takes an extra nap it is better to wake a healthy baby to give him his meals at regular hours than to let his digestion get out of order. Between meals a little water which has been boiled and cooled and kept covered will wash out its mouth as well as refresh the child. The average infant is fed every three hours until it is five months old. After that it is fed every four hours until it is fifteen or sixteen months old, when it is shifted to three meals a day with perhaps a cup of milk in long intervals. Solid food, such as zwieback and milk or cereal, is begun at seven months, and by thirteen or fourteen months the child will be eating cereal, bread, broth, beef juice, potato, rice, vegetables, etc. Candy is harmful for children, and even older children should eat candy only after meals. Raw fruit, except orange juice, is apt to be upsetting in summer.
Keep the baby and everything around him clean. The baby's food is the most important thing to keep clean. The cleanliness of the bottle, when it is necessary to feed the baby from one, is very important. Choose a bottle of fairly heavy glass with rounded bottom and wide mouth, so that it may be easily cleaned. Short rubber nipples which clip over the neck of the bottle and which can be easily turned inside out, should be selected, and discarded when they become soft, or when the openings become large enough for the milk to run in a stream instead of drop by drop. Remove the bottle from the baby's mouth as soon as empty, rinse at once in cold water and then fill with a solution of bicarbonate of soda (baking soda), about one teaspoonful to a pint of water. Before rinsing wash in hot soapsuds, using a bottle brush, rinse well in plain water, and boil for twenty minutes, placing a clean cloth in the bottom of the basin to protect the bottle from breaking. Before using new nipples they should be scrubbed inside and out and boiled for at least five minutes. After using they should be carefully rinsed in cold water and kept in a covered glass containing a solution of boric acid (one teaspoonful dissolved in a pint of boiling water), and at least once a day be turned inside out and thoroughly washed with soap and water, then rinsed. Nipples should be boiled twice a week.
Bath—A baby should have a bath every day, not sooner than one hour after feeding. The room should be warm; if possible there should be an open fire in the room. The temperature of the water for a baby up to six months old should be 98°. Then it should gradually decrease, next temperature being 95°, until at the age of two it should range between 85° to 90°. Before a baby is undressed the person who is bathing the baby must be sure that everything needed for the bath and dressing is at hand. The hand basin or small tub of warm water, a pitcher of hot water in case it is needed, castile or ivory soap, soft wash cloths, towels, brush, powder, fresh absorbent cotton, boric acid solution, and the baby's clothes laid out in the order in which they will be needed in dressing the child, the soft flannel bandage, the diapers, the shirt, flannel petticoat, dress and shawl.
For some people it is easier to handle a baby when laid on a bed or table than on one's lap, having under the child a soft bath towel or canton flannel large enough to be wrapped around it. Its nose may be cleaned with a bit of absorbent cotton rolled to a point, using a fresh piece for each nostril. To bathe the eyes use fresh pieces of absorbent cotton dipped in boric acid solution. Wash the baby's face carefully so that the water does not drip into its ears. Dry the face carefully. Wash the head gently and thoroughly with soap, being careful to rinse completely. Soap the baby's body before putting it into the bath. As a soapy little baby is difficult to hold, support him firmly all the time he is kicking and splashing, by placing the arm or hand at the baby's back between its shoulders. Wash particularly, under the arms, the creases in the back of the neck, between the legs, fingers and toes. The bath should be given quickly and the baby lifted out in the bath towel or flannel, covered and dried quickly, using a soft towel. Rub the baby very slightly. All the folds of the skin should be dried and well powdered: under the arms, behind the ears, about the neck, legs, etc. Do not put too much powder on, as it forms a paste. Dress the infant and lay it on its crib while putting away all the things used for its bath. It is perfectly proper for a baby to exercise its lungs by crying, so do not be alarmed, but be sure that its clothing is comfortable and that the child is clean. Garments worn at night should always be different from those worn during the day. The garments next to the skin should be of wool or part wool, except the diaper, which should be soft cotton, and when new, washed several times before using. Wet diapers should be rinsed in cold water and dried before using a second time; about every twenty-four hours diapers should be washed, scalded, rinsed in cold water and hung in the air to dry.
Daily Routine—Child Under Two Years of Age
6.00 A.M. Feed warm milk.
7.30 A.M. Seat on chair or hold over chamber not more than ten minutes. If the child has no movement of the bowels at this time, try later.
9.00 A.M. Give bath, and immediately after, feed, then put to bed in a well ventilated room, darkened, or out of doors in carriage or crib. Be sure no strong light is in the child's eyes. Child should sleep until one o'clock.
1.00 P.M. Take up, make comfortable, and feed.
2.00 P.M. Take child out of doors again, but do not stay after 3 P.M. in winter time. Later in summer. Stormy days keep in house in crib or carriage, well wrapped up in room with window open.
3 to 5 P.M. Hold child, or let it stay in crib and play or kick.
6.00 P.M. Undress, rub with soft, dry towel, put on nightclothes, feed and put to bed in well ventilated room.
10.00 P.M. A young baby should be fed at this time, dried, and not fed again until 6. A.M.
A baby needs to be kept quiet. Do not make loud noises near it. Do not play with infant too much. Leave it to itself to grow. Keep the baby clean, everything about it tidy. Do not give a child pointed toys or playthings small enough to go into the infant's mouth. Tie toys to the crib or carriage so that they do not fall on the floor.
Things to Remember
Emphasize "tidy as you go," sleep, water, bowel movements, exercise for older children, especially in cold weather, nothing in mouth, do not use pacifiers, tying toys to crib or carriage, a baby over two years of age should not be fed oftener than every four hours.
Bowel Movements
At least once a day.
Should be medium soft, not loose, smooth, and when on milk diet, light in color.
If child is constipated, give one teaspoonful of milk of magnesia clear, at night.
See doctor if child is not well.
Feedings
Children from birth to five months should be fed every three hours.
Children over one and a half years old need three meals a day, dinner in the middle of the day.
Little children need to be kept very quiet. No confusion or loud noises around them. They will then grow better and stronger.
Colds
Never neglect a cold. Do not "pass it on" to a child by coughing, sneezing, talking or breathing into its face. Do not kiss anyone when you have a cold. Never allow the handkerchief used by a person with a cold to touch a child. If you must handle a child when you have a cold, wear a piece of gauze over your mouth and nose, and be sure to keep your hands clean. Be very careful with the handkerchiefs used; see that no one touches or uses them. It is preferable to use gauze or soft paper for handkerchiefs and burn them. When a child has a cold put it to bed. Keep quiet as long as there is any fever. Give a cathartic, such as castor oil, as soon as cold appears. Reduce the child's diet and give plenty of drinking water. Consult a doctor. Do not let the child go out until thoroughly well.
3. THE FIRST AIDE IN ACCIDENTS AND EMERGENCIES
General Rules
The sorrow and unhappiness of the world is increased enormously every year by injury and loss from accidents, more than half of which might be prevented if someone had not been careless, or if someone else had taken a little trouble to correct the results of that carelessness before they caused an accident.
It therefore becomes the plain duty of Girl Scouts not only to be careful but to repair, if possible, the carelessness of others which may result in accident.
Let us review briefly some of the many small things in our daily lives which cause accidents, and therefore suffering and loss.
1. Carelessness in the Street. As, for example, taking chances in getting across in front of a car or automobile; running from behind a car without looking to see of some vehicle is coming from another direction; catching a ride by hanging on to the rear end of cars or wagons; getting off cars before they stop; getting on or off cars in the wrong way; being too interested to watch for open manholes, cellarways, sewers, etc.; reckless roller skating in the street, throwing things like banana peels on the street or sidewalk where people are likely to slip on them; teasing dogs, or trying to catch strange ones; many dogs resent a stranger petting them and use their only means of defense—biting. Other examples will occur to you of carelessness in the streets which space does not allow us to mention here.
Wait until the car stops before trying to get off. In getting off cars you should face in the direction in which the car is going. A simple rule is to get off by holding a rod with the left hand and putting the right foot down first. This brings you facing the front of the car and prevents your being swept off your feet by the momentum of the car.
If you see any refuse in the street which is likely to cause an accident, either remove it yourself or report it to the proper authorities to have it removed at once.
2. Carelessness at Home. As for example, starting the fire with kerosene; leaving gas jets burning where curtains of clothing may be blown into the flame; leaving clothing or paper too near a fire; throwing matches you thought had been put out into paper or other material which will catch fire easily; leaving oily or greasy rags where they will easily overheat or take fire spontaneously; leaving objects on stairs and in hallways which will cause others to fall; leaving scalding water where a child may fall into it or pull it down, spilling the scalding water over himself; leaving rags or linoleum with upturned edges for someone to fall over; and innumerable other careless things which will occur to you.
3. Disobedience, playing with matches; building fires in improper places; playing with guns; trying the "medicines" in the closet; throwing stones; playing with the electric wires or lights; playing around railroad tracks and bridges: We could multiply the accidents from disobedience indefinitely. Remember, a caution given you not to do something means there is danger in doing it, which may bring much sorrow and suffering to yourself and others.
It is a very old saying that "An ounce of prevention is worth a pound of cure," but it is as true today as it was hundreds of years ago.
After the Accident
When the time for prevention is past, and the accident has happened, then you want to know what is the best thing to do, and how best to do it in order to give the most help and relief immediately, before expert help can arrive, and to have the victim in the best condition possible for the doctor when he comes, in order that he may not have to undo whatever has been done before he can begin to give the patient relief from his suffering.
1. Keep cool. The only way to do this effectually is to learn beforehand what to do and how to do it. Then you are not frightened and can do readily and with coolness whatever is necessary to be done.
2. Send at once for a doctor, if you have a messenger, in all except the minor accidents. This book will help you learn to judge of whether a doctor will be necessary. If in doubt send for a doctor anyway.
3. Prevent panic and keep the crowd, if there is one, at a distance. The patient needs fresh air to breathe, and space around him.
4. Loosen the clothing, especially any band around the neck, tight corsets or anything else that may interfere with breathing.
5. Keep the patient flat on his back if the accident is at all serious, with the head slightly down if his face is pale and he is faint, or slightly raised if his face is flushed and he is breathing heavily, as though snoring.
6. If there is vomiting, turn the head to one side in order that the vomited material may easily run out of the mouth and not be drawn into the windpipe and produce choking to add to the difficulties already present.
7. Remove clothing, if necessary, gently and in such manner as to give the patient the least amount of suffering. Move any injured part as little as possible. At the same time, as a secondary consideration, injure the clothing as little as possible. If, as often, it becomes necessary to cut off the clothing, it may be possible to rip up a seam quickly instead of cutting the cloth, but saving the clothing is always secondary to the welfare of the patient. Little or no consideration should be shown for clothing where it is necessary to keep the patient motionless, or where quick action is needed.
8. Transportation. There are three methods for emergency transportation of accident victims which can be used according to the degree of the injury:
(a) Fireman's Lift. If it is necessary for one person to carry a patient, it is easily possible to lift and carry quite a weight in the following manner:
First, turn the patient on his face, then step astride his body, facing toward his head, and, with hands under his armpits, lift him to his knees, then clasp your hands over the patient's abdomen and lift him to his feet; then draw his left arm around your neck and hold it against the left side of your chest, the patient's left side resting against your body, and supporting him with your right arm about the waist. Then drop the patient's left hand and grasp his right wrist with your left hand and draw the right arm over your head and down upon your left chest; then stooping, clasp his right thigh with your right arm passed between the legs (or around both legs) and with a quick heave lift the patient to your shoulders and seize his right wrist with your right hand, and lastly, grasp the patient's left hand with your left hand to steady him against your body. (Work this out with a companion as you read it.)
(b) A seat made of four arms and hands (which you have no doubt used in your play), may be used for the lesser injuries. If the patient can, he supports himself by putting his arms around the necks of his carriers, each of whom in the meantime grasps one of his own wrists and one of his partner's. This makes a comfortable seat for carrying. If the patient needs supporting, a back may be improvised by each carrier grasping the other's arm below the shoulder to form the back and their other hands clasped to form the seat. A better seat may be made with three hands clasping the wrists, while the fourth arm is used as a back, by one clasping the other's arm below the shoulder. This does not provide a very secure back, however, as it is not easy to hold the arm against much of a weight from the patient's body.
(c) Improvised Stretcher. When the patient shows any sign of shock, is unconscious, has a serious fracture of some bone or bones, has a serious injury to any part of the body, or is bleeding excessively, he must be carried lying down. It may be that there will be no regular stretcher at hand. In that case one must be improvised. A serviceable one can be made from ordinary grain or flour bags by cutting the two corners at the bottom and running two poles inside the mouth of the bags and through the holes.
A workable stretcher can be made from coats by turning the sleeves inside out, passing the poles through the sleeves and buttoning the coat over the poles. This brings the turned sleeves on the inside. A five-bar gate or a door, if it can be gotten without delay, also make satisfactory emergency stretchers.
A stretcher may also be made out of dress skirts, with or without poles. Put the skirts together, bottoms slipped past each other, and slip the poles through, as with the bags. If no poles are available, roll the edges of the skirts over several times to form a firm edge, and carry with two or four bearers, as the size and weight of the patient make necessary.
Minor Injuries and Emergencies
Minor injuries may or may not need the aid of a doctor, and you must learn to use judgment as to the necessity of sending for one. We will consider these minor injuries in groups to remember them more easily.
1. (a) BRUISES; (b) STRAINS; (c) SPRAINS
(a) A Bruise is produced by a blow which does not break the skin, but does break the delicate walls of the capillaries and smaller veins, thus permitting the blood to flow into the surrounding tissues, producing the discoloration known as "black and blue."
(b) A Strain is produced by the overstretching of muscles or ligaments, or both, but not tearing them. It may or may not be accompanied by breaking of capillary walls with discoloration. Any muscle or ligament may be strained.
(c) A Sprain is produced by the overstretching of the muscles or ligaments or both about a joint. There may also be some tearing of the fibres or tearing loose from their attachments. This always breaks capillaries or small veins, making the surface black and blue. This discoloration usually appears some time after the accident, because the broken blood vessels are far below the surface.
Treatment—For bruises and strains it is seldom necessary to call a doctor. Apply cold, either by wringing cloths out of cold water and applying, or by holding the injured part under the cold water tap. Do this at intervals of several hours, until the pain is lessened. The cold may be alternated with hot water which must, however, be quite hot, just enough not to burn, as lukewarm water is almost useless. Some patients will prefer to use only hot water. The water followed by applications of tincture of arnica, witch hazel, or alcohol and water, half and half, and bandaging will be sufficient.
If, however, there has been no black and blue at first, as in a bruise, but it begins to show later, and the pain continues severe, and there is a good deal of swelling, then you should send for a doctor, as more than first aid is needed.
In case of sprain, send for a doctor, and in the meantime elevate the joint and apply hot or cold water, or alternate hot and cold, as patient prefers. This will give relief by contracting the blood vessels.
2. (a) BURNS; (b) SCALDS; (c) SUNBURN; (d) FROSTBITE
(a) Burns are produced by dry heat, as a fire, acids, alkalis, etc., and may be of all degrees, from a superficial reddening of the skin to a burning of the tissues to the bone.
(b) Scalds are produced by moist heat, and may be of the same degrees as those produced by dry heat.
(c) Sunburn is produced by the sun, and is usually superficial, but may be quite severe.
(d) Frostbite is produced by freezing the tissues and is usually not dangerous. The more severe types will be treated later under Freezing.
Treatment—(a) Burns; (b) Scalds
1. Except in the minor burns and scalds, send for the doctor at once.
2. The first thing to do is allay pain by protecting the injured part from the air.
3. For a burn produced by fire, cover with a paste made of baking soda and water, or smear with grease—as lard, carron oil (mixture of linseed oil and lime water—half and half) or vaseline or calendula cerate. Cover with a piece of clean cloth or absorbent gauze and bandage loosely or tie in place. Gauze prepared with picric acid, if at hand, is a most satisfactory dressing. It can be purchased and kept on hand for emergencies.
4. In burns from alkalis or acids, wash off as quickly as possible and neutralize (make inactive the acids with baking soda, weak ammonia or soapsuds; the alkalis with vinegar or lemon juice). Afterward treat like other burns.
(c) Sunburn is an inflammation of the skin produced by the action of the sun's rays and may be prevented by gradually accustoming the skin to exposure to the sun. It is treated as are other minor burns.
(d) Frostbite—Prevention—1. Wear sufficient clothing in cold weather and keep exposed parts, such as ears and fingers, covered.
2. Rub vigorously any part that has become cold. This brings the warm blood to the surface and prevents chilling.
3. Keep in action when exposed to the cold for any length of time. The signs of danger are sudden lack of feeling in an exposed part, and a noticeably white area. Chilblain is an example of frostbite.
Treatment—The circulation of the blood through the frozen part must be restored gradually. This must be done by rubbing the part first with cold water, which will be slightly warmer than the frozen part, and gradually warming the water until the circulation and warmth is fully restored. Then treat as a minor burn. If heat is applied suddenly it causes death of frozen parts.
3. SPLINTERS, SMALL CUTS, SCRATCHES AND PIN PRICKS
None of these injuries will usually require a doctor if properly treated in the beginning. The bleeding from any of them is not sufficient to be dangerous. But whenever there is a break in the skin or mucous membrane there is danger of infection by germs, and this is what makes the first aid treatment in these cases so important. A tiny scratch is sometimes converted into a bad case of blood poisoning by not being properly treated at first.
Splinters should be removed by using a needle (not a pin) which has been sterilized by passing it through a flame (the flame of a match will do if nothing better is at hand). After the splinter is out, the wound is treated like a cut or scratch.
The germs which produce poisoning do not float in the air, but may be conveyed by any thing which is not sterile, as, for instance, the splinter or the instrument that did the cutting, scratching or pricking. They may be carried to the scratch by our hands, by water, or cloth used for dressings.
Treatment—Wash your own hands thoroughly with soap and water, using a nail brush. Clean the injured part well with disinfectant, as, for instance, alcohol and water, half and half, or peroxide of hydrogen—paint the spot with iodine, and cover with sterile gauze (if this is not to be had, use a piece of clean cloth that has been recently ironed), and bandage in place. If the bleeding is severe, a little pressure with the bandage over the dressing will stop it. Use the same precautions if the wound has to be re-dressed.
4. STINGS AND BITES OF INSECTS
The poison injected by the sting or bite of an insect is usually acid, and the part should be washed at once with a solution of ammonia or soda (washing soda) to neutralize the poison. Then apply a paste of soda bicarbonate (baking soda) or wet salt and bandage in place. If the sting is left in the wound it must be pulled out before beginning treatment.
5. FOREIGN BODIES IN THE (a) EYE (Cinder) (b) EAR (Insect), (c) NOSE (Button)
(a) Eye—If a cinder, eyelash, or any tiny speck gets into the eye it causes acute pain, and in a few minutes considerable redness.
Treatment—Do not rub the eye, as this may press the object into the tender cornea so that it can be removed only with difficulty and by a physician. First close the eye gently, pull the eyelid free of the ball, and the tears may wash out the speck. If this is not successful, close the eye, hold the lid free, and blow the nose hard. You may then be able to see the speck and remove it with a bit of clean cotton or the corner of a clean handkerchief. If the object is lodged under the lid, and the foregoing efforts do not dislodge it, proceed to turn the lid up as follows:
Ask the patient to look at the floor, keeping the eyeball as stationary as possible. Take a clean wooden toothpick or slender pencil, wrapped with cotton, place on the upper lid about one-fourth of an inch from the edge, grasp the eyelashes with the other hand, give a slight push downward toward the cheek with the toothpick, a slight pull upward on the lashes and turn the lid over the toothpick. Remove the speck and slip the lid back in position. Wash the eye with boric acid solution.
If you are still unable to dislodge the body, discontinue any further efforts, apply a cloth wet in cold boric acid solution and send for the doctor. Anything done to the eyes must be done with the greatest gentleness.
If an acid has entered the eye, neutralize it with a weak solution of soda bicarbonate in water. If an alkali (lime) is the offending substance, neutralize by a weak vinegar solution. Follow in each case with a wash of boric acid solution.
(b) Ear (Insect); (c) Button in Nose—Foreign bodies in the ear and nose are not very common.
But sometimes a child slips a button or other small object into these cavities, or an insect may crawl in. Drop in a few drops of sweet oil and if the object comes out easily, well and good. If not, do not keep on trying to extract it, for fear of greater injury. Send for the doctor.
6. IVY AND OAK POISONING
There is a poison ivy (or poison oak) which is very poisonous to some people, and more or less so to all people. The poison ivy has a leaf similar to the harmless woodbine, but the leaves are grouped in threes instead of fives. The poison given off by these plants produces a severe inflammation of the skin. In the early stages it may be spread from one part of the body to another by scratching.
Treatment—Wash the irritated surface gently with soap and water, and then apply a paste of soda bicarbonate or cover quickly with carbolated vaseline. Another remedy is fluid extract grindelia robusta, one dram to four ounces of water. Sugar of lead and alcohol have also been found useful. For severe cases consult a doctor, especially if the face or neck or hands are affected.
7. (a) FAINTING; (b) HEAT EXHAUSTION
(a) Fainting is caused by lack of blood in the brain, and usually occurs in overheated, crowded places, from fright or from overfatigue.
Symptoms—1. The patient is very pale and partially or completely unconscious.
2. The pulse is weak and rapid.
3. The pupils of the eyes are normal.
Treatment—1. If possible put the patient flat on his back, with the head slightly lower than the rest of the body.
2. If there is not room to do this, bend the patient over with his head between the knees until sufficient blood has returned to the brain to restore consciousness.
3. Then get the patient into the fresh air as soon as possible.
4. Keep the crowd back.
5. Loosen the clothing about the neck.
6. Apply smelling salts to the nose.
7. When the patient has recovered sufficiently to swallow, give him a glass of cold water, with one-half teaspoonful of aromatic spirits of ammonia if necessary.
(b) Heat Exhaustion is exhaustion or collapse due to overheating where there is not sufficient evaporation from the surface of the body to keep the temperature normal.
Symptoms—1. The patient is usually very weak.
2. The face is pale and covered with a clammy sweat.
3. The pulse is weak and rapid.
4. The patient is usually not unconscious.
Treatment—1. Remove the patient to a cool place and have him lie down.
2. Loosen the clothing.
3. Give him a cold drink to sip.
4. Put cold cloths on his head.
5. Send for the doctor.
6. If necessary, give stimulant as in fainting.
8. (a) CHOKING: (b) HICCOUGH
(a) Choking—Choking is produced by something lodged in the throat, does not require artificial respiration, but a smart slap on the back to aid in dislodging whatever is blocking the air passage. It may be necessary to have the patient upside down, head lower than feet, to aid in getting out the foreign body. This is a comparatively simple matter with a child, but is not so easy with an adult. When the object is not too far down the throat it may be necessary for someone to use his fingers to pull out the offending substance to keep the patient alive until the doctor can arrive. In this case wedge the teeth apart with something to prevent biting before trying to grasp the object.
(b) Hiccough—This is usually due to indigestion or overloading of the stomach. Holding the breath for one-half minute will usually cure it, as it holds quiet the diaphragm (the large muscular and fibrous partition between the chest and abdomen), and overcomes its involuntary contractions which are causing the hiccoughs. A scare has the same effect sometimes. If the hiccoughs still continue troublesome after these simple remedies try to cause vomiting by drinking lukewarm water, which will get rid of the offending material causing the hiccough, and relieve the distress.
9. NOSE BLEED
The ordinary nose bleed will soon stop from the normal clotting of the blood and does not require treatment.
(a) Keep head elevated, with patient sitting up if possible. Do not blow the nose, as this will dislodge any clot which may have formed, and the bleeding will begin again. Any tight collar around the neck should be loosened.
(b) If the bleeding seems excessive, apply cloths wrung out of ice water to the back of the neck and over the nose.
(c) If the bleeding still continues and is abundant, pack the nostril with a cotton or gauze plug. Pack tightly (with a blunt end of a pencil if nothing else is at hand) and send for the doctor at once.
Major Injuries and Emergencies
1. (a) DISLOCATIONS; (b) FRACTURES
(a) Dislocations—In a dislocation the head of a bone is pushed or pulled out of its socket. A person may be falling and in trying to save himself catch hold of something in such a way that he feels a sharp, sudden, severe pain, and may even feel the head of the bone slip out at the shoulder or elbow.
Symptoms—1. When you looked at the injured part it does not look like the other side.
2. If you attempt to move it you find it will no longer move as a joint does, but is stiff.
3. There is great pain and rapid swelling usually.
4. There may or may not be black and blue spots around the joint.
Treatment—Send for a doctor at once. While waiting for the doctor, place the patient in the easiest position possible, and apply hot or cold cloths, frequently changed, to the injured part.
In dislocation of the jaw it may be necessary for someone to try to replace it before the doctor arrives. The mouth is open and the jaw fixed. The patient may even tell you he has felt the jaw slip out of its socket. Wrap your thumbs in cloth to prevent biting when the jaw snaps back in place. Place the thumbs on the tops of the lower teeth on each side, with the fingers outside, and push firmly down until the head of the bone can slip over the edge of the socket into place. As you feel the bone slipping into place, slide your thumbs out to the inner side of the cheek to prevent biting when the jaws snap together with the reducing of the dislocation.
(b) Fractures—Broken bones—There are two classes of fractures:
1. Simple—In a simple fracture the bone is broken, but the skin is not broken; that is, there is no outward wound.
2. Compound—In a compound fracture not only is the bone broken, but the jagged ends pierce through the skin and form an open wound. This makes it more dangerous as the possibility of infection by germs at the time of the accident, or afterward, is added to the difficulty of the fracture.
Symptoms—As in dislocation, you should be familiar with the main symptoms of a broken bone.
1. When you look at the injured part it may or may not look like its mate on the other side. In the more severe fractures it usually does not.
2. When you try to move it you find more motion than there should be, if the bone has broken clear through; that is, there will seem to be a joint where no joint should be.
3. The least movement causes great pain.
4. The swelling is usually rapid.
5. The discoloration (black and blue) appears later; not at once, unless there is also a superficial bruise.
6. The patient is unable to move the injured part.
7. You may hear the grate of the ends of the bone when the part is moved, but you should not move the injured bone enough to hear this, especially if the limb is nearly straight; the detection of this sound should be left for the doctor.
Treatment—Send for a doctor at once, and if it will be possible for him to arrive soon, make the patient as comfortable as possible and wait for him. However, if it will be some time before the doctor can arrive you should try to give such aid as will do no harm and will help the sufferer.
You must handle the part injured and the patient with the utmost gentleness to avoid making a simple fracture into a compound one, or doing other injury, and also to give him as little additional suffering as possible. You will need to get the clothing off the part to be sure of what you are doing. Rip the clothing in a seam if possible when the fracture is in an arm or leg, but if this cannot be done, you will have to cut the material. Do not try to move the broken bone trying to get off a sleeve or other part of the clothing.
With the greatest gentleness put the injured part, for instance, the arm or leg, as nearly as possible in the same position as the sound part, and hold it in that position by splints. Do not use force to do this. There is no great hurry needed to set a broken bone. The important point is to get it set right, and this may better be done after complete rest of several days, allowing for the passing of the inflammation.
The Most Important "What Not to Do Points" for Fractures Are:
1. If there is reason to think a bone may be broken try in all ways to prevent motion at point of fracture lest it be made compound.
2. Do not go hunting for symptoms of fracture (such as the false point of motion or the sound "crepitus") just to be sure.
3. The best treatment is to try to immobilize the part till the doctor comes.
Splints—Anything that is stiff and rigid may be used for splints. Shingles, boards, limbs of trees, umbrellas, heavy wire netting, etc. Flat splints are best, however. All splints should be padded, especially where they lie against a bony prominence, as for instance, the ankle or elbow joint.
If the patient is wearing heavy winter clothing this may form sufficient padding. If not, then other cloth, straw or leaves may be used. Cotton batting makes excellent padding but if this is not to be had quickly, other things can be made to do to pad the first rough splints which are applied until the patient can reach a doctor or the doctor arrives on the scene of the accident.
In applying splints remember they must extend beyond the next joint below and the next joint above, otherwise movement of the joint will cause movement of the broken part.
The splints are tied firmly in place with handkerchiefs, strips of cloth, or bandages, tied over splints, padding and limb. Do not tie tight enough to increase the pain, but just enough to hold the splints firmly. Do not tie directly over the break. There must be an inner and outer splint for both the arms and the legs.
2. (a) SERIOUS WOUNDS; (b) SERIOUS BLEEDING
Send for the doctor at once, and then stop the bleeding and keep as clean as possible till he arrives.
Dangers—1. In any wound with a break in the skin, there is the danger of infection or blood poisoning, as you have already learned.
2. In serious wounds through the skin, flesh and blood vessels there is also the danger of severe bleeding, with the possibility of the patient's bleeding to death.
Infection—You already know how the germs which can cause the blood poisoning get into the wound.
(a) by the object that makes the wound
(b) from the clothing of the patient through which the wound is made
(c) from the rescuer's hands
(d) from the water which has not been sterilized used in washing the wound
(e) from dirty dressings, that is, dirty in the sense that they have on them germs which can get into the wound and cause infection or blood poisoning.
The first two of these chances the Girl Scout will not be able to control. The last three she can to some extent prevent. Do not wash, touch or put anything into a serious wound unless a doctor cannot be found. Only this sort of thing justifies running risk of infection. Otherwise just put on a sterile dressing and bandage. In reality washing wounds only satisfies the aesthetic sense of the operator without real benefit to the patient in many cases. If a wound has to be cleansed before the doctor comes use boiled water; if this cannot be had at once, use water and alcohol half and half.
1. Always wash your hands thoroughly with water, soap and a nail brush, unless there is necessity for immediate help to stop bleeding which admits of no time to clean one's hands. Be sure your nails are clean.
2. Try not to touch the wound with your hands unless it is absolutely necessary.
3. Many wounds do not have to be washed, but dressing may be applied directly.
4. Having cleansed the wound as best you can, or all that is necessary, apply sterile cloth for dressing. This may be gotten at a drug store in a sterile package ready for use immediately, and is very satisfactory. If, however, these cannot be had, remember any cloth like a folded handkerchief that has been recently washed and ironed is practically sterile, especially if you unfold it carefully and apply the inside which you have not touched, to the wound. Bind the dressing on with a bandage to keep in place until the doctor arrives.
(b) Serious Bleeding:
It is important that you should learn what is serious bleeding and this will often help you to be cool under trying circumstances.
As you learned in your work in minor emergencies, the bleeding from the small veins and capillaries is not usually sufficient to be dangerous, and the pressure of the dressing when put on and bandaged in place will soon stop it. It may sometimes be necessary to put more dressing outside of that already on (called re-inforcing it) and bandage again snugly. But if you have made sure first that there is no large vein or artery cut, you need not be troubled for fear there will be serious bleeding before the doctor arrives.
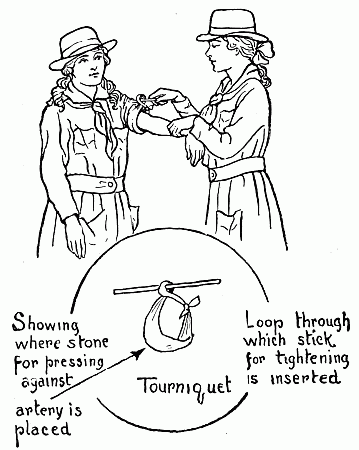
Bleeding from an Artery: If an artery is cut the blood spurts out, the size of the stream depending on the size of the artery cut. This is the most serious bleeding because the heart is directly behind, pumping the blood through the artery with all its power. If it is a small artery the pressure with the finger between the cut and the heart for a few minutes will give the blood time to clot behind the finger and form a plug. This will stop the bleeding aided by pressure of the bandage. If it is a larger vessel the force in the heart muscle pumping the blood will force out any plug formed by the finger there, as the finger tires too easily.
Tourniquet: In this case it will be necessary to put on a tourniquet to take the place of the finger until a clot can form in the vessel big enough and strong enough to prevent the force of the blood current from pushing it out. This of course can be used only on the legs or arms.
A tourniquet is something put on to make pressure on a blood vessel to stop serious bleeding. There are five points to remember about a tourniquet:
1. It must be long enough to tie around the limb—a big handkerchief, towel or wide bandage.
2. There must be a pad to make the pressure over the artery greater than on the rest of the limb—a smooth stone, a darning ball, a large cork, cloth folded into a large pad or a rolled bandage.
3. The pad must be so placed that the artery lies between pad and the bone on the limb, in order that the pressure may stop the flow of blood by forcing the walls of the artery together between the pad and the bone.
4. Unless the tourniquet is put on tight enough, its application increases bleeding. It is extremely rare to find a tourniquet put on tight enough. In almost every such case removing the tourniquet will stop or partly lessen bleeding. A short stick or handle is needed, about a foot long, with which to twist the tourniquet sufficiently to stop the flow of blood. Usually it cannot be twisted tightly enough by hand alone. Tie the twisted part firmly so it will not slip, after it has been made tight enough to stop bleeding.
5. Remember, a tourniquet stops most of the circulation below it as well as in the cut artery, and must not be left in place too long for fear of injury to the rest of the limb by cutting off the circulation. Usually it should not be left on for more than an hour.
Bleeding from Veins—Bleeding from the veins is not so dangerous as from an artery. The blood from the heart has to go through the little capillaries before it gets into the veins, and therefore the force of the heart muscle on the blood in the veins is not so great as in the arteries. The blood does not spurt out, but flows out as it would from a bottle tipped on its side.
You have already learned what to do to stop the bleeding from the smaller veins, and that it is not serious. From the larger veins, however, it can be very serious, and it may be necessary for you to put on a tourniquet before the doctor arrives in order to save the patient's life.
Almost always bleeding from a vein can be controlled by clean gauze or handkerchief pad and pressure by hand directly over the bleeding wound. Tourniquets are almost never needed in bleeding from a vein. If necessary, it is wisest to apply them in the same way as for arterial hemorrhage and stop the circulation in the whole limb.
It is important to know in a general way where the blood vessels are in order to put the pad over them to stop the bleeding. Roughly speaking, the artery of the arm runs down about in a line with the inner seam of the coat. The large vein lies close beside it, carrying the blood back to the heart. The artery and vein of the leg run about in a line with the inside seam of a man's trousers.
Stimulants—In serious bleeding of any kind do not give stimulants until the bleeding has been stopped, as the stimulants increase the force of the heart and so increase the flow of blood. After the tourniquet is on and bleeding is stopped, if the patient is very weak, he may have a teaspoonful of aromatic spirits of ammonia in half a glass of water.
(a) SHOCKS; (b) APOPLEXY; (c) CONVULSIONS
(a) Shocks—In any injury, except the slight ones, the ends of the nerves in the skin are bruised or jarred. They send this jar along the nerves to the very delicate brain. The blood is drawn from the brain into the larger blood vessels, and the result produced is called shock. If you have jammed your finger in a door sometime, perhaps you have felt a queer sick feeling and had to sit down. A cold sweat broke out all over you, and you were hardly conscious for a moment or two. This was a mild case of shock. In more severe injuries a shock to the brain may be very serious.
Symptoms of Shock—1. The patient may or may not be unconscious, but he may take no notice of what is going on around him.
2. The face is pale and clammy.
3. The skin is cold.
4. The pulse is weak.
5. The breathing is shallow.
In any serious injury the shock is liable to be severe and will need to be treated before the doctor arrives.
Treatment—Send for the doctor if serious.
1. Lay the patient flat on his back with head low, so that the heart can more easily pump the blood back into the brain.
2. Cover warmly; if they can be gotten, put around him several hot water bottles or bricks, being extremely careful to have them covered so that they will not burn him. Persons suffering from shock are more easily burnt than usual. Do not put anything hot next him unless it can be held against your own face for a minute without feeling too hot.
3. Rub the arms and legs, toward the body, but under the covers.
4. Give stimulants only after the patient has recovered enough to swallow, and when there is no serious bleeding.
Stimulants—Strong, hot coffee, or a half teaspoonful of aromatic spirits of ammonia in a half glass of warm water. The latter may be given if the coffee is not ready.
(b) Apoplexy—When a person has a "stroke" of apoplexy send for the doctor at once.
This condition resembles shock only in that the patient is unconscious. The blow to the delicate brain does not come from the outside along the nerves, but from the inside by the breaking of a blood vessel in the brain, letting the blood out into the brain tissue and forming a clot inside of the brain, and thus making pressure which produces the unconsciousness.
Symptoms of Apoplexy—1. The patient is unconscious.
2. The face is usually flushed—red.
3. The skin is not cold and clammy.
4. The pulse is slow and full.
5. The breathing is snoring instead of shallow.
6. The pupils of the eye are usually unequally dilated.
Treatment—1. Lay the patient flat on his back with head slightly raised.
2. Do not give any stimulants.
3. Wait for the doctor.
(c) Convulsions—This condition resembles the foregoing shock and apoplexy in that the patient is unconscious.
Symptoms of Convulsions—1. The patient is unconscious.
2. The face is usually pale at first, but not so white as in shock, and later is flushed, often even purplish.
3. The skin is not usually cold.
4. The breathing may be shallow or snoring.
5. There are twitchings of the muscles of the face and body or a twisting motion of the body.
6. The pulse may be rapid, but is usually regular.
7. The mouth may be flecked with foam.
8. The pupils of the eye may be contracted or equally dilated.
Treatment—Convulsions come from various causes, and are always serious, therefore send for the doctor at once.
1. Put a wedge of some kind between the teeth if possible, the handle of a spoon protected by a cloth cover, or a rolled napkin does well. This is to prevent biting the tongue, which the patient is apt to do in unconsciousness with convulsive movements.
2. Lay the patient flat on his back, and prevent him from hurting himself in his twisting, but do not try to stop convulsive movement. It will do no good.
3. No stimulant is needed.
(a) SUNSTROKE; (b) FREEZING
(a) Sunstroke—Sunstroke is caused by too long exposure to excessive heat, or to the direct rays of the sun, and is much more serious than heat exhaustion, which you have already studied.
Prevention—Do not stay out in the direct sunlight too long on a hot summer day. Wear a large hat which shades the head and face well, if obliged to be in the hot sun for any length of time. Do not wear too heavy clothing in the hot weather. Leaves or a wet sponge in the top of the hat will help to prevent sunstroke. Drink plenty of cool water between meals.
Symptoms of Sunstroke—1. The patient is unconscious.
2. The face is red.
3. The pupils large.
4. The skin very hot and dry, with no perspiration.
5. The pulse is full and slow.
6. The breathing is sighing.
Treatment—1. Get the patient into the shade where it is as cool as possible.
2. Send for the doctor.
3. Remove the greater part of the clothing.
4. Apply cold water or ice to the head, face, chest and armpits.
Often the patient recovers consciousness before the doctor arrives; give cold water to drink; never stimulants.
(b) Freezing—This is a much more serious condition than frostbite, which you have studied, but only because more of the body is frozen and the tissues are frozen deeper. Much more care must therefore be taken to prevent bad effects after the thawing-out process.
Symptoms of Freezing—1. The patient may or may not be unconscious.
2. The frozen parts are an intense white and are without any feeling or motion.
Treatment—Send for the doctor at once.
1. Take the patient into a cold room.
2. Remove the clothing.
3. Rub the body with rough cloths wet in cold water.
4. Very gradually increase the warmth of the water used for rubbing.
5. Increase the temperature of the room gradually.
6. When the patient can swallow, give him stimulants.
7. When the skin becomes more normal in color and the tissues are soft, showing that the blood is once more circulating properly through the frozen flesh, cover the patient warmly with hot bottles or bricks outside of the bed clothing, or wraps, and give hot drinks. In using hot water be sure it is not too hot.
Dog Bite[3]
In the case of the dog bite we have a more or less extensive break in the skin and sometimes a deep wound in the flesh, through which the poison of hydrophobia, which is a living virus or animal poison, may be introduced, to be taken up slowly by the nerves themselves, reaching the central nervous system in about forty days. The slowness and method of this absorption renders the use of a ligature useless and unsafe. The treatment for dog bite is therefore as follows:
Immediate. Send for a physician, telling him the reason. While waiting, treat as any similar wound from any cause. If the skin is not penetrated, but scratched only, apply iodine and a sterile or wet dressing. If the skin is penetrated, the treatment should be the same as for a wound made by a dirty nail: that is, a small stick, such as a match, whittled to a point, with a little cotton twisted on the point, should be dipped into tincture of iodine, and twisted down into the full depth of the wound, and then done a second time.
Subsequent. A physician should be consulted immediately, and if there is any suspicion of the dog being sick it should be kept under observation. The body of a dog that has been killed under suspicion of rabies or hydrophobia, should be sent as soon as possible to the proper authorities.
One of the greatest discoveries in medical science is the Pasteur treatment for the prevention of hydrophobia after mad dog bite, and fortunately, provision for this treatment is so widespread that practically every one in civilized regions needing it, can have it, as is well known to all physicians. The fact that the period of development of the disease is so long makes the possibility of prevention greater.
It is never proper to suck a dog bite, because the merest scratch or break in the surface, even if too small to notice, will serve as a portal of entry for the living virus of rabies.
Snake Bite. For treatment of snake bite see page 297.
WATER ACCIDENTS
When it is possible, Girl Scouts should learn to swim well. It is fear when suddenly thrown into the water that causes so many of the deaths by drowning, and learning to swim well takes away this fear. A Girl Scout should also learn how to prevent accidents, and how best to help the victims of accidents in the water.
Prevention
Below are five rules for preventing drowning accidents.
1. Do not change seats in a canoe or rowboat.
2. Do not rock the boat.
3. Do not go out alone in a canoe, rowboat or sailboat unless you are thoroughly competent to manage such a boat, in a sudden squall or storm.
4. Very cold water exhausts a swimmer much quicker than warm water, therefore do not take any chances on a long swim in cold water unless a boat accompanies you to pick you up in case of necessity.
5. Be careful not to go too far out when there is a strong undertow; that is, a strong current below the surface of the water flowing relentlessly out to sea.
6. Always wade upstream.
Rescue
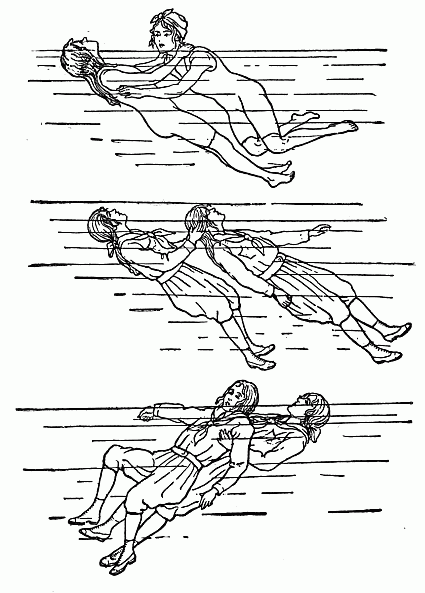
When a person gives up the struggle in the water, the body goes down, and then because of its buoyancy it comes to the surface and some air is expelled from the lungs, making the body less buoyant. It immediately sinks again, this time a little lower, and again comes to the surface, and more air is expelled. This process may be repeated several times, until sufficient water is taken into the stomach and lungs to overcome the buoyancy of the body and it no longer appears at the surface; but the buoyancy is barely overcome, and therefore the body will float easily. This can easily be utilized in saving the drowning person by making the water carry most of the weight of the body.
To do this, place the hands on either side of the drowning person's head, and tow him floating on his back with the face above the surface of the water, while you swim on your back and keep the body away from you. Remember, if possible, to go with the current and thus save necessary strength. In some cases it may be easier and safer to grasp the drowning person by the hair instead of trying to clasp the head.
Emergencies
Grips—A drowning person is always a frightened person, and is governed by a mad instinct to grab anything which subconsciously he thinks may save his life. Usually he is past any reasoning. He grabs his would-be rescuer with a death grip that is hard to break, but remember he instinctively grabs what is above the surface and will not try to grab below the shoulders.
Wrist Grip—If the drowning person grasps the rescuer's wrists, the rescuer throws both hands above his head, which forces both low in the water, and then turns the leverage of his arms against the other's thumbs and breaks the grip.
Neck Grip—To release a grip around the neck and shoulders from the front, immediately cover the mouth of the other with the palm of the hand, holding the nose between the first two fingers, and at the same time pull the other body toward you with the other hand, meanwhile treading water. Then take a full breath and apply your knee to the other's stomach quickly, thus forcing him to expel any air in his lungs and preventing him from getting more air by the hand on mouth and nostrils.
If the grip of the drowning person does not allow use of the arms, then try to raise your arms to the level of the shoulder, thus slipping his arms to the neck and leaving your own arms free to use, as described.
Back Grip—This strangle hold is perhaps the most difficult to break, and it is necessary to break it instantly if the rescuer is not also to be in the rescued class.
Grasp the wrists of the other and push sharply back with the buttocks against the abdomen of the other, and thus make room to slip suddenly out of the encircling arms.
If this is not successful, do not despair, but throw the head suddenly against the nose of the drowning person and then slip out of the grip before he recovers from his daze.
It is often necessary to dive from the surface in rescuing a drowning person, and this requires practice, and should be learned thoroughly before the necessity for saving a life is presented. Remember that to dive from the surface to a depth of more than ten feet will usually require a weight in addition to the weight of the body. Carry a stone or other heavy object in diving. Then when wishing to rise to the surface, drop it and push against the bottom with the feet. This will send the swimmer to the surface in short order.
In carrying a weight in the water, carry it low on the body, close to the waist line, leaving one hand and both feet free for swimming. Or if for any reason it is necessary to swim on the back, it leaves both feet free to use as propellers.
Artificial Respiration
If the apparently drowned person is to be saved, no time must be lost in the rescue from the water or in getting the water out of him, and breathing re-established after he is brought to land.
If there is a messenger handy send for a doctor at once, but in the meantime lose no time in attempting restoration.
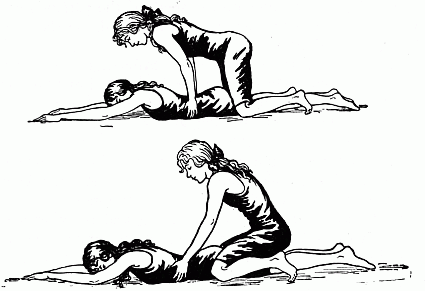
The best method for getting the water out of the lungs and breathing re-established is the Schaefer Method, because it is the simplest, requiring only one operator and no equipment. It can be kept up alone for a long time.
1. Every moment is precious. Immediately lay the patient face downwards, with the arms extended above the head and the face to one side. In this position the water will run out and the tongue will fall forward by its own weight, and not give trouble by falling back and closing the entrance to the windpipe. Be sure there is nothing in the mouth, such as false teeth, gum, tobacco, etc. Do not put anything under the chest. Be sure there is no tight collar around the neck.
2. Kneel astride of the patient facing toward his head.
3. Place your hands on the small of the patient's back, with thumbs nearly touching and the hands on the spaces between the short ribs.
4. Bend slightly forward with arms rigid so that the weight of your body falls on the wrists, and makes a firm steady pressure downward on the patient while you count one, two, three, thus forcing any water and air out of the lungs.
5. Then relax the pressure very quickly, snatching the hand away, and counting one-two—the chest cavity enlarges and fresh air is drawn into the lungs.
6. Continue the alternate pressing and relaxing about twelve to fifteen times a minute, which empties and fills the lungs with fresh air approximately as often as he would do it naturally.
It may be necessary to work for an hour or two before a gasp shows the return of natural breathing. Even then the rescuer's work is not over, as it will be necessary to fill in any gaps with artificial breathing. When natural breathing is established, aid circulation by rubbing and by wrapping him in hot blankets and putting hot bottles around him, being careful that they are protected to prevent burning the patient.
If at any time it is necessary to pull the tongue forward and to hold it to prevent choking, remember to put a wedge between the teeth to prevent biting. Do not give anything liquid by mouth until the patient is conscious and can swallow readily. Aromatic Spirits of Ammonia or Spirits of Camphor may be used on a handkerchief for the patient to smell. The patient should be watched carefully for an hour or two even after he is considered out of danger.
ICE RESCUE
Prevention: Below are two rules for preventing ice accidents:
1. Do not skate or walk on thin ice.
2. Watch for air holes.
Rescue: In trying to rescue a person who has broken through the ice, always tie a rope around your own body and have this tied to some firm object on shore. Do not try to walk out to the rescue as the ice will probably break again under the weight of your body on so small an area as the size of your feet. Always get a long board, ladder, rail or limb of a tree, and either crawl out on this, which will distribute the weight of your body over a larger surface of ice, or lie flat on your stomach and crawl out, pushing the board ahead of you so that the person in the water may reach it. If you yourself break through the ice in attempting a rescue, remember that trying to pull yourself up over the edge of the ice only breaks it more. If rescuers are near it is much wiser to support yourself on the edge of the ice and wait for rescue.
After getting the person out of the water use artificial respiration if necessary and bend every effort to get the patient warm and breathing properly.
ASPHYXIATION
Prevention: Below are seven rules for preventing asphyxiation:
1. When coal stoves and furnaces are freshly filled with coal, coal gas may escape if the dampers are not properly regulated. See that all dampers in coal stoves and furnaces are correctly arranged before leaving them for any long time, as for the night.
2. Do not go to sleep in a house or room with a gas jet or gas stove turned low. The pressure in the pipes may change and the flame go out, or a breeze may blow out the flame leaving the gas leaking into the room.
3. Do not blow out a gas jet.
4. Be careful to turn off gas jet completely.
5. Report gas leaks promptly.
6. Charcoal stoves and braziers are especially dangerous from escaping gas and should not be used in sleeping rooms.
7. Do not go into unused wells or underground sewers without first lowering a lighted candle which will go out at once if the air is very impure, because of lack of oxygen to keep it burning.
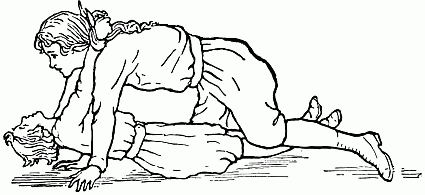
Rescue: 1. Remove the patient at once to the fresh air. Gas is lighter than air, and therefore will not be found close to the floor and it will often be possible to crawl out when one would be overcome by the gas if he tried to walk out. For this reason it is sometimes best in trying to rescue anyone already unconscious from gas to tie the wrists together with a handkerchief, put his arms around your neck, and crawl out on all fours, dragging the insensible body with you, under your own body. If you attempt to walk out and carry the patient, cover your mouth and nose with a wet handkerchief, go very quickly, do not breathe until you reach the fresh air.
2. If there is a messenger handy, send for the doctor at once, but in the meantime if necessary, perform artificial respiration as outlined under the Schaefer System in the preceding paragraphs, until the patient is restored to normal breathing.
ELECTRIC SHOCK
This is caused by some part of the body coming in contact with a live electric wire. The seriousness of the shock depends on how heavy a charge of electricity the wire is carrying at the time.
The patient is usually unable to release himself from the wire. The first thing to be done, if possible, is to turn off the current by means of the switch, but if this cannot be done at once, the patient must be rescued by pulling him away from the wire.
Remember his body will easily carry the charge to yours while he is against the wire. Therefore you must "insulate" yourself—that is, put on your hands something that will not let the electricity into your body—or stand on something that will "insulate" you; for instance, rubber gloves or rubber tobacco pouches, dry silk handkerchiefs, other silk garments or newspapers used in place of gloves if necessary. Stand on a rubber mat or on dry boards, or glass, or in dire necessity dry clothes can be used to stand on. They must not be wet as then they will carry the electric current through your body and you must also be rescued instead of rescuing.
Prevention: 1. Do not touch the "third rail" of electric railways.
2. Do not catch hold of swinging wires, they may be "live wires."
3. Report broken wires to the right authorities.
Treatment:
1. Get patient loose from the current.
2. Send for the doctor.
3. Lay the patient flat on his back.
4. Loosen the clothing, and perform artificial respiration according to the Schaefer method if necessary.
5. Give first aid treatment to the burns.
FIRE ACCIDENTS
The first thought about a fire is to get it put out before it spreads any further. There are methods which will do this work effectually and Girl Scouts should learn these methods beforehand thoroughly, in order that when the emergency arises they may act quickly, coolly and effectively.
Fire in Clothing
If this happens in your own clothing, do not run for help, as the draft made by the motion of your body will only fan the flames to burn fiercely.
Grab the nearest thing that will cover you; overcoat, blanket, rug, wrap it tightly around you at the neck first to prevent flames from burning the face and lie down and roll over and over. This will smother the flames quickly. If you can get nothing to wrap around you, lie down and roll slowly over and beat the fire with your hands covered by some part of your clothing not on fire.
If the fire is in the clothing of another, wrap him in the nearest thing available, lay him on the floor and roll him over, smothering the flames as described before.
Woolen material will not catch fire as easily as cotton, therefore, if you have a chance to choose, take woolen material for smothering the flames.
Results
Results of fire in the clothing are sure to be more or less serious burns.
When you have discovered the extent of the burn, if it is at all serious, send for the doctor at once, and in the meantime treat the burn as you have already learned to do in minor burns.
Fire in Buildings
Keep cool, in order to remember what to do, and do it quickly.
Turn in a fire alarm at once. Send some one else if possible who may not know what to do to the fire. The quickest way is by telephone call, "Fire Department," and tell them the exact address of the building where the fire is. Or you may go to the nearest alarm box, smash the glass, open the door, and pull down the hook that sounds the alarm. (Generally the directions are printed on the box.) If you cannot sound the alarm alone, call upon the nearest person to help you. Wait there until the firemen arrive and direct them to the fire. When the firemen come do just as they tell you, for they know exactly what to do.
People trying to escape from a burning building often get frightened and then there is a panic. Panic kills more people than fire. Keep cool, and others will follow your example.
Never jump from a window unless the flames are so close that it is your only means of escape. If outside a burning building put mattresses and bedding piled high to break the jumper's fall and get a strong hold on a rug to catch the jumper, and let many people hold the rug.
If the fire is just beginning, it can easily be put out by smothering it with a rug or blanket; sand, ashes, salt, or a few pails of water will answer the same purpose.
Keep the doors and windows closed if possible to prevent draughts from fanning the flames to fiercer effort.
Remember this point when you go into a burning building, and leave some responsible person guarding the door, in order that it may not be left open by some one in excitement and the flames fanned beyond control.
If you need fresh air in your search for people in a burning building, open a window, put out your head and draw your lungs full of fresh air and then close the window again. In any case it is best to tie a wet handkerchief or towel over the nose and mouth while in a burning building, as this will prevent you from breathing a good deal of smoke.
In searching for persons remember always to begin at the top of the building if possible, and search every room. When on stairs keep to wall side, where air is relatively free from flames and smoke. If a room is locked, try to rouse the people by pounding and calling and then break in the door if unsuccessful in rousing them, and you suspect there is some one there.
Remember, the air within six inches from the floor is usually free from smoke, and if the smoke makes breathing too difficult, you can still accomplish your end by crawling along the floor and dragging the rescued one with you as you learned to do in gas rescue.
Form a bucket brigade from the fire to the nearest water supply; passing the filled pails from one to another rapidly, the last throwing the water on the fire and passing the empty pails back along another line to be filled again and passed on as before.
Fires from Kerosene, Gasoline, Benzine
Prevention.—1. Do not light a fire with kerosene.
2. Do not clean gloves or clothing with gasoline or benzine in a room with a lamp or gas jet lighted.
3. Do not try to dry clothing that has been cleaned with gasoline or benzine near a hot stove or lighted gas jet.
Extinction.—Do not use water to put out a fire of kerosene, benzine, or gasoline, as that only scatters the flames. Smother with blankets, rugs, sand, ashes, salt, or anything which is at hand and can be used; remember that woolen will not catch fire as easily as cotton.
COMMON POISON AND ANTIDOTES
Poisoning—Cases of poisoning happen most often because people do not examine the bottles before taking medicines from them.
Prevention—Disinfectants, liniments and medicines in bottles and boxes should be correctly and plainly labelled.
Bottles containing a poisonous substance should be rough outside, or with notched corks or marked with something beside the label stating that their contents are poison.
Treatment—1. Send for the doctor at once, telling him what kind of poison you think the patient has taken in order that he may bring the right antidote and the right implements to give the quickest and most effective relief.
2. Give demulcent or mucilaginous drinks, as for example, milk, raw egg, one or two tablespoonfuls of salad oil, sweet oil, or barley water—which can be obtained most readily.
3. Give something to produce vomiting, provided the lips are not burned or stained as they are with an acid or alkali. A simple but effectual emetic can be made by mixing two teaspoonfuls of salt or a tablespoon of mustard in a glass of lukewarm water. This may be repeated if necessary.
4. If the patient seems drowsy, suspect opium and keep patient awake at all costs till the doctor arrives.
5. If delirium threatens, dash cold water on the patient's head and face to try to prevent the fit from coming on.
6. When the poison taken has been acid, the antidote should be an alkali, but different poisons require different antidotes, and it would be unwise to trust to one's memory as to the proper one to take in each case. It would be well to have a list of the more common poisons and their antidotes attached to the First Aid Kit, but do not trust to the memory. If a Girl Scout does not know, and if the patient's lips are not stained or burned, give an emetic.
Bandages
Bandages form the most convenient way of keeping dressings on wounds and for making pressure when necessary. They are also used to correct some deformities, but you will not need to concern yourselves with the latter, as this is in the province of doctors.
There are three varieties of bandages which you will need to use and with which you should be familiar: the roller, triangular and four-tailed. The materials used for bandages are absorbent gauze, muslins or flannels. The kind you will use most will be gauze and muslin. The gauze is best to use in dressing wounds because it is pliable and absorbent, and muslin, if you may choose, in applying pressure, because it is firm. In an emergency there will usually be little chance to choose. Anything at hand, as underclothing, sheets, blankets, etc., may be torn into strips or triangles and used. Have the material which is used clean if possible.
The width of the roller bandage depends on the part of the body to be bandaged, from one inch for the little finger to four inches for the body. They can be rolled very well by hand with a little practice, and every Girl Scout should learn to do this or to improvise a bandage roller by running a very stiff wire through a small wooden box and then bending one end on the outside of the box like a handle.
A bandage must be rolled sufficiently tight so that the center will not fall out. By folding one end back and forth a few times to make a core, and then laying the bandaging over one's knees lengthwise of the thigh with the core uppermost, it can be rolled quite tightly and answer every purpose for emergencies.
Learn to put on all bandages smoothly and securely, but not too tightly.
Triangular Bandages—These bandages have advantages for first aid work. They can be quickly made, easily applied and are not apt to be put on too tightly even by a beginner.
The size of the piece of cloth varies with the part to be bandaged. Take a square piece of cloth (it should not be less than 34 to 38 inches), fold it diagonally from corner to corner and cut across the fold, making two bandages.
The bandage may be applied unfolded or folded into a narrow strip, called cravat bandage.
To fold the cravat bandage, the point of the triangle is brought to the middle of the diagonal side and the bandage folded lengthwise to the desired width.
The cravat bandage is convenient to use in bandaging the hand, foot, head, eyes, throat and jaw; for tying on splints; for tying around the limb in case of snake bite, and in making a tourniquet.
Always tie the bandage with a square knot to prevent slipping. Care must be used in applying the triangular bandage to have it smooth and firm, folding the loose ends into pleats evenly.
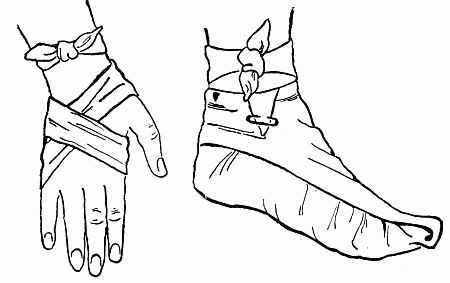
Bandage for Hand—For wound of the palm, lay cravat in straight line, place palm across it at the middle. Fold ends over the back of hand, carry around wrist and tie. Reverse the order for injury to the back of the hand.
To cover entire hand, unfold cravat, lay flat with point of triangle beyond the fingers. Fold the point of the bandage over the fingers, cross the ends, and pass around wrist and tie at the back.
Bandage for Foot—Place foot on the smooth triangle with the point extending beyond the toes several inches. Fold the point back over the instep, cross the ends, carry around the ankle and tie.
Bandage for the Head—The bandage may be used flat or as a cravat, according to the nature of the injury and the part to be bandaged.
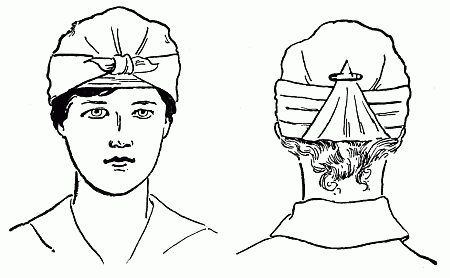
For a cap bandage, fold over the edge of the diagonal edge, place on the head with the folded edge just above the eyes; pleat the edges hanging down over the ears into small folds so that the bandage lies smoothly; carry the ends around the head; cross at the back, and tie in a square knot in front. The cravat bandage may be used to hold on small dressings where the whole head does not need to be covered.
For the eyes, jaw and throat the triangular bandage is used by folding smoothly into a cravat and tying securely over the part to be covered.
Arm Sling.—The triangular bandage makes the best arm sling to support the forearm or for supporting injuries to the elbow or shoulder.
An arm sling is firmer and more satisfactory if the triangle is double; that is, simply fold over the square diagonally, but do not cut it along the fold. An arm sling will need to be about a yard square before folding.
To adjust the arm sling, put one end over the shoulder on the uninjured side; slip the point of the triangle under the injured arm, so that it will extend beyond the elbow a few inches; then take the end of the bandage over the arm, carry around the back of the neck on the injured side, meeting the other end; and tie securely. To prevent slipping, pin the point of the bandage around the arm just above the elbow.
A temporary sling can be made by pinning the sleeve of the injured arm to the dress or coat in such a way as to support the arm.
The Four-tailed Bandage—This bandage is useful for bandaging the head, and especially in fracture of the jaw. Use a piece of cloth about six or eight inches wide and a yard long. Cut each end into two equal parts, leaving about three or four inches in the middle uncut.
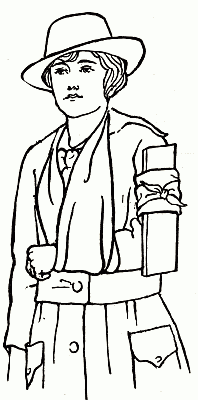
When the bandage is applied, the split ends are crossed so that they may be tied over different parts of the head and thus hold the bandage more securely in place. For instance, in the jaw bandage the uncut middle part is placed over and under the chin, the ends crossed, and two ends tied at the back of the neck and two over the top of the head.
Roller Bandages—Roller bandages are a little more difficult to put on so that they will stay on, and at the same time be smooth and have a uniform pressure on the part of the body bandaged. This last point is most important.
Rules for applying roller bandages:
1. Lay external surface of bandage against the part to be bandaged, holding the roll in the right hand, unless you are left-handed, unrolling it as a roll of carpet unrolls to show you a pattern in the shops.
2. Hold the loose end with the left hand and catch it with two or three turns of the bandage before beginning to put on the bandage. Never have more than four or five inches of the bandage unrolled at once.
3. Be careful to have the same pressure from every turn of the bandage. This is most important if the bandage is to stay on and be comfortable and not interfere with the circulation of the blood. Judgment of the pressure is only acquired by practice, and therefore you should practice enough to acquire this before the real emergency happens.
4. Do not bandage too tightly. Blueness of the skin above or below the bandage always means the bandage must be loosened. Remember in applying a bandage immediately after an injury that considerable swelling may occur later, and apply your bandage more loosely than if bandaging after the swelling has gone down. Always loosen a bandage that is tight enough to cause pain or blueness.
5. Bandage from below upward. That is, from the tip of a finger or toe toward the hand or foot. From the hand or foot toward the shoulder or groin. This is in the general direction of the return of the circulation.
6. Bandage over a splint and not under it.
7. Bandage arms, legs, fingers, etc., in the position the patient is to keep the part in when the bandaging is completed. For instance, bend the elbow to a right angle before putting on the arm bandage. This will be more comfortable for the patient, allowing him to carry the arm easily in a sling and also permit him to use the hand to some extent if the nature of the injury will permit. In bandaging a leg both above and below the knee, the bandage must be put on with a view to the necessary bending of the knee in walking and sitting, if the patient is expected to use the leg.
8. Never apply a wet bandage, as you cannot judge of just how much pressure will be exerted when the bandage dries, because of the shrinkage of cloth with drying; much greater in some cloth than in others.
Kinds of roller bandages:
1. Circular for parts uniform in size, as the body.
2. Spiral for conical surfaces, as fingers or toes.
3. Reverse for more conical surfaces, as arms and legs.
Circular Bandages—Any part of the body which is of uniform size may be covered with a circular bandage. Each turn covers about two-thirds of the previous turn. This holds each turn firmly and prevents slipping and exposing the dressing or wound underneath. Bandage in general direction of the return of the blood to the heart. Fasten the bandage with a strip of adhesive plaster or safety pin. If there is possibility of restlessness or much activity on the part of the patient, it is best to run several narrow strips of adhesive plaster along the whole width of the bandage when finished to prevent possible slipping of the turns of the bandage when the muscles move under it with the activity of the patient. This is especially true of a body bandage.
Spiral Bandage—A conical part, if not too conical, may be covered with a spiral bandage. Each turn ascends at a slight angle, with one edge of the bandage a little tighter than the other. In putting on this kind of bandage it is necessary to learn to have the tight edges all of a uniform pressure and each turn overlap the turn below in such a way that these tight edges make the uniform pressure without regard to the upper edge underneath, which is covered in each turn by the tighter edge of the turn above it.
Reverse Bandages—The reverse bandage is a modification of the spiral one, in order to cover the gapping between spirals which occurs when the surface is very conical, as, for instance, on the leg.
In putting on this bandage the loose end is caught by two or three turns first as in other bandages. Then start to make a spiral turn, but at the mid point of the front of the part being bandaged place the thumb of the left hand, and fold the bandage down so that it lies smoothly and continue the turn around to that same point. Repeat the process with each turn. (See illustration.) Each turn covers two-thirds of the one below in order to hold firmly. The pressure must be uniform when the bandage is finished. Fasten the ends as described under circular bandages, or divide the end of the bandage into two parts for several inches—long enough to wind around the part bandaged. Tie a single knot at the base to prevent further dividing, and wrap the ends around the part in different directions; tie in a hard knot to hold firmly.
Bandaging Fingers and Toes—In bandaging fingers and toes it is usually best to bandage the whole of the injured member. Cover the end of the finger, for instance, by passing the end of the half inch or one inch bandage several times the whole length of the finger, over the end and to the base of the other side. Hold this in place with one hand, start the spiral at the end of the finger, and bandage smoothly toward the hand. The spiral or the reverse spiral may be used.
Bandaging Two or More Fingers or Toes—It is sometimes necessary to bandage two or more fingers, for instance, at once, as in case of a burn, where it is necessary always to have the burned fingers separated while healing to prevent the raw places from growing together.
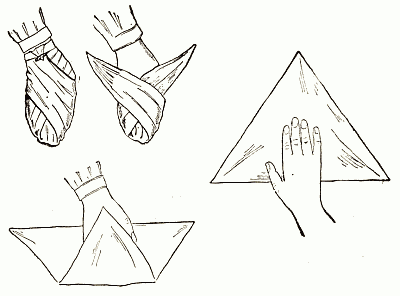
Pass a finger bandage twice around the wrist and pass obliquely to the base of the thumb. Carry to the end of the thumb and bandage as described above. When the thumb is bandaged, carry the bandage back to the wrist; pass around the wrist in one or two circular turns, and carry the bandage to the first finger and bandage as before. Repeat this until all the fingers are bandaged. Carry the bandage back to the wrist, after the last finger you wish to bandage is done; make one or two turns around the wrist and fasten.
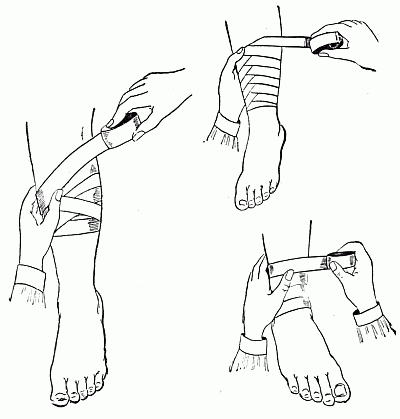
In bandaging the foot, carry the bandage to the ankle to make secure and hold in place.
Bandaging Arms and Legs—The reverse spiral is usually best for bandaging these, because of the conical shape. Practice alone can teach you to put this on smoothly, firmly, not too tightly, and at the same time quickly. A reverse bandage will not stay in place on the leg of the person walking around unless pinned in many places or stuck by sizing in the cloth (which has been wet), plaster, etc. Only a figure eight caught over the top of the calf, in each alternate loop, will do so.
The Figure Eight Bandage—The figure eight is a modification of the spiral used in bandaging over joints in such a way as to permit some motion and at the same time keep the bandage firm and in place.
The bandage is carried first below and then above the joint; then below and then above, the turns overlapping the usual two-thirds of the width of the bandage, leaving the joint free until the last. Then it may be covered with two or three circular turns of the bandage. This admits of considerable motion without disturbing the bandage to any extent.
The National Red Cross and Girl Scout Instruction in First Aid
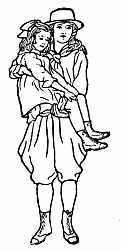
By special arrangement with the National Red Cross, it is possible for a Girl Scout completing satisfactorily the requirements for the First Aid Proficiency Badge to secure with slight additional work the Red Cross certificate in First Aid. Or the course may be taken entirely under Red Cross auspices, though arranged by Scout officials, in which case the Scout may receive both the Proficiency Badge and the Red Cross certificate. The conditions of this co-operation between the Girl Scouts and the National Red Cross are as follows:
Classes are to be organized with not less than four or more than twenty-five in a class. The best size is ten to fifteen. Scouts must be at least sixteen years of age to be admitted to these classes.
The instructor must be a physician appointed by the Chairman of the First Aid Committee of the local Chapter of the Red Cross. He or she may be supplied upon request by the Chapter, or chosen by the class and the name submitted to the Chapter for appointment.