PRACTICAL NOTES ON PLUMBING.1
Reading edition
PRACTICAL NOTES ON PLUMBING.1
By P.J. DAVIES, H.M.A.S.P., etc.
TINNING IRON PIPES, COPPER OR BRASS-WORK, BITS, ETC.
Previously, I described the method of tinning the bit, etc., with resin; but before this work on joints can be considered complete, I find it necessary to speak of tinning the ends of iron pipes, etc., which have within the last fifty years been much used in conjunction with leaden pipes. This is done as follows: Take some spirits of salts (otherwise known as hydrochloric acid, muriatic acid, hydrogen chloride, HCl), in a gallipot, and put as much sheet-zinc in it as the spirit will dissolve; you have then obtained chloride of zinc (ZnCl). A little care is required when making this, as the acid is decomposed and is spread about by the discharged hydrogen, and will rust anything made of iron or steel, such as tools, etc. It also readily absorbs ammoniacal gas, so that, in fact, sal ammoniac may also be dissolved in it, or sal ammoniac dissolved in water will answer the purpose of the chloride of zinc.
Having the killed spirits, as it is sometimes called, ready, file the end of your iron or bit and plunge this part into the spirits, then touch your dipped end with some fine solder, and dip it again and again into the spirits until you have a good tinned face upon your iron, etc.; next you require a spirit-brush.
SPIRIT-BRUSH.
You can make this by cutting a few bristles out of a broom or brush, push them into a short piece of compo tube, say ¼ in., and hammer up the end to hold the bristles; next cut the ends of the bristles to about 3/8 in. long, and the brush is ready for use.
SOLDERING IRON TO LEAD.
Suppose you want to make a joint round a lead and iron pipe. First file the end of your iron pipe as far up as you would shave it if it were lead, and be sure to file it quite bright and free from grease; heat your soldering-iron; then, with your spirit-brush, paint the prepared end of your iron, and with your bit, rub over the pipe plenty of solder, until the pipe is properly tinned, not forgetting to use plenty of spirits; this done, you can put your joint together, and wipe in the usual manner. Caution.—Do not put too much heat on your iron pipe, either when tinning or making the joint, or the solder will not take or stand.
DUMMIES FOR PIPE-BENDING.
FIGS. 38. and 38b.
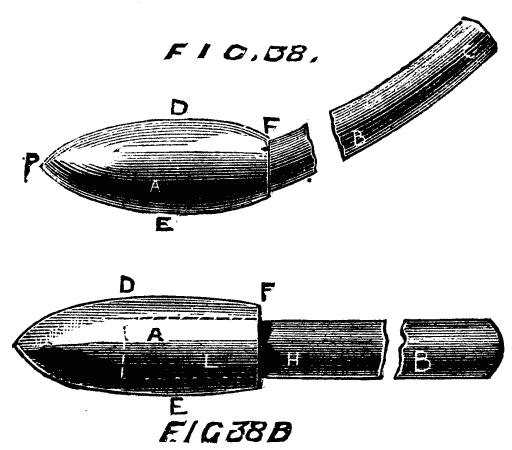
Figs. 38 and 38b. This tool I had better describe before proceeding to the method of bending. To make it take a piece of, say, ½ in. iron pipe, 3 ft. long, or the length required, bent a little at one end, as shown at A B in Fig. 38 and Fig. 38b. Tin the end about 2 in. up, make a hole with a small plumbing-iron in some sand, and place the tinned end of the iron pipe, B, into this hole; fill the hole up with good hot lead, and the dummy, after it has been rasped up a little, is ready for use. It will be found handy to have three or four different lengths, and bent to different angles, to suit your work. A straight one (Fig. 38b.) made to screw into an iron socket or length of gas-pipe, will be found very handy for getting dents out of long lengths of soil-pipe.
BENDS AND SET-OFFS.
Before you begin bending solid pressed pipes always put the thickest part of your pipe at the back. Lead, in a good plumber's hands, may be twisted into every conceivable shape; but, as in all other trades, there is a right and a wrong way of doing everything, and there are many different methods, each having a right and wrong way, which I shall describe. I shall be pleased if my readers will adopt the style most suitable for their particular kind of work; of course I shall say which is the best for the class of work required.
For small pipes, such as from ½ in. to 1 in. "stout pipe," you may pull them round without trouble or danger; but for larger sizes, say, from 1¼ in. to 2 in., some little care is necessary, even in stout pipes.
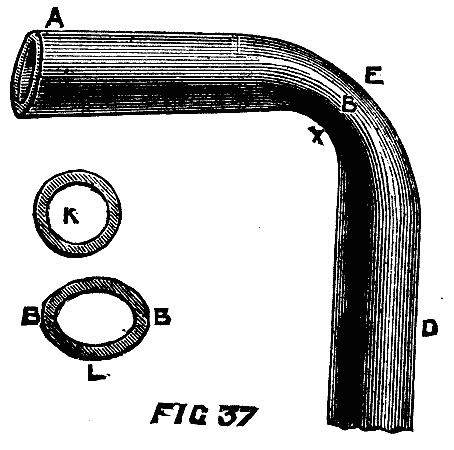
Fig. 37 illustrates a badly made bend, and also shows how it comes together at the throat, X, and back, E; L is the enlarged section of X E, looking at the pipe endways. The cause of this contraction is pulling the bend too quickly, and too much at a time, without dressing in the sides at B B as follows: After you have pulled the pipe round until it just begins to flatten, take a soft dresser, or a piece of soft wood, and a hammer, and turn the pipe on its side as at Fig. 37; then strike the bulged part of the pipe from X B toward E, until it appears round like section K. Now pull your pipe round again as before, and keep working it until finished. If you find that it becomes smaller at the bend, take a long bolt and work the throat part out until you have it as required.
FIG. 37.
BENDING WITH WATER (LIGHT PIPES).
Fig. 39. This style of bending is much in use abroad, but not much practiced in London, though a splendid method of work.
FIG. 39.
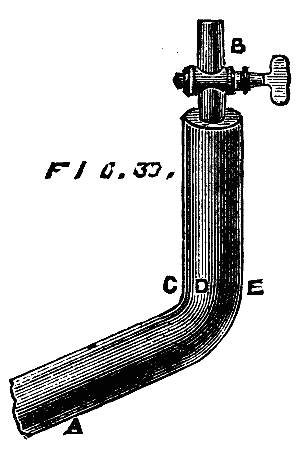
It is a well known fact that, practically speaking, for such work, water is incompressible, but may be turned and twisted about to any shape, provided it is inclosed in a solid case—Fig. 39 is that case. The end, A, is stopped, and the stopcock, B, soldered into the other end. Now fill up this pipe quite full with warm water and shut the cock, take the end, A, and pull round the pipe, at the same time dressing the molecules of lead from the throat, C, toward D E, which will flow if properly worked.
You can hammer away as much as you please, but be quick about it, so that the water does not cool down, thereby contracting; in fact, you should open the cock now and then, and recharge it to make sure of this.
SAND BENDING.
This is a very old method of bending lead pipes, and answers every purpose for long, easy bends. Proceed in this way: The length of the pipe to be 5 ft., fill and well ram this pipe solid with sand 2 ft. up, then have ready a metal-pot of very hot sand to fill the pipe one foot up, next fill the pipe up with more cold sand, ramming it as firmly as possible, stop the end and work it round as you did the water bend, but do not strike it too hard in one place, or you will find it give way and require to be dummied out again, or if you cannot get the dent out with the dummy send a ball through (see "Bending with Balls").
BENDING WITH BALLS OR BOBBINS.
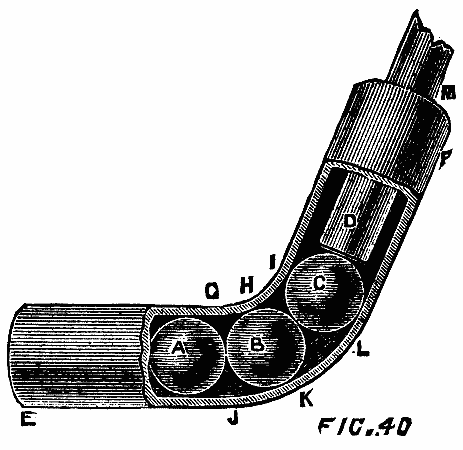
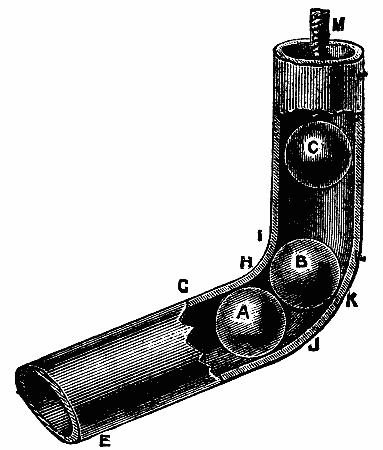
This style of work is much practiced on small pipes, such as 2 in. to 3 in., especially by London plumbers. Method: Suppose your pipe to be 2 in., then you require your ball or bobbin about 1/16 in. less than the pipe, so that it will run through the pipe freely. Now pull the pipe round until it just begins to flatten, as at Fig. 37, put the ball into the pipe, and with some short pieces of wood (say, 2 in. long by 1½ in. diameter) force the ball through the dented part of the pipe, or you may use several different-sized balls, as at A B C, Fig. 40, and ram them through the pipe with a short mandrel, as at D M. You will require to proceed very carefully about this ramming, or otherwise you will most likely drive the bobbins through the back at L K J. You must also watch the throat part, G H I, to keep it from kinking or buckling-up; dress this part from the throat toward the back, in order to get rid of the surplus in the throat.
FIG. 40.
THREE-BALL OR LEAD DRIVING BALL AND DOUBLE-BALL BENDING.
Fig. 41 shows a method of bending with three balls, one of lead being used as a driver attached to a piece of twine. This is a country method, and very good, because the two balls are kept constantly to the work. First, put the two balls just where you require the bend, then pull the pipe slightly round; take the leaden ball and drop it on the ball, B, then turn the pipe the other end up and drop it on A, and do so until your bend is the required shape. You must be careful not to let your leaden ball touch the back of the pipe. Some use a piece of smaller leaden pipe run full of lead for the ball, C, and I do not think it at all a bad method, as you can get a much greater weight for giving the desired blow to your boxwood balls.
FIG. 41.
BENDING WITH WINDLASS AND BRASS BALL.
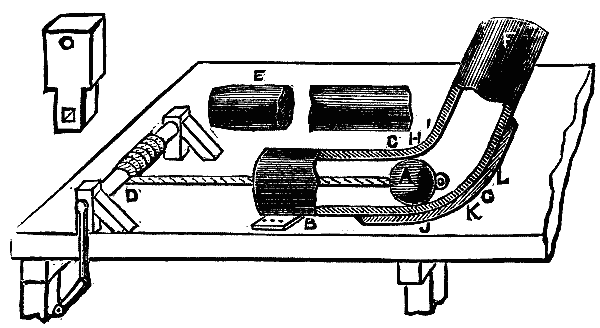
This is an excellent method of bending small pipes. Fig. 42 will almost describe itself. A is a brass or gun metal ball having a copper or wire rope running through it, and pulled through the flattened part of the pipe as shown. It will be quite as well to tack the bend down to the bench, as at B, when pulling the ball through; well dress the lead from front to back to thicken the back. I have seen some plumbers put an extra thickness of lead on the back before beginning to bend. Notice: nearly all solid pressed pipes are thicker on one side than the other (as before remarked), always place the thickest part at the back.
FIG. 42.
HYDRAULIC OR CUP-LEATHER AND BALL BENDING.
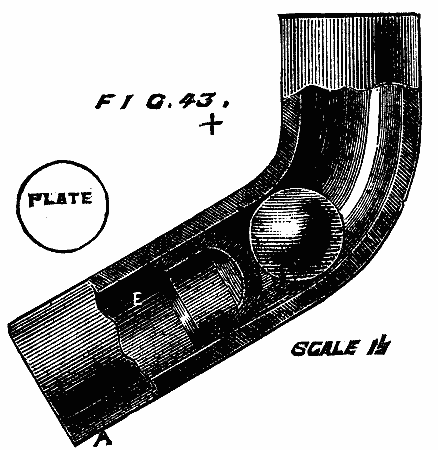
Fig 43. This is my own method of pipe-bending, and is very useful when properly handled with plenty of force, but requires great care and practice. You must have a union sweated on the end, A, Fig. 43, and the ball, B, to fit the pipe. The cup-leather, E, should have a plate fixed on the front to press the ball forward. Pull up the pipe as you please, and pump the ball through; it will take all the dents out, and that too very quickly.
FIG. 43.
BENDING BY SPLITTING OR SPLIT-MADE BENDS.
This method of bending is much practiced in the provinces, and, for anything I know to the contrary, is one of the best methods in use, as by it you are likely to get a good substance of metal on the back of the bend whether the plumber be a good or a bad workman. Proceed as follows: Cut the pipe down the center to suit the length of your bend, as shown at A B, Fig. 44. It will be quite as well if you first set out this bend on the bench, then you may measure round the back, as from C to L, to obtain the distance of the cut, which should always be three or four inches longer than the bend. You may also in this way obtain the correct length for the throat, G H I; here you will see that you have a quantity of lead to spare, i.e., from A to E, all of which has to be got rid of in uncut bends—some plumbers shift from front to back, but how many? Not one in twenty. After you have cut the pipe, open the throat part, bend out the sides, and pull this part round a little at a time, then with a dummy, Fig. 38, work the internal part of the throat outward to as nearly the shape as you can. Go carefully to work, and do not attempt to work up the sides, A D B, until your throat is nearly to the proper shape, after which you may do so with a small boxwood dresser or bossing-stick (It is not necessary to explain minutely what a bosser or dressing-stick is, as they can be bought at almost any lead-merchants—the dresser is shown at E, Fig. 1; the bossing-stick is somewhat similar, the only difference being that it has a rounded face instead of flat.) Keep the dummy up against the sides when truing it. If you have proceeded properly with this throat part, you will not require to work up the sides or edges, as in working the throat back the sides will come up by themselves. Next take the back, pull it round a little at a time, the dummy being held inside, with your dresser work the two edges and sides slowly round, and the back will follow. Never strike the back from the underside with the dummy. After you have made a dozen or two you will be able to make them as fast as you please, but do not hurry them at first, as the greater part of this work is only to be learned by patient application, perseverance, and practice.
FIG. 44.
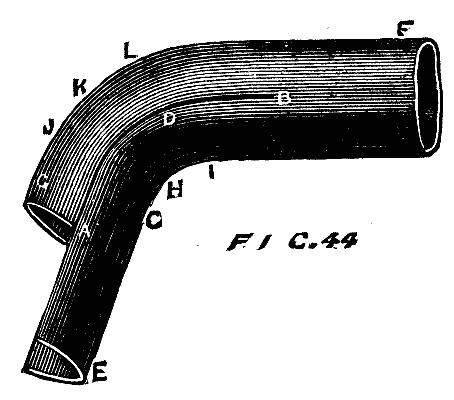
After you have made the bend it will require to be soldered, but before you can do this you must have the joint quite perfect and the edges true one with the other. A good bender will not require to touch his edges at all, but a novice will have to rasp and trim them up so that they come together. Having your edges true, soil them, take a gauge-hook, which may be described as a shave-hook with a gauge attached, and shave it about 1/8 in. each side; now solder it to look like the solder A, Fig. 45, which is done as follows: With some fine solder tack the joint at A D B, Fig. 44, put on some resin, and with a well-heated copper-bit drop some solder roughly on the point from B to A, then draw the bit over it again to float the solder, being especially careful not to let the joint open when coming off at A. Some plumbers think fit to begin here, but that is a matter of no importance. Do not forget that if your joint is not properly prepared, that is to say, true and even, it is sure to be a failure, and will have a "higgledy-piggledy" appearance. Some difference of opinion exists as to the best method of making these joints: one workman will make a good joint by drawing it while, on the other hand, another one will do it equally well by wiping it. Drawing will be fully explained in a part on pipe making. It may, however, be here mentioned that it is a method of making the joint by floating the solder along the joint with the ladle and plumbing-iron.
FIG. 45.
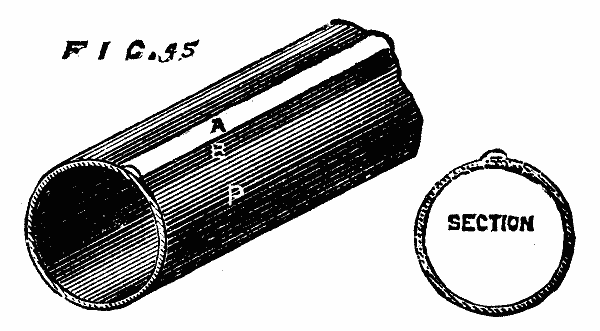
It is not uncommon for plumbers to make their bends with only one joint on the back.
PULLING UP BENDS.
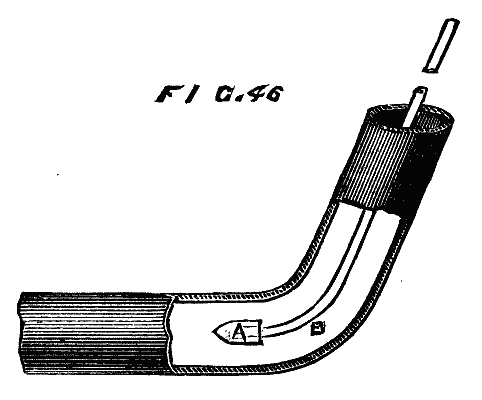
In London, it is the favorite plan to make bends without cutting them. Fig. 46. It is done by taking a length of pipe, and, just where you require the bend, lay it (with the seam at the side) upon a pillow, made by tightly filling a sack with sand, wood shavings, or sawdust; have some shavings ready to hand and a good lath, also a short length of mandrel about 3 ft. long and about ½ in. smaller than the pipe, and a dummy as shown at A B, Fig. 56. Now, all being ready, put a few burning shavings into the throat of the bend, just to get heat enough to make it fizz, which you can judge by spitting on it. When this heat is acquired withdraw the fire, and let the laborer quickly place the end of the mandrel into the pipe, and pull the pipe up while you place a sack or anything else convenient across the throat of the bend, then pull the pipe up a little, just sufficient to dent it across the throat. Now, with a hot dummy, dummy out the dent, until it is round like the other part of the pipe. Keep at this until your bend is made, occasionally turning the pipe or its side and giving it a sharp blow on the side with the soft or hornbeam dresser; this is when the sides run out as in Fig. 37. Never strike the back part of the bend from inside with the dummy, but work the lead from the throat to the back with a view to thickening the back.
FIG. 46.
SET-OFFS.
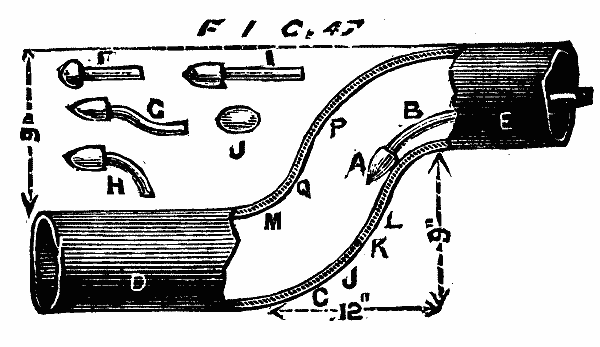
A set-off is nothing more than a double bend, as shown at Fig. 47, and made in much the same manner. D is the long end of the pipe. Always make this bend first and pull it up quite square, as it will be found to go a little back when pulling up the other bend; if you can make the two together so much the better, as you can then work the stuff from the throat of one bend into the back of the other. The different shaped dummies are also here shown: F a round-nosed dummy, G a double bent dummy, H a single bent, I straight, J hand-dummy, ABN a long bent dummy shown at Fig. 38.
FIG. 47.
BAD BENDS.
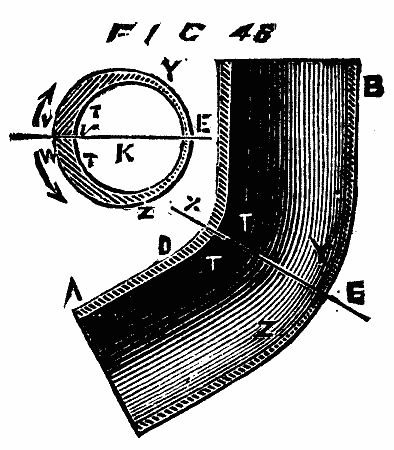
These can always be detected by examining them in their backs, as at Fig. 48; take a small dresser and tap the pipe a few times round ABD to test for the thickness. Strike it hard enough to just dent it; next strike the back part of the pipe, E, with the same force, and if it dents much more it is not an equally-made bend. I have seen some of these much-praised London-made bends that could be easily squeezed together by the pressure of the thumb and finger. N.B.—Care must be taken not to reduce or enlarge the size of the bore at the bend.
FIG. 48.
BAD FALLS IN BENDS.
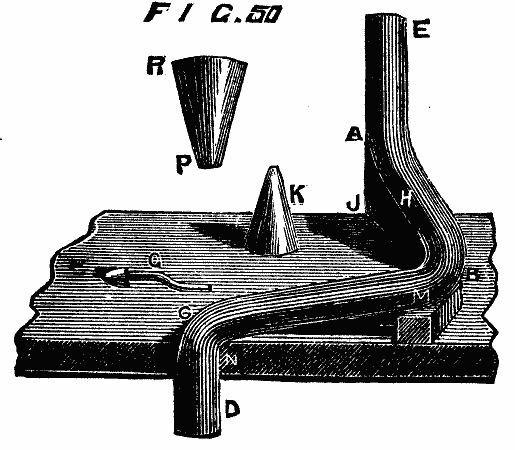
The fall given in bending lead pipes should be considered of quite as much importance as making the bends of equal thickness especially for pipes, as shown in Fig. 49. In this Fig. you have a drawing of a bad bend. From A to B there is no fall whatever, as also from B to C; such bending is frequently done and fixed in and about London, which is not only more work for the plumber, but next to useless for soil-pipes. Fig. 50 shows how this bend should be made with a good fall from A to J, also from M to N; the method of making these bends requires no further explanation. R, P, and K are the turnpins for opening the ends, the method of which will be explained in a future paragraph on "Preparing for Fixing."
FIG. 49.
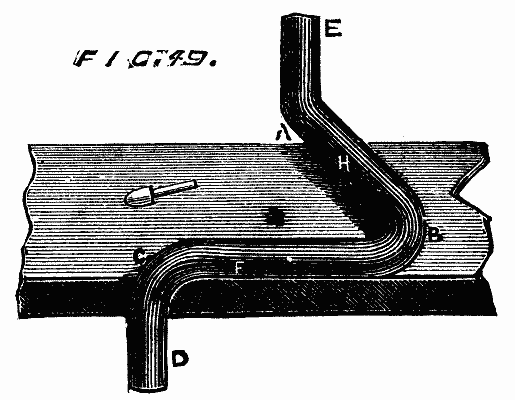
FIG. 50.
BENDS MADE INTO TRAPS OR RETARDERS.
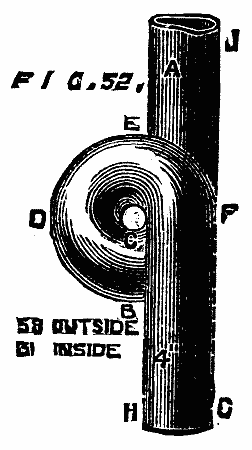
It will sometimes be found requisite to retard the flow of water when running through soil or other pipes, or to direct it to another course, or even to form a trap in the length of pipe. This has been done in many ways, but Figs. 51 and 52 represent the method that I, after mature consideration, think most preferable. There is nothing new about this style of bending, as it has been long in vogue with provincial plumbers, but more especially in Kent. For many years it has had a run as a sink and slop closet-trap. Mr. Baldwin Latham, in his "Sanitary Engineering," says it was introduced and has been used for the Surrey and Kent sewers from about 1848.
FIG. 51.
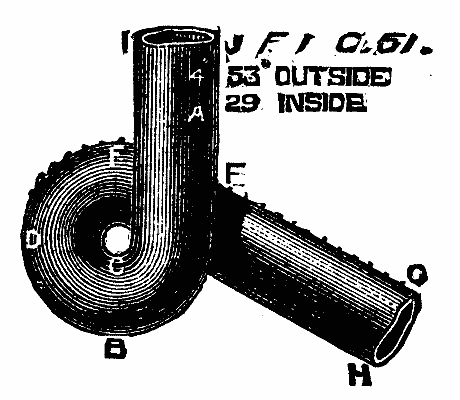
FIG. 52.
I have also noticed many of these traps in the Sanitary Exhibition at South Kensington, made by Graham and Fleming, plumbers, who deserve a medal for their perseverance and skill, not only for the excellence of their bends, but also for some other branches of the trade, such as joint-wiping, etc., which is unquestionably the best work sent into this Exhibition—in fact, quite equal to that which was shown at the Exhibition of 1862. I shall treat further of these bends in an article on Fixing, in a future part.
BENDS MADE WITH THE "SNARLING DUMMY."
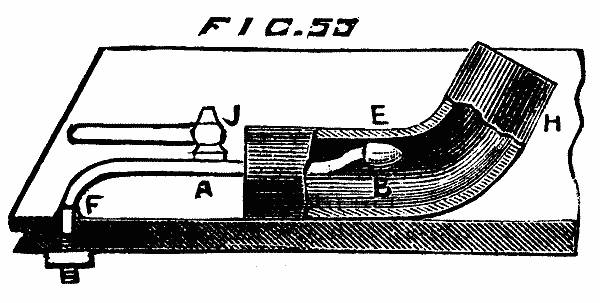
This is an American method of making lead bends. Fig. 53 shows a dummy made upon a bent steel rod, fixed into the bench. The method of working it is by first pulling up the bend, and to get out the dents, strike the rod of the snarling dummy, as shown at A, and the reaction gives a blow within the bend, throwing out the bend to any shape required. This method of working the dummy is also taken advantage of in working up embossed vases, etc.
FIG. 53.
(To be continued)
[1]
From the London Building News.