PART TWO—VEHICLE MAINTENANCE INSTRUCTIONS
Reading edition
Section VII MAINTENANCE ALLOCATION
Paragraph
Scope24
Allocation of maintenance25
24. SCOPE.
a. The scope of maintenance and repair by the crew and other units of the using arms is determined by the availability of suitable tools, availability of necessary parts, capabilities of the mechanics, time available, and the tactical situation. All of these are variable and no exact system of procedure can be prescribed.
25. ALLOCATION OF MAINTENANCE.
a. Indicated below are the maintenance duties for which tools and parts have been provided for the using arm and maintenance personnel. Replacements and repairs which are the responsibility of ordnance maintenance personnel may be performed by using arm personnel when circumstances permit, within the discretion of the commander concerned. Echelons and words as used in this list of maintenance allocations are defined as follows:
First and Second Echelon: Table III AR 850–15 Operating organization driver, operator or crew, companies and detachments, battalions, squadrons, regiments, and separate companies and detachments (first and second echelons, respectively).
Third Echelon: Table III AR 850–15 Technical light and medium maintenance units, including post and port shops.
Fourth Echelon: Table III AR 850–15 Technical heavy maintenance and field depot units including designated post and service command shops.
Fifth Echelon: Table III AR 850–15 Technical base units.
Service: (Including preventive maintenance) par. 24 a (2) and (3) in part AR 850–15 Checking and replenishing fuel, oil, grease, water and antifreeze, air, and battery liquid; checking and tightening nuts and bolts; cleaning.
Service: (Including preventive maintenance) par. 24 a (2) and (3) in part AR 850–15 Checking and replenishing fuel, oil, grease, water and antifreeze, air, and battery liquid; checking and tightening nuts and bolts; cleaning.
Replace: Par. 24 a (5) AR 850–15 To remove an unserviceable part, assembly, or subassembly from a vehicle and replace it with a serviceable one.
Repair: Par. 24 a (6) in part AR 850–15 To restore to a serviceable condition, such parts, assemblies or subassemblies as can be accomplished without completely disassembling the assembly or subassembly, and where heavy riveting, or precision machining, fitting, balancing, or alining is not required.
Rebuild: Par. 24 a (6) AR 850–15 Consists of stripping and completely reconditioning and replacing in serviceable condition any vehicle or unserviceable part, subassembly, or assembly of the vehicle, including welding, riveting, machining, fitting, alining, balancing, assembling, and testing.
Reclamation: AR 850–15 Par. 4 (c) in part CIR. 75, dated 16 March ’43 Salvage of serviceable or economically repairable units and parts removed from vehicles, and their return to stock. This includes the process which recovers and/or reclaims unusable articles or component parts thereof and places them in a serviceable condition.
NOTES: (1) Operations allocated will normally be performed in the echelon indicated by X. (2) Operations allocated to the third echelon as indicated by E may be performed by these units in emergencies only. (3) Operations allocated to the fourth echelon by E are normally fifth echelon operations. They will not be performed by the fourth echelon, unless the unit is expressly authorized to do so by the chief of the service concerned.
ECHELONS
CLUTCH 2nd 3rd 4th 5th
Bearings, clutch release—replace X
Clutch—replace and/or repair (reline) X
Hub, clutch—replace X
Hub, clutch—repair X
Sprocket assembly, clutch—replace X
Sprocket assembly, clutch—repair X
CONTROLS AND LINKAGE
Controls and linkage—service and/or replace X
Controls and linkage—repair X
ELECTRICAL GROUP
Battery—service (recharge) and/or replace X
Battery—repair X
Battery—rebuild E X
Cables, battery—replace and/or repair X
Coil, ignition—replace X
Head, speedometer—replace X
Head, speedometer—repair X
Head, speedometer—rebuild X
Horn assembly—replace X
Horn assembly—repair X
Light assemblies—service and/or replace X
Light assemblies—repair X
Panel, instrument—replace X
Panel, instrument—repair X
Switch assemblies—replace X
Switch assemblies—repair X
Wiring—replace X
ENGINE
(V–45″–Twin Engine)
Bearings, main—replace E X
Bearings, connecting rod—replace E X
Breaker assembly, circuit—replace X
Breaker assembly, circuit—repair X
Breaker assembly, circuit—rebuild X
Carburetor—replace X
Carburetor—repair X
Carburetor—rebuild X
Cleaner, air—service and/or replace X
Cleaner, air—repair X
Cleaner, air—rebuild X
Cylinder assembly—replace X
Cylinder assembly—repair X
Cylinder assembly—rebuild (recondition) E X
Condenser—replace X
Engine assembly—replace *4 X
Engine assembly—repair X
Engine assembly—rebuild E X
Gasket, cylinder head—replace X
Gears, timing—replace E X
Generator assembly—replace X
Generator assembly—repair X
Generator assembly—rebuild X
Head, cylinder—replace and/or repair X
Lines and connections—replace X
Lines and connections—repair X
Pistons, rings and pins assembly—replace E E X
Plug, spark—replace X
Points, circuit breaker—service and/or replace X
Pump assembly, feed—replace X
Pump assembly, feed—repair X
Pump assembly, feed—rebuild X
Pump assembly, oil—replace X
Pump assembly, oil—repair X
Pump assembly, oil—rebuild X
Pump assembly, oil scavenger—replace and/or repair X
Pump assembly, oil scavenger—rebuild X
Rod, connecting—replace and/or rebuild (recondition) X X
Sprocket, engine—replace X
Strained gasoline—replace and/or repair X
Valves—service X
EXHAUST GROUP
Muffler and exhaust pipe—replace X
Muffler and exhaust pipe—repair X
MISCELLANEOUS
Bars, safety—replace X
Bars, safety—repair X
Boxes, ammunition, battery and tool—replace X
Boxes, ammunition, battery and tool—repair X
Carriers, luggage and scabbard—replace X
Carriers, luggage and scabbard—repair X
Frame—replace and/or rebuild E X
Guards, mud—replace X
Guards, mud—repair X
Plate, skid—replace X
Plate, skid—repair X
Saddle—replace X
Saddle—repair X
Saddle—rebuild X
Springs, saddle post—replace X
Tank, fuel—replace X
Tank, fuel—repair X
Tank, oil—replace X
Tank, oil—repair X
SUSPENSION (FRONT)
Bars, handle—replace X
Bars, handle—repair X
Damper, steering—replace X
Drum, brake—replace X
Fork, front assembly—replace X
Fork, front assembly—repair X
Fork, front assembly—rebuild X
Fork, spring—replace X
Fork, spring—repair X
Fork, spring—rebuild X
Plate, rocker—replace X
Plate, rocker—repair X
Shoe assembly, brake—service and/or replace X
Shoe assembly, brake—repair (reline) X
Springs, cushion and rebound—replace X
SUSPENSION (REAR)
Chains, all—replace and/or repair X
Drum, brake, rear—replace X
Guards, chains—replace X
Guards, chains—repair X
Shoe assemblies, brake—service and/or replace X
Shoe assemblies, brake—repair (reline) X
Sprocket, rear—replace X
Wheels—replace X
Wheels—repair X
Wheels—rebuild E X
TIRES
Casings and tubes—replace X
Casings—repair E X
Tubes, inner—repair X
TRANSMISSION
Spring, kick starter—replace X
Sprocket, transmission countershaft—replace X
Starter, kick—replace X
Starter, kick—repair X
Transmission—replace *4 X
Transmission—repair X
Transmission—rebuild E X
VEHICLE ASSEMBLY
Motorcycle—service X
Motorcycle—rebuild (with serviceable unit assemblies) X E
Section VIII SECOND ECHELON PREVENTIVE MAINTENANCE
Paragraph
Second echelon preventive maintenance services26
26. SECOND ECHELON PREVENTIVE MAINTENANCE SERVICES.
a. Regular scheduled maintenance inspections and services are a preventive maintenance function of the using arms, and are the responsibility of commanders of operating organizations.
(1) Frequency. The frequencies of the preventive maintenance services outlined herein are considered a minimum requirement for normal operation of vehicles. Under unusual operating conditions such as extreme temperatures, and dusty or sandy terrain, it may be necessary to perform certain maintenance services more frequently.
(2) First Echelon Participation. The drivers should accompany their vehicles and assist the mechanics while periodic second echelon preventive maintenance services are performed. Ordinarily the driver should present the vehicle for a scheduled preventive maintenance service in a reasonably clean condition; that is, it should be dry, and not caked with mud or grease to such an extent that inspection and servicing will be seriously hampered. However, the vehicle should not be washed or wiped thoroughly clean, since certain types of defects, such as cracks, leaks, and loose or shifted parts or assemblies are more evident if the surfaces are slightly soiled or dusty.
(3) If instructions other than those contained in the general procedures in paragraph (4) or the specific procedures in paragraph (5) which follow, are required for the correct performance of a preventive maintenance service, or for correction of a deficiency, other sections of the vehicle operator’s manual pertaining to the item involved, or a designated individual in authority, should be consulted.
(4) General Procedures. These general procedures are basic instructions which are to be followed when performing the services on the items listed in the specific procedures. The second echelon personnel must be thoroughly trained in these procedures so that they will apply them automatically.
(a) When new or overhauled subassemblies are installed to correct deficiencies, care should be taken to see that they are clean, correctly installed, properly lubricated, and adjusted.
(b) When installing new lubricant retainer seals, a coating of the lubricant should be wiped over the sealing surface of the lip of the seal.
(c) The general inspection of each item applies also to any supporting member or connection, and usually includes a check to see whether the item is in good condition, correctly assembled, secure, or excessively worn. The mechanics must be thoroughly trained in the following explanations of these terms:
1. The inspection for “good condition” is usually an external visual inspection to determine whether or not the unit is damaged beyond safe or serviceable limits. The term “good condition” is explained further by the following: not bent or twisted, not chafed or burned, not broken or cracked, not bare or frayed, not dented or collapsed, not torn or cut.
2. The inspection of a unit to see that it is “correctly assembled” is usually an external visual inspection to see whether or not it is in its normal assembled position in the vehicle.
3. The inspection of a unit to determine if it is “secure” is usually an external visual examination, a hand‐feel, or a pry‐bar check for looseness; such an inspection should include any brackets, lock washers, lock nuts, locking wires, or cotter pins used in assembly.
4. “Excessively worn” will be understood to mean worn, close to or beyond serviceable limits, and likely to result in a failure if not replaced before the next scheduled inspection.
(d) Special Services. These are indicated by repeating the item numbers in the columns which show the interval at which the services are to be performed, and show that the parts, or assemblies, are to receive certain mandatory services. For example, an item number in one or both columns opposite a Tighten procedure, means that the actual tightening of the object must be performed. The special services include:
1. Adjust. Make all necessary adjustments in accordance with the pertinent section of the vehicle operator’s manual, special bulletins, or other current directives.
2. Clean. Clean units of the vehicle with dry‐cleaning solvent to remove excess lubricant, dirt, and other foreign material. After the parts are cleaned, rinse them in clean dry‐cleaning solvent, and dry them thoroughly. Take care to keep the parts clean until reassembled, and be certain to keep dry‐cleaning solvent away from rubber or other material which it will damage. Clean the protective grease coating from new parts, since this material is not a good lubricant.
3. Special lubrication. This applies both to lubrication operations that do not appear on the vehicle Lubrication Guide, and to items that do appear on such guides, but should be performed in connection with the maintenance operations, if parts have to be disassembled for inspection or service.
4. Serve. This usually consists of performing special operations, such as replenishing battery water, and draining and refilling units with oil.
5. Tighten. All tightening operations should be performed with sufficient wrench‐torque (force on the wrench handle) to tighten the nut according to good mechanical practice. Use torque‐indicating wrench where specified. Do not overtighten, as this may strip threads, or cause distortion. Tightening will always be understood to include the correct installation of lock washers, lock nuts, and cotter pins provided to secure the tightening.
(e) When conditions make it difficult to perform the complete preventive maintenance procedures at one time, these can sometimes be handled in sections, planning to complete all operations within the task if possible. All available time at halts and in bivouac areas must be utilized, if necessary, to assure that maintenance operations are completed. When limited by the tactical situation, items with special services in the columns should be given first consideration.
(f) The numbers of the preventive maintenance procedures that follow are identical with those outlined on W.D. AGO Form No. 463, which is the Preventive Maintenance Service Work Sheet for Motorcycles. Certain items on the work sheet that do not apply to this vehicle are not included in the procedures in this manual. In general, the numerical sequence of items on the work sheet is followed in the manual procedures, but in some instances there is deviation for conservation of the mechanic’s time and effort.
(5) Specific Procedures. The procedures for performing each item in the 1,000‐mile maintenance procedures are described in the following chart. Each page of the chart has a column at its left edge corresponding to the 1,000‐mile maintenance.
ROAD TEST
1000 Mile Maintenance NOTE: If tactical situation does not permit a full road test, perform items 2, 3, 4, 5, 6, 7, 8, 9, 12, and 14, which require slight or no movement of the vehicle. When a road test is possible, it should be for preferably 5, and not over 10 miles.
1 Before‐operation Inspection. Perform Before‐operation Service listed on W.D. Form No. 418. “Driver’s Trip Ticket and Preventive Maintenance Service Record” (described in par. 15), to determine if vehicle is in a satisfactory condition to make the road test safely.
2 Ease of Starting. Start engine and observe action of starter. Note if engine responds readily.
3 Oil Circulation. Oil circulation is normally indicated by oil signal light (red light) in instrument panel being out. When red light is on, oil is not circulating. Observe for excess smoke in exhaust. CAUTION: If red light fails to go out after engine has been started, stop engine at once. Refer to paragraph 30 for possible causes.
4 Instruments. Observe instruments for proper or normal indication and functioning of system to which they apply.
Speedometer and Odometer. Speedometer must indicate vehicle speed without excessive noise or fluctuation; odometer must record trip and total mileage. Oil Pressure Signal Light. Note whether oil signal light (red light) indicates correctly. After ignition switch is turned on, and before starting engine, the red light should go on, indicating no oil circulation. When engine is started, light should go out.
Generator Signal Light. With switch on, and before starting engine, the green signal light should go on, indicating discharge of battery. After starting engine, increase engine speed to a medium fast idle; green signal light should then go out, indicating generator is charging battery. CAUTION: Continue observation of signal lights during road test, and if lights should fail to operate as indicated above, stop engine, investigate cause, and correct or report trouble to proper authority.
5 Brake Operation. Test foot brake for safe stop within reasonable distance. Note squeaks or chatter that might indicate wet, oily, dirty, or loose lining, damaged drum, or improper adjustment. Apply hand‐operated front brake only in conjunction with rear brake and observe whether it operates effectively in assisting to make a quicker stop.
6 Clutch Operation. Before moving vehicle, make sure that clutch pedal has satisfactory free travel before it begins to disengage clutch; that it releases clutch completely before reaching end of travel; and that there are no unusual noises in clutch‐release mechanism. When starting vehicle, observe whether clutch grabs, chatters, or slips when fully engaged.
7 Gearshift. Shift through entire gear range of transmission and observe whether mechanism operates freely without clashing or jumping out of gear. Note any unusual vibration that might indicate loose engine or transmission mountings.
8 Unusual Noises. During entire road test, listen for unusual noises that might indicate worn, loose, damaged, or insufficiently lubricated parts in the entire motorcycle, particularly in engine and accessories, or in the power train. CAUTION: Loose primary (front) drive chain, with slack in excess of ½ inch total up‐and‐down motion, can cause excessive noise which sounds like engine knock. Remove inspection cover for examination of chain.
9 Steering. Observe steering mechanism for indication of looseness or excessive binding through full turning range. With hands resting lightly on handle bars and vehicle in vertical position, observe whether there is any tendency to pull to one side when operating at a reasonable speed. Note any indication of steering instability at higher speeds.
10 Balance. If vehicle does not balance properly in operation, inspect for misalinement of rear wheel.
11 Speedometer and Odometer. Inspect speedometer for proper operation, excessive fluctuation, or unusual noise. Observe odometer for correct recording of trip and total mileage.
12 Throttle and Spark Controls. Set throttle stop screw and low speed needle adjustment so that engine will operate smoothly and will not stall at idling speed. With vehicle running at a speed of 30 miles per hour, or faster, in high gear, turn throttle control grip to “OPEN” and “CLOSED” positions and note whether engine responds instantly to throttle changes. Turn spark control grip and note whether it fully advances and retards ignition timer.
13 Power and Operation. Observe engine for normal pulling power, and good operating characteristics in each speed, from first to high gear. Also observe whether engine misses, stalls, knocks excessively, or makes any other unusual noise.
14 Carburetor Adjustment. No carburetor adjustment, other than idle adjustment as performed in item 12, is required on this vehicle.
15 Brake Drum and Hub Temperature. Immediately after completing road test, feel front and rear brake drums and wheel hubs for overheating.
16 Power Train Temperatures. Feel transmission for overheating.
MAINTENANCE OPERATION
17 Compression Test. With throttle wide‐open, test compression with starter. If engine lacks compression, inspect for leaks.
18 Transmission. Inspect transmission for good condition, secure mounting, and leaks. Inspect oil level. Drain and refill transmission to level of transmission filler plug opening with specified grade of engine oil. CAUTION: Always drain transmission immediately after it has been warmed and agitated by operation of engine. Refill as soon as draining is completed to avoid hazard of operating without lubricant. Tighten all mounting and assembly bolts securely.
20 Engine Oil. Inspect oil tank for oil level: drain and refill tank. CAUTION: Fill to within 1 inch of filler opening and filler cap with specified weight of oil. Always drain immediately after engine operation and refill as soon as draining is completed, to avoid hazard of operating without lubricant.
21 Battery and Carrier. Clean top of battery. See that battery and carrier are in good condition, and that carrier is securely mounted. Remove cell caps: make sure that vents are open. Test specific gravity with hydrometer and record readings on work sheet, W.D. AGO Form No. 463. Readings below 1.225 indicate need for recharge, or battery failure. Variation between cells of more then 0.025 must be reported. Read and record voltage of battery (6‐volt reading is normal). Bring electrolyte to 5⁄16 inch above tops of plates, using clean, drinkable water. If excessive looseness of battery in case is noted, check for presence of rubber pad in bottom of case, and make sure rubber pad is installed on top of battery, when battery service is completed.
22 Battery Wires and Terminals. Inspect battery for good condition and secure connections. Look for worn spots in wire insulation. Oil the felt washers on battery terminals.
23 Electrical Wiring. Inspect all electric wiring to see that it is in good condition, securely attached, and connected. Look for worn spots in insulation.
24 Generator Drive and Mounting, and Relay. Inspect generator for secure mounting. After removing left footboard assembly, remove generator and cover. Examine commutator for cleanliness, good condition, or excessive wear. If commutator is dirty, it must be cleaned with No. 00 sandpaper. Blow out with compressed air. If commutator is in bad condition or excessively worn, replace generator. Remove relay cover, being careful to avoid damage to mechanism, and inspect for cleanliness. Blow out with air if wet or dirty. CAUTION: Do not attempt to adjust relay, or to clean it in any other manner.
25 Timer (Circuit Breaker). Clean and remove timer cover. See that wiring leads are securely connected and that inside of the timer is clean. Inspect breaker points to see that they are clean, well‐lined, engaging squarely, and are not excessively pitted, burned, or worn. See that condenser mounting screw is tight. Breaker lever should be free on its pivot and well insulated from the pivot pin. Determine if breaker arm spring exerts normal force against arm. Examine camshaft by hand‐feel to see whether it is excessively worn in its bushings; if camshaft bushings are worn excessively, install new timer. If points are slightly burned or pitted, dress them with a fine file. If breaker points are unserviceable, install a new set, taking care to aline them and to adjust gap to 0.022 inch. Apply one drop of oil to breaker arm pivot pin. Use clean cloth to wipe cam and then coat with a very light film of light grease. CAUTION: Be careful to avoid getting oil or grease on breaker points.
26 Spark Plugs. Remove spark plugs, clean with sandblast cleaner, and inspect for cracked insulators: inspect electrodes for good condition and adjust gap to 0.025 to 0.030 inch; replace faulty plugs. Be sure to install new gasket with new plug. Inspect radio suppressors on plug cables for good condition and secure attachment.
27 Ignition and Light Switch. Make sure that the switch is in good condition and operating properly in all positions.
28 Lights, Service and Blackout. See that all lights are clean, in good condition, properly aimed, and securely mounted. Tactical situation permitting, turn switch to each of its positions and observe whether service and blackout lights operate properly, and whether they go out when switched off. Operate dimmer switch on left handle bar to see whether it depresses beam of service headlight. Apply foot brake for check of both blackout and service stop light operation. Inspect lenses for breakage, and headlight reflector for discoloration. Clean all lenses.
29 Horn. Tactical situation permitting, sound horn to test for normal signal. Examine horn for good condition, secure mounting, and tight wiring connections.
30 Cylinder Heads. If cylinder head gaskets show signs of leakage, tighten head bolts: if leakage persists, new gaskets should be installed. A head bolt wrench (Fed‐Stock No. 41–W–1525) is available with which head bolts can be tightened without removing tanks for wrench clearance. If tanks are removed to permit taking off heads and installing new gaskets, bolts should then be tightened evenly with a torque wrench to a tension of 60 foot‐pounds minimum, or 65 foot‐pounds maximum, when engine is cold.
31 Cylinder Hold‐down Nuts. If these nuts are loose, or there is excessive oil leakage around cylinder bases, tighten nuts evenly when engine is cold. If excessive leakage persists, new gaskets should be installed. CAUTION: If cylinder base nuts are loose, perform item 36 before starting engine.
32 Engine Mountings. Inspect top engine mounting bracket and bolt for good condition and security. CAUTION: Tight seating of the engine bracket mounting bolt is a necessity for effective radio bonding. Inspect four lower engine mounting bolts for signs of looseness. Tighten as required.
33 Engine Crankcase. Examine engine crankcase for good condition and for leaks. Make sure timing gear cover screws, and oil feed and scavenger pump nuts, are tight.
34 Intake Manifold. Examine manifold for good condition and secure mounting. Make sure manifold nuts are tight.
35 Muffler and Exhaust Pipes. Inspect muffler and exhaust pipes for good condition, secure mounting, and for leaks. Be sure tail pipe opening is not restricted.
36 Valve Mechanism. When engine is cold, adjust valve tappet clearance to 0.004–inch minimum, 0.005–inch maximum on intake valve; 0.006–inch minimum, 0.007–inch maximum on exhaust valve. See that valve springs are in good condition and properly secured; that valve tappet adjusting screws and lock nuts are in good condition; and that valve covers are in good condition, secure, and not leaking oil.
37 Starter. Examine pedal, crank, and return spring for good condition, correct assembly, and secure mounting. Starter should operate without binding, and return spring should bring starter crank to its disengaged position when foot pressure is removed. CAUTION: Make sure that starter crank pinch bolt is installed with head of bolt toward rear of vehicle when crank is in upright position.
38 Engine Cooling Fins. Inspect engine cooling fins for good condition and cleanliness. Remove all dirt or foreign matter. Do not apply paint to cooling fins.
39 Filler Caps and Vents. Wipe dirt and dust from filler caps of fuel and oil tanks. Inspect caps and gaskets to see that they are in good condition. Note whether vent in fuel filler cap is open. Reinstall caps, observing that each locks properly on filler neck. Do not interchange fuel and oil tank filler caps.
40 Fuel Tank Valves and Lines. See that valves and lines are in good condition, secure, and not leaking. Test fuel shut‐off valve for ample friction to hold valve in reserve position. See that valve lifts freely enough to operate satisfactorily.
41 Oil System Leaks. Examine oil tank, oil lines, vent line, and connections for good condition, secure attachment, and for leaks.
42 Carburetor and Fuel Filter (Gasoline Strainer). Examine carburetor and fuel filter for good condition, secure connections, and for leaks. Shut off fuel tank valve and remove filter (strainer) cap and screen. Wash cap and screen in dry‐cleaning solvent, and open shut‐off valve slightly to flush filter body. Reassemble screen, gaskets, and cap, being careful not to damage gaskets. Use new gaskets if necessary. Drain water and foreign matter from carburetor bowl by removing bowl drain plug. Open shut‐off valve slightly to flush carburetor bowl while plug is out. Replace plug, being careful to avoid crossing threads. Open fuel tank shut‐off valve and check for leaks.
43 Air Cleaner. Remove oil cup; inspect condition of oil, and amount of sediment. If service is required, remove filter elements, clean and fill cup to NORMAL level. Wash elements in dry‐cleaning solvent, dry thoroughly with compressed air, immerse each element in oil in cup, and reassemble elements and oil cup to air cleaner body immediately. Make sure gaskets are in good condition. NOTE: Early type round cleaner does not have removable filter element; therefore, the complete cleaner body must be removed to wash element.
44 Gearshift Lever and Linkage. See that gearshift lever and linkage are in good condition, secure, and not excessively worn. Lubricate all joints with a few drops of engine oil. Adjust shifter lever so that when moved to any gear position in shifter guide on tank, the transmission is shifted to full engagement in corresponding gear.
45 Primary Drive. Remove inspection hole cover from front chain guard. With clutch engaged and transmission in neutral, rotate primary chain to position of least slack. Check chain for ½–inch deflection. Deflection measurement should be total up‐and‐down free movement. Inspect chain for adequate lubrication. Loosen front and rear chain oiler adjusting screws two turns each. Do not remove screws. Idle engine 1 minute, then tighten screws firmly, but do not force. This operation serves to flush control valves and rear chain oiler pipe.
46 Clutch Pedal and Linkage. Inspect clutch pedal clevis connections and cable to see that they are in good condition and not excessively worn. Check free travel of clutch pedal to make sure it is within specified limits. With foot pedal in fully disengaged position (heel against footboard) clutch release lever must clear sprocket cover stud and nut by about 1⁄16 inch: with foot pedal in fully engaged position, clutch release lever must have between 1⁄8– and ¼–inch of free movement on end of foot pedal cable. Lubricate all joints with a few drops of engine oil, including cable at each end of cable housing.
47 Rear Chain and Guard. Inspect rear chain guard for good condition and secure mounting. Remove chain, wash thoroughly in dry‐cleaning solvent, and hang it up to dry. See that chain is in good condition, not excessively worn, and has no broken rollers on side plates. Soak chain in SAE 10 engine oil for a short period of time to allow oil to penetrate into all rollers; drain chain, and wipe off excess oil. Inspect countershaft sprocket, and rear wheel sprocket to see that they are in good condition, not excessively worn, and that rear sprocket rivets are tight. Do not reinstall chain until item 71 has been performed. When reinstalling chain, make sure that connecting link is in good condition and securely locked. See that open end of connecting link spring clip is trailing in direction of chain travel. Adjust chain (paragraph 60).
48 Final Drive Sprockets. Inspection of final drive sprockets is made when performing item 47.
50 Paint and Markings. Examine vehicle for good condition and see that paint is not rubbed to a polish, and has no bare spots that might rust or reflect light. See that vehicle markings are legible.
51 Frame. Examine frame for good condition; observe whether it seems to be sprung out of alinement.
52 Steering Head and Fork Stem. Raise front end of vehicle by placing blocks under skid plate. Complete all following items to and including item 71, before lowering vehicle to ground. Examine steering head and fork stems for good condition. Note whether there is up‐and‐down play caused by loose bearings. Move handle bars through complete range and observe if there is any binding which might indicate improperly adjusted or defective bearings.
53 Handle Bars. Examine handle bars for good condition and secure mounting.
54 Throttle Control. See that grip is in good condition, that throttle opens and closes completely as grip is turned to its extreme positions, and that control wire and housing are in good condition and secure. Lubricate lightly through hole in rear of grip to avoid rusting and “freezing.” If grip does not rotate freely, disassemble grip, clean, and lubricate spiral control parts.
55 Spark Control. See that grip is in good condition, that spark is fully advanced and retarded as the grip is turned to its extreme positions; that the control wire and housing are in good condition and secure. Lubricate lightly through hole in rear of grip to avoid rusting and “freezing.” If grip does not rotate freely, disassemble grip, clean, and lubricate spiral control parts.
57 Rear View Mirror. Clean rear view mirror and examine for good condition and secure mounting.
58 Front Fender (Mudguard). Examine front fender for good condition and secure mounting; see that fender does not scrape tire.
59 Weapon Carrier. Inspect weapon carrier for good condition and secure mounting.
60 Ammunition Box. See that ammunition box and cover are in good condition and securely attached.
61 Front Springs. See that front springs and their mountings are in good condition, correctly assembled, and secure.
62 Front Forks. See that front forks are in good condition and securely mounted.
63 Front Fork Rocker Plates (Rocker Arms). See that front fork rocket plates are in good condition, secure, and not excessively worn. Tighten rocker plate stud nuts securely.
64 Front Fork Damper. Inspect steering damper for good condition and to see that it operates freely. Observe whether friction disks are glazed, coated with grease, or excessively worn.
65 Front Brake and Control Linkage. See that control linkage operates freely, that all connections are tight, and that brake is adjusted so that end of hand lever has ¼ free travel before meeting resistance. Look for any indications of a cracked or excessively worn brake drum: badly worn, loose, or grease‐saturated linings. If there are any such indications, remove wheel for closer inspection. Look for badly worn brake side cover bushing, shackle bushings and studs, or brake operating stud bearing. Apply a few drops of engine oil to control cable, especially at control housing oiler at left handle bar, and to pin joints.
66 Front Wheel Alinement and Spokes. Examine front wheel spokes for presence, good condition, and tightness. If loose spokes are found, tighten evenly, taking care not to distort rim out‐of‐round, or to cause run‐out. Examine rim for good condition, and spin wheel to see that it has no appreciable run‐out.
67 Front Wheel Bearings. Inspect wheel to see whether bearings are excessively loose. Wheel should have slight amount of side play at rim. Spin wheel and listen for unusual noises which might indicate dry or defective bearings or races. Observe for excessive grease leak. If wheel is found to need only slight cone readjustment to correct excessive bearing play, remove wheel and make this adjustment (par. 126). If indications are found that hub is otherwise in bad order, replace wheel.
Each Sixth 1,000–Mile Maintenance Service. Remove front wheel, axle sleeve and bearing, and, together with wheel hub, clean thoroughly in dry‐cleaning solvent. Inspect parts for good condition: inspect brake drum. Inspect lining for good condition and secure attachment, and see that it is neither excessively worn nor soaked with grease. Repack bearings, hub, and axle sleeve with specified lubricant. CAUTION: Make sure that hands and grease are perfectly clean, and that grease is forced between balls onto the cone. Reassemble and adjust bearings according to instructions in paragraph 126, taking care to see that wheel is properly alined. If unusual operating conditions, such as fording streams, have indicated probable contamination of lubricant, this service should be performed more frequently.
68 Front Wheel Axle Nuts. Tighten axle nuts, making sure that cotter pins are installed. Slot in stabilizer plate must be anchored on extended end of left‐front rocker plate stud.
69 Tires, Front and Rear. Gage tires and inflate to 18 pounds front, and 20 pounds rear (cold). Make sure that valve stems are in good condition and correctly installed, and that valve caps are present and secure. Examine tires for cuts, bruises, breaks, and blisters: remove imbedded glass, nails, or other foreign matter from tire treads; observe treads for excessive or irregular tire wear. At any inspection when unusual or irregular tire wear becomes evident, interchange front and rear tires.
70 Rear Wheel Alinement and Spokes. With vehicle on rear stand, inspect in same manner as front wheel (item 66). If it is necessary to aline wheel in frame, make sure sprockets and chains are in correct alinement.
71 Rear Wheel Bearings and Seals. Inspect wheel to see whether bearings are excessively loose (wheel should have a slight amount of play at rim). Spin wheel and listen for unusual noise which might indicate dry or defective bearings. Also observe whether there is excessive grease leak. Test for excessive end play. If wheel is found to have considerable side play at rim, indicating excessively worn bearings, or there is evidence of hub assembly being in bad order otherwise, replace wheel. If wheel must be replaced, inspect brake drum and lining for good condition, as indicated in item 75, before reinstalling wheel. CAUTION: Make sure that wheel mounting socket screws are tight.
72 Rear Wheel Axle Nut. See that rear wheel axle nut is in good condition and securely tightened.
74 Rear Fender (Mudguard). Inspect rear fender for good condition and secure attachment.
75 Rear Brake and Control Linkage. See that brake control linkage operates freely, and that all connections are secure. Look for indications of badly worn or grease‐saturated linings. If brake operating lever stands considerably ahead of vertical, excessive lining wear is indicated. If grease has worked out between brake drum and brake cover, grease‐saturated linings are indicated. In either case the wheel should be removed for closer inspection. Inspect drum for cracks or excessive wear. Make sure wheel mounting socket screws are tight. Examine linkage for loose or worn pin or clevis, and for missing washers or cotter pins. Apply a few drops of engine oil to all linkage joints. Brake pedal should have 1–inch free travel before brake begins to meet resistance. Adjust length of brake rod at brake operating lever to provide 1–inch free pedal travel.
77 Footboard and Rest. Examine footboard and rest for good condition and secure attachment.
78 Saddle Spring and Hinge. Examine saddle for good condition and secure mounting, paying particular attention to torn leather, ripped seams, sagging or broken spring in seat post, and excessive wear in front hinge. CAUTION: Make sure that spring wire clip properly locks the saddle rear hinge clevis pin.
79 Luggage Carrier. Examine luggage carrier for good condition and secure mounting.
80 Saddle Bags. Examine saddle bags for good condition, cleanliness, and secure fastening to luggage carrier. Note particularly whether leather is torn, seams ripped, or straps and buckles missing or damaged.
81 Tools, Tire Pump, and Equipment. Inspect tool kit, tools, tire pump, and other equipment for good condition, cleanliness, serviceability, and proper stowage. Make sure that tire pump is securely clamped to motorcycle frame. Check all items with stowage list (pars. 21, 22 and 23). Make sure that vehicle manuals and Accident Report Form No. 26 are present on vehicle and legible.
82 Safety Guards. Inspect safety guards for good condition and secure mounting.
83 Leg Shields. Inspect leg shields for good condition and secure mounting. NOTE: Motorcycles operating in warm weather should not be equipped with leg shields, as they seriously hamper engine cooling.
84 Skid Plate. Examine skid plate for good condition and secure mounting. CAUTION: Skid plate must be present.
85 Vehicle Lubrication. Lubricate all points of vehicle in accordance with instructions in this manual, Lubrication Guide, current lubrication bulletins or directives, and the following instructions:
Any unit that required disassembly for inspection purposes must be lubricated correctly unless the vehicle is to be deadlined for the repair of that unit. Use only clean lubricant. Keep all lubricant containers covered except when used during lubrication. Before applying lubricant, always wipe dirt from the lubrication fitting or plug so that dirt will not enter with the lubricant. If lubricant fittings or plugs are missing or damaged, replace them. Clean the hole in which the fitting is to be installed, and lubricate after the new fitting has been installed.
Lubricant must be applied properly. On unsealed joints or bushings, apply lubricant until it appears at openings. However, lubricate sparingly the front wheel hub, rear wheel hub, front brake side cover bushing, front brake operating lever stud, and rear brake operating lever stud, to prevent grease reaching brake linings. Rider should be advised whenever wheel bearings are serviced or adjusted, so that during the next road operation he may determine whether bearings or brake drums are running hot, due to overtight adjustment of bearings, or a dragging brake.
Do not apply more than specified amount of lubricant to generator or timer (circuit breaker). To do so may cause failure of the unit.
Wipe off excess applied lubricant that may drip onto brake or operating surfaces, soil clothes, or detract from vehicle’s appearance.
Parts or assemblies that have already been lubricated while disassembled for inspection, gear cases that have been drained and refilled as mandatory items in the procedure, and those parts that have been indicated for special lubrication, will be omitted from the general lubrication of the vehicle.
86 Final Road Test. Make a final road test, reinspecting items 2 to 16, inclusive. Be sure to recheck transmission to see that lubricant is at correct level and not leaking. Confine this road test to the minimum distance necessary to make satisfactory observation. Correct or report all deficiencies found during final road test to designated authority.
Section IX ORGANIZATION TOOLS AND EQUIPMENT
Paragraph
Tools and equipment27
27. TOOLS AND EQUIPMENT.
a. Refer to SNL–N 19 for common hand tools available to second echelon.
b. Refer to list given below for all special tools available to second echelon.
Special Tool Description Manufacturer’s Number Federal Stock Number
Hydrometer, battery, special HRD 11831–X 18–H–1242
Tool, repair, drive chain, motorcycle universal HRD 12039–X 41–T–3320
Tool, spoke tightening, special, ¾–inch, for small diameter spokes IMC 7–T–3259 41–T–3368–20
Wrench, cyl. base nut, twin HRD 12650–29 2941–W–872–10
Wrench, head bolt HRD 12047–30A 41–W–1525
Wrench, manifold, 45–in. twin HRD 12003–X 41–W–1570–10
Wrench, spark plug HRD 11929–40 41–W–3334
Wrench, spoke nipple, front wheel HRD 12032–X 41–W–3339
Wrench, spoke nipple, heavy duty rear wheel HRD 12033–39 41–W–3340
Wrench, tappet and dbl–head open–end 7⁄16– and 1⅜–in HRD 11806–31 41–W–3617
Section X TROUBLE SHOOTING
Paragraph
Introduction28
Engine29
Engine lubricating system30
Fuel system31
Ignition system32
Generating system33
Electrical system34
Transmission and clutch35
Wheels and chains36
Brakes37
Steering38
28. INTRODUCTION.
a. Trouble shooting for the entire vehicle is given in this section. The engine trouble shooting paragraph traces trouble to a system affecting engine performance: for example, fuel or ignition. To trace trouble to one or more defective components of a system, it is necessary to refer to the pertinent paragraph of this section when the defective system or systems have been located in the engine trouble shooting paragraph.
b. The material given in this section applies to the operation of the vehicle under normal conditions. If extreme conditions of temperature occur, it is assumed the operator of the vehicle has prepared his vehicle for use for the conditions encountered.
29. ENGINE.
a. Instruction. This subparagraph traces troubles to a system affecting engine performance. Step b below gives simple engine tests to determine the mechanical condition of the engine. References in step b refer to step c for engine mechanical troubles, or to pertinent paragraphs in this section for system troubles, or when a test indicates a special unit is faulty, to the pertinent paragraph in this manual.
(1) Engine Does Not Turn Over When Foot Starter Is Operated.
(a) Clutch slipping. Check adjustment (par. 48).
(b) Sheared engine sprocket key. Replace (par. 65).
(c) Starter clutch stuck by congealed oil. Free starter clutch. Use proper grade of oil.
(d) Starter clutch worn. Refer to maintenance personnel.
(e) Engine locked (seized). Refer to organization mechanic.
(2) Engine Turns Over When Cranked but Does Not Start.
(a) Fuel supply valve closed. Open valve.
(b) Empty fuel tank. Fill tank.
(c) Fuel system faulty. Refer to paragraph 31.
(d) Ignition system faulty. Refer to paragraph 32.
(e) Battery weak or dead. Refer to paragraph 34.
(f) Insufficient compression. Refer to step b, below.
(3) Weak Compression. Refer to step b below for test.
(a) Improper valve tappet adjustment. Adjust (par. 43).
(b) Valves sticking. Use dry‐cleaning solvent to free valve stems in guides.
(c) Faulty lubrication. Refer to paragraph 20.
(d) Loose cylinder head bolts and/or faulty gasket. Tighten head bolts or replace gasket (par. 41).
(4) Overheating.
(a) Faulty fuel system. Refer to paragraph 31.
(b) Dirt on cylinders. Clean fins on cylinder, especially the fins on cylinder head.
(c) Defective lubrication system. Refer to paragraph 30.
(d) Defective ignition system. Refer to paragraph 32.
(e) Idling engine without having vehicle in motion. Do not idle engine longer than 1 minute.
(f) Valve tappet adjustment incorrect. Refer to step b (1) below for test, to paragraph 43 for adjustment.
(g) Drive chains too tight. Adjust (pars. 59 and 60).
(h) Excessive carbon deposits. Refer to organization mechanic.
(5) Lack of Power.
(a) Defective fuel system. Refer to paragraph 31.
(b) Defective ignition system. Refer to paragraph 32.
(c) Overheating. Refer to step (4) above.
(d) Defective lubricating system. Refer to paragraph 30.
(e) Poor compression. Refer to step (3) above.
(f) Drive chains too tight. Adjust (pars. 59 and 60).
(g) Brakes dragging. Adjust (pars. 96 and 97).
(6) Popping and Spitting Through Carburetor.
(a) Water in fuel. Water may be present in fuel tank and carburetor. Drain and refill fuel tank and carburetor bowl.
(b) Incorrect valve tappet adjustment or sticky valves. Test (step b (1) below). Adjust tappets (par. 43). (c) Defective ignition system. Refer to paragraph 32.
(d) Defective fuel system. Refer to paragraph 31.
(e) Weak and/or broken valve springs. Refer to higher authority.
(7) Spark Knock.
(a) Defective ignition system. Refer to paragraph 32.
(b) Excessive carbon deposits. Refer to step b (2) below.
(c) Defective fuel system. Refer to paragraph 31.
(d) Defective lubrication system. Refer to paragraph 30.
(8) Pounding and Excessive Metallic Noise.
(a) Front drive chain too loose. Refer to paragraph 36.
(b) Engine sprocket loose on shaft.
(c) Excessively loose valve tappets. Adjust (par. 43).
(d) Engine mounting bolts loose. Tighten.
(e) Transmission mounting stud nuts loose. Tighten (par. 60).
(f) Spark timing incorrect. Adjust.
(g) Internal parts of engine worn or broken. Notify organization mechanic.
b. Tests to Determine Mechanical Condition of Engine.
(1) Rings and Valves. This is a simple compression test. If possible, make this test with the engine warm. Ignition switch must be off. Crank engine slowly, placing entire weight of body on starter crank. Engine compression should sustain the weight of an average size rider several seconds before crank passes through complete range of its travel. If engine offers little resistance to starter crank in testing either or both cylinders, it is an indication that compression is not adequate in one or both cylinders. No clearance or insufficient clearance at valve tappets; valves sticking in guides; valves seating poorly; cylinder heads leaking; spark plugs loose in heads; piston rings badly worn and/or broken; cylinder and pistons badly worn, or lack of lubrication could cause the above condition. Make external checks first: See that oil is in tank, that spark plugs are tight, and examine around cylinder heads for signs of leaking oil deposits. In extremely cold weather, resistance to the starter crank is increased by “stiff” oil in engine and transmission. Therefore, do not mistake this condition to indicate actual engine compression.
(2) Abnormal Engine Noise. Owing to constructional design of the motorcycle, correct adjustment of the several units and components is necessary for smooth and normally quiet engine operation. Many motorcycles have been “deadlined” and engines exchanged because simple tune‐up service and correct adjustment of components have been neglected. Rough, jerky, and noisy engine action at low speed riding is usually caused by excessively loose front and rear drive chains, or by a transmission being loose in its frame mounting. Fast idling of engine with the front drive chain too loose, may give the false impression that the engine bearings and pistons need replacement service. Engine sprocket loose on its shaft will cause a pounding noise similar to that of badly worn engine bearings. If front drive chain is too tight, or engine sprocket and chain are badly worn, a grinding noise results, seeming to come from the engine. Excessively loose valve tappets will cause abnormal metallic noise in the valve timing gear train and engine crankcase. Spark advanced too far will cause rough engine performance at low speeds as well as spark knock, pounding, and overheating. Engine pounding and rough operation with consequent noise, result from loose mounting bolts. Generator mounted to give insufficient gear‐tooth clearance will cause “howl” in gear case.
30. ENGINE LUBRICATING SYSTEM.
a. Action of the oil feed pump is indicated by the red signal light located in right side of instrument panel. (Red signal light is normally grounded by the oil pressure switch. When oil pump pressure is built up several pounds, diaphragm opens the signal light circuit.) Action of the scavenger (oil return) pump is indicated (engine running) by oil dripping from 1⁄8–inch hole in oil return tube (large tube) inside oil tank, just back of oil gage rod (dip stick) tube. Since the oil feed pump and scavenger pump are separate units, operated individually, it is possible (due to faulty unit) for either to function alone, thus affecting engine oil pressure and return of oil to the tank. Action of the vent pipe (small pipe) located within the oil tank is of a “breather” nature; its function not being indicated in any manner. Before attempting to diagnose trouble in engine lubricating system, rider must be familiar with and understand indications by instrument panel signal lights (par. 7 f).
b. Red Signal Light Fails to Burn When Ignition and Light Switch is Turned On.
(1) Check other lights to determine if battery is “up” and that switch and wiring connections between battery and switch are in good order. See that wire connection is secure and screw is tight on oil pressure switch terminal. Failure of light to burn after these checks indicates that either the lamp is burned out or oil pressure switch is faulty.
(2) Test to eliminate the oil pressure switch by removing wire from switch terminal; ground wire on switch body and note if red light burns with ignition and light switch in “ON” position. If light burns, it indicates that oil pressure switch is faulty, and must be replaced. If light does not burn in making this test, it indicates that lamp is burned out. Remove panel cover (par. 119) and replace lamp.
c. Red Signal Light Continues to Burn After Engine Is Operated Above Idling Speeds.
(1) Check oil supply in tank. If light fails to go out after engine is warm, or after 1 minute of operation, further checks must be made to locate trouble, as indication points to faulty engine lubrication system, or fault in signal circuit. Eliminate the signal system first.
(2) Test oil pressure signal switch to panel signal light circuit. Remove wire from oil pressure switch terminal by turning on ignition and light switch and observing red signal light. If light burns, short circuit in wiring exists. If light does not burn, it indicates normal condition, leaving oil pressure switch of the signal circuit to be tested.
(3) Install new oil pressure switch and start engine. If red signal light goes out after engine is operated above idling speeds, it indicates trouble in oil pressure signal switch. If red signal light continues to burn, it indicates trouble in oil feed pump. Replace pump (par. 44).
d. Excessive Smoke Issues from Exhaust and Oil Spray Issues from Gear Case Breather Outlet. This is an indication that the scavenger pump is not draining engine crankcase and returning oil to tank. With engine running at idle speed, examine oil return in tank. Remove tank oil cap, and with a small flashlight (tactical situation permitting), observe whether or not oil is dripping from 1⁄8–inch hole in oil return tube. Hole is on under side of tube and is located just back of oil gage rod tube. If observation is poor, place finger over hole and feel for pulsation of oil pressure. If oil does not return to tank, scavenger pump is faulty. Should the crankcase breather valve be incorrectly timed, smoke will issue from the exhaust, but not as noticeably as when scavenger pump is not working. Refer to step e below for this condition.
e. Smoke Issues from Exhaust and Excessive Oil Condition Exists Around Cylinder Exhaust Ports (where exhaust pipes enter cylinders). Engine scavenger pump and crankcase breather valve are one unit, operated by worm gear located behind engine shaft pinion gear. Although scavenger pump is not “timed,” the breather valve sleeve which drives it must be timed to balance the engine lubricating system. If for any reason the scavenger pump unit is removed from engine base, the breather valve must be retimed (within the gear case) when pump assembly is replaced. Incorrectly timed breather valve will force oil past piston rings, causing some smoke, besides forcing oil out through exhaust ports, causing excessive oily condition around exhaust pipes where they enter cylinder ports.
31. FUEL SYSTEM.
a. Many symptoms which might be attributed to the air‐fuel system are, in reality, due to faulty ignition. Before attempting any but the obviously required adjustments, check the ignition system thoroughly. Gasoline tank supply valve is a dual purpose valve, and its operation is explained in paragraph 5 b.
b. Shut off gasoline supply valve. Disconnect fuel line at strainer, open valve, and observe free flow of fuel from pipe. If line is plugged, remove, clean out, and replace.
c. Remove, disassemble, clean, and install fuel strainer (par. 72).
d. Hard Starting, Spitting, and Misfiring Caused by Water in Fuel. Remove drain screw from carburetor bowl, drain bowl, and replace screw. Take care not to cross drain screw threads when replacing. If there is still evidence of water, dirt, or other foreign matter after bowl is drained, replace carburetor (pars. 70 and 71). Remove air cleaner oil cup and inspect for evidence of water in oil. Drain, clean, refill to correct level mark, and replace cup. Should above procedure fail to eliminate trouble, drain fuel tank by removing drain plug located under tank in forward position. Replace drain plug and refill tank with fuel.
e. Hard Starting, or Missing at Idling and Low Speeds. Carburetor low speed circuit in need of adjustment (par. 68). Carburetor high speed circuit is controlled by a fixed jet.
f. Impossible to Obtain Satisfactory Carburetor Adjustment: Lean Spot Between Idling and Up to 30 Miles per Hour Speeds. Carburetors in service for some time become dirty and crust forms in the throttle barrel, making satisfactory low speed adjustment difficult, if not impossible. Replace carburetor (pars. 70 and 71).
g. Fuel Leaking from Carburetor. Evidence of dirt in float valve, incorrect float level, or faulty float. Replace carburetor (pars. 70 and 71).
h. Difficult Starting, Fuel Mixture Too Rich. Air cleaner oil cup overfilled, or cleaner elements exceptionally dirty, choking off adequate air supply to carburetor. Check the oil cup level. If oil cup level is correct, remove, clean, and install cleaner elements (par. 76).
32. IGNITION SYSTEM.
a. When checking ignition system for trouble, make the most obvious and simple checks first. For example: Turn on ignition and light switch, observe lights to ascertain battery current supply; then check to see that current is reaching spark coil, circuit breaker, etc. Faulty spark plugs are responsible for the great majority of engine ignition troubles. There is no service for spark plugs other than sandblast cleaning and correct adjustment of electrodes. Questionable spark plugs must be replaced (par. 83).
b. Remedy all poor connections in ignition wiring system ( fig. 48).
c. Remove circuit breaker cover, operate engine with starter pedal, and observe opening and closing of circuit breaker points. Correct point gap when breaker lever fiber is on highest point of cam is 0.022 inch. For adjustment refer to paragraph 84.
d. Testing for High Tension Spark. Spark at plug gaps depends upon condition and operation of circuit breaker points, condition of condenser, and condition of spark coil and high‐tension cables. Testing the ignition system is best done by means of elimination, testing each unit by replacement until trouble is located; then replacing serviceable units which were removed.
(1) Remove spark plug cable terminal from either plug, leaving other cable and plug connected (to effect ground return of high‐tension current); turn engine until circuit breaker points are closed; turn ignition and light switch on; hold high tension cable terminal ¼ inch from cylinder; open and close circuit breaker points with finger and observe spark jump at gap. If spark jumps gap, it indicates ignition primary and secondary circuits are complete.
(2) No spark at high‐tension gap calls for testing of primary and secondary circuits. Turn engine until breaker points are held open; hold cable end ¼ inch from cylinder; turn ignition switch on and with the bit of a screwdriver, make a good ground connection between breaker movable (lever) point, and the ground. If a good spark is obtained at high‐tension cable terminal gap when ground connection made by screwdriver is broken, clean or replace faulty breaker points (par. 84).
(3) If circuit breaker points are in good condition, but no spark (or a very weak spark) occurs at high‐tension gap, replace condenser (par. 85) and repeat test under step (1) above. If replacement of condenser does not remedy trouble, replace spark coil (par. 89).
(4) If tests made under steps d (1), (2), and (3) above show ignition system to be in good order (no units having been replaced), and ignition trouble still exists, it means that breaker points, condenser, and spark coil must be replaced with new units and engine road test made with each replacement until trouble has been located and remedied.
e. Ignition System Tests Satisfactory but Engine Starts Hard, Overheats or Misses. Clearly an indication that spark plugs are faulty. Remove spark plugs, clean with sandblast, regap points between 0.028 inch to 0.030 inch and reinstall. Replace defective plugs with new ones of correct (No. 2) heat range (par. 83).
f. Engine Misses After Warm‐up, or When Quite Hot. Replacement of spark plugs should remedy this trouble. If it does not, then either the condenser or spark coil is at fault. Replace condenser first (par. 85). If new condenser fails to correct trouble, replace spark coil (par. 89).
33. GENERATING SYSTEM.
a. Panel Green Signal Light Continues to Burn Above 20 Miles per Hour. Correct faulty wiring and connections between battery and generator. Refer to figure 55. Inspect condition of relay and, if necessary, replace (par. 95). Inspect brushes and commutator of generator. Clean commutator if necessary (par. 91). If brushes are sticking in holders or badly worn, replace generator (pars. 93 and 94).
b. Generator Output Fails to Keep Battery Charged Although Green Signal Light Behavior Is Satisfactory. Test battery: if it will not hold charge, or is defective, replace (par. 113). If the machine is used most of the time for night operation, have a higher echelon increase the generating charging rate. Inspect brushes and commutator of generator. Clean commutator if necessary (par. 91). If brushes are badly worn or sticking in holders, replace generator (pars. 93 and 94).
34. ELECTRICAL SYSTEM.
a. Panel Lamps Do Not Light When Switch Is Turned On. Examine each lamp and if burned out, replace (par. 120). Examine battery; if discharged, replace (par. 113). Remedy defective wiring and connections (fig. 71). Test light switch: if defective, replace (par. 116). Test blackout light switch (in lamp body): if defective, replace lamp (par. 114).
b. Lights Burn Dim but Brighten Up Considerably When Engine Is Accelerated. Test battery with hydrometer. If it is not fully charged, replace (par. 113). Remedy defective wiring, connections, and switches in circuit (fig. 73). If the battery runs down again after a short period of operation, have the generator output increased (refer to a higher echelon).
c. Lights Exceed Normal Brilliancy When Accelerating Engine. Examine battery: if defective, replace (par. 113). Remedy faulty wiring and connections (fig. 73). Do not forget the ground connection of the lamp body.
d. Blackout Stop Lamp and/or Service Stop Lamp Fail to Light. If the unit is burned out, replace it (par. 115). If the brake pedal is not operating switch, remedy the faulty operation. Remedy all faulty wiring and connections (fig. 73).
e. Horn Does Not Sound When Ignition and Light Switch Is Turned On and Horn Button Is Pressed. Test battery by turning on lights. If lights are dim, replace battery (par. 113). Remedy defective wiring and connections (fig. 73). If the horn does not respond to adjustment, replace (par. 117).
35. TRANSMISSION AND CLUTCH.
a. Need for attention to clutch and controls is indicated by clutch slipping under load or dragging (transmission gears will shift hard and clash) when in disengaged position. In either case, the first thing to be checked is adjustment of controls; this being the attention usually needed. Indication that gear shifter controls are in need of adjustment is when transmission gears “jump” out of engagement when accelerating vehicle or when under heavy pull. CAUTION: This warning must not be disregarded.
(1) Clutch Slips When Fully Engaged. Adjust clutch control (par. 48). Adjust clutch spring tension (par. 48). If the clutch still slips, replace either the disks, springs, or both (par. 48).
(2) Clutch Drags When Fully Disengaged. Adjust control (par. 48). Adjust spring tension (par. 48).
(3) Clutch Rattles When in Disengaged Position, Engine Idling. In this case, the clutch probably was not properly assembled. Refer to paragraph 51 a.
(4) Transmission “Jumps” Out of Gear Upon Accelerating Vehicle, or When Under Heavy Pull. Adjust shifter lever control linkage (par. 54).
(5) Transmission Gears Shift Hard or Clash When Clutch is Fully Disengaged. Adjust clutch control linkage and spring tension (par. 48). Make sure the transmission mounting bolts and units are tight (pars. 57 and 58). Drain and fill transmission with correct lubricant (fig. 10). If the above methods fail to cure the symptom, refer to a higher authority.
36. WHEELS AND CHAINS.
a. Transmission Countershaft and Rear Wheel Sprockets Show Excessive Wear on One Side of Teeth. Adjust the position of the rear wheel axle to aline the rear wheel sprocket with the transmission sprocket (par. 60). If they cannot be alined, the frame is out of alinement, and the trouble must be referred to a higher authority.
b. Chains Produce Grinding Noise with Engine Idling and Vehicle on Rear Stand. If either chain is adjusted too tight, adjust to proper tension (pars. 59 and 60). Examine both chains for presence of dirt and grit. If dirty, clean and lubricate them (par. 20 c (10)). If either chain is dry, adjust chain oilers (par. 61). Badly worn chains and sprockets will cause this symptom; the worn parts must be replaced (pars. 62 and 63).
c. Front Chain Dry and/or Red (Rusty) in Appearance. The chain in this condition has not been receiving enough lubrication. Adjust chain oiler (par. 61). If the chain is damaged from lack of oil, replace (par. 62).
d. Rough or Jerky Vehicle Operation at Low Speed. Chains are too loose. Adjust (pars. 59 and 60).
e. Excessive Side Play at Rim of Front Wheel. Adjust bearing cones (par. 126). If the cones and or hub races are badly worn, replace wheel (par. 125).
f. Front Wheel Spinning Test Produces Grinding, Grating Noise (not in brake). The wheel bearings are defective. Replace wheel (par. 125).
g. Rear Wheel Has Excessive Side Play at Rim of Wheel. The hub bearings are defective. Replace wheel (par. 127).
h. Rear Wheel Has Side Play in Excess of 0.010 inch on Axle. The thrust washers of hub are worn or damaged. Replace wheel (par. 127).
i. Rear Wheel Spinning Test Produces Grinding, Grating Noise (chain removed). Tighten wheel mounting screws. If this does not correct noise, replace wheel (par. 127).
37. BRAKES.
a. Rear Brake Does Not Hold When Foot Pedal Is Depressed. If the brake linings are wet, operate the vehicle and apply a slight pressure to the brake pedal to dry out linings. After drying the linings adjust brake rod length (par. 96 b). If the brake operating lever stands ahead of the vertical position with brake applied, or the brake does not hold, replace the defective brake shoes (par. 96).
b. Rear Brake Squeaks or Chatters When Used. Tighten side plate sleeve nut, if it is loose. Adjust shoe position (par. 96). If the operating camshaft and/or side cover bearing is worn, replace the assembly (par. 96). If the brake shoe spring is defective, replace (par. 96). If the lining on the brake shoes is loose, worn, or defective, replace shoes (par. 96). If the brake drum is worn or damaged, replace the brake drum and sprocket assembly (par. 96).
c. Rear Brake Drags (vehicle on rear stand). Adjust linkage (par. 96). If it still drags, equalize shoe assemblies, and adjust linkage (par. 96).
d. Front Brake Does Not Hold When Hand Lever Is Operated. Adjust brake control (par. 97). If brakes are wet, operate vehicle a short distance with slight pressure on brake lever to dry out linings. If brake does not hold, replace shoes (par. 97).
e. Front Brake Drags. Adjust control linkage (par. 97). If brake still drags, equalize shoes and readjust control linkage (par. 97).
f. Front Brake Action Rough and/or Chatters. Adjust control linkage assembly (par. 97). If malfunction continues, examine brake shoes, shoe spring, camshaft bearing and side cover bearing. Replace any defective parts or assemblies (par. 97).
38. STEERING.
a. Motorcycle Pulls to One Side. Inspect and correct alinement of rear wheel (par. 60). If the front forks are bent or twisted, replace (par. 98). If trouble persists, refer to higher authority.
b. Motorcycle Weaves from Side to Side. Adjust steering damper to suit speed and road conditions. If this fails, inflate tires to correct pressure. Make sure rear wheel mounting screws are tight. If the steering head bearings are too tight, weaving will result. Check the steering head bearings (par. 98), and adjust if necessary.
c. Motorcycle Shimmies at High Speed. Inflate tires to correct pressure. Adjust steering damper to suit speed and road conditions. If the tire tread is unevenly worn, and shifting tires does not correct the condition, replace the defective casings. Make sure the axle nuts are tight. If the rocker plate studs and bushings are badly worn, or the fork springs are broken, replace (par. 98).
Section XI ENGINE
Paragraph
Description and data39
Tune‐up40
Replacement of head gasket41
Carbon removal42
Valve tappet adjustment43
Replacement of oil feed pump44
39. DESCRIPTION AND DATA.
a. Description. This 2‐cylinder, V‐type, air‐cooled gasoline engine of L‐head design operates on the 4‐stroke, 4‐cycle principle. Flywheel and connecting rod assemblies operate on roller bearings. Engine is fitted with low‐expansion aluminum alloy, cam‐ground, horizontally slotted pistons and with deep‐finned aluminum cylinder heads. As viewed from left side of vehicle (drive chain side), rotation of engine is counterclockwise.
b. Lubrication system is of dry‐sump type, in which oil supply is maintained in a tank away from engine. Oil is circulated by a supply feed pump and a scavenger, return pump. This oil circulating system plays a most important part in cooling the engine as well as lubricating it.
c. Data.
Type of engine 2‐cylinder, V‐type, L‐head, air‐cooled
Cylinder bore 2¾ in.
Stroke 313⁄16 in.
Piston displacement 45.12 cu in.
Compression ratio 5.0:1
Horsepower (N.A.C.C. Rating) 6.05
Engine number (serial), left side of engine base, just below front cylinder.
40. TUNE‐UP.
a. Tune‐up consists of making correct adjustment to valve tappets, circuit breaker ignition points, spark plug electrodes: checking and correcting ignition timing; draining and flushing carburetor bowl; cleaning and flushing gasoline strainer; cleaning muffler outlet, servicing air cleaner, and adjusting carburetor.
(1) Valve tappet adjustment (par. 43).
(2) Circuit breaker point adjustment (par. 84).
(3) Spark plug service (par. 83).
(4) Timing ignition (par. 86).
(5) Draining carburetor bowl (par. 73).
(6) Cleaning fuel strainer (par. 72).
(7) Cleaning muffler outlet requires freeing outlet of carbon deposits, caked dirt, oil, etc., with blade of screwdriver, or other suitable tool. Do not enlarge outlet size when cleaning.
(8) Servicing air cleaner (par. 76).
(9) Adjusting carburetor (par. 68).
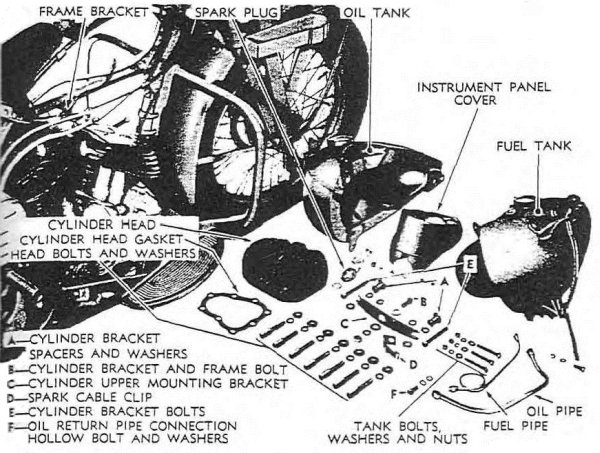
A—CYLINDER BRACKET SPACERS AND WASHERS B—CYLINDER BRACKET AND FRAME BOLT C—CYLINDER UPPER MOUNTING BRACKET D—SPARK CABLE CLIP E—CYLINDER BRACKET BOLTS F—OIL RETURN PIPE CONNECTION HOLLOW BOLT AND WASHERS
RA PD 315711 Figure 15—Disassembly for Head Gasket Replacement
41. REPLACEMENT OF HEAD GASKET (fig. 15).
a. Removal. Refer to figure 15, illustrating necessary parts and units to be removed to perform this operation.
(1) Remove instrument panel cover (par. 119).
(2) Remove gasoline tank and oil tank (par. 107).
(3) Remove cylinder head bracket to frame lug bolt: this will free clamp which secures front spark plug cable. Pay particular attention to shim washers placed between cylinder head bracket and frame lug, as these washers must be replaced when installing cylinder head.
(4) Remove spark plug, or plugs.
(5) Remove cylinder head bolts, using head bolt wrench 41–W–1525. NOTE: On some 42 WLA models, plain washers (0.095–inch thick), in addition to regular (heavy) cylinder head bolt washers, were used to prevent cylinder head bolts from bottoming.
(6) Perform carbon removal (head only). Refer to paragraph 42.
b. Installing Gasket and Head (fig. 15).
(1) Clean top of cylinder. Apply a light application of grease or oil to both sides of gasket before locating on cylinder head. Place head on cylinder.
(2) Install head bolts, using heavy washers (also 0.095–inch thick plain washers, if any were removed). If in doubt as to use of 0.095–inch thick washers in addition to regular washers, measure depth of bolt holes in cylinder head. Head having hole depth of 31/32 inch must use the 0.095–inch thick washers in addition to regular washers. Head having bolt hole depth of 11⁄16 inch does not require the 0.095–inch thick washers.
(3) Install cylinder frame bracket with the two long bolts, special (spool‐shaped) spacers, and flat washers. The spacers go between cylinder heads and frame bracket. A flat washer goes under the head of each long cylinder bolt, above the bracket; some engines may have flat washers between the spacers and the bracket.
(4) Tighten head bolts evenly to ensure a tight cylinder head joint. Use head bolt wrench 41–W–1525, first turning down bolts just snug, then tightening each bolt 1⁄8 to ¼ turn at a time, until all are securely tightened. If torque wrench is available, tighten head bolts to 60 foot‐pounds minimum, 65 foot‐pounds maximum tension when engine is cold.
42. CARBON REMOVAL.
a. At time cylinder head is removed for gasket replacement, carbon must be removed from head only.
43. VALVE TAPPET ADJUSTMENT (fig. 16).
a. Adjust Tappets with Engine Cold. Before loosening valve spring covers, a light application of oil around top edge of each cover will facilitate raising cover without damage to seal packing.
(1) Loosen valve spring covers; use tappet and valve cover wrench 41–W–3617.
(2) Before checking or adjusting tappet clearance, make sure valve is seated and that tappet is at lowest position, by turning engine ahead until like tappet (inlet or exhaust, whichever one is being adjusted) in the other cylinder is at highest position (valve fully open). Inlet valves are located nearest the carburetor manifold.
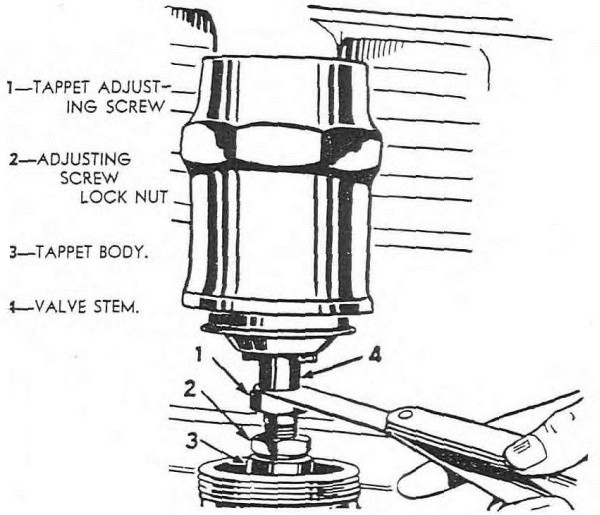
RA PD 310211 Figure 16—Valve Tappet Adjustment
(4) Loosen adjusting screw lock nut (“2,” fig. 16) slightly before turning adjusting screw (fig. 16).
(5) Adjust inlet valve tappets to 0.004–inch minimum, and 0.005–inch maximum clearance between valve stems and tappet (“1” and “4,” fig. 16). Use thickness gage to determine clearance; recheck (correcting if necessary) clearance after lock nut has been securely tightened.
(6) Adjust exhaust valve tappets to 0.006–inch minimum, and 0.007–inch maximum clearance between valve stems and tappet. Use thickness gage to determine clearance; recheck (correcting if necessary) clearance after lock nut has been securely tightened.
(7) Before turning down valve spring covers, inspect paper gasket between each cover and tappet guide. If broken or damaged, fit a new gasket to prevent oil leak. Turn down and securely tighten valve spring covers.
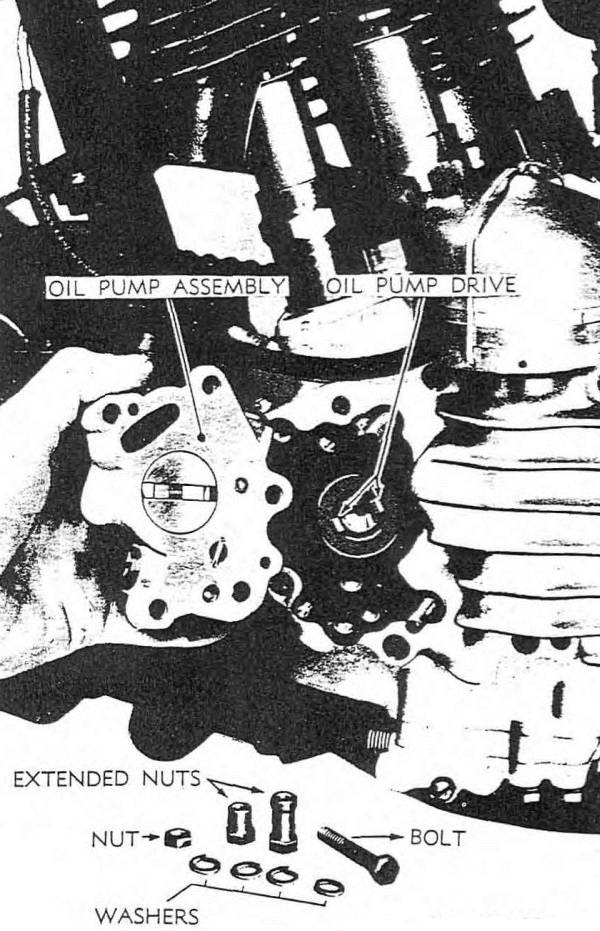
RA PD 315712 Figure 17—Oil Pump Removed
44. REPLACEMENT OF OIL FEED PUMP (fig. 17).
a. Removal.
(1) Disconnect oil tank feed pipe at oil tank. Install nipple cap on tank nipple to prevent oil from running out, or drain tank. Disconnect oil feed pipe from oil pump nipple.
(2) Oil pump is secured to engine gear case cover by one hexagon head bolt and three nuts. Two of the nuts are extra long to provide wrench clearance, and their location should be noted so they will be put back where they belong when reinstalling pump. After removing screw and nuts, remove pump. Unless a new pump gasket is available, take care not to damage or break the old one, as this is a very special gasket concerning both thickness and holes provided for oil channels. A “homemade” gasket may put oiling system completely out of commission.
b. Installing Oil Pump.
(1) Clean surface of pump body mounting on gear case cover and see that gasket is in good condition. Clean face of oil pump body.
(2) Start pump on mounting studs, turn engine slowly and press lightly against pump until driving dogs on end of cam gear shaft line up with and drop into driving slot in oil pump rotor.
(3) Insert hexagon‐head bolt and lock washer, and install the three lock washers and nuts (two are long extension nuts) on pump mounting studs. Make sure to replace the two extra long nuts on the studs from which they were originally removed.
(4) Tighten mounting bolt and three nuts securely.
(5) Connect oil feed pipe to oil pump nipple. Remove nipple cap from tank nipple and connect upper end of oil feed pipe to this nipple. Tighten nipple nuts securely.
Section XII ENGINE—REMOVAL AND INSTALLATION
Paragraph
Remove engine45
Install engine46
45. REMOVE ENGINE (figs. 18, 19, and 20).
a. A study of figures 18 and 19 will provide a good picture of the steps necessary for engine removal. Do not attempt any short cut methods, as this would consume more time and possibly cause damage to parts or unit assemblies.
(1) Disconnect battery ground wire at frame lug connection on right side of vehicle.
(2) To disconnect brake front rod from bell crank (located on right side of rear support rod), remove cotter pin and plain washer.
(3) Loosen footboard rear support stud nut and remove footboard front stud nut, then pull footboard outward to free right front end of safety guard. Disconnect brake front rod at bell crank. Remove bolt which secures front exhaust pipe clamp. Remove nut from rear support rod, freeing stop light switch and rear end of side bar. Remove nut from front support rod, freeing footboard and brake assembly for removal.
(4) Remove the two rear mounting bolts and drop rear end of skid plate (fig. 37).
(5) Remove muffler (par. 81).
(6) Disconnect oil pipe from tank and install nipple cap on oil tank feed pipe nipple to prevent oil from running out, or drain tank. Disconnect pipe from oil pump and remove oil pipe.
(7) Disconnect spark control wire at circuit breaker lever, and free control housing clamp at cylinder base.
(8) Disconnect brake rear rod from bell crank.
(9) Disconnect red wire and black wire from front end of relay; also green wire from generator terminal.
(10) Remove spark plugs.
(11) Remove engine top mounting (cylinder head bracket) bracket to frame lug bolt: this also frees front spark plug cable clamp. Pay particular attention to shim washers (if any) between cylinder head bracket and frame lug; these will have to be installed in the original position.
(12) Remove lever bottom bolt, freeing gear shifter lever from shifter rod.
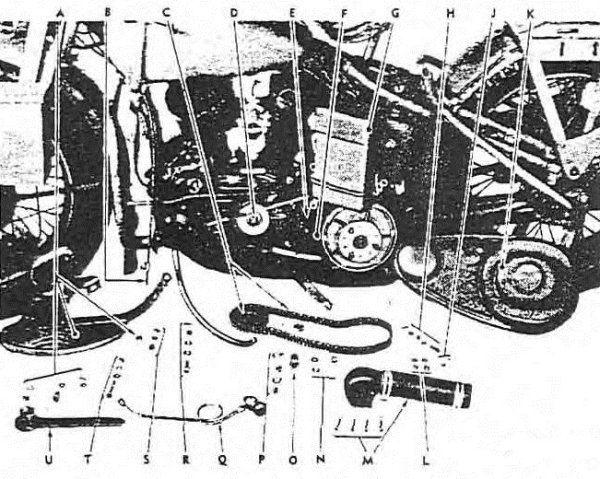
RA PD 315713
A—LEFT FOOTBOARD, CLUTCH PEDAL AND SIDEBAR ASSEMBLY AND MOUNTING NUTS AND WASHERS
B—SPARK CONTROL WIRE AND HOUSING
C—ENGINE SPROCKET, KEY, NUT AND FRONT DRIVE CHAIN
D—ENGINE SPROCKET SHAFT
E—REAR SUPPORT ROD
F—INNER CHAIN GUARD
G—AIR CLEANER AND BRACKET ASSEMBLY
H—OUTER CHAIN GUARD REAR MOUNTING BOLT, WASHER, SPRING, NUT AND COTTER PIN
J—SPARK COIL REAR TERMINAL NUT, WASHER AND SCREW
K—OUTER CHAIN GUARD
L—AIR CLEANER BRACKET UPPER MOUNTING BOLT NUTS AND WASHERS
M—AIR CLEANER HOSE AND CARBURETOR FITTING ASSEMBLY AND MOUNTING SCREWS
N—ENGINE LEFT REAR BASE MOUNTING BOLT CASTLE NUT, WASHERS AND COTTER PIN
O—REAR SUPPORT ROD EXTENDED NUT
P—INNER CHAIN GUARD MOUNTING SCREWS AND LOCKS
Q—FUEL PIPE AND STRAINER ASSEMBLY
R—ENGINE LEFT FRONT BASE MOUNTING BOLT, WASHERS, CASTLE NUT AND COTTER PIN
S—GEAR SHIFTER AND ROD ATTACHING BOLT, WASHER AND NUT
T—TANK, LOWER FRONT MOUNTING BOLT, WASHERS AND NUT
U—ENGINE SPROCKET NUT WRENCH
RA PD 315713B Figure 18—Disassembly for Engine Removal—Left Side
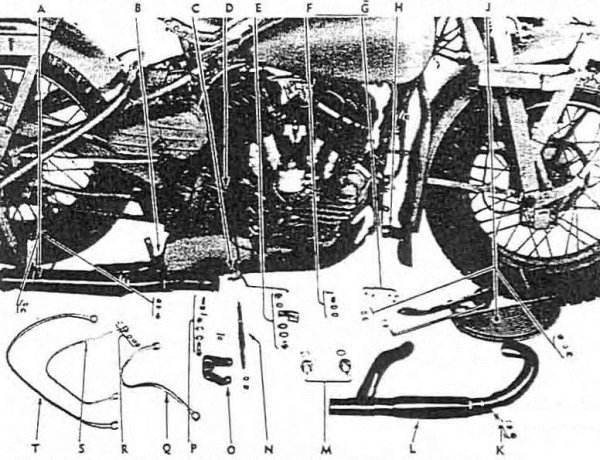
RA PD 315714
A—MUFFLER ASSEMBLY AND MOUNTING BOLTS AND NUTS
B—SKID PLATE
C—STOP LIGHT SWITCH
D—REAR BRAKE ROD FRONT END
E—CYLINDER BRACKET AND FRAME MOUNTING BOLT, SPACING WASHERS, SPARK CABLE CLIP AND NUT
F—ENGINE RIGHT FRONT BASE MOUNTING BOLT, CASTLE NUT, WASHERS AND COTTER PIN
G—RELAY TERMINAL SCREWS AND WASHERS
H—SAFETY GUARD END
J—RIGHT FOOTBOARD, BRAKE PEDAL AND SIDEBAR ASSEMBLY AND MOUNTING NUTS AND WASHERS
K—FRONT EXHAUST PIPE CLAMP, BOLT, WASHER AND NUT
L—EXHAUST PIPE ASSEMBLY
M—SPARK PLUGS AND GASKETS
N—REAR SUPPORT ROD, WASHER AND NUT
O—BRAKE ROD BELLCRANK
P—ENGINE REAR BASE MOUNTING BOLTS, WASHERS, CASTLE NUT AND COTTER PIN
Q—OIL FEED PIPE
R—VENT PIPE HOLLOW BOLT AND WASHER
S—VENT PIPE
T—OIL RETURN PIPE
RA PD 315714B Figure 19—Disassembly for Engine Removal—Right Side
(13) Close fuel tank valve. Remove gasoline pipe from tank nipple and fuel filter nipple.
(14) Disconnect throttle control wire at carburetor lever.
(15) Disconnect air intake hose connection fitting from carburetor (four screws) and leave attached to hose. Remove air cleaner from mounting bracket (par. 78).
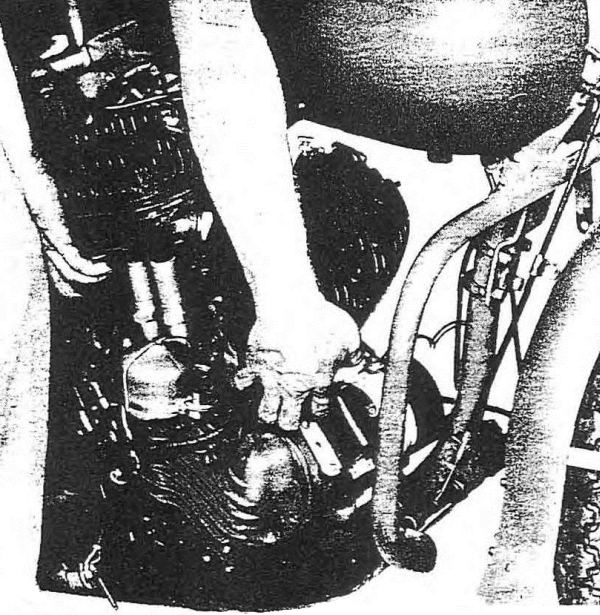
RA PD 310215 Figure 20—Removing Engine
(16) Remove front chain guard (par. 102).
(17) Remove engine sprocket (par. 65).
(18) Remove two screws and locks securing inner chain guard to crankcase.
(19) With 13⁄16–inch deep socket wrench slipped over rear footboard support rod stud, remove extended nut, and withdraw support rod from right side of vehicle.
(20) To disconnect the circuit breaker to coil wire and shielding ground from coil rear terminals, disconnect oil pressure signal light wire from oil pressure switch terminal. It will be necessary to free air cleaner mounting bracket and swing it outward, to gain access to coil rear shielding ground terminal.
(21) Engine mounting bolts are secured by cotter pins and castle nuts. Remove all engine mounting bolts, except the one under generator; this bolt cannot be removed without removing generator; merely push it up far enough to clear frame engine lug when engine is removed from frame.
(22) Lift and remove engine from right side of frame.
46. INSTALL ENGINE (figs. 18, 19, and 20).
a. Installing the engine is generally the reverse of the procedure followed in engine removal. Pay close attention to the following procedure because checking and adjustment of controls and other items is necessary to satisfactory vehicle operation.
(1) Lift engine into frame from right side of vehicle. Make sure that mounting bolt under generator is raised to clear frame engine lug.
(2) Pass remaining three engine mounting bolts up from under side of frame lugs through crankcase lugs: install plain washers and castle nuts. Fit plain washer and castle nut on mounting bolt under generator. Securely tighten all four castle nuts and lock with cotter pins.
(3) Connect circuit breaker to coil wire. Connect wire to coil rear terminal and ground shielding on coil case terminal.
(4) Connect oil pressure switch wire to switch terminal.
(5) Pass rear footboard support rod through frame lug from right side of vehicle and install the extended 13⁄16–inch nut.
(6) Secure inner chain guard by attaching the two screws and locks mounting inner chain guard to engine base. Drift edge of locks into screw slots for security.
(7) Install engine sprocket and front drive chain together. See that engine shaft is clean, sprocket taper clean, and that key is in place before tightening sprocket nut. Drift nut tight, using hammer on wrench.
(8) Install outer front chain guard (par. 102).
(9) Connect hose and fitting assembly by installing two bolts, washers, and nuts securing air cleaner to frame bracket; then install four screws securing hose fitting to carburetor. NOTE: If cleaner frame bracket was loosened and shifted to gain access to coil rear terminals, securely mount bracket before installing air cleaner assembly.
(10) Connect throttle control wire to carburetor lever. Make sure that throttle closes fully when right grip is turned outward; and that throttle opens fully when grip is turned inward.
(11) Install fuel pipe. Securely tighten union nuts on tank and fuel strainer nipples. Open fuel supply valve and check connections for leaks.
(12) Connect gear shifter lever end to gear shifter rod by tightening bolt and nut.
(13) Attach engine top mounting bracket (cylinder head bracket) to frame lug, exercising care in installing required number of thin shims, together with clamp for front spark plug cable, to fill space between bracket and frame lug before tightening bolt nut. NOTE: Frame lug must be free from paint or grease to make clean “electrical” connection with plated shims and mounting bracket for adequate radio bonding.
(14) Before installing spark plugs, inspect for cleanliness and correct electrode adjustment. Service if necessary (par. 83). Replace gaskets to ensure tight joints.
(15) Connect red and black wires to relay: connect green wire to generator terminal marked “SWITCH.” Refer to wiring diagram (fig. 73).
(16) Attach rear brake rod to bell crank. Install plain washer and secure with cotter pin.
(17) Connect spark control wire to circuit breaker lever and secure control wire housing clamp under cylinder base nut. Make sure that spark advances fully (lever inward) when control grip (left handle bar) is turned inward, and that spark retards fully when control grip is turned outward. Make needed adjustment at control wire and lever connection.
(18) Remove nipple cap from tank oil pipe nipple (if one was used) and connect oil feed pipe, securely tightening union nuts at tank and oil pump.
(19) Position exhaust pipe and muffler assembly and attach rear hanger frame bolt, washer, and nut. Secure muffler front mounting bracket bolt, but do not tighten nut until skid plate rear bracket is located on this bolt.
(20) Lift rear end of skid plate, secure rear mounting bracket and muffler front mounting bracket with bolt, washer, and nut. Attach skid plate left side bracket, tightening support rod nut and bracket bolt and nut.
(21) Install right side footboard, sidebar, and brake pedal assembly. Install stop light switch bracket on rear support rod before placing lock washer and tightening nut. Attach front exhaust pipe clamp to sidebar. Install lock washer, and tighten sidebar front support rod nut. Attach right end of front safety guard to sidebar with footboard front support stud. Replace lock washer, and tighten nut. Also tighten footboard rear support stud nut. Connect stop light switch control to brake foot pedal.
(22) Attach brake front rod to bell crank; fit plain washer and secure with cotter pin.
(23) Connect battery ground wire to frame lug on right side of vehicle.
b. Check instrument panel signal lights for normal indications, and see that oil is in tank before starting engine.
Section XIII CLUTCH
Paragraph
Description47
Maintenance and adjustment48
Removal of disks49
Inspection of disks and springs50
Installation of disks51
Replacement of clutch release bearing52
47. DESCRIPTION (fig. 21).
a. Clutch is of simple multiple‐dry‐disk type, having two steel disks and three lined disks, one of which provides spring action within disk pack to “cushion” clutch operation.
48. MAINTENANCE AND ADJUSTMENT (figs. 22, 23, 24, and 25).
a. If clutch adjustment is correctly maintained, clutch will cause very little trouble. Ease of gear shifting and service life of transmission gear shifter clutch dogs depend largely upon full disengagement of the clutch. Clutch adjustment is in two parts; namely, control linkage and spring tension. Do not adjust clutch spring tension before correcting control adjustment.
b. Clutch Control Linkage (fig. 22). Operation of foot pedal, control cable, and clutch release lever actuates the push rod through hollow transmission shaft, disengaging or engaging clutch at will. Correct adjustment to control cable and release lever must be made before push rod adjustment is made.
c. Clutch Control Adjustment (figs. 23, 24, 25, and 26).
(1) Adjusting Cable Length. With clutch in fully disengaged position (foot pedal heel down) the clutch release lever must clear the countershaft sprocket cover stud and/or nut by 1⁄16 inch. Should clutch release lever strike sprocket cover and nut, clutch push rod movement is restricted, and clutch cannot be fully disengaged. Length of control cable must be adjusted to obtain 1⁄16–inch clutch release lever and sprocket cover stud and/or nut clearance. To lengthen or shorten clutch control cable, cable adjustable end must be removed from foot pedal stud (figs. 23 and 24). With foot pedal in forward (toe down) position, remove cotter pin and washer retaining cable end. Release other end of cable from notch in clutch release lever by pressing release lever inward and lifting cable end out of notch. Rock the foot pedal to rear (heel down) position and work cable adjustable end off foot pedal stud. Loosen lock nut and turn cable end to right (clockwise) to shorten cable; turn to left (counter‐clockwise) to lengthen cable. Tighten lock nut, install cable end on foot pedal stud; install washer and cotter pin, and install other end of cable in clutch release lever notch.
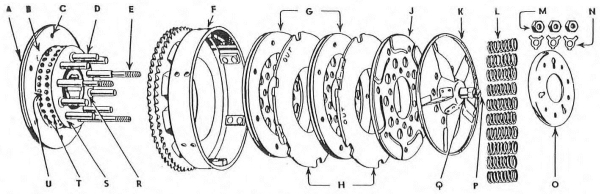
A—CLUTCH HUB COMPLETE, WITH LINER, BEARING, STUDS, ETC.
B—HUB DISK LINING.
C—LINING RIVET (6 USED).
D—PIN (7 USED).
E—STUD.
F—SPROCKET COMPLETE WITH DISK SPLINE RING.
G—LINED DISKS (2 USED).
H—PLAIN STEEL DISKS (2 USED).
J—SPRUNG STEEL DISK WITH ONE LINING.
K—RELEASING DISK (WITH PUSH ROD ADJUSTING SCREW AND ADJUSTING SCREW).
L—CLUTCH SPRINGS (10 USED).
M—STUD NUT LOCKING WASHER (3 USED).
N—STUD NUT (3 USED).
O—SPRING COMPRESSION COLLAR.
P—PUSH ROD ADJUSTING SCREW.
Q—ADJUSTING SCREW LOCK NUT.
R—RETAINING PLATE LOCK RING (3 USED).
S—BEARING RETAINING PLATE.
T—60 7/32–INCH STEEL BALLS.
U—BALL BEARING RETAINER.
RA PD 310218 Figure 21—Clutch, Disassembled
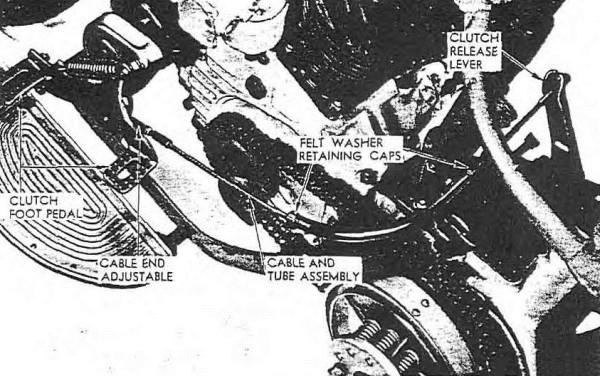
RA PD 310219 Figure 22—Clutch Control Linkage
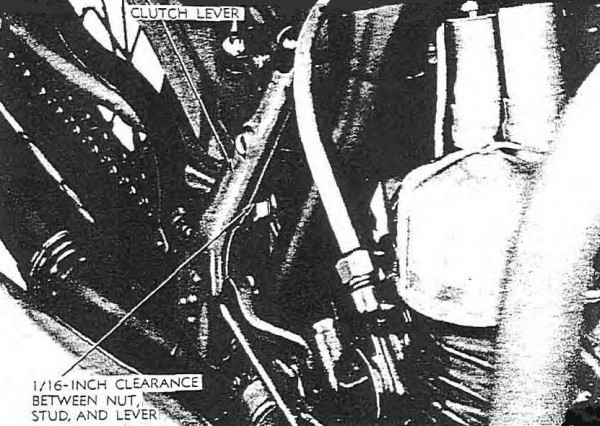
RA PD 310220 Figure 23—Clutch Lever and Stud Nut Clearance
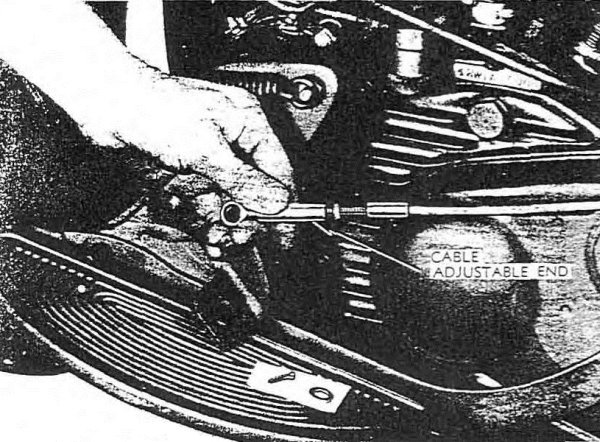
RA PD 310221 Figure 24—Control Cable Length Adjustment
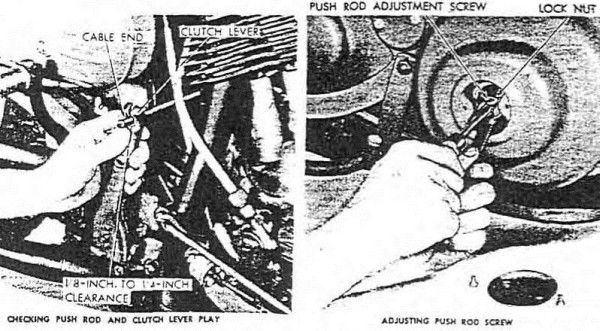
RA PD 315715 Figure 25—Clutch Adjustments
(2) Adjusting Clearance of Clutch Release Lever and Push Rod (fig. 25). With clutch release lever and sprocket cover stud clearance correctly adjusted (step (1) above), clutch release lever must have between 1⁄8–inch and ¼–inch free play at end where control cable engages lever notch (fig. 25). This free play ensures a fully engaged clutch without pressure on clutch release bearing. Adjustment is made by means of push rod adjusting screw located in clutch outer disk. Remove two screws which secure inspection hole cover to chain guard (fig. 25). If clutch release lever has less than 1⁄8–inch free play at end of cable, loosen push rod adjusting screw lock nut and turn push rod adjusting screw to the left (counter‐clockwise) to increase amount of free play. If clutch release lever has more than ¼–inch free play at end of cable, turn adjusting screw to the right (clockwise) to decrease amount of free play. Tighten lock nut after correct adjustment is obtained. Replace inspection hole cover. CAUTION: If end of clutch release lever has no free play as explained above, clutch will not hold when fully engaged. If too much free play is allowed, clutch will drag when disengaged; consequently, transmission gears will shift hard, clash, and eventually become damaged.
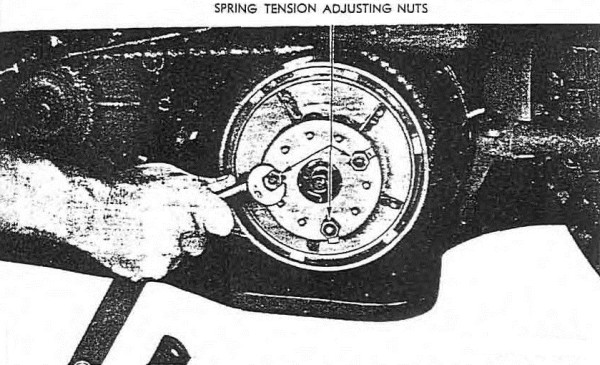
RA PD 310223 Figure 26—Adjusting Clutch Spring Tension
d. Adjusting Clutch Spring Tension (fig. 26). If clutch slips (does not hold when starting engine or with vehicle in operation) after controls have been correctly adjusted (step c (1) and (3) above), spring tension must be increased. NOTE: Do not increase spring tension any more than actually required to make clutch hold.
(1) Remove front outer chain guard (par. 102).
(2) Bend down lock lips to free the three clutch adjusting nuts.
(3) Turning nuts to right (clockwise) increases clutch spring tension. Tighten (turn to right) all three adjusting nuts, one‐half turn at a time, until clutch holds. Test clutch after each half‐turn of the three adjusting nuts by cranking engine. Usually a clutch that holds without any noticeable slippage when cranking engine, also holds on the road.
(4) After clutch spring tension adjustment is made, bend up nut lock lips to secure adjusting nuts. Replace any broken or badly damaged locks.
(5) When a new clutch is originally assembled and adjusted, the distance from the inner edge of shoulder on spring collar to face of outer (releasing) disk is 1–3/32 inches (fig. 27). In any case, do not tighten the three adjusting nuts to the point where inner edge of shoulder of spring collar is closer than ⅞ inch to face of outer (releasing) disk. If compressed more, clutch probably cannot be fully disengaged.
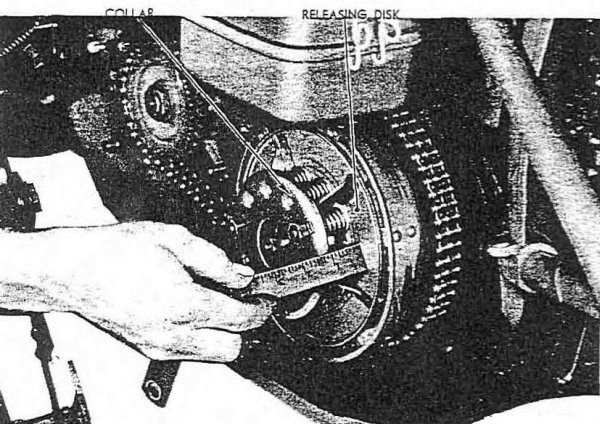
RA PD 310224 Figure 27—Measuring Distance Between Spring Collar and Disk
(7) If clutch still does not hold, after correct control and spring tension adjustments have been made, clutch “pack” assembly must be replaced (par. 49).
(8) After making clutch spring tension adjustment, replace outer front chain guard (par. 102).
49. REMOVAL OF DISKS (figs. 28, 29, and 30).
a. Clutch disks can be removed for inspection, cleaning, and/or replacing. Springs can be removed for checking and/or replacing without disturbing sprocket, which is integral with clutch shell. It is advisable to remove releasing (outer) disk, springs, and collar as an assembly because it is difficult to correctly aline, hold in place, and reassemble springs in this unit. If springs show signs of overheating, and appear to be “set,” they should be removed, measured, and replaced if necessary (par. 50).
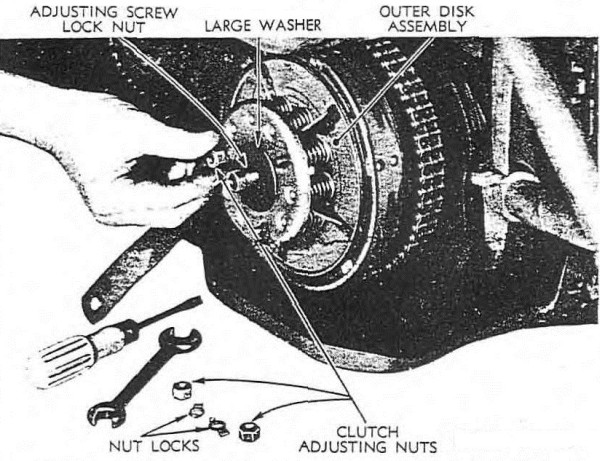
RA PD 315716 Figure 28—Removing Spring and Outer Disk Assembly
(1) Remove outer front chain guard (par. 102).
(2) Remove push rod adjusting screw lock nut. Place a large flat washer, approximately 1⁄8–inch thick, 1¾–inch in diameter with a ⅜–inch center hole, over push rod adjusting screw, and replace adjusting screw lock nut just removed (fig. 28). Tighten adjusting screw lock nut against large washer until the three clutch spring adjusting nuts are free. Bend nut lock down, remove the three adjusting nuts, and withdraw releasing (outer) disk and spring assembly as one unit. Remaining lined and plain steel disks can now be removed from sprocket and clutch shell unit without further disassembly (fig. 30). NOTE: At time lined and plain disks are removed from shell, observe relative position of each disk in order of correct assembly.
50. INSPECTION OF DISKS AND SPRINGS.
a. Worn Disk Liners. When disk liners are worn down flush (or nearly flush) with rivet heads, disk and liner assembly must be replaced.
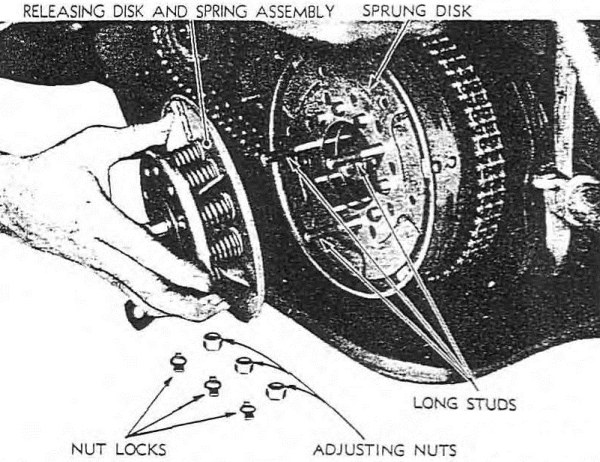
RA PD 315717 Figure 29—Outer Assembly Removed, Exposing Clutch Disks
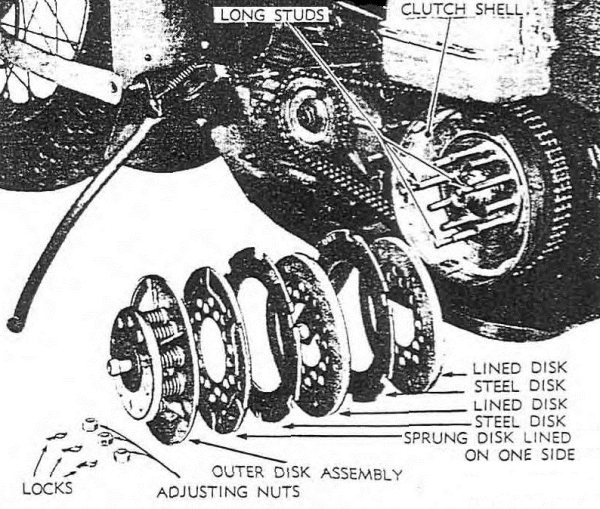
RA PD 315718 Figure 30—Clutch Disks, Removed
b. Loose Liner Rivets. If disk liner rivets are loose, replace disk and liner assembly with like assembly in new or good order.
c. Oil‐soaked Disk Liners. If lined disks are not badly worn, but are oil‐soaked, wash them thoroughly in clean gasoline and dry with air or heat.
d. Shrunken or Weak Springs. If clutch has been badly overheated as a result of slippage, springs may be found in shrunken or weakened condition. Assuming disk liners are not badly worn, weakened springs are indicated when the three spring tension nuts have been tightened to make the clutch hold until the distance between spring collar and releasing (outer) disk is ⅞ inch. If shrunken or weak springs are suspected, remove them for inspection.
(1) To remove springs, remove push rod adjusting screw lock nut, freeing spring collar and the 10 springs from the releasing (outer) disk assembly.
(2) Measure springs for free length. Free length of new clutch springs is approximately 1½ inches (they may vary plus or minus 1/32 inch). Old springs found to be shrunk 1⁄8 inch (total free length of spring is 1⅜ inch or less) must be replaced with new springs. NOTE: Before replacing springs, select 10 springs that do not vary more than 1/32 inch to make up the assembly.
(3) Assembling Releasing Disk, Springs, and Spring Collar. Place the 10 springs upright on releasing disk to centrally locate each of the 10 stud holes. Place spring collar (flanged edge down) over ends of springs, locating the collar plate “dimples” in ends of 7 of the springs. Place the large washer over push rod adjusting screw; tighten adjusting screw nut, and compress springs lightly. Turn assembly over and observe alinement of springs and disk holes. If necessary, insert a ⅜–inch rod through holes to aline springs. Tighten down adjusting screw nut; assembly is now ready for complete clutch assembly.
51. INSTALLATION OF DISKS (figs. 30, 29, and 28).
a. It is important when assembling a clutch to start with a lined disk. Install the two steel disks so that the antirattle devices are staggered on splines in the shell, and the “sprung” disk (lined on one side) is the last of the pack, its lined side facing the steel disk. Before installing disks, see that bearing retaining plate lock rings (“R,” fig. 21) are in place on the short studs, and are tight against the retaining plate. This is to prevent noise in the clutch.
(1) Install one of the two lined disks on clutch hub studs first.
(2) Next, engage one of the two steel disks with the splines within the clutch shell, with side stamped “OUT” facing outward.
(3) Install the remaining lined disk on the clutch hub studs.
(4) Engage remaining steel disk with shell splines with “OUT” side facing outward.
(5) Install “sprung” (one side lined) steel disk, lined side inward, on clutch hub studs.
(6) It will be noted that the three long, threaded‐end, clutch hub studs are not spaced an equal distance apart. It will also be noted that the three holes (keyhole shaped) in the spring collar are not spaced equidistantly. Therefore, when installing releasing disk and spring assembly on clutch hub studs, the three threaded studs and holes in spring collar must be alined. Install assembly on studs, replace the three nut locks, replace the three adjusting nuts, and tighten all three evenly until the distance between shoulder of spring collar and face of releasing disk is 1–1/32 inch (fig. 27).
(7) Remove the large washer and replace push rod adjusting screw lock nut. Do not attempt adjustment of clutch release lever and push rod adjusting screw until outer front chain guard and footboard have been installed.
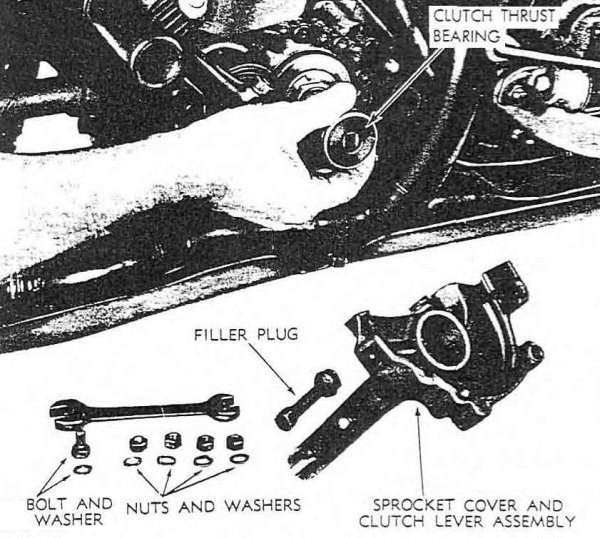
RA PD 315719 Figure 31—Removing Clutch Releasing Bearing Assembly
(8) Install outer front chain guard (par. 102).
(9) Check controls and clutch adjustment. If necessary, correct according to paragraph 48.
52. REPLACEMENT OF CLUTCH RELEASE BEARING (fig. 31).
a. Clutch release lever acts against a thrust bearing and push rod assembly which actuates clutch releasing disk.
b. Remove Clutch Release Bearing. Engage clutch fully (foot pedal toe down) and disengage clutch control cable end from slotted end of clutch release lever.
(1) Loosen rear chain guard by removing cap screw which retains rear chain oil pipe and secures front end of rear drive chain guard to transmission countershaft sprocket cover.
(2) Remove the four nuts which secure sprocket cover to transmission.
(3) Remove filler plug.
(4) Hold down starter crank with screwdriver.
(5) Remove sprocket cover and clutch release lever assembly. It may be necessary to pry cover off studs. With cover removed, clutch release bearing is exposed.
(6) Withdraw clutch release bearing and push rod assembly from transmission shaft.
c. Install Clutch Release Bearing.
(1) Insert push rod with clutch release bearing assembly into transmission shaft hole, as far as rod will go. See that bearing is clean and well greased.
(2) Install sprocket cover. Securely tighten the four nuts.
(3) Install cap screw which secures rear chain guard end and chain oiler pipe clamp to sprocket cover.
(4) Engage clutch control cable end in slotted end of clutch release lever.
(5) Check clutch release lever for free play at end of cable.
Section XIV TRANSMISSION
Paragraph
Description53
Control linkage54
Replacement of foot starter crank55
Replacement of starter crank spring56
Remove transmission57
Install transmission58
53. DESCRIPTION.
a. Transmission has three speeds: low, second, and high, and is of the constant‐mesh, non‐selective type. High gear is direct drive. Since “dogs” on gear shifter clutches are used to engage transmission gears, it is of great importance that vehicle clutch is correctly adjusted. Clutch must be fully disengaged when shifting gears, to prevent clashing of gears, and possible damage to the shifter clutch “dogs” and transmission gears. It is also important that gear shifter control linkage be kept in correct adjustment to ensure full engagement of shifter clutch driving dogs in all positions, thus preventing possible damage caused by dogs jumping out of engagement under driving load. Close fitting and needle roller bearings, within the transmission, necessitate use of engine oil (seasonal grade) in transmission case for adequate lubrication.
54. CONTROL LINKAGE (fig. 32).
a. Transmission Shifted to Adjust Front Drive Chain. The transmission is located to receive power from front (engine) drive chain and transmit power through rear drive chain to rear wheel, and is movable on its mounting for adjustment of the front (engine) drive chain. When front (engine) drive chain is adjusted, transmission gear shifter control linkage is affected. Therefore, after each front drive chain adjustment, gear shifter control linkage must be checked, and, if necessary, correctly adjusted to ensure proper gear shifting with full engagement of the gear shifter clutch driving “dogs” as well as prevent transmission from jumping out of gear under load.
b. Checking Gear Shifter Control Linkage. Before making adjustment to gear shifter control linkage, make the following checks: See that all linkage points from transmission gear shifter lever to gear shifter hand lever are well oiled and free‐working. Check hand lever pivot bolt nut for tightness. Observe whether there is binding or interference with shifter rod at any point in the shifting range; this sometimes results from a bent snifter rod. Check whether or not shifter rod is correctly adjusted so that when hand lever is moved to any gear position in tank shifter guide, transmission lever moves to the proper position to fully engage shifter clutch dogs and shifter cam spring plunger in cam‐locating notch (inside transmission).