HOW? OR, SPARE HOURS MADE PROFITABLE. (continued 2)
Reading edition
As these boats are necessarily very light, some ballast or a keel is indispensable for their sailing well. If a ballast is used, it must be fastened in place by wires on the inside; but as a keel is most satisfactory in the end, I should strongly advise its use. As it is molded from lead, you will be obliged to construct your own mold, which can be done by digging out a piece of wood in the proper shape, or, what is easier, by nailing on a flat piece of board two narrow strips at a suitable distance from each other, and closing the form by nailing other and shorter strips across the ends of the first. A little trough, as you will see, will be the result, and if after passing into this your melted lead you place two sharp nails with their heads imbedded in the mass, at the same distance from each other, and in the same relative positions as your wooden supports, your keel will, when hard, require only a few blows with the hammer to fix it in place. Care must be taken to place the nails so that they will enter the supports after passing through the paper bottom; as the keel would not otherwise hold in place. Next cut from the cigar-box wood a deck for your craft; this is 92easiest done by simply laying the model upon the wood bottom upward, and marking around the edge with a sharp-pointed lead-pencil. This deck must necessarily fit in your boat if your lines are followed in the cutting. Mark upon the deck the positions of the supports, and bore holes through it and into them, for the accommodation of the masts, which should be two in number for a schooner, or three for a full-rigged ship; fasten a bowsprit in its place, and arrange your sails and stays to suit the style of your boat.
After the keel, deck, and bowsprit are in place, it would be well to give her another good coat of paint, and when that is perfectly dry, to varnish her thoroughly with the shellac spoken of before in this book.
This boat is a great improvement on the ordinary dug-out hulls most boys are in the habit of making; for aside from taking less time in making, and sailing more rapidly, it has the advantage of being duplicated; that is, of having a dozen if you wish, made just like it on the same model, while it would be almost impossible to make two alike by the old, laborious method. In forming your model be careful to make it largest at the top, so that it can be removed without trouble from its papier-maché covering.
93―――――◀▶―――――
THE TOY STEAM-BOAT.
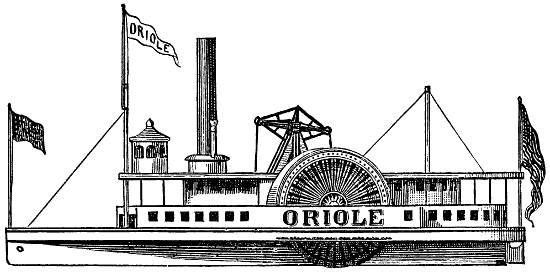
Among the many mechanical toys a boy of ordinary ability can make, the steam-boat is perhaps one of the most satisfactory of them all.
As a scroll-saw takes an important part in its making, some knowledge of one, or friendship with the owner of it, is desirable, if not absolutely necessary, for complete success.
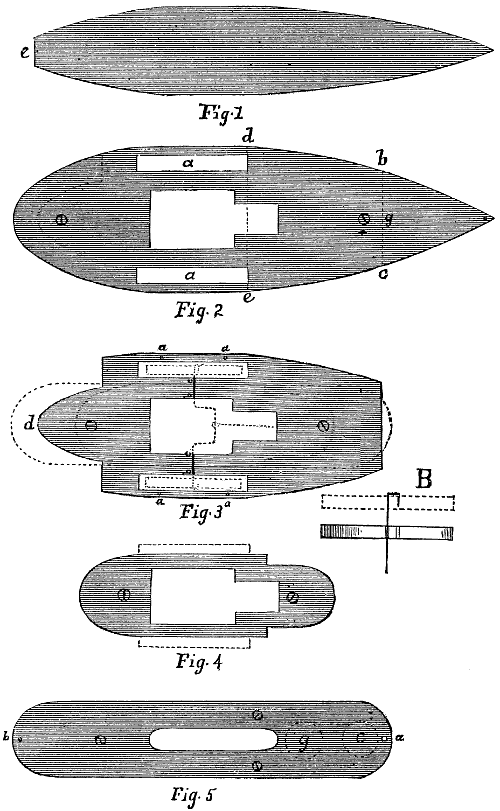
This toy is composed principally of five pieces of board, of different degrees of thickness, which are first cut out as follows:
The first piece, or hull, is eighteen inches long by three and one-half inches wide, with a shape like that indicated by Fig. 1, and made of wood seven-eighths of an inch thick.
To insure making both sides of these pieces alike, it would be well to first draw, on thick brown paper, a straight line from the bow to the middle point of the stern, and 94carefully mark out one-half the piece on the right side of this line; then, folding the paper on the line, cut through the outline, and the pattern is ready for use on your wood. Do this with all the parts, and you will find less difficulty in putting them together.
The second piece is made of a half-inch board, and is nineteen inches long, by five and one-half inches wide opposite the slits for the wheels.
The dotted line d e across this is just nine and one-half inches from the bow, and is placed there to show where the slits a a are to begin. These slits are for the wheels, and are four and one-quarter inches long, five-eighths of an inch wide, and three-eighths of an inch from the edge. The sides opposite these slits must be straight, or parallel to a line drawn from bow to middle of stern. The hole in the middle is three inches long by two inches wide, with an extension two inches long by one wide on the forward end. The middle of the main hole forms a line with the middle point of the paddle-wheel slits. Remember and mark out one-half of this on paper, double, and cut both sides at once; do 3, 4, and 5 the same way.
The third piece is made of seven-eighths-inch wood, fourteen inches long, and corresponds in shape to the second board from the dotted line b c, Fig. 2, to just aft of the slits for the paddle-wheels. Here the edge forms a line parallel to that of the second board, but one inch from it all the 97distance around, as indicated by the dotted lines on Fig. 2. Its shape is given in Fig. 3, and the point d is intended to fall over e in Fig. 1. The rear, f, in the second board, indicated in Fig. 2, extends an inch beyond, and forms the base for the flag-staff to stand upon, and a hole is made at g for another flag-staff to rest in (see engraving). The slits and central hole are the same size as in second board, and correspond to them in shape and position. (The position which three occupies in connection with two is indicated on Fig. 2 by the dotted lines.)
Fourth piece: Cut it like Fig. 4 in shape, and out of a board one inch in thickness. Its position is indicated by the inner set of dotted lines on Fig. 3. This piece is ten inches long and two and three-quarter inches wide, with a central hole the same size and shape as in the other pieces. At three-quarters of an inch forward from the slits for paddle-wheels, cut in three-quarters of an inch and finish in a semicircular shape at each end.
The fifth piece is made of half-inch wood, in shape like Fig. 5, and fifteen inches long by two and three-quarter inches wide, with the middle opening corresponding in length to the other three, but only three-quarters of an inch wide. Its position is indicated on Fig. 3 by the outer set of dotted lines. When referring to these pieces hereafter, I will call them Numbers 1, 2, etc., as indicated by the figures.
98The smoke-stack next claims our attention: this is six inches long, and seven-eighths of an inch in diameter across the top; its position is indicated at g on Fig. 5.
The pilot-house is cylindrical, and cut to correspond in form to that in the illustration. It is one and one-half inches in diameter and two inches high from base line to tip of point on the top.
The walking-beam is rather less than one-quarter of an inch thick, and is two and three-quarter inches long by one and one-quarter inches wide. It should be cut in the shape represented in Fig. 6, and a small hole bored in either end.
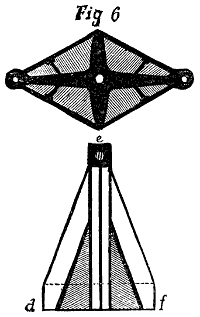
The supports for the walking-beam are two in number, made of quarter-inch wood, cut in the shape of d, e, f, Fig. 6; the base line, d f, is one and one-half inches, and the height of the support just two inches.
The wheels are made from three-eighths-of-an-inch wood and are circular in form, with a diameter of three and three-quarter inches.
At this stage of the work it would be well to bore in each of these two holes to allow the passage of a good-sized wire; one hole through the center, and the other a quarter of an inch one side of it. 99This is so arranged that the wire can be brought through the center of one wheel and allowed to project a few inches. Then bend the projecting end twice, in such a manner that it may enter the second hole in the wheel when that is pushed back upon it. This arrangement is seen at B, Fig. 3, in which the dotted lines show the final position of the wheel.
The pieces for the paddle-boxes, four in number, are semicircular, with a base line or diameter of four and one-quarter inches. The form is seen in Fig. 8, which also is intended to assist in the decoration.
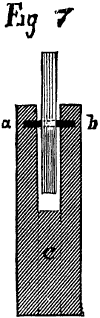
Fig. 7 represents a front view of the walking-beam and its supports; the line a b is a short piece of strong wire, which passes through the hole made in the center of the walking-beam, and rests in two holes made in the sides of the supports near the top, and extending nearly, but not quite through to the outer side. This is plainly seen in the figure, the black line indicating the length of these holes. C in the same figure is a small piece cut from a quarter-inch wood and intended to hold the supports in place, and to keep them a sufficient distance apart to allow free motion of the walking-beam.
The forward and aft flag-staffs are of large wire, and the two masts are of tough wood nearly as large round as a lead-pencil.
100Having all the parts now cut out in the proper form and size, take each piece and bore holes for the screws which hold them together. The position of these is indicated in each figure by the heads of the screws placed at precisely the best points; these screws should be of different lengths, as those passing through No. 4 require a length of one and one-half to one and three-quarter inches, while those for No. 2 need not be more than an inch in length. In No. 3 make four small holes, indicated by a in Fig. 3, for slender screws which are to hold the outer paddle-box pieces in place. In Fig. 3, the lines b c, b c, indicate grooves, cut down in the sides five-eighths of an inch deep, and reaching across in a straight line from the middle of one slit to the middle of the other; these should be large enough to admit an easy play of the wire which is to form the axle of the wheels. Holes should also be made at a and b, in Fig. 5, for the wire forming the flag-staffs to pass up through, and for the screws at c and g, which are to hold the pilot-house and smoke-stack in place.
Having smoothed off all these pieces and sand-papered those parts needing it, we now proceed to the painting, as it is much more convenient to paint each piece separately, and then put them together, than to leave it till the last, as is generally the custom.
No. 1 simply needs a thick coat of white paint.
No. 2 is also painted white. It seems unnecessary to 101add that those parts not seen when the steam-boat is put together, need no paint.
No. 3 is first painted white, then the windows are stenciled on in the same manner as given in the directions for making toy cars, in another part of this book. These should be black, while the name should be either dark red or brown.
No. 4 is also white, with windows stenciled on in black, as in No. 3, while No. 5 is painted a buff color, both on the top and under-side.
The smoke-stack is black, while the base is a deep yellow; and the pilot-house is white, with windows stenciled around its sides, while its pagoda-shaped top is a bright, light green.
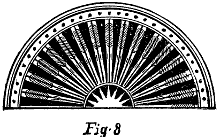
In Fig. 8, the two outside pieces of the paddle-box are given; and the manner in which they are to be painted is indicated; these four pieces need be painted only on one side, with a thick coat of white; two of these may now be laid aside, but the other two, after drying, should be decorated with radiating lines of red extending from the 102central semicircle, to the dark-red line running around the top at a short distance from the edge. These radiating lines should be alternated with light blue ones near the circumference; and the small semicircle at the bottom is a rich dark blue, with a star cut from gilt paper pasted on to give it the desired brilliant effect.
The walking-beam, Fig. 6, should next be treated; this is first covered with a bright green, and when dry marked with black, as indicated in the cut. The supports are first painted buff, the same color as the top, and afterward striped with black, as seen in Fig. 6.
The wheels must not be forgotten, for although showing but slightly, they would give the whole boat an unfinished appearance if left unpainted. These may be dark, or Indian red, with lines of black radiating from the center to the edge.
After all the parts are perfectly dry, fasten No. 2 and No. 1 in position, then having a sufficient length of wire, about the size of a large knitting-needle, fasten it in the first wheel, as indicated at B, Fig. 3. Then bend it into a crank, as shown by dotted lines in the middle opening of Fig. 3. This crank should be one and one-half inches wide and three-quarters of an inch deep; make the points, where it bends, as near right angles as possible; then pass the end through the other wheel, and with pliers bend it in place; next fasten the end of the wire, as in the first 103wheel, taking especial care meanwhile that the wheels are fixed the proper distance apart, and that the center of the crank comes in the middle of the opening.
It is a matter of some difficulty to adjust these wheels, as they should not be crowded against either side of the slit, but turn easily when the boat is drawn over the floor.
After the crank is bent in shape, wind around it the end of a piece of smaller wire about six inches long, as shown in Fig. 3. This wire is to connect the crank to the walking-beam, but it is not to be fastened to the latter until the boat is put together.
The outside of the paddle-boxes should next be attached to No. 3 by the small screws already spoken of, which are to pass up from the under-side through the holes a a, a a, Fig. 3, into their lower edge. The extremities of these boxes should form a line with the ends of the slits, and the outside of these and the edge of No. 3, which contains the name, should form a continuous flat surface.
The other two sides of these paddle-boxes are to be secured against the sides of No. 4, their bottom line forming a continuation of the bottom of the piece, and their position determined by placing the part on top of No. 3, as indicated in Fig. 3, and making their ends form a straight line with those of the outside pieces and the slits; this is also indicated by the dotted lines on the outside of Fig. 4.
104Having fastened No. 3 in its position over No. 2 (see Fig. 2, dotted lines), place the wheels in their slits and let the wires rest in the bottom of the grooves; they will then extend a fraction of an inch below the bottom of the boat. This arrangement is intentional, as the toy is intended to be drawn over a floor or carpet, and it is the friction these wheels encounter that moves the walking-beam, and thus gives it the natural appearance of a boat moving through the water. After these wires are pushed to the bottom of the grooves, insert wedges of wood above, deep enough to nearly touch them; make these of tough hard wood, so that there shall be no danger of the wheels riding up out of their proper places.
Place No. 4 in position, first drawing the wire attached to the crank through the opening, and screw it firmly down upon No. 3. There is now no danger of the axle of the wheels getting out of order, if the wedges were firmly fixed, and deep enough to keep the wire in place.
The smoke-stack should now be fastened with a strong and very long screw from the under-side of No. 5, at g. It should be very firmly attached in its place, as little children frequently use this as a handle to take the boat from the floor. Fasten on the pilot-house in the same manner at c, on Fig. 5. Having the walking-beam and its supports perfectly dry—and it would have been well to have given both a good coating of shellac dissolved in 105alcohol—take a wire or piece of knitting-needle nine-sixteenths of an inch long, and having fixed one end in the hole made near the top of the support to hold it, pass it through the central hole in the walking-beam, and insert the other end in the second support, then screw the piece marked c, in Fig. 7, in its place, which will of course hold the walking-beam firmly fixed. Now glue the supports inside the slit of No. 5, and in such a position that when the walking-beam is extended in a horizontal direction, the hole in the end toward the stern shall be exactly above the line of the axle of the wheels—that is, a line running across the boat from the center of one wheel to that of the other. These supports should also be caught underneath with nails, that there may be no danger of their falling through into the opening in the center.
Having fixed these in place, fasten the loose end of the wire connected with the crank through the small hole in the end of the walking-beam, so that when the crank is in a horizontal position, the walking-beam will also be in the same position. Attach a piece of wire four or five inches long to the other end of the walking-beam, and let the loose end fall through the opening in the top.
Now cover the open spaces at the top of the paddle-boxes with pieces of tin just wide enough to reach their edges, and catch it in place with tacks. Paint them with the light buff used for the deck.
106Fasten the two wire flag-staffs to bow and stern, and pass a wooden one seven inches long through a, Fig. 5, down into a hole in No. 2, as shown in Fig. 2, at g. With fine wire attach a topmast five inches in length to this, allowing them to lap about an inch.
Sink a mast four inches in length into a hole bored through 5 and well into 4, so that its top will be about three inches above the deck, and fasten the stays in their positions, as seen in the cut. On a piece of blue cambric paint white stars, cut it in the shape of a flag, and attach it to the forward pole. A small “one cent flag” will do for the stern, while the name of the boat painted in red or vermilion upon a white ground, should float from the tall staff in front of the pilot-house.
Before the flags are placed, the whole surface of the boat should be washed, if she has become soiled while being put together, and after the flag-staffs and stays are painted and have dried, the whole should be covered with the shellac dissolved in alcohol. Be sure and use white shellac, as the other would stain the white to a light brown and spoil the whole effect.
A hole is bored horizontally through the bow three-quarters of an inch from the extreme end, of sufficient size to admit a piece of large fish-line, the ends of which after it is inserted can be tied together to give a better hold for the hand.
107This boat is modeled after the ordinary bay and river excursion boats common to the northern and middle Atlantic sea-coast, but if any boy residing in the West should care to make one resembling those he is accustomed to see, he will find little difficulty in modifying these directions to suit his own particular taste in naval architecture.
―――――◀▶―――――
THE BOTTLE IMP.
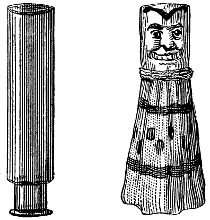
Take one or more small bottles, such as are generally used by homeopathic physicians for their pellets; cover them with a bit of closely-woven white cloth, and fasten it with a string around the middle. With oil paint make a grotesque face upon the upper part, and draw stripes or figures to represent a clown’s dress upon the lower and loose portion of the covering of each. Varnish this with the shellac, dissolved in alcohol, and when perfectly dry 108they are ready for use. Have a large-mouthed, perfectly clear glass jar nearly filled with water; then, after filling the little bottles about one-third full of the liquid, place the finger over the opening and immerse them, one at a time, bottom upward, into the jar. Be sure and keep the finger over the tiny mouth till they are well under the surface of the water. Should they sink in the jar, you have too much water in them.
The quantity of water they contain should be such that they will barely float, that is, the bottom of the little inverted vials should just touch the surface. This adjusting of the equilibrium is a matter of some delicacy; a single drop will make a difference: but by half-filling the bottle, placing the finger over the mouth, and removing it an instant to allow a drop or two to escape, the proper degree of buoyancy may be attained. Three or four of these bottles, in masquerade, should be introduced into the jar, and if they are, as they doubtless will be, of slightly differing degrees of buoyancy, the amusing effect will be enhanced. Now stretch a piece of thin rubber, such as toy balloons are made of, across the mouth of the jar, and tie it down, as seen in the illustration.
To make the imps dance, one has only to press upon the rubber top, as the air, in the top of the jar, is thus forced downward, the water is driven up into the small bottles, compressing the tiny quantity of air they contain, 109and they, in consequence, fall lower in the jar; but when the pressure is removed, the air in them expands, and they instantly rise to their normal position again.
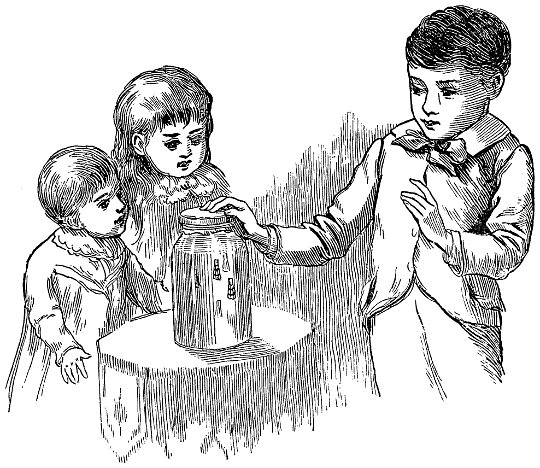
Quite a pleasant evening’s entertainment can be derived from this simple toy. You may first adjust your imps and make sure they are in good working order; then prepare a slight introductory speech, in which you can pretend to mesmerize the little images, not letting it be known they are bottles, and by some wonderful power you are supposed to possess, can make them obey your 110slightest wish. This will be very simple, as they will naturally descend when you press upon the top. This pressure should be exerted in such a manner that it is not noticed by the others in the room. You might stand with your left hand resting upon the top of the jar as if by accident, but in such a manner that you can easily press down upon the rubber with one or more fingers, and while telling of the wonderful things these little fellows can do, you can make graceful gestures with your right hand, and motion with it what you require them to do; it will thus seem that they are obeying the motions of that hand, and will serve to mystify more than ever those of your audience who are unacquainted with the secret.
―――――◀▶―――――
TELESCOPE WHICH A BOY CAN MAKE.
First, obtain two lenses; the larger having a long and the smaller a short focus.
A powerful telescope, having a large field of vision, requires a lens at least two inches in diameter, with a focus of from two to three feet for the larger glass; and another lens of from one-half to one inch in diameter, and with a focus of one inch, for the smaller end. Having your lenses, the next important step is to make your tubes; this is done by bending a piece of pasteboard a foot long by 111seven inches wide in the shape of a tube, whose diameter shall be about one-sixteenth of an inch larger than that of your lens. Glue the edges firmly together, and tie a piece of tape around to insure their keeping in place. Make two tubes of this size and one rather smaller, that its ends may fit in the other two. Lap these ends together, and paste or glue them in place (see cut). Joining these sections together is simply to insure a proper length of tube. If a piece of pasteboard can be found large enough to make a tube three feet long, it will look much neater than the one described above. Take a narrow strip of pasteboard and glue it around the inside of the tube, half an inch from one end; put the large lens in its place, and press it against the edge of this band. Now take another strip, three-eighths of an inch wide, and paste around the inside between the lens and the end of the tube. By this means the glass is kept in place, it being held by the edges of the pasteboard on either side.

Another and smaller tube, five or six inches in length, and of a size just sufficient to slide easily in the other end of the long tube should now be made. Around the inside of one end paste a band of pasteboard, as in the larger section, but much nearer the edge. When this is dry, 112paste still another strip inside this one, making a wide edge for the lens to rest against. As this tube is of much greater diameter than the glass, inclose the latter between two disks of cardboard of the same size as the opening in the tube, and each having a round hole cut in its center for the eye to look through. Cover the inner side with paste, and press it against the edges of the strips. Finally, cover the whole thing with some dark-colored paper, pasting it carefully over the surface, and your telescope is completed.
This instrument will present everything in an inverted position, but if the lenses are carefully adjusted, objects at a long distance can be very plainly seen, and a boy can derive a great amount of solid comfort, not only while constructing, but from its subsequent use.
To find the focal distance of a lens, if for any reason the optician does not give it, hold it in the sun, and observe at what distance from itself it makes the smallest point of light. That, if measured, will be its focal distance. The long tube should be from two to three inches shorter than the focal distance of the larger lens.
113―――――◀▶―――――
CHRISTMAS PRESENTS.
“What shall we make for Christmas?” is the cry that arises from the children all over this land and abroad, wherever the Christmas season is known and observed; and many a boy would be glad to contribute his share of labor toward making the others of his household happy, if he only could think of something to make. In the following pages, I purpose to give a few directions for some simple things, which boys of ordinary ability can easily execute.
THE ORNAMENTAL EGG.
Procure a large, perfectly white, hen’s egg, and after making a hole slightly larger than a pea in either end, blow the contents into a bowl placed to receive it. Paint some little thing on both sides of the shell—a bunch of forget-me-nots or pansies are very good subjects—or, if well acquainted with the brush, a small landscape, inclosed in an oval, is still prettier. After the painting is perfectly dry, varnish it with a brush filled with “retouching varnish,” and, with a long hair-pin, draw a piece of blue or pink ribbon through the holes, and get some lady friend, who can keep the secret, to tie the ends in a pretty bow. A yard of ribbon about an inch wide is required to complete this pretty ornament.
114
TRINKET-HOLDER.
During your summer journeyings, collect any fine large shells you may see; the large well-formed quahaug-shells (the common hard-shell clam), or those of the beautiful sea clam, with their wonderful opalescent linings. Scrape off all the outside you can possibly remove; then sketch on the inside some pleasing marine view, or, if that is beyond your powers, take any simple subject you are confident of doing well, remembering that a very unpretending thing, well painted, is much more pleasing, and indeed ornamental, than the most ornate subject imaginable, if poorly executed or badly drawn.
In painting on egg or sea shell, or, in fact, on any hard substance of a similar nature, use the paint as dry as is consistent with its flowing freely, and allow plenty of time for it to dry. After the painting seems firm and hard, give it a good coat of varnish, taking care to avoid touching all the unpainted surface of the shell. This little trinket-holder is easily made, costs nothing if one has a supply of paints at command, and makes one of the most acceptable presents you can offer to either an older sister or brother, as it is intended to stand on the dressing-table, and hold rings, collar-studs, or sleeve-buttons, when taken off for the night.
115
AN IDEA FOR BRACKETS.
In making a corner bracket, which, on the whole, is the most satisfactory to make, let one side be as large as the other, with the thickness of the wood in addition, and let the front of the shelf form the arc of a circle. If no curtain or fringe is to be tacked on the shelf to cover the uprights, some simple ornamentation on these is desirable. If a scroll-saw is conveniently at hand, this is easily accomplished. A design should first be drawn upon paper the exact shape and size of the bracket desired. This should then be transferred to the wood and the surplus portions carefully cut away. After the pattern is sawed out, the edges should be rubbed down with sand-paper, or if left very rough, a rasp would reduce this unevenness more readily; the sand-paper should be used in that case, to give the final finish. After the surface is as smooth as it is possible to make it, oil the whole, and when dry put the three parts together with brads and glue. Then oil the entire surface again, and when dry varnish if you like.
ANOTHER BRACKET.
If no scroll-saw is to be had, a pretty pair of uprights are made by gouging a narrow stripe around the entire form, at equal distances from the edge, and painting with gold paint a small stenciled form on the middle of each, 116also filling the stripe with the same material. For the stencil use a simple one of your own design, made according to directions given in another place in this book. Should you and an older sister desire to unite in making the present, she making the curtain, and you the woodwork, no fancy design would be required. A simple bracket, with well-proportioned supports nicely curving in front, and well sand-papered, oiled, and varnished, would be all required, as the curtain would hide the entire form.
THE CONE AND TWIG BRACKET.
One of the prettiest home-made brackets the writer ever saw was in an old-fashioned country house, in a thinly settled region of Massachusetts. The maker, a quiet, gentlemanly boy of fifteen, was a cripple, and being obliged to remain much of his time within-doors, had utilized these spare moments, and surrounded himself with many beautiful things, made from materials which nature with so lavish a hand bestows upon us all. This poor crippled boy loved the fields and meadows, lakes and woods, with an intensity of feeling utterly inconceivable to his more robust brothers and sisters; but his gentle, kindly manner won their hearts, and the brightest and best the farm afforded, whether fruit or flowers, minerals or young animals, found its way into “Ned’s sanctum,” 117as his little room was called. Even the young calves and colts, were brought around to his window, that he might admire their rather doubtful beauty, and nearly every brood of newly-hatched chickens spent several hours of their early life in a basket on the table at his side. One day, the children brought home some beautiful spruce and larch cones, and the little sufferer began, with the true artist’s sentiment, to revolve in his mind how he could put them in a form, which should always be in sight from his place by the window. At last he thought of the bracket, and immediately set to work drawing designs for the foundation. When these were quite satisfactory, he asked his brother to saw the different pieces from old cigar-box wood, and nail them together. The bracket was very simple in outline, but the arrangement of the cones, half nut-shells, and tiny twigs, was extremely artistic and pretty. They covered the two supports and the under-side of the shelf, forming little pendants, like stalactites in some hidden cave. These were glued firmly in place and afterward carefully varnished.
THE PEBBLE VASE.
On this bracket was a little vase, made by the same deft fingers. A broken wine-glass held the water, and the vase was formed around this, of that inexhaustible material, papier-maché, studded all over with bits of colored 118glass and bright pebbles gathered from the sea-shore. From earliest spring till the frost claimed the last lingering blossom, this vase was filled with the fairest flowers of the seasons, and, with the unique little bracket, seemed like a bit of the delightful out-door world transferred to the pleasant corner of the sunny little room.
THE CONE AND TWIG HANGING-BASKET.
The fall after his experiment with the bracket, Ned made a hanging-basket with the same materials, using a wooden bowl for the foundation. This was also a success, but not as uncommon as the bracket. The cocoanut-shell, cut evenly around near one end, forms a good material to build upon. In either this or the bowl, be sure to bore three holes near the top, at equal distances from each other, to attach the chains or strings to the basket. This must be done before the cones are glued in place. If a fourth hole is made near the bottom, and filled with a round-headed peg which can be removed at will, but which forms a part of the design, and receives its share of the final varnishing, the plants growing in the basket will present a much more flourishing condition, as the surplus water can be readily drawn off from their roots.
119―――――◀▶―――――
PAPER BOXES.
Many years ago, when our mothers were little girls and ready-made playthings were not as common as at the present day, during the long winter evenings they were obliged to invent their own amusements, and it was not uncommon in a large family where there were several girls and boys, for them to take turns in providing games for certain evenings in the week. Even the little ones contributed their share to the general amusement, and it was from one of these little girls, now grown to be an old gray-haired lady, that I first learned to make these simple boxes.
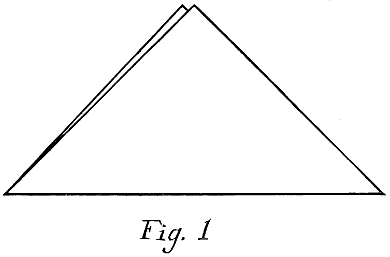
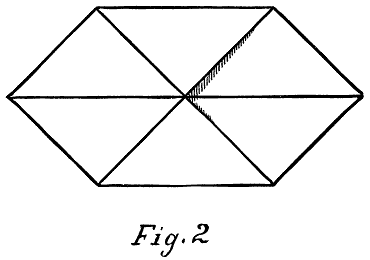
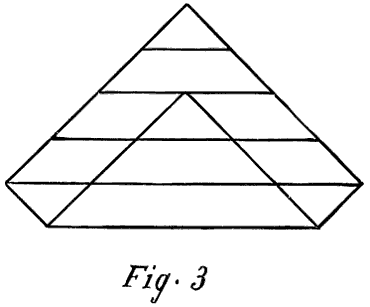
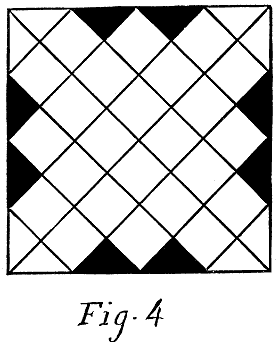
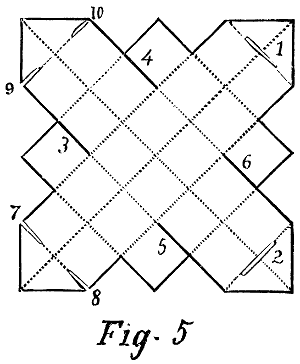
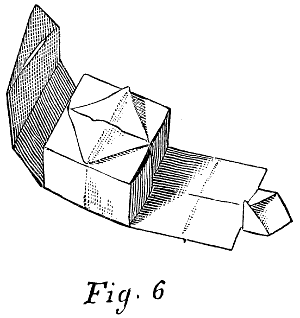
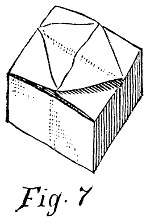
Take a square of ordinary note-paper, fold it as in Fig. 1, and crease it across; now open it and bring the two corners to the central point of the crease, and making 120them just touch each other at that point, and crease the folds, as in Fig. 2. Next fold between these folds and between the last made, and the corners, as in Fig. 3, always remembering to crease the folds when made. Now 121turn the paper and crease it seven times across the other way, and you will find your paper is folded in little 122squares. Then take your scissors and cut the little half squares left out in Fig. 4. Then with your penknife or the sharp points of the scissors cut the little slits 1 and 2; next, cut 3 and 4, 5 and 6 to the first creases; last, 7 and 8, 9 and 10 to the dots, but no further. Now fold the joint marked 9, 10, so that it will go through the slit 2, and when you have passed it through, straighten it out and press the paper in the shape of Fig. 6. Now pass the last point through the remaining slit and your box is complete. Occasionally, we used to make “nests” of these boxes, by commencing with very tiny ones, and gradually increasing the size, making one over another until our paper gave out, or we became tired of the amusement.
123―――――◀▶―――――
A SHAVING-CASE.
Although generally considered girls’ work, many little boys delight in working upon perforated paper, and they can put this pleasure to good account in making a shaving-case for papa. Procure a piece of silver or gold gilt perforated cardboard, of the coarsest variety, and cut it into two similar pieces, five by seven inches in size. With double zephyr, work an initial or some simple design on one of the pieces only, as the other will form the back of the case. Then get half-a-dozen sheets of different colored tissue-paper, and cut them up into pieces the exact size of the case. When all are fitted, place them between the two covers, and ask some lady in the family to sew them together at the top; fasten a ribbon of the same color as the worsted to each top corner for a handle, and cover the points of juncture with tiny bows. A little boy in the writer’s family made one of these for a dear uncle, and it lasted him a year without replenishing, forming one of the most useful presents he received.
―――――◀▶―――――
LEATHER WORK.
How many of my young readers have seen the beautiful shoes, boxes, and saddle-cloths, made of leather or velvet, and appliquéd with thinner leather, in graceful 124traceries, which are occasionally brought over to this country from Russia? These are mostly the work of the women and children of the smaller Russian villages, and in many instances their only means of support.
In those cold, desolate regions, where summer is very short, and the long dreary winter extends over a greater part of their lives, their occupations necessarily must be such as can be carried on in-doors, and are in many instances executed in their own homes. Hence the children seeing the simple processes going on around them, soon learn to help, and long before they have reached the age when American boys begin to think of working, they are earning their own living, and frequently supporting others of the family by their industry.
Although leather work to a Russian boy is anything but play, to a bright American it will be a source of considerable pleasure, and will serve the same purpose of amusement and instruction, for which most of the things in this book are intended.
The materials for leather work are very simple, consisting of the waste scraps from the neighboring book-binders or shoe-makers; these can be chosen without regard to shape or size.
To do the kind of work spoken of above, and known as “Kasan work,” select the thinner kid pieces from your leather, and with a lead-pencil mark upon the wrong side 125any design you may fancy. Then with a pair of sharp-pointed scissors cut out the design, carefully following the lines, and making the edges smooth and even. Lastly, wet the back with a little glue or paste, and stick it upon the cloth. Care should be taken not to move the pattern after it touches the cloth, as the glue might besmear the material in the open places of the pattern, and thus ruin the effect. After this has partially dried, get your mother or sister to stitch the edges on the machine, and you will have a nice bit of material, suitable for a shoe-bag or any other useful object you may like.
Another kind of leather work which is better adapted for boys, and a much more fascinating process than the above, is called by the French name “Cuir Bouilli”—pronounced “queer bwea”—or boiled leather. The scraps already gathered are suitable for this work, as any kind of leather can be used, although the softer kinds, such as sheep or calf skin, work much more easily. Soak this in hot alum water until it is soft, remembering that thick, tough leather requires a much longer time, as well as a hotter and stronger solution to soften, than the thinner pieces you may have. After this leather has been reduced to mere pulp, press it into any mold you may have at hand, taking care that it is pressed into all the cavities. After it is partially dried, in two or three days, remove the mold, and you have your object in firm hard leather 126which can be painted or varnished as you like. Many toys for your younger brothers and sisters can be made in this way, and are quite indestructible. Should you chance to have a good-sized piece of skin, much prettier things could be made from it, although a good worker in leather will use his scraps as the boy in his papier-maché uses his bits of paper, pasting them so nicely that no one would guess the number of pieces used. The best paste for this work is made of dextrine, a cheap substance, easily procured at any apothecary’s.
A PANEL OF LEATHER WORK.
As this is one of the simplest forms into which leather can be wrought, and one that probably gives the most satisfaction when completed, perhaps the description of a dining room panel, made by the writer’s little son, may afford more real assistance to the reader than any general rules which could be given for the work.
He had a sheet of calf-skin, nine by fourteen inches, which he soaked in warm alum water till it was very soft and pliable. Before this, however, he had prepared his foundation, which consisted of a thick piece of pasteboard six by twelve inches. Upon this was nailed or glued a simple design of a duck hanging by its legs, which he had drawn upon a thin slab of wood—a cigar-box cover, I think—and had cut out with a scroll-saw. Before tacking 127this on, he rounded off the edges of the figure on the right side with his jackknife, and using an old newspaper and a little paste, he built out the body of the bird, molding it with his fingers and an old ivory paper-cutter until he obtained the desired shape. After this had dried he covered his soaked leather with the dextrine paste, and laid it evenly on the form. Beginning at the middle of the panel, he carefully pressed the wet leather upon the figure, using the dull edge of the paper-cutter for the lines and deep places left in the foundation; always working from the center toward the edge, and taking particular care that each part was firmly attached to the wood. After the bird was done to his satisfaction, he proceeded to stamp over the whole background, using for this purpose an old office-seal which was at hand. In regard to the stamp, any ingenious boy can easily make a good substitute, by taking a piece of hard wood with a flat end, and cutting it across in parallel lines, re-cross these lines with other parallel ones, forming a surface of even diamond-work upon the wood. This, when pressed upon the wet leather, makes a very agreeable background for almost any figure you may like. A wet sponge must be constantly applied to the leather while working, to prevent its drying too rapidly. After the surface was well covered with the stamping, the leather was again rubbed with paste and pressed over the edge of the pasteboard 128background; tiny triangular pieces were snipped from the corners to allow of their lying quite flat on the under-side. Finally, the whole thing was firmly glued upon a black-walnut slab bought for that purpose. This panel is the natural color of the leather, but they are frequently stained black, and for that purpose the “ebony black stain” is the best material to use; but it is not necessary that they should be black; any color can be used, the beautiful bronze powders making very fine effects.
―――――◀▶―――――
TO TELL THE HOUR OF THE DAY BY THE LEFT HAND.
For the benefit of those boys who make frequent excursions into the woods, or away from the sight and sound of town clocks and bells, I write the following, which I found in an old book published early in the present century:
Extend the left hand in a horizontal position, so that the inside shall be turned toward the sky; then take a bit of straw or wood, and place it at right angles at the joint, between the thumb and the forefinger. It must be equal in length to the distance from that joint to the end of the forefinger, and must be held upright, as represented 129in the figure at a. Now turn the bottom of the thumb toward the sun, the hand being extended till the shadow of the muscle which is below the thumb terminates at the line of life, marked c. If the wrist or bottom of the hand be then turned toward the sun, the fingers being kept equally extended, the shadow of the bit of straw or stick will indicate the hour.
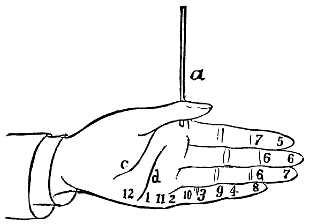
When the shadow falls on the tip of the forefinger, it denotes five in the morning, or seven in the evening; at the end of the middle finger, it denotes six in the morning or evening; at the end of the next finger, seven in the morning, or five in the evening; at the end of the little finger, eight in the morning, or four in the afternoon. At the nearest joint of the little finger, nine in the morning, or three in the afternoon; at the next joint of the little finger, ten in the morning, or two in the afternoon; at the root of the little finger, eleven in the morning, or one in 130the afternoon; in the last place where the shadow falls, on that line of the hand marked d, which is called the table line, it will indicate twelve o’clock at noon.
―――――◀▶―――――
STENCILS.
A dozen or more years ago I saw an advertisement from a Boston firm, of a package, to be had for the small sum of twenty-five cents, which contained several devices for entertaining children. As the advertisement seemed attractive, I sent for the article, and received by return mail a small box, which certainly contained all one could reasonably expect for the money. Many of the smaller things I have forgotten, but the idea of cutting stencils was so good, and gave the children of our family so much pleasure, that I insert a few simple designs, and give directions for cutting, hoping they may amuse the little ones of other families as agreeably as those of ours.
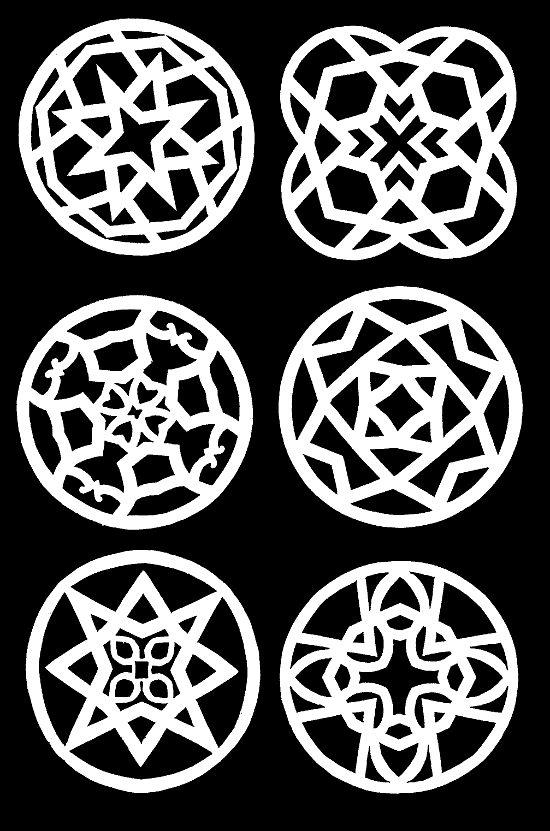
These designs, which require considerable care in the tracing, should be first drawn upon tracing-paper, or some stiff, thin paper, with a sharp-pointed lead-pencil; then, this being securely attached to a piece of thin bristol-board, or a common business-card, carefully cut the design, leaving the edges smooth and even. Particular care should be taken to cut all the useless bits of paper 133from the pattern. After a little practice, children learn to make designs for themselves, and enjoy it much more than following those given by others. It is, however, necessary that they should use those supplied at first, so as to understand just how the lines are to be cut.
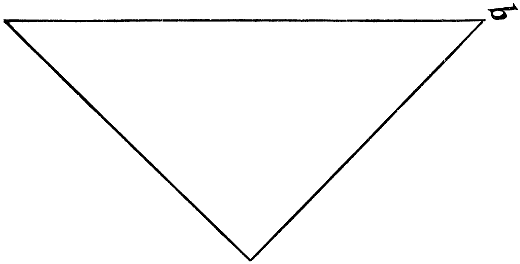
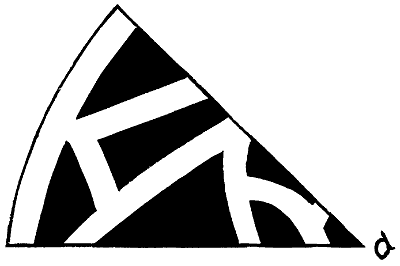
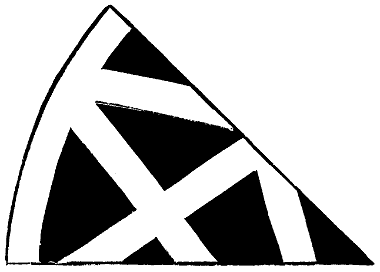
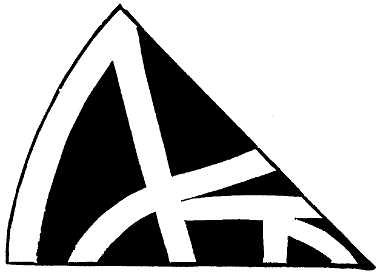
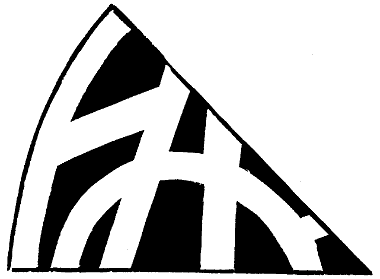
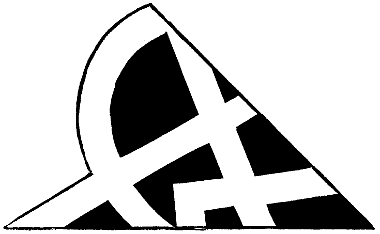
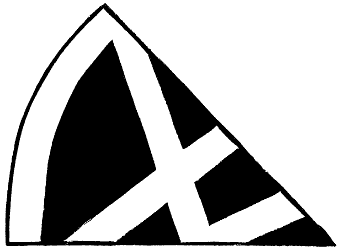
After the design has been carefully cut out, take a smooth piece of white paper, fold it through the middle; now fold again, bringing the ends of the first crease together; fold once more, making the last crease to fall upon the same line as the other two, and your paper will be in shape like the letter V, Fig. 1. Be sure that b, in Fig. 1, forms a perfect point. Now lay the pattern on your folded paper, letting a, Fig. 2, fall upon b, Fig. 1, and taking care that the edges of the pattern fall evenly upon the folds of the paper. Cut the paper out, following the lines of the design. After the black portions 134have all been cut away, open your folded form, and you will have a very pretty stencil, which can be used in decorating your playthings, or for the various other purposes stencils are so extensively employed. One little friend of mine used to paste all his finest specimens on square pieces of black cloth, and after he had a good-sized collection, he had the pieces sewed together in the 135form of a book. On the cover he pasted the word “Stencil” and his initials, all cut from white paper; and it was a never-failing source of pleasure to him to show this little work, declaring proudly as he did so, “I did it all myself with my own little pair of scissors.” These stencils could be cut from variously colored papers and then pasted upon ordinary note; the whole being caught together 136with a piece of ribbon. A book would be the result, which, if not prettier, would be less cumbersome than my little friend’s, and would probably give full as much satisfaction, besides being much easier to make. If you will carefully examine the inside decorations of many of our fine public buildings, you will see that much of the work is put on with stencils; and by looking still more carefully, you can learn just how these stencils are made; and from them gain ideas for your own designs, which will aid you very materially in any decoration you may try. It is not expected that a boy has judgment or skill sufficient to decorate an important room, but if you would like to try the experiment, you may be able to persuade your parents to allow you to try your hand at something of the kind in an unused garret room. But even in this, do not begin at hap-hazard. Study all the designs you can 137find, and note the effect of the colors on each other and upon the color of the wall itself. Choose some simple, open pattern at first, and do not use more than two colors in putting it on the wall. The fresco paint, or kalsomine, comes in a powder, with full directions for using printed on each package. It is put on with a short, thick brush; and is patted on through the stencil. For stenciling, the paint or kalsomine must be mixed much thicker than for an ordinary wash, and it is best to have your stencil pattern, after it is perfected to your taste, cut from a piece of tin, if a tinman is near at hand. After the walls have received their share of decoration, it would be well to paint the door to match, using some appropriate oblong stencil for the panels, and applying it with oil paint. In such things it is very easy to overload the work, and by putting on too much spoil the effect; so care and judgment 138must be exercised to know at just what point to stop, as well as to avoid daubiness and an uneven character to your work.
―――――◀▶―――――
LIGHT PRODUCED BY FRICTION UNDER WATER.
If you should rub two squares of cut-loaf sugar together in a dark room, light would result from the friction; but the effect is produced in a much greater degree by two pieces of silex or quartz; and if two pieces of a fine quality of quartz be forcibly rubbed together, you may distinguish the time of night by a watch; but what is more surprising, the same effect is produced equally strong on rubbing the pieces together under water.
In olden times, before matches were invented, fire for all purposes was produced by means of friction; a piece of flint and one of steel being the substances used, and a tin box of charred linen rags, called tinder, received the sparks which fell from the steel.
Many years ago, when your great-grandmothers were children, in many New England communities a cow’s horn, sawed across the top, and fitted with a wooden stopper, was used to hold the tinder, but later, the more stylish and luxurious tinder-box took its place. This box, made of tin, and somewhat larger and deeper than a 139good-sized blacking-box of to-day was fitted with an inside cover, a simple disk of tin with a ring of wire in the top for a handle, and was filled with a quantity of cotton or linen rags, which were set on fire with a brand from the hearth. When this burning cloth had reached a black color, but before it was reduced to ashes, the inside cover was let down upon it, and the flames were extinguished. After this, another outside cover was put on the box to prevent dampness penetrating, and thus rendering the tinder worthless. To insure further protection against the intruding damp, the box, with its companions of flint and steel, were generally kept in the chimney closet beside the fire-place.
In those primitive days of our country, it was a very common thing for a farmer’s wife to run into a neighbor’s and borrow some one of these necessary articles, and it was usually the tinder, which she had neglected to prepare when fire was plenty, that was the thing needed. Occasionally, when two or three houses were near together and the inmates on friendly terms with each other, one set would answer the demands of the neighborhood, and would be used by all with equal freeness. Later on, each family made their own matches, by simply dipping bits of wood into melted sulphur, and allowing it to dry on the end. These matches were kept in another tin box, and when the spark had ignited the 140tinder, the sulphur end was touched to the smoldering fire, and would immediately burst into flame.
Before these matches were invented, however, when the housewife wished to make her fire (stoves were of course unknown), she would seat herself near the fire-place, and, grasping the uncovered horn or box between her knees, would hold her steel in her left hand just above it, and with the flint or quartz in her right, would strike upon the former, till two or three sparks fell upon the charred surface; the bit of glowing tinder would then be carefully taken from the box, wrapped around with a bit of rag, and blown upon with her breath until the cloth burst into flames. A candle was quickly lighted from this, to keep the flame till the fire was well under way.
Every boy has probably felt the inconvenience of being without matches, when a fire on the beach in summer, or near the skating-pond in winter, would have been such a luxury. The next time the emergency occurs, strike a piece of quartz or hard white stone upon the large blade of your jackknife, over any bit of dry cotton or thin paper you may have at hand, as a tinder-box would probably not form part even of the very miscellaneous collection of the average school-boy’s pockets.
141―――――◀▶―――――
EXPERIMENT WITH FLOWER-SEEDS.
Split a small twig of the elder-bush lengthwise, and having scooped out the pith, fill each of the compartments with seeds of flowers of different colors, but which blossom about the same time. Surround them with mold, and then tying together the two bits of wood, plant the whole in a pot filled with earth, properly prepared. The stems of the different flowers will thus be so incorporated as to exhibit to the eye only one stem, throwing out branches covered with flowers of different colors, analagous to the seed which produced them. If the plants are somewhat alike in the texture of their stems, and germinate at about the same period, there will be less danger of the strong choking the weak.
―――――◀▶―――――
HOW TO SKELETONIZE LEAVES.
Among the many desirable subjects for photographic printing, none are more satisfactory or so delicate as a graceful arrangement of skeletonized leaves. It may be very simple, and composed of only three or four leaflets; or it may be so elaborate as to embrace specimens from trees and weeds, wild flowers and garden shrubs; while the beautiful seed-pods and grasses, readily found 142in our fields or along our brooklets, answer for the blossoms in this dainty, fairy-like bouquet.
The methods employed in freeing leaves from their pulpy element, or cellular tissue, as it is more properly called, are very unlike, as practiced by different individuals; but the following, given the author by a lady friend who has a large and extremely beautiful collection of remarkably fine specimens, is very simple, and can be practiced with success by a boy or girl of ten.
Take a wash-bowl, and fill it half full of soft water, into which a heaping teaspoonful of baking soda should be thrown; place this in a sunny window, or one with a southern exposure if possible, and put in your leaves; care must be taken that they are all under water, and not too crowded, although three or four dozen can safely be done at a time. Any leaf which has a firm, well-defined frame-work will make a good specimen. The leaves of the horse-chestnut, maple, silver-leaf catalpa, and magnolia; those of the currant, pear, English ivy, and plum, all make fine skeletons, and many delicate seed-covers, like those of the strawberry-tomato, are very easily treated. Do not confine yourself to this list, however, but try any which resemble these in texture, as a great variety is particularly desirable, if you would have a good collection.
After you have put your leaves to soak in the soda-water, 143leave them in the sun for three weeks, as that is the shortest time in which any will do. Then look them carefully over, and should any be found nearly free from their tissues, take them out, and wash them off in a bowl of clean water; then with a soft brush liberate any tiny particle that may still adhere to the frame-work, as any blemish of this kind is considered a defect in the specimen.
During this process, be careful to retain the fine threadlike bit of fiber that entirely encircles the leaf and forms an outside frame-work or edge. If it is found impossible to entirely clean the skeleton by aid of the brush, it should be put in a bowl or saucer of clean water and left in the sun for two or three days longer. When they are thoroughly cleaned, place them between the leaves of an old book, and lay them aside until the time for bleaching.
If you live in or near the latitude of New York, the best time to collect and treat your leaves is in June, while they are still fresh and tender, and before the insects have destroyed their shape; but should your home be further south, April or May would be a better time.
After your collection is complete, and all are dry, they will be much improved by bleaching. This process is also very simple, consisting, as it does, of merely dipping them in a weak solution of chloride of lime, and letting them remain there until the proper color is attained; then 144by slipping a piece of unglazed paper—ribbon paper is best for this purpose—beneath the surface of the water, and bringing it up with the leaf lying flat upon it, the skeleton can easily be taken from the water.
If the form is not inclined to spread out on the paper as it should, take a long slender darning-needle, and with the point carefully arrange it to your satisfaction. Another drying is now necessary, but the bleached leaves should be left on the ribbon paper, which may be put between the leaves of a book as before.
These can be kept for years, and should you be successful and obtain a number of perfect specimens, they will form a very valuable addition to your materials for Christmas gifts, and, prettily arranged, a very acceptable present to any dear friend.
―――――◀▶―――――
CAMERA OBSCURA.
Camera Obscura, a Latin name, meaning literally a dark chamber, belongs to an instrument invented by Baptista Porta in the sixteenth century.
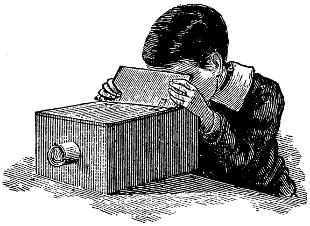
The principle involved in the simplest and most refined forms is the same, and may be illustrated by the following experiment: Let a small hole be cut in an opaque window-shade, and the room darkened. If, now, the beam 145of light entering the room by this hole be intercepted by a sheet of white paper, held at a small distance from the hole, an inverted image of objects without will be seen upon the paper. By placing a small convex lens over the hole this image is rendered much more distinct. It will also be found, that at a certain distance from the hole the image attains the sharpest or clearest outline, and that if the paper be removed from this point to any position either nearer to the hole or further from it, the image becomes indistinct and confused. At the point of greatest clearness the image is said to be focused. Such being the principle of the camera, it is evident that in practice the instrument may assume many forms, provided always that it consists of a darkened box or chamber, having a hole at one end for the insertion of a lens or combination of lenses, and at the other a screen, generally made of ground glass, on which to receive the image. One of the 146first home-made cameras I remember seeing was constructed by a boy friend many years ago. In it he used a lens from an old ship’s spy-glass, which still remained incased in its brass tube. Fig. 1 gives a view of this form of camera. As every boy is not as fortunate as my friend in having a brass mounting for his lens, it would be well to inclose it in a small tube of papier-maché or pasteboard, so that it may be moved in or out of the opening at will. The box itself was made of cigar-box wood, with the cover sawed in two parts. After the hole had been cut at one end and the lens inserted, a piece of looking-glass was placed obliquely across the lower corner of the other end of the box, the longer piece of the cover nailed on the front part of the top, and a piece of ground glass carefully fitted, with the ground side downward, over the remaining open space; the smaller part of the cover was then fastened on one side with small pieces of tape. When not in use, this little cover fell down over the glass, but when any object was to be viewed the little lid was lifted into the position in the cut, and served as a 149shield to the ground glass beneath. A piece of black cloth thrown over this cover, and allowed to fall over the triangular side-openings, so as to still further prevent outside light from reaching the ground glass, is a great improvement.
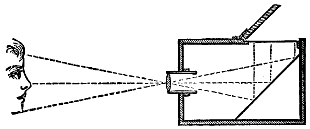
In the diagram, the dotted lines show the course of the light from the object in view, through the lens (where the rays cross each other) to the looking-glass, and thence to the ground glass above.
A SIMPLER FORM OF THE CAMERA OBSCURA.
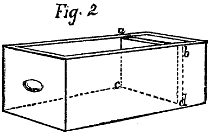
A simpler form of the camera obscura is seen in Fig. 2. Here the case is a small soap or spice box, the lens a convex spectacle-glass, and the board marked b a partition, serving as a screen upon which the image is thrown. In this form the lens may be fixed in the end of the box if desired, which is much easier than adjusting it in a sliding tube. The focal distance of an ordinary spectacle-glass averages about twelve or fourteen inches, and the box should be, of course, somewhat longer than the focal 150length of the glass used. A glass from “near-sighted” spectacles will not do, as it is concave instead of convex.
The box is now pointed out of the window, at some well-marked object, such as a sun-lighted building, and the partition-board moved backward and forward, till the point is found at which the image on it is best defined. Then the board may be fastened (as a, b, c, d, Fig. 2) and the top put on, of which the end should be cut off about four inches from the screen, as shown in the figure.
A piece of black cloth thrown over the head, and completely covering the ends of the opening, renders the image more distinct.
THE SKETCHING CAMERA.
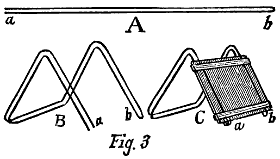
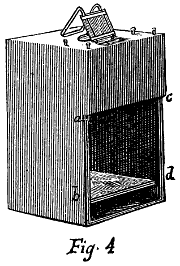
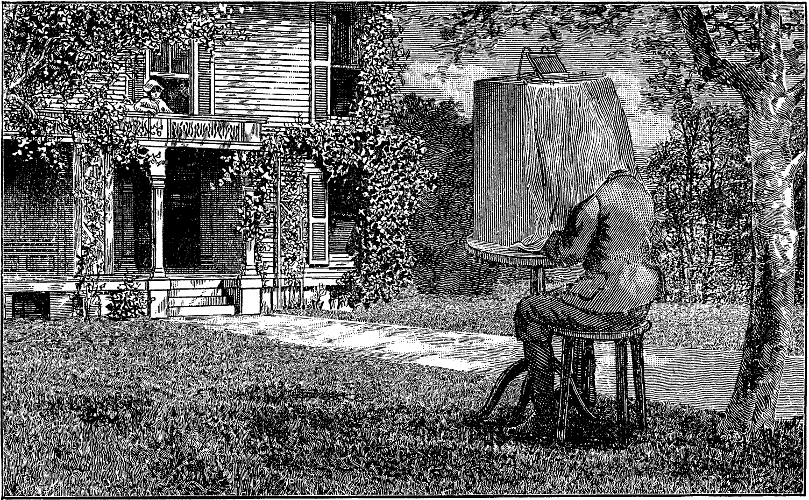
This form of camera may be also used for sketching from nature, by raising it on end, and providing it with an inclined mirror, as shown in Fig. 4. The opening a, b, 151c, d, should in this case be sufficiently large to admit easy play of the hand in sketching, and also allow an unobstructed view of the image. The mirror may be prepared without much difficulty. Get the glazier to cut for you a piece of looking-glass three or four inches square, and cover the back with a piece of thick paper or card, to prevent scratching; then take a wire of sufficient length, and double it as in A; now bend this double wire in the form of B, letting the ends come at a and b, and placing your mirror, face downward, upon the frame as in C; hold it in place by two bands of strong paper, passed around the glass and wires, and pasted strongly on the back, at the top and bottom of the mirror. When in use this frame is placed over the lens, and reflects the image down upon the drawing-paper placed on the screen below. The four round-headed screws in the top are intended for attaching an opaque curtain to the box, which, however, is only needed when the artist is working in the open air. Then the dark curtain is buttoned in place, and falls over 152the head and shoulders, completely shielding the image from any invading rays of light which might otherwise confuse the draughtsman.
As a matter of fact, in using the sketching camera, it is necessary to turn one’s back to the objects sketched, if it is desired to draw them in an upright position. I have represented the artist facing the house, as it would look strangely in the illustration to see him seated with his back to the view; but he is compelled, in consequence, to draw his house, sister, and everything else which is included in the image thrown upon his paper upside down, as a penalty for appearances.
THE DARKENED ROOM.
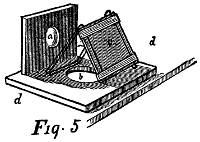
To those boys living in the country, and having a wide, extended landscape stretched out before their windows, the “darkened room” is a very interesting feature. It simply requires a room which can be made perfectly dark. At the window (if there are more than one) commanding the broadest prospect have a perfectly tight, opaque screen fitted, with a small hole cut in the lower part for the insertion of the lens. Over this fasten a small mirror to receive the image, at such an angle as will throw the reflection down upon a stand placed two or three feet from the window, and thus make it possible for the spectator 153to view the scene in its normal condition. Should you be desirous of having the whole sweep of the horizon at your command in the darkened room, a simply constructed frame-work is necessary for the accommodation of the movable mirror, and also for the lens; this would further necessitate the cutting of a larger hole in the curtain. Fig. 5 represents this arrangement; a being the movable lens, which can be readily taken from its socket if desired; b, the hole in the bottom of the bracket, which should correspond to a larger hole in the shelf d, upon which the bracket rests, and can be easily turned in any direction desired. This hole should be large enough to allow the passage of all the diverging rays, and c, a small mirror, fitted like the one for the sketching camera just described, to receive the image and reflect it down through b upon the stand, or a sheet placed upon the floor for the screen. The height of the shelf d from the floor is determined by the focal length of the lens, and must be decided by experiment before the hole is cut in the shade. It is fastened in place by strings attached to small screw-eyes 154at its corners, and tied upon tacks driven into the window-frame. The arrangement shown in Fig. 5 can be moved on the shelf, so as to face the lens toward any portion of the view commanded by the window.
―――――◀▶―――――
PHOTOGRAPHIC PRINTING.
If all boys are not so fortunate as to possess a camera, there is no reason why they should be debarred from all the pleasures of photography; and as there is much entertainment to be derived from this simple amusement, it is advisable for every boy throughout the land who is old enough to give it a fair trial. The first thing needed is a frame for holding the print while it is being exposed. This can be made by an ingenious boy, but as it is a rather troublesome job, it is better to buy a small transparent slate for five or ten cents, and discarding the copies, use the frame and glass for your work. The sensitized paper should next be prepared. This can be bought at any place where photographers’ supplies are to be found; many boys, however, are too far away from our great cities to have access to such stores, and even those who have will find more delight in making it for themselves. There is a great satisfaction in the feeling of perfect independence, and the more we can do for ourselves without 155aid or hinderance from the world at large, the nearer we come to the ideal state. So, presuming that every boy has this independent spirit well ingrained in his nature, I will give two formulas for this kind of paper, and leave it to the reader to decide for himself which he will use. The first produces a negative impression; that is, one in which all the parts that are dark in the copy come out light in the print, and vice versâ; and the second makes a positive print, or one in which all the shadings remain the same as in the original.
FIRST PROCESS.
Paper by this process is very easily prepared as follows: Make two solutions:
1st.—Water, 1 ounce.
Prussiate of potash, 60 grains.
2d.—Water, 1 ounce.
Ammonia citrate of iron, 70 grains.
When these are dissolved, mix them together, and pour them through a piece of filter-paper into a tumbler, and then into a clean glass bottle. If filter-paper cannot be had, nice clean cotton wool answers the purpose nearly as well. This solution should be kept and also used in a dark room. To sensitize the paper, pour out a little of 156the liquid into a saucer; then having cut note-paper into rectangular pieces, a trifle smaller than the glass in your frame, take one of these pieces at a time, and place it evenly upon the surface of the liquid; let it lie in this position until it is flat and not inclined to curl. Now take it out by one corner, and thrusting a pin through this point, drive it lightly into the edge of a shelf in your dark room, and leave it to dry. It is now ready for use; should any be left after printing, roll it up and place it in a tin box which has a cover, to keep it from the light and dampness. To print on this paper, place your glass in the frame, and next to it any engraving you may fancy, provided it is printed on thin paper and has no type on its back. If a copy is desired precisely like the original, place the engraving face downward on the glass, but if a reverse is wished, that is, one in which all the objects in the original are turned about, and its left side is to correspond to the right in your print, then place it with its face toward you in the frame. When this is adjusted to your satisfaction, take the frame to your dark closet, and put in your sensitized paper, being careful to cover it closely with the back of the frame well fastened in place before bringing it to the light. Place the frame, glass side upward, on a window-ledge, or in any place where it will be exposed to the free rays of the sun, and let it remain until it is printed to the desired depth. It will be 157noticed that at first the light changes the portions exposed to a bluish color; the operation, however, is not finished at this stage, but must be continued long enough to turn these portions a deep metallic gray. Care must be exercised in examining the print, that the paper is not moved from its position relative to the copy to be printed; with the above frame this will be a very delicate matter, and it is doubtful if it can be successfully done. A better way would be to make one or two prints, without caring for accuracy of form, but simply with a view of obtaining a good color, and time the operation; this would form a sort of basis from which to work. If some subsequent engraving was upon thicker paper, it would take a somewhat longer time to print it, and if on thinner paper, the time required would be proportionately shorter. It would be a great source of convenience if the back could be cut in two equal parts, and a piece of canton flannel be pasted over both, joining them as they were at first. This with the soft side outward will keep the paper from slipping, and act as a hinge to either half. Now instead of one fastening, two will be required, one on either half of the cover; if then you wish to examine your print, you have only to open one end of your frame, and carefully lift up the edge of the paper, while the other end, remaining firmly closed, holds the whole thing in place.
After your print has reached the proper degree of color, 158take it out and immerse it in clean water, when it will become a rich blue, except those parts which are to remain white. Change the water once or twice, or until every part comes out distinctly; then take it from the bath and dry between sheets of blotting-paper.
The second way to prepare paper consists in washing good letter-paper with the following solution:
Bichromate of potash, 10 grains.
Sulphurate of copper, 20 grains.
Water, 1 ounce.
Papers prepared with this are of a pale yellow color; they may be kept any length of time in a tin box, and are always ready for use. For copying engravings, the wings of dragon-flies, or of cicadas, the beautiful skeletonized leaves or delicate ferns, arranged in tiny bouquets on the inner surface of the ground glass, this paper is excellent.
After it has been exposed to the influence of the sunshine, take the frame to your dark closet, and after removing the print, wash it over with a solution of nitrate of silver of moderate strength. As soon as this is done, a very vivid positive picture makes its appearance, and all the “fixing” it requires is well washing in pure water.
The dark closet spoken of above is necessary in all kinds of photography, as light let in upon the sensitized paper would darken the whole surface. To make a 159“dark room,” stop the upper part of the window with any opaque substance, and pin a large sheet of dark orange paper over the lower sash. The yellow paper used in making envelopes is excellent for this, but if it cannot be found, four sheets of tissue-paper, two red and two yellow, placed over each other, answer the purpose very well.
A friend of the writer utilizes an old disused chicken-house for his dark room, and it answers its purpose capitally, while it was at the window of this little room I first saw the tissue-paper successfully used.
The prints used for copy might be rendered more translucent by rubbing them over with a little linseed oil mixed with turpentine. This, of course, should be thoroughly dried before it is used in connection with the sensitized paper.
A great number of graceful, pretty things can be photographed in this manner; the delicate maiden-hair fern, so common in several parts of our country; the fine, feathery leaves of many of our wild flowers, some of the finer flowers themselves, and many of the beautiful mosses and sea-weeds after they are pressed, make exquisite little photographs, worthy of a place in any collection.
A dozen or more of these prints carefully taken, pressed, and trimmed, would make a pretty Christmas present to 160a dear friend. The cover could be of plain paper, with the name of the person for whom it was intended neatly written upon the top, an appropriate sentiment on the middle, and the donor’s name with the date upon the lower part of the page.
The stencils, for the making of which full directions are given in another part of this book, make very line subjects for photographs. If intended for this purpose, however, they should be of a slender, delicate pattern, small in size, and cut with extreme care. A snow-flake caught upon a black surface, and examined in a cold room, will furnish many suggestions for stencils designed for copy.
―――――◀▶―――――
THE TOY PANORAMA.
The modern stereopticon has almost entirely superseded the old-fashioned panorama, so popular a quarter of a century ago.
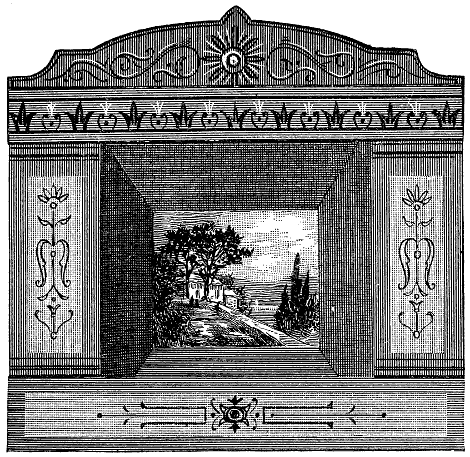
Your parents will probably remember with what delight those itinerant exhibitions were greeted by the young people of those days; how the very handbills, those wonderful precursors of so many entertaining spectacles, were studied and commented upon, and when the happy day came, how we all rejoiced to see the manager enter the school-house door, and after a few words with the teacher, 161address the school, and offer to us children an afternoon exhibition, for the trifling sum of ten cents apiece, if enough could be induced to attend.
The panoramas the writer remembers most vividly occurred during the war of the Rebellion, and as the subjects of the paintings were of a very patriotic character, we had little difficulty in urging our parents to permit us to go; and the afternoon session of the school was gladly sacrificed for so good a cause.
The battle of the Monitor and Merrimac, was a favorite 162subject, and, as the vessels moved to and fro, and sent forth from their tiny port-holes volleys of real fire and smoke, while a big drum, out of sight, gave forth the answering boom, the scene was very impressive, and struck a kind of fascinating terror to our childish hearts.
After the many accounts and fine illustrations which subsequent readings have given, at the simple mention of that famous battle, my mind instantly wanders back to the darkened hall, filled with boys and girls, all intently gazing at the sham battle in progress before them; while far back in the rear end of the hall stood the two brass field-pieces, captured from Burgoyne at the battle of Saratoga, nearly a hundred years before, grim and awful, and silently waiting for the time when they should be called to take their place in the mighty conflict then so fiercely raging in our land.[1]
But finally the war ceased; and after all, the only part the old cannon played was to thunder forth resoundings of joy, which shook our old town to its very foundations, when peace was again restored.
Although children’s hearts will never again be gladdened by these great, clumsy shows, there is no reason why the little toy panorama should also be banished from 163among us. The mere delight of making it is sufficient reason for its existence, and when it is once finished it will continue to be a source of enjoyment to each little member of the household in turn.
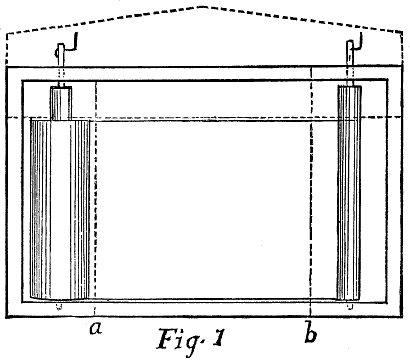
The simplest form this can have is represented in Fig. 1, the foundation being a small soap-box, the rollers, sections of a broomstick, with small wooden pins glued into each end, which extend through holes made in the box for that purpose. The pictures, taken from any illustrated paper, are all cut the same width, about an inch narrower than the length of the rollers, and pasted together at their ends, the only limit to the length of this strip being the capacity of the box.
164
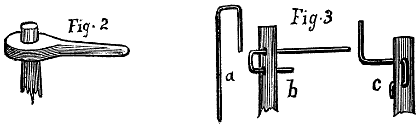
When the paste is dry, attach an end to each roller. It is necessary that the upper peg of each roller be also fitted with a strong crank, as an even motion is requisite for the proper display of the pictures; and this crank can be made in two ways: first, like Fig. 2, where a piece of wood is nicely fitted and glued on the pin, or like Fig. 3, which is the better arrangement, where a stiff wire is bent into the shape a, and then passed through two holes pierced through the crank-pin as shown at b; this arrangement securing the needful firmness, the projecting ends of the wire are then bent, the upper one upward, the lower downward, so completing the crank.
After the mechanical part of the panorama is finished so that it runs smoothly, two strips of stiff pasteboard can be fastened over the front, corresponding to the dotted lines a and b in Fig. 1, which will hide the rollers and give a neater appearance to the whole. If liked, a second piece of the pasteboard can be cut, in length corresponding to the width of the box, and wide enough to 165cover the cranks, and extend down to the top of the pictures.
When exhibiting the pictures, place the box on a table with its front well lighted, turned toward the audience, and turn the pictures slowly, by an even motion of the cranks, pausing slightly at each scene, at the same time giving, if possible, a brief description of the thing illustrated, as this will add considerably to the enjoyment of the little folks. I forgot to add, in its proper place, that for a final finish the whole thing should be covered with any pretty paper at hand. Nice wall-paper or even common brown wrapping-paper gives it a neat appearance.
―――――◀▶―――――
A MORE ELABORATE PANORAMA.
Having thoroughly mastered the construction of the simpler form of the panorama, a more elaborate one can be made by simply devoting to it considerably more time and attention; but as this is greatly superior to the other in every respect, it is well worth the extra trouble.
This will necessarily require a much larger box than the one previously described. For convenience in description, suppose we have a soap-box two feet long, twelve inches high, and eighteen inches wide. We shall first take away both top and bottom, then standing it upon its 166side, we have the frame-work of our structure, which is still two feet long, but now eighteen inches high, and twelve inches deep, that is from front to back; next, we cut from the discarded top a false bottom, or shelf, like Fig. 2, which, if your box is of seven-eighths inch material, will measure twenty-two and a quarter, by eight inches. Mark the point a, four inches from one side of the board, and equidistant from the ends; through this draw the line b c, five inches long on each side of a, or ten inches in all; mark at three and one-half inches from the ends of the board the points d and e, and draw the lines b d and c e; then cut out the piece thus marked off.
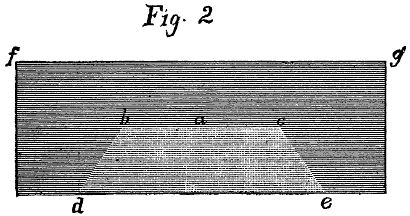
The holes at the bottom for the rollers are four and one-half inches from the back f g, in order to insure that the line of pictures when in motion shall not fall back from the line b c, and are equidistant from the ends of the board and the oblique lines b d and c e, to secure as much room as possible for the roll. Make corresponding 167holes in the top of the box, taking particular care that they are exactly above those in the shelf, when that is in position. The rollers are made from sections of broomstick, with holes bored in the ends, and the wooden pins glued firmly in place. Remember that the upper set of pins are to be much longer than the lower to allow for the insertion of the crank. These rollers are about eleven and one-half inches long, and when the glue has thoroughly dried, should be put in place and kept there by inserting the shelf, and fastening it in place by nails driven through the sides as at i i, in Fig. 3.
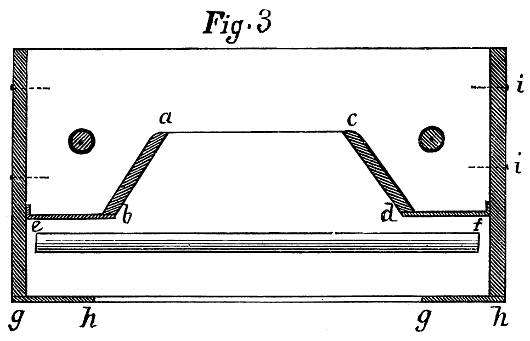
Fig. 3 represents what is called a horizontal section; that is, the work is supposed to be cut across from front 168to back, a little way above the shelf just mentioned, and the observer is supposed to be looking downward at it. Fig. 4 represents the work in an upright position, and the observer sees the front of it.
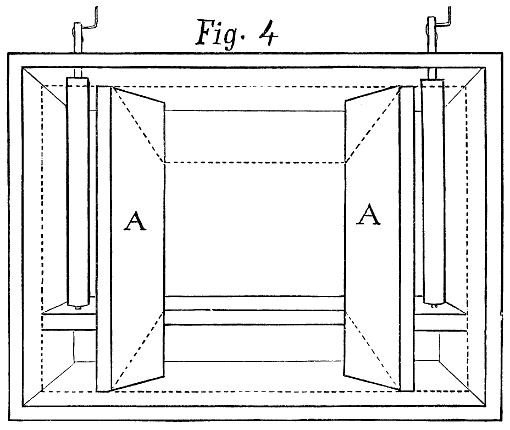
From the top of the shelf to the lower outside edge of the box should be just five and one-half inches. Next come the two uprights, a b, c d, Fig. 3, and A A, Fig. 4. They may be made from the bottom of the box, which was taken out, it will be remembered, and let their width correspond to a b and c d, Fig. 3. Round off the edges at 169a and c, and smooth it with sand-paper, as it would soon tear the pictures if left in a rough state; place these two boards in position, and secure them by nails at the top and bottom. Now cut two oblong pieces from stiff cardboard, as long as these wooden uprights, and wide enough to cover the spaces left at e b and d f, and tack these in position; they are shown by dotted lines in Fig. 4.
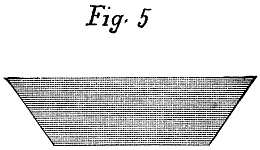
From a thin board cut two other strips to cover the spaces g h, but leave the placing of these till the work is nearly finished. A board two feet long and about three inches high is also necessary for the lower edge of the front, and should be put on after the other parts are in position, to hide the flame of the foot-lights (consisting of a row of short candles) from the spectator. The two pieces like Fig. 5 are made of pasteboard and are designed to furnish the upper and lower portions of the frame for the pictures. Their position is indicated by dotted lines in Fig. 4. As it is somewhat difficult to arrive at the 170exact proportions of these irregular pieces, without the actual box before one, it will be easier to leave this to the maker, as it is simply necessary to take a stiff piece of paper and place it in the position desired; then crease the lines so that they shall meet the proper points on the uprights; the lower piece comes up to the top of the shelf, and the upper piece comes down just below the top of the picture. After fitting this paper, it is an easy matter to trace the form on the pasteboard, taking care that all the lines are perfectly straight. The curtain should be next adjusted, and a piece of dark blue or green cambric is best suited for this purpose.
Cut (do not tear) from your cloth a piece of the required size, making sure that the sides are at right angles to each other, and prepare another roller from your broomstick twenty-one and one-half inches long. This roller is seen between e and f in Fig. 3. Paste or glue one of the ends of the cloth, which corresponds to the length of the roller, smoothly around it; now letting this roll just touch the floor, draw the other end up evenly, and tack it along the under-side of the top of the box, on a line three inches from the edge. In order that the curtain may roll up smoothly, it is best to mark straight lines with a pencil and ruler, on both roller and box, and adjust its edges carefully to these lines.
Just in front of this line, and at two inches from either 171end, tack to the box the ends of two pieces of fish-line, and, carrying the strings down the front of the curtain, bring them under the roller, up on the other side, and through two small holes bored for the purpose in the top of the box, about three and one-half inches from the ends; next bring the two strings together, and pass them through a screw-eye placed at the middle and back edge of the top to receive them. At one side of the back, in any convenient place, drive a small nail to wind the strings upon when the curtain is up. By simply undoing this, the curtain can at any moment be made to fall. It is also well to tie the two strings together, and fasten a button to them just back of the point where they pass through the screw-eye, when the curtain is down, and they are evenly drawn, as this prevents an extra play of the cord, and obviates entirely the danger of their slipping. Before the curtain is nailed on, it is best to paper the whole beveled surface picture frame with some neat plain paper; very dark red or green “velvet” house-paper being preferable to all others.
After the curtain is in a good working condition, fasten on the two uprights, g and h, indicated in Fig. 3, and the long piece across the front which you have already prepared; make a fancy design for the top out of stiff cardboard, taking especial care that it is wide enough to cover the cranks on the top, while at the same time it extends 172low enough to cover the upper edges of the curtain and the rough unfinished wood in front.
Cover the outside and edges of the box with fancy wall-paper, letting it extend well over on the inside, wherever there is the slightest danger of that surface being exposed to view; and lastly, fasten the long strip of pictures on the rollers, and nothing is wanting but posters and tickets, to insure a first-class show, of the best approved, old-fashioned style.
―――――◀▶―――――
REPOUSSÉ WORK FOR BOYS.
The term Repoussé is applied to any sheet-metal in which a pattern is hammered out or left in relief, by means of a hammer and common nail, or a regular tool made for the purpose. It does not simply refer to brass-work, but applies equally to work of like character either on silver or gold.
If you have friends who have made the voyage of the Nile, you have probably seen the beautiful silver bracelets bought by them of the Nubian workmen as souvenirs of their Eastern travels. These bracelets are made, I was told, by the natives of the interior, with simply a nail and a stone, but the effect is very artistic and pretty. So, if ignorant Nubians can make these beautiful things with such primitive tools, certainly an intelligent American 175lad can do equally good work, with a little instruction and better materials.
REPOUSSÉ, OR HAMMERED BRASS.
This work is chiefly produced by means of a punch and hammer. An ordinary tack-hammer can be used, but that generally in use by most workers is of rather peculiar shape, like that in Fig. 1.
The round end will be found very useful in working from the inside of the pattern, which will be explained hereafter. The punches are of various forms; but a set of common board nails of different sizes, and varying shaped ends, make good tools for beginners. A very nice piece of work can be done with a common French nail whose end has been ground flat.
It is desirable that a beginner should practice upon the thinnest sheet-brass until he becomes perfectly acquainted with the use of his tools. Brass can be obtained for about twenty-five cents a pound, and one-quarter of a pound of No. 25 will be amply sufficient for this practice.
176A tool which is of great assistance in all brass work is a dull chisel or screw-driver, with a serrated edge, so that a dotted line is left when it is pressed upon the metal; however, if this is not readily procurable, a common screw-driver will answer the same purpose in most instances. In this practice, the first thing to be done is to draw a line of some design upon the brass with a soft lead-pencil or with impression-paper, taking extreme care that this line is precisely like that in the copy, as all irregularities should be corrected in the drawing, and none left for the punch. It is, indeed, very difficult to make the proper corrections after the work is commenced. Then having traced your line as perfectly as you can do it, lay the brass upon a piece of soft wood, and with the end of the screw-driver pressed evenly upon the line, give the head a light blow with the hammer; then move the blade along the penciled line, so that its edge shall just touch the end of the last indentation, and give it another slight tap with the hammer. If you strike with too much force your line will be unequally deep in some places, and your work will not present as good an appearance when finished. This process should be repeated along the entire design, and a perfect unbroken line should be the result. Until this is accomplished it is best to attempt nothing further. After you have succeeded in making one unbroken even line, mark two parallel lines upon the 177metal, and do them in the same manner. When these present a satisfactory appearance, trace some very simple design upon the same thin sheet, and after nailing the sheet at each corner to the block, commence with the chisel and mark lightly around the figure. It is often necessary to do this tracing over two or three times during the process of working, as too deep denting at first warps, or, as the regular brass-worker would say, “buckles” your pattern. Now commence at the outside edge of your design, with your nail placed near the line, strike upon it with a light blow, and continue this operation until your whole background is covered with little dents, and presents a thickly mottled appearance. When this is removed from the block, the pattern will seem to stand out from the rest of the surface.