HOW TO MAKE A TOOL CHEST.
Reading edition
BY AN OLD BOY.
Carpentering is such a useful, healthy, and pleasing employment that boys will do well to learn the use of tools for convenience in making their own toys, traps, sleds, etc., even if they are never called upon to do some little "job" for their mothers.
Of course if a boy can afford to buy a full set of tools and chest, this particular article will have but little interest for him, as it is especially intended for those who must begin on an economical scale.
The tools absolutely needed, and which can be purchased for the least money, are: a handsaw, about 20 inches long, which can be used to cut crosswise as well as lengthwise of the wood; a tenon-saw, about 12 inches long, for cutting dovetails, and also across the grain of the wood; a smoothing-plane, about 8 inches long by 2½ inches broad; a mallet; a joiner's hammer; a two-foot rule of box-wood; a set square; two chisels, one an eighth of an inch broad, and the other three-eighths; a screw-driver; a marking gauge; a gimlet; a brace, with four or five bits of different sizes; a medium-sized gouge; and a bench-dog to hold the wood on the bench when it is being planed. With this assortment of tools the amateur carpenter will get on very well, and he can add to the stock as he grows more expert in the business.
Do not make the mistake of undertaking a too elaborate piece of work at first, for it is only by practice that you can come anywhere near perfection; but let your first work be to make a box for your tools, and see how neat a job you can make of it. You will want one about 2 feet long, 21 inches broad, and 10½ inches deep, for which the following material will be required: 12 feet half-inch pine-wood 11 inches wide, one pair of hinges or butts, 12 screws half an inch long, lock and key, glue, and brads.
Cut the wood into pieces, as follows: For the sides, two pieces 24½ inches long; for the ends, two pieces 21½ inches long; for the lid, two pieces 24½ inches long; for the bottom, two pieces 24 inches long. These dimensions should be marked off on the board with a rule and pencil before they are cut. The sides and the ends should be planed on both sides, and the top and bottom edges planed true and square. The breadth of the wood will be 10½ inches.
Fig. 1.
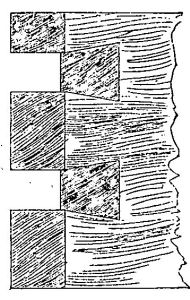
Fig. 2.
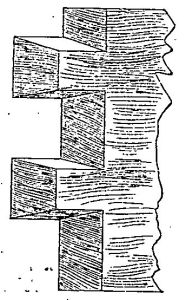
Fig. 3.
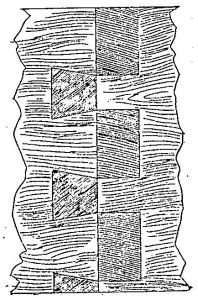
The best joint is the "dovetail." Fig. 1 shows the side with the "dovetail" cut; Fig. 2, the end with the points cut; and Fig. 3 shows the joint finished.
To make the joint: on one of the sides of the box mark off lines with the square 2 feet apart; also mark off lines 23 inches apart, and call these lines A and B, as in Fig. 4. Mark on the line A points every inch and half-inch alternately; on the line B mark off a point seven-eighths of an inch from B, and then points for every six-eighths of an inch.
Fig. 4.
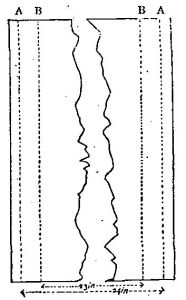
Fig. 5.
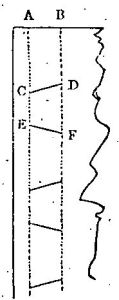
Now draw lines from the points on line A to the points on line B, as shown in Fig. 5. Cut with a tenon-saw from C to D and from E to F, treating each dovetail in the same way. With a chisel cut the piece out so as to form a dovetail, as in Fig. 1. The pins are now to be drawn to correspond with the dovetails, which can be done by placing the dovetails just made over the end of the short sides, or ends, and marking them with a pencil. When this is done, make lines 20 inches apart; cut the pins down to this line with the tenon-saw. In cutting the pins, cut outside the pencil lines. The space can then be cut out with a chisel.
When all the pieces have been done in this manner, they should be coated with thin glue, and then hammered well together. When dry, the projecting ends of the pins and dovetails may be trimmed off with a chisel. This is called the "shell" of the box.
The bottom is to be put on next. Plane the two pieces 24 inches long by 11 inches wide, and fit them neatly in the shell. They should be nailed from outside the box.
Fig. 6.
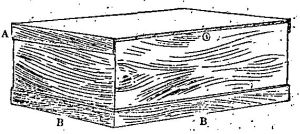
The lid pieces are planed up next so as to fit outside the shell. Fig. 6 is the box when finished. A is a piece of wood two inches deep, nailed on the lid to keep it square on the box; B B is a beading of wood nailed on the box to make a strong base; and also to protect the edges from chipping.
A SPLENDID TEAM.