OPERATING THE CAR
Reading edition
Starting The Engine
Before starting the engine be sure the gearshift lever is in neutral position. Depress the accelerator to the toeboard once only and then immediately release it. This permits the automatic choke to come into full operation. This operation is essential to easy starting. Turn the ignition key to the right. Then depress the clutch pedal to the toeboard to operate the starter.
If engine should not start after a few revolutions, completely depress accelerator and, holding it in this position, operate starter.
Starting a Hot Engine It is easier to start a hot engine if the accelerator is held approximately halfway to the floorboard until the engine starts. Release the accelerator as soon as the engine starts.
Warming Up the Engine A gasoline engine performs best when it reaches an operating temperature of approximately 170° F. (76,7° C.). This is the normal range indicated by the rectangular mark on the face of the heat indicator. In cold weather the engine temperature should be raised by allowing the engine to idle slowly before driving the car.
Do not drive the car until oil pressure registers on the gage. If it registers above 40 lbs. (2,8 kgs.), drive slowly until pressure returns to normal, or approximately 40 lbs. (2,8 kgs.).
After starting, the high idle system may cause the engine to “race”. If so, depress and immediately release the accelerator.
17
Push or Tow Starting
Should the battery fail to supply enough current to start the engine with the starter, place the transmission in conventional high gear and either push or tow the car until the engine starts. OD control (on cars so equipped) must be in Out position. Be sure ignition is On and parking brake released.
Shifting the Gears
To shift the gears in either the conventional or overdrive ratios with the steering post gearshift lever, follow this procedure:
TO SET CAR INTO MOTION
1. Start engine and with clutch pedal still depressed, place gearshift lever in low (first) gear position.
2. Release parking brake.
3. Release the clutch pedal gradually and at the same time slowly accelerate.
TO SHIFT FROM LOW TO SECOND GEAR
1. At approximately 10 miles (16 km.) per hour, release accelerator and depress clutch pedal.
2. Place gearshift lever in second (intermediate) gear position.
3. Release the clutch pedal gradually and at the same time slowly accelerate.
TO SHIFT INTO HIGH (THIRD) GEAR
1. At approximately 18 miles (29 km.) per hour, release accelerator and depress clutch pedal.
2. Shift lever into high (third) gear position.
18
3. Release the clutch pedal gradually and at the same time slowly accelerate. Without overdrive, this is the highest or cruising gear ratio.
TO SHIFT INTO REVERSE GEAR
1. Bring the car to a complete stop.
2. Depress clutch pedal.
3. Place lever in reverse gear position.
4. Release the clutch pedal gradually and at the same time slowly accelerate.
Shifting Tips To avoid excessive wear on the clutch, transmission, and drive mechanism, never try to jump gears (that is, do not shift from low to high, or start out in second and avoid using low) and never shift from any gear—even the neutral position—into reverse until the car’s motion is stopped. Also, never make a gear shift until the clutch pedal is depressed, disengaging the clutch. Make it a habit to pause for an instant in neutral as the gearshift lever passes from one gear ratio to another.
Transmission Overdrive
The automatic overdrive operates only when the control handle, next to the hood control handle and marked OD, is in its full forward position. It engages automatically when the accelerator is released momentarily at or above the overdrive cut-in speed of 30 to 35 miles (50 to 55 km.) per hour.
If, while in overdrive, it is desired to gain more power for passing cars in traffic or on grades, push the accelerator 19 to the floorboard. This cuts out the overdrive and it will remain inoperative until the accelerator is again released. At that time the overdrive again engages automatically.
The overdrive control can be pulled out, thereby locking the transmission in the conventional position. This should be done for descending steep, mountainous grades, or when pushing or towing the car to start the engine. The circumstances under which this change can be made safely are as follows:
1. To change the transmission from overdrive to the locked-in conventional position while the car is standing still, merely pull out the OD control.
2. To change the transmission from overdrive to the locked-in conventional position when driving below the overdrive cut-in speed of approximately 30-35 m.p.h. (50-55 km.) accelerate the engine and at the same time pull out the OD control.
3. To change the transmission from overdrive to the locked-in conventional position when driving in overdrive, completely depress the accelerator past the wide-open throttle position and as soon as the transmission is in conventional, pull out the OD control.
If the OD control is in the locked-in conventional position (pulled out) it can be placed in the overdrive position while the car is standing still. To make this change when the car is moving at any forward speed, accelerate slightly and push the control fully forward.
Overdrive is available at extra cost.
20
Automatic Hill Holder
The automatic Hill Holder retains the same degree of braking effort on an upgrade as that applied by the driver in stopping as long as the clutch pedal is depressed. The Hill Holder does not operate on level or descending surfaces. However, the clutch must be depressed before releasing the brake pedal. This permits the right foot to be removed from the brake pedal to operate the accelerator when ready to resume forward motion. Releasing the clutch pedal releases the action of the Hill Holder.
To use the Hill Holder when stopping on an upgrade, depress the clutch pedal and then apply foot brakes. The right foot may now be removed from the brake pedal. To release Hill Holder action, release the clutch pedal.
Hill Holder is special equipment for the Champion available at extra cost.
Studebaker Climatizer and Defroster
The Studebaker Climatizer is a fresh air heating and ventilating system. Fresh air passes through an air duct and then through the Climatizer heater core. The warmed air is discharged forward and rearward from below the front seat and spreads uniformly through the car interior.
The Climatizer heat output is thermostatically controlled so that you may select the degree of heating desired and be assured of its remaining constant until you reset the control. Pushing or pulling the control regulates a thermostat which in turn controls the flow of water through the heater coils. The further outward you pull the control, the warmer will be the hot air output of the Climatizer.
21
When the engine cooling water is cold and the control is in the closed position, the thermostat permits a full flow of water into the heat core until the temperature at the thermostat unit (just above the accelerator pedal) reaches approximately 70° F. (21° C.). As the water gets warmer, the thermostat will maintain that temperature. If you desire more heat in the car, pull the Climatizer control. After using the Climatizer a few times you will find the position of the control that gives you the heat in the car which best suits your comfort. Further regulation of the control will be unnecessary.
If you wish to obtain maximum heat flow in extremely cold weather, pull the handle to its full “out” position. This will lock the valve open until you push the handle forward.
Climatizer Operation
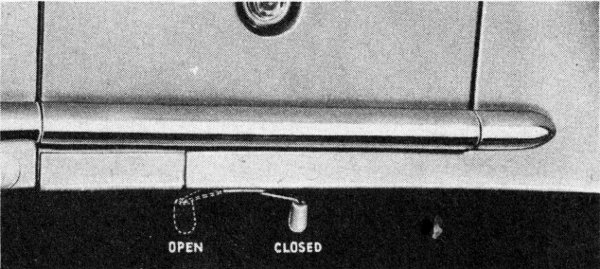
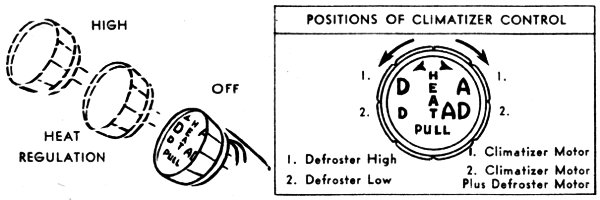
The entire range of Climatizer and defroster operation is controlled through the use of the Climatizer and vent controls. The Climatizer control operates thermostat when pulled or pushed, operates blowers when turned. The vent control opens and closes the right outside cowl ventilator.
22
HIGH
HEAT REGULATION
OFF
POSITIONS OF CLIMATIZER CONTROL
1. Defroster High
2. Defroster Low
1. Climatizer Motor
2. Climatizer Motor Plus Defroster Motor
1. To open the outside right cowl ventilator, move the control lever (directly beneath the package compartment) to the left. This is the position of the ventilator whenever you operate the Climatizer or want to draw fresh outside air into the car through the Climatizer system. To close the ventilator, move the control lever to the right. When using Climatizer, be sure the inner ventilator door is closed.
2. Pull Climatizer control handle outward to the position which gives the temperature desired by the car occupants. The further outward the control is pulled, the warmer the air will become.
3. Turn the Climatizer control handle clockwise to the first position to operate the Climatizer blower. Turning the control to the second position clockwise will continue the Climatizer blower operation and will also add the operation of the defroster blower.
Air forced through the Climatizer system at car speeds above 25 m.p.h. makes use of the Climatizer blower unnecessary when traveling steadily at or above such speeds.
4. Slight opening of one or more ventilators or windows permits some measure of directional control over circulation since warm air flow will be increased towards such openings. For uniform temperature and defrosting efficiency throughout the entire car, however, it is generally recommended that windows and vents be fully closed.
23
NOTE.—If upon entering a cold car, the accumulation of moisture on windshield and windows appears excessive, open the ventilator windows for rapid circulation until the moisture begins to clear.
Defroster Operation Turn the Climatizer control counterclockwise to the first position for maximum hot air flow through the defroster ducts; turn control to the second position to reduce the defroster air flow.
Climatizer and defroster are special equipment available at extra cost.
Operation of the Convertible Top
The mechanically operated top of the Studebaker convertible models is raised and lowered by an electric motor and prelubricated driving arms and gears. The mechanism is controlled by a lever located at the left of the two control handles at the lower edge of the instrument panel on the driver’s side of the car. Moving the lever to the left raises the top, and to the right, lowers it. When the lever is released from either of these positions, it automatically returns to the central position, stopping the electric motor.
Always let the motor operate the top—never try to force the top up or down by hand.
Top Operation Motor Circuit Breaker
The electric motor is guarded against short circuit and overload by a 30-ampere circuit breaker. Should a short circuit or overload occur in the top operating system, the circuit breaker will automatically interrupt the circuit and will continue to interrupt it until the cause is eliminated.
If the circuit breaker interrupts the current flow for any reason, see your Studebaker dealer.
24
SNAP LOCK
LOCKING HANDLE
TO RELEASE
TO LOCK
TO LOWER THE TOP—STOP THE CAR
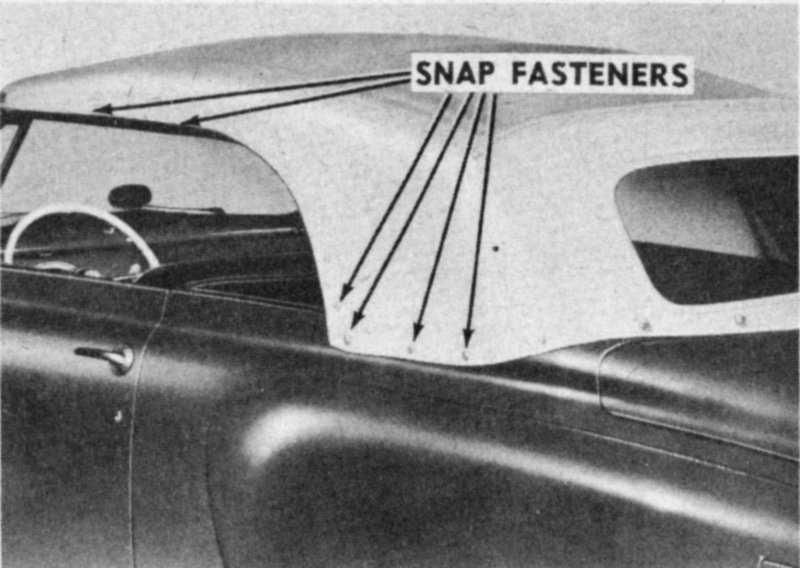
1. Unsnap the fasteners on both sides of the top cover at the points indicated in the illustration below. Snap the top cover boot in place on the rear of the seat back. Remove any packages or other material from the top well behind the seat.
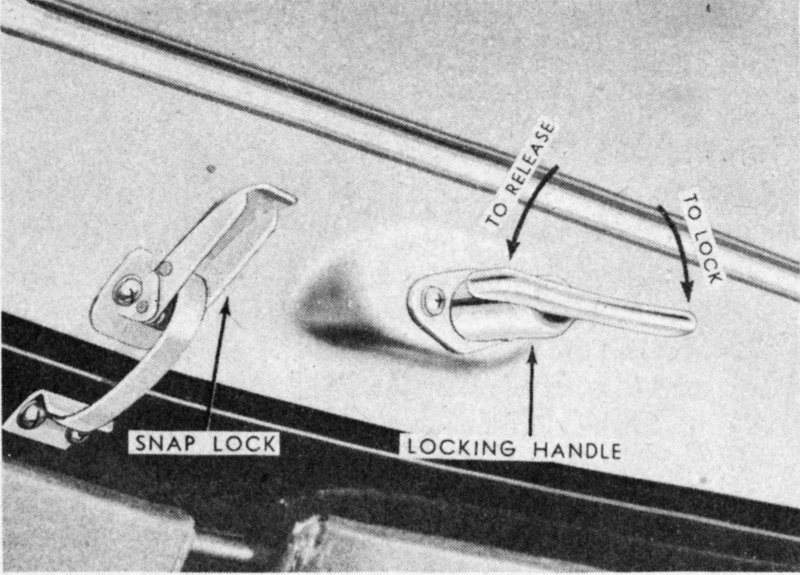
2. Pull both sun visors down and release the snap lock at the left of the locking handle on the header. Turn the top locking handle at the center of the header fully to the left (counterclockwise). Lift the top free of the pilots.
3. Move the control switch lever to the right and hold it in this position until the top rests on the rear deck of the car; then release the lever.
4. Cover the top with the boot and snap all boot fasteners in place.
25
SNAP FASTENERS
TO RAISE THE TOP—STOP THE CAR
1. Unsnap the boot fasteners along the rear deck and side panels. Uncover the top and let the boot hang over the rear seat back.
2. After pulling down both sun visors, move the top operating lever to the left and hold it in this position until the top header is approximately one foot above the windshield pilots; then release the lever.
3. Grasp the top locking handle firmly with the right hand and guide the top down over the windshield pilots while the left hand holds the top operating lever at its “Raise” position. When the header rests on the windshield, release the control lever. Lock the snap lock at the left of the locking handle on the header. Lock the top securely to the windshield by turning the top locking handle clockwise two 26 or three complete turns. Test the lock by attempting to lift the top free of the pilots.
4. Snap the fasteners in place along the top side rails and side panels on both sides of the top. There are 6 of these fasteners on each side. Let the boot fold down into the top compartment or unsnap the boot from the rear seat back and place it in the boot bag provided.
NOTICE
The radiator of this car may be equipped with a pressure-type cap. If it is so equipped, remove the cap by turning it slowly half-way to the open position and pausing to permit relief of any vapor or steam pressure present. Then complete turning of cap to the stop and remove it.
27