TRANSACTIONS
Reading edition
Paper No. 1154
THE NEW YORK TUNNEL EXTENSION OF THE PENNSYLVANIA RAILROAD. THE BERGEN HILL TUNNELS.1
By F. Lavis, M. Am. Soc. C. E.
Location.—That section of the Pennsylvania Railroad’s New York Tunnels lying west of the Hudson River is designated Section “K,” and the tunnels are generally spoken of as the Bergen Hill Tunnels. Bergen Hill is a trap dike (diabase) forming the lower extension of the Hudson River Palisades.
There are two parallel single-track tunnels, cross-sections of which are shown on Plate VIII of the paper by Charles M. Jacobs, M. Am. Soc. C. E. The center line is a tangent, and nearly on the line of 32d Street, New York City, produced, its course being N. 50° 30' W. The elevation of the top of the rail at the Weehawken Shaft (a view of which is shown by Fig. 2, Plate XXII), on the west bank of the Hudson River, is about 64 ft. below mean high water; and at the Western Portal, or Hackensack end, the rail is about 17 ft. above; the grade throughout is 1.3%, ascending from east to west. The length of each tunnel between the portals is 5,920 ft.
A general plan and profile of these tunnels is shown on Plate I of the paper by Charles W. Raymond, M. Am. Soc. C. E. At
Skip to text
PLATE XXI. TRANS. AM. SOC. CIV. ENGRS. VOL. LXVIII, No. 1154. LAVIS ON PENNSYLVANIA R.R. TUNNELS: BERGEN HILL TUNNELS.
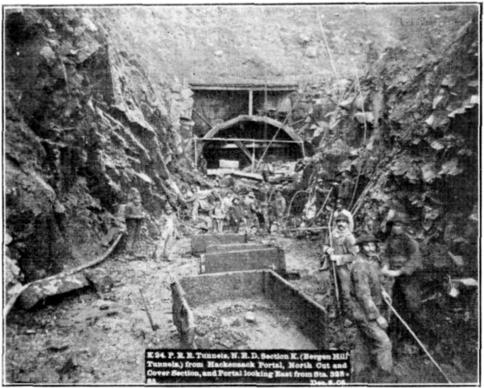
Fig. 1. K 94. P.R.R. Tunnels, N. R. D. Section K. (Bergen Hill Tunnels.) from Hackensack Poral, North Cut and Cover Section, and Portal looking East from Sta. 323. Dec. 8, 05.
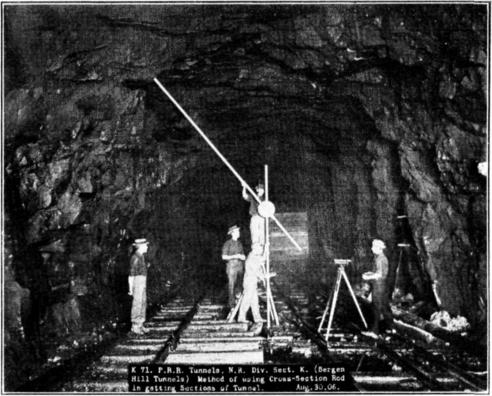
Fig. 2. K 71. P.R.R. Tunnels, N.R. Div. Sect. K. (Bergen Hill Tunnels) Method of using Cross-Section Rod in getting Sections of Tunnel. Aug. 30, 06.
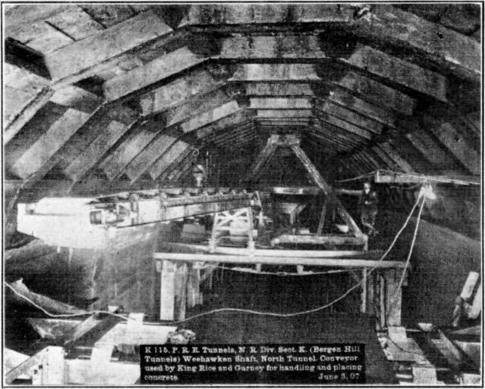
Fig. 3. K 115. P.R.R. Tunnels, N. R. Div. Sect. K. (Bergen Hill Tunnels) Weehawken Shaft, North Tunnel Conveyor used by King Rice and Garney for handling and placing concrete. June 3, 07.
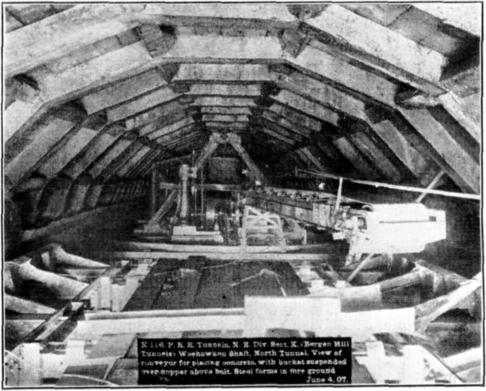
Fig. 4. K 116. P.R.R. Tunnels, N. R. Div. Sect. K. (Bergen Hill Tunnels) Weehawken Shaft, North Tunnel. View of conveyor for placing concrete, with bucket suspended over hopper above belt. Steel forms in fore ground. June 4, 07.
History.—The contract for this work was let on March 6th, 1905, to the John Shields Construction Company; it was abandoned by the Receiver for that company on January 20th, 1906, and on March 20th, of that year, was re-let to William Bradley, who completed the work by December 31st, 1908.
The progress of excavation and lining in the North Tunnel is shown graphically on the progress diagram, Fig. 9, that of the South Tunnel being practically the same.
Geology.—Starting west from the Weehawken Shaft, the tunnels pass through a wide fault for a distance of nearly 400 ft., this fault being a continuation of that which forms the valley between the detached mass of trap and sandstone known as King’s Bluff, which lies north of the tunnels, and the main trap ridge of Bergen Hill.
The broken ground of the fault, which consists of decomposed sandstone, shale, feldspar, calcite, etc., interspersed with masses of harder sandstone and baked shale, gradually merges into a compact granular sandstone, which, at a distance of 460 ft. from the shaft, was self-supporting, and did not require timbering, which, of course, had been necessary up to this point.
A full face of sandstone continued to Station 274 + 60, 940 ft. from the shaft, where the main overlying body of trap appeared in the heading. The full face of the tunnel was wholly in trap at about Station 275 + 30, and continued in this through to the Western Portal, where the top of the trap was slightly below the roof of the tunnel, with hardpan above. The contact between the sandstone and the overlying trap was very clearly defined, the angle of dip being approximately 17° 40' toward the northwest.
The sandstone and trap are of the Triassic Period, and the trap of this vicinity is more particularly classified as diabase.
The character of the trap rock varied considerably. At the contact, at Station 275, and for a distance of approximately 200 ft. west, corresponding to a thickness of about 60 ft. measured at right angles to the line of the contact, a very hard, fine-grained trap, almost black in color, was found, having a specific gravity of 2.98, and weighing 186 lb. per cu. ft. The hardness of this rock is attested by the fact that the average time required to drill a 10-ft. hole in the heading, with
The remainder of the trap varied from this, through several changes of texture and color, due to different amounts of quartz and feldspar, to a very coarse-grained rock, closely resembling granite of a light color, though quite hard. The speed of drilling the normal trap in the heading was approximately 20 to 25 min. per ft., as compared with the 60 min. per ft. noted above, the larger amounts of quartz and feldspar accounting for the greater brittleness and consequently the easier drilling qualities of the rock. The normal trap in these tunnels has a specific gravity varying from 2.85 to 3.04, and weighs from 179 to 190 lb. per cu. ft.
The temperature of the tunnels, at points 1,000 ft. from the portals at both ends, remained nearly stationary, and approximately between 50° in winter and 60° in summer, up to the time the headings were holed through, being practically unaffected by daily changes in the temperature outside. At the western end, after the connection with the Central Shaft headings was made, there was almost always a current of air from the portal to the shaft, and ascending through the latter. This tended to make the temperature in this part of the tunnel correspond more nearly with the outside temperature; in fact, the variation was seldom more than 5° Fahr.
Timbering.—These tunnels have been excavated entirely by the center top heading method, almost invariably used in the United States. Timbering, where required, was of the usual segmental form with outside lagging, as shown in several of the photographs. In a few places it was necessary to hold the ground as the work progressed, and, in such cases, crown bars were used in the headings.
There was some little trouble at the Western Portal, where the top of the rock was very near the roof of the tunnel, as shown by Fig. 1, Plate XXI. A side heading was driven at the level of the springing line until a point was reached where the roof was self-supporting, and the timbering was brought out to the face of the portal from that point.
Skip to text
PLATE XXII. TRANS. AM. SOC. CIV. ENGRS. VOL. LXVIII, No. 1154. LAVIS ON PENNSYLVANIA R.R. TUNNELS: BERGEN HILL TUNNELS.
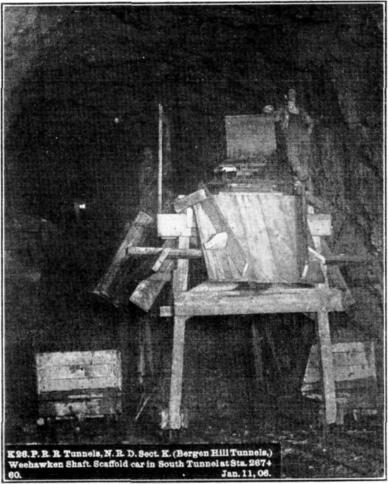
Fig. 1. K 26. P.R.R. Tunnels, N. R. D. Sect. K. (Bergen Hill Tunnels,) Weehawken Shaft. Scaffold car in South Tunnel at Sta. 267+60. Jan. 11, 06.
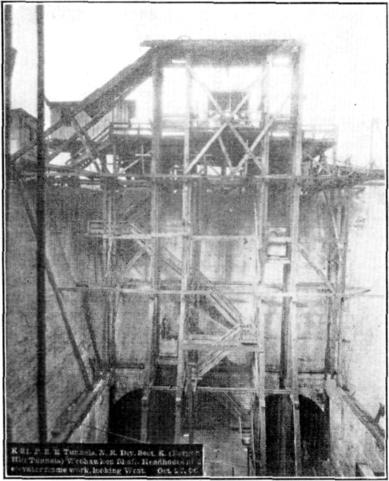
Fig. 2. K 31. P.R.R. Tunnels, N. R. Div. Sect. K. (Bergen Hill Tunnels) Weehawken Shaft. Headhouse at ? elevator frame work, looking West. Oct. 17, 06.
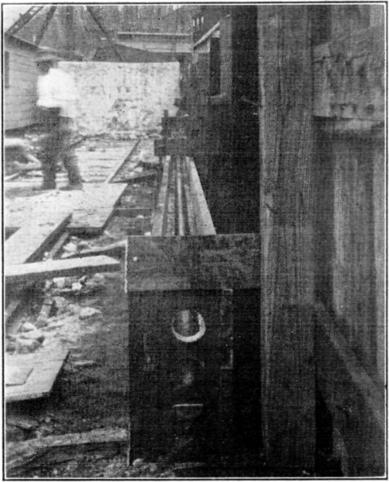
Fig. 3.—Round Holes in Concrete Forms.
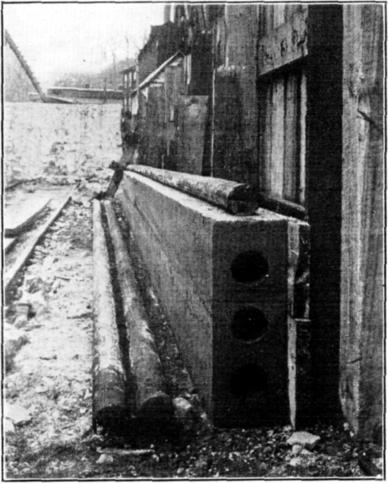
Fig. 4.—Round Holes in Concrete Forms Completed.
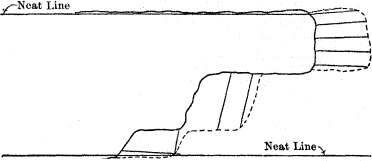
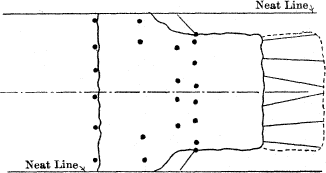
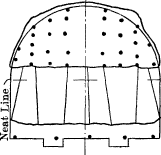
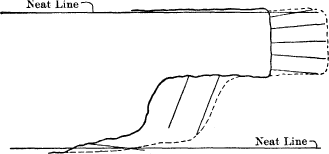
Drilling.—Where no timbering was required, several different methods were used in drilling and excavating the solid rock, though in all cases a center top heading was driven. The four diagrams, Figs. 1, 2, 3, and 4, give typical examples of these methods and show, in the order of their numbers, the general tendency of the development from a small heading kept some distance ahead of the bench, to a large heading with the bench kept close to it. The notes on each diagram give the general details of the quantity of drilling and powder used, methods of blasting, etc., and on the progress profile, Fig. 6, is indicated those portions of the tunnels in which each method was used.
All the drills used throughout the work by Mr. Bradley were Rand No. 34 sluggers, with 3⅝-in. cylinders, and the steel was that known as the “Black Diamond Brand,” 1⅜-in., octagon. It was used in 2, 4, 6, 8, 10, and 12-ft. lengths; toward the end of the work it was proposed to use 14-ft. lengths, but owing to some delay in delivery this length was never obtained. The starters, 18 to 24 in. long, were sharpened to 2¾ to 3-in. gauge, which was generally held up to depths of 6 ft.; then the gauge gradually decreased until it was 1¾ to 2¼ in. at the bottom of a 12-ft. hole. Frequently, as many as three or four starters were used in starting a hole, and generally two sharpenings were required for each 2 ft. drilled, after the first 6 ft. It is estimated that about ¼ in. of steel was used for each sharpening, and that there was an average of one sharpening for every foot drilled.
The total quantity of steel used up, lost, or scrapped on the whole work was almost exactly 1 ft. for each 10 cu. yd. excavated, equal to 1¼ in. of steel per yard, distributed approximately as follows:
Sharpening ¾ to ⅞ in.
Other losses ½ to ⅜ ”
Total 1¼ in. per cu. yd.
An “Ajax” drill sharpener was used, and proved very satisfactory. Rubber and cotton hose, covered with woven marlin, was used for the bench (3 in. inside diameter, in 50-ft. lengths), for drills (1 in. in diameter, in 25-ft. lengths), and for steam shovels (2½ in. in diameter, in 50-ft. lengths). Hose coverings of wound marlin, and of woven marlin with spiral steel wire covering were tried, but were not satisfactory, owing to the unwinding of the marlin and the bending of the steel covering.
Skip to Text
Figures 1-4 were identically laid out; Figure 1 is representative. In the enlarged views, the plans have been rotated to match the longitudinal section. In the tables, variation between “to” and “-”, and formatting of table entries, is as in the original.
Adv.: Advance Cu. Yd.: Cubic Yards
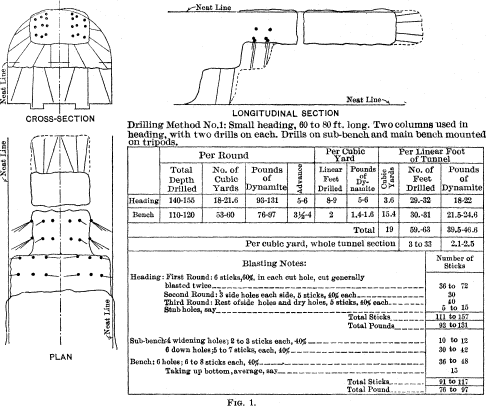
Fig. 1.
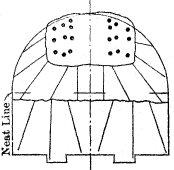
CROSS-SECTION
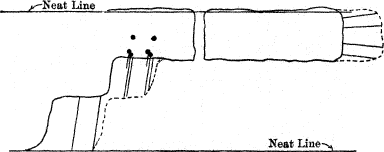
LONGITUDINAL SECTION
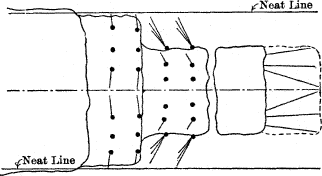
PLAN
Drilling Method No. 1: Small heading, 60 to 80 ft. long. Two columns used in heading, with two drills on each. Drills on sub-bench and main bench mounted on tripods.
Per Round Per Cubic Yard Per linear Foot of Tunnel
Total Depth Drilled No. of Cubic Yards Pounds of Dynamite Adv. Linear Feet Drilled Pounds of Dynamite Cu. Yd. Linear Feet Drilled Pounds of Dynamite
Heading 140-155 18-21.6 93-131 5-6 8-9 5-6 3.6 29.-32 18-22
Bench 110-120 53-60 76-97 3½-4 2 1.4-1.6 15.4 30.-31 21.5-24.6
Total 19 59.63 39.5-46.6
Per cubic yard, whole tunnel section 3 to 33 2.1-2.5
Blasting Notes: Number of Sticks
Heading: First Round: 6 sticks, 60% in each cut hole, cut generally blasted twice 36 to 72
Second Round: 3 side holes each side, 5 sticks, 40% ea. 30
Third Round: Rest of side holes and dry holes, 5 sticks, 40% each 40
Stub holes, say 5 to 15
Total Sticks 111 to 157
Total Pounds 93 to 131
Sub‑bench: 4 widening holes; 2 to 3 sticks, each, 40% 10 to 12
6 down holes; 5 to 7 sticks, each, 40% 30 to 42
Bench: 6 holes; 6 to 8 sticks each, 40% 36 to 48
Taking up bottom, average, say 15
Total Sticks 91 to 117
Total Pounds 76 to 97
Fig. 2.
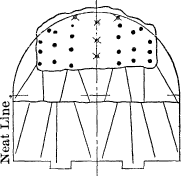
CROSS-SECTION
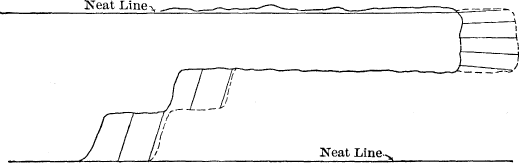
LONGITUDINAL SECTION
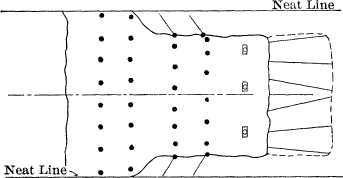
PLAN
Drilling Method, No. 2: Five drills in heading, mounted on three columns; the holes marked with a cross (X) were drilled with the drills on the center column
.
Per Round Per Cubic Yard Per linear Foot of Tunnel
Total Depth Drilled No. of Cubic Yards Pounds of Dynamite Adv. Linear Feet Drilled Pounds of Dynamite Cu. Yd. Linear Feet Drilled Pounds of Dynamite
Heading 190-220 35-42 134-196 6½-8 5.4-6.0 3.9-5.0 5.3 28 to 32. 20.7-26.5
Bench 110-130 55 79-106 4 2.-2.4 1.4-2.0 13.7 27.-33. 19.2-27.4
Total 19 55.-65. 39.9-53.9
Per cubic yard, whole tunnel section 2.9-3.4 2.1-2.8
Blasting Notes: Number of Sticks
Heading: First Round; 2 to 3 relieving holes sprung with 4 to 5 sticks each 8 to 15
8 cut holes, 7 sticks each (sometimes shot twice) 56 to 112
First side round, 6 holes, 6 sticks each 36
Widening and dry holes, 10 to 12, 6 sticks each 60 to 72
Total Sticks 160 to 235
Total Pounds 134 to 196
Sub‑bench: 8 holes, 4 to 6 sticks, each 32 to 48
Bench: 8 holes, 6 to 8 sticks, each 46 to 64
Taking up bottom, average 15
Total Sticks 95 to 127
Total Pounds 79 to 109
Fig. 3.
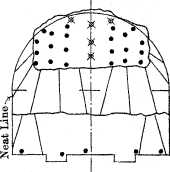
CROSS-SECTION
LONGITUDINAL SECTION
PLAN
Drilling Method No. 3: Heading same as second method, but larger lift taken off bench, and lift holes drilled in bottom bench in order to get down to grade in floor. Bench kept closer to heading.
Per Round Per Cubic Yard Per linear Foot of Tunnel
Total Depth Drilled No. of Cubic Yards Pounds of Dynamite Adv. Linear Feet Drilled Pounds of Dynamite Cu. Yd. Linear Feet Drilled Pounds of Dynamite
Heading 190 to 220 35 to 42 134 to 196 6½ to 8 5.4 to 6.0 3.9 to 5.0 5.3 28 to 32 20.7 to 26.5
Bench 145 ” 190 90 to 110 118 ” 167 6½ ” 8 1.6 ” 1.9 1.3 ” 1.8 13.7 22 ” 36 17.8 ” 24.7
Total 19 50 ” 58 38.5 ” 51.2
Per cubic yard, whole tunnel section 2.6 ” 3.1 2.0 ” 2.6
Blasting Notes: Number of Sticks
Heading: First Round: 2 to 3 relieving holes sprung, with 4 to 5 sticks each 8 to 15
8 cut holes, 7 sticks each (sometimes shot twice) 56 to 112
First side round, 6 holes, 6 sticks each 36
Widening and dry holes, 10 to 12 holes, 6 sticks each 60 to 72
Total Sticks 160 to 235
Total Pounds 134 to 196
Sub‑bench: 4 widening holes, 4 to 5 sticks each, 2 rounds 32 to 40
6 down holes, 5 to 7 sticks each, 2 rounds 60 to 84
Bench: 4 down holes, 5 to 7 sticks each 20 to 28
6 to 8 lift holes, 5 to 6 sticks each 30 to 48
Total Sticks 142 to 200
Total Pounds 118 to 167
Fig. 4.
CROSS-SECTION
LONGITUDINAL SECTION
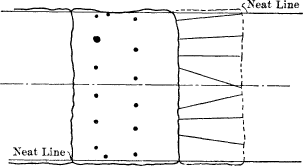
PLAN
Drilling Method No. 4: 8 drills on 4 columns used in heading. Bench taken off in one lift. Bottom taken up with lift holes
.
Per Round Per Cubic Yard Per linear Foot of Tunnel
Total Depth Drilled No. of Cubic Yards Pounds of Dynamite Adv. Linear Feet Drilled Pounds of Dynamite Cu. Yd. Linear Feet Drilled Pounds of Dynamite
Heading 310-320 63-71 215-257 8-9 4.5-5.1 3.4-5.7 7.9 35.6-45. 26.9-45.0
Bench 190-210 89-100 107-155 8-9 1.9-2.2 1.2-1.7 11.1 21.1-24. 13.3-18.9
Total 19 56.7-69. 40.2-63.9
Per cubic yard, whole tunnel section 3.-3.6 2.1-3.4
Blasting Notes: All holes of whole round are cleaned and loaded before blasting is started Number of Sticks
First Round: 5-6 lift holes, 7 to 9 sticks each 35 to 54
First row, sub-bench, 6 holes, 6 to 8 sticks each 36 to 48
Second Round: Second row, sub-bench and widening holes, 8 to 10 holes, 6 to 8 sticks each 48 to 64
Stub holes 10 to 20
Bench: Total Sticks 129 to 186
Total Pounds 107 to 155
Third Round: 8 cut holes, 7 sticks each, often requires 3 to 4 charges 112 to 224
Fourth Round: 8 holes, First side round, 5 to 7 sticks each 40 to 56
Fifth Round: 8 holes, Second side round, 5 to 7 sticks each 40 to 56
2 dry holes 5 to 7 sticks each 10 to 14
Sixth Round: 4 to 6 widening holes and dry holes, 6 sticks each 36 to 48
Stub holes 20 to 30
Heading: Total Sticks 258 to 428
Total Pounds 215 to 357
There was some time, too, during the earlier stages of the work, when it is believed that an excessive quantity of powder was used; for one or two months it ran up to 4 lb. per cu. yd.
Fig. 5.
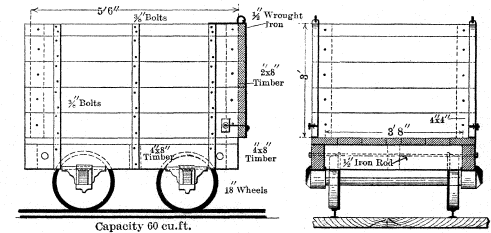
MUCK CAR USED AT WEEHAWKEN SHAFT
The dynamite used was “Forcite.” At first, both 40% and 60% were used, the 60% generally only for blasting the cut in the headings; during the latter part of the work, however, the 60% was used exclusively.
The rock as a rule broke very well, and only a comparatively small quantity could not be handled by the shovels without being broken up further by block-holing. In the sandstone the quantity of powder per cubic yard was much more than for any of the trap.
In drilling the Central Shaft, a 6-hole cut was made approximately on the center line, east and west, the enlargement requiring about 18 more holes, which were generally about 6 ft. deep, the average advance being about 4 ft. per day of 24 hours.
Fig. 6.
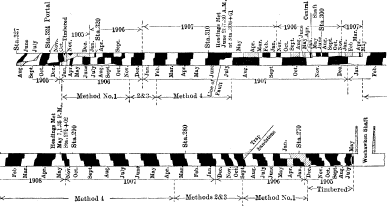
NORTH TUNNEL larger view
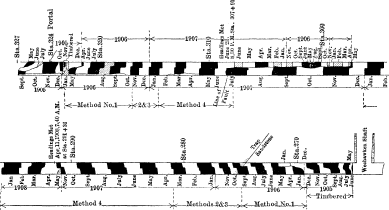
SOUTH TUNNEL larger view
PROGRESS PROFILES OF NORTH AND SOUTH TUNNELS SHOWING MONTHLY EXCAVATION
The drills were run by steam until a depth of about 150 ft. had been reached, air from the plant at Hackensack being available after
Skip to text
PLATE XXIII. TRANS. AM. SOC. CIV. ENGRS. VOL. LXVIII, No. 1154. LAVIS ON PENNSYLVANIA R.R. TUNNELS: BERGEN HILL TUNNELS.
larger view
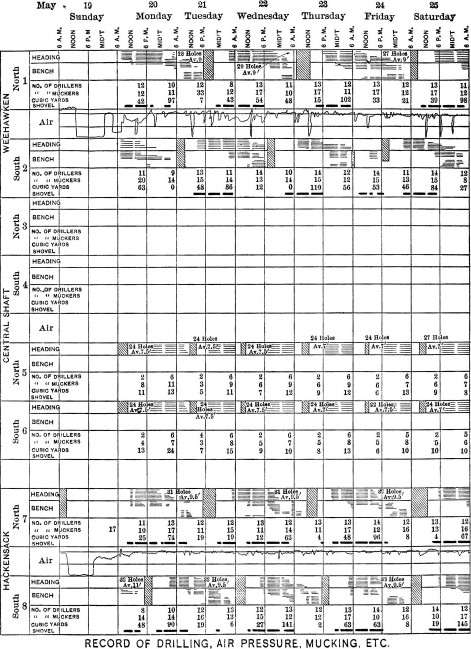
Drilling Data.—During the progress of the work, both general and detailed observations were made of the drilling, the results of which are shown in the tables. Table 1 has been compiled from the records as platted daily on the chart from the inspectors’ reports, as shown by Plate XXIII, and described on page 113. Table 2 contains some data relating to the drilling in the headings.
The general results of these observations show that the average time the drills were “actually working” was 5.2 hours per shift, and that they were actually “hitting the rock” about half of this time, or about 2.5 hours per shift. The average depth drilled per hour, during the time the drills were “actually working,” was 2.66 ft.
The “actual working time,” as noted above, covers the period from the time the drills were first set up in the heading after blasting until they were taken down for the next blast; it does not include the time occupied in setting up or taking down, which would probably average 30 min. more per shift. It is believed that this figure will also apply very closely to drills working on the bench, though no actual observations were taken to determine this, on account of the irregularity with which they were worked.
The actual working time of the drills in the 736 shifts (7,360 hours) covered by Table 1, was 3,826 hours, or 5.2 hours per shift. The average depth drilled per yard, as shown in the last column of Table 1, agrees fairly well with the figures on the diagrams, Figs. 1, 2, 3, and 4.
Table 2 has been compiled from detailed timed observations of individual drilling of down holes in the bench, for periods of 7 or 8 hours each, in January, 1907. The work at that time was in fairly normal condition at all points.
The figures in the third column of Table 2 include the time required for moving from one hole to another, when this occurred during the observation, the time required for changing bits, oiling drills, etc., and all delays of all kinds. A close record of the delays was
TABLE 1.
Shifts: Number of shifts covered by observations. Hours: Average number of hours worked per shift. D/Hr: Average depth drilled per hour per drill D/Yd: Average depth drilled per yard. Hack.: Hackensack Whk.: Weehawken CS: Central Shaft
Method. Date. Shifts Place. Hours D/Hr D/Yd
No. 1— 4-drill Aug. ’06 44 Hack., N. 5.69 2.78 10.1
Sept. ’06 38 ” N. 5.80 3.77 11.1
Aug. ’06 43 ” S. 5.60 2.89 9.1
Sept. ’06 36 ” S. 6.18 2.65 8.7
Jan. ’07 16 CS E. N. 5.99 2.99 8.2
Jan. ’07 20 ” S. 6.05 2.9 7.1
Apr. ’07 48 CS W. N. 4.92 3.3 6.7
Apr. ’07 48 ” S. 5.00 3.2 7.7
Nos. 2 and 3— 5-drill Dec. ’06 54 Whk., N. 4.95 2.16 4.52
Dec. ’06 54 ” S. 5.23 2.14 4.54
Dec. ’06 52 Hack., N. 5.03 2.2 5.77
Dec. ’06 54 ” S. 5.90 1.82 5.67
No. 4— 7-drill June ’07 56 Whk., N. 4.77 2.55 4.23
June ’07 58 ” S. 4.82 2.26 3.88
8-drill May ’07 60 Hack., N. 4.67 2.44 5.00
May ’07 60 ” S. 4.54 2.57 4.80
TABLE 2.
Date. Place. Total working time. Number of feet drilled.
Hours. Minutes.
Jan. 14th, 1907 Weehawken N. 8 0 15
” 15th, 1907 ” N. 7 32 12
” N. 7 22 14
” 12th, 1907 ” S. 8 0 20
” S. 8 0 11
” S. 8 0 10
” 11th, 1907 Hackensack N. 8 0 13
” 17th, 1907 ” N. 7 10 10
” N. 7 5 11
” N. 7 10 10
” 16th, 1907 ” S. 4 20 10
” S. 6 9 10
” S. 7 ... 8
Totals. 93 48 154
Average: 36.6 min. per ft. drilled, or 1.64 ft. drilled per hour.
As a check on the average figures obtained from various sources, the following estimate of the cost of drilling per cubic yard was made up from these average figures, for comparison with the actual average cost on the whole work. The cost records show this to be about $2.25 per yd., exclusive of power for running the drills, almost exactly what
Estimated Cost per Drill per Day.
Drill Runner 1 at $3.50 per day, $3.50
Helper 1 ” 2.00 ” ” 2.00
Nipper 1/5 ” 1.75 ” ” 0.35
Heading foreman 1/12 ” 5.00 ” ” 0.42
Walking boss 1/50 ” 7.50 ” ” 0.15
Blacksmith 1/12 ” 4.00 ” ” 0.34
Blacksmith helper 1/12 ” 2.00 ” ” 0.16
Machinist 1/12 ” 3.00 ” ” 0.25
Machinist helper 1/24 ” 1.75 ” ” 0.07
Pipe fitter and helper 1/50 ” 5.00 ” ” 0.10
Oil, waste, blacksmith coal, etc. 0.24
Drill steel, 6 in. per shift 0.20
$7.78
Average number of feet drilled per cubic yard 3 to 3.5
Number of feet drilled per drill, per shift 10.5 to 12
Number of yards per drill, per shift 3.5±
Cost of drilling, per yard, $7.78/3.5 $2.22±
In all the foregoing tables and computations, the quantities used have been those paid for. The quantity taken out, however, has been 10% more than that paid for, and 28% more than the contractor was actually required to take out.
The specifications required that the excavation should be taken entirely outside of the neat line, as shown on Plate VIII of the paper by Mr. Jacobs, but not necessarily beyond this line, but that the contractor would be paid for rock out to the standard section line, which is 1 ft. larger on the sides and top and 6 in. deeper in the bottom than the neat line.
A great deal of the extra quantity was due to rock falling from the core-wall side whenever one working face was behind the other. Blasting at the face behind generally loosened more or less rock on the core-wall side of the tunnel which was ahead, in one or two instances breaking entirely through, as shown in Fig. 2, Plate XXVI, the hole in the core-wall in this case being utilized by building a storage chamber in it.
TABLE 3.
Bergen Hill. Simplon.
Drills set up in heading, percentage of total elapsed time 50% 60%
Actually drilling the rock, percentage of total elapsed time 25% 50%
Average advance per round (attack) 8.5 ft. 3.8 ft.
Average time for each attack 36 hours. 5 hours.
Average advance per day of 24 hours 5 ft. 18 ft.†
Depth of holes 10 ft. 4.6 ft.
Diameter of holes 2¾ in. 2¾ in.
Linear feet drilled per hour, per drill 2.7 7.0
Linear feet drilled per cubic yard 5.0 6.0
Pounds of dynamite per cubic yard 3.4 to 5.7 8½
Average depth drilled with one sharpening 12 in. 6½ in.
Total number of men per day of 24 hours* 450 3,300
The figures in Table 3 are for “heading only” in both cases, except for the last item (number of men), the heading in the Simplon Tunnels being about 60 sq. ft., as compared with the heading of Method No 4 (which has been used for comparison), of 210 sq. ft.
Mucking and Disposal.—The conditions affecting the disposal of the muck, after blasting, were quite different at the two ends, the grade descending in the direction of the loads at Weehawken and ascending at the Hackensack end. At the Weehawken end the mouth of the tunnels was at the bottom of a shaft some 80 ft. deep, Fig. 2, Plate XXII, the muck in the tunnel cars being hoisted by elevators to a platform at the top from which it was dumped into standard-gauge cars supplied by the Erie Railroad, as shown by Fig. 7; or later hauled to the crusher or storage pile, some 500 ft. distant, on the north side of Baldwin Avenue. At the western end, the cars were hauled directly to the surface through the approach cut, and the material, except that required for concrete and rock packing, was deposited in the embankment across the Hackensack Meadows, a haul of from 1,000 to 3,000 ft. beyond the portal.
All disposal tracks were of 3-ft. gauge, the main running tracks being generally laid with 60-lb. second-hand rails, although some of lighter weight were used.
Fig. 7.
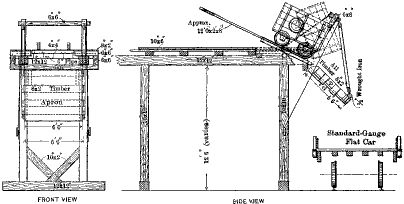
METHOD OF EMPTYING DUMP CARS AT WEEHAWKEN SHAFT
larger view
At Weehawken, previous to the time the shovels were installed, the muck was shoveled by hand into the cars from the bottom of the bench, and the heading muck was dumped into them from the movable platform (Jumbo) shown by Fig. 1, Plate XXII. There were three loading tracks at the face. The cars used at that time were similar to that shown by Fig. 5, but were about two-thirds the size and had no end door; stop-planks were supposed to be placed in the ends but seldom were. The loads averaged about ½ cu. yd. (measured in place). After the shovel was installed the cars shown by Fig. 5 were used, and the loads averaged nearly 1 cu. yd.
The empty cars were pushed up to the shovel by hand from the storage track. When loaded, they were given a start with the bucket of the shovel, and were then allowed to coast by gravity out to the storage track near the shaft, where they were stopped by placing rolls of cement bags or burlap on the rails. After the lining was started, the loaded cars were stopped on the inside of the lining and only sent out over the single track through this latter at stated intervals,
Up to the time the trap rock was reached, about 1,100 ft. from the shaft, the excavated material was disposed of by loading it on flat cars. All the trap, however, was stored to be used later for concrete and ballast.
When the tunnels were in full working order, sixty muck cars of the type shown by Fig. 5, were in use, about evenly divided between the two tunnels. For some time the work was greatly hampered by lack of cars, and even with the sixty finally obtained, there were many times when extra cars could have been used to advantage to keep the shovel working.
When mucking by hand, the mucking gangs consisted of from 15 to 20 men. The maximum output was 50 cu. yd., and averaged about 35 cu. yd. per shift; there was a great deal of trouble in keeping the gangs full, as labor at that time was very scarce, and the tunnels were quite wet. The maximum output of either of the shovels was 159 cu. yd. in one shift, and the best average in any month—which was between July and December, 1907, during which time only the enlargement and bench of the Central Shaft headings was being taken out from the western end—was 60 cu. yd. per shift. As the shovels were generally idle for one shift out of three, the quantity actually handled averaged 90 cu. yd. per shift during the shifts the shovel worked. All these quantities were “measured in place,” and, as previously noted, would be about equal to twice as much measured loose in the cars.
The shovels at both ends were usually worked with three crews for the two tunnels; two day crews, one at each shovel, and a night crew which was used in either tunnel as occasion required. The day crews generally averaged from 45 to 60 hours overtime during the month, one of them working during the early part of the evenings in the opposite tunnel to the night crew. For a short time, when the ventilation at the western end was very bad, four crews were worked, day and night crews in each tunnel; but, as a general rule, the method of working three crews was preferred by the men, and was less expensive for the contractor.
Generally, 4 cars were hauled out together, although 5 and occasionally 6 were handled. The work was generally arranged so that the heavy mucking shift alternated in the two tunnels, the two engines being worked there and a single engine in the other tunnel.
The tunnel engines left the cars on a track just outside the portal, from which they were made up into trains of from 6 to 8 cars and taken to the dump or crusher by the large “dinky.”
The muck from the Central Shaft headings was loaded by hand into cars similar to that shown by Fig. 5, but smaller and having no door at the forward end. A double elevator took the cars to a platform about 20 ft. above the surface, where they were dumped by revolving platforms, similar to those at Weehawken, into storage bins or directly into wagons. The muck was all hauled away in wagons; part of it was used to fill some vacant lots, and part was hauled to the crusher at the Western Portal.
The method under which the best results were obtained was that in which a full round was blasted every 36 hours, securing an advance of practically 9 ft. of full section. During the first shift of the three, as soon as the blasting had been completed and lights strung, the shovel was moved forward, and cleaned up the floor to the main pile of muck, the material from the blast being scattered from 150 to 300 ft. back from the face; during this shift, also, the drillers mucked the heading and set up their drills, the muckers helping to carry in the columns and drills. During the second shift the main pile of muck was disposed of, leaving not more than 2 or 3 hours’ work for the shovel on the third shift. This left nearly the whole of the third shift for drilling the lift holes.
Ventilation.—At Weehawken considerable difficulty was caused by fog and smoke accumulating in the tunnels after blasting. This was generally worse on days when the barometric pressure was low outside, Fig. 8.
This necessitated, of course, that the cross-passages between that in which the fan was placed and the mouths of the tunnels should be blocked tight. There was some difficulty in keeping this blocking tight, owing to the force of the blasting blowing out the bulkheads. The fan, however, did good service when it and the bulkheads were in good order. The compressed air discharged from the drills kept the headings fairly clear, as well as that part of the tunnel between the headings and the fan. The fan was moved ahead to the next cross-passage at Station 277 when the work had progressed far enough, and was used there for some time; it was found, however, that by the time the excavation had reached Station 280, about 1,500 ft. from the shaft, there was practically no further difficulty from fog and smoke. No satisfactory explanation was found for this, as it would rather be expected that the ventilation and trouble with smoke and fumes from blasting would be worse as the distance increased between the mouth of the tunnel and the working face. One explanation was offered: That the blasting of the softer sandstone tended to create more and lighter dust than the heavier trap rock; whether or not this was so, it is a fact that there was far less trouble with fog and smoke after the sandstone was passed.
Fig. 8.

At Hackensack, the principal cause of trouble was the smoke from the “dinky” locomotives. As the tunnels progressed, this gradually became worse, until a connection was made with the Central Shaft headings. A fan was installed in the cross-passage at Station
Lighting.—During the earlier stages of the work, gasoline lamps and Kitson lights were used. The former, of the familiar banjo type, and a modification of this, with a section of wrought-iron pipe for the reservoir, were very unsatisfactory, and were out of repair and leaking a large proportion of the time. The Kitson lights were given only a short trial, but were found unsatisfactory, owing to the necessity of moving them frequently and having to set them up in insecure positions. Electric lights were installed by Mr. Bradley, on his assumption of the contract.
At the main working face From 8 to 10
On and around the shovel ” 9 to 12
Between the portal and the working face ” 60 to 80
The cost of lighting for the whole work averaged about 15 cents per cu. yd., which is quite large. This was mainly due to the fact that current was bought from outside sources during a large part of the time (one-third of the yardage). Part of this current cost 5 cents per kw-hr., and there were fairly heavy charges for connecting the tunnel wiring system with the source of supply. Current bought from the Public Service Corporation cost from 10 to 12 cents per kw-hr. delivered at the mouth of the tunnel.
Pumping.—The quantity of water encountered during the excavation of the tunnels, measured somewhat roughly, was approximately as follows:
At Weehawken 74 gal. per min.
At Central Shaft 1 ” ” ”
At Hackensack 18 ” ” ”
The water at the Weehawken end had to be pumped from the bottom of the shaft, a lift of about 90 ft., while at the Hackensack end it had to be pumped back from the face up grade to the portal.
The cost of pumping was about $100 to $125 per month for labor for the whole work, besides the cost of the plant (about $1,200) and the power for running it.
Progress.
The total time elapsed from the time of starting work at the Weehawken end, in May, 1905, to the completion of the excavation, in May, 1908, was almost exactly three years. Of this time about 40 days were lost in February and March, 1906, when work was stopped by the Receiver of the Shields Company, the total number of days actually worked being about 940, giving an average progress of 6.26 ft. per working day in each of the two tunnels, which, omitting the Central Shaft headings, gives an average rate of progress for each working face, of 3.13 ft. per day.
Progress at Weehawken.—At Weehawken the total number of days worked was 763, divided as follows:
186 days in timbered section, about 426 ft., an average rate of 2.3 ft. per day in each tunnel;
176 days in hard sandstone, about 563 ft., an average rate of 3.2 ft. per day in each tunnel;
112 days in hard trap, about 267 ft., an average rate of 2.4 ft. per day in each tunnel;
289 days in ordinary trap, about 1,316 ft., an average rate of 4.55 ft. per day in each tunnel.
Progress at Central Shaft.—At Central Shaft the average length driven per day in each of the four headings is shown by Table 4.
TABLE 4.
Location. Number of days worked. Total length of heading, in feet. Average length of heading driven per day worked, in feet.
N.E. 227 446 1.96
S.E. 168 346 2.06
N.W. 272 768 2.82
S.W. 234 698 2.98
Progress at Hackensack.—At Hackensack the total number of days worked on the tunnels proper, all in trap rock (omitting the cut and cover) was about 792, divided as shown in Table 5.
TABLE 5.
Location. Number of days worked. Advance. Average advnce per day.
Station 323 to Central Shaft headings 492 1,450 4.5
Bench and enlargement of Central Shaft headings 159 {1,150* { 906† 7.2* 5.7†
Central Shaft headings to Weehawken headings 141 620 4.4
Weehawken.—
Linear feet. Feet per day.
Full timbered section, North Tunnel Nov., 1905, 87 == 3.0
Sandstone ” ” May, 1906, 109 == 3.9
Trap (normal) South ” July, 1907, 144 == 5.3
Hackensack (All trap).—
Linear feet. Feet per day.
Portal to Central Shaft headings, South Tunnel May, 1907, 139 == 5.0
* Enlargement of headings, ” ” Nov., 1907, 175 == 6.0
Central Shaft headings to Weehawken headings, North Tunnel Apr., 1908, 145 == 5.2
Central Shaft Headings.—During April, 1907, 122 lin. ft. of heading, averaging 3.8 cu. yd. per lin. ft., were taken out in the South Tunnel, west of the shaft. This was equal to 5.0 ft. per day for the 24 days worked.
The Best Week’s Work.—The best week’s work at either of the main working faces, when the full section was being excavated in trap rock, was 803 cu. yd., equal to 41.8 lin. ft. of full-section tunnel, or an average of 6.0 lin. ft. of full section per day; this was from the South Tunnel at Hackensack for the week ending January 11th, 1908.
The Best Yardage.—The largest number of yards taken out in any one week from one working face was 1,087, equivalent to 56.6 lin. ft. of full section, or an average of 8.1 lin. ft. of full section per day. This was bench and enlargement only (Central Shaft headings) in the North Tunnel, Hackensack, for the week ending October 19th, 1907.
The largest yardage for the whole work in any one week was 3,238 cu. yd. from four working faces—two at Weehawken in full section and
The Best Month’s Work.—The best month’s work with each of the four methods of drilling the headings, as shown in Figs. 1, 2, 3, and 4, where the work was straight forward and the full section was being taken out, was as follows:
Method No. 1 About 90 ft. in sandstone.
” No. 2 ” 100 ” in trap.
” No. 3 ” 137 ” in trap.
” No. 4 ” 145 ” in trap.
In regard to these figures it should be noted, as stated previously, that the organization of the men and plant was not properly completed until near the time Method No. 4 was put in operation.
In Fig. 9 is shown graphically the relation of the progress to the time elapsed in the North Tunnel, the diagram for the South Tunnel being almost exactly the same.
Fig. 9.
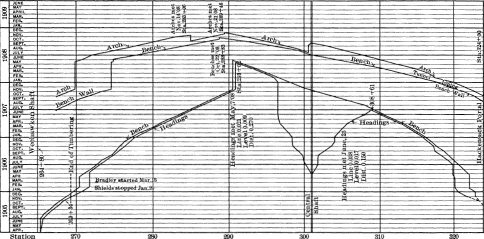
PROGRESS PROFILE—NORTH TUNNEL
larger view
Plant.
The plant installed by the John Shields Construction Company, and taken over by Mr. Bradley, was composed very largely of second-hand material, and eventually most of it had to be replaced. Insufficient and inefficient plant and delay in installation were largely responsible for the small progress made by the Shields Company, and Mr. Bradley’s endeavor to utilize this plant not only caused much delay during the first 8 or 10 months after he started work, but also involved large expense.
Power Plant.—At Weehawken the plant installed by the Shields Company consisted of three old locomotive boilers, each having a nominal capacity of about 125 h.p., and one Rand and one Ingersoll-Sergeant compressor, each of a rated capacity of about 1,250 cu. ft. of free air per min. compressed to 100 lb.
To this Mr. Bradley added two more second-hand locomotive boilers, and another Rand compressor of the same type and capacity as the first. The theoretical steam capacity of each of the five old locomotive boilers was about 4,250 lb. per hour, or a total capacity of 21,250 lb. per hour.
Pounds per hour.
Three compressors, about 5,600 lb. per hour each 16,800
One dynamo About 1,000
One 500-gal. pump ” 1,000
One hoisting engine for elevators ” 2,000
Total 20,800
Actually, there was considerable deficiency of steam when an endeavor was made to work the three compressors at their full capacity. A separate boiler was afterward installed to run the hoisting engine for the elevators and the pumps, thus leaving a requirement of only approximately 18,000 lb. of steam per hour, but even this was beyond the capacity of the boilers, especially as one was almost always out of commission.
The two Rand compressors were 24 by 24 by 30-in., straight-line, one-stage, steam-driven, with a nominal capacity of 1,250 cu. ft. of free air per min. at 80 rev. per min. The Ingersoll-Sergeant was of similar type and capacity. Therefore, the theoretical quantity available was 3,750 cu. ft. of free air per min.
The theoretical air requirements (as taken from manufacturers’ catalogues) were:
Cubic feet of free air per minute.
20 Rand slugger drills (12 by 174) 2,088
2 Little Giant shovels (taking air two-thirds of the time) 1,100
Total 3,188
This estimate, based on the assumption (given in the catalogues) that the drills would be working about three-fifths of the time, and the shovels about two-thirds of the time, left apparently an ample margin between the full capacity of the compressors and the requirements for the drills; as a matter of fact, however, it was seldom that more than 80 lb. of air was available, and the pressure often dropped to 60 or 50 lb. at the compressors. During the time this plant was in use the greatest distance to the drills was about 1,500 ft.
As this plant proved to be entirely inadequate to the demands, an arrangement was made with the O’Rourke Construction Company on
The new plant had been in use previously in the construction of the River Tunnels. The air from it was compressed to 40 lb. by low-pressure machines, one being used all the time and two when necessary. These machines were built by the Ingersoll-Sergeant Company, the engines being of the Corliss duplex type, cross-compound steam, with simple duplex air cylinders, each compressor having a capacity of nearly 4,000 cu. ft. of free air per min. This air, at 40 lb., was delivered to an Ingersoll-Sergeant high-pressure machine, having Corliss cross-compound engines, 14 by 26 by 36-in., with air cylinders of the piston inlet type, 13¼ by 36-in., which compressed it to 100 lb. The capacity of this latter machine, taking air at normal pressure, is 920 cu. ft. of free air per min. working at 85 rev. per min.; by taking the air at 40 lb., and working at a somewhat higher speed, this machine alone supplied all the air used at the Weehawken end (approximately 4,000 ft.) from December, 1906, to November, 1907, and, with very few exceptions, the pressure was steadily maintained at from 90 to 100 lb., there being no break-down of any kind.
At Hackensack the plant taken over by Mr. Bradley consisted of six old locomotive boilers and four Rand compressors, all of the same type as those at Weehawken. To this he added two second-hand marine boilers, each of a stated capacity of about 350 h.p., and two more Rand compressors of the same type and capacity as the others, making the total theoretical steam power available approximately 1,450 h.p., with a compressor capacity of approximately 7,500 cu. ft. of free air per min., equal to about 1,500 h.p., allowing for 15% of loss.
Nowhere near the theoretical steam power was ever developed from the boilers. The tubes of the old locomotive boilers were filled with mud in many cases, and were always leaking. The marine boilers were not properly installed to give the best results, and it was seldom possible to work more than four compressors at once, or to keep the air pressure at the power-house much greater than from 70 to 80 lb. at any time.
Two pairs of Stirling boilers, with a total capacity of 2,000 h.p., were installed. As a rule, at times of maximum demand, three of the boilers were in use; after the Central Shaft was stopped, two were generally sufficient, until, toward the latter part of the excavation, the losses in the transmission of the air made it necessary to keep three going.
Eight compressors (the six old ones with two brought from Weehawken), were installed in the new power-house. All were of the same type, namely, Rand, straight-line, steam-driven, 24 by 24 by 30-in., each with a nominal capacity of 1,250 cu. ft. of free air per min. Seven of these were generally worked to their full capacity in order to keep up the necessary supply of air.
The maximum requirements of air at this end were primarily estimated as follows:
Central Shaft, four headings 24 drills.
Hackensack, two working faces 20 drills.
Total 44 drills.
Cubic feet of free air per minute.
44 Slugger drills (25 by 174) require 4,350
2 Steam shovels 1,600
Pumps and machine-shop, say 1,000
4 Hoisting engines, placing concrete 2,000
4 Derricks 2,000
Total 10,950
1250 × 8 = 10,000 cu. ft. of free air per min.
It was considered that not more than two-thirds of the above equipment would be working at the same time; the actual requirement, therefore, was taken at about 8,000 cu. ft. of free air per min., thus leaving a margin of one spare compressor.
As actually worked out, there were probably never more than eight drills working at any one time at the Central Shaft, and this work was entirely suspended in June, 1907, before there was any demand for power in connection with the tunnel lining. The heaviest actual requirement, therefore, was approximately as follows:
(A) Previous to June 25th, 1907:
Cubic feet of free air per minute.
40 Drills (22 by 174) 3,828
2 Shovels 1,600
Pumps and machine-shop, say 1,000
2 Derricks 1,000
Total 7,428
(B) After November, 1907 (after completion of enlargement of Central Shaft headings):
Cubic feet of free air per minute.
32 Drills (17 by 174) 2,958
2 Shovels 1,600
Pumps, etc 1,000
3 Hoisting engines on concrete, each working one-third time 500
2 Derricks 1,000
Total 7,058
The average number of drillers per shift was about 25 at the two main working faces. There were also from 5 to 10 drills trimming and cleaning up for concrete, say an average of 7, making 32 in all.
After November 1st, it actually required three boilers under steam all the time, and not less than seven compressors running at full capacity, to keep the air at proper pressure, the theoretical capacity
Some of this deficiency was due to losses in transmission, part also was due to the fact that the actual was probably considerably below the theoretical capacity of the compressors.
Accidents.
Two accidents occurred to the powder magazines, the causes of which were never absolutely determined. The first occurred on January 10th, 1907, when the dynamite burned up without exploding. The second accident was on March 3d, 1907, when an explosion occurred which damaged property over a very large area, but did not involve any serious injury to persons, only one man being slightly hurt.
The only serious blasting accident in the tunnels occurred on January 26th, 1908, and was due to a premature blast, the cause for which could not be ascertained.
Contractor’s Organization.—The work was in general charge of a superintendent, and, during the time it was being carried on at both ends, an assistant superintendent had charge at night. At each end there was a day and a night walking boss, who had general supervision of the men in the tunnels, the day walking boss being the superior, and responsible for the general conduct of the work at his end, both day and night. Two 10-hour shifts were worked, thirteen shifts every two weeks, no work being done on alternate Sundays and Sunday nights. With the exception of the walking bosses and the master mechanic, all the men changed from the day to the night shift every two weeks.
The organization was approximately as follows, for each shift:
General—Both Tunnels.
1 Master mechanic (days only), 1 Machinist, 1 Engine runner, 2 Firemen, 2 Oilers, 1 Electrician and helper, 1 Drill machinist and helper, 3 Blacksmiths and helpers, 1 Powderman, 1 Walking boss, 4 Locomotive engine runners, 4 Brakemen, 1 Switchman, 1 Foreman on dump, 6 Men on dump, 1 Foreman on track, 6 Men on track.
In Each Tunnel.
Drilling and Blasting. Mucking.
1 Foreman, 12 Drillers, 12 Helpers, 1 Nipper, 1 Pipe-fitter. 1 Shovel engineer, 1 Cranesman, 1 Muck boss, 12 Muckers.
Records.
The records of the work have been based largely on the reports of the day and night inspectors, which were made out on regular forms.
A daily report card was made out each morning and forwarded to the office of the chief engineer. It covered the work done for the previous 24 hours, up to 6 o’clock each morning.
A telephone report was made to the resident engineer by the inspectors each day at 8.30 A.M., giving the conditions, number of men, etc., at the opening of the day’s work.
A daily progress profile, on 10 by 10 to the inch cross-section paper, covering the whole length of the tunnels, was kept in the office of the resident engineer. This was mounted in sections, on a piece of composition board, and hung on the wall for convenient reference. The information, showing the progress up to 6 o’clock each morning, was shown on the report of the night inspector, and was plotted on this profile at 7 o’clock each morning. The plotting was left in pencil, and each month’s work was colored in. A progress profile was taken by the men of the alignment corps each Saturday morning and plotted by them, alternate weeks being in red and blue ink on the same profile.
A chart showing the number of drills working, time worked, blasting periods, etc. (Plate XXIII), was plotted each morning and was extremely useful, not only in keeping in touch with the work, but in compiling many of the statistics used in the preparation of this paper. These cross-section sheets were ruled 12 by 12 to the inch, thus giving one space per hour horizontally. In the top vertical space are shown the heading drills, their time of stopping and starting, and their number, each heavy line representing one drill. In the next space below are shown the drills on the bench, lift holes, etc.
The blasting time is shown by the portion hatched (shown in red on the original), which covers the whole vertical space when a complete
A combination daily and weekly report, showing the total number of men working on each section, and the number of cubic yards excavated, was entered every day and kept on a filing board in the office of the resident engineer, and a copy was sent to the main office at the end of the week, with such notes on the back as might be necessary, or of interest.
A report was made out weekly and sent to the contractor’s superintendent, showing any deviations from grade, any tight places, and the station of bench and headings.
A monthly report was made to the chief engineer, giving detailed statistics of the amount of work done, etc., plant installed, and short notes of any matter of interest affecting the work in any way.
Tunnel Lining.
Preliminary Considerations.—For the placing of the concrete lining, a sub-contract was given to Messrs. King, Rice and Ganey, by Mr. Bradley, which provided substantially that all materials should be supplied by him, and delivered to the sub-contractors at track level, at or near the point in the tunnel at which they were to be placed, and that he would supply light and power; the sub-contractors were to supply the plant, forms, and labor necessary for placing the concrete and water-proofing, building the conduit lines, manholes, etc., etc., to complete the lining, the general form of which is shown on Plate VIII of the paper by Mr. Jacobs, and in Fig. 10. The latter also shows the different sections into which the lining was divided for purposes of construction, and the nomenclature adopted for each. It may be noted, incidentally, that the cubic contents of the lining per linear foot of tunnel is almost exactly half the quantity excavated, out to the standard section lines, and as there was some excavation outside of these lines, all of which had to be replaced, the actual quantity of material which had to be brought back into the tunnel
Fig. 10.
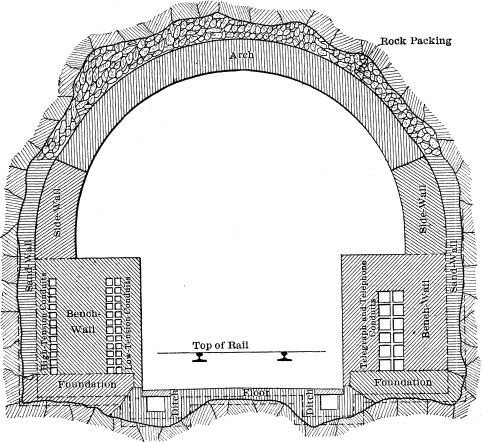
SKETCH SHOWING DIVISION OF LINING FOR PURPOSES OF CONSTRUCTION, AND NAMES OF SECTIONS
An essential part of the agreement with the sub-contractors provided that the operations incident to the placing of the lining should be carried on so as to provide at all times space for a single track of 3-ft. gauge, running through the work, and the necessary clearance for the locomotives and cars used in hauling out the muck. A clearance diagram of one of the “dinkys” used in the tunnels, and its relation to the forms used, is shown by Fig. 12 and also by Fig. 16, the 4-yd. Allison cars, used for handling the muck, taking practically the same width, although they were not quite as high. This requirement and the limited space available must be kept in mind in considering the design finally adopted for the forms and plant required in placing
In working out a design for the bench-wall forms, another highly important and controlling factor, which had to be considered, was the arrangement of the conduit lines, as shown in the general cross-section.2
The quantities of the various materials in the lining, per linear foot of tunnel, were as follows:
Concrete 7.64 cu. yd.
Rock packing: Paid for 1.48 cu. yd.
Outside standard section line 1.74 ” ”
3.22 ” ”
Iron and steel 44.2 lb.
Vitrified conduits 84.0 duct ft.
Water-proofing 13.0 sq. ft.
Flags 3.3 ” ”
General Methods.—The lining was started at both ends of the tunnels before the headings were finally holed through, so that there was practically a separate organization at each end, each in charge of one of the members of the firm. The work at the Weehawken end was started first, and the plant and scheme of working adopted there was thoroughly tried out before the plant for the western end was built, consequently, the latter was somewhat more efficient, being designed in the light of the experience gained at the Weehawken end.
The general sequence of the plan first adopted in placing the concrete is shown by Fig. 10. The concrete was first placed in the foundations up to the elevation of the bottom of the conduit bines, this work, of course, being kept well in advance; next followed, in the order named, the sand-walls, water-proofing, conduits, bench-walls, and finally the arch. The foundation was built in any convenient lengths, multiples of 16 ft., the length of one section of form, the sand-walls in lengths of from 25 to 35 ft., the bench-walls in 25-ft. lengths, and the arch in 10-ft. lengths. Concrete was placed during the day shift only,
Five gangs were organized at each end, the first placed concrete in the foundations in both tunnels, as the excavation was ready. In each tunnel there was a gang which built sand-wall one day and bench-wall the next, the two tunnels alternating so that only one bench-wall was built each day, and finally a gang in each tunnel building arches, a 10-ft. section being completed each day. During the night shift, the arch forms and travelers were moved, and all other forms, etc., were made ready for the concrete to be placed the following day. Some of the conduit laying was done by the night shift, but part of it was necessarily done during the day, as the concrete was built up. A small gang was kept busy in both tunnels, during the day shift, laying conduits and water-proofing. The latter two operations were generally performed by the same gang.
This organization, of course, required considerable regularity in the work, and this was finally attained, but at the beginning many sections were often not finished on time, thus creating considerable confusion. The progress possible with this organization (finally maintained with great regularity) was 75 ft. of bench-wall and 60 ft. of arch per week at each of the two working faces in each tunnel. This allowed the bench-wall to gain considerably on the arch, and therefore at a suitable point, as shown on the progress diagram, Fig. 9, a third pair of arches was started, one in each tunnel, increasing the progress on the arches to 180 ft. per week in each tunnel.
Mixing and Transportation.—All the concrete used on this section was mixed in Hains mixers, one being at each end. At the Weehawken shaft the mixer was installed in the framework supporting the head-house and elevators; and storage bins were arranged above, as shown by Fig. 11, A, the whole structure being somewhat strengthened to allow this to be done. At the western end the mixer was placed immediately under the bins of the stone crusher, as shown by Fig. 11, B, the track below being connected directly with the tunnels. The stone bin under the screen of the crusher plant at the Hackensack end was divided into three parts, the center being filled with sand by a derrick having a clam-shell bucket, the other two with stone directly from the screen above.
Skip to Text
Fig. 11.
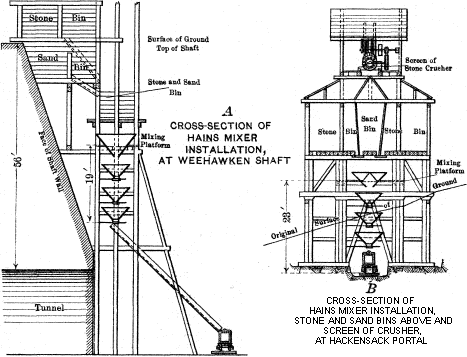
Cross-Section of Hains Mixer Installation, at Weehawken Shaft (Larger view)
Cross-Section of Hains Mixer Installation, Stone and Sand Bins Above and Screen of Crusher, at Hackensack Portal (Larger view)
This type of mixer proved very efficient on this work. The largest
The concrete for the foundations was hauled in steel, V-shaped, dumping cars holding about 1 cu. yd., and the concrete for the bench-walls and arches in Stuebner, 1-yd., bottom-dumping buckets placed on small flat cars, as shown by Fig. 1, Plate XXIV. Rock packing was handled in Allison 4-yd. cars and also in the cars shown by Fig. 5, as well as in the Stuebner buckets, the latter, however, being most generally used. Mules were used for a short time at the Weehawken end to haul the concrete in, but proved entirely inadequate to haul the loaded cars up the 1.3% grade, and locomotives were substituted after the headings were holed through. At the western end the cars were allowed to coast in, and, up to the time the headings were holed through, were hauled back by mules; after that they were pushed out by a locomotive which had gone in ahead of them. As a rule, from 8 to 10 cars of concrete and rock packing were sent in, one after the other, in proper order, a boy riding on each car and stopping it at the proper place; all these cars were pushed out together when empty.
Skip to text
PLATE XXIV. TRANS. AM. SOC. CIV. ENGRS. VOL. LXVIII, No. 1154. LAVIS ON PENNSYLVANIA R.R. TUNNELS: BERGEN HILL TUNNELS.
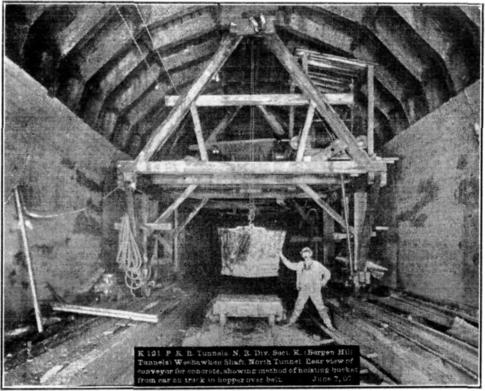
Fig. 1. K 131. P.R.R. Tunnels, N. R. Div. Sect. K. (Bergen Hill Tunnels) Weehawken Shaft, North Tunnel. Rear view of conveyor for concrete, showing method of hoisting bucket from car on track in hopper over belt. June 7, 07.
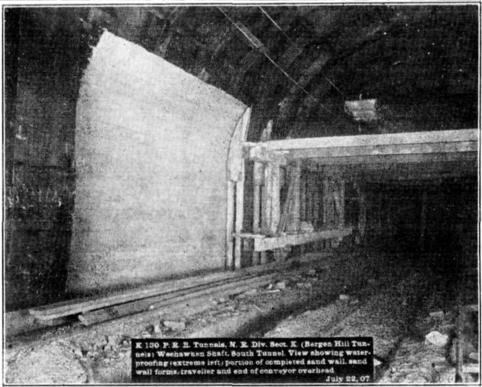
Fig. 2. K 130. P.R.R. Tunnels, N. R. Div. Sect. K. (Bergen Hill Tunnels) Weehawken Shaft, South Tunnel. View showing waterproofing (extreme left) portion of completed sand wall, sand wall forms, traveller and end of conveyor overhead. July 22, 07.
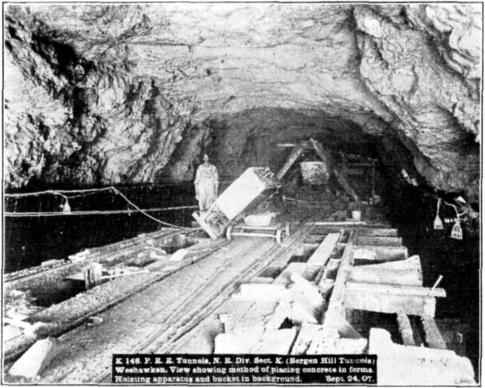
Fig. 3. K 148. P.R.R. Tunnels, N. R. Div. Sect. K. (Bergen Hill Tunnels) Weehawken. View showing method of placing concrete in forms. Hoisting apparatus and bucket in background. Sept. 24, 07.
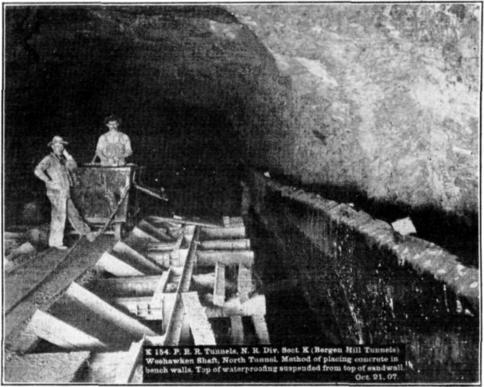
Fig. 4. K 154. P.R.R. Tunnels, N. R. Div. Sect. K. (Bergen Hill Tunnels) Weehawken Shaft, North Tunnel. Method of placing concrete in bench walls. Top of waterproofing suspended from top of sandwall. Oct. 21, 07.
At the western end the larger part of the rock packing was sent in from outside, but occasionally, during the time the excavation was going on, the cars from the heading were stopped at convenient points, generally under the gantries, where the lining was being placed, and whatever stone could be utilized was sorted from the top and passed up to the platforms above.
After the headings were holed through, there was considerable difficulty at times in getting a sufficient supply of concrete and rock packing into the tunnel at the time it was required, and while undoubtedly the transportation facilities may have had some influence in this, the principal trouble lay in the difficulty of securing a sufficient supply of proper stone for rock packing, and for the crusher.
While the excavation was progressing, the cars of muck, as they came from the headings, were taken directly to the crusher and dumped into it, the proportion of fine material being fairly constant and the supply regular. At this time, also, a portion of the rock not required at the crusher was dumped along the edge of the bank on the south side of the approach, the larger stones rolling to the bottom where they were easily available to be loaded into cars for rock packing, being entirely free from the fine material; as this stone at the bottom of the bank was used up, the supply was renewed, the rock suitable for rock packing being automatically separated from the fine material as it rolled to the foot of the slope.
After the excavation was completed, however, it was necessary to go into the bulk of the storage piles to get material for the crusher and for rock packing, and then the difficulties were materially increased by the large quantity of fine material encountered, the proportion remaining after the rock packing had been sorted out being too large to send through the crusher. It was not only the handling over of this fine material which caused delay, but the difficulty of disposing of it. On rainy days the trouble was increased by the difficulty of getting men to work in the open.
The delays due to transportation were usually caused by derailments,
The average number of cars handled (round trips of 1 car) during a day (two 10-hour shifts) at the Hackensack end during January, 1908, when the excavation and lining were in full swing, was about 125 cars of muck and 200 cars of lining material, the former being hauled by locomotives and the latter by mules.
Methods of Handling Concrete in the Tunnels.—The concrete for the floor, ditches, and foundations, was brought into the tunnel in V-shaped steel, dumping cars, and dumped as near as possible to the place it was to occupy.
The concrete for the arches and bench-walls was loaded at the mixers into 1-yd., Stuebner, bottom-dumping buckets which just held a 4-bag batch. These buckets were placed on small flat cars, hauled into the tunnel, placed beneath the traveling gantry, as shown by Fig. 1, Plate XXIV, and hoisted to the platform above.
These traveling gantries, the details of which are shown by Fig. 12, consisted essentially of platforms at each end of which an A-frame was erected; the latter supported at their apexes two I-beams, from the lower flanges of which was suspended a traveling block, shown at A, Fig. 12, and through which the hoisting rope was rigged. The buckets were hoisted through an opening in the platform and then moved along to where they could be dumped. The platforms were supported on wheels traveling on rails laid on the concrete of the foundation (for the bench-wall gantries) or on top of the bench-wall (for the arch gantries).
Skip to Text
Fig. 12.
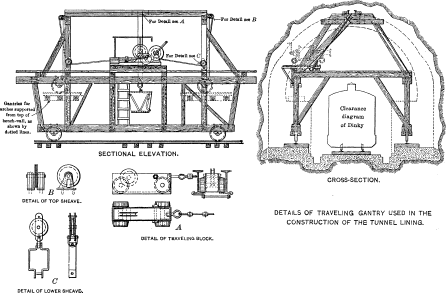
DETAILS OF TRAVELING GANTRY USED IN THE CONSTRUCTION OF THE TUNNEL LINING
SECTIONAL ELEVATION (Larger view)
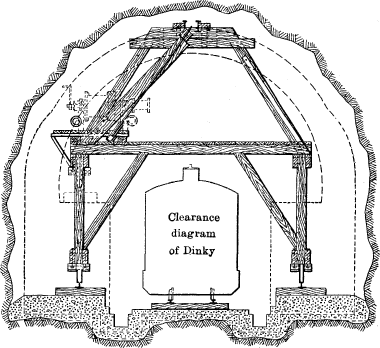
CROSS-SECTION
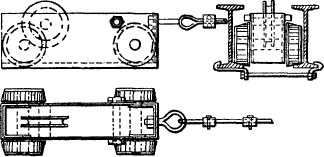
A. DETAIL OF TRAVELING BLOCK
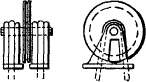
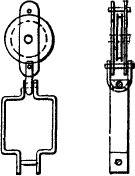
B. DETAIL OF TOP SHEAVE C. DETAIL OF LOWER SHEAVE.
Each of the first two of these traveling gantries used was equipped with a belt conveyor working on a cantilever arm, as shown by Figs. 3 and 4, Plate XXI, and Figs. 1 and 2, Plate XXIV. In using these belt conveyors, the concrete was dumped from the Stuebner bucket into a hopper, Fig. 1, Plate XXIV, with an adjustable slot in the bottom, under which the belt ran.
It was the original intention, in designing the conveyor, that the end of the cantilever arm should be swung from one side of the tunnel
The principal difficulty with its use, however, was the inability to take care of more than one batch of concrete at a time. When one batch had been dumped into the hopper, a second could not be disposed of until the first had nearly all run through on the belt, and this took from 7 to 20 min., varying with the consistency of the concrete, etc. In a few instances, where there happened to be some fairly dry batches, the concrete could not be started through the slot at all, and had to be shoveled out of the hopper. On the other hand, it is stated that some batches, under favorable conditions, passed through in about 2 min., but this was quite exceptional, and the operation was irregular and uncertain.
Before the final method of handling the concrete was adopted, a trial was made of two forms of cars and buckets, to be used on the top platform, as shown by Figs. 3 and 4, and Plate XXIV. In the method shown by Fig. 3, Plate XXIV, the concrete was hoisted in the regular Stuebner buckets, one of which can be seen suspended in the background of this photograph, and dumped into the car shown, which was mounted so that it could be revolved in a horizontal plane. It was intended to move this car on the tracks to the point at which the concrete was required, and dump it directly through a chute into the bench-walls. This car was abandoned, as there was a great deal of difficulty in turning it when it was loaded, and in several instances it had to be dumped straight ahead in the middle of the platform and the concrete shoveled into the forms. This method was also objectionable when the bucket was dumped, inasmuch as the force of the impact
The bucket shown by Fig. 4, Plate XXIV, was next tried. It had a slanting bottom and a door opening at the side. It was filled at the mixer, came into the tunnel on a small flat car, and was hoisted and placed on a similar car on top, as shown. This bucket was not successful, as its great weight made it difficult to handle, and it generally required a man to shovel the concrete out, which latter, of course, had been pretty well compacted in the bottom of the bucket by its trip from the mixer. All these cars were hauled backward and forward on the top platform by a rope running to the winch on the hoisting engine on the traveling gantry.
Aside from the fact that neither type was a success, neither of these schemes was much improvement over the belt, inasmuch as only one batch could be handled at a time, owing to the necessity of using the engine to haul the cars back and forth on the platform. The final solution was found in the use of the traveling gantry, shown by Fig. 12 and Fig. 1, Plate XXVI, the latter being one of the arch gantries. The gantry used for the bench- and sand-walls was supported on framed bents on wheels running on rails laid on the foundation; that for the arch was the same, except that the high-framed bent was dispensed with, the side-sills resting directly on the journals of wheels traveling on rails on top of the finished bench-wall.
These gantries were used only as a means of hoisting the buckets and moving them along to where they could be dumped directly on the platform, whence the concrete was shoveled into wheel-barrows, which could be dumped directly into the bench-walls; or, in the case of the arches, shoveled from the platform of the gantry to the intermediate platform on the arch ribs, and thence directly into the arch. This use of wheel-barrows, though apparently a somewhat crude method and a retrogression from the use of the belt conveyor, proved very successful, and really involved no more labor than did the conveyors, although this might not have been the case had these latter worked as they were originally designed to.
The method finally adopted allowed as many as four buckets to be dumped on the platform on one end of the arch gantry at one time, and eight on one end of that used for the bench-walls, the workmen
Rock packing was stored at the other end of the platform, for use as required, when it was not handled directly from the end nearest the work. This method allowed the concrete and other materials to be brought in in trains at infrequent intervals, and provided a sufficient supply of material on hand so that the men handling it on top could be kept steadily at work.
Each hoisting engine on these gantries had 7 by 10-in. cylinders, and a double drum; some of them were Lamberts and some Mundys, operated by compressed air.
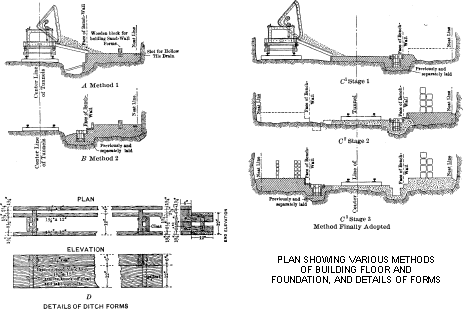
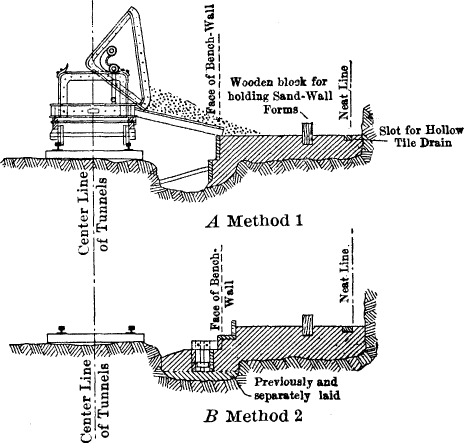
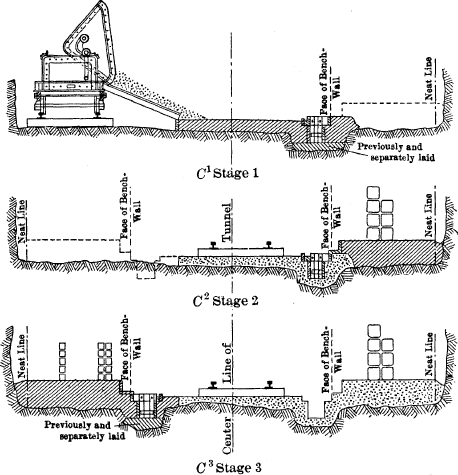
Ditches, Floor and Foundations.—The first method of building the foundation was that shown by Fig. 13, A; no attempt was then made to build the ditch, or floor, the intention being to leave these until the completion of the remainder of the lining. In building the bench-wall on this foundation, however, it was found difficult to secure the bottom of the forms properly (Fig. 2, Plate XXV), so as to prevent any give, as the material under the track was not solid enough to brace against. It was decided, therefore, to build the whole of the ditch (see Fig. 13, B) so that the bottom of the forms could be braced against the solid concrete. At the beginning of the work, the face of the bench-wall was built up to the level of the bottom of the conduits with the foundation; if, therefore, in placing the concrete above this level, extreme care were not taken to get a tight fit between the bench-wall form and the lower face, and then to hold it rigidly in place, the result was a rather unsightly horizontal joint high enough to be plainly visible. The position of this joint may be seen in Fig. 2, Plate XXV, which shows the first section of bench-wall built. Several subsequent sections showed an overhang above this joint, amounting in one or two cases to as much as ½ in., due to the fact that the bench-wall form moved or did not fit tightly. This defect was obviated by building the foundations with an offset on the face, shown by Fig. 13, B, so that the joint came at the level of the top of the flagging over the ditches, and therefore was almost entirely concealed; at the same time this allowed a sufficient surface, on the plane of the face of the bench-wall, against which the bench-wall forms could be braced and lined up.
Skip to Text
Fig. 13.
PLAN SHOWING VARIOUS METHODS OF BUILDING FLOOR AND FOUNDATION, AND DETAILS OF FORMS
Method Finally Adopted
DETAILS OF DITCH FORMS (Larger View)
After a short length had been built with the ditches only, it was thought desirable to try and put in the floor as well, so that the whole of the concrete would be put in place as the lining advanced, and leave less cleaning up to be done over the end of a single track, in the restricted spaces between the bench-walls. Fig. 13, C, shows the method finally adopted. In this may be seen the three stages in which it was put in, the details of the ditch forms being shown by Fig. 13, D.
In that part of the tunnel where sand-walls were built, a hollow tile drain was built into the foundation, as shown in Fig. 13, A and B, along the foot of the water-proofing and connected at intervals with the drains by 4-in. cast-iron pipes. When the sand-walls and water-proofing were not built, however, the concrete of the foundations was sloped from the neat line back to the rock, as shown by Fig. 13, C3, so that in case any water found its way down through the rock packing, its tendency would be to flow back against the rock, or to follow the low part of this concrete to 4-in. cast-iron pipes leading to the side ditches, rather than to find its way through the joint between the foundation and the bench-wall and so into the lower duct lines.
Sand-Walls.—The sand-wall forms first used are shown in Fig. 2, Plate XXIV, with a section of the finished sand-wall. As this work was only intended to give a comparatively smooth surface against which to place the water-proofing, no particular care was taken with the surface, except to avoid sharp projections which might cut through the felt and pitch used for this purpose. A rather porous concrete (with all the rock which could be safely embedded in it and have the wall stand) was used, so that it would not act as a dam, but rather tend to allow the water to find its way to the bottom of the tunnel, and so into the drains.
The traveling gantry for placing the concrete in the sand-walls, as first designed, with the belt conveyor, could of course only deliver the concrete at one end. Before setting the forms for a new section, it Plate XXIV, shows the end of the conveyor over the top of the cross-braces. In order to hold the bottom of these forms, small wooden blocks were embedded in the foundation concrete, against which they could be wedged, as shown by Fig. 13, A; these blocks were cut out after the sand-wall had been built.
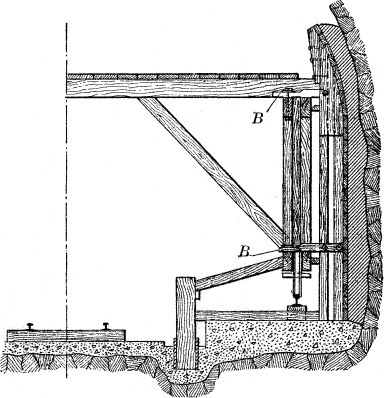
After the forms had been filled, the conveyor could not be moved back to the bench-wall until the concrete had set sufficiently so that these cross-braces could be removed, and, on account of the overhang at the top, the set had to be fairly good in order to prevent this overhang from breaking off. This arrangement, therefore, for placing the concrete was found to be impractical, if the proposed schedule of a section of bench-wall and a section of sand-wall to be built on alternate days, was to be carried out. In a few instances, where the sand-wall was finished fairly early in the afternoon, the forms were released next morning, and the conveyor was moved back, but, even then, 2 or 3 hours at least were lost at the beginning of the shift. The conveyor, however, was abandoned, for the reasons previously given, and the traveling gantry was rearranged to allow concrete to be delivered at either end; it was then only necessary to move it backward and forward between the bench- and sand-wall forms instead of through these forms. This permitted the construction of the much more substantial type of forms shown by Fig. 14.
Fig. 14.
TRAVELING FORM FOR BUILDING SAND-WALL
DETAIL SHOWING METHOD OF HANGING WATER-PROOFING FROM TOP OF SAND-WALL
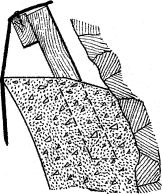
After being moved ahead on the track on top of the foundation, the form was first blocked up to grade, and then adjusted to line by the screws and slotted cleats shown at B, Fig. 14, after which it was secured by the braces from the ditches, as shown. The face lagging was placed in separate pieces and held against the uprights by lightly nailing every third or fourth piece; the whole was removed each time the form was moved, and built up again as the concrete was placed.
Considerable care was taken to slope the top of the sand-wall back toward the rock, as shown by Fig. 14, and to allow free drainage along the top (which ran parallel to the grade of the tunnel) to the 4-in. cast-iron drain pipes which carried the water from the rock packing above the arch to the drains beneath the track.
Sand-walls were built for a length of about 1,100 ft. in each tunnel at the Weehawken end, and about 700 ft. in each tunnel at the western
Skip to text
PLATE XXV. TRANS. AM. SOC. CIV. ENGRS. VOL. LXVIII, No. 1154. LAVIS ON PENNSYLVANIA R.R. TUNNELS: BERGEN HILL TUNNELS.
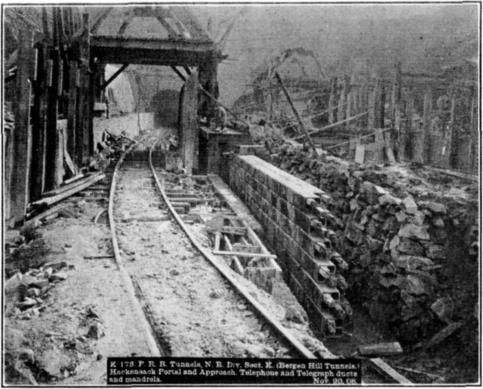
Fig. 1. K 173. P.R.R. Tunnels, N. R. Div. Sect. K. (Bergen Hill Tunnels.) Hackensack Portal and Approach. Telephone and Telegraph ducts and mandrels. Nov. 20, 08.
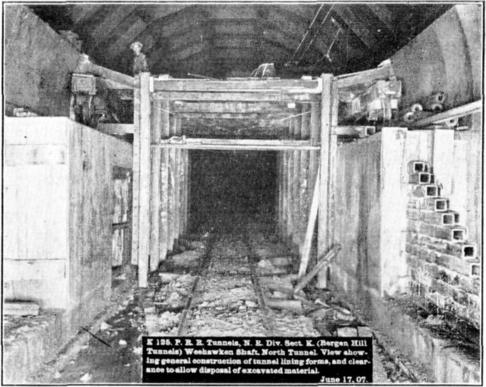
Fig. 2. K 125. P.R.R. Tunnels, N. R. Div. Sect. K. (Bergen Hill Tunnels) Weehawken Shaft, North Tunnel. View showing general construction of tunnel lining forms, and clearance to allow disposal of excavated material. June 17, 07.
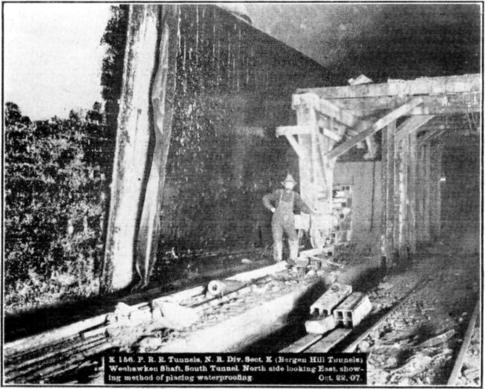
Fig. 3. K 156. P.R.R. Tunnels, N. R. Div. Sect. K. (Bergen Hill Tunnels) Weehawken Shaft, South Tunnel. North side looking East, showing method of placing waterproofing. Oct. 22, 07.
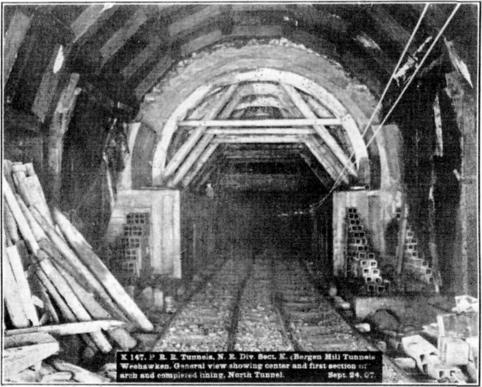
Fig. 4. K 147. P.R.R. Tunnels, N. R. Div. Sect. K. (Bergen Hill Tunnels) Weehawken. General view showing center and first section of arch and completed lining, North Tunnel. Sept. 24, 07.
Conduits.—The arrangement of the conduit lines is shown in the general cross-section.3 On the core-wall side there are 48 lines for telegraph and telephone cables, built of 4-way multiple conduit, each piece of which is 3 ft. long and about 10 in. square outside. On the other side there are the high- and low-tension lines, built of single conduit 18 in. long and a little more than 5 in. square outside. Manholes or splicing chambers are built every 400 ft., and are about 8 ft. long and 4 ft. wide. General views of the conduits as built are shown in Fig. 4, Plate XXV, which shows all the lines in one tunnel, and in Fig. 1, Plate XXV, which shows the telegraph and telephone lines, with the expanding mandrels used in laying them.
In attempting to plan the work of placing the lining, two methods of building the bench-wall were considered. One was to build the wall in longitudinal sections, each section separated by a line of ducts; and the other was to attempt to build the wall in the manner called for by the specifications, which required the concrete to be carried up in layers as the conduits were laid. In this latter method, it was Fig. 15, A, but, as it might have been impractical to use these if the wall had been built in sections, provision was made in the contract to place expanded metal, as shown by Fig. 15, B, if this was thought advisable. The method of construction necessary, if the wall had been built in sections, is shown graphically by the five sketches, Fig. 15, B, 1, 2, 3, 4, and 5.
The form and details of the expanding mandrel which was finally designed to meet the conditions, and proved so satisfactory in every way, are shown by Fig. 15, C. The mandrel consisted of two triangular pieces of hard pine, separated by wedges attached to one piece which fitted into slots in the other; these, when expanded, practically filled the whole of the inside of the ducts. One of these mandrels was placed in each line of single ducts and two in each 4-way duct, placed diagonally, as shown in Fig. 1, Plate XXV. This required 60 mandrels at each working point, or 240 for the whole work. The mandrels were 35 ft. long, so that they easily covered the whole of a 25-ft. section, projected sufficiently far back into the previously finished work to assure the continuity of the alignment, and allowed the ends to be racked out at the forward end to secure proper breaks between the joints.
In laying the single conduits, as a rule, the (collapsed) mandrels were pulled ahead from the previous section as each line was laid, and the conduits were strung on it until the whole length was completed; the conduits were then pushed up tight together, so as to close the joints as tightly as possible, and then the mandrel was expanded. The conduits were thus held firmly in position, and the forward end of the line was lifted slightly so that the wraps could be placed around the joints. The 4-way conduits were generally laid in the ordinary way, except that no laying mandrel was necessary. One dowel was used between each of the pieces of conduit, at the center, and the joints were wrapped. When a line was finished, two mandrels were placed diagonally in each line and expanded simultaneously, so that any inequalities in the ducts themselves were divided as far as possible. In connection with the use of these mandrels, one of the points which was most carefully watched was that they projected back into the last completed section, thus insuring the continuity of the alignment.
It was originally intended to wrap the joints of the 4-way ducts
Considerable attention was given to breaking the joints of the ducts properly, so as to maintain throughout the conduit lines the greatest break possible. The joints in each superimposed line were broken at half the length of the individual pieces of conduit, the joints in lines in the same horizontal plane being broken at one-quarter the length, thus preventing any joints from touching one another either at the sides or corners, which tended to prevent a burn-out on one line from being communicated to another. There was some little difficulty at first in maintaining the breaks, owing to slight variations in the lengths of the conduit, but after a very short time both the workmen and the inspectors became very expert at this and in the proper use of short lengths to maintain the spacing; after the first few weeks there was little if any difficulty in attaining at all times almost perfect results. The method of making the breaks is shown in the photographs and by the isometric sketch at F, Fig. 15.
All the conduits used on this work were furnished by the Great Eastern Clay Company, and were made at its factory at South River, N.J., where they were inspected before shipment.
The mandrel used in the final rodding was made as shown at G, Fig. 15, the larger size being used for all lines. The rods for pushing it through the conduit lines were made of 6½-ft. lengths of ordinary 1-in. wrought-iron pipe with extra long (3-in.) couplings. The lines were rodded in both directions from alternate manholes, thus avoiding uncoupling the rods and allowing every pull to be effective in pushing the mandrel through the ducts.
Wooden rods were used at first, but proved entirely too light, as the mandrels used were a close fit, and it required considerable effort to push them through 400 ft. of conduit. Iron pipe with ordinary couplings
Skip to Text
In the Figure as printed, only B was shown. Red letters were added by the transcriber.
Fig. 15.
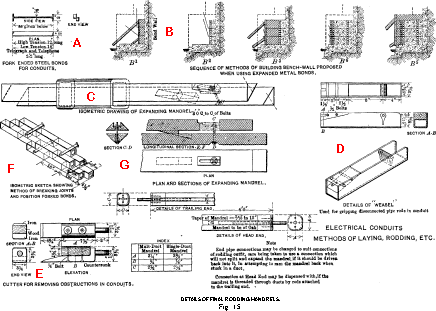
ELECTRICAL CONDUITS: METHODS OF LAYING, RODDING, ETC.
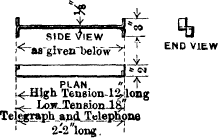
A. FORK ENDED STEEL BONDS FOR CONDUITS.
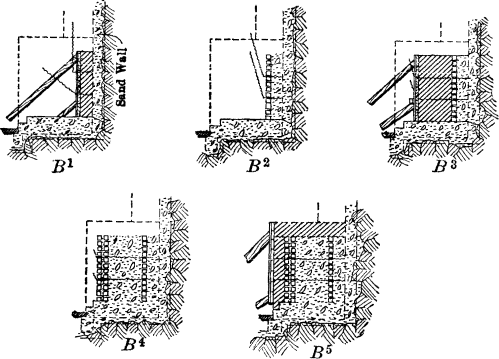
B. SEQUENCE OF METHODS OF BUILDING BENCH-WALL PROPOSED WHEN USING EXPANDED METAL BONDS.
C. ISOMETRIC DRAWING OF EXPANDING MANDREL. (Larger view)
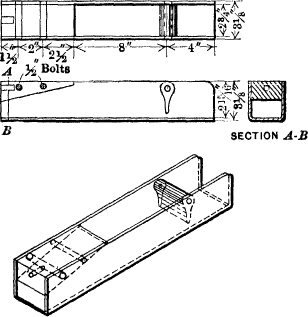
D. DETAILS OF “WEASEL” Used for gripping disconnected pipe rods in conduit
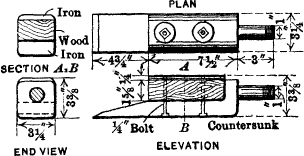
E. CUTTER FOR REMOVING OBSTRUCTIONS IN CONDUITS.
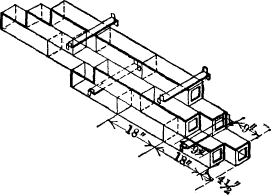
F. ISOMETRIC SKETCH SHOWING METHOD OF BREAKING JOINTS AND POSITION FORKED BONDS.
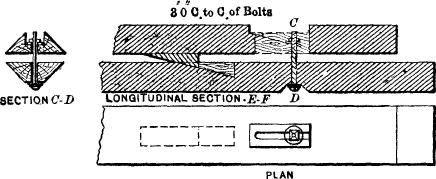
G. PLAN AND SECTIONS OF EXPANDING MANDREL.
MANDREL DETAILS (Larger view)
DETAILS OF FINAL RODDING MANDRELS
INDEX
Multi-Duct Mandrel Single-Duct Mandrel
A 3¼” 3⅜”
B ¾” ⅞”
C 2½” 2⅝”
Note
End pipe connections may be changed to suit connections of rodding outfit, care being taken to use a connection which will not split and expand the mandrel if it should be driven back into it, in attempting to ram the mandrel back when stuck in a duct.
Connection at Head End may be dispensed with, if the mandrel is threaded through ducts by rods attached to the trailing end.
It was thought necessary at first to run a cutter, Fig. 15, E, through the conduits ahead of the final rodding mandrel, but this was soon found to be unnecessary except in a very few instances, and, after a short experience, the cutter was only used at places where an obstruction was encountered by the mandrel.
At such times as the pipe became uncoupled inside the duct line, the part remaining inside was recovered by the use of the tool shown at D, Fig. 15, called a “weasel.” In two instances, the mandrel became stuck in such a manner that the duct line had to be cut into in order to take it out.
The best day’s work of the rodding gang (1 foreman and 4 men) was 20,400 duct ft. of the 4-way conduit in the telegraph and telephone line, and 19,200 duct ft. of single conduit on the low-tension line, an average day’s work under ordinary conditions being about 10,000 duct ft. The cost, including labor, material, and all tools, for rodding for the whole work was slightly less than 0.2 cent per duct ft. The average cost of the single conduit was about 0.25 cents per ft., and of the 4-way, 0.15 cents per ft. About 10% of the conduit lines were rodded twice, owing to partial sections having been rodded once before completion. The best continuous work on rodding was done between October 22d and 29th, 1908, when in 7 working days, 105,600 duct ft. were rodded, an average of a little more than 15,000 ft. per day.
Bench-walls.—The original design for the tunnels provided for the construction of a brick arch above a point 22° above the springing line, that is, the part above the side-walls (Fig. 10). It was thought desirable, therefore, in designing the bench-wall forms, to provide for placing the concrete in the side-walls and bench-walls at one operation. These forms, as first designed, are shown by Fig. 2, Plate XXV, and the details in Fig. 16, A and A’; they were built of steel, the facing plates being 5/16 in. thick, in pieces 4 ft. 6 in. wide, and in length about 6 in. more than the height of the bench-wall.
Skip to Text
Fig. 16.
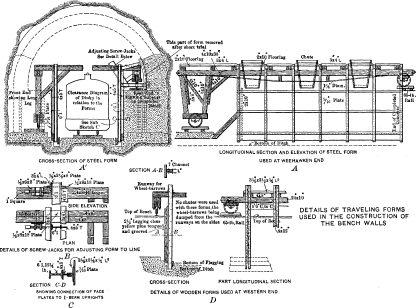
DETAILS OF TRAVELING FORMS USED IN THE CONSTRUCTION OF THE BENCH WALLS
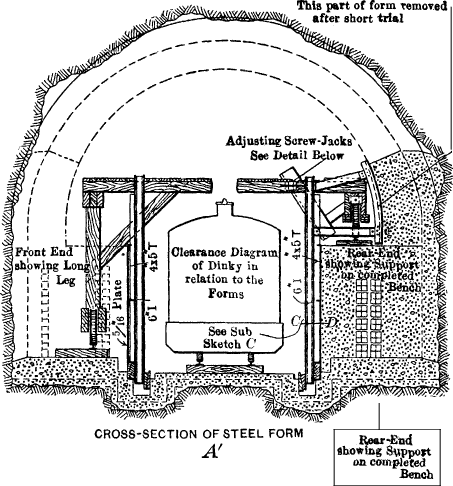
A. LONGITUDINAL SECTION AND ELEVATION OF STEEL FORM USED AT WEEHAWKEN END (Larger view)
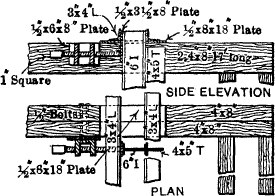
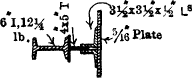
B. DETAILS OF SCREW-JACKS FOR ADJUSTING FORM TO LINE C. SECTION C-D SHOWING CONNECTION OF FACE PLATES TO I-BEAM UPRIGHTS
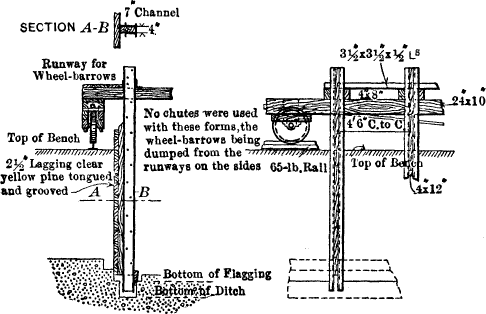
D. DETAILS OF WOODEN FORMS USED AT WESTERN END CROSS-SECTION (left), PART LONGITUDINAL SECTION (right)
Plate XXV, and the rear ends directly on the journal-boxes of wheels traveling on a rail on the top of the finished bench, as shown in Fig. 2, Plate XXV.
Although it had been decided to substitute concrete for brick in the arch before any of the lining was actually placed, two sets of forms for the Weehawken end had already been ordered and delivered, so it was decided to use them as designed, and place the side-wall with the bench.
The forms were designed so that 30-ft. lengths could be built, and this was done at the start, but owing to the occurrence of the refuge niches, ladders, etc., at 25-ft. intervals, it was soon seen that it would be advisable to build the bench-wall in sections of that length (25 ft.), or multiples of it, and as the clearance conditions seemed to preclude the possibility of making the forms 50 ft. long, 25 ft. was adopted. This permitted the removal of one of the panels, 4 ft. 6 in. wide, and at the same time it was decided to remove the side-wall forms. This decreased the load on the trusses considerably, but being still a trifle weak, they were strengthened by the substitution of 1¼-in. truss rods instead of the ¾-in. rods used originally. The top platform and the cross-bracing were also stiffened a little and tightened up to prevent racking.
The construction of the side-walls in conjunction with the bench-wall was abandoned for three reasons: First, it was found that there would be a much more even distribution of the work by including the side-wall with the arch rather than with the bench; second, there was difficulty in getting a good finish for the top of the bench-wall, as of course a top form for the latter had to be placed to prevent the concrete from squeezing up when the side-wall was built above it, which prevented troweling; the third reason was the weakness of the whole form as designed, and the increasing difficulty of adjusting it to line as the work progressed, the principal difficulty being with the curved side-wall forms.
The bench-wall forms were set in position, after they had been moved ahead, by first blocking the bottom against the face of the Fig. 13. As previously noted, this foundation face had been built very carefully to line. The back end of the form, of course, was blocked tightly against the end of the previously finished section, and the top was made plumb by the adjusting screwjacks shown in Fig. 16, B. At first these screws were ¾-in., but they were afterward changed to 1¼-in. The only points which it was necessary for the alignment corps to give in setting these forms was a grade at each of the front ends for the top of the finished bench.
The steel face forms in both tunnels gave excellent results, as far as smoothness of finish was concerned, but, owing to the imperviousness of the steel, small air holes were formed in the surface, though not in sufficient numbers or size to cause trouble or disfigure the work in any way.
The design of the bench-wall forms used at the western end, where this differs from the steel form, is shown by Fig. 16, D. The principal features in which they differed from those used at the Weehawken end was in the substitution of 2½-in. tongued and grooved hard pine for the face. This timber was of the very best quality obtainable, each piece being especially selected and as nearly clear and free from knots or other defects as it was possible to get it. The edges of each piece were planed at the back so as to insure a tight joint on the face, and all joints were shellacked. These forms were used, without renewal of the face timber and with only two planings, for a length of 2,500 ft., or 100 separate sections, and gave good satisfaction.
In order to obtain a surface to which the face lagging could be fastened, wooden uprights were used and were reinforced on either side by light channels bolted together through the timber, in place of the I-beams used on the steel forms. The lagging was nailed to these uprights by 6-in. wire nails driven through the top edges of each piece as it was placed in position, thus leaving the surface entirely clear and free from any marks or nail holes, and in condition for planing when this became necessary. Runways for wheeling the concrete were built one either side over the bench-walls instead of having a center platform with chutes, as was used at Weehawken.
When the original lagging had become too much worn for further use, it was resurfaced with strips of ⅞ by 2½-in., clear, tongued and grooved, hard pine, placed vertically, which did fairly well and lasted to the end (about 1,000 ft.), although it was not altogether satisfactory,
In designing the forms for all exposed surfaces in the tunnels, it was the desire of the contractors to obtain directly from them a surface which would be satisfactory to the engineers without further finishing than the patching of minor defects. In this they were generally quite successful, and excellent results were obtained, as shown in the view of the finished tunnel, Fig. 2, Plate XXVII. The surface of the bench-walls was obtained solely by spading the face with a flat spade as the work progressed. No after treatment was resorted to, except for the few sections where the forms became worn. The top of the bench-wall was finished with a float about 2 or 3 hours after the concrete was placed.
When the work was well organized, a bench-wall was built at each end each day, one day in the North Tunnel, and the following day in the South. During the time sand-walls were being built, a sand-wall and bench-wall were built on alternate days in each tunnel, care being taken that when a bench-wall was being built in one tunnel, the sand-wall was being built in the other, this being necessary in order to equalize the work of the night gang and the conduit layers as well as the transportation.
The conduit layers on the day shift, two or three men and a foreman, required about 2 hours in the forenoon and 1 hour in the afternoon to lay their portion of the conduits, and usually finished this work by 3 P.M. At other times during the shift they were utilized at those points where rock packing was heaviest, and when the packing was brought in in the large cars, as shown in Fig. 1, Plate XXVI, these men helped unload it so that the track could be cleared as soon as possible. When water-proofing was to be done, the number of men in this gang was increased, so as to enable them to do that work also.
Skip to text
PLATE XXVI. TRANS. AM. SOC. CIV. ENGRS. VOL. LXVIII, No. 1154. LAVIS ON PENNSYLVANIA R.R. TUNNELS: BERGEN HILL TUNNELS.
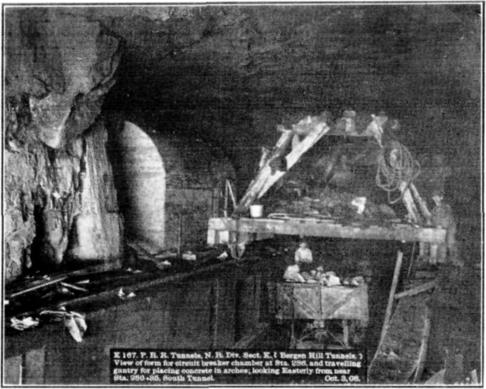
Fig. 1. K 167. P.R.R. Tunnels, N. R. Div. Sect. K. (Bergen Hill Tunnels.) View of form for circuit breaker chamber at Sta. 286, and travelling gantry for placing concrete in arches, looking Easterly from near Sta. 280+85, South Tunnel. Oct. 3, 08.